
Android 15 में, डेवलपर के लिए कई बेहतरीन सुविधाएं और एपीआई उपलब्ध हैं. यहां दिए गए सेक्शन में, इन सुविधाओं के बारे में खास जानकारी दी गई है. इससे आपको इनसे जुड़े एपीआई का इस्तेमाल शुरू करने में मदद मिलेगी.
जोड़े गए, बदले गए, और हटाए गए एपीआई की पूरी सूची देखने के लिए, एपीआई में अंतर दिखाने वाली रिपोर्ट पढ़ें. जोड़े गए एपीआई के बारे में ज़्यादा जानने के लिए, Android API रेफ़रंस पर जाएं. Android 15 के लिए, एपीआई लेवल 35 में जोड़े गए एपीआई देखें. उन क्षेत्रों के बारे में जानने के लिए जहां प्लैटफ़ॉर्म में हुए बदलावों का असर आपके ऐप्लिकेशन पर पड़ सकता है, Android 15 के काम करने के तरीके में हुए बदलावों के बारे में ज़रूर जानें. ये बदलाव, Android 15 को टारगेट करने वाले ऐप्लिकेशन और सभी ऐप्लिकेशन के लिए किए गए हैं.
कैमरा और मीडिया
Android 15 में कई ऐसी सुविधाएं शामिल हैं जिनसे कैमरा और मीडिया का अनुभव बेहतर होता है. साथ ही, आपको ऐसे टूल और हार्डवेयर का ऐक्सेस मिलता है जिनकी मदद से, क्रिएटर्स Android पर अपनी कल्पना को साकार कर पाते हैं.
Android मीडिया और कैमरे के लिए, नई सुविधाओं और डेवलपर के लिए उपलब्ध समाधानों के बारे में ज़्यादा जानने के लिए, Google I/O में Android मीडिया और कैमरे के लिए आधुनिक अनुभव तैयार करना टॉक देखें.
कम रोशनी वाला मोड
Android 15 में कम रोशनी में बेहतर फ़ोटो क्वालिटी की सुविधा जोड़ी गई है. यह ऑटो-एक्सपोज़र मोड है, जो Camera 2 और नाइट मोड कैमरा एक्सटेंशन, दोनों के लिए उपलब्ध है. कम रोशनी वाला मोड, कम रोशनी वाली स्थितियों में झलक स्ट्रीम के एक्सपोज़र को अडजस्ट करता है. यह तरीका, नाइट मोड कैमरा एक्सटेंशन के स्टिल इमेज बनाने के तरीके से अलग है. ऐसा इसलिए है, क्योंकि नाइट मोड एक बेहतर इमेज बनाने के लिए, बर्स्ट फ़ोटो को जोड़ता है. नाइट मोड, स्टिल इमेज बनाने के लिए बहुत अच्छा काम करता है. हालांकि, यह फ़्रेम की लगातार स्ट्रीम नहीं बना सकता. हालांकि, लो लाइट बूस्ट की सुविधा से ऐसा किया जा सकता है. इसलिए, कम रोशनी में बेहतर फ़ोटो लेने की सुविधा, कैमरे की इन सुविधाओं को चालू करती है:
- इमेज की बेहतर झलक दिखाने की सुविधा, ताकि उपयोगकर्ता कम रोशनी में बेहतर तरीके से फ़ोटो खींच सकें
- कम रोशनी में क्यूआर कोड स्कैन करना
कम रोशनी वाला मोड चालू करने पर, यह कम रोशनी होने पर अपने-आप चालू हो जाता है और ज़्यादा रोशनी होने पर बंद हो जाता है.
ऐप्लिकेशन, कम रोशनी में झलक वाली स्ट्रीम को रिकॉर्ड कर सकते हैं, ताकि ज़्यादा रोशनी वाला वीडियो सेव किया जा सके.
ज़्यादा जानकारी के लिए, कम रोशनी में बेहतर फ़ोटो लेने की सुविधा देखें.
ऐप्लिकेशन में कैमरे के कंट्रोल
Android 15 adds an extension for more control over the camera hardware and its algorithms on supported devices:
- Advanced flash strength adjustments enabling precise control of flash
intensity in both
SINGLEandTORCHmodes while capturing images.
एचडीआर हेडरूम कंट्रोल
Android 15, डिवाइस की क्षमताओं और पैनल की बिट-डेंसिटी के हिसाब से एचडीआर हेडरूम चुनता है. जिन पेजों पर ज़्यादा एसडीआर कॉन्टेंट होता है, जैसे कि एक एचडीआर थंबनेल दिखाने वाला मैसेजिंग ऐप्लिकेशन, उन पर इस व्यवहार का असर एसडीआर कॉन्टेंट की चमक पर पड़ सकता है. Android 15 में, setDesiredHdrHeadroom की मदद से एचडीआर हेडरूम को कंट्रोल किया जा सकता है. इससे एसडीआर और एचडीआर कॉन्टेंट के बीच संतुलन बना रहता है.
वॉल्यूम कंट्रोल करने की सुविधा

Android 15 introduces support for the CTA-2075 loudness standard to help you avoid audio loudness inconsistencies and ensure users don't have to constantly adjust volume when switching between content. The system leverages known characteristics of the output devices (headphones and speaker) along with loudness metadata available in AAC audio content to intelligently adjust the audio loudness and dynamic range compression levels.
To enable this feature, you need to ensure loudness metadata is available in
your AAC content and enable the platform feature in your app. For this, you
instantiate a LoudnessCodecController object by
calling its create factory method with the audio
session ID from the associated AudioTrack; this
automatically starts applying audio updates. You can pass an
OnLoudnessCodecUpdateListener to modify or filter
loudness parameters before they are applied on the
MediaCodec.
// Media contains metadata of type MPEG_4 OR MPEG_D
val mediaCodec = …
val audioTrack = AudioTrack.Builder()
                                .setSessionId(sessionId)
                                .build()
...
// Create new loudness controller that applies the parameters to the MediaCodec
try {
   val lcController = LoudnessCodecController.create(mSessionId)
   // Starts applying audio updates for each added MediaCodec
}
AndroidX media3 ExoPlayer will also be updated to use the
LoudnessCodecController APIs for a seamless app integration.
वर्चुअल एमआईडीआई 2.0 डिवाइस
Android 13 में, यूएसबी का इस्तेमाल करके एमआईडीआई 2.0 डिवाइसों से कनेक्ट करने की सुविधा जोड़ी गई है. ये डिवाइस, यूनिवर्सल एमआईडीआई पैकेट (यूएमपी) का इस्तेमाल करके कम्यूनिकेट करते हैं. Android 15 में, वर्चुअल एमआईडीआई ऐप्लिकेशन के लिए यूएमपी (यूनिवर्सल MIDI प्रोटोकॉल) की सुविधा जोड़ी गई है. इससे कंपोज़िशन ऐप्लिकेशन, वर्चुअल एमआईडीआई 2.0 डिवाइस के तौर पर सिंथेसाइज़र ऐप्लिकेशन को कंट्रोल कर सकते हैं. यह सुविधा, यूएसबी एमआईडीआई 2.0 डिवाइस के साथ काम करने जैसी ही है.
AV1 सॉफ़्टवेयर डिकोडिंग को ज़्यादा बेहतर तरीके से इस्तेमाल करना

VideoLAN का लोकप्रिय AV1 सॉफ़्टवेयर डीकोडर dav1d, उन Android डिवाइसों के लिए उपलब्ध है जिनमें हार्डवेयर में AV1 को डिकोड करने की सुविधा नहीं है. dav1d, लेगसी AV1 सॉफ़्टवेयर डीकोडर की तुलना में तीन गुना ज़्यादा बेहतर परफ़ॉर्म करता है. इससे ज़्यादा उपयोगकर्ताओं के लिए, एचडी AV1 प्लेबैक की सुविधा मिलती है. इनमें कुछ लो और मिड टीयर डिवाइस भी शामिल हैं.
आपके ऐप्लिकेशन को dav1d का इस्तेमाल करने के लिए, नाम "c2.android.av1-dav1d.decoder" डालकर उसे ऑप्ट-इन करना होगा. अगले अपडेट में, dav1d को डिफ़ॉल्ट AV1 सॉफ़्टवेयर डिकोडर बनाया जाएगा. यह सुविधा, Android 11 वाले उन डिवाइसों के लिए स्टैंडर्ड और बैकपोर्ट की गई है जिन्हें Google Play के सिस्टम अपडेट मिलते हैं.
डेवलपर की प्रॉडक्टिविटी और टूल
आपकी प्रॉडक्टिविटी को बेहतर बनाने के लिए, हम ज़्यादातर काम Android Studio, Jetpack Compose, और Android Jetpack लाइब्रेरी जैसे टूल पर करते हैं. हालांकि, हम हमेशा ऐसे तरीके ढूंढते रहते हैं जिनसे आपको अपने विज़न को आसानी से पूरा करने में मदद मिल सके.
OpenJDK 17 के अपडेट
Android 15 में, Android की मुख्य लाइब्रेरी को रीफ़्रेश करने का काम जारी है, ताकि इसे OpenJDK LTS के नए रिलीज़ की सुविधाओं के साथ अलाइन किया जा सके.
इसमें ये मुख्य सुविधाएं और सुधार शामिल हैं:
- NIO बफ़र से जुड़ी सुविधाओं को बेहतर बनाया गया है
- लाइव स्ट्रीम
mathऔरstrictmathके लिए अन्य तरीकेutilपैकेज के अपडेट, जिनमें क्रम से लगाए गएcollection,map, औरsetशामिल हैंDeflaterमेंByteBufferकी सहायता- सुरक्षा से जुड़े अपडेट, जैसे कि
X500PrivateCredentialऔर सुरक्षा कुंजी के अपडेट
ये एपीआई, Google Play के सिस्टम अपडेट की मदद से, Android 12 (एपीआई लेवल 31) और उसके बाद के वर्शन वाले एक अरब से ज़्यादा डिवाइसों पर अपडेट किए जाते हैं, ताकि आप प्रोग्रामिंग की नई सुविधाओं को टारगेट कर सकें.
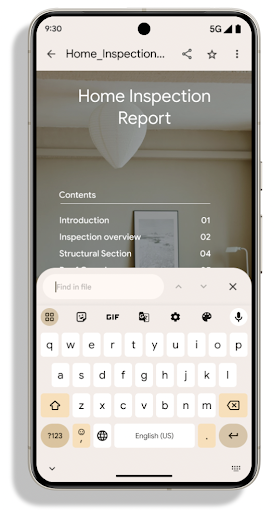
PDF से जुड़े सुधार
Android 15 includes substantial improvements to the PdfRenderer
APIs. Apps can incorporate advanced features such as rendering
password-protected files, annotations, form editing,
searching, and selection with copy. Linearized PDF
optimizations are supported to speed local PDF viewing and reduce resource use.
The Jetpack PDF library uses these APIs to simplify adding PDF
viewing capabilities to your app.
The PdfRenderer has been moved to a module that can be updated using Google
Play system updates independent of the platform release, and we're supporting
these changes back to Android 11 (API level 30) by creating a compatible
pre-Android 15 version of the API surface, called
PdfRendererPreV.
अपने-आप भाषा बदलने की सुविधा में सुधार
Android 14 में, ऑडियो में कई भाषाओं की पहचान करने की सुविधा जोड़ी गई है. साथ ही, भाषाओं के बीच अपने-आप स्विच करने की सुविधा भी जोड़ी गई है. हालांकि, इससे शब्दों को छोड़ा जा सकता है. ऐसा खास तौर पर तब होता है, जब दो वाक्यांशों के बीच कम समय के लिए भाषा स्विच की जाती है. Android 15 में अतिरिक्त कंट्रोल जोड़े गए हैं, ताकि ऐप्लिकेशन अपने इस्तेमाल के हिसाब से, इस स्विचिंग को ट्यून कर सकें.
EXTRA_LANGUAGE_SWITCH_INITIAL_ACTIVE_DURATION_TIME_MILLIS, ऑडियो सेशन की शुरुआत में ही अपने-आप स्विच होने की सुविधा को सीमित करता है. वहीं, EXTRA_LANGUAGE_SWITCH_MATCH_SWITCHES, तय संख्या में स्विच करने के बाद, भाषा स्विच करने की सुविधा को बंद कर देता है. ये विकल्प तब खास तौर पर काम के होते हैं, जब आपको लगता है कि सेशन के दौरान एक ही भाषा बोली जाएगी और उसकी पहचान अपने-आप होनी चाहिए.
बेहतर OpenType Variable Font API
Android 15 improves the usability of the OpenType variable font. You can create
a FontFamily instance from a variable font without specifying weight axes
with the buildVariableFamily API. The text renderer overrides the value
of wght axis to match the displaying text.
Using the API simplifies the code for creating a Typeface considerably:
Kotlin
val newTypeface = Typeface.CustomFallbackBuilder(
            FontFamily.Builder(
                Font.Builder(assets, "RobotoFlex.ttf").build())
                    .buildVariableFamily())
    .build()
Java
Typeface newTypeface = Typeface.CustomFallbackBuilder(
            new FontFamily.Builder(
                new Font.Builder(assets, "RobotoFlex.ttf").build())
                    .buildVariableFamily())
    .build();
Previously, to create the same Typeface, you would need much more code:
Kotlin
val oldTypeface = Typeface.CustomFallbackBuilder(
            FontFamily.Builder(
                Font.Builder(assets, "RobotoFlex.ttf")
                    .setFontVariationSettings("'wght' 400")
                    .setWeight(400)
                    .build())
                .addFont(
                    Font.Builder(assets, "RobotoFlex.ttf")
                        .setFontVariationSettings("'wght' 100")
                        .setWeight(100)
                        .build()
                )
                .addFont(
                    Font.Builder(assets, "RobotoFlex.ttf")
                        .setFontVariationSettings("'wght' 200")
                        .setWeight(200)
                        .build()
                )
                .addFont(
                    Font.Builder(assets, "RobotoFlex.ttf")
                        .setFontVariationSettings("'wght' 300")
                        .setWeight(300)
                        .build()
                )
                .addFont(
                    Font.Builder(assets, "RobotoFlex.ttf")
                        .setFontVariationSettings("'wght' 500")
                        .setWeight(500)
                        .build()
                )
                .addFont(
                    Font.Builder(assets, "RobotoFlex.ttf")
                        .setFontVariationSettings("'wght' 600")
                        .setWeight(600)
                        .build()
                )
                .addFont(
                    Font.Builder(assets, "RobotoFlex.ttf")
                        .setFontVariationSettings("'wght' 700")
                        .setWeight(700)
                        .build()
                )
                .addFont(
                    Font.Builder(assets, "RobotoFlex.ttf")
                        .setFontVariationSettings("'wght' 800")
                        .setWeight(800)
                        .build()
                )
                .addFont(
                    Font.Builder(assets, "RobotoFlex.ttf")
                        .setFontVariationSettings("'wght' 900")
                        .setWeight(900)
                        .build()
                ).build()
        ).build()
Java
Typeface oldTypeface = new Typeface.CustomFallbackBuilder(
    new FontFamily.Builder(
        new Font.Builder(assets, "RobotoFlex.ttf")
            .setFontVariationSettings("'wght' 400")
            .setWeight(400)
            .build()
    )
    .addFont(
        new Font.Builder(assets, "RobotoFlex.ttf")
            .setFontVariationSettings("'wght' 100")
            .setWeight(100)
            .build()
    )
    .addFont(
        new Font.Builder(assets, "RobotoFlex.ttf")
            .setFontVariationSettings("'wght' 200")
            .setWeight(200)
            .build()
    )
    .addFont(
        new Font.Builder(assets, "RobotoFlex.ttf")
            .setFontVariationSettings("'wght' 300")
            .setWeight(300)
            .build()
    )
    .addFont(
        new Font.Builder(assets, "RobotoFlex.ttf")
            .setFontVariationSettings("'wght' 500")
            .setWeight(500)
            .build()
    )
    .addFont(
        new Font.Builder(assets, "RobotoFlex.ttf")
            .setFontVariationSettings("'wght' 600")
            .setWeight(600)
            .build()
    )
    .addFont(
        new Font.Builder(assets, "RobotoFlex.ttf")
            .setFontVariationSettings("'wght' 700")
            .setWeight(700)
            .build()
    )
    .addFont(
        new Font.Builder(assets, "RobotoFlex.ttf")
            .setFontVariationSettings("'wght' 800")
            .setWeight(800)
            .build()
    )
    .addFont(
        new Font.Builder(assets, "RobotoFlex.ttf")
            .setFontVariationSettings("'wght' 900")
            .setWeight(900)
            .build()
    )
    .build()
).build();
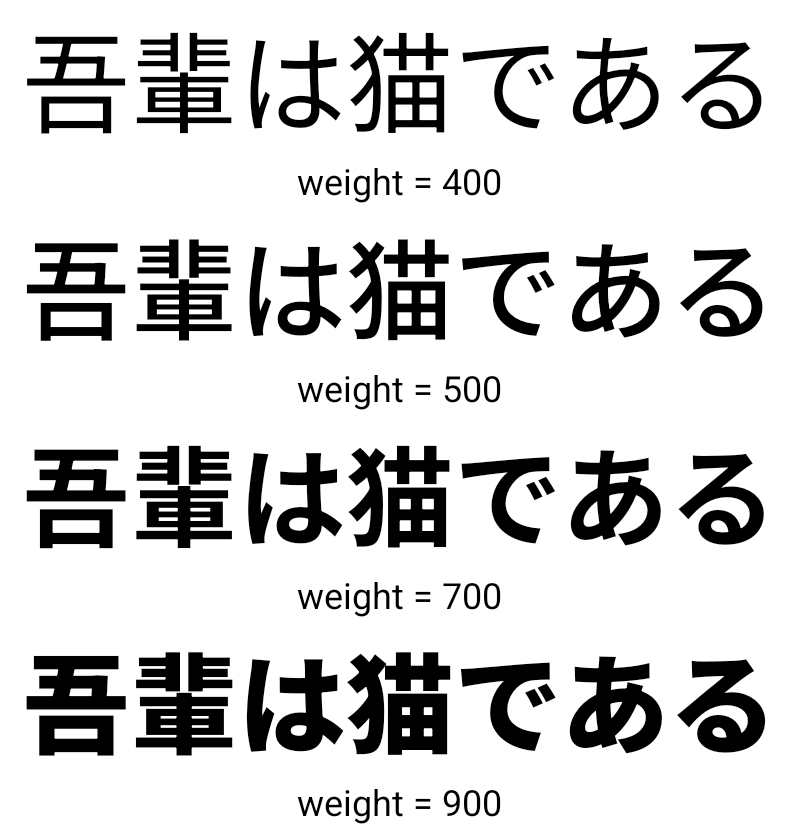
Here's an example of how a Typeface created with both the old and new APIs
renders:
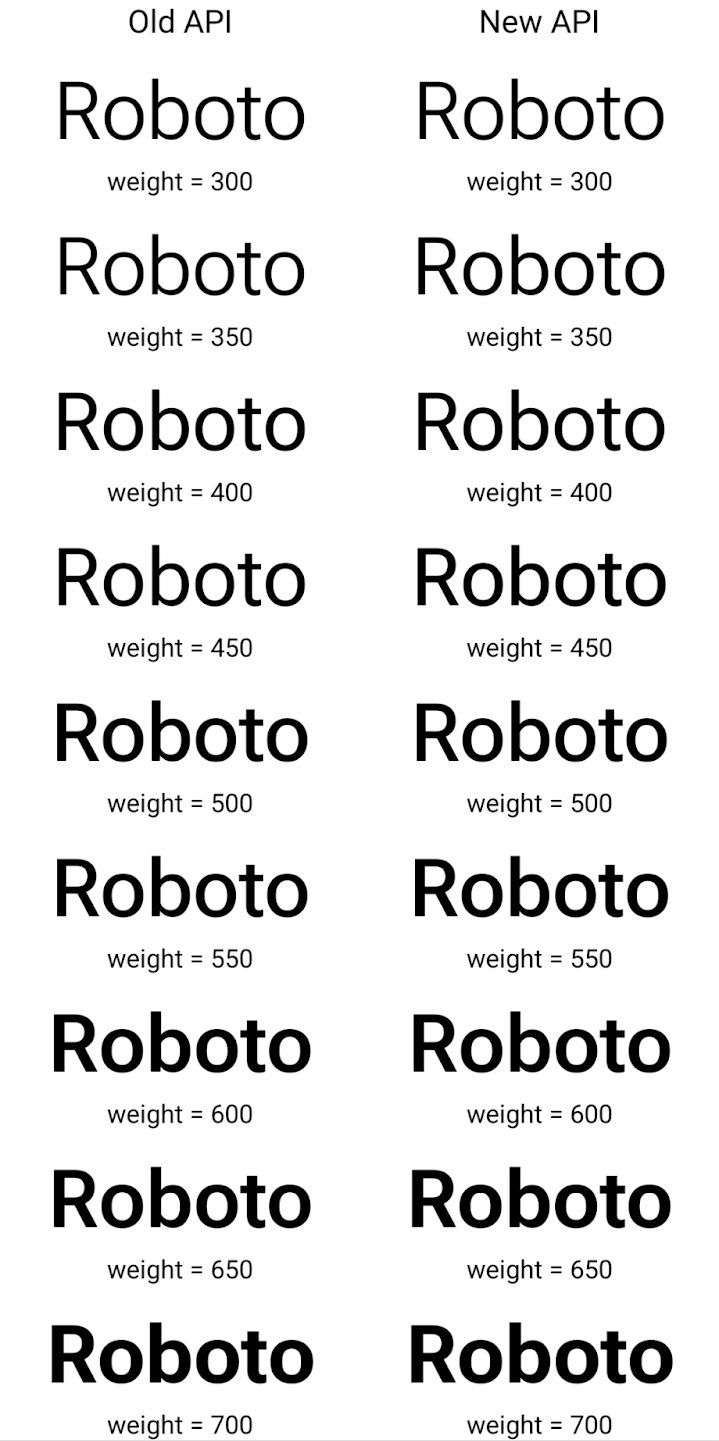
In this example, the Typeface created with the old API doesn't have the
capability to create accurate font weights for the 350, 450, 550 and 650
Font instances, so the renderer falls back to the closest weight. So in
this case, 300 is rendered instead of 350, 400 is rendered instead of 450, and
so on. By contrast, the Typeface created with the new APIs dynamically creates
a Font instance for a given weight, so accurate weights are rendered for 350,
450, 550, and 650 as well.
लाइन ब्रेक को कंट्रोल करने की बेहतर सुविधाएं
Android 15 से, TextView और लाइन ब्रेकर, टेक्स्ट के दिए गए हिस्से को एक ही लाइन में बनाए रख सकते हैं, ताकि उसे पढ़ने में आसानी हो. लाइन ब्रेक को पसंद के मुताबिक बनाने की सुविधा का फ़ायदा पाने के लिए, स्ट्रिंग रिसॉर्स में <nobreak> टैग या createNoBreakSpan का इस्तेमाल करें. इसी तरह, <nohyphen> टैग या
createNoHyphenationSpan का इस्तेमाल करके, शब्दों को हाइफ़न से बचाया जा सकता है.
उदाहरण के लिए, यहां दी गई स्ट्रिंग रिसॉर्स में लाइन ब्रेक शामिल नहीं है. साथ ही, यह "Pixel 8 Pro" टेक्स्ट के साथ रेंडर होती है. यह टेक्स्ट, रेंडर होने के दौरान गलत जगह पर ब्रेक लेता है:
<resources>
    <string name="pixel8pro">The power and brains behind Pixel 8 Pro.</string>
</resources>
इसके उलट, इस स्ट्रिंग संसाधन में <nobreak> टैग शामिल है, जो "Pixel 8 Pro" वाक्यांश को रैप करता है और लाइन ब्रेक को रोकता है:
<resources>
    <string name="pixel8pro">The power and brains behind <nobreak>Pixel 8 Pro.</nobreak></string>
</resources>
इन स्ट्रिंग को रेंडर करने के तरीके में अंतर को यहां दी गई इमेज में दिखाया गया है:
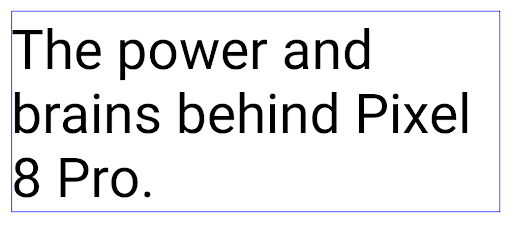
<nobreak> टैग का इस्तेमाल करके रैप न किया गया हो.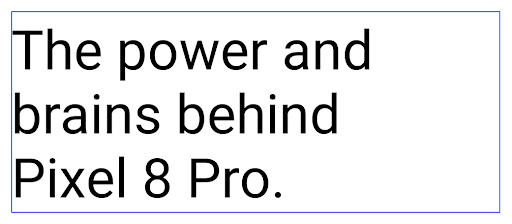
<nobreak> टैग का इस्तेमाल करके रैप किया गया है.ऐप्लिकेशन को संग्रहित करना
Android और Google Play ने पिछले साल, ऐप्लिकेशन को संग्रहित करने की सुविधा के बारे में एलान किया था. इसकी मदद से, उपयोगकर्ता अपने डिवाइस में कम इस्तेमाल किए जाने वाले उन ऐप्लिकेशन को हटाकर जगह खाली कर सकते हैं जिन्हें Google Play पर Android ऐप्लिकेशन बंडल का इस्तेमाल करके पब्लिश किया गया था. Android 15 में, ऐप्लिकेशन को संग्रहित करने और संग्रह से हटाने के लिए, ओएस लेवल पर सहायता शामिल है. इससे सभी ऐप स्टोर के लिए, इसे लागू करना आसान हो जाता है.
REQUEST_DELETE_PACKAGES अनुमति वाले ऐप्लिकेशन, PackageInstaller requestArchive तरीके का इस्तेमाल करके, इंस्टॉल किए गए ऐप्लिकेशन पैकेज को संग्रहित करने का अनुरोध कर सकते हैं. इससे APK और कैश मेमोरी में सेव की गई सभी फ़ाइलें हट जाती हैं, लेकिन उपयोगकर्ता का डेटा सेव रहता है. संग्रहित किए गए ऐप्लिकेशन, डिसप्ले करने लायक ऐप्लिकेशन के तौर पर वापस दिखेंगे. इसके लिए,
LauncherApps एपीआई; उपयोगकर्ताओं को एक यूज़र इंटरफ़ेस (यूआई) दिखेगा, ताकि यह हाइलाइट किया जा सके कि वे
ऐप्लिकेशन संग्रहित किए जाते हैं. अगर कोई उपयोगकर्ता संग्रहित किए गए किसी ऐप्लिकेशन पर टैप करता है, तो ऐप्लिकेशन इंस्टॉल करने वाले व्यक्ति को उसे अनअर्काइव करने का अनुरोध मिलेगा. साथ ही, ऐप्लिकेशन को वापस लाने की प्रोसेस को ACTION_PACKAGE_ADDED ब्रॉडकास्ट से मॉनिटर किया जा सकता है.
Enable 16 KB mode on a device using developer options
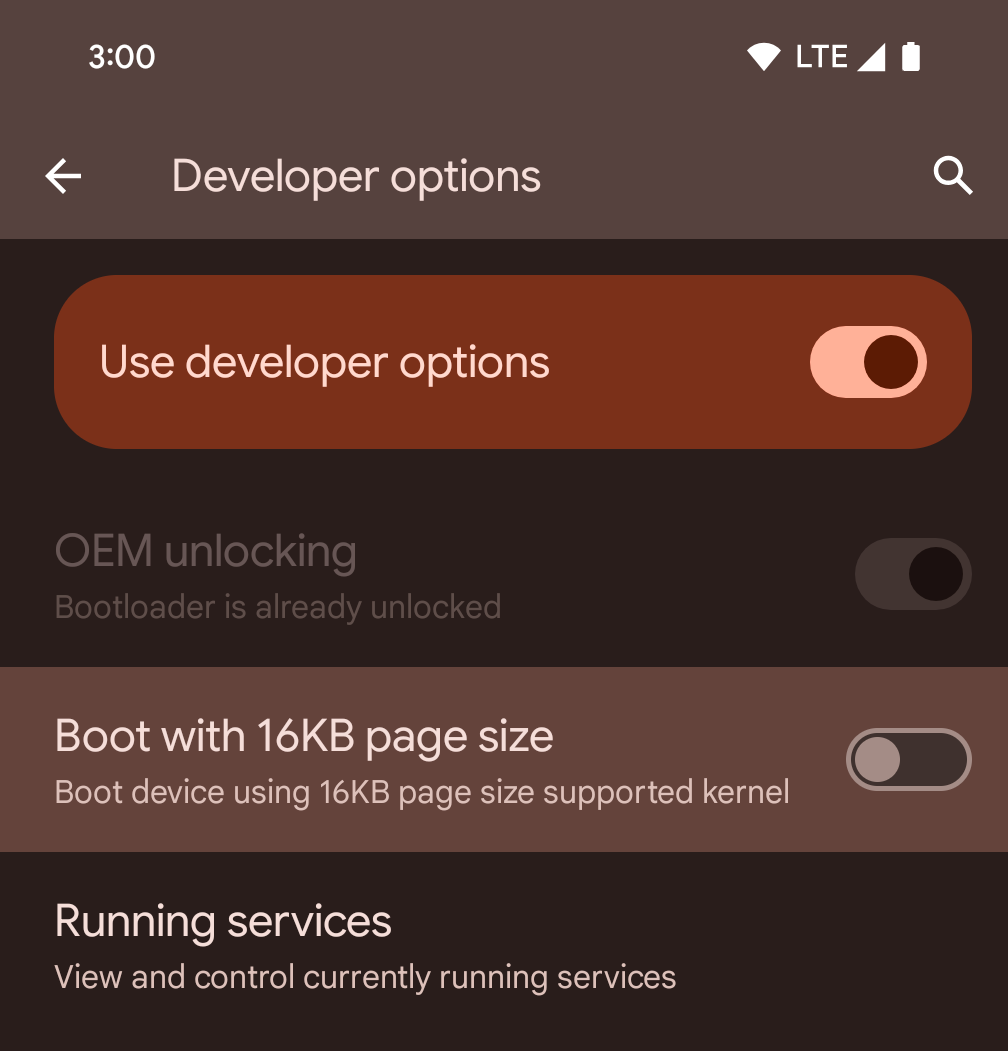
Toggle the Boot with 16KB page size developer option to boot a device in 16 KB mode.
In QPR versions of Android 15, you can use the developer option that's available on certain devices to boot the device in 16 KB mode and perform on-device testing. Before using the developer option, go to Settings > System > Software updates and apply any updates that are available.
This developer option is available on the following devices:
Pixel 8 and 8 Pro (with Android 15 QPR1 or higher)
Pixel 8a (with Android 15 QPR1 or higher)
Pixel 9, 9 Pro, and 9 Pro XL (with Android 15 QPR2 Beta 2 or higher)
ग्राफ़िक्स
Android 15 में ग्राफ़िक को बेहतर बनाने से जुड़े नए अपडेट शामिल हैं. इनमें ANGLE और Canvas ग्राफ़िक सिस्टम में किए गए बदलाव शामिल हैं.
Android में जीपीयू ऐक्सेस करने की सुविधा को बेहतर बनाना

Android हार्डवेयर, शुरुआती दिनों के मुकाबले काफ़ी बदल गया है. शुरुआती दिनों में, मुख्य ओएस एक सीपीयू पर चलता था और जीपीयू को फ़िक्स्ड-फ़ंक्शन पाइपलाइन पर आधारित एपीआई का इस्तेमाल करके ऐक्सेस किया जाता था. Vulkan® ग्राफ़िक्स API, Android 7.0 (एपीआई लेवल 24) से NDK में उपलब्ध है. यह एपीआई, कम लेवल के एब्स्ट्रैक्शन के साथ काम करता है, जो आधुनिक जीपीयू हार्डवेयर को बेहतर तरीके से दिखाता है. साथ ही, यह कई सीपीयू कोर के साथ बेहतर तरीके से काम करता है और सीपीयू ड्राइवर के ओवरहेड को कम करता है. इससे ऐप्लिकेशन की परफ़ॉर्मेंस बेहतर होती है. Vulkan, सभी आधुनिक गेम इंजन के साथ काम करता है.
Android, जीपीयू के लिए Vulkan को प्राथमिकता देता है. इसलिए, Android 15 में ANGLE को वैकल्पिक लेयर के तौर पर शामिल किया गया है. इससे, Vulkan के साथ-साथ OpenGL® ES को भी चलाया जा सकता है. ANGLE पर स्विच करने से, Android OpenGL को बेहतर तरीके से लागू किया जा सकेगा. इससे, ऐप्लिकेशन के साथ बेहतर तरीके से काम करने के साथ-साथ, कुछ मामलों में बेहतर परफ़ॉर्मेंस भी मिलेगी. ANGLE की मदद से, अपने OpenGL ES ऐप्लिकेशन की परफ़ॉर्मेंस और स्थिरता की जांच की जा सकती है. इसके लिए, Android 15 पर सेटिंग -> सिस्टम -> डेवलपर के लिए सेटिंग और टूल -> एक्सपेरिमेंटल: ANGLE चालू करें में जाकर, डेवलपर के लिए सेटिंग चालू करें.
Vulkan के लिए Android ANGLE का रोडमैप
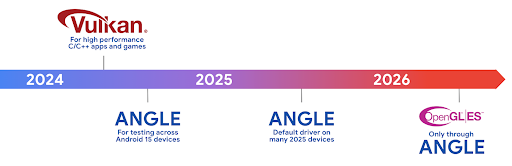
अपने जीपीयू स्टैक को बेहतर बनाने के लिए, हम आने वाले समय में ANGLE को ज़्यादा नए डिवाइसों पर, GL सिस्टम ड्राइवर के तौर पर शिप करेंगे. आने वाले समय में, OpenGL/ES सिर्फ़ ANGLE के ज़रिए उपलब्ध होगा. हालांकि, हमारा प्लान है कि हम सभी डिवाइसों पर OpenGL ES की सुविधा देना जारी रखें.
इसके बाद यह करें
OpenGL ES के लिए ANGLE ड्राइवर चुनने और अपने ऐप्लिकेशन की जांच करने के लिए, डेवलपर के विकल्पों का इस्तेमाल करें. नए प्रोजेक्ट के लिए, हमारा सुझाव है कि C/C++ के लिए Vulkan का इस्तेमाल करें.
Canvas में किए गए सुधार
Android 15 में, Android के कैनवस ग्राफ़िक सिस्टम को और बेहतर बनाया गया है. इसमें ये नई सुविधाएं भी जोड़ी गई हैं:
Matrix44, निर्देशांकों को बदलने के लिए 4x4 मैट्रिक उपलब्ध कराता है. इसका इस्तेमाल तब करना चाहिए, जब आपको कैनवस को 3D में बदलना हो.clipShader, मौजूदा क्लिप को तय किए गए शेडर के साथ इंटरसेक्शन करता है. वहीं,clipOutShader, क्लिप को मौजूदा क्लिप और शेडर के अंतर पर सेट करता है. दोनों ही शेडर को ऐल्फ़ा मास्क के तौर पर इस्तेमाल करते हैं. इससे जटिल आकार आसानी से बनाए जा सकते हैं.
परफ़ॉर्मेंस और बैटरी
Android, आपके ऐप्लिकेशन की परफ़ॉर्मेंस और क्वालिटी को बेहतर बनाने में आपकी मदद करता रहेगा. Android 15 में ऐसे एपीआई पेश किए गए हैं जो आपके ऐप्लिकेशन में टास्क को ज़्यादा असरदार तरीके से पूरा करने, ऐप्लिकेशन की परफ़ॉर्मेंस को ऑप्टिमाइज़ करने, और अपने ऐप्लिकेशन के बारे में अहम जानकारी इकट्ठा करने में मदद करते हैं.
बैटरी की खपत कम करने के सबसे सही तरीके, नेटवर्क और बैटरी की खपत से जुड़ी गड़बड़ियों को ठीक करने, और Android 15 और Android के हाल ही के वर्शन में बैकग्राउंड में होने वाले काम के लिए बैटरी की खपत को बेहतर बनाने के बारे में ज़्यादा जानकारी पाने के लिए, Google I/O में हुई Android पर बैकग्राउंड में होने वाले काम के लिए बैटरी की खपत को बेहतर बनाना टॉक देखें.
ApplicationStartInfo API
Android के पिछले वर्शन में, ऐप्लिकेशन के शुरू होने की प्रोसेस को समझना थोड़ा मुश्किल था. आपके ऐप्लिकेशन में यह तय करना मुश्किल था कि वह कोल्ड, वॉर्म या हॉट स्टैटस से शुरू हुआ था. यह जानना भी मुश्किल था कि ऐप्लिकेशन को लॉन्च करने के अलग-अलग चरणों में कितना समय लगा: प्रोसेस को फ़ॉर्क करना, onCreate को कॉल करना, पहला फ़्रेम बनाना वगैरह. जब आपकी Application क्लास को इंस्टैंशिएट किया गया था, तब आपके पास यह जानने का कोई तरीका नहीं था कि ऐप्लिकेशन किसी ब्रॉडकास्ट, कॉन्टेंट प्रोवाइडर, जॉब, बैकअप, बूट पूरा होने, अलार्म या Activity से शुरू हुआ है.
Android 15 पर ApplicationStartInfo एपीआई, ये सभी सुविधाएं और इससे ज़्यादा सुविधाएं देता है. आपके पास फ़्लो में अपने टाइमस्टैंप जोड़ने का विकल्प भी होता है, ताकि एक ही जगह पर टाइमिंग का डेटा इकट्ठा किया जा सके. मेट्रिक इकट्ठा करने के अलावा, ApplicationStartInfo का इस्तेमाल करके ऐप्लिकेशन के शुरू होने की प्रोसेस को सीधे ऑप्टिमाइज़ किया जा सकता है. उदाहरण के लिए, जब आपका ऐप्लिकेशन किसी ब्रॉडकास्ट की वजह से शुरू हो रहा हो, तो Application क्लास में यूज़र इंटरफ़ेस (यूआई) से जुड़ी लाइब्रेरी को इंस्टैंशिएट करने की ज़रूरत नहीं होती.
ऐप्लिकेशन के साइज़ के बारे में ज़्यादा जानकारी
Since Android 8.0 (API level 26), Android has included the
StorageStats.getAppBytes API that summarizes the installed
size of an app as a single number of bytes, which is a sum of the APK size, the
size of files extracted from the APK, and files that were generated on the
device such as ahead-of-time (AOT) compiled code. This number is not very
insightful in terms of how your app is using storage.
Android 15 adds the
StorageStats.getAppBytesByDataType([type]) API, which lets
you get insight into how your app is using up all that space, including APK file
splits, AOT and speedup related code, dex metadata, libraries, and guided
profiles.
ऐप्लिकेशन के ज़रिए मैनेज की जाने वाली प्रोफ़ाइलिंग
Android 15 में ProfilingManager क्लास शामिल है. इसकी मदद से, अपने ऐप्लिकेशन में प्रोफ़ाइलिंग की जानकारी इकट्ठा की जा सकती है. जैसे, हेप डंप, हेप प्रोफ़ाइल, स्टैक सैंपलिंग वगैरह. यह आपके ऐप्लिकेशन को, दिए गए टैग के साथ कॉलबैक उपलब्ध कराता है. इससे, आउटपुट फ़ाइल की पहचान की जाती है. यह फ़ाइल, आपके ऐप्लिकेशन की फ़ाइल डायरेक्ट्री में डिलीवर की जाती है. एपीआई, परफ़ॉर्मेंस पर पड़ने वाले असर को कम करने के लिए, अनुरोध की दर को सीमित करता है.
अपने ऐप्लिकेशन में प्रोफ़ाइलिंग के अनुरोधों को आसानी से बनाने के लिए, हमारा सुझाव है कि आप Core 1.15.0-rc01 या इसके बाद के वर्शन में उपलब्ध, उससे जुड़े Profiling AndroidX API का इस्तेमाल करें.
SQLite डेटाबेस में सुधार
Android 15 में SQLite एपीआई उपलब्ध कराए गए हैं, जो इसमें मौजूद SQLite इंजन, जो परफ़ॉर्मेंस की उन समस्याओं को टारगेट करता है जो मेनिफ़ेस्ट करते हैं. ये एपीआई SQLite के अपडेट को वर्शन में शामिल करते हैं 3.44.3.
डेवलपर को अपने SQLite डेटाबेस का ज़्यादा से ज़्यादा फ़ायदा पाने के लिए, SQLite की परफ़ॉर्मेंस के लिए सबसे सही तरीकों के बारे में जानना चाहिए. ऐसा खास तौर पर, बड़े डेटाबेस के साथ काम करते समय या इंतज़ार का समय कम करने वाली क्वेरी चलाते समय ज़रूरी है.
- रीड-ओनली डेफ़र्ड ट्रांज़ैक्शन: रीड-ओनली ट्रांज़ैक्शन जारी करते समय (लिखने के स्टेटमेंट शामिल न करें), रीड-ओनली
DEFERREDट्रांज़ैक्शन जारी करने के लिए,beginTransactionReadOnly()औरbeginTransactionWithListenerReadOnly(SQLiteTransactionListener)का इस्तेमाल करें. ऐसे लेन-देन चलाए जा सकते हैं और डेटाबेस के WAL मोड में होने पर, ये दोनों काम कर सकते हैंIMMEDIATEयाEXCLUSIVEलेन-देन के साथ चलाए जाते हैं. - लाइन की संख्या और आईडी: एपीआई जोड़े गए हैं, ताकि बदली गई लाइनों की संख्या या डाली गई आखिरी लाइन का आईडी, अतिरिक्त क्वेरी जारी किए बिना वापस पाया जा सके.
getLastChangedRowCount(), मौजूदा ट्रांज़ैक्शन में सबसे हाल ही के एसक्यूएल स्टेटमेंट की मदद से डाली गई, अपडेट की गई या मिटाई गई पंक्तियों की संख्या दिखाता है. वहीं,getTotalChangedRowCount(), मौजूदा कनेक्शन की गिनती दिखाता है.getLastInsertRowId(), आखिरी पंक्ति काrowidदिखाता है को चालू करने के लिए किया जा सकता है. - रॉ स्टेटमेंट: रॉ SQlite स्टेटमेंट जारी करें. इससे, सुविधाजनक रैपर और प्रोसेसिंग के लिए होने वाले अतिरिक्त खर्च से बचा जा सकता है.
Android Dynamic Performance Framework के अपडेट
Android 15 continues our investment in the Android Dynamic Performance Framework (ADPF), a set of APIs that allow games and performance intensive apps to interact more directly with power and thermal systems of Android devices. On supported devices, Android 15 adds ADPF capabilities:
- A power-efficiency mode for hint sessions to indicate that their associated threads should prefer power saving over performance, great for long-running background workloads.
- GPU and CPU work durations can both be reported in hint sessions, allowing the system to adjust CPU and GPU frequencies together to best meet workload demands.
- Thermal headroom thresholds to interpret possible thermal throttling status based on headroom prediction.
To learn more about how to use ADPF in your apps and games, head over to the documentation.
निजता
Android 15 में कई ऐसी सुविधाएं शामिल हैं जिनसे ऐप्लिकेशन डेवलपर को उपयोगकर्ता की निजता को सुरक्षित रखने में मदद मिलती है.
स्क्रीन रिकॉर्डिंग का पता लगाने की सुविधा
Android 15 में ऐप्लिकेशन के लिए सहायता जोड़ी गई है, ताकि यह पता लगाया जा सके कि उन्हें रिकॉर्ड किया जा रहा है. ऐप्लिकेशन के ट्रांज़िशन होने पर, कॉलबैक शुरू हो जाता है के बीच फ़र्क़ पड़ता है. अगर रजिस्टर करने की प्रोसेस के UID के मालिकाना हक वाली गतिविधियां रिकॉर्ड की जा रही हैं, तो ऐप्लिकेशन को दिखने वाला माना जाता है. इस तरह से, अगर आपका ऐप्लिकेशन संवेदनशील कार्रवाई करता है, तो उपयोगकर्ता को बता सकता है कि उन्हें रिकॉर्ड किया जा रहा है.
val mCallback = Consumer<Int> { state ->
  if (state == SCREEN_RECORDING_STATE_VISIBLE) {
    // We're being recorded
  } else {
    // We're not being recorded
  }
}

override fun onStart() {
   super.onStart()
   val initialState =
      windowManager.addScreenRecordingCallback(mainExecutor, mCallback)
   mCallback.accept(initialState)
}

override fun onStop() {
    super.onStop()
    windowManager.removeScreenRecordingCallback(mCallback)
}
IntentFilter की बेहतर सुविधाएं
Android 15 में, UriRelativeFilterGroup के ज़रिए Intent को ज़्यादा सटीक तरीके से हल करने की सुविधा पहले से मौजूद है. इसमें UriRelativeFilter ऑब्जेक्ट का एक सेट होता है, जो Intent मैच करने वाले नियमों का एक सेट बनाता है. इन नियमों को पूरा करना ज़रूरी है. इनमें यूआरएल क्वेरी पैरामीटर, यूआरएल फ़्रैगमेंट, और ब्लॉक करने या बाहर रखने के नियम शामिल हैं.
इन नियमों को AndroidManifest एक्सएमएल फ़ाइल में, <uri-relative-filter-group> टैग की मदद से तय किया जा सकता है. इसमें android:allow टैग भी शामिल किया जा सकता है. इन टैग में ऐसे <data> टैग शामिल हो सकते हैं जिनमें मौजूदा डेटा टैग एट्रिब्यूट के साथ-साथ, android:query और android:fragment एट्रिब्यूट का इस्तेमाल किया जाता है.
यहां AndroidManifest सिंटैक्स का एक उदाहरण दिया गया है:
<intent-filter android:autoVerify="true">
  <action android:name="android.intent.action.VIEW" />
  <category android:name="android.intent.category.BROWSABLE" />
  <category android:name="android.intent.category.DEFAULT" />
  <data android:scheme="http" />
  <data android:scheme="https" />
  <data android:host="astore.com" />
  <uri-relative-filter-group>
    <data android:pathPrefix="/auth" />
    <data android:query="region=na" />
  </uri-relative-filter-group>
  <uri-relative-filter-group android:allow="false">
    <data android:pathPrefix="/auth" />
    <data android:query="mobileoptout=true" />
  </uri-relative-filter-group>
  <uri-relative-filter-group android:allow="false">
    <data android:pathPrefix="/auth" />
    <data android:fragmentPrefix="faq" />
  </uri-relative-filter-group>
</intent-filter>
प्राइवेट स्पेस
Private space lets users create a separate space on their device where they can keep sensitive apps away from prying eyes, under an additional layer of authentication. The private space uses a separate user profile. The user can choose to use the device lock or a separate lock factor for the private space.
Apps in the private space show up in a separate container in the launcher, and are hidden from the recents view, notifications, settings, and from other apps when the private space is locked. User-generated and downloaded content (such as media or files) and accounts are separated between the private space and the main space. The system sharesheet and the photo picker can be used to give apps access to content across spaces when the private space is unlocked.
Users can't move existing apps and their data into the private space. Instead, users select an install option in the private space to install an app using whichever app store they prefer. Apps in the private space are installed as separate copies from any apps in the main space (new copies of the same app).
When a user locks the private space, the profile is stopped. While the profile is stopped, apps in the private space are no longer active and can't perform foreground or background activities, including showing notifications.
We recommend that you test your app with private space to make sure your app works as expected, especially if your app falls into one of the following categories:
- Apps with logic for work profiles that assumes that any installed copies of their app that aren't in the main profile are in the work profile.
- Medical apps
- Launcher apps
- App store apps
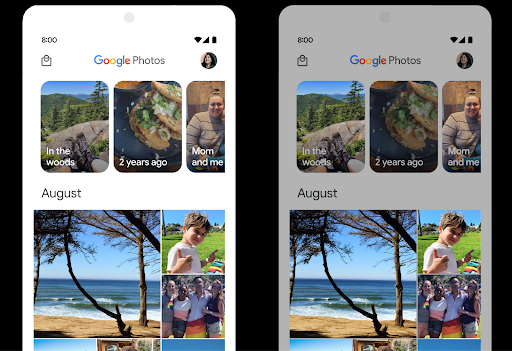
'चुनिंदा फ़ोटो का ऐक्सेस' के लिए, उपयोगकर्ता के सबसे हाल ही के चुने गए विकल्प के बारे में क्वेरी करना
Apps can now highlight only the most-recently-selected photos and videos when
partial access to media permissions is granted. This feature can improve
the user experience for apps that frequently request access to photos and
videos. To use this feature in your app, enable the
QUERY_ARG_LATEST_SELECTION_ONLY argument when querying MediaStore
through ContentResolver.
Kotlin
val externalContentUri = MediaStore.Files.getContentUri("external")

val mediaColumns = arrayOf(
   FileColumns._ID,
   FileColumns.DISPLAY_NAME,
   FileColumns.MIME_TYPE,
)

val queryArgs = bundleOf(
   // Return only items from the last selection (selected photos access)
   QUERY_ARG_LATEST_SELECTION_ONLY to true,
   // Sort returned items chronologically based on when they were added to the device's storage
   QUERY_ARG_SQL_SORT_ORDER to "${FileColumns.DATE_ADDED} DESC",
   QUERY_ARG_SQL_SELECTION to "${FileColumns.MEDIA_TYPE} = ? OR ${FileColumns.MEDIA_TYPE} = ?",
   QUERY_ARG_SQL_SELECTION_ARGS to arrayOf(
       FileColumns.MEDIA_TYPE_IMAGE.toString(),
       FileColumns.MEDIA_TYPE_VIDEO.toString()
   )
)
Java
Uri externalContentUri = MediaStore.Files.getContentUri("external");

String[] mediaColumns = {
    FileColumns._ID,
    FileColumns.DISPLAY_NAME,
    FileColumns.MIME_TYPE
};

Bundle queryArgs = new Bundle();
queryArgs.putBoolean(MediaStore.QUERY_ARG_LATEST_SELECTION_ONLY, true);
queryArgs.putString(MediaStore.QUERY_ARG_SQL_SORT_ORDER, FileColumns.DATE_ADDED + " DESC");
queryArgs.putString(MediaStore.QUERY_ARG_SQL_SELECTION, FileColumns.MEDIA_TYPE + " = ? OR " + FileColumns.MEDIA_TYPE + " = ?");
queryArgs.putStringArray(MediaStore.QUERY_ARG_SQL_SELECTION_ARGS, new String[] {
    String.valueOf(FileColumns.MEDIA_TYPE_IMAGE),
    String.valueOf(FileColumns.MEDIA_TYPE_VIDEO)
});
Android पर Privacy Sandbox
Android 15 includes the latest Android Ad Services extensions, incorporating the latest version of the Privacy Sandbox on Android. This addition is part of our work to develop technologies that improve user privacy and enable effective, personalized advertising experiences for mobile apps. Our privacy sandbox page has more information about the Privacy Sandbox on Android developer preview and beta programs to help you get started.
Health Connect
Android 15 में, Health Connect by Android के नए एक्सटेंशन इंटिग्रेट किए गए हैं. यह एक सुरक्षित और एक ही जगह से कंट्रोल किया जा सकने वाला प्लैटफ़ॉर्म है. इसकी मदद से, सेहत और फ़िटनेस से जुड़ा वह डेटा मैनेज और शेयर किया जा सकता है जो ऐप्लिकेशन इकट्ठा करता है. इस अपडेट में, फ़िटनेस, पोषण, त्वचा के तापमान, ट्रेनिंग प्लान वगैरह के लिए, अन्य डेटा टाइप का इस्तेमाल करने की सुविधा जोड़ी गई है.
त्वचा के तापमान को ट्रैक करने की सुविधा की मदद से, उपयोगकर्ता किसी पहने जा सकने वाले डिवाइस या किसी अन्य ट्रैकिंग डिवाइस से, तापमान का ज़्यादा सटीक डेटा सेव और शेयर कर सकते हैं.
ट्रेनिंग के प्लान, कसरत के प्लान होते हैं. इनकी मदद से, उपयोगकर्ता अपने फ़िटनेस लक्ष्यों को हासिल कर सकता है. ट्रेनिंग के प्लान में, कसरत पूरी करने और परफ़ॉर्मेंस से जुड़े कई लक्ष्य शामिल होते हैं:
- बर्न की गई कैलोरी के हिसाब से लक्ष्य पूरा करने के लिए, दूरी, अवधि, दोहराव और कदम.
- ज़्यादा से ज़्यादा बार दोहराएं (AMRAP), गति, हृदय की दर, पावर, थकान की दर, और गति के आधार पर परफ़ॉर्मेंस के लक्ष्य.
Android में Health Connect में हुए नए अपडेट के बारे में यहां ज़्यादा जानें: Android के लिए, ज़रूरत के हिसाब से अनुभव तैयार करना Google I/O से स्वास्थ्य के बारे में जानकारी.
ऐप्लिकेशन की स्क्रीन शेयर करने की सुविधा
Android 15 में ऐप्लिकेशन की स्क्रीन शेयर करने की सुविधा उपलब्ध है. इसकी मदद से, उपयोगकर्ता अपने डिवाइस की पूरी स्क्रीन के बजाय, सिर्फ़ ऐप्लिकेशन की विंडो को शेयर या रिकॉर्ड कर सकते हैं. यह सुविधा, पहली बार Android 14 QPR2 में चालू की गई थी. इसमें MediaProjection कॉलबैक शामिल हैं. इनकी मदद से, आपके ऐप्लिकेशन को स्क्रीन शेयर करने के अनुभव को पसंद के मुताबिक बनाया जा सकता है. ध्यान दें कि Android 14 (एपीआई लेवल 34) या उसके बाद के वर्शन को टारगेट करने वाले ऐप्लिकेशन के लिए, हर MediaProjection कैप्चर सेशन के लिए उपयोगकर्ता की सहमति लेना ज़रूरी है.
उपयोगकर्ता अनुभव और सिस्टम यूज़र इंटरफ़ेस (यूआई)
Android 15 में, ऐप्लिकेशन डेवलपर और उपयोगकर्ताओं को अपने डिवाइस को अपनी ज़रूरतों के हिसाब से कॉन्फ़िगर करने के लिए, ज़्यादा कंट्रोल और सुविधा मिलती है.
Android 15 में किए गए नए सुधारों का इस्तेमाल करके, अपने ऐप्लिकेशन पर लोगों को बेहतर अनुभव देने के बारे में ज़्यादा जानने के लिए, Google I/O का अपने Android ऐप्लिकेशन पर लोगों को बेहतर अनुभव देना वीडियो देखें.
जनरेटेड प्रीव्यू एपीआई की मदद से, विजेट की बेहतर झलकें
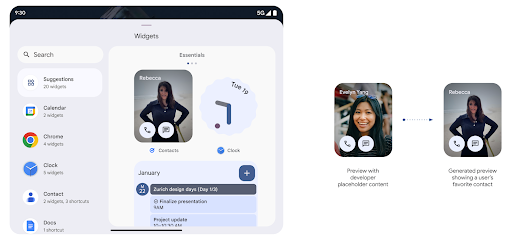
Before Android 15, the only way to provide widget picker previews was to specify a static image or layout resource. These previews often differ significantly from the look of the actual widget when it is placed on the home screen. Also, static resources can't be created with Jetpack Glance, so a Glance developer had to screenshot their widget or create an XML layout to have a widget preview.
Android 15 adds support for generated previews. This means that app widget
providers can generate RemoteViews to use as the picker preview, instead
of a static resource.
Push API
Apps can provide generated previews through a push API. Apps can provide
previews at any point in their lifecycle, and don't receive an explicit request
from the host to provide previews. Previews are persisted in AppWidgetService,
and hosts can request them on-demand. The following example loads an XML widget
layout resource and sets it as the preview:
AppWidgetManager.getInstance(appContext).setWidgetPreview(
   ComponentName(
       appContext,
       SociaLiteAppWidgetReceiver::class.java
   ),
   AppWidgetProviderInfo.WIDGET_CATEGORY_HOME_SCREEN,
   RemoteViews("com.example", R.layout.widget_preview)
)
The expected flow is:
- At any time, the widget provider calls
setWidgetPreview. The provided previews are persisted inAppWidgetServicewith other provider info. setWidgetPreviewnotifies hosts of an updated preview through theAppWidgetHost.onProvidersChangedcallback. In response, the widget host reloads all of its provider information.- When displaying a widget preview, the host checks
AppWidgetProviderInfo.generatedPreviewCategories, and if the chosen category is available, callsAppWidgetManager.getWidgetPreviewto return the saved preview for this provider.
When to call setWidgetPreview
Because there is no callback to provide previews, apps can choose to send previews at any point when they are running. How often to update the preview depends on the widget's use case.
The following list describes the two main categories of preview use cases:
- Providers that show real data in their widget previews, such as personalized or recent information. These providers can set the preview once the user has signed in or has done initial configuration in their app. After this, they can set up a periodic task to update the previews at their chosen cadence. Examples of this type of widget could be a photo, calendar, weather or news widget.
- Providers that show static information in previews or quick-action widgets that don't display any data. These providers can set previews once, when the app first launches. Examples of this type of widget include a drive quick actions widget or chrome shortcuts widget.
Some providers might show static previews on the hub mode picker, but real information on the homescreen picker. These providers should follow the guidance for both of these use cases to set previews.
पिक्चर में पिक्चर
Android 15 में, पिक्चर में पिक्चर (पीआईपी) मोड में बदलाव किए गए हैं. इससे, पीआईपी मोड में जाने पर, स्क्रीन पर वीडियो का ट्रांज़िशन ज़्यादा आसानी से हो पाता है. यह इनके लिए फ़ायदेमंद होगा ऐसे ऐप्लिकेशन जिनके मुख्य यूज़र इंटरफ़ेस (यूआई) के ऊपर यूआई एलिमेंट दिखते हैं, जो पीआईपी (पिक्चर में पिक्चर) में जाते हैं.
लॉजिक तय करने के लिए डेवलपर, onPictureInPictureModeChanged कॉलबैक का इस्तेमाल करते हैं
जो ओवरले किए गए यूज़र इंटरफ़ेस (यूआई) एलिमेंट के दिखने को टॉगल करता है. यह कॉलबैक है
यह तब ट्रिगर होता है, जब पीआईपी में एंट्री या एग्ज़िट ऐनिमेशन पूरा हो जाता है. इतने समय में शुरू होगा
Android 15 के हिसाब से, PictureInPictureUiState क्लास में कोई दूसरा राज्य शामिल है.
यूज़र इंटरफ़ेस (यूआई) की इस स्थिति में, Android 15 (एपीआई लेवल 35) को टारगेट करने वाले ऐप्लिकेशन,
Activity#onPictureInPictureUiStateChanged कॉलबैक को इसके साथ शुरू किया जा रहा है
पीआईपी ऐनिमेशन के शुरू होते ही isTransitioningToPip(). यहां हैं
ऐसे कई यूज़र इंटरफ़ेस (यूआई) एलिमेंट जो ऐप्लिकेशन के पीआईपी मोड में होने पर, इनके लिए काम के नहीं होते
व्यू या लेआउट के उदाहरण, जिनमें सुझाव, आगे होने वाली, और ऐसी जानकारी शामिल है
कॉन्टेंट, रेटिंग, और टाइटल के बारे में जानकारी शामिल होती है. जब ऐप्लिकेशन पीआईपी मोड में जाए, तो
इन यूज़र इंटरफ़ेस (यूआई) एलिमेंट को छिपाने के लिए onPictureInPictureUiStateChanged कॉलबैक. जब
पीआईपी विंडो से, ऐप्लिकेशन फ़ुल स्क्रीन मोड में जाता है.
इन एलिमेंट को दिखाने के लिए onPictureInPictureModeChanged कॉलबैक, जैसा कि इसमें दिखाया गया है
ये उदाहरण:
override fun onPictureInPictureUiStateChanged(pipState: PictureInPictureUiState) {
        if (pipState.isTransitioningToPip()) {
          // Hide UI elements
        }
    }
override fun onPictureInPictureModeChanged(isInPictureInPictureMode: Boolean) {
        if (isInPictureInPictureMode) {
          // Unhide UI elements
        }
    }
बिना काम के यूज़र इंटरफ़ेस (यूआई) एलिमेंट के इस क्विक विज़िबिलिटी टॉगल से, पीआईपी विंडो में यह पक्का करें कि पीआईपी (पिक्चर में पिक्चर) में जाने का ऐनिमेशन आसान और झिलमिलाने वाला हो.
'परेशान न करें' सुविधा के बेहतर नियम
AutomaticZenRule की मदद से ऐप्लिकेशन, 'ध्यान दें' सुविधा को अपनी पसंद के मुताबिक बना सकते हैं
मैनेजमेंट (परेशान न करें) के नियम और तय करें कि इन्हें कब चालू या बंद करना है
उन्हें. Android 15, इन नियमों को बेहतर तरीके से दिखाता है. ऐसा करने का मकसद,
उपयोगकर्ता अनुभव मिलता है. इसमें ये बदलाव शामिल हैं:
AutomaticZenRuleमें टाइप जोड़े जा रहे हैं. इससे सिस्टम, खास वैल्यू लागू कर सकता है कुछ नियम-कानूनों के बारे में बताता है.AutomaticZenRuleमें आइकॉन जोड़ा जा रहा है. इससे मोड बेहतर तरीके से काम करेगा पहचानने लायक.AutomaticZenRuleमें ऐसीtriggerDescriptionस्ट्रिंग जोड़ी जा रही है जो यह बताए ऐसी शर्तें जिनके आधार पर, उपयोगकर्ता के लिए नियम चालू होना चाहिए.- जोड़े गए
ZenDeviceEffectsसेAutomaticZenRuleतक, जिससे नियम ग्रेस्केल जैसी चीज़ों को ट्रिगर कर सकेंगे वॉलपेपर की रोशनी कम करने के लिए भी किया जा सकता है.
सूचना चैनलों के लिए VibrationEffect सेट करना
Android 15 पर, आने वाली सूचनाओं के लिए शानदार वाइब्रेशन सेटिंग चालू की जा सकती है
NotificationChannel.setVibrationEffect का इस्तेमाल कर रहे हैं, इसलिए
आपके उपयोगकर्ता इसके बिना अलग-अलग तरह की सूचनाओं के बीच अंतर कर सकते हैं
उन्हें अपने डिवाइस में देखना पड़ता है.
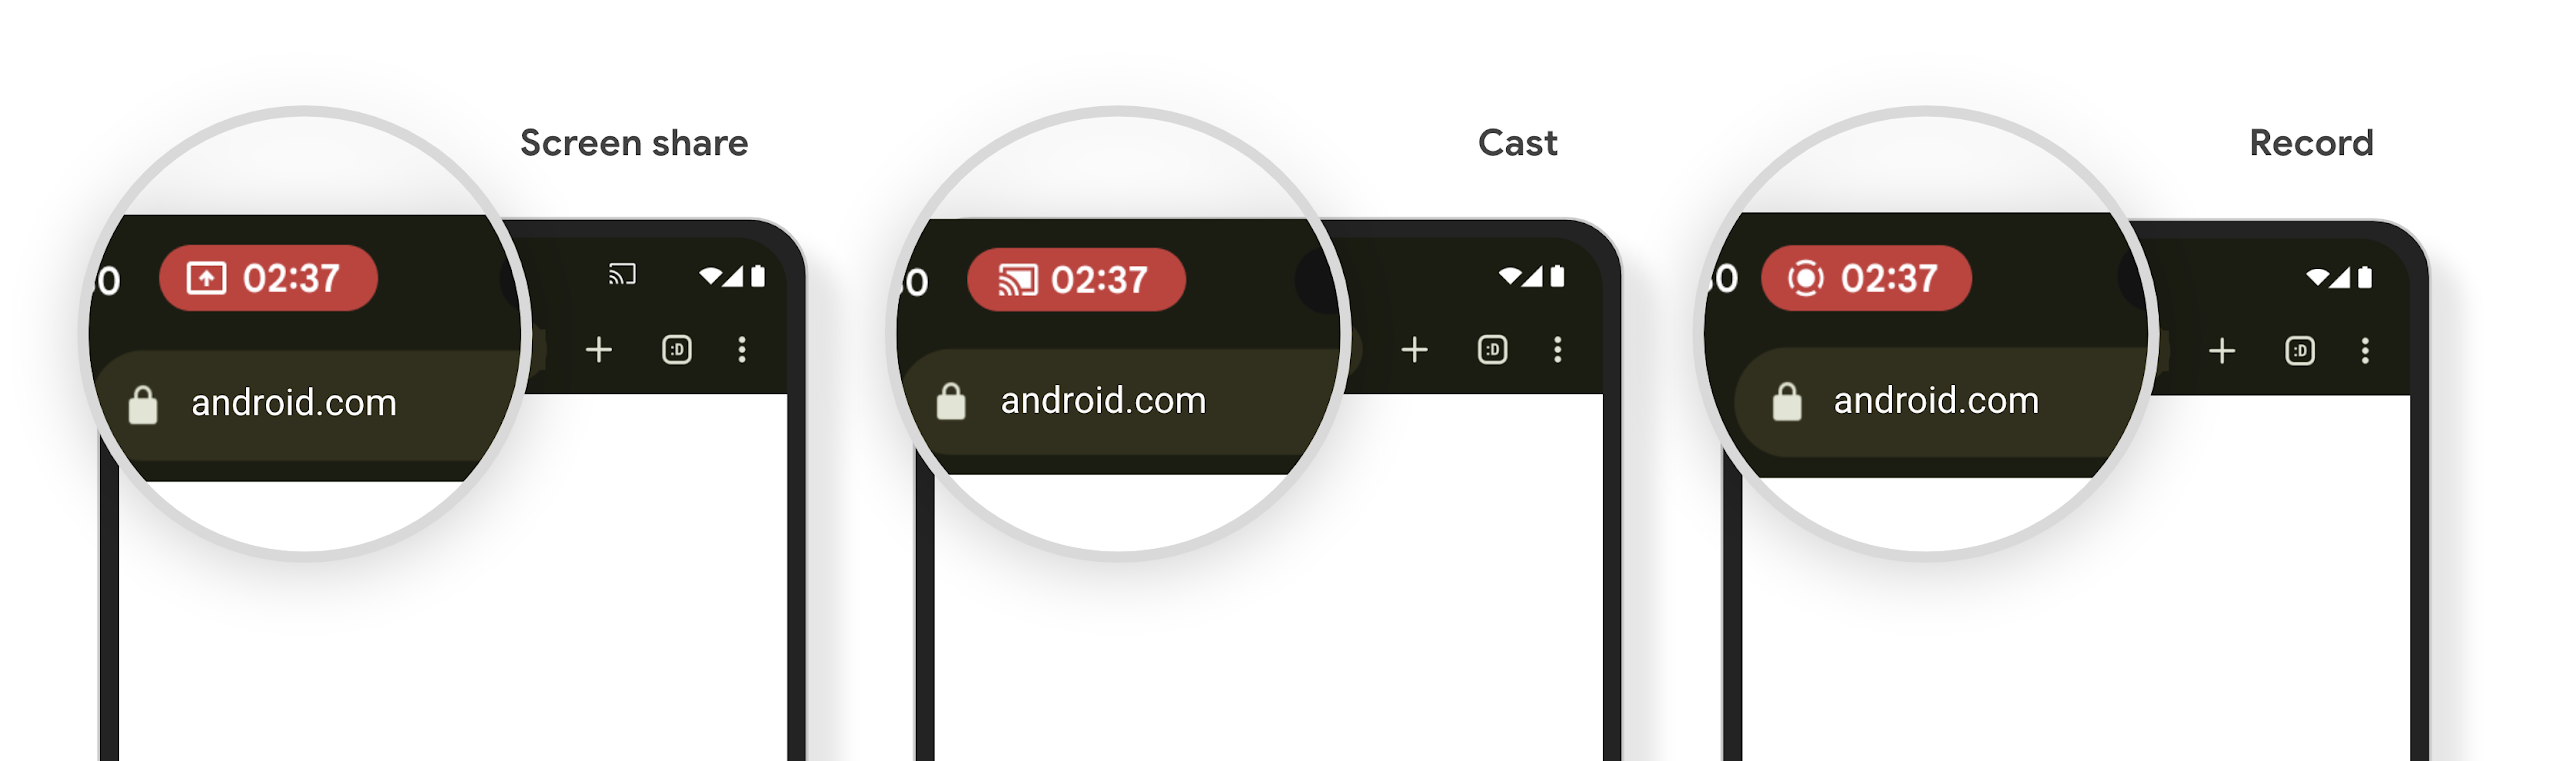
मीडिया प्रोजेक्शन की स्थिति दिखाने वाली स्टेटस बार चिप और अपने-आप बंद होने की सुविधा
Media projection can expose private user information. A new, prominent status bar chip makes users aware of any ongoing screen projection. Users can tap the chip to stop screen casting, sharing, or recording. Also, for a more intuitive user experience, any in‑progress screen projection now automatically stops when the device screen is locked.
बड़ी स्क्रीन और फ़ॉर्म फ़ैक्टर
Android 15, आपके ऐप्लिकेशन को Android के फ़ॉर्म फ़ैक्टर का ज़्यादा से ज़्यादा फ़ायदा पाने में मदद करता है. इनमें बड़ी स्क्रीन, फ़्लिप किए जा सकने वाले डिवाइस, और फ़ोल्ड किए जा सकने वाले डिवाइस शामिल हैं.
बड़ी स्क्रीन पर मल्टीटास्किंग की बेहतर सुविधा
Android 15 gives users better ways to multitask on large screen devices. For example, users can save their favorite split-screen app combinations for quick access and pin the taskbar on screen to quickly switch between apps. This means that making sure your app is adaptive is more important than ever.
Google I/O has sessions on Building adaptive Android apps and Building UI with the Material 3 adaptive library that can help, and our documentation has more to help you Design for large screens.
कवर स्क्रीन पर काम करने की सुविधा
आपका ऐप्लिकेशन, ऐसी प्रॉपर्टी का एलान कर सकता है जिसका इस्तेमाल Android 15, Application या Activity को फ़्लिप किए जा सकने वाले डिवाइसों की छोटी कवर स्क्रीन पर दिखाने के लिए करता है. ये स्क्रीन इतनी छोटी हैं कि इन्हें Android ऐप्लिकेशन के साथ काम करने वाले डिवाइसों के तौर पर नहीं माना जा सकता. हालांकि, आपका ऐप्लिकेशन इन डिवाइसों पर काम करने के लिए ऑप्ट-इन कर सकता है. इससे आपका ऐप्लिकेशन ज़्यादा जगहों पर उपलब्ध हो पाएगा.
कनेक्टिविटी
Android 15, प्लैटफ़ॉर्म को अपडेट करता है, ताकि आपके ऐप्लिकेशन को कम्यूनिकेशन और वायरलेस टेक्नोलॉजी के क्षेत्र में हुई नई तरक्की का ऐक्सेस मिल सके.
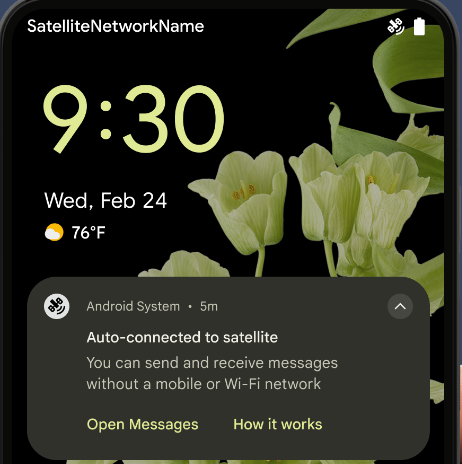
सैटलाइट की मदद से मैसेज भेजने की सुविधा
Android 15 continues to extend platform support for satellite connectivity and includes some UI elements to ensure a consistent user experience across the satellite connectivity landscape.
Apps can use ServiceState.isUsingNonTerrestrialNetwork() to
detect when a device is connected to a satellite, giving them more awareness of
why full network services might be unavailable. Additionally, Android 15
provides support for SMS and MMS apps as well as preloaded RCS apps to use
satellite connectivity for sending and receiving messages.
एनएफ़सी की सुविधा का बेहतर अनुभव
Android 15 में, टैप करके पैसे चुकाने की सुविधा को ज़्यादा आसान और भरोसेमंद बनाने पर काम किया जा रहा है. साथ ही, Android के एनएफ़सी ऐप्लिकेशन के बेहतर नेटवर्क को भी बेहतर बनाने पर काम किया जा रहा है. जिन डिवाइसों पर यह सुविधा काम करती है उन पर ऐप्लिकेशन, NfcAdapter से निगरानी मोड में जाने का अनुरोध कर सकते हैं. इस मोड में डिवाइस, एनएफ़सी रीडर को सुनता है, लेकिन उनका जवाब नहीं देता. साथ ही, ऐप्लिकेशन की एनएफ़सी सेवा PollingFrame को प्रोसेस करने के लिए ऑब्जेक्ट भेजता है. PollingFrame ऑब्जेक्ट का इस्तेमाल, एनएफ़सी रीडर से पहली बार संपर्क करने से पहले पुष्टि करने के लिए किया जा सकता है. इससे कई मामलों में एक टैप से लेन-देन किया जा सकता है.
इसके अलावा, ऐप्लिकेशन ऐसे डिवाइसों पर फ़िल्टर रजिस्टर कर सकते हैं जिन पर यह सुविधा काम करती है. इससे उन्हें पोलिंग लूप गतिविधि की सूचना मिल सकती है. इससे, एनएफ़सी की सुविधा वाले कई ऐप्लिकेशन को आसानी से चलाया जा सकता है.
Wallet की भूमिका
Android 15 introduces a Wallet role that allows tighter integration with the user's preferred wallet app. This role replaces the NFC default contactless payment setting. Users can manage the Wallet role holder by navigating to Settings > Apps > Default Apps.
The Wallet role is used when routing NFC taps for AIDs registered in the payment category. Taps always go to the Wallet role holder unless another app that is registered for the same AID is running in the foreground.
This role is also used to determine where the Wallet Quick Access tile should go when activated. When the role is set to "None", the Quick Access tile isn't available and payment category NFC taps are only delivered to the foreground app.
सुरक्षा
Android 15 की मदद से, अपने ऐप्लिकेशन की सुरक्षा को बेहतर बनाया जा सकता है. साथ ही, ऐप्लिकेशन के डेटा को सुरक्षित रखा जा सकता है. इसके अलावा, उपयोगकर्ताओं को उनके डेटा के बारे में ज़्यादा जानकारी दी जा सकती है और उन्हें डेटा पर ज़्यादा कंट्रोल दिया जा सकता है. उपयोगकर्ताओं की सुरक्षा को बेहतर बनाने और आपके ऐप्लिकेशन को नए खतरों से बचाने के लिए, हम क्या कर रहे हैं, इस बारे में ज़्यादा जानने के लिए, Google I/O में Android पर उपयोगकर्ताओं की सुरक्षा को बेहतर बनाना टॉक देखें.
ऑटोमैटिक भरने की सुविधा के साथ Credential Manager को इंटिग्रेट करना
Android 15 से, डेवलपर क्रेडेंशियल मैनेजर के अनुरोधों के साथ, उपयोगकर्ता नाम या पासवर्ड फ़ील्ड जैसे खास व्यू को लिंक कर सकते हैं. इससे, साइन-इन की प्रोसेस के दौरान उपयोगकर्ता को बेहतर अनुभव देना आसान हो जाता है. जब उपयोगकर्ता इनमें से किसी एक व्यू पर फ़ोकस करता है, तो उससे जुड़ा अनुरोध क्रेडेंशियल मैनेजर को भेजा जाता है. इस प्रोसेस से मिले क्रेडेंशियल, सभी सेवा देने वाली कंपनियों के साथ इकट्ठा किए जाते हैं और ऑटोमैटिक भरने की सुविधा के फ़ॉलबैक यूज़र इंटरफ़ेस (यूआई) में दिखाए जाते हैं. जैसे, इनलाइन सुझाव या ड्रॉप-डाउन सुझाव. डेवलपर के लिए, Jetpack androidx.credentials लाइब्रेरी का इस्तेमाल करना सबसे बेहतर है. यह लाइब्रेरी, Android 15 और इसके बाद के वर्शन में इस सुविधा को बेहतर बनाने के लिए जल्द ही उपलब्ध होगी.
बायोमेट्रिक प्रॉम्प्ट के साथ, एक टैप में साइन-अप और साइन-इन करने की सुविधा को इंटिग्रेट करना
क्रेडेंशियल मैनेजर बायोमेट्रिक प्रॉम्प्ट को क्रेडेंशियल बनाने की सुविधा में इंटिग्रेट करता है और साइन-इन करने की प्रोसेस को पूरा करता है. इससे, सेवा देने वाली कंपनियों को अपने बायोमेट्रिक प्रॉम्प्ट. इस वजह से, क्रेडेंशियल देने वालों को सिर्फ़ बनाने और पाने के नतीजे, बायोमेट्रिक फ़्लो के नतीजे के साथ बेहतर बनाए जाते हैं. यह आसान प्रोसेस, ज़्यादा बेहतर और आसान क्रेडेंशियल बनाती है बनाने और वापस पाने की प्रोसेस.
एंड-टू-एंड एन्क्रिप्शन के लिए कुंजी मैनेजमेंट
हम Android 15 में E2eeContactKeysManager को लॉन्च कर रहे हैं. इससे आपके Android ऐप्लिकेशन में एंड-टू-एंड एन्क्रिप्शन (E2EE) की सुविधा मिलती है. इसके लिए, क्रिप्टोग्राफ़िक सार्वजनिक कुंजियों को सेव करने के लिए, ओएस-लेवल का एपीआई उपलब्ध कराया जाता है.
E2eeContactKeysManager को प्लैटफ़ॉर्म के संपर्क ऐप्लिकेशन के साथ इंटिग्रेट करने के लिए डिज़ाइन किया गया है. इससे उपयोगकर्ताओं को अपने संपर्कों के सार्वजनिक कुंजियों को मैनेज करने और उनकी पुष्टि करने का एक ही तरीका मिलता है.
कॉन्टेंट यूआरआई पर अनुमतियों की जांच करना
Android 15 introduces a set of APIs that perform permission checks on content URIs:
Context.checkContentUriPermissionFull: This performs a full permission check on content URIs.Activitymanifest attributerequireContentUriPermissionFromCaller: This enforces specified permissions on the provided content URIs at activity launch.ComponentCallerclass forActivitycallers: This represents the app that launched the activity.
सुलभता
Android 15 में ऐसी सुविधाएं जोड़ी गई हैं जिनसे लोगों को ऐक्सेसिबिलिटी से जुड़ी बेहतर सुविधाएं मिलती हैं.
बेहतर ब्रेल
In Android 15, we've made it possible for TalkBack to support Braille displays that are using the HID standard over both USB and secure Bluetooth.
This standard, much like the one used by mice and keyboards, will help Android support a wider range of Braille displays over time.
इंटरनैशनलाइज़ेशन
Android 15 में ऐसी सुविधाएं और क्षमताएं जोड़ी गई हैं जो अलग-अलग भाषाओं में डिवाइस इस्तेमाल करने पर, उपयोगकर्ता अनुभव को बेहतर बनाती हैं.
सीजेके वैरिएबल फ़ॉन्ट
Android 15 से, चाइनीज़, जैपनीज़, और कोरियन (CJK) भाषाओं के लिए फ़ॉन्ट फ़ाइल, NotoSansCJK अब वैरिएबल फ़ॉन्ट है. वैरिएबल फ़ॉन्ट की मदद से, CJK भाषाओं में क्रिएटिव टाइपोग्राफ़ी की संभावनाएं बढ़ जाती हैं. डिज़ाइनर, अलग-अलग तरह के स्टाइल आज़मा सकते हैं और ऐसे लेआउट बना सकते हैं जो पहले मुश्किल या असंभव थे.
अक्षर के बीच में स्पेस को सही ठहराना
Android 15 से, JUSTIFICATION_MODE_INTER_CHARACTER का इस्तेमाल करके, अक्षरों के बीच के स्पेस का इस्तेमाल करके टेक्स्ट को अलाइन किया जा सकता है. एक ही शब्द में दो बार सही ठहराने की वजह यह थी
पहली बार Android 8.0 (एपीआई लेवल 26) और इंटर-कैरेक्टर में पेश किया गया था
वजह बताने की सुविधा, उन भाषाओं के लिए समान सुविधाएं देती है जो
चाइनीज़, जैपनीज़ वगैरह जैसे सेगमेंटेशन के लिए खाली सफ़ेद जगह.
JUSTIFICATION_MODE_NONE का इस्तेमाल करने वाले जैपनीज़ टेक्स्ट के लिए लेआउट.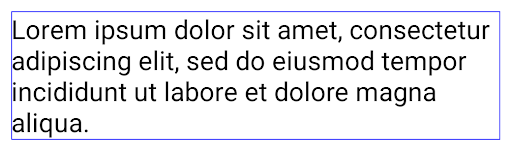
JUSTIFICATION_MODE_NONE का इस्तेमाल करके अंग्रेज़ी टेक्स्ट के लिए लेआउट.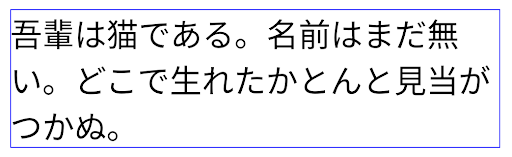
JUSTIFICATION_MODE_INTER_WORD का इस्तेमाल करके, जैपनीज़ टेक्स्ट के लिए लेआउट.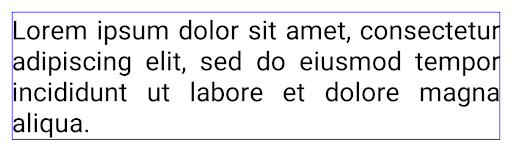
JUSTIFICATION_MODE_INTER_WORD का इस्तेमाल करके अंग्रेज़ी टेक्स्ट के लिए लेआउट.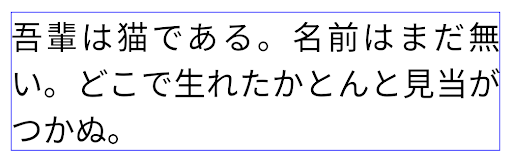
JUSTIFICATION_MODE_INTER_CHARACTER का इस्तेमाल करके, जैपनीज़ टेक्स्ट के लिए लेआउट.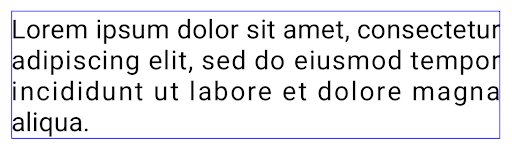
JUSTIFICATION_MODE_INTER_CHARACTER का इस्तेमाल करके अंग्रेज़ी टेक्स्ट का लेआउट.लाइन अपने-आप टूटने की सुविधा को कॉन्फ़िगर करना
Android started supporting phrase-based line breaks for Japanese and Korean in
Android 13 (API level 33). However, while phrase-based line breaks improve the
readability of short lines of text, they don't work well for long lines of text.
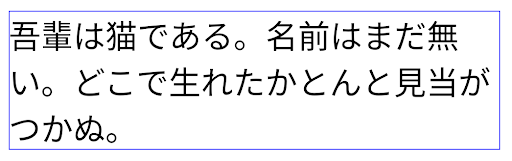
In Android 15, apps can apply phrase-based line breaks only for short lines
of text, using the LINE_BREAK_WORD_STYLE_AUTO
option. This option selects the best word style option for the text.
For short lines of text, phrase-based line breaks are used, functioning the same
as LINE_BREAK_WORD_STYLE_PHRASE, as shown in the
following image:
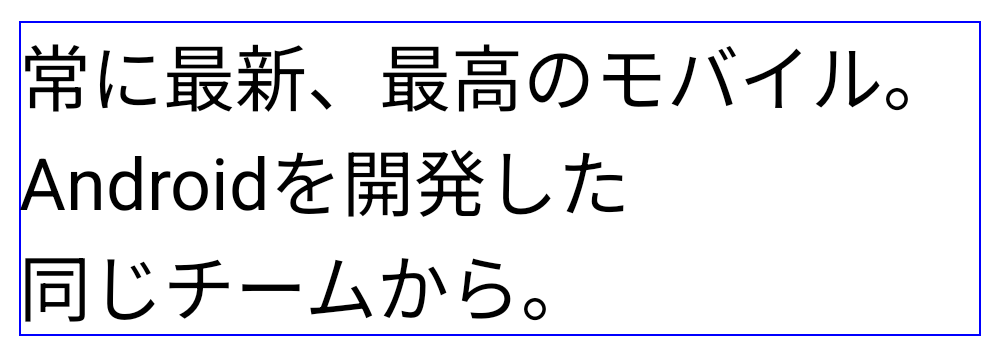
LINE_BREAK_WORD_STYLE_AUTO
applies phrase-based line breaks to improve the readability of the text.
This is the same as applying
LINE_BREAK_WORD_STYLE_PHRASE.For longer lines of text, LINE_BREAK_WORD_STYLE_AUTO uses a no
line-break word style, functioning the same as
LINE_BREAK_WORD_STYLE_NONE, as shown in the
following image:
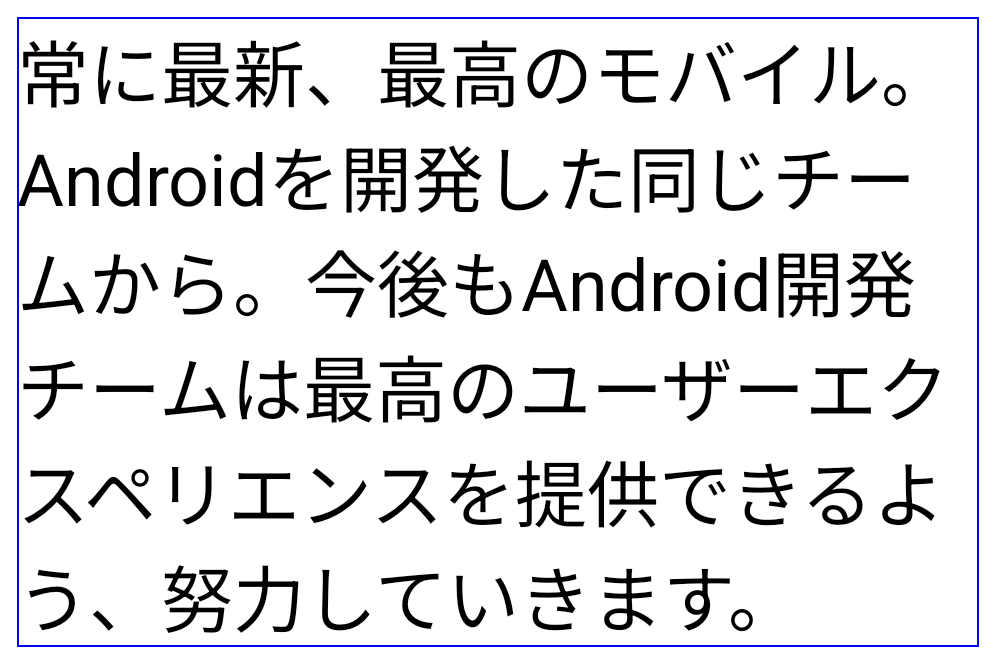
LINE_BREAK_WORD_STYLE_AUTO
applies no line-break word style to improve the readability of the text.
This is the same as applying
LINE_BREAK_WORD_STYLE_NONE.जापानी हेंटाइगाना फ़ॉन्ट
In Android 15, a font file for old Japanese Hiragana (known as Hentaigana) is bundled by default. The unique shapes of Hentaigana characters can add a distinctive flair to artwork or design while also helping to preserve accurate transmission and understanding of ancient Japanese documents.

VideoLAN cone Copyright (c) 1996-2010 VideoLAN. This logo or a modified version may be used or modified by anyone to refer to the VideoLAN project or any product developed by the VideoLAN team, but does not indicate endorsement by the project.
Vulkan and the Vulkan logo are registered trademarks of the Khronos Group Inc.
OpenGL is a registered trademark and the OpenGL ES logo is a trademark of Hewlett Packard Enterprise used by permission by Khronos.