
این سند نحوه تنظیم انواع تست های رایج اسپرسو را شرح می دهد.
یک نما را با نمای دیگری مطابقت دهید
یک طرح بندی می تواند حاوی نماهای خاصی باشد که به خودی خود منحصر به فرد نیستند. به عنوان مثال، یک دکمه تماس تکراری در جدولی از مخاطبین میتواند دارای همان R.id باشد، حاوی متن یکسان باشد و دارای ویژگیهای مشابه با دکمههای تماس دیگر در سلسله مراتب نمایش باشد.
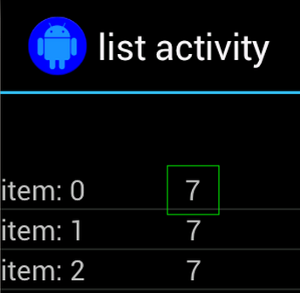
به عنوان مثال، در این فعالیت، نمای با متن "7" در چندین ردیف تکرار می شود:
اغلب، نمای غیر منحصر به فرد با برچسب منحصر به فردی که در کنار آن قرار دارد، جفت می شود، مانند نام مخاطب در کنار دکمه تماس. در این مورد، می توانید از تطبیق hasSibling() برای محدود کردن انتخاب خود استفاده کنید:
کاتلین
onView(allOf(withText("7"), hasSibling(withText("item: 0"))))
    .perform(click())
جاوا
onView(allOf(withText("7"), hasSibling(withText("item: 0"))))
    .perform(click());
نمایی را که در داخل نوار اقدام قرار دارد مطابقت دهید
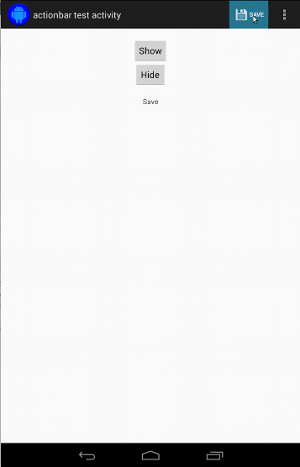
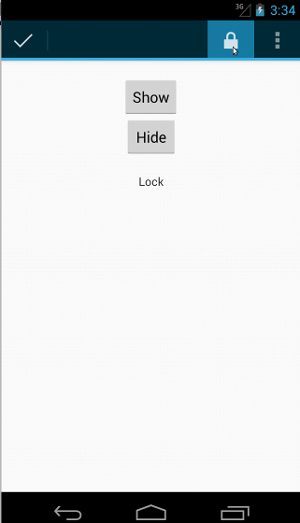
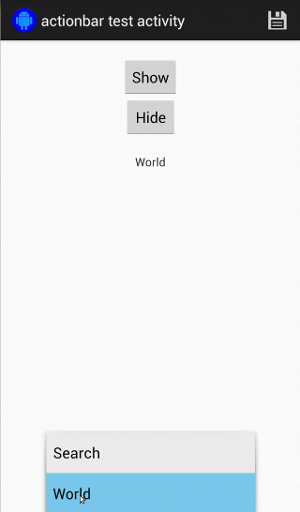
ActionBarTestActivity دارای دو نوار عمل متفاوت است: یک نوار اقدام معمولی و یک نوار اقدام متنی که از منوی گزینه ها ایجاد می شود. هر دو نوار اقدام دارای یک آیتم هستند که همیشه قابل مشاهده است و دو مورد که فقط در منوی سرریز قابل مشاهده هستند. وقتی روی یک مورد کلیک می شود، یک TextView به محتوای مورد کلیک شده تغییر می کند.
مطابق با نمادهای قابل مشاهده در هر دو نوار اقدام، همانطور که در قطعه کد زیر نشان داده شده است، ساده است:
کاتلین
fun testClickActionBarItem() {
    // We make sure the contextual action bar is hidden.
    onView(withId(R.id.hide_contextual_action_bar))
        .perform(click())

    // Click on the icon - we can find it by the r.Id.
    onView(withId(R.id.action_save))
        .perform(click())

    // Verify that we have really clicked on the icon
    // by checking the TextView content.
    onView(withId(R.id.text_action_bar_result))
        .check(matches(withText("Save")))
}
جاوا
public void testClickActionBarItem() {
    // We make sure the contextual action bar is hidden.
    onView(withId(R.id.hide_contextual_action_bar))
        .perform(click());

    // Click on the icon - we can find it by the r.Id.
    onView(withId(R.id.action_save))
        .perform(click());

    // Verify that we have really clicked on the icon
    // by checking the TextView content.
    onView(withId(R.id.text_action_bar_result))
        .check(matches(withText("Save")));
}
کد برای نوار اقدام متنی یکسان به نظر می رسد:
کاتلین
fun testClickActionModeItem() {
    // Make sure we show the contextual action bar.
    onView(withId(R.id.show_contextual_action_bar))
        .perform(click())

    // Click on the icon.
    onView((withId(R.id.action_lock)))
        .perform(click())

    // Verify that we have really clicked on the icon
    // by checking the TextView content.
    onView(withId(R.id.text_action_bar_result))
        .check(matches(withText("Lock")))
}
جاوا
public void testClickActionModeItem() {
    // Make sure we show the contextual action bar.
    onView(withId(R.id.show_contextual_action_bar))
        .perform(click());

    // Click on the icon.
    onView((withId(R.id.action_lock)))
        .perform(click());

    // Verify that we have really clicked on the icon
    // by checking the TextView content.
    onView(withId(R.id.text_action_bar_result))
        .check(matches(withText("Lock")));
}
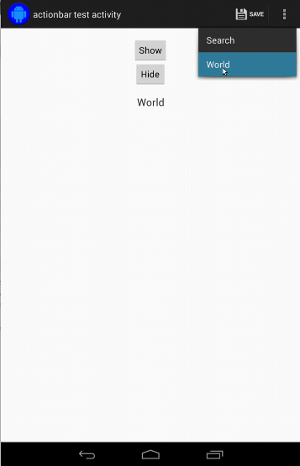
کلیک کردن روی آیتمها در منوی سرریز برای نوار عملکرد عادی کمی پیچیدهتر است، زیرا برخی از دستگاهها دارای دکمه منوی سرریز سختافزاری هستند که موارد سرریز شده را در منوی گزینهها باز میکند و برخی از دستگاهها دکمه منوی سرریز نرمافزاری دارند که یک دکمه معمولی را باز میکند. منوی سرریز خوشبختانه، اسپرسو این را برای ما مدیریت می کند.
برای نوار اقدام معمولی:
کاتلین
fun testActionBarOverflow() {
    // Make sure we hide the contextual action bar.
    onView(withId(R.id.hide_contextual_action_bar))
        .perform(click())

    // Open the options menu OR open the overflow menu, depending on whether
    // the device has a hardware or software overflow menu button.
    openActionBarOverflowOrOptionsMenu(
            ApplicationProvider.getApplicationContext<Context>())

    // Click the item.
    onView(withText("World"))
        .perform(click())

    // Verify that we have really clicked on the icon by checking
    // the TextView content.
    onView(withId(R.id.text_action_bar_result))
        .check(matches(withText("World")))
}
جاوا
public void testActionBarOverflow() {
    // Make sure we hide the contextual action bar.
    onView(withId(R.id.hide_contextual_action_bar))
        .perform(click());

    // Open the options menu OR open the overflow menu, depending on whether
    // the device has a hardware or software overflow menu button.
    openActionBarOverflowOrOptionsMenu(
            ApplicationProvider.getApplicationContext());

    // Click the item.
    onView(withText("World"))
        .perform(click());

    // Verify that we have really clicked on the icon by checking
    // the TextView content.
    onView(withId(R.id.text_action_bar_result))
        .check(matches(withText("World")));
}
در دستگاههایی که دکمه منوی سرریز سختافزاری دارند اینگونه به نظر میرسد:
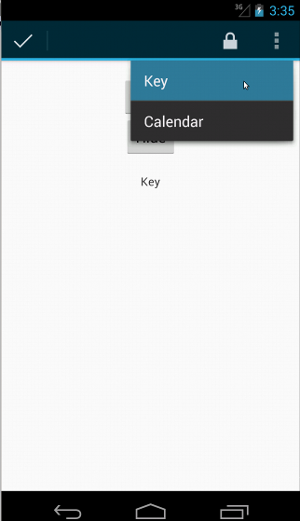
برای نوار اقدام متنی، دوباره بسیار آسان است:
کاتلین
fun testActionModeOverflow() {
    // Show the contextual action bar.
    onView(withId(R.id.show_contextual_action_bar))
        .perform(click())

    // Open the overflow menu from contextual action mode.
    openContextualActionModeOverflowMenu()

    // Click on the item.
    onView(withText("Key"))
        .perform(click())

    // Verify that we have really clicked on the icon by
    // checking the TextView content.
    onView(withId(R.id.text_action_bar_result))
        .check(matches(withText("Key")))
    }
}
جاوا
public void testActionModeOverflow() {
    // Show the contextual action bar.
    onView(withId(R.id.show_contextual_action_bar))
        .perform(click());

    // Open the overflow menu from contextual action mode.
    openContextualActionModeOverflowMenu();

    // Click on the item.
    onView(withText("Key"))
        .perform(click());

    // Verify that we have really clicked on the icon by
    // checking the TextView content.
    onView(withId(R.id.text_action_bar_result))
        .check(matches(withText("Key")));
    }
}
برای مشاهده کد کامل این نمونه ها، نمونه ActionBarTest.java را در GitHub مشاهده کنید.
تاکید کنید که یک نما نمایش داده نمی شود
پس از انجام یک سری اقدامات، مطمئناً می خواهید وضعیت رابط کاربری تحت آزمایش را تأیید کنید. گاهی اوقات، این ممکن است یک مورد منفی باشد، مانند زمانی که چیزی اتفاق نمی افتد. به خاطر داشته باشید که با استفاده از ViewAssertions.matches() می توانید هر تطبیق نمای hamcrest را به ViewAssertion تبدیل کنید.
در مثال زیر، تطبیق isDisplayed() را می گیریم و با استفاده از تطبیق استاندارد not() آن را معکوس می کنیم:
کاتلین
import androidx.test.espresso.Espresso.onView
import androidx.test.espresso.assertion.ViewAssertions.matches
import androidx.test.espresso.matcher.ViewMatchers.isDisplayed
import androidx.test.espresso.matcher.ViewMatchers.withId
import org.hamcrest.Matchers.not

onView(withId(R.id.bottom_left))
    .check(matches(not(isDisplayed())))
جاوا
import static androidx.test.espresso.Espresso.onView;
import static androidx.test.espresso.assertion.ViewAssertions.matches;
import static androidx.test.espresso.matcher.ViewMatchers.isDisplayed;
import static androidx.test.espresso.matcher.ViewMatchers.withId;
import static org.hamcrest.Matchers.not;

onView(withId(R.id.bottom_left))
    .check(matches(not(isDisplayed())));
رویکرد بالا در صورتی کار می کند که نما همچنان بخشی از سلسله مراتب باشد. اگر اینطور نیست، یک NoMatchingViewException دریافت خواهید کرد و باید از ViewAssertions.doesNotExist() استفاده کنید.
ادعا کنید که دیدگاهی وجود ندارد
اگر نما از سلسله مراتب view حذف شده باشد - که ممکن است زمانی اتفاق بیفتد که یک عمل باعث انتقال به فعالیت دیگری شود - باید از ViewAssertions.doesNotExist() استفاده کنید:
کاتلین
import androidx.test.espresso.Espresso.onView
import androidx.test.espresso.assertion.ViewAssertions.doesNotExist
import androidx.test.espresso.matcher.ViewMatchers.withId

onView(withId(R.id.bottom_left))
    .check(doesNotExist())
جاوا
import static androidx.test.espresso.Espresso.onView;
import static androidx.test.espresso.assertion.ViewAssertions.doesNotExist;
import static androidx.test.espresso.matcher.ViewMatchers.withId;

onView(withId(R.id.bottom_left))
    .check(doesNotExist());
ادعا کنید که یک آیتم داده در آداپتور نیست
برای اینکه ثابت کنید یک آیتم داده خاص در AdapterView نیست، باید کارها را کمی متفاوت انجام دهید. ما باید AdapterView مورد علاقه خود را پیدا کنیم و از داده هایی که در آن نگهداری می شود، تحقیق کنیم. ما نیازی به استفاده از onData() نداریم. در عوض، onView() برای یافتن AdapterView استفاده می کنیم و سپس از تطبیق دیگری برای کار روی داده های داخل view استفاده می کنیم.
ابتدا همسان:
کاتلین
private fun withAdaptedData(dataMatcher: Matcher<Any>): Matcher<View> {
    return object : TypeSafeMatcher<View>() {

        override fun describeTo(description: Description) {
            description.appendText("with class name: ")
            dataMatcher.describeTo(description)
        }

        public override fun matchesSafely(view: View) : Boolean {
            if (view !is AdapterView<*>) {
                return false
            }

            val adapter = view.adapter
            for (i in 0 until adapter.count) {
                if (dataMatcher.matches(adapter.getItem(i))) {
                    return true
                }
            }

            return false
        }
    }
}
جاوا
private static Matcher<View> withAdaptedData(final Matcher<Object> dataMatcher) {
    return new TypeSafeMatcher<View>() {

        @Override
        public void describeTo(Description description) {
            description.appendText("with class name: ");
            dataMatcher.describeTo(description);
        }

        @Override
        public boolean matchesSafely(View view) {
            if (!(view instanceof AdapterView)) {
                return false;
            }

            @SuppressWarnings("rawtypes")
            Adapter adapter = ((AdapterView) view).getAdapter();
            for (int i = 0; i < adapter.getCount(); i++) {
                if (dataMatcher.matches(adapter.getItem(i))) {
                    return true;
                }
            }

            return false;
        }
    };
}
سپس تنها چیزی که نیاز داریم onView() است تا AdapterView پیدا کنیم:
کاتلین
fun testDataItemNotInAdapter() {
    onView(withId(R.id.list))
          .check(matches(not(withAdaptedData(withItemContent("item: 168")))))
    }
}
جاوا
@SuppressWarnings("unchecked")
public void testDataItemNotInAdapter() {
    onView(withId(R.id.list))
          .check(matches(not(withAdaptedData(withItemContent("item: 168")))));
    }
}
و ما ادعایی داریم که اگر آیتمی برابر با "اقلام: 168" در نمای آداپتور با لیست ID وجود داشته باشد، ناموفق خواهد بود.
برای نمونه کامل، به متد testDataItemNotInAdapter() در کلاس AdapterViewTest.java در GitHub نگاه کنید.
از یک کنترل کننده شکست سفارشی استفاده کنید
جایگزینی FailureHandler پیشفرض در اسپرسو با یک مورد سفارشی، امکان رسیدگی به خطاهای اضافی یا متفاوت را فراهم میکند، مانند گرفتن عکس از صفحه یا ارسال اطلاعات بیشتر در مورد اشکالزدایی.
مثال CustomFailureHandlerTest نحوه پیاده سازی یک کنترل کننده شکست سفارشی را نشان می دهد:
کاتلین
private class CustomFailureHandler(targetContext: Context) : FailureHandler {
    private val delegate: FailureHandler

    init {
        delegate = DefaultFailureHandler(targetContext)
    }

    override fun handle(error: Throwable, viewMatcher: Matcher<View>) {
        try {
            delegate.handle(error, viewMatcher)
        } catch (e: NoMatchingViewException) {
            throw MySpecialException(e)
        }

    }
}
جاوا
private static class CustomFailureHandler implements FailureHandler {
    private final FailureHandler delegate;

    public CustomFailureHandler(Context targetContext) {
        delegate = new DefaultFailureHandler(targetContext);
    }

    @Override
    public void handle(Throwable error, Matcher<View> viewMatcher) {
        try {
            delegate.handle(error, viewMatcher);
        } catch (NoMatchingViewException e) {
            throw new MySpecialException(e);
        }
    }
}
این کنترل کننده خرابی یک MySpecialException را به جای NoMatchingViewException پرتاب می کند و همه خرابی های دیگر را به DefaultFailureHandler محول می کند. CustomFailureHandler می توان با اسپرسو در روش setUp() تست ثبت کرد:
کاتلین
@Throws(Exception::class)
override fun setUp() {
    super.setUp()
    getActivity()
    setFailureHandler(CustomFailureHandler(
            ApplicationProvider.getApplicationContext<Context>()))
}
جاوا
@Override
public void setUp() throws Exception {
    super.setUp();
    getActivity();
    setFailureHandler(new CustomFailureHandler(
            ApplicationProvider.getApplicationContext()));
}
برای اطلاعات بیشتر، به رابط FailureHandler و Espresso.setFailureHandler() مراجعه کنید.
ویندوزهای غیر پیش فرض را هدف قرار دهید
اندروید از چندین ویندوز پشتیبانی می کند. به طور معمول، این برای کاربران و توسعهدهنده برنامه شفاف است، اما در موارد خاص، چندین پنجره قابل مشاهده است، مانند زمانی که یک پنجره تکمیل خودکار بر روی پنجره اصلی برنامه در ویجت جستجو کشیده میشود. برای سادهتر کردن کارها، اسپرسو بهطور پیشفرض از یک اکتشافی برای حدس زدن Window که قصد تعامل با آن را دارید استفاده میکند. این اکتشافی تقریباً همیشه به اندازه کافی خوب است. با این حال، در موارد نادر، باید مشخص کنید که یک تعامل باید کدام پنجره را هدف قرار دهد. شما می توانید این کار را با ارائه تطبیق پنجره ریشه یا Root matcher خود انجام دهید:
کاتلین
onView(withText("South China Sea"))
    .inRoot(withDecorView(not(`is`(getActivity().getWindow().getDecorView()))))
    .perform(click())
جاوا
onView(withText("South China Sea"))
    .inRoot(withDecorView(not(is(getActivity().getWindow().getDecorView()))))
    .perform(click());
همانطور که در مورد ViewMatchers است، ما مجموعه ای از RootMatchers از قبل ارائه شده را ارائه می دهیم. البته، همیشه می توانید شی Matcher خود را پیاده سازی کنید.
به نمونه MultipleWindowTest در GitHub نگاهی بیندازید.
یک سرصفحه یا پاورقی را در نمای فهرستی مطابقت دهید
هدرها و پاورقی ها با استفاده از متدهای addHeaderView() و addFooterView() به ListViews اضافه می شوند. برای اطمینان از اینکه Espresso.onData() می داند با چه شی داده ای مطابقت دارد، مطمئن شوید که یک مقدار آبجکت داده از پیش تعیین شده را به عنوان پارامتر دوم به addHeaderView() و addFooterView() ارسال کنید. به عنوان مثال:
کاتلین
const val FOOTER = "FOOTER"
...
val footerView = layoutInflater.inflate(R.layout.list_item, listView, false)
footerView.findViewById<TextView>(R.id.item_content).text = "count:"
footerView.findViewById<TextView>(R.id.item_size).text
        = data.size.toString
listView.addFooterView(footerView, FOOTER, true)
جاوا
public static final String FOOTER = "FOOTER";
...
View footerView = layoutInflater.inflate(R.layout.list_item, listView, false);
footerView.findViewById<TextView>(R.id.item_content).setText("count:");
footerView.findViewById<TextView>(R.id.item_size).setText(String.valueOf(data.size()));
listView.addFooterView(footerView, FOOTER, true);
سپس، می توانید یک تطبیق برای پاورقی بنویسید:
کاتلین
import org.hamcrest.Matchers.allOf
import org.hamcrest.Matchers.instanceOf
import org.hamcrest.Matchers.`is`

fun isFooter(): Matcher<Any> {
    return allOf(`is`(instanceOf(String::class.java)),
            `is`(LongListActivity.FOOTER))
}
جاوا
import static org.hamcrest.Matchers.allOf;
import static org.hamcrest.Matchers.instanceOf;
import static org.hamcrest.Matchers.is;

@SuppressWarnings("unchecked")
public static Matcher<Object> isFooter() {
    return allOf(is(instanceOf(String.class)), is(LongListActivity.FOOTER));
}
و بارگیری نمای در یک آزمایش بی اهمیت است:
کاتلین
import androidx.test.espresso.Espresso.onData
import androidx.test.espresso.action.ViewActions.click
import androidx.test.espresso.sample.LongListMatchers.isFooter

fun testClickFooter() {
    onData(isFooter())
        .perform(click())

    // ...
}
جاوا
import static androidx.test.espresso.Espresso.onData;
import static androidx.test.espresso.action.ViewActions.click;
import static androidx.test.espresso.sample.LongListMatchers.isFooter;

public void testClickFooter() {
    onData(isFooter())
        .perform(click());

    // ...
}
به نمونه کد کامل که در متد testClickFooter() AdapterViewTest.java در GitHub یافت می شود نگاهی بیندازید.