
मैन्युअल डिपेंडेंसी इंजेक्शन या सेवा आपके Android ऐप्लिकेशन में लोकेटर की वजह से समस्याएं हो सकती हैं. यह समस्या इस बात पर निर्भर करती है कि आपके ऐप्लिकेशन का साइज़ प्रोजेक्ट. प्रोजेक्ट की जटिलता को सीमित किया जा सकता है, क्योंकि यह डिपेंडेंसी मैनेज करने के लिए डैगर.
डैगर अपने-आप ऐसा कोड जनरेट करता है जो आपके कोड की नकल करता है हाथ से लिखे होते हैं. कोड कंपाइल करते समय जनरेट होने की वजह से, इसका पता लगाया जा सकता है ये रिफ़्लेक्शन पर आधारित अन्य समाधानों की तुलना में बेहतर परफ़ॉर्म करते हैं, जैसे कि गुआस.
डैगर इस्तेमाल करने के फ़ायदे
डैगर आपको इन तरीकों का इस्तेमाल करके, उबाऊ और गड़बड़ी वाले बॉयलरप्लेट कोड लिखने से बचाता है:
मैन्युअल तरीके से
AppContainerकोड (ऐप्लिकेशन ग्राफ़) जनरेट किया जा रहा है मैन्युअल डीआई सेक्शन में लागू किया गया है.ऐप्लिकेशन ग्राफ़ में उपलब्ध क्लास के लिए फ़ैक्ट्री बनाना. यह डिपेंडेंसी आंतरिक रूप से कैसे पूरी होती है.
तय करना कि किसी डिपेंडेंसी का फिर से इस्तेमाल करना है या इसके ज़रिए नया इंस्टेंस बनाना है स्कोप का इस्तेमाल करना.
खास फ़्लो के लिए कंटेनर बनाना, जैसा कि आपने पिछले सेक्शन में, डैगर सबकॉम्पोनेंट का इस्तेमाल करते हैं. इससे आपके ऐप्लिकेशन के परफ़ॉर्मेंस को बेहतर बनाने के लिए, मेमोरी में मौजूद ऑब्जेक्ट को ज़रूरत पड़ने पर छोड़ दिया जाता है.
डैगर बिल्ड टाइम में ये सभी अपने-आप तब तक करता है, जब तक आप किसी क्लास की डिपेंडेंसी के बारे में बताता है. साथ ही, इसका इस्तेमाल करके उन्हें संतुष्ट करने का तरीका बताता है एनोटेशन. डैगर, आपके लिखे कोड से मिलता-जुलता कोड जनरेट करता है मैन्युअल रूप से. अंदरूनी रूप से, डैगर उन ऑब्जेक्ट का ग्राफ़ बनाता है जिनका रेफ़रंस दिया जा सकता है का इस्तेमाल करें. ग्राफ़ में मौजूद हर क्लास के लिए, डैगर एक फ़ैक्ट्री-टाइप क्लास जनरेट करता है, जिसका वह इस्तेमाल करता है उस प्रकार के इंस्टेंस पाने के लिए.
बिल्ड के समय, डैगर आपके कोड की जानकारी देते हैं और:
डिपेंडेंसी ग्राफ़ बनाता और उसकी पुष्टि करता है. इससे यह पक्का किया जाता है कि:
- हर ऑब्जेक्ट की डिपेंडेंसी पूरी की जा सकती है, इसलिए कोई रनटाइम नहीं होता अपवाद.
- कोई डिपेंडेंसी साइकल मौजूद नहीं है. इसलिए, कोई अनंत लूप नहीं है.
यह उन क्लास को जनरेट करता है जिनका इस्तेमाल रनटाइम के दौरान, असल ऑब्जेक्ट और उनकी डिपेंडेंसी बनाने के लिए किया जाता है.
डैगर में इस्तेमाल का एक आसान उदाहरण: फ़ैक्ट्री बनाना
यह दिखाने के लिए कि डैगर के साथ कैसे काम किया जा सकता है, चलिए एक आसान तरीका बनाते हैं
फ़ैक्ट्री, UserRepository क्लास के लिए
नीचे दिया गया डायग्राम:
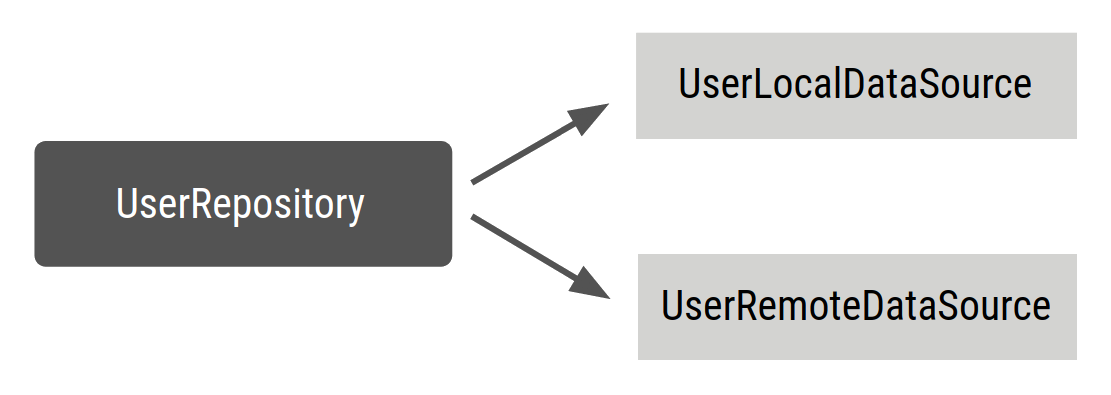
UserRepository को इस तरह परिभाषित करें:
Kotlin
class UserRepository(
    private val localDataSource: UserLocalDataSource,
    private val remoteDataSource: UserRemoteDataSource
) { ... }
Java
public class UserRepository {

    private final UserLocalDataSource userLocalDataSource;
    private final UserRemoteDataSource userRemoteDataSource;

    public UserRepository(UserLocalDataSource userLocalDataSource, UserRemoteDataSource userRemoteDataSource) {
        this.userLocalDataSource = userLocalDataSource;
        this.userRemoteDataSource = userRemoteDataSource;
    }

    ...
}
UserRepository कंस्ट्रक्टर में @Inject एनोटेशन जोड़ें, ताकि डैगर को पता चल सके
UserRepository बनाने का तरीका:
Kotlin
// @Inject lets Dagger know how to create instances of this object
class UserRepository @Inject constructor(
    private val localDataSource: UserLocalDataSource,
    private val remoteDataSource: UserRemoteDataSource
) { ... }
Java
public class UserRepository {

    private final UserLocalDataSource userLocalDataSource;
    private final UserRemoteDataSource userRemoteDataSource;

    // @Inject lets Dagger know how to create instances of this object
    @Inject
    public UserRepository(UserLocalDataSource userLocalDataSource, UserRemoteDataSource userRemoteDataSource) {
        this.userLocalDataSource = userLocalDataSource;
        this.userRemoteDataSource = userRemoteDataSource;
    }
}
कोड के ऊपर दिए गए स्निपेट में, आप डैगर को बता रहे हैं:
जानकारी देने वाले
@Injectके साथUserRepositoryइंस्टेंस बनाने का तरीका कंस्ट्रक्टर है.इसकी डिपेंडेंसी क्या हैं:
UserLocalDataSourceऔरUserRemoteDataSource.
अब डैगर को UserRepository का इंस्टेंस बनाने का तरीका पता है, लेकिन यह नहीं है
डिपेंडेंसी बनाने का तरीका जानना. अगर आपने अन्य क्लास के बारे में भी जानकारी दी है,
डैगर जानता है कि उन्हें कैसे बनाना है:
Kotlin
// @Inject lets Dagger know how to create instances of these objects
class UserLocalDataSource @Inject constructor() { ... }
class UserRemoteDataSource @Inject constructor() { ... }
Java
public class UserLocalDataSource {
    @Inject
    public UserLocalDataSource() { }
}

public class UserRemoteDataSource {
    @Inject
    public UserRemoteDataSource() { }
}
डैगर घटक
डैगर आपके प्रोजेक्ट की डिपेंडेंसी का ऐसा ग्राफ़ बना सकता है जो
का इस्तेमाल करके पता लगाया जा सकता है कि ज़रूरत पड़ने पर ये डिपेंडेंसी कहां मिलनी चाहिए.
डैगर को ऐसा करने के लिए, आपको एक इंटरफ़ेस बनाना होगा और
@Component. डैगर एक कंटेनर बनाता है, जैसा कि आप मैन्युअल
डिपेंडेंसी इंजेक्शन.
@Component इंटरफ़ेस में, उन फ़ंक्शन को तय किया जा सकता है जो रिटर्न करते हैं
आपकी ज़रूरत की क्लास के इंस्टेंस (जैसे, UserRepository). @Component बताता है कि
डैगर की मदद से एक ऐसा कंटेनर जनरेट करें जिसमें, इस एपीआई को पूरा करने के लिए ज़रूरी सभी डिपेंडेंसी
दिखाती है. इसे डैगर कॉम्पोनेंट कहा जाता है; इसमें शामिल है
ऐसा ग्राफ़ जिसमें वे ऑब्जेक्ट हों जिन्हें डैगर जानता है कि
उपलब्ध कराने और उनसे जुड़ी डिपेंडेंसी.
Kotlin
// @Component makes Dagger create a graph of dependencies
@Component
interface ApplicationGraph {
    // The return type  of functions inside the component interface is
    // what can be provided from the container
    fun repository(): UserRepository
}
Java
// @Component makes Dagger create a graph of dependencies
@Component
public interface ApplicationGraph {
    // The return type  of functions inside the component interface is
    // what can be consumed from the graph
    UserRepository userRepository();
}
जब आप प्रोजेक्ट बनाते हैं, तो डैगर
आपके लिए ApplicationGraph इंटरफ़ेस: DaggerApplicationGraph. अपने
एनोटेशन प्रोसेसर, डैगर एक डिपेंडेंसी ग्राफ़ बनाता है जिसमें
तीन क्लास (UserRepository,
UserLocalDatasource, और UserRemoteDataSource) में सिर्फ़ एक एंट्री पॉइंट है:
UserRepository इंस्टेंस मिल रहा है. इसका इस्तेमाल इस तरह किया जा सकता है:
Kotlin
// Create an instance of the application graph
val applicationGraph: ApplicationGraph = DaggerApplicationGraph.create()
// Grab an instance of UserRepository from the application graph
val userRepository: UserRepository = applicationGraph.repository()
Java
// Create an instance of the application graph
ApplicationGraph applicationGraph = DaggerApplicationGraph.create();

// Grab an instance of UserRepository from the application graph
UserRepository userRepository = applicationGraph.userRepository();
हर बार अनुरोध किए जाने पर डैगर, UserRepository का एक नया इंस्टेंस बनाता है.
Kotlin
val applicationGraph: ApplicationGraph = DaggerApplicationGraph.create()

val userRepository: UserRepository = applicationGraph.repository()
val userRepository2: UserRepository = applicationGraph.repository()

assert(userRepository != userRepository2)
Java
ApplicationGraph applicationGraph = DaggerApplicationGraph.create();

UserRepository userRepository = applicationGraph.userRepository();
UserRepository userRepository2 = applicationGraph.userRepository();

assert(userRepository != userRepository2)
कभी-कभी, आपको कंटेनर में डिपेंडेंसी का एक यूनीक इंस्टेंस रखना पड़ता है. ऐसा इन वजहों से हो सकता है:
आपको डिपेंडेंसी के तौर पर इस टाइप की और भी वैल्यू को शेयर करना है उदाहरण, लॉगिन फ़्लो में उसी का इस्तेमाल करके एक से ज़्यादा
ViewModelऑब्जेक्टLoginUserData.एक ऑब्जेक्ट बनाना महंगा है और आपको नई चीज़ नहीं बनानी है इंस्टेंस हर बार इसे डिपेंडेंसी के रूप में घोषित किया जाता है (उदाहरण के लिए, JSON पार्सर).
इस उदाहरण में, हो सकता है कि आप UserRepository का एक यूनीक इंस्टेंस रखना चाहें
यह ग्राफ़ में उपलब्ध है, ताकि जब भी आप UserRepository मांगें, तब आप
हमेशा एक ही इंस्टेंस मिलता है. यह आपके उदाहरण में उपयोगी है, क्योंकि
ज़्यादा जटिल ऐप्लिकेशन ग्राफ़ वाला रीयल-लाइफ़ ऐप्लिकेशन, जिसमें आपको
UserRepository के आधार पर एक से ज़्यादा ViewModel ऑब्जेक्ट हैं, जो आपको नहीं चाहिए
UserLocalDataSource और UserRemoteDataSource के नए इंस्टेंस बनाने के लिए
हर बार UserRepository देने की ज़रूरत होती है.
मैन्युअल डिपेंडेंसी इंजेक्शन में, इसे पास करके ऐसा किया जाता है
UserRepository का इंस्टेंस, ViewModel क्लास के कंस्ट्रक्टर के लिए; लेकिन
डैगर में नहीं लिखा है, क्योंकि आप उस कोड को मैन्युअल रूप से नहीं लिख रहे हैं, तो आपको
डैगर जानते हैं कि आपको उसी इंस्टेंस का इस्तेमाल करना है. ऐसा स्कोप की मदद से किया जा सकता है
एनोटेशन.
डैगर के साथ स्कोप करना
स्कोप एनोटेशन का इस्तेमाल करके, किसी ऑब्जेक्ट की लाइफ़टाइम गतिविधि को सीमित किया जा सकता है उसके कॉम्पोनेंट के लिए इस्तेमाल होता है. इसका मतलब है कि डिपेंडेंसी के उसी इंस्टेंस का इस्तेमाल किया गया है को हर बार टाइप करना होगा.
डेटा स्टोर करने की जगह का अनुरोध करने पर, UserRepository का यूनीक इंस्टेंस पाने के लिए
ApplicationGraph में, @Component के लिए उसी स्कोप एनोटेशन का इस्तेमाल करें
इंटरफ़ेस और UserRepository. @Singleton एनोटेशन का इस्तेमाल किया जा सकता है
पहले से ही javax.inject पैकेज के साथ आता है जिसका उपयोग डैगर करता है:
Kotlin
// Scope annotations on a @Component interface informs Dagger that classes annotated
// with this annotation (i.e. @Singleton) are bound to the life of the graph and so
// the same instance of that type is provided every time the type is requested.
@Singleton
@Component
interface ApplicationGraph {
    fun repository(): UserRepository
}

// Scope this class to a component using @Singleton scope (i.e. ApplicationGraph)
@Singleton
class UserRepository @Inject constructor(
    private val localDataSource: UserLocalDataSource,
    private val remoteDataSource: UserRemoteDataSource
) { ... }
Java
// Scope annotations on a @Component interface informs Dagger that classes annotated
// with this annotation (i.e. @Singleton) are scoped to the graph and the same
// instance of that type is provided every time the type is requested.
@Singleton
@Component
public interface ApplicationGraph {
    UserRepository userRepository();
}

// Scope this class to a component using @Singleton scope (i.e. ApplicationGraph)
@Singleton
public class UserRepository {

    private final UserLocalDataSource userLocalDataSource;
    private final UserRemoteDataSource userRemoteDataSource;

    @Inject
    public UserRepository(UserLocalDataSource userLocalDataSource, UserRemoteDataSource userRemoteDataSource) {
        this.userLocalDataSource = userLocalDataSource;
        this.userRemoteDataSource = userRemoteDataSource;
    }
}
इसके अलावा, आपके पास कस्टम स्कोप एनोटेशन को बनाने और उसका इस्तेमाल करने का विकल्प भी है. स्कोप की जानकारी देने के लिए, यह तरीका अपनाएं:
Kotlin
// Creates MyCustomScope
@Scope
@MustBeDocumented
@Retention(value = AnnotationRetention.RUNTIME)
annotation class MyCustomScope
Java
// Creates MyCustomScope
@Scope
@Retention(RetentionPolicy.RUNTIME)
public @interface MyCustomScope {}
इसके बाद, इसे पहले की तरह इस्तेमाल किया जा सकता है:
Kotlin
@MyCustomScope
@Component
interface ApplicationGraph {
    fun repository(): UserRepository
}

@MyCustomScope
class UserRepository @Inject constructor(
    private val localDataSource: UserLocalDataSource,
    private val service: UserService
) { ... }
Java
@MyCustomScope
@Component
public interface ApplicationGraph {
    UserRepository userRepository();
}

@MyCustomScope
public class UserRepository {

    private final UserLocalDataSource userLocalDataSource;
    private final UserRemoteDataSource userRemoteDataSource;

    @Inject
    public UserRepository(UserLocalDataSource userLocalDataSource, UserRemoteDataSource userRemoteDataSource) {
        this.userLocalDataSource = userLocalDataSource;
        this.userRemoteDataSource = userRemoteDataSource;
    }
}
दोनों मामलों में, ऑब्जेक्ट को एक ही स्कोप के साथ दिया जाता है. इसका इस्तेमाल,
@Component इंटरफ़ेस. इसलिए, हर बार कॉल करने पर
applicationGraph.repository(), आपको
UserRepository.
Kotlin
val applicationGraph: ApplicationGraph = DaggerApplicationGraph.create()

val userRepository: UserRepository = applicationGraph.repository()
val userRepository2: UserRepository = applicationGraph.repository()

assert(userRepository == userRepository2)
Java
ApplicationGraph applicationGraph = DaggerApplicationGraph.create();

UserRepository userRepository = applicationGraph.userRepository();
UserRepository userRepository2 = applicationGraph.userRepository();

assert(userRepository == userRepository2)
नतीजा
डैगर के फ़ायदे और इसके काम करने के तरीके की बुनियादी बातों के बारे में जानना ज़रूरी है इससे पहले कि आप उसका इस्तेमाल ज़्यादा जटिल परिस्थितियों में कर पाएं.
अगले पेज पर, आपको Android ऐप्लिकेशन में डैगर को जोड़ने का तरीका बताया जाएगा.