

ระบบบิลด์ของ Android จะคอมไพล์ทรัพยากรและซอร์สโค้ดของแอป แล้วรวมเป็น APK หรือ Android App Bundle ที่คุณสามารถทดสอบ ติดตั้งใช้งาน ลงนาม และเผยแพร่ได้
ในภาพรวมของบิลด์ Gradle และโครงสร้างบิลด์ Android เราได้พูดถึงแนวคิดของบิลด์และโครงสร้างของแอป Android ไปแล้ว ตอนนี้ก็ถึงเวลากำหนดค่าบิลด์
อภิธานศัพท์เกี่ยวกับบิลด์ของ Android
Gradle และปลั๊กอิน Android Gradle ช่วยคุณกำหนดค่าด้านต่อไปนี้ของบิลด์
- ประเภทบิลด์
-
ประเภทบิลด์จะกำหนดพร็อพเพอร์ตี้บางอย่างที่ Gradle ใช้เมื่อสร้างและแพ็กเกจแอป โดยปกติแล้ว ประเภทบิลด์จะได้รับการกำหนดค่าสำหรับขั้นตอนต่างๆ ของวงจรการพัฒนา
เช่น ประเภทบิลด์การแก้ไขข้อบกพร่องจะเปิดใช้ตัวเลือกการแก้ไขข้อบกพร่องและรับรองแอปด้วยคีย์การแก้ไขข้อบกพร่อง ส่วนประเภทบิลด์ที่เผยแพร่อาจลดขนาด สร้างความสับสน และรับรองแอปด้วยคีย์ที่เผยแพร่สำหรับการจัดจำหน่าย
คุณต้องกำหนดประเภทบิลด์อย่างน้อย 1 ประเภทเพื่อสร้างแอป โดย Android Studio จะสร้างประเภทบิลด์สำหรับการแก้ไขข้อบกพร่องและบิลด์ที่เผยแพร่โดยค่าเริ่มต้น หากต้องการเริ่มปรับแต่งการตั้งค่าแพ็กเกจสำหรับแอป ให้ดูวิธีกำหนดค่าประเภทบิลด์
- เวอร์ชันผลิตภัณฑ์
- เวอร์ชันผลิตภัณฑ์แสดงถึงแอปเวอร์ชันต่างๆ ที่คุณสามารถเผยแพร่ให้ผู้ใช้ได้ เช่น เวอร์ชันฟรีและเวอร์ชันที่ต้องซื้อ คุณสามารถปรับแต่งเวอร์ชันผลิตภัณฑ์เพื่อใช้โค้ดและทรัพยากรที่แตกต่างกันขณะแชร์และนำส่วนที่เหมือนกันในแอปทุกเวอร์ชันมาใช้ซ้ำ เวอร์ชันผลิตภัณฑ์เป็นตัวเลือกที่ไม่บังคับ และคุณต้องสร้างด้วยตนเอง หากต้องการเริ่มสร้างแอปเวอร์ชันต่างๆ ให้ดูวิธีกำหนดค่าเวอร์ชันผลิตภัณฑ์
- ตัวแปรบิลด์
- ตัวแปรบิลด์คือผลคูณไขว้ของประเภทบิลด์และเวอร์ชันผลิตภัณฑ์ และเป็นการกำหนดค่าที่ Gradle ใช้เพื่อสร้างแอป เมื่อใช้ตัวแปรบิลด์ คุณจะสามารถสร้างเวอร์ชันแก้ไขข้อบกพร่องของเวอร์ชันผลิตภัณฑ์ในระหว่างการพัฒนาและเวอร์ชันที่เผยแพร่ที่มีการรับรองของเวอร์ชันผลิตภัณฑ์สำหรับการเผยแพร่ได้ แม้ว่าคุณจะไม่ได้กำหนดค่าตัวแปรบิลด์โดยตรง แต่คุณกำหนดค่าประเภทบิลด์และเวอร์ชันผลิตภัณฑ์ที่ประกอบกันเป็นตัวแปรบิลด์ การสร้างประเภทบิลด์หรือเวอร์ชันผลิตภัณฑ์เพิ่มเติมจะสร้างตัวแปรบิลด์เพิ่มเติมด้วย หากต้องการดูวิธีสร้างและจัดการตัวแปรบิลด์ โปรดอ่านภาพรวมกำหนดค่าตัวแปรบิลด์
- รายการไฟล์ Manifest
- คุณสามารถระบุค่าสำหรับพร็อพเพอร์ตี้บางอย่างของไฟล์ Manifest ในการกำหนดค่าตัวแปรบิลด์ได้ ค่าบิลด์เหล่านี้จะลบล้างค่าที่มีอยู่ในไฟล์ Manifest ซึ่งจะมีประโยชน์หากคุณต้องการสร้างตัวแปรหลายรายการของแอปที่มีชื่อแอปพลิเคชัน, เวอร์ชัน SDK ขั้นต่ำ หรือเวอร์ชัน SDK เป้าหมายที่แตกต่างกัน เมื่อมีไฟล์ Manifest หลายไฟล์ เครื่องมือผสานไฟล์ Manifest จะผสานการตั้งค่าไฟล์ Manifest
- ทรัพยากร Dependency
- ระบบบิลด์จะจัดการทรัพยากร Dependency ของโปรเจ็กต์จากระบบไฟล์ในเครื่องและจากที่เก็บระยะไกล ซึ่งหมายความว่าคุณไม่จำเป็นต้องค้นหา ดาวน์โหลด และคัดลอกแพ็กเกจไบนารีของทรัพยากร Dependency ไปยังไดเรกทอรีโปรเจ็กต์ด้วยตนเอง ดูข้อมูลเพิ่มเติมได้ที่เพิ่มทรัพยากร Dependency ของบิลด์
- การใช้ภาษามือ
- ระบบบิลด์ช่วยให้คุณระบุการตั้งค่าการรับรองในการกำหนดค่าบิลด์ได้ และสามารถรับรองแอปโดยอัตโนมัติในระหว่างกระบวนการบิลด์ ระบบบิลด์จะรับรองเวอร์ชันแก้ไขข้อบกพร่องด้วยคีย์และใบรับรองเริ่มต้นโดยใช้ข้อมูลเข้าสู่ระบบที่รู้จักเพื่อหลีกเลี่ยงการแจ้งให้ป้อนรหัสผ่านเมื่อสร้าง ระบบบิลด์จะไม่ลงนามในเวอร์ชันที่เผยแพร่ เว้นแต่คุณจะกำหนดการกำหนดค่าการลงชื่อสำหรับบิลด์นี้อย่างชัดเจน หากไม่มีคีย์การเผยแพร่ คุณสามารถสร้างคีย์ได้ตามที่อธิบายไว้ในรับรองแอป คุณต้องมีบิลด์ที่เผยแพร่ที่รับรองแล้วเพื่อจัดจำหน่ายแอปผ่าน App Store ส่วนใหญ่
- การลดขนาดโค้ดและทรัพยากร
- ระบบบิลด์ช่วยให้คุณระบุไฟล์กฎ ProGuard ที่แตกต่างกันสำหรับตัวแปรบิลด์แต่ละรายการได้ เมื่อสร้างแอป ระบบบิลด์จะใช้ชุดกฎที่เหมาะสมเพื่อลดขนาดโค้ดและทรัพยากรโดยใช้เครื่องมือลดขนาดในตัว เช่น R8 การย่อโค้ดและทรัพยากรจะช่วยลดขนาด APK หรือ AAB ได้
- การรองรับ APK หลายรายการ
- ระบบบิลด์ช่วยให้คุณสร้าง APK ต่างๆ โดยอัตโนมัติได้ ซึ่งแต่ละ APK จะมีเฉพาะโค้ดและทรัพยากรที่จำเป็นสำหรับความหนาแน่นของหน้าจอหรืออินเทอร์เฟซแบบไบนารีของแอปพลิเคชัน (ABI) ที่เฉพาะเจาะจง ดูข้อมูลเพิ่มเติมได้ที่ สร้าง APK หลายรายการ อย่างไรก็ตาม เราขอแนะนำให้เผยแพร่ AAB รายการเดียว เนื่องจากจะมีการแยกตามภาษา นอกเหนือจากความหนาแน่นของหน้าจอและ ABI โดยไม่จำเป็นต้องอัปโหลดอาร์ติแฟกต์หลายรายการไปยัง Google Play แอปใหม่ทั้งหมดที่ส่งหลังเดือนสิงหาคม 2021 จะต้องใช้ AAB
เวอร์ชัน Java ในบิลด์ Android
ไม่ว่าซอร์สโค้ดจะเขียนด้วย Java, Kotlin หรือทั้ง 2 ภาษา คุณจะต้องเลือกเวอร์ชัน JDK หรือภาษา Java สำหรับบิลด์ในหลายๆ ที่ ดูรายละเอียดได้ที่เวอร์ชัน Java ในบิลด์ Android
ไฟล์การกำหนดค่าบิลด์
การสร้างการกำหนดค่าบิลด์ที่กำหนดเองกำหนดให้คุณต้องทำการเปลี่ยนแปลงไฟล์การกำหนดค่าบิลด์อย่างน้อย 1 ไฟล์ ไฟล์ข้อความธรรมดาเหล่านี้ใช้ภาษาเฉพาะโดเมน (DSL) เพื่ออธิบายและจัดการตรรกะการสร้างโดยใช้สคริปต์ Kotlin ซึ่งเป็นรูปแบบหนึ่งของภาษา Kotlin นอกจากนี้ คุณยังใช้ Groovy ซึ่งเป็นภาษาแบบไดนามิกสำหรับ Java Virtual Machine (JVM) เพื่อกำหนดค่าบิลด์ได้ด้วย
คุณไม่จำเป็นต้องรู้จักสคริปต์ Kotlin หรือ Groovy เพื่อเริ่มกำหนดค่าบิลด์ เนื่องจากปลั๊กอิน Android Gradle มีองค์ประกอบ DSL ส่วนใหญ่ที่คุณต้องการอยู่แล้ว ดูข้อมูลเพิ่มเติมเกี่ยวกับ DSL ของปลั๊กอิน Android Gradle ได้ที่เอกสารอ้างอิง DSL สคริปต์ Kotlin ยังอาศัย Gradle Kotlin DSL ที่สำคัญด้วย
เมื่อเริ่มโปรเจ็กต์ใหม่ Android Studio จะสร้างไฟล์เหล่านี้บางไฟล์ให้คุณโดยอัตโนมัติ และป้อนข้อมูลในไฟล์ตามค่าเริ่มต้นที่เหมาะสม ดูภาพรวมของไฟล์ที่สร้างขึ้นได้ที่หัวข้อโครงสร้างบิลด์ Android
ไฟล์ Gradle Wrapper
Gradle Wrapper (gradlew) เป็นแอปพลิเคชันขนาดเล็กที่รวมอยู่ในซอร์สโค้ดซึ่งจะดาวน์โหลดและเปิด Gradle เอง
ซึ่งจะช่วยให้การดำเนินการบิลด์มีความสอดคล้องกันมากขึ้น นักพัฒนาแอปดาวน์โหลดแหล่งที่มาของแอปพลิเคชันและเรียกใช้ gradlew ซึ่งจะดาวน์โหลดการกระจาย Gradle ที่จำเป็น และเปิด Gradle เพื่อสร้างแอปพลิเคชัน
ไฟล์ gradle/wrapper/gradle-wrapper.properties มีพร็อพเพอร์ตี้ distributionUrl ซึ่งอธิบายเวอร์ชันของ Gradle ที่ใช้ในการเรียกใช้บิลด์
distributionBase=GRADLE_USER_HOME
distributionPath=wrapper/dists
distributionUrl=https\://services.gradle.org/distributions/gradle-8.0-bin.zip
zipStoreBase=GRADLE_USER_HOME
zipStorePath=wrapper/dists
ไฟล์การตั้งค่า Gradle
ไฟล์ settings.gradle.kts (สำหรับ Kotlin DSL) หรือไฟล์ settings.gradle (สำหรับ Groovy DSL) จะอยู่ในไดเรกทอรีโปรเจ็กต์รูท ไฟล์การตั้งค่านี้จะกำหนดการตั้งค่าที่เก็บระดับโปรเจ็กต์และแจ้งให้ Gradle ทราบว่าควรใส่โมดูลใดเมื่อสร้างแอป โปรเจ็กต์แบบหลายโมดูลต้องระบุแต่ละโมดูลที่ควรอยู่ในบิลด์สุดท้าย
สำหรับโปรเจ็กต์ส่วนใหญ่ ไฟล์จะมีลักษณะดังต่อไปนี้โดยค่าเริ่มต้น
Kotlin
pluginManagement {

    /**
      * The pluginManagement.repositories block configures the
      * repositories Gradle uses to search or download the Gradle plugins and
      * their transitive dependencies. Gradle pre-configures support for remote
      * repositories such as JCenter, Maven Central, and Ivy. You can also use
      * local repositories or define your own remote repositories. Here we
      * define the Gradle Plugin Portal, Google's Maven repository,
      * and the Maven Central Repository as the repositories Gradle should use to look for its
      * dependencies.
      */

    repositories {
        gradlePluginPortal()
        google()
        mavenCentral()
    }
}
dependencyResolutionManagement {

    /**
      * The dependencyResolutionManagement.repositories
      * block is where you configure the repositories and dependencies used by
      * all modules in your project, such as libraries that you are using to
      * create your application. However, you should configure module-specific
      * dependencies in each module-level build.gradle file. For new projects,
      * Android Studio includes Google's Maven repository and the Maven Central
      * Repository by default, but it does not configure any dependencies (unless
      * you select a template that requires some).
      */

  repositoriesMode.set(RepositoriesMode.FAIL_ON_PROJECT_REPOS)
  repositories {
      google()
      mavenCentral()
  }
}
rootProject.name = "My Application"
include(":app")
ดึงดูด
pluginManagement {

    /**
      * The pluginManagement.repositories block configures the
      * repositories Gradle uses to search or download the Gradle plugins and
      * their transitive dependencies. Gradle pre-configures support for remote
      * repositories such as JCenter, Maven Central, and Ivy. You can also use
      * local repositories or define your own remote repositories. Here we
      * define the Gradle Plugin Portal, Google's Maven repository,
      * and the Maven Central Repository as the repositories Gradle should use to look for its
      * dependencies.
      */

    repositories {
        gradlePluginPortal()
        google()
        mavenCentral()
    }
}
dependencyResolutionManagement {

    /**
      * The dependencyResolutionManagement.repositories
      * block is where you configure the repositories and dependencies used by
      * all modules in your project, such as libraries that you are using to
      * create your application. However, you should configure module-specific
      * dependencies in each module-level build.gradle file. For new projects,
      * Android Studio includes Google's Maven repository and the Maven Central
      * Repository by default, but it does not configure any dependencies (unless
      * you select a template that requires some).
      */

    repositoriesMode.set(RepositoriesMode.FAIL_ON_PROJECT_REPOS)
    repositories {
        google()
        mavenCentral()
    }
}
rootProject.name = "My Application"
include ':app'
ไฟล์บิลด์ระดับบนสุด
ไฟล์ build.gradle.kts ระดับบนสุด (สำหรับ Kotlin DSL) หรือไฟล์ build.gradle (สำหรับ Groovy DSL) จะอยู่ในไดเรกทอรีโปรเจ็กต์รูท โดยปกติแล้วจะกำหนดเวอร์ชันทั่วไปของปลั๊กอินที่โมดูลใช้ในโปรเจ็กต์
ตัวอย่างโค้ดต่อไปนี้อธิบายการตั้งค่าเริ่มต้นและองค์ประกอบ DSL ในสคริปต์บิลด์ระดับบนสุดหลังจากสร้างโปรเจ็กต์ใหม่
Kotlin
plugins {

    /**
     * Use `apply false` in the top-level build.gradle file to add a Gradle
     * plugin as a build dependency but not apply it to the current (root)
     * project. Don't use `apply false` in sub-projects. For more information,
     * see Applying external plugins with same version to subprojects.
     */

    id("com.android.application") version "9.4.0" apply false
    id("com.android.library") version "9.4.0" apply false
    id("org.jetbrains.kotlin.android") version "2.4.10" apply false
}
ดึงดูด
plugins {

    /**
     * Use `apply false` in the top-level build.gradle file to add a Gradle
     * plugin as a build dependency but not apply it to the current (root)
     * project. Don't use `apply false` in sub-projects. For more information,
     * see Applying external plugins with same version to subprojects.
     */

    id 'com.android.application' version '9.4.0' apply false
    id 'com.android.library' version '9.4.0' apply false
    id 'org.jetbrains.kotlin.android' version '2.4.10' apply false
}
ไฟล์บิลด์ระดับโมดูล
ไฟล์ build.gradle.kts ระดับโมดูล (สำหรับ Kotlin DSL) หรือไฟล์ build.gradle (สำหรับ Groovy DSL) จะอยู่ในไดเรกทอรี project/module/ แต่ละรายการ ซึ่งช่วยให้คุณกำหนดการตั้งค่าบิลด์สำหรับโมดูลที่เฉพาะเจาะจงที่ไฟล์นั้นอยู่ได้ การกำหนดค่าการตั้งค่าบิลด์เหล่านี้ช่วยให้คุณมีตัวเลือกแพ็กเกจที่กำหนดเอง เช่น ประเภทบิลด์และเวอร์ชันผลิตภัณฑ์เพิ่มเติม รวมถึงลบล้างการตั้งค่าในไฟล์ Manifest ของแอป main/ หรือสคริปต์บิลด์ระดับบนสุด
การตั้งค่า Android SDK
ไฟล์บิลด์ระดับโมดูลสำหรับแอปพลิเคชันของคุณมีการตั้งค่าที่ระบุเวอร์ชัน Android SDK ที่ใช้เมื่อคอมไพล์ การเลือกพฤติกรรมของแพลตฟอร์ม และการระบุเวอร์ชันขั้นต่ำที่แอปพลิเคชันของคุณทำงานได้
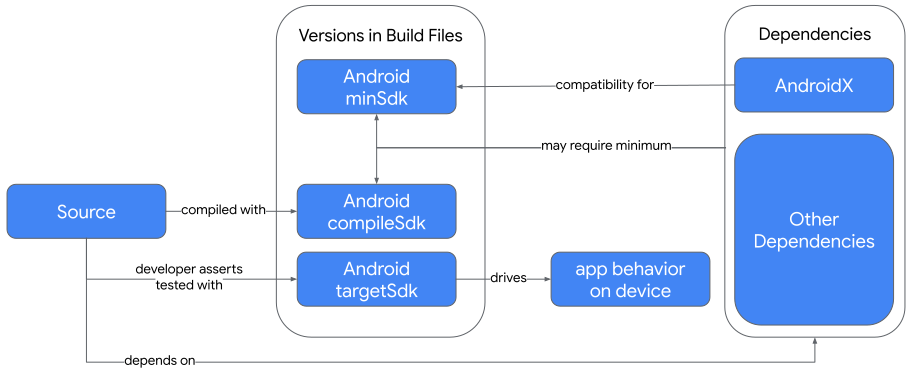
-
compileSdk -
compileSdkจะกำหนดว่า API ของ Android และ Java ใดบ้างที่ใช้ได้เมื่อคอมไพล์ซอร์สโค้ด หากต้องการใช้ฟีเจอร์ล่าสุดของ Android ให้ใช้ Android SDK เวอร์ชันล่าสุดเมื่อคอมไพล์API ของแพลตฟอร์ม Android บางรายการอาจไม่พร้อมใช้งานในระดับ API ที่เก่ากว่า คุณสามารถ ป้องกันการใช้ฟีเจอร์ใหม่ๆ แบบมีเงื่อนไขหรือใช้ ไลบรารีความเข้ากันได้ของ AndroidX เพื่อใช้ฟีเจอร์ใหม่ๆ กับ Android API ระดับต่ำกว่าได้
Android SDK แต่ละรายการจะมีชุดย่อยของ Java API สำหรับใช้ในแอปพลิเคชันของคุณ ตารางที่ ฉันใช้ Java API ใดได้บ้างในซอร์สโค้ด Java หรือ Kotlin แสดงระดับ Java API ที่ใช้ได้ตามเวอร์ชัน Android SDK ระบบรองรับ Java API เวอร์ชันใหม่ใน Android เวอร์ชันก่อนหน้าผ่านกระบวนการ Desugaring ซึ่งต้องเปิดใช้ในบิลด์
หากต้องการคอมไพล์กับระดับ API ย่อยที่เฉพาะเจาะจง ให้ใช้ไวยากรณ์บล็อก
compileSdkที่ขยายแล้วและระบุminorApiLevelดังนี้Kotlin
    android {
        compileSdk {
            version = release(36) {
                minorApiLevel = 1
            }
        }
    }
ดึงดูด
    android {
        compileSdk {
            version = release(36) {
                minorApiLevel = 1
            }
        }
    }
Android Studio จะแสดงคำเตือนหาก
compileSdkขัดแย้งกับ Android Studio, AGP หรือข้อกำหนดการพึ่งพาไลบรารีของโปรเจ็กต์เวอร์ชันปัจจุบัน -
minSdk -
minSdkจะระบุเวอร์ชัน Android ต่ำสุดที่คุณต้องการให้แอปรองรับ การตั้งค่าminSdkจะจำกัดอุปกรณ์ที่ติดตั้งแอปของคุณได้การรองรับ Android เวอร์ชันที่ต่ำกว่าอาจต้องมีการตรวจสอบแบบมีเงื่อนไขเพิ่มเติมในโค้ดหรือการใช้ไลบรารีความเข้ากันได้ของ AndroidX มากขึ้น คุณควรพิจารณาค่าใช้จ่ายในการบำรุงรักษาเพื่อรองรับเวอร์ชันที่ต่ำกว่าเทียบกับเปอร์เซ็นต์ของผู้ใช้ที่ยังคงใช้เวอร์ชันที่ต่ำกว่าเหล่านั้น ดูแผนภูมิเวอร์ชันในวิซาร์ดโปรเจ็กต์ใหม่ของ Android Studio เพื่อดูเปอร์เซ็นต์การใช้งานเวอร์ชันปัจจุบัน
เมื่อแก้ไขโค้ดใน Android Studio หรือเรียกใช้การตรวจสอบระหว่างการบิลด์ Lint จะเตือนเกี่ยวกับ API ที่คุณใช้ซึ่งไม่มีใน
minSdkคุณควรแก้ไขปัญหาเหล่านี้โดย ทำให้ฟีเจอร์ใหม่ๆ มีเงื่อนไขหรือใช้Appcompatเพื่อให้เข้ากันได้แบบย้อนหลัง -
targetSdk -
targetSdkมีวัตถุประสงค์ 2 ประการ ดังนี้- ซึ่งจะกำหนดลักษณะการทำงานของรันไทม์ของแอปพลิเคชัน
- ซึ่งจะรับรองเวอร์ชัน Android ที่คุณได้ทดสอบ
หากคุณเรียกใช้ในอุปกรณ์ที่ใช้ Android เวอร์ชันสูงกว่า
targetSdkของคุณ Android จะเรียกใช้แอปในโหมดความเข้ากันได้ซึ่งทำงานคล้ายกับเวอร์ชันต่ำกว่าที่ระบุไว้ในtargetSdkของคุณ ตัวอย่างเช่น เมื่อ API 23 เปิดตัวโมเดลสิทธิ์รันไทม์ แอปบางแอปก็ยังไม่พร้อมที่จะนำไปใช้ทันที การตั้งค่าtargetSdkเป็น 22 จะทำให้แอปเหล่านั้นทำงานในอุปกรณ์ API 23 ได้โดยไม่ต้องใช้สิทธิ์รันไทม์ และใช้ฟีเจอร์ที่รวมอยู่ในcompileSdkเวอร์ชันล่าสุดได้ นโยบายการจัดจำหน่ายของ Google Play บังคับใช้ นโยบายเพิ่มเติมเกี่ยวกับระดับ API เป้าหมายค่าของ
targetSdkไม่เชื่อมต่อกับค่าของcompileSdkตัวอย่างเช่น คุณสามารถมีค่าtargetSdkที่สูงกว่า เท่ากัน หรือต่ำกว่าcompileSdk
หมายเหตุ: ค่าของ compileSdk และ targetSdk ไม่จำเป็นต้องเหมือนกัน โปรดคำนึงถึงหลักการพื้นฐานต่อไปนี้
compileSdkช่วยให้คุณเข้าถึง API ใหม่ๆtargetSdkกำหนดลักษณะการทำงานของแอปขณะรันไทม์
สคริปต์บิลด์ของโมดูลแอปตัวอย่าง
สคริปต์บิลด์โมดูลแอป Android ตัวอย่างนี้แสดงองค์ประกอบและการตั้งค่า DSL พื้นฐานบางอย่าง
Kotlin
/**
 * The first section in the build configuration applies the Android Gradle plugin
 * to this build and makes the android block available to specify
 * Android-specific build options.
 */

plugins {
    id("com.android.application")
}

/**
 * Locate (and possibly download) a JDK used to build your kotlin
 * source code. This also acts as a default for sourceCompatibility,
 * targetCompatibility and jvmTarget. Note that this does not affect which JDK
 * is used to run the Gradle build itself, and does not need to take into
 * account the JDK version required by Gradle plugins (such as the
 * Android Gradle Plugin)
 */
kotlin {
    jvmToolchain(11)
}

/**
 * The android block is where you configure all your Android-specific
 * build options.
 */

android {

    /**
     * The app's namespace. Used primarily to access app resources.
     */

    namespace = "com.example.myapp"

    /**
     * compileSdk specifies the Android API level Gradle should use to
     * compile your app. This means your app can use the API features included in
     * this API level and lower.
     */

    compileSdk = 36

    /**
     * The defaultConfig block encapsulates default settings and entries for all
     * build variants and can override some attributes in main/AndroidManifest.xml
     * dynamically from the build system. You can configure product flavors to override
     * these values for different versions of your app.
     */

    defaultConfig {

        // Uniquely identifies the package for publishing.
        applicationId = "com.example.myapp"

        // Defines the minimum API level required to run the app.
        minSdk = 23

        // Specifies the API level used to test the app.
        targetSdk = 36

        // Defines the version number of your app.
        versionCode = 1

        // Defines a user-friendly version name for your app.
        versionName = "1.0"
    }

    /**
     * The buildTypes block is where you can configure multiple build types.
     * By default, the build system defines two build types: debug and release. The
     * debug build type is not explicitly shown in the default build configuration,
     * but it includes debugging tools and is signed with the debug key. The release
     * build type applies ProGuard settings and is not signed by default.
     */

    buildTypes {

        /**
         * By default, Android Studio configures the release build type to enable code
         * shrinking, using minifyEnabled, and specifies the default ProGuard rules file.
         */

        getByName("release") {
            isMinifyEnabled = true // Enables code shrinking for the release build type.
            proguardFiles(
                getDefaultProguardFile("proguard-android.txt"),
                "proguard-rules.pro"
            )
        }
    }

    /**
     * The productFlavors block is where you can configure multiple product flavors.
     * This lets you create different versions of your app that can
     * override the defaultConfig block with their own settings. Product flavors
     * are optional, and the build system does not create them by default.
     *
     * This example creates a free and paid product flavor. Each product flavor
     * then specifies its own application ID, so that they can exist on the Google
     * Play Store or an Android device simultaneously.
     *
     * If you declare product flavors, you must also declare flavor dimensions
     * and assign each flavor to a flavor dimension.
     */

    flavorDimensions += "tier"
    productFlavors {
        create("free") {
            dimension = "tier"
            applicationId = "com.example.myapp.free"
        }

        create("paid") {
            dimension = "tier"
            applicationId = "com.example.myapp.paid"
        }
    }

    /**
     * To override source and target compatibility (if different from the
     * toolchain JDK version), add the following. All of these
     * default to the same value as kotlin.jvmToolchain. If you're using the
     * same version for these values and kotlin.jvmToolchain, you can
     * remove these blocks.
     */
    //compileOptions {
    //    sourceCompatibility = JavaVersion.VERSION_11
    //    targetCompatibility = JavaVersion.VERSION_11
    //}
    //kotlinOptions {
    //    jvmTarget = "11"
    //}
}

/**
 * The dependencies block in the module-level build configuration file
 * specifies dependencies required to build only the module itself.
 * To learn more, go to Add build dependencies.
 */

dependencies {
    implementation(project(":lib"))
    implementation("androidx.appcompat:appcompat:1.8.0")
    implementation(fileTree(mapOf("dir" to "libs", "include" to listOf("*.jar"))))
}
ดึงดูด
/**
 * The first line in the build configuration applies the Android Gradle plugin
 * to this build and makes the android block available to specify
 * Android-specific build options.
 */

plugins {
    id 'com.android.application'
}

/**
 * Locate (and possibly download) a JDK used to build your kotlin
 * source code. This also acts as a default for sourceCompatibility,
 * targetCompatibility and jvmTarget. Note that this does not affect which JDK
 * is used to run the Gradle build itself, and does not need to take into
 * account the JDK version required by Gradle plugins (such as the
 * Android Gradle Plugin)
 */
kotlin {
    jvmToolchain 11
}

/**
 * The android block is where you configure all your Android-specific
 * build options.
 */

android {

    /**
     * The app's namespace. Used primarily to access app resources.
     */

    namespace 'com.example.myapp'

    /**
     * compileSdk specifies the Android API level Gradle should use to
     * compile your app. This means your app can use the API features included in
     * this API level and lower.
     */

    compileSdk 36

    /**
     * The defaultConfig block encapsulates default settings and entries for all
     * build variants and can override some attributes in main/AndroidManifest.xml
     * dynamically from the build system. You can configure product flavors to override
     * these values for different versions of your app.
     */

    defaultConfig {

        // Uniquely identifies the package for publishing.
        applicationId 'com.example.myapp'

        // Defines the minimum API level required to run the app.
        minSdk 23

        // Specifies the API level used to test the app.
        targetSdk 36

        // Defines the version number of your app.
        versionCode 1

        // Defines a user-friendly version name for your app.
        versionName "1.0"
    }

    /**
     * The buildTypes block is where you can configure multiple build types.
     * By default, the build system defines two build types: debug and release. The
     * debug build type is not explicitly shown in the default build configuration,
     * but it includes debugging tools and is signed with the debug key. The release
     * build type applies ProGuard settings and is not signed by default.
     */

    buildTypes {

        /**
         * By default, Android Studio configures the release build type to enable code
         * shrinking, using minifyEnabled, and specifies the default ProGuard rules file.
         */

        release {
              minifyEnabled true // Enables code shrinking for the release build type.
              proguardFiles getDefaultProguardFile('proguard-android.txt'), 'proguard-rules.pro'
        }
    }

    /**
     * The productFlavors block is where you can configure multiple product flavors.
     * This lets you create different versions of your app that can
     * override the defaultConfig block with their own settings. Product flavors
     * are optional, and the build system does not create them by default.
     *
     * This example creates a free and paid product flavor. Each product flavor
     * then specifies its own application ID, so that they can exist on the Google
     * Play Store or an Android device simultaneously.
     *
     * If you declare product flavors, you must also declare flavor dimensions
     * and assign each flavor to a flavor dimension.
     */

    flavorDimensions "tier"
    productFlavors {
        free {
            dimension "tier"
            applicationId 'com.example.myapp.free'
        }

        paid {
            dimension "tier"
            applicationId 'com.example.myapp.paid'
        }
    }

    /**
     * To override source and target compatibility (if different from the
     * tool chain JDK version), add the following. All of these
     * default to the same value as kotlin.jvmToolchain. If you're using the
     * same version for these values and kotlin.jvmToolchain, you can
     * remove these blocks.
     */
    //compileOptions {
    //    sourceCompatibility JavaVersion.VERSION_11
    //    targetCompatibility JavaVersion.VERSION_11
    //}
    //kotlinOptions {
    //    jvmTarget = '11'
    //}
}

/**
 * The dependencies block in the module-level build configuration file
 * specifies dependencies required to build only the module itself.
 * To learn more, go to Add build dependencies.
 */

dependencies {
    implementation project(":lib")
    implementation 'androidx.appcompat:appcompat:1.8.0'
    implementation fileTree(dir: 'libs', include: ['*.jar'])
}
ไฟล์พร็อพเพอร์ตี้ Gradle
นอกจากนี้ Gradle ยังมีไฟล์พร็อพเพอร์ตี้ 2 ไฟล์ซึ่งอยู่ในไดเรกทอรีโปรเจ็กต์รูท ซึ่งคุณใช้ระบุการตั้งค่าสำหรับชุดเครื่องมือบิลด์ Gradle ได้ ดังนี้
-
gradle.properties - คุณสามารถกำหนดการตั้งค่า Gradle ทั่วทั้งโปรเจ็กต์ได้ที่นี่ เช่น ขนาดฮีปสูงสุดของ Gradle Daemon ดูข้อมูลเพิ่มเติมได้ที่สภาพแวดล้อมของบิลด์
-
local.properties -
กำหนดค่าพร็อพเพอร์ตี้สภาพแวดล้อมในเครื่องสำหรับระบบบิลด์ ซึ่งรวมถึงสิ่งต่อไปนี้
ndk.dir- เส้นทางไปยัง NDK เราเลิกใช้งานพร็อพเพอร์ตี้นี้แล้ว ระบบจะติดตั้ง NDK เวอร์ชันที่ดาวน์โหลดไว้ในไดเรกทอรีndkภายในไดเรกทอรี Android SDKsdk.dir- เส้นทางไปยัง Android SDKcmake.dir- เส้นทางไปยัง CMakendk.symlinkdir- ใน Android Studio 3.5 ขึ้นไป จะสร้างลิงก์สัญลักษณ์ไปยัง NDK ที่สั้นกว่าเส้นทาง NDK ที่ติดตั้งไว้ได้
รีแมป NDK เป็นเส้นทางที่สั้นลง (Windows เท่านั้น)
ใน Windows เครื่องมือในโฟลเดอร์ NDK ที่ติดตั้ง เช่น ld.exe จะมีเส้นทางที่ยาว เครื่องมือไม่รองรับเส้นทางที่ยาวมากนัก
หากต้องการสร้างเส้นทางที่สั้นลง ให้ตั้งค่าพร็อพเพอร์ตี้ ndk.symlinkdir ใน local.properties เพื่อขอให้ปลั๊กอิน Android Gradle สร้างลิงก์สัญลักษณ์ไปยัง NDK เส้นทางของ Symlink นั้นอาจสั้นกว่าโฟลเดอร์ NDK ที่มีอยู่
ตัวอย่างเช่น ndk.symlinkdir = C:\ จะส่งผลให้เกิดลิงก์สัญลักษณ์ต่อไปนี้
C:\ndk\19.0.5232133
ซิงค์โปรเจ็กต์กับไฟล์ Gradle
เมื่อคุณทำการเปลี่ยนแปลงไฟล์การกำหนดค่าบิลด์ในโปรเจ็กต์ Android Studio กำหนดให้คุณต้องซิงค์ไฟล์โปรเจ็กต์เพื่อให้สามารถนำเข้าการเปลี่ยนแปลงการกำหนดค่าบิลด์และเรียกใช้การตรวจสอบบางอย่างเพื่อให้แน่ใจว่าการกำหนดค่าของคุณจะไม่ทำให้เกิดข้อผิดพลาดในการบิลด์
หากต้องการซิงค์ไฟล์โปรเจ็กต์ ให้คลิกซิงค์เลยในแถบการแจ้งเตือนที่ปรากฏขึ้นเมื่อคุณทำการเปลี่ยนแปลง ดังที่แสดงในรูปที่ 2 หรือคลิกซิงค์โปรเจ็กต์  จากแถบเมนู หาก Android Studio พบข้อผิดพลาดในการกำหนดค่า เช่น ซอร์สโค้ดใช้ฟีเจอร์ API ที่ใช้ได้เฉพาะในระดับ API ที่สูงกว่า
 compileSdkVersion หน้าต่างข้อความจะอธิบายปัญหา

ชุดซอร์ส
Android Studio จะจัดกลุ่มซอร์สโค้ดและทรัพยากรสำหรับแต่ละโมดูลเป็นชุดซอร์สอย่างสมเหตุสมผล เมื่อคุณสร้างโมดูลใหม่ Android Studio จะสร้างชุดซอร์ส main/ ภายในโมดูล ชุดซอร์ส main/ ของโมดูลประกอบด้วยโค้ดและทรัพยากรที่ตัวแปรบิลด์ทั้งหมดใช้
ไดเรกทอรีชุดซอร์สเพิ่มเติมเป็นแบบไม่บังคับ และ Android Studio จะไม่สร้างไดเรกทอรีดังกล่าวให้คุณโดยอัตโนมัติเมื่อคุณกำหนดค่าตัวแปรบิลด์ใหม่ อย่างไรก็ตาม การสร้างชุดซอร์สที่คล้ายกับ main/ จะช่วยจัดระเบียบไฟล์และทรัพยากรที่ Gradle ควรใช้เมื่อสร้างแอปบางเวอร์ชันเท่านั้น
-
src/main/ - ชุดซอร์สนี้มีโค้ดและทรัพยากรที่ใช้ร่วมกันในตัวแปรบิลด์ทั้งหมด
-
src/buildType/ - สร้างชุดซอร์สนี้เพื่อรวมโค้ดและทรัพยากรสำหรับประเภทบิลด์ที่เฉพาะเจาะจงเท่านั้น
-
src/productFlavor/ -
สร้างชุดซอร์สนี้เพื่อรวมโค้ดและทรัพยากรสำหรับเวอร์ชันผลิตภัณฑ์ที่เฉพาะเจาะจงเท่านั้น
หมายเหตุ: หากกำหนดค่าบิลด์ให้รวมเวอร์ชันผลิตภัณฑ์หลายรายการ คุณจะสร้างไดเรกทอรีชุดซอร์สสำหรับชุดค่าผสมของเวอร์ชันผลิตภัณฑ์แต่ละรายการระหว่างมิติข้อมูลของเวอร์ชันได้ ดังนี้
src/productFlavor1ProductFlavor2/ -
src/productFlavorBuildType/ - สร้างชุดซอร์สนี้เพื่อรวมโค้ดและทรัพยากรสำหรับตัวแปรบิลด์ที่เฉพาะเจาะจงเท่านั้น
ตัวอย่างเช่น หากต้องการสร้างแอปเวอร์ชัน "fullDebug" ระบบบิลด์จะผสานโค้ด การตั้งค่า และทรัพยากรจากชุดซอร์สต่อไปนี้
-
src/fullDebug/(ชุดซอร์สของตัวแปรบิลด์) -
src/debug/(ชุดซอร์สประเภทบิลด์) -
src/full/(ชุดซอร์สของเวอร์ชันผลิตภัณฑ์) -
src/main/(ชุดซอร์สหลัก)
หมายเหตุ: เมื่อสร้างไฟล์หรือไดเรกทอรีใหม่ใน Android Studio ให้ใช้ตัวเลือกเมนูไฟล์ > ใหม่เพื่อสร้างไฟล์หรือไดเรกทอรีสำหรับชุดซอร์สที่เฉพาะเจาะจง ชุดซอร์สที่คุณเลือกได้จะอิงตามการกำหนดค่าบิลด์ และ Android Studio จะสร้างไดเรกทอรีที่จำเป็นโดยอัตโนมัติหากยังไม่มี
หากชุดซอร์สที่ต่างกันมีไฟล์เดียวกันเวอร์ชันต่างกัน Gradle จะใช้ลำดับความสำคัญต่อไปนี้เมื่อตัดสินใจว่าจะใช้ไฟล์ใด ชุดซอร์สทางด้านซ้ายจะลบล้างไฟล์และการตั้งค่าของชุดซอร์สทางด้านขวา ดังนี้
ตัวแปรบิลด์ > ประเภทบิลด์ > เวอร์ชันผลิตภัณฑ์ > ชุดซอร์สหลัก > ทรัพยากร Dependency ของไลบรารี
ซึ่งจะช่วยให้ Gradle ใช้ไฟล์ที่เจาะจงสำหรับตัวแปรบิลด์ที่คุณพยายามสร้างได้ ขณะที่นำกิจกรรม ตรรกะของแอปพลิเคชัน และทรัพยากรที่ใช้ร่วมกันกับแอปเวอร์ชันอื่นๆ มาใช้ซ้ำ
เมื่อรวมไฟล์ Manifest หลายไฟล์ Gradle จะใช้ลำดับความสำคัญเดียวกันเพื่อให้ตัวแปรบิลด์แต่ละรายการสามารถกำหนดคอมโพเนนต์หรือสิทธิ์ที่แตกต่างกันในไฟล์ Manifest สุดท้ายได้ ดูข้อมูลเพิ่มเติมเกี่ยวกับการสร้างชุดซอร์สที่กำหนดเองได้ที่หัวข้อสร้างชุดซอร์ส
แคตตาล็อกเวอร์ชัน
หากบิลด์มีหลายโมดูลที่มีทรัพยากร Dependency ร่วมกัน หรือคุณมีโปรเจ็กต์อิสระหลายโปรเจ็กต์ที่มีทรัพยากร Dependency ร่วมกัน เราขอแนะนำให้ใช้แคตตาล็อกเวอร์ชันหรือรายการวัสดุ (BOM) เพื่อระบุเวอร์ชันร่วมกัน
ระบบบิลด์อื่นๆ
การสร้างแอป Android ด้วย Bazel เป็นไปได้ แต่ไม่รองรับอย่างเป็นทางการ Android Studio ไม่รองรับโปรเจ็กต์ Bazel อย่างเป็นทางการ
หากต้องการทำความเข้าใจข้อจำกัดปัจจุบันของการสร้างด้วย Bazel ให้ดูปัญหาที่ทราบ