
1. Before you begin
Quick recap on Deep links, web links, and Android App Links
A user's main objective when following a deep link is to get the content they want to see. Deep links have all the functionality to help users achieve this goal. Android handles the following types of links:
- Deep links: URIs of any scheme that take users to a specific part of your app.
- Web links: Deep links with the HTTP and HTTPS scheme.
- Android App Links: Web links with HTTP and HTTPS schemes that contain the
android:autoVerifyattribute.
For more detailed information about deep links, web links, and Android App links, see the Android documentation and the crash course on YouTube and Medium.
Already familiar with Android App Links?
If you are aware of all the technical details, check out a quick implementation from the accompanying blog post that helps you set it up in few steps.
Codelab objective
This codelab walks you through the best practices for the configuration, implementation, and verification process of an app with Android App Links.
One of the benefits of Android App Links is that they are secure, meaning that no unauthorized app can handle your links. Android OS must verify links with a website you own to qualify them as Android App Links. This process is called website association.
This codelab focuses on developers with a website and an Android app. Android App Links provide a better user experience by enabling a seamless integration between your app and website.
Prerequisites
- Basic knowledge of adb activity manager and adb package manager.
- Basic knowledge of Android development and navigation with Jetpack Compose.
What you'll learn
- Learn best practices in designing URLs for Android App Links.
- Configure all types of deep links in an Android Application.
- Understand path wildcards (
path,pathPrefix,pathPattern,pathAdvancePattern). - Learn the Android App Links verification process, which includes the upload of the Google Digital Asset Links (DAL) file, the Android App Links manual verification process, and the Play Developer Console deep links dashboard.
- Build and Android app with various restaurants in different locations.
What you'll need
- Android Studio Dolphin (2021.3.1) or newer.
- A domain to host Google Digital Asset Link (DAL) files. (Optional: Read this blog post, which helps you have this ready in minutes.)
- Optional: Google Play Console developer account. This enables another approach to debug your Android App Links configuration.
2. Set up code
Create an empty Compose Application
To start a Compose project, follow these steps:
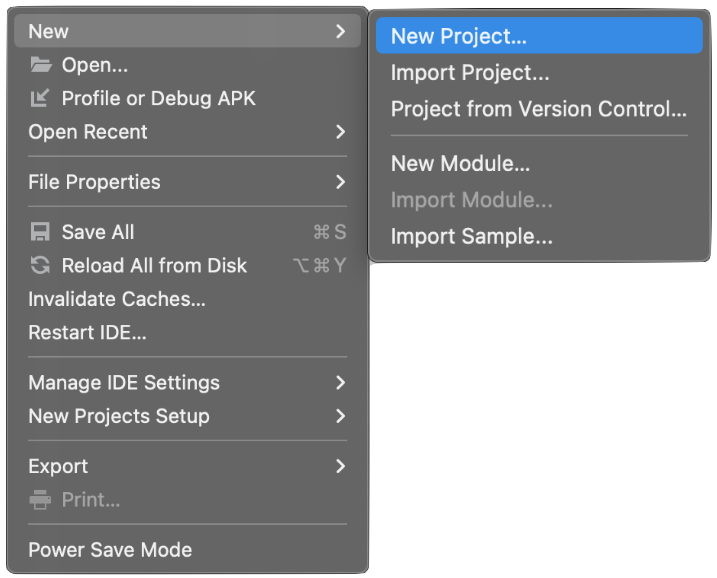
- In Android Studio, select File > New > New Project.
- Select Empty Compose Activity from the available templates.
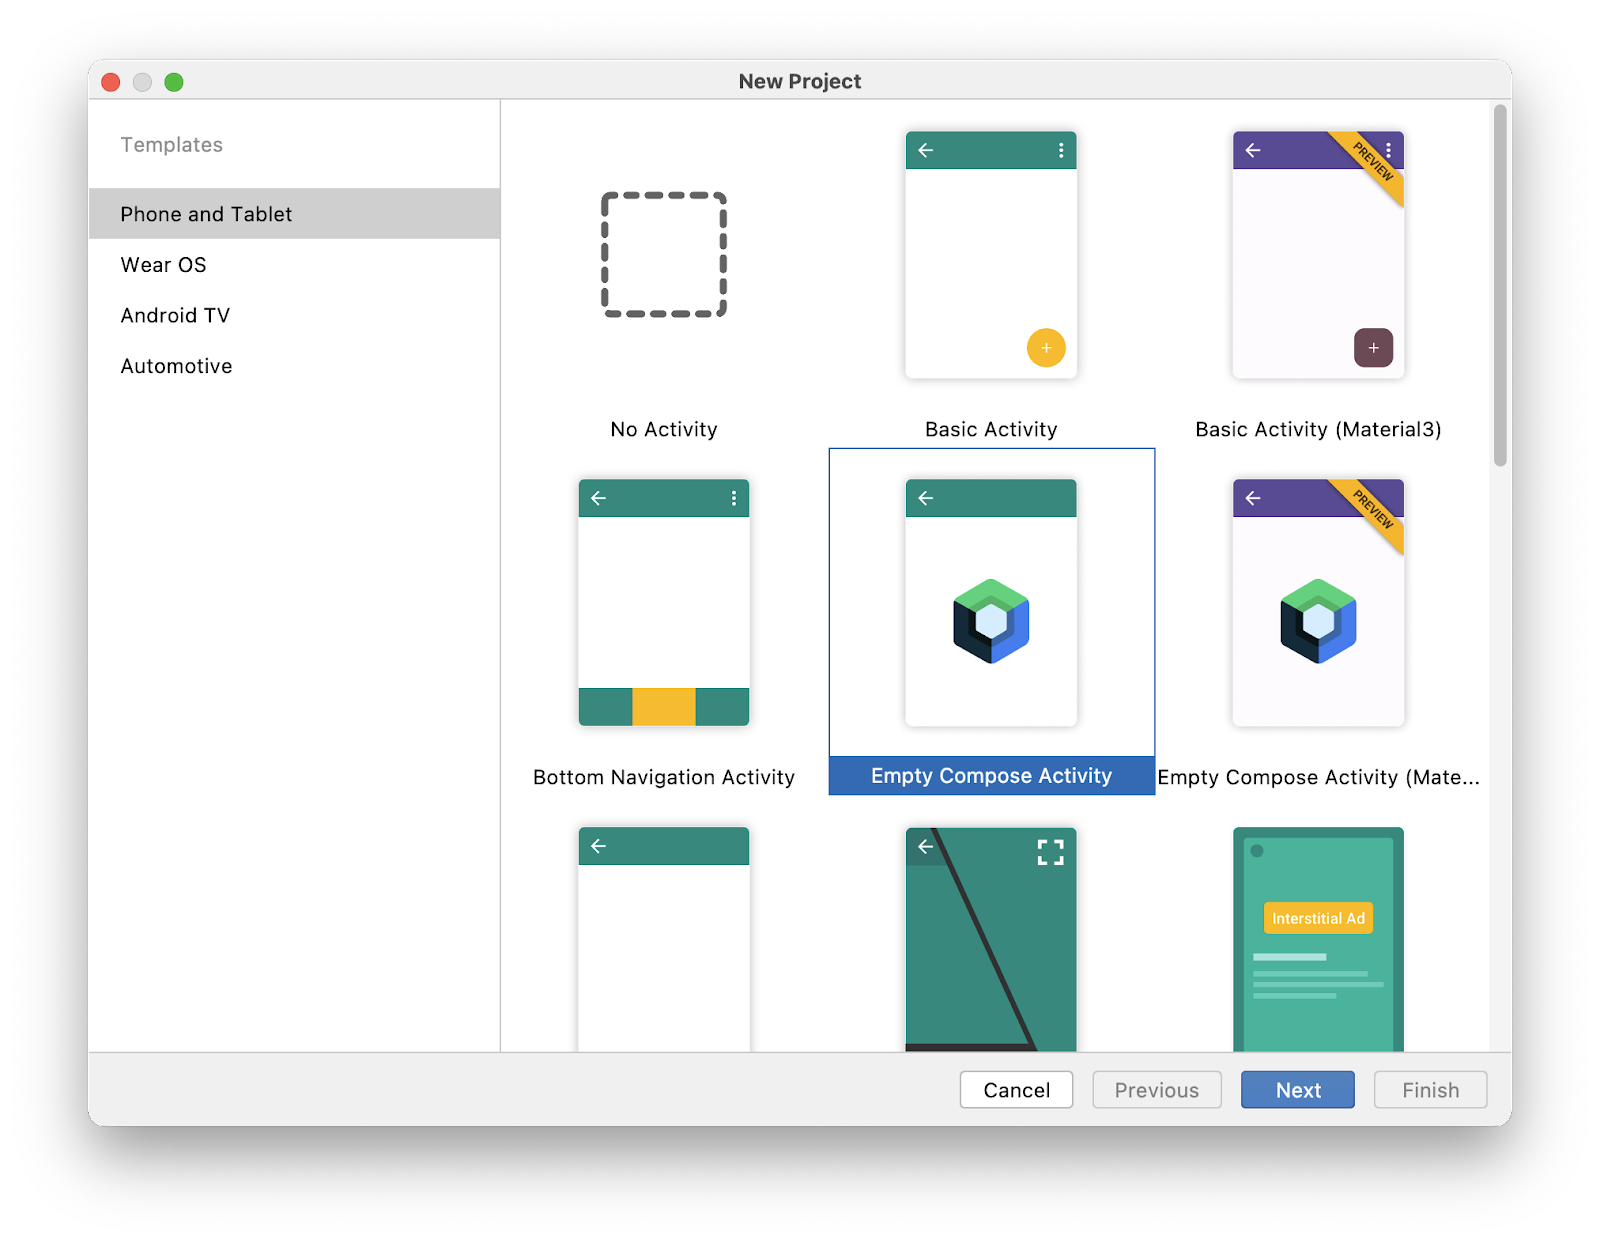
- Click Next and configure your project, calling it Deep Links Basics. Make sure you choose a Minimum SDK version of at least API level 21, which is the minimum API that Compose supports.
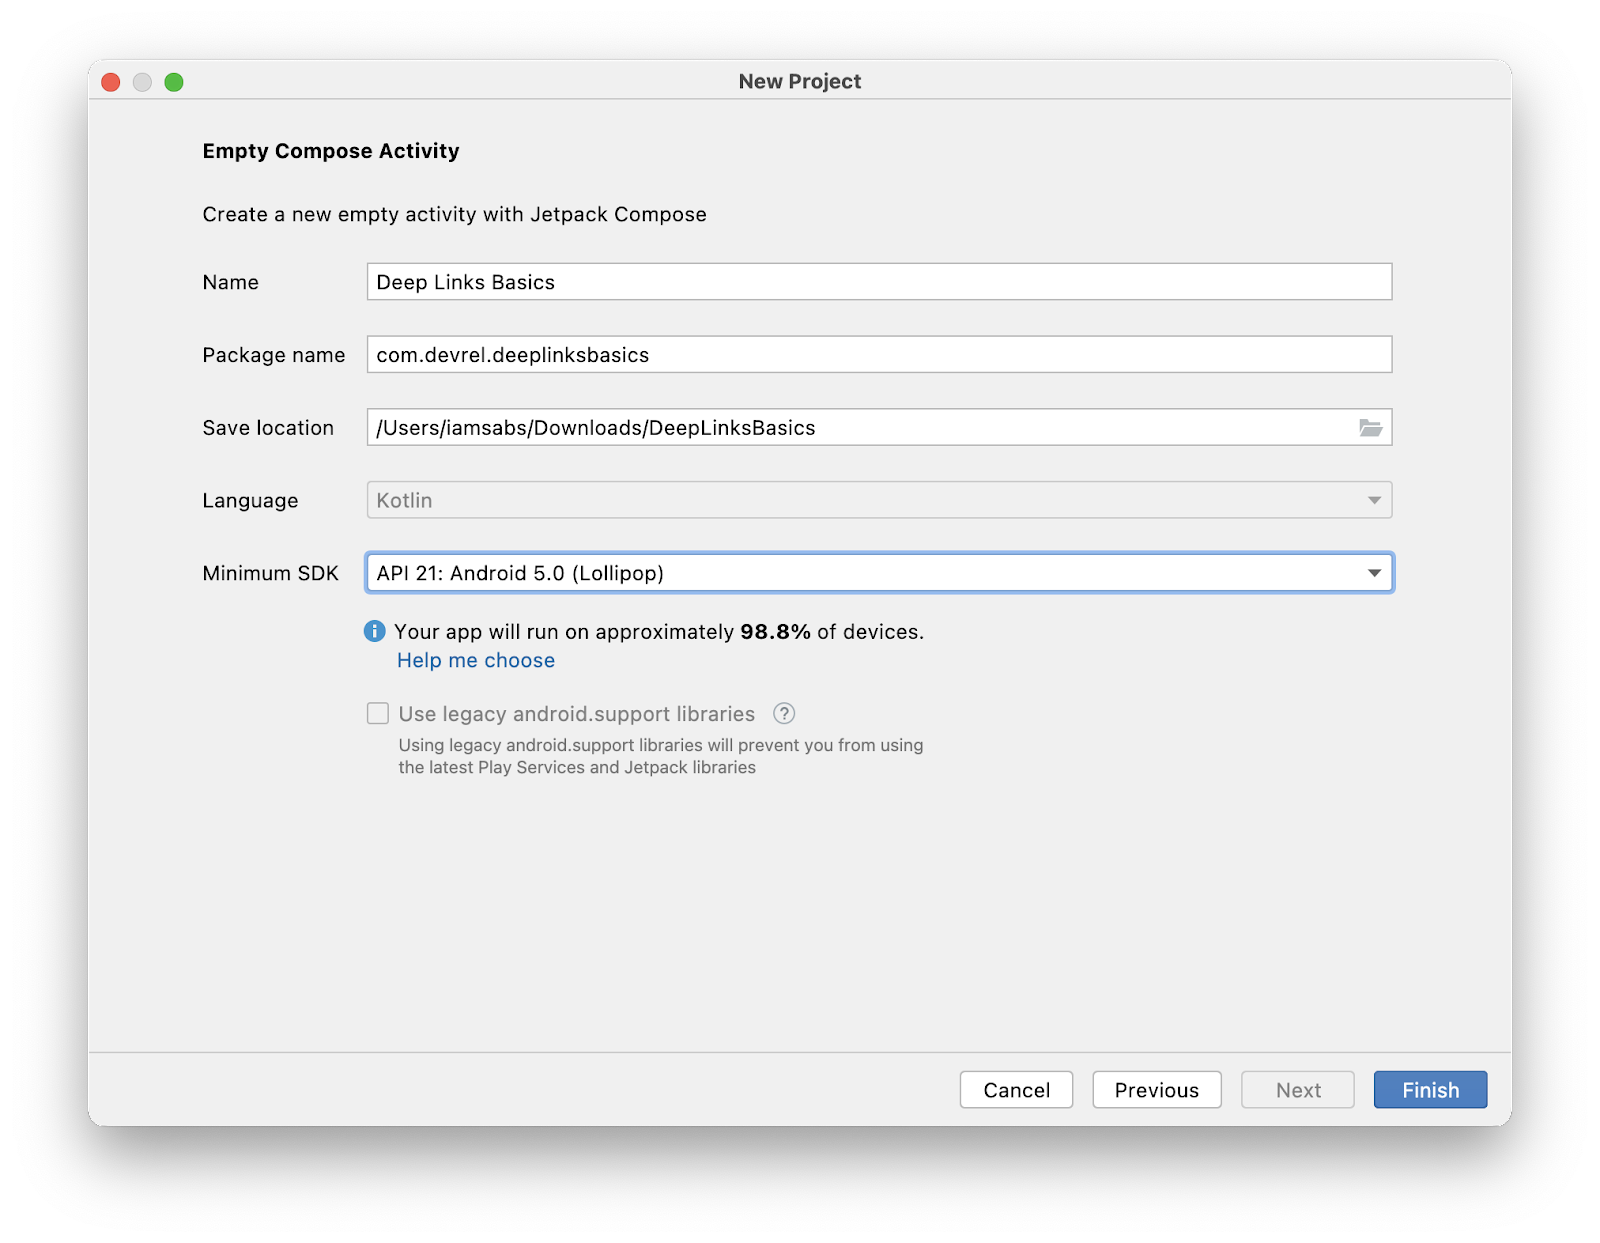
- Click Finish and wait for your project to be generated.
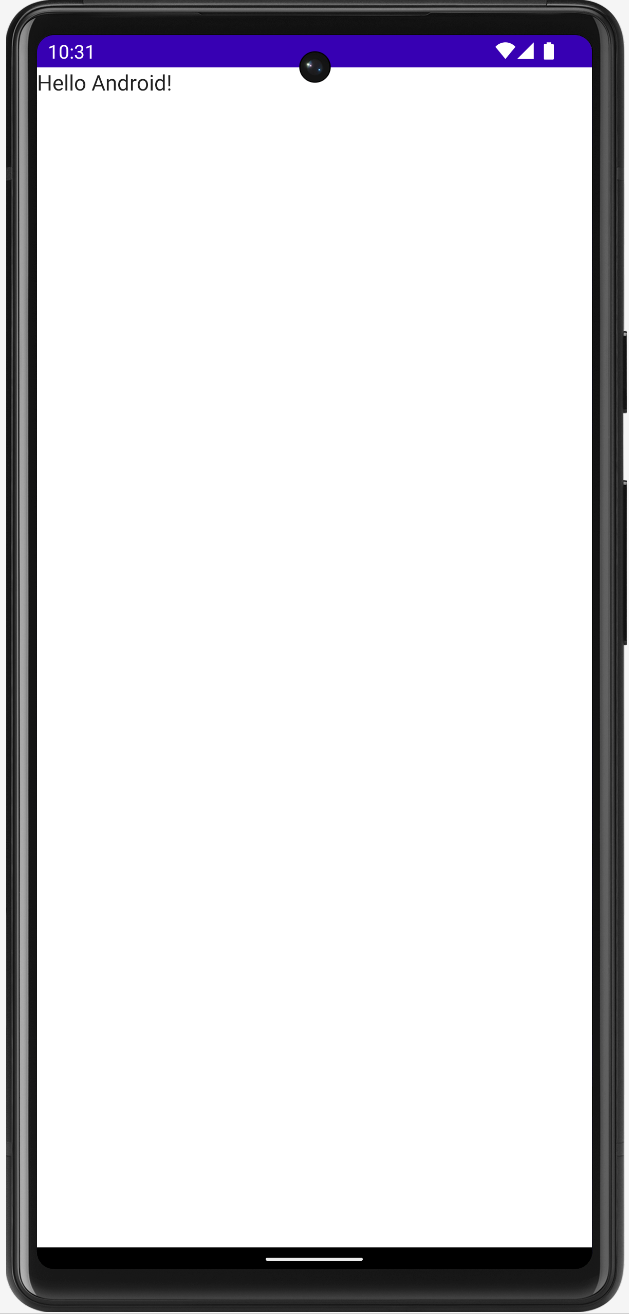
- Start the application. Make sure the app runs. There should be a blank screen with a Hello Android! message.
Solution to the codelab
You can get the code for the solution of this codelab from GitHub:
git clone https://github.com/android/deep-links
Alternatively you can download the repository as a Zip file:
First, go into the deep-links-introduction directory. You'll find the app in the solution directory. It is recommended that you follow the codelab step-by-step at your own pace and check the solution if you consider it necessary. During the codelab, you'll be presented with snippets of code that you'll need to add to the project.
3. Review Deep Links-oriented URL design
RESTful API design
Links are an essential part of web development, and link design has been through countless iterations, resulting in various standards. It's worth looking at and applying web development link design standards, which makes them easier to use and maintain.
One of these standards is REST (representational state transfer), which is an architecture that is generally used to build APIs for web services. Open API is an initiative that standardizes REST APIs. Alternatively, you can use REST to design your URLs for deep links.
Note that you are not building a web service. This section focuses only on URL design.
Designing the URLs
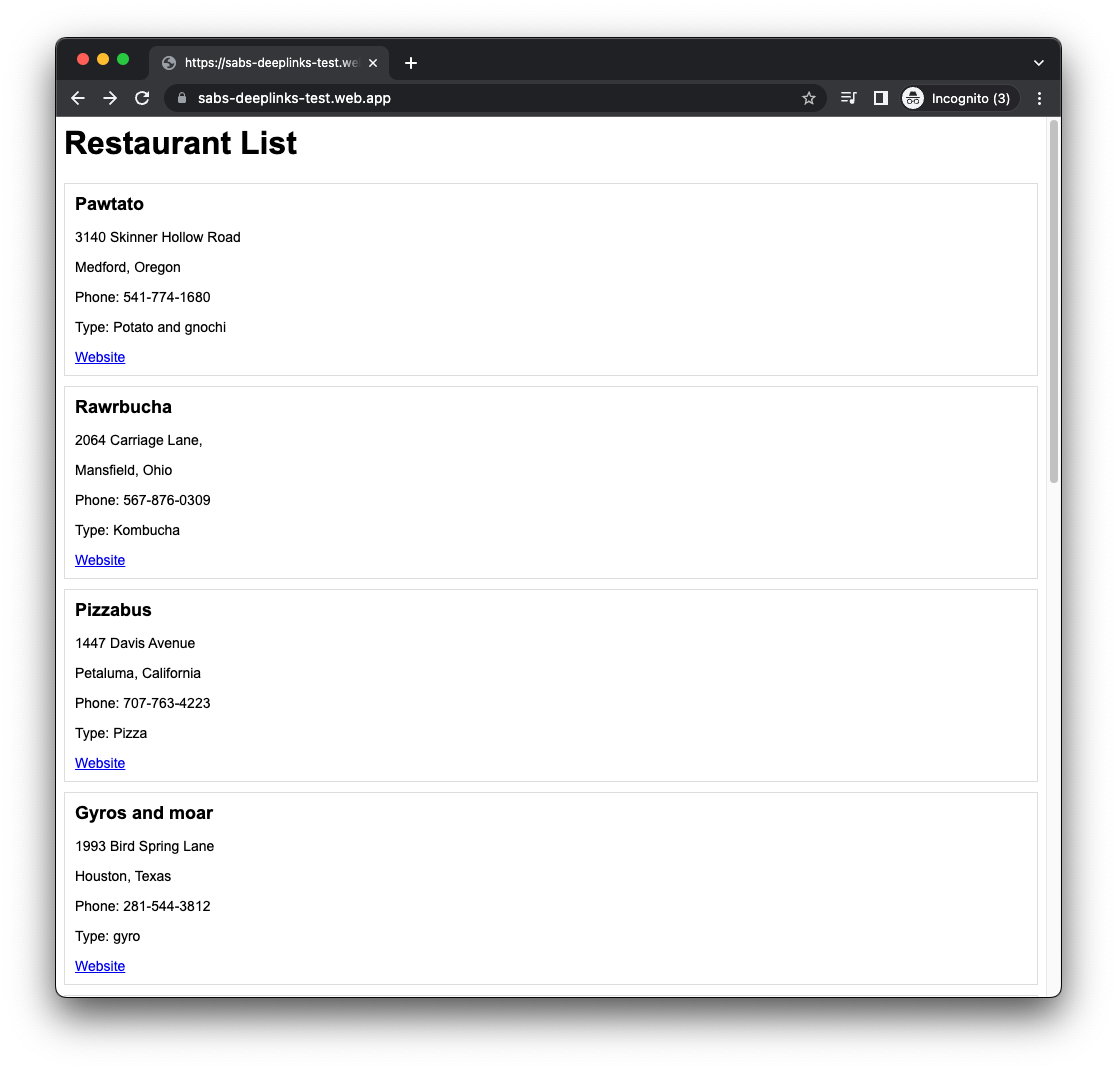
First, review the resulting URLs in your website and understand what they represent in the Android App:
/restaurantslists all restaurants you manage./restaurants/:restaurantNamedisplays the details of a single restaurant./restaurants/:restaurantName/ordersshows a restaurant's orders./restaurants/:restaurantName/orders/:orderNumbershows a particular order in a restaurant./restaurants/:restaurantName/orders/latestshows the latest order in a restaurant.
Why the URL design matters
Android has intent filters that handle actions from another app component and also are used to catch URLs. When you define an intent filter to catch a URL, you must follow a structure that relies on path prefixes and straightforward wildcards. Here is an example of how this is structured from an existing URL in your restaurant's website:
https://example.com/pawtato-3140-Skinner-Hollow-Road
Even though this URL specifies your restaurant and its location, the path can create a problem when defining an intent filter for Android to catch the URL because your application is based on various restaurant URLs like these:
https://example.com/rawrbucha-2064-carriage-lane
https://example.com/pizzabus-1447-davis-avenue
When you define an intent filter with a path and a wildcard to catch these URLs, you can use something like https://example.com/*, which essentially works. Nevertheless, you have not truly solved the problem because there are other existing paths for different sections of your website, such as the following:
Delivery: https://example.com/deliveries
Admin: https://example.com/admin
You may not want Android to catch these URLs because some of them may be internal, but the defined intent filter https://example.com/* will catch them, including URLs that don't exist. And when a user clicks on one of these URLs they will open on the browser (> Android 12) or a disambiguation dialog may appear (< Android 12). Which in this design is not an intended behavior.
Now, Android offers path prefixes that solve this problem, but it does involve a URL redesign, from:
https://example.com/*
to:
https://example.com/restaurants/*
Adding a hierarchical nesting structure makes your intent filters clearly defined, and Android catches the URL you tell it to catch.
URL design best practices
Here are some best practices gathered from Open API and applied to a deep links perspective:
- Focus the URL design on the business entities they expose. For instance, in e-commerce it can be customers and orders. For travel it can be tickets and flights. In your restaurant app and website you will use restaurants and orders.
- Most HTTP methods (GET, POST, DELETE, PUT) are verbs that describe the request being made, but it would be confusing to use verbs for endpoints in URLs.
- To describe collections, use the plural of the entity, such as
/restaurants/:restaurantName. This makes the URL easier to read and maintain. Here is an example with each of the HTTP methods:
GET /restaurants/pawtato
POST /restaurants
DELETE /restaurants
PUT /restaurants/pawtato
Each URL is easier to read and understand what it does. Note that this codelab doesn't cover web services API design and what each method does.
- Use logical nesting to group URLs containing related information. For instance, a URL for one of our restaurants can have the orders that are being worked:
/restaurants/1/orders
4. Review the data element
The AndroidManifest.xml file is an essential part of Android. It describes the app information to the Android build tools, Android OS, and Google Play.
For deep links, you have to define an intent filter using 3 main tags: <action>, <category> and <data>. Our main focus in this section is the <data> tag.
A <data> element tells Android OS the URL structure of a link once the link is clicked by a user. The URL format and structure you can use on the intent filters is as follows:
<scheme>://<host>:<port>[<path>|<pathPrefix>|<pathPattern>|<pathAdvancedPattern>|<pathSuffix>]
Android reads, parses, and merges all <data> elements in an intent filter to account for all the variations of the attributes. For instance:
AndroidManifest.xml
<intent-filter>
  ...
  <data android:scheme="http" />
  <data android:scheme="https" />
  <data android:host="example.com" />
  <data android:path="/restaurants" />
  <data android:pathPrefix="/restaurants/orders" />
</intent-filter>
Android will catch the following URLs:
http://example.com/restaurantshttps://example.com/restaurantshttp://example.com/restaurants/orders/*https://example.com/restaurants/orders/*
Path Attributes
path (available in API 1)
This attribute specifies a complete path, beginning with /, that is matched against the complete path in the intent. For example, android:path="/restaurants/pawtato" only matches the /restaurants/pawtato website path, and if we have /restaurant/pawtato, this URL will not match because of the missing s.
pathPrefix (available in API 1)
This attribute specifies a partial path that is matched against only the initial part of the path of the intent. For example,
android:pathPrefix="/restaurants" will match the restaurants paths: /restaurants/pawtato, /restaurants/pizzabus, and so on.
pathSuffix (available in API 31)
This attribute specifies a path that is matched exactly against the ending part of the path in the intent. For example,
android:pathSuffix="tato" will match to all restaurants paths that end with tato like /restaurants/pawtato and /restaurants/corgtato.
pathPattern (available in API 1)
This attribute specifies a complete path that matches a complete path with wildcards in the intent:
- An asterisk (
*) matches a sequence of 0-to-many occurrences of the preceding character. - A period followed by an asterisk (
.*) matches any sequence of 0-to-many characters.
Examples:
/restaurants/piz*abus: this pattern matches the pizzabus restaurant but will also match restaurants with 0 or morezcharacters in the name, such as/restaurants/pizzabus,/restaurants/pizzzabus, and/restaurants/pizabus./restaurants/.*: this pattern matches any restaurant name with the/restaurantspath, such as/restaurants/pizzabusand/restaurants/pawtato, as well as ones the app doesn't know, such as/restaurants/wateriehall.
pathAdvancePattern (available in API 31)
This attribute specifies a complete path that matches the complete path with regex-like patterns:
- A period (
.) matches any character. - A set of square brackets (
[...]) matches a range of characters. This set also supports the not (^) modifier. - An asterisk (
*) matches the preceding pattern 0 or more times. - A plus (
+) matches the preceding pattern 1 or more times. - Curly brackets (
{...}) represent the number of times a pattern may match.
This attribute can be considered an extension of pathPattern. It gives more flexibility on what URLs to match, for example:
/restaurants/[a-zA-Z]*/orders/[0-9]{3}matches any restaurant order that is up to 3 digits in length./restaurants/[a-zA-Z]*/orders/latestmatches the latest order of any of the app's restaurants
5. Create Deep links and web links
Custom scheme deep links
Deep links with custom schemes are the most generic types of deep links and are the easiest to implement, which comes with drawbacks. These links cannot be opened by web sites. And any app that declares its support for that scheme in its manifest can open the link.
You can use any scheme on the <data> element. For example, this codelab uses the food://restaurants/keybabs URL.
- In Android Studio, add the following intent filter to the manifest file:
AndroidManifest.xml
<activity ... >
  <intent-filter>
    <action android:name="android.intent.action.VIEW"/>
    <category android:name="android.intent.category.BROWSABLE"/>
    <category android:name="android.intent.category.DEFAULT"/>
    <data android:scheme="food"/>
    <data android:path="/restaurants/keybabs"/>
  </intent-filter>
</activity>
- To verify that your application can open links with custom schemes, print it on the home screen adding the following to the main activity:
MainActivity.kt
class MainActivity : ComponentActivity() {
    override fun onCreate(savedInstanceState: Bundle?) {
        super.onCreate(savedInstanceState)

        // Receive the intent action and data
        val action: String? = intent?.action;
        val data: Uri? = intent?.data;

        setContent {
            DeepLinksBasicsTheme {
                Surface(
                    modifier = Modifier.fillMaxSize(),
                    color = MaterialTheme.colors.background
                ) {
                    // Add a Column to print a message per line
                    Column {
                        // Print it on the home screen
                        Greeting("Android")
                        Text(text = "Action: $action")
                        Text(text = "Data: $data")
                    }
                }
            }
        }
    }
}
- To test that the intent is received, use the Android Debug Bridge (adb) with the following command:
adb shell am start -W -a android.intent.action.VIEW -d "food://restaurants/keybabs"
This command starts an intent with the VIEW action and uses the provided URL as data. When you run this command, the app launches and receives the intent. Notice the changes on the main screen text sections. One displays the Hello Android! message, the second displays the action the intent was called, and the third one displays which url the intent was called.
In the following image, note that at the bottom section of Android Studio the mentioned adb command was run. To the right, the app shows the intent information in the home screen, meaning it has been received. 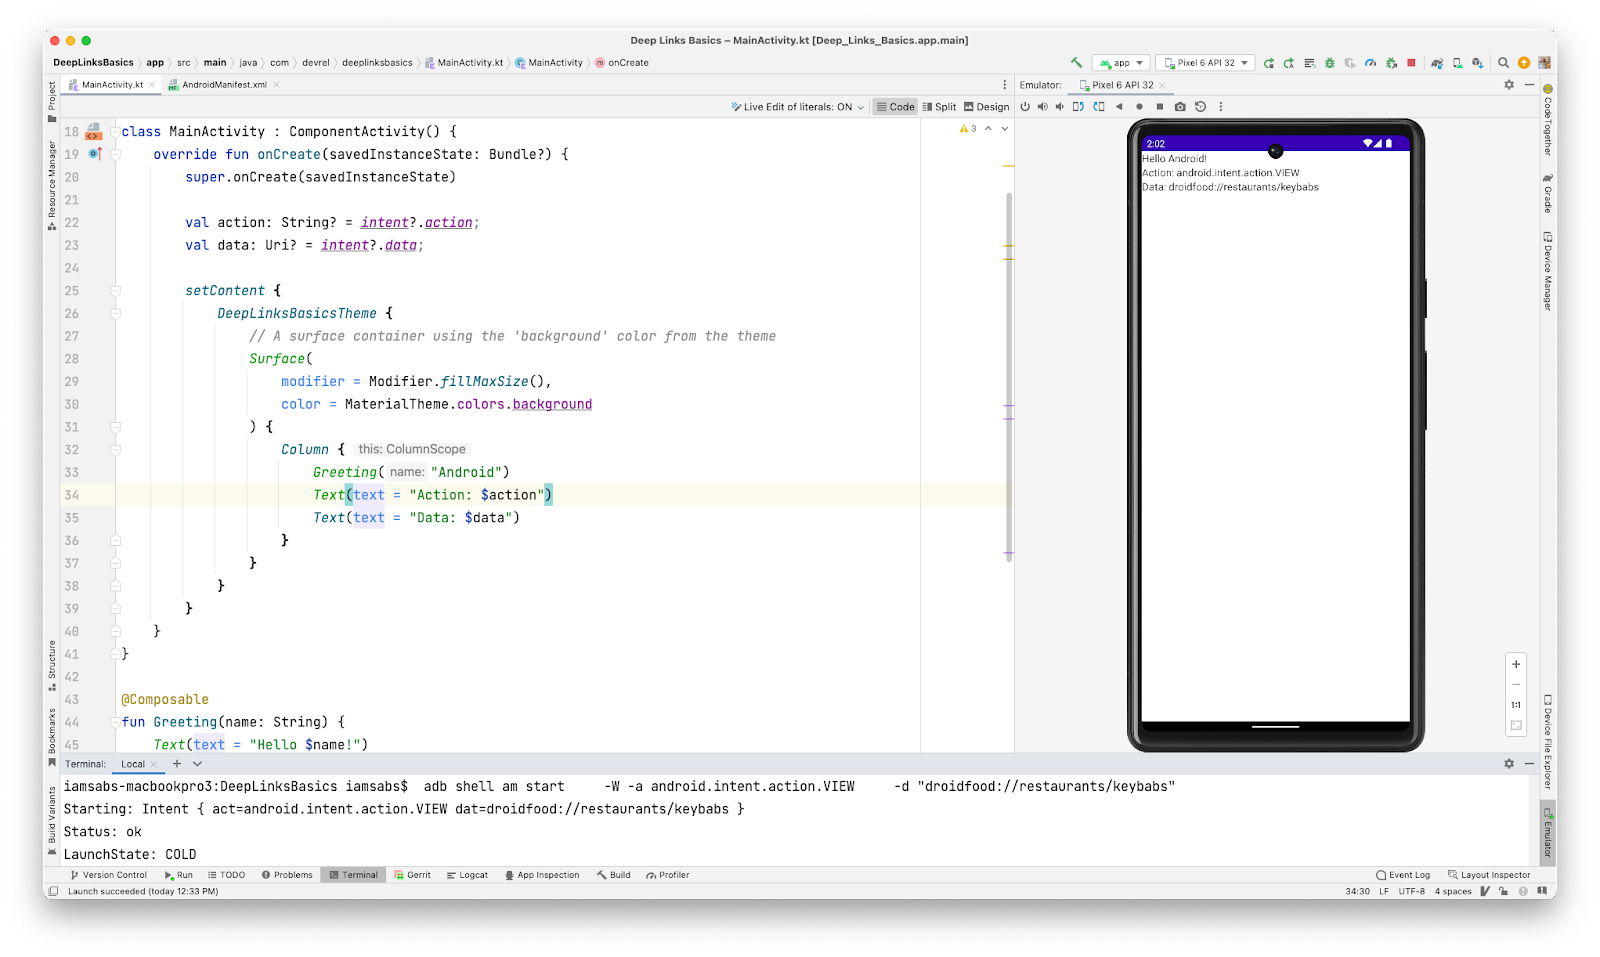
Web links
Web links are deep links that use http and https instead of custom schemes.
For the web link implementation, use the /restaurants/keybabs/order/latest.html path, which represents the latest order received in the restaurant.
- Adjust the manifest file using the existing intent filter.
AndroidManifest.xml
<intent-filter>
  <action android:name="android.intent.action.VIEW"/>
  <category android:name="android.intent.category.BROWSABLE"/>
  <category android:name="android.intent.category.DEFAULT"/>
  <data android:scheme="food"/>
  <data android:path="/restaurants/keybabs"/>

  <!-- Web link configuration -->
  <data android:scheme="http"/>
  <data android:scheme="https"/>
  <data android:host="sabs-deeplinks-test.web.app"/>
  <data android:path="/restaurants/keybabs/order/latest.html"/>
</intent-filter>
Since both paths are being shared (/restaurants/keybabs), it is a good practice to have them under the same intent filter because it makes the implementation simpler and the manifest file easier to read.
- Before testing the web link, restart the app to apply the new changes.
- Use the same adb command to launch the intent, but in this case we will update the URL.
adb shell am start -W -a android.intent.action.VIEW -d "https://sabs-deeplinks-test.web.app/restaurants/keybabs/orders/latest.html"
In the screenshot, note that the intent is received and the web browser is opened to show the website, a feature of versions later than Android 12. 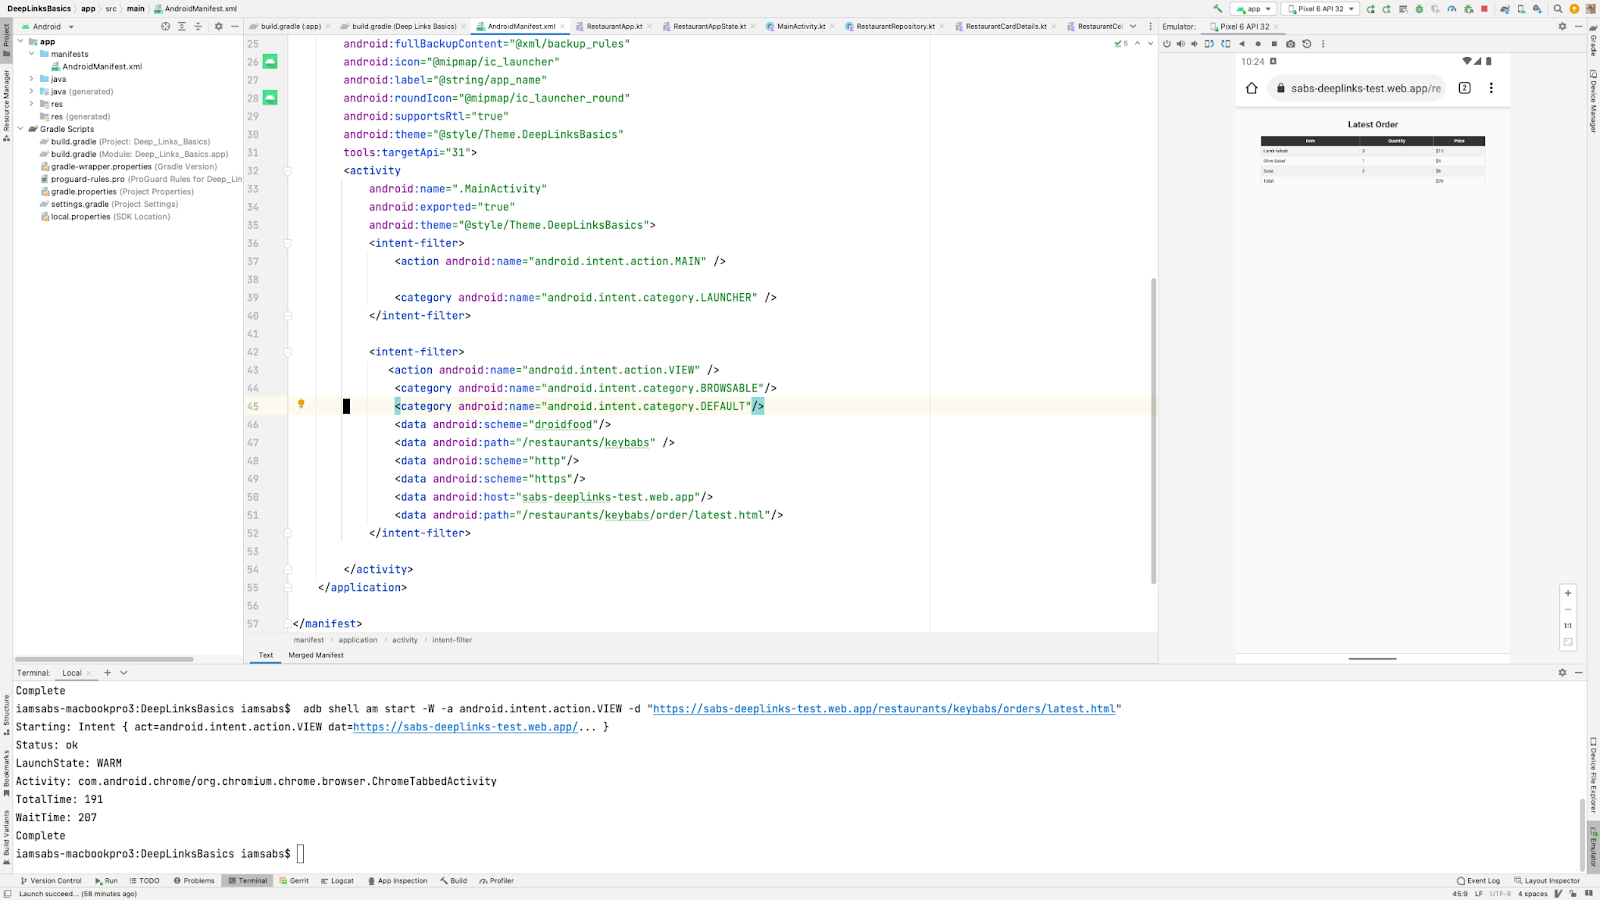
6. Configure Android App Links
These links offer the most seamless user experience because when a user clicks on a link, the link is guaranteed to take them to the app with no disambiguation dialog. Android App Links were implemented in Android 6.0 and are the most specific type of deep link. They are web links that use the http/https scheme and the android:autoVerify attribute, which makes the app the default handler for any matching link. There are two main steps to implement Android App Links:
- Update the manifest file with the appropriate intent filter.
- Add website association for verification.
Update Manifest file
- To support Android App Links, in the manifest file, replace the older configuration with the following:
AndroidManifest.xml
<!-- Replace deep link and web link configuration with this -->
<!-- Please update the host with your own domain -->
<intent-filter android:autoVerify="true">
  <action android:name="android.intent.action.VIEW"/>
  <category android:name="android.intent.category.BROWSABLE"/>
  <category android:name="android.intent.category.DEFAULT"/>
  <data android:scheme="https"/>
  <data android:host="example.com"/>
  <data android:pathPrefix="/restaurants"/>
</intent-filter>
This intent filter adds the android:autoVerify attribute and sets it to true. This enables Android OS to verify the domain when the application is installed, and on every new update.
Website Association
To verify an Android App Link, create an association between the application and the website. A Google Digital Asset Links (DAL) JSON file must be published on the website for the validation to occur.
Google DAL is a protocol and API that defines verifiable statements about other apps and websites. In this codelab, you create a statement about the Android app in the assetlinks.json file. Here is an example:
assetlinks.json
[{
  "relation": ["delegate_permission/common.handle_all_urls"],
  "target": {
    "namespace": "android_app",
    "package_name": "com.devrel.deeplinksbasics",
    "sha256_cert_fingerprints":
   ["B0:4E:29:05:4E:AB:44:C6:9A:CB:D5:89:A3:A8:1C:FF:09:6B:45:00:C5:FD:D1:3E:3E:12:C5:F3:FB:BD:BA:D3"]
  }
}]
This file can store a list of statements, but the example shows only one item. Each statement must contain the following fields:
- Relation. Describes one or more relations being declared about the target.
- Target. The asset this statement applies to. It can be one of two available targets:
weborandroid_app.
The android statement's target property contains the following fields:
namespace. Theandroid_appfor all Android apps.package_name. The fully qualified package name (com.devrel.deeplinksbasics).sha256_cert_fingerprints. The fingerprint of the certificate for the app. You learn how to generate this certificate in the next section.
Certificate fingerprint
There are various methods to obtain the certificate fingerprint. This codelab uses two methods, one for the application debug build and the other to help release the app to the Google Play Store.
Debug Configuration
The first time Android Studio runs your project, it automatically signs the app with a debug certificate. This certificate's location is $HOME/.android/debug.keystore. You can use a Gradle command to obtain this SHA-256 certificate fingerprint; here are the steps:
- Press
Controltwice and the Run anything menu should appear. If it does not appear, you can find it in the right-sidebar Gradle menu and then click on the Gradle icon.

- Type
gradle signingReportand pressEnter. The command executes in the console and displays the fingerprint information for the debug app variant.
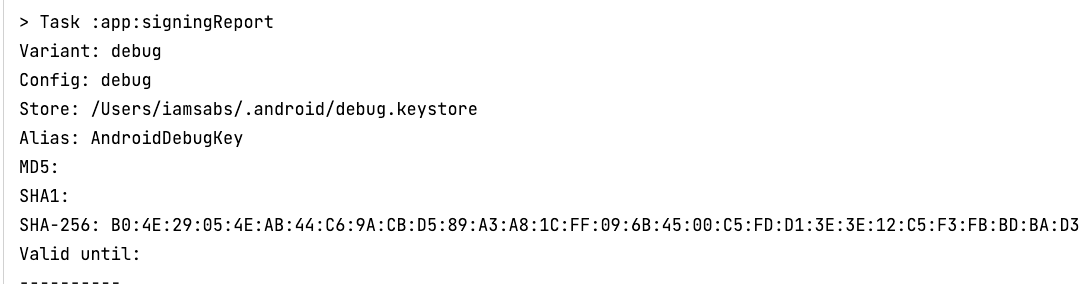
- To complete the website association, copy the SHA-256 certificate fingerprint, update the JSON file, and upload it to your website at the
https://<domain>/.well-know/assetlinks.jsonlocation. This Android App Links blog post helps you set it up. - If your app is still running, press Stop to stop the application.
- To relaunch the verification process, remove the app from the simulator. On the simulator, click and hold the DeepLinksBasics app icon and select App Info. Click Uninstall and Confirm on the modal. Then run the application so Android Studio can verify the association.
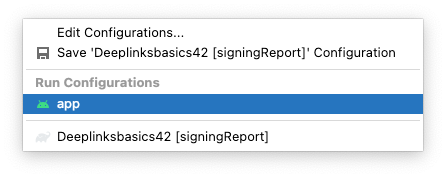
- Make sure you select the app running configuration. Otherwise, the Gradle signing report runs again.
- Restart the application and launch the intent with the Android App Link URL:
adb shell am start -W -a android.intent.action.VIEW -d "https://sabs-deeplinks-test.web.app/restaurants/"
- Notice that the app launches and the intent appears on the home screen.

Congratulations, you just created your first Android App Link!
Release configuration
Now, to be able to upload your application with Android App Links to the Play Store, you must use a release build with the proper certificate fingerprint. To generate and upload it, follow these steps:
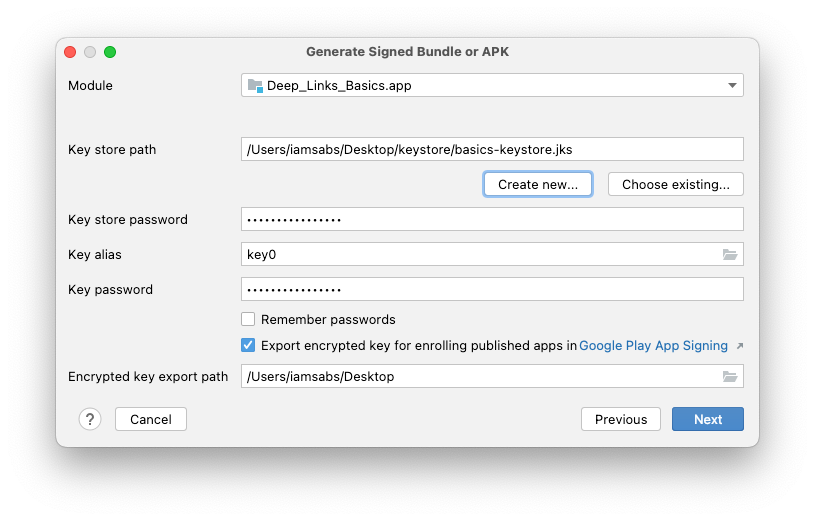
- In Android Studio main menu, click on Build > Generate Signed Bundle/APK.
- In the next dialog, select either Android App Bundle for Play App Signing or APK if you are deploying it to a device directly.
- In the next dialog, under Key store path, click Create new. This prompts a new window.
- Select a path for your keystore and name it
basics-keystore.jks. - Create and confirm a password for the keystore.
- Leave the default for the key Alias.
- Ensure that the password and confirmation are the same as in the keystore. They must match.
- Fill the Certificate information and click OK.

- Make sure the option to export the encrypted keys is checked for Play App Signing and click Next.
- On this dialog, select the release build variant and click Finish. Now you can upload your app to Google Play Store and use Play App Signing.
Play App Signing
With Play App Signing, Google helps you manage and protect your app's signing key. You only need to upload the app's signed bundle, which you accomplished in the previous step.
To retrieve the certificate fingerprint for the assetlinks.json file and have your Android App Links in the release variant build, follow these steps:
- In the Google Play Console, click on Create app.
- For the app name, type Deep Links Basics.
- Select App and Free for the next two options.
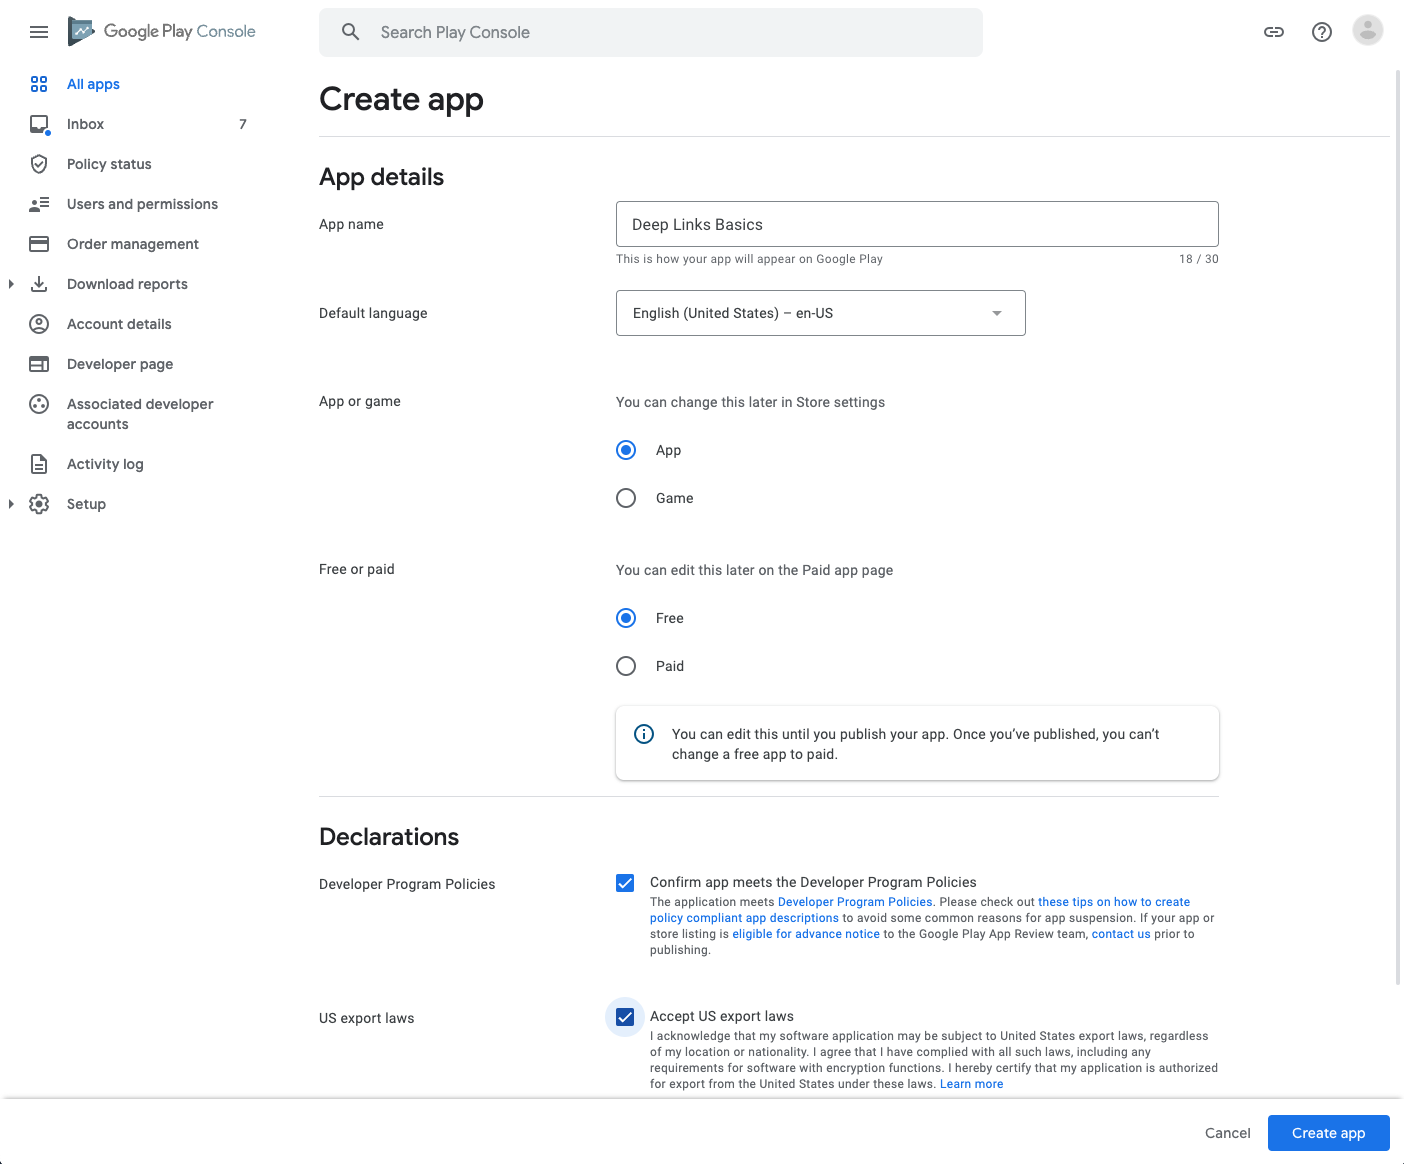
- Accept the Declarations and click Create app.
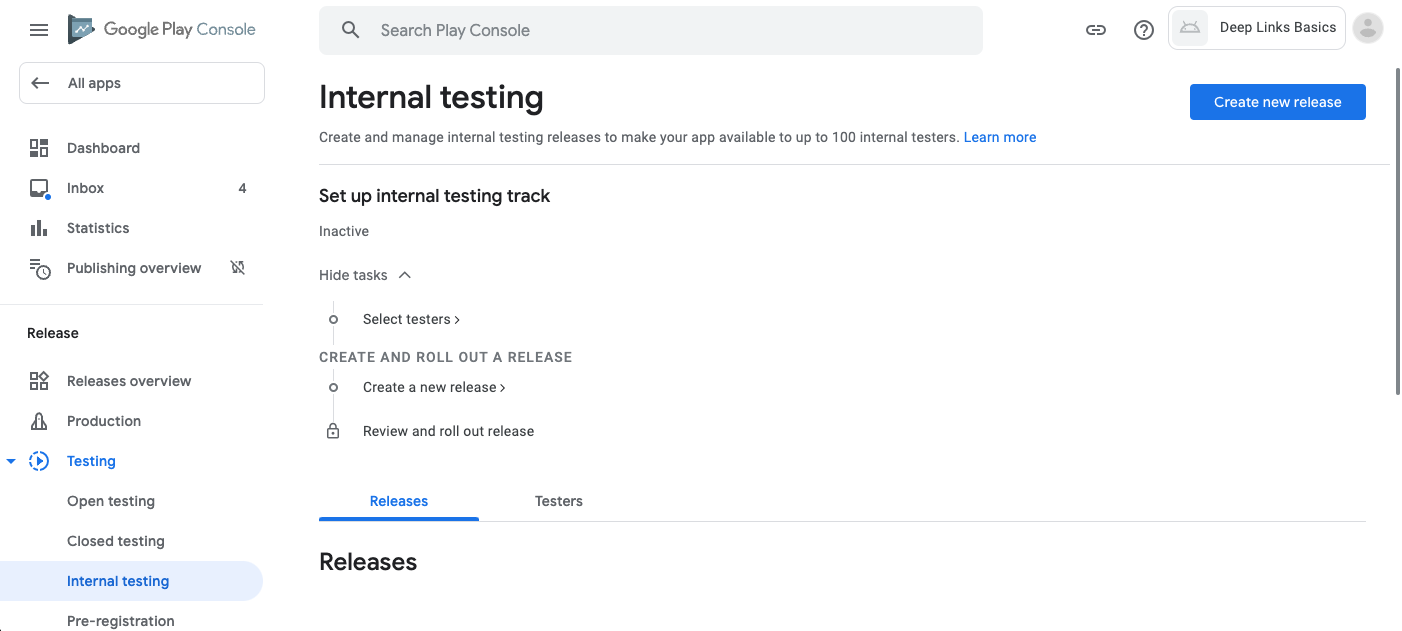
- To upload the bundle and be able to test Android App Links, under the left menu select Testing > internal testing.
- Click on Create new release.
- In the next screen, click Upload and then select the generated bundle from the last section. You can find the
app-release.aabfile under DeepLinksBascis > app > release. Click Open and wait until the bundle is uploaded. - Once uploaded, leave the rest of the fields with their defaults for now. Click on Save.
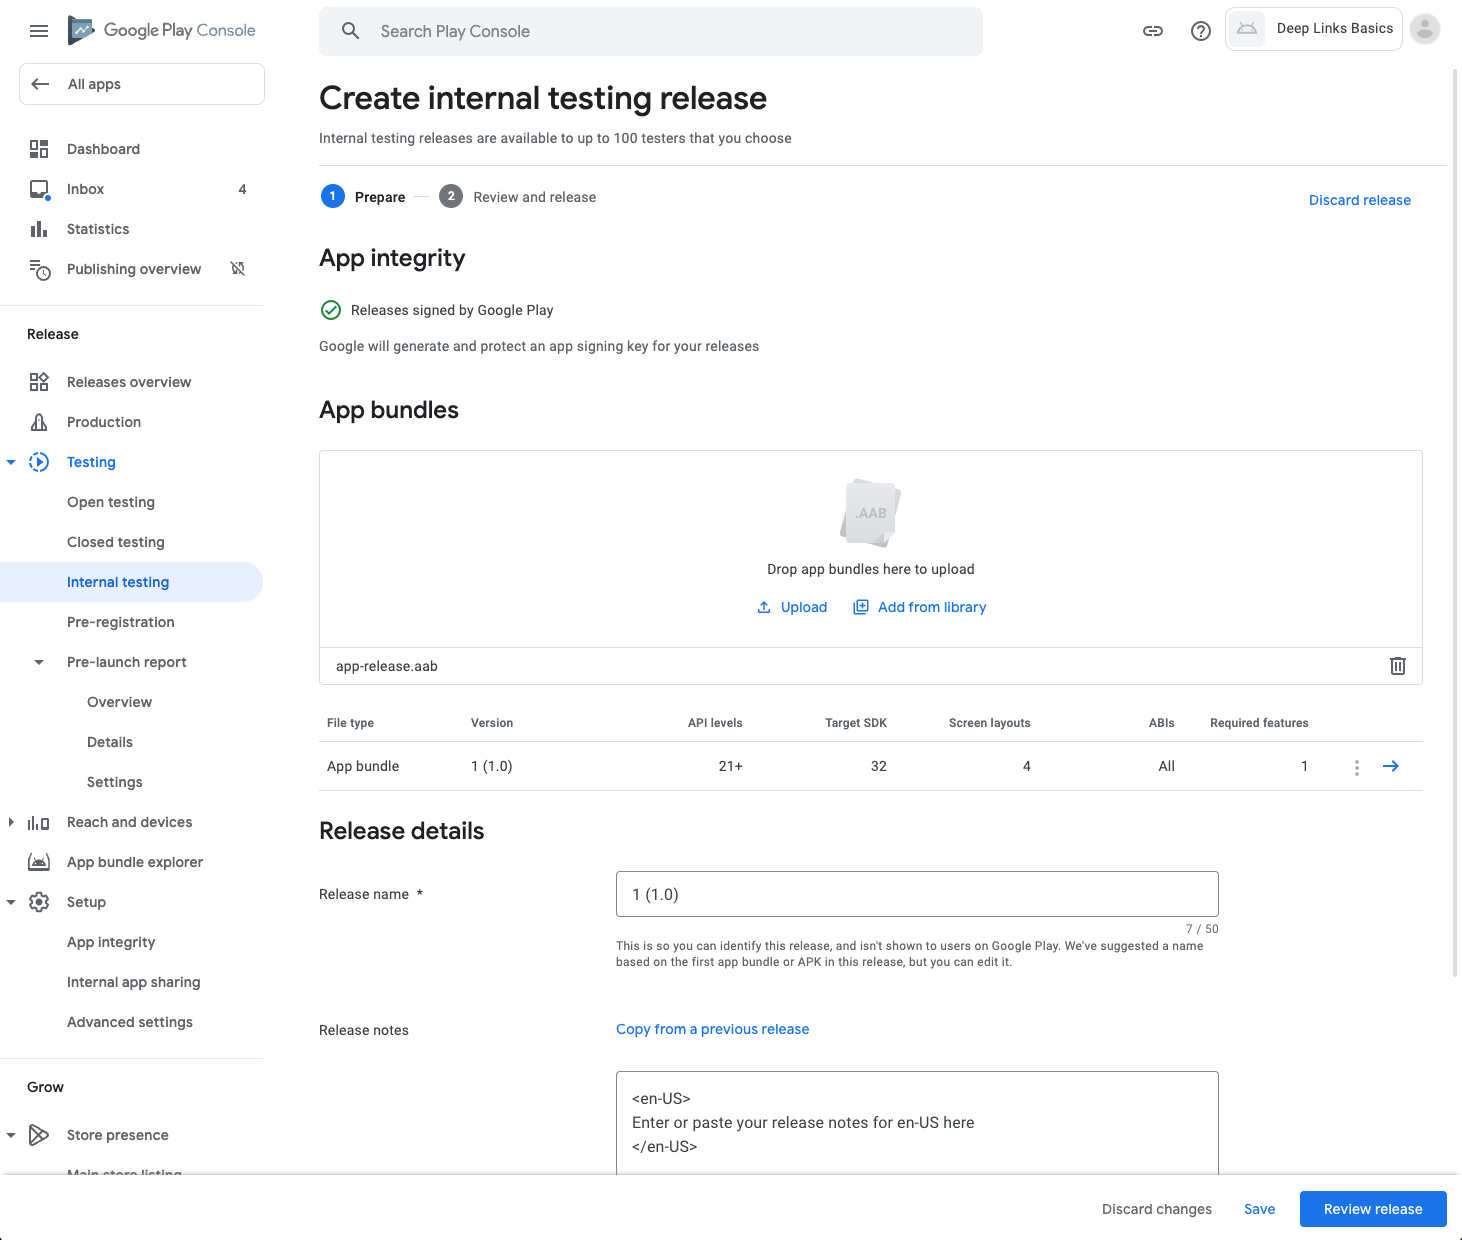
- To prepare for the next section, click Review release, and then, on the next screen, click Start rollout to Internal testing. Ignore the warnings, since publishing to the Play Store is out of scope for this codelab.
- Click Rollout on the modal.
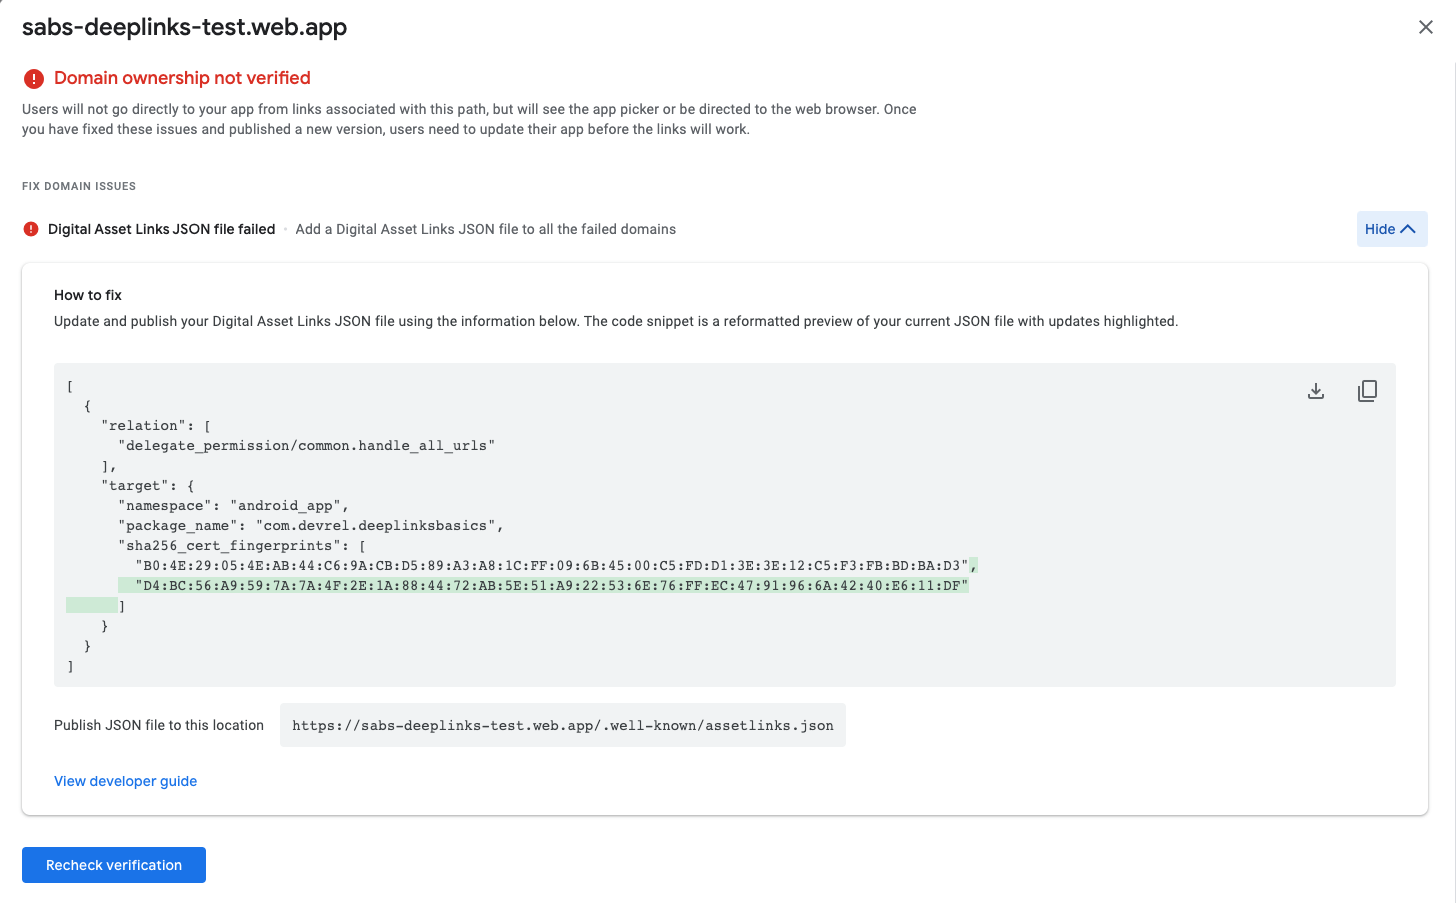
- To get the SHA-256 certificate fingerprint that Play App Signing created, go to the Deep links tab on the left menu, and then see the deep links dashboard.
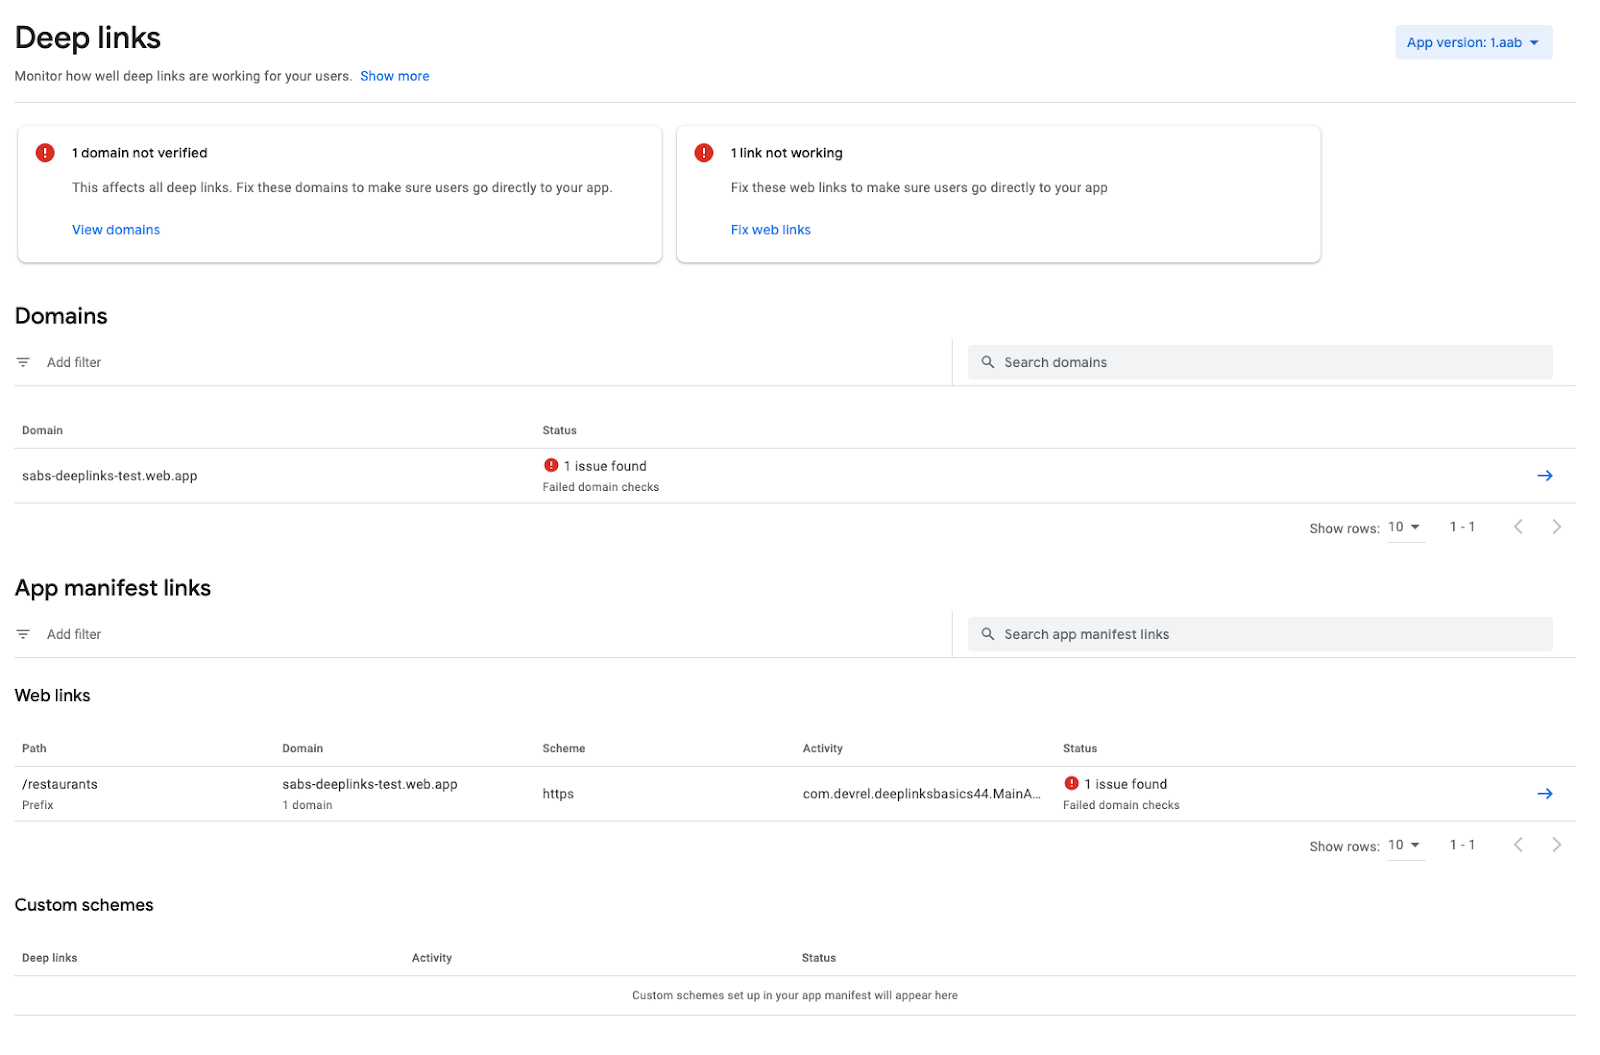
- Under the Domains section, click on the website's domain. Notice that Google Play Console mentions you have not validated the domain with your app (website association).
- Under the Fix Domain Issues section, click the Show More arrow.
- In this screen, Google Play Console shows how to update the
assetlinks.jsonfile with the certificate fingerprint. Copy the code snippet and update theassetlinks.jsonfile.
- Once the
assetlinks.jsonfile is updated, click Recheck verification. If the verification has not passed yet, allow up to five minutes for the verification service to detect the new changes. - If you reload the Deep links dashboard page you see that there are no more verification errors.
Verification of uploaded app
You already know how to verify an app that lives on the simulator. Now, you will verify your app that was uploaded to the Play store.
To install the application on the emulator and make sure the Android App Link is verified, follow these steps:
- On the left sidebar, click Releases Overview, and then select the latest release you just uploaded; it should be the 1 (1.0) release.
- Click Release details (right blue arrow) to go over the release details.
- Click the same right blue arrow button to get the app bundle information.
- On this modal, select the Downloads tab, and then click download for the Signed, universal APK asset.
- Before installing this bundle into the simulator, delete the previous application installed by Android Studio.
- On the simulator, click and hold the DeepLinksBasics app icon and select App Info. Click Uninstall and Confirm on the modal.
- To install the downloaded bundle, drag and drop the downloaded
1.apkfile to the simulator screen and wait for it to be installed.
- To test for validation, open the terminal in Android Studio and run the verification process with the following two commands:
adb shell pm verify-app-links --re-verify com.devrel.deeplinksbasics
adb shell pm get-app-links com.devrel.deeplinksbasics
- After the
get-app-linkscommand, you should see averifiedmessage on the console. If you see alegacy_failuremessage, make sure the certificate fingerprint matches the one you uploaded for the website. If it matches and you still don't see the verification message, try running steps 6, 7, and 8 again.

7. Implement Android App Links
Now that you have everything configured, it's time to implement the app.
Jetpack Compose will be used for implementation. To learn more about Jetpack Compose, see Build better apps faster with Jetpack Compose.
Code Dependencies
To include and update a few dependencies you need for this project, follow this step:
- Add the following to the
ModuleandProjectGradle files:
build.gradle (Project)
buildscript {
  ...
  dependencies {
    classpath "com.google.dagger:hilt-android-gradle-plugin:2.43"
  }
}
build.gradle (Module)
plugins {
  ...
  id 'kotlin-kapt'
  id 'dagger.hilt.android.plugin'
}
...
dependencies {
  ...
  implementation 'androidx.compose.material:material:1.2.1'
  ...
  implementation "androidx.lifecycle:lifecycle-viewmodel-ktx:2.5.1"
  implementation "androidx.lifecycle:lifecycle-viewmodel-compose:2.5.1"
  implementation "androidx.hilt:hilt-navigation-compose:1.0.0"
  implementation "com.google.dagger:hilt-android:2.43"
  kapt "com.google.dagger:hilt-compiler:2.43"
}
Included in the project zip file is an image directory with 10 royalty-free images that can be used for each restaurant. Feel free to use them, or you can include your own images.
To add the main entry point for the HiltAndroidApp, follow this step:
- Create a new Kotlin Class/File named
DeepLinksBasicsApplication.kt, and then update the manifest file with the new application name.
DeepLinksBasicsApplication.kt
package com.devrel.deeplinksbasics

import android.app.Application
import dagger.hilt.android.HiltAndroidApp

@HiltAndroidApp
class DeepLinksBasicsApplication : Application() {}
AndroidManifest.xml
<?xml version="1.0" encoding="utf-8"?>
<manifest xmlns:android="http://schemas.android.com/apk/res/android"
    xmlns:tools="http://schemas.android.com/tools">
    <!-- Update name property -->
    <application
        android:name=".DeepLinksBasicsApplication"
        ...
Data
You need to create a data layer for the restaurants with a Restaurant class, repository, and local data source. Everything will live under a data package that you need to create. To do this, follow these steps:
- In the
Restaurant.ktfile, create aRestaurantclass with the following code snippet:
Restaurant.kt
package com.devrel.deeplinksbasics.data

import androidx.annotation.DrawableRes
import androidx.compose.runtime.Immutable

@Immutable
data class Restaurant(
    val id: Int = -1,
    val name: String = "",
    val address: String = "",
    val type: String = "",
    val website: String = "",
    @DrawableRes val drawable: Int = -1
)
- In the
RestaurantLocalDataSource.ktfile, add some restaurants in the data source class. Don't forget to update the data with your own domain. Reference the following code snippet:
RestaurantLocalDataSource.kt
package com.devrel.deeplinksbasics.data

import com.devrel.deeplinksbasics.R
import javax.inject.Inject
import javax.inject.Singleton

@Singleton
class RestaurantLocalDataSource @Inject constructor() {
    val restaurantList = listOf(
        Restaurant(
            id = 1,
            name = "Pawtato",
            address = "3140 Skinner Hollow Road, Medford, Oregon 97501",
            type = "Potato and gnochi",
            // TODO: Update with your own domain
            website = "https://your.own.domain/restaurants/pawtato/",
            drawable = R.drawable.restaurant1,
        ),
        Restaurant(
            id = 2,
            name = "Rawrbucha",
            address = "2064 Carriage Lane, Mansfield, Ohio 44907",
            type = "Kombucha",
            // TODO: Update with your own domain
            website = "https://your.own.domain/restaurants/rawrbucha/",
            drawable = R.drawable.restaurant2,
        ),
        Restaurant(
            id = 3,
            name = "Pizzabus",
            address = "1447 Davis Avenue, Petaluma, California 94952",
            type = "Pizza",
            // TODO: Update with your own domain
            website = "https://your.own.domain/restaurants/pizzabus/",
            drawable = R.drawable.restaurant3,
        ),
        Restaurant(
            id = 4,
            name = "Keybabs",
            address = "3708 Pinnickinnick Street, Perth Amboy, New Jersey 08861",
            type = "Kebabs",
            // TODO: Update with your own domain
            website = "https://your.own.domain/restaurants/keybabs/",
            drawable = R.drawable.restaurant4,
        ),
        Restaurant(
            id = 5,
            name = "BBQ",
            address = "998 Newton Street, Saint Cloud, Minnesota 56301",
            type = "BBQ",
            // TODO: Update with your own domain
            website = "https://your.own.domain/restaurants/bbq/",
            drawable = R.drawable.restaurant5,
        ),
        Restaurant(
            id = 6,
            name = "Salades",
            address = "4522 Rockford Mountain Lane, Oshkosh, Wisconsin 54901",
            type = "salads",
            // TODO: Update with your own domain
            website = "https://your.own.domain/restaurants/salades/",
            drawable = R.drawable.restaurant6,
        ),
        Restaurant(
            id = 7,
            name = "Gyros and moar",
            address = "1993 Bird Spring Lane, Houston, Texas 77077",
            type = "Gyro",
            // TODO: Update with your own domain
            website = "https://your.own.domain/restaurants/gyrosAndMoar/",
            drawable = R.drawable.restaurant7,
        ),
        Restaurant(
            id = 8,
            name = "Peruvian ceviche",
            address = "2125 Deer Ridge Drive, Newark, New Jersey 07102",
            type = "seafood",
            // TODO: Update with your own domain
            website = "https://your.own.domain/restaurants/peruvianCeviche/",
            drawable = R.drawable.restaurant8,
        ),
        Restaurant(
            id = 9,
            name = "Vegan burgers",
            address = "594 Warner Street, Casper, Wyoming 82601",
            type = "vegan",
            // TODO: Update with your own domain
            website = "https://your.own.domain/restaurants/veganBurgers/",
            drawable = R.drawable.restaurant9,
        ),
        Restaurant(
            id = 10,
            name = "Taquitos",
            address = "1654 Hart Country Lane, Blue Ridge, Georgia 30513",
            type = "mexican",
            // TODO: Update with your own domain
            website = "https://your.own.domain/restaurants/taquitos/",
            drawable = R.drawable.restaurant10,
        ),
    )
}
- Remember to import images into your project.
- Next, in the
RestaurantRepository.ktfile, add theRestaurantrepository with a function to get a restaurant by its name, as in the following code snippet:
RestaurantRepository.kt
package com.devrel.deeplinksbasics.data

import javax.inject.Inject

class RestaurantRepository @Inject constructor(
    private val restaurantLocalDataSource: RestaurantLocalDataSource
){
    val restaurants: List<Restaurant> = restaurantLocalDataSource.restaurantList

    // Method to obtain a restaurant object by its name
    fun getRestaurantByName(name: String): Restaurant ? {
        return restaurantLocalDataSource.restaurantList.find {
            val processedName = it.name.filterNot { it.isWhitespace() }.lowercase()
            val nameToTest = name.filterNot { it.isWhitespace() }.lowercase()
            nameToTest == processedName
        }
    }
}
ViewModel
To be able to select a restaurant through the app and an Android App Link you need to create a ViewModel that changes the value of the selected restaurant. Follow this step:
- In the
RestaurantViewModel.ktfile, add the following code snippet:
RestaurantViewModel.kt
package com.devrel.deeplinksbasics.ui.restaurant

import androidx.lifecycle.ViewModel
import androidx.lifecycle.viewModelScope
import com.devrel.deeplinksbasics.data.Restaurant
import com.devrel.deeplinksbasics.data.RestaurantRepository
import dagger.hilt.android.lifecycle.HiltViewModel
import kotlinx.coroutines.flow.MutableStateFlow
import kotlinx.coroutines.flow.StateFlow
import kotlinx.coroutines.launch
import javax.inject.Inject

@HiltViewModel
class RestaurantViewModel @Inject constructor(
    private val restaurantRepository: RestaurantRepository,
) : ViewModel() {
    // restaurants and selected restaurant could be used as one UIState stream
    // which will scale better when exposing more data.
    // Since there are only these two, it is okay to expose them as separate streams
    val restaurants: List<Restaurant> = restaurantRepository.restaurants

    private val _selectedRestaurant = MutableStateFlow<Restaurant?>(value = null)
    val selectedRestaurant: StateFlow<Restaurant?>
        get() = _selectedRestaurant

    // Method to update the current restaurant selection
    fun updateSelectedRestaurantByName(name: String) {
        viewModelScope.launch {
            val selectedRestaurant: Restaurant? = restaurantRepository.getRestaurantByName(name)
            if (selectedRestaurant != null) {
                _selectedRestaurant.value = selectedRestaurant
            }
        }
    }
}
Compose
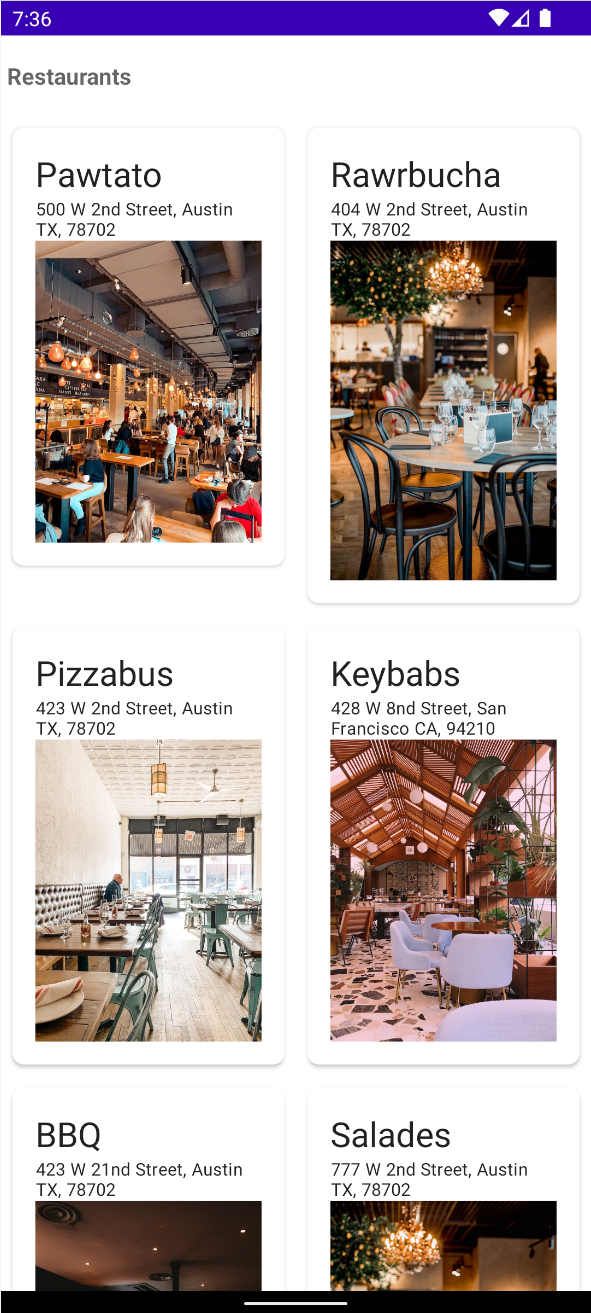
Now that you have the logic of the viewmodel and data layers, it's time to add a UI layer. Thanks to Jetpack Compose library, you can do it in a few steps. For this app, you want to render your restaurants on a grid of cards. The user can click on each card and go to each restaurant's details. You need three main composable functions and one navigation component that routes to the corresponding restaurant.
To add a UI layer, follow these steps:
- Begin with the composable function that renders each restaurant details. In the
RestaurantCardDetails.ktfile, add the following code snippet:
RestaurantCardDetails.kt
package com.devrel.deeplinksbasics.ui

import androidx.activity.compose.BackHandler
import androidx.compose.foundation.Image
import androidx.compose.foundation.clickable
import androidx.compose.foundation.layout.Arrangement
import androidx.compose.foundation.layout.Column
import androidx.compose.foundation.layout.Row
import androidx.compose.foundation.layout.Spacer
import androidx.compose.foundation.layout.fillMaxWidth
import androidx.compose.foundation.layout.padding
import androidx.compose.foundation.layout.width
import androidx.compose.foundation.shape.CornerSize
import androidx.compose.foundation.shape.RoundedCornerShape
import androidx.compose.foundation.text.selection.SelectionContainer
import androidx.compose.material.Card
import androidx.compose.material.Icon
import androidx.compose.material.MaterialTheme
import androidx.compose.material.Scaffold
import androidx.compose.material.Text
import androidx.compose.material.TopAppBar
import androidx.compose.material.icons.Icons
import androidx.compose.material.icons.filled.ArrowBack
import androidx.compose.runtime.Composable
import androidx.compose.ui.Modifier
import androidx.compose.ui.graphics.Color
import androidx.compose.ui.res.painterResource
import androidx.compose.ui.unit.dp
import com.devrel.deeplinksbasics.data.Restaurant


@Composable
fun RestaurantCardDetails (
    restaurant: Restaurant,
    onBack: () -> Unit,
) {
    BackHandler() {
       onBack()
    }
    Scaffold(
        topBar = {
            TopAppBar(
                backgroundColor = Color.Transparent,
                elevation = 0.dp,
            ) {
                Row(
                    horizontalArrangement = Arrangement.Start,
                    modifier = Modifier.padding(start = 8.dp)
                ) {
                    Icon(
                        imageVector = Icons.Default.ArrowBack,
                        contentDescription = "Arrow Back",
                       modifier = Modifier.clickable {
                            onBack()
                        }
                    )
                    Spacer(modifier = Modifier.width(8.dp))
                    Text(text = restaurant.name)
                }
            }
        }
    ) { paddingValues ->
        Card(
            modifier = Modifier
                .padding(paddingValues)
                .fillMaxWidth(),
            elevation = 2.dp,
            shape = RoundedCornerShape(corner = CornerSize(8.dp))
        ) {
            Column(
                modifier = Modifier
                    .padding(16.dp)
                    .fillMaxWidth()
            ) {
                Text(text = restaurant.name, style = MaterialTheme.typography.h6)
                Text(text = restaurant.type, style = MaterialTheme.typography.caption)
                Text(text = restaurant.address, style = MaterialTheme.typography.caption)
                SelectionContainer {
                    Text(text = restaurant.website, style = MaterialTheme.typography.caption)
                }
                Image(painter = painterResource(id = restaurant.drawable), contentDescription = "${restaurant.name}")
            }
        }
    }
}
- Next, implement the grid cell and the grid itself. In the
RastaurantCell.ktfile, add the following code snippet:
RestaurantCell.kt
package com.devrel.deeplinksbasics.ui

import androidx.compose.foundation.Image
import androidx.compose.foundation.layout.Column
import androidx.compose.foundation.layout.fillMaxWidth
import androidx.compose.foundation.layout.padding
import androidx.compose.foundation.shape.CornerSize
import androidx.compose.foundation.shape.RoundedCornerShape
import androidx.compose.material.Card
import androidx.compose.material.MaterialTheme
import androidx.compose.material.Text
import androidx.compose.runtime.Composable
import androidx.compose.ui.Modifier
import androidx.compose.ui.res.painterResource
import androidx.compose.ui.unit.dp
import com.devrel.deeplinksbasics.data.Restaurant

@Composable
fun RestaurantCell(
    restaurant: Restaurant
){
    Card(
        modifier = Modifier
            .padding(horizontal = 8.dp, vertical = 8.dp)
            .fillMaxWidth(),
        elevation = 2.dp,
        shape = RoundedCornerShape(corner = CornerSize(8.dp))
    ) {
        Column(
            modifier = Modifier
                .padding(16.dp)
                .fillMaxWidth()
        ) {
            Text(text = restaurant.name, style = MaterialTheme.typography.h6)
            Text(text = restaurant.address, style = MaterialTheme.typography.caption)
            Image(painter = painterResource(id = restaurant.drawable), contentDescription = "${restaurant.name}")
        }
    }
}
- In the
RestaurantGrid.ktfile, add the following code snippet:
RestaurantGrid.kt
package com.devrel.deeplinksbasics.ui

import androidx.compose.foundation.clickable
import androidx.compose.foundation.layout.Column
import androidx.compose.foundation.layout.fillMaxWidth
import androidx.compose.foundation.layout.padding
import androidx.compose.foundation.lazy.grid.GridCells
import androidx.compose.foundation.lazy.grid.LazyVerticalGrid
import androidx.compose.foundation.lazy.grid.items
import androidx.compose.material.Scaffold
import androidx.compose.material.Text
import androidx.compose.material.TopAppBar
import androidx.compose.runtime.Composable
import androidx.compose.ui.Modifier
import androidx.compose.ui.graphics.Color
import androidx.compose.ui.text.font.FontWeight
import androidx.compose.ui.unit.dp
import com.devrel.deeplinksbasics.data.Restaurant

@Composable
fun RestaurantGrid(
    restaurants: List<Restaurant>,
    onRestaurantSelected: (String) -> Unit,
    navigateToRestaurant: (String) -> Unit,
) {
    Scaffold(topBar = {
        TopAppBar(
            backgroundColor = Color.Transparent,
            elevation = 0.dp,
        ) {
            Text(text = "Restaurants", fontWeight = FontWeight.Bold)
        }
    }) { paddingValues ->
        LazyVerticalGrid(
            columns = GridCells.Adaptive(minSize = 200.dp),
            modifier = Modifier.padding(paddingValues)
        ) {
            items(items = restaurants) { restaurant ->
                Column(
                    modifier = Modifier
                        .fillMaxWidth()
                        .clickable(onClick = {
                            onRestaurantSelected(restaurant.name)
                            navigateToRestaurant(restaurant.name)
                        })
                ) {
                    RestaurantCell(restaurant)
                }
            }
        }
    }
}
- Next, you need to implement the application state and navigation logic, and update
MainActivity.kt. It can direct to a particular restaurant when a user clicks on a restaurant card. In theRestaurantAppState.ktfile, add the following code snippet:
RestaurantAppState.kt
package com.devrel.deeplinksbasics.ui

import androidx.compose.runtime.Composable
import androidx.compose.runtime.remember
import androidx.navigation.NavHostController
import androidx.navigation.compose.rememberNavController

sealed class Screen(val route: String) {
   object Grid : Screen("restaurants")
   object Name : Screen("restaurants/{name}") {
       fun createRoute(name: String) = "restaurants/$name"
   }
}

@Composable
fun rememberRestaurantAppState(
    navController: NavHostController = rememberNavController(),
) = remember(navController) {
    RestaurantAppState(navController)
}

class RestaurantAppState(
    val navController: NavHostController,
) {
    fun navigateToRestaurant(restaurantName: String) {
        navController.navigate(Screen.Name.createRoute(restaurantName))
    }

    fun navigateBack() {
        navController.popBackStack()
    }
}
- For the navigation, you need to create the
NavHostand use the composable routes to direct to each restaurant. In theRestaurantApp.ktfile, add the following code snippet:
RestaurantApp.kt
package com.devrel.deeplinksbasics.ui

import androidx.compose.runtime.Composable
import androidx.compose.runtime.collectAsState
import androidx.compose.runtime.getValue
import androidx.lifecycle.viewmodel.compose.viewModel
import androidx.navigation.compose.NavHost
import androidx.navigation.compose.composable
import com.devrel.deeplinksbasics.ui.restaurant.RestaurantViewModel

@Composable
fun RestaurantApp(
   viewModel: RestaurantViewModel = viewModel(),
   appState: RestaurantAppState = rememberRestaurantAppState(),
) {
    val selectedRestaurant by viewModel.selectedRestaurant.collectAsState()
    val onRestaurantSelected: (String) -> Unit = { viewModel.updateSelectedRestaurantByName(it) }

    NavHost(
        navController = appState.navController,
        startDestination = Screen.Grid.route,
    ) {
        // Default route that points to the restaurant grid
        composable(Screen.Grid.route) {
            RestaurantGrid(
                restaurants = viewModel.restaurants,
                onRestaurantSelected = onRestaurantSelected,
                navigateToRestaurant = { restaurantName ->
                    appState.navigateToRestaurant(restaurantName)
                },
            )
        }
        // Route for the navigation to a particular restaurant when a user clicks on it
        composable(Screen.Name.route) {
            RestaurantCardDetails(restaurant = selectedRestaurant!!, onBack = appState::navigateBack)
        }
    }
}
- You are now ready to update
MainActivity.ktwith the application instance. Replace the file with the following code:
MainActivity .kt
package com.devrel.deeplinksbasics

import android.os.Bundle
import androidx.activity.ComponentActivity
import androidx.activity.compose.setContent
import androidx.compose.foundation.layout.fillMaxSize
import androidx.compose.material.MaterialTheme
import androidx.compose.material.Surface
import androidx.compose.ui.Modifier
import com.devrel.deeplinksbasics.ui.RestaurantApp
import com.devrel.deeplinksbasics.ui.theme.DeepLinksBasicsTheme
import dagger.hilt.android.AndroidEntryPoint

@AndroidEntryPoint
class MainActivity : ComponentActivity() {
    override fun onCreate(savedInstanceState: Bundle?) {
        super.onCreate(savedInstanceState)
        setContent {
            DeepLinksBasicsTheme {
                Surface(
                    modifier = Modifier.fillMaxSize(),
                    color = MaterialTheme.colors.background
                ) {
                    RestaurantApp()
                }
            }
        }
    }
}
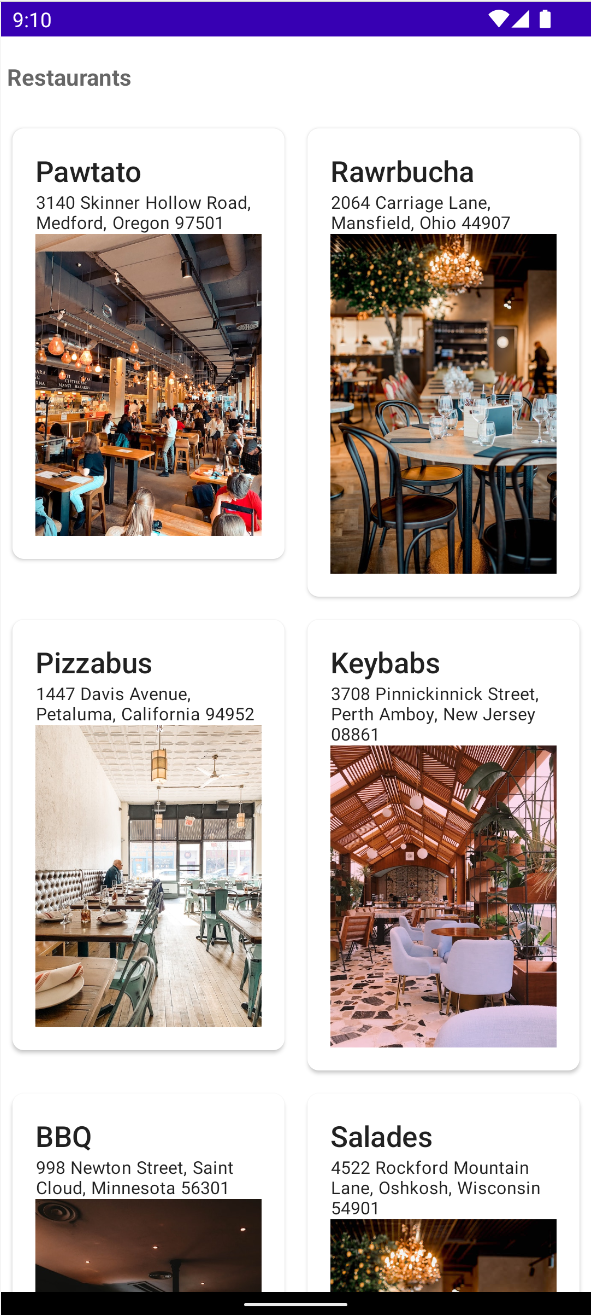
- Run the application to navigate the grid and select a particular restaurant. You should see that when you select a restaurant, the app displays that restaurant and its details.

Android App Links
Now, add your Android App Links to the grid and to every restaurant. You already have the AndroidManifest.xml section for the grid under /restaurants. What is really neat is that you can use the same for every restaurant; you just need to add a new route configuration to your logic. To do this, follow these steps:
- Update the Manifest file with the intent filter to receive
/restaurantsas a path, and remember to include your domain as host. In theAndroidManifest.xmlfile, add the following code snippet:
AndroidManifest.xml
...
<intent-filter android:autoVerify="true">
  <action android:name="android.intent.action.VIEW"/>
  <category android:name="android.intent.category.BROWSABLE"/>
  <category android:name="android.intent.category.DEFAULT"/>
  <data android:scheme="http"/>
  <data android:scheme="https"/>
  <data android:host="your.own.domain"/>
  <data android:pathPrefix="/restaurants"/>
</intent-filter>
- In the
RestaurantApp.ktfile, add the following code snippet:
RestaurantApp.kt
...
import androidx.navigation.NavType
import androidx.navigation.navArgument
import androidx.navigation.navDeepLink

fun RestaurantApp(...){
  NavHost(...){
    ...
    //  Route for the navigation to a particular restaurant when a user clicks on it
    //  and for an incoming deep link
    // Update with your own domain
        composable(Screen.Name.route,
            deepLinks = listOf(
                navDeepLink { uriPattern = "https://your.own.domain/restaurants/{name}" }
            ),
            arguments = listOf(
                navArgument("name") {
                    type = NavType.StringType
                }
            )
        ) { entry ->
            val restaurantName = entry.arguments?.getString("name")
            if (restaurantName != null) {
                LaunchedEffect(restaurantName) {
                    viewModel.updateSelectedRestaurantByName(restaurantName)
                }
            }
            selectedRestaurant?.let {
                RestaurantCardDetails(
                    restaurant = it,
                    onBack = appState::navigateBack
                )
            }
        }
  }
}
Under the hood, the NavHost matches Android Intent Uri data with the composable routes. If a route matches, the composable is rendered.
The composable component can take a deepLinks parameter, which contains a list of the URIs received from the intent filter. In this codelab, you add the URL of the created website and define the id parameter to receive and send the user to that particular restaurant.
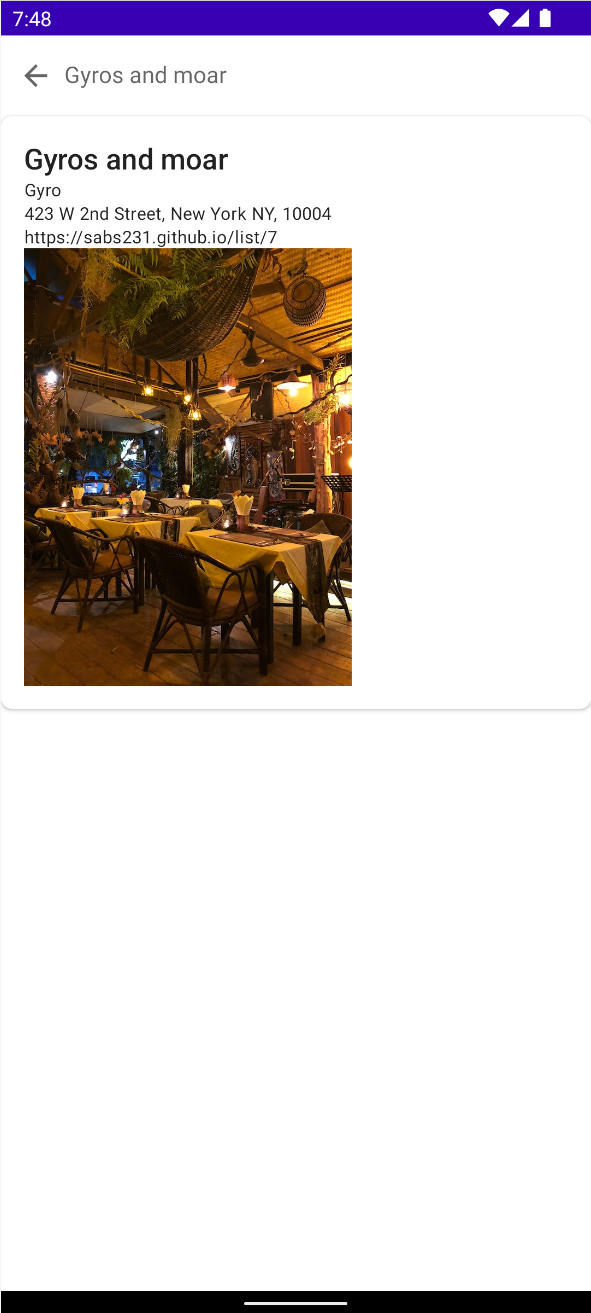
- To make sure the app logic sends a user to the corresponding restaurant after clicking an Android App Link, use
adb:
adb shell am start -W -a android.intent.action.VIEW -d "https://sabs-deeplinks-test.web.app/restaurants/gyrosAndMoar"
Notice that the app shows the corresponding restaurant.
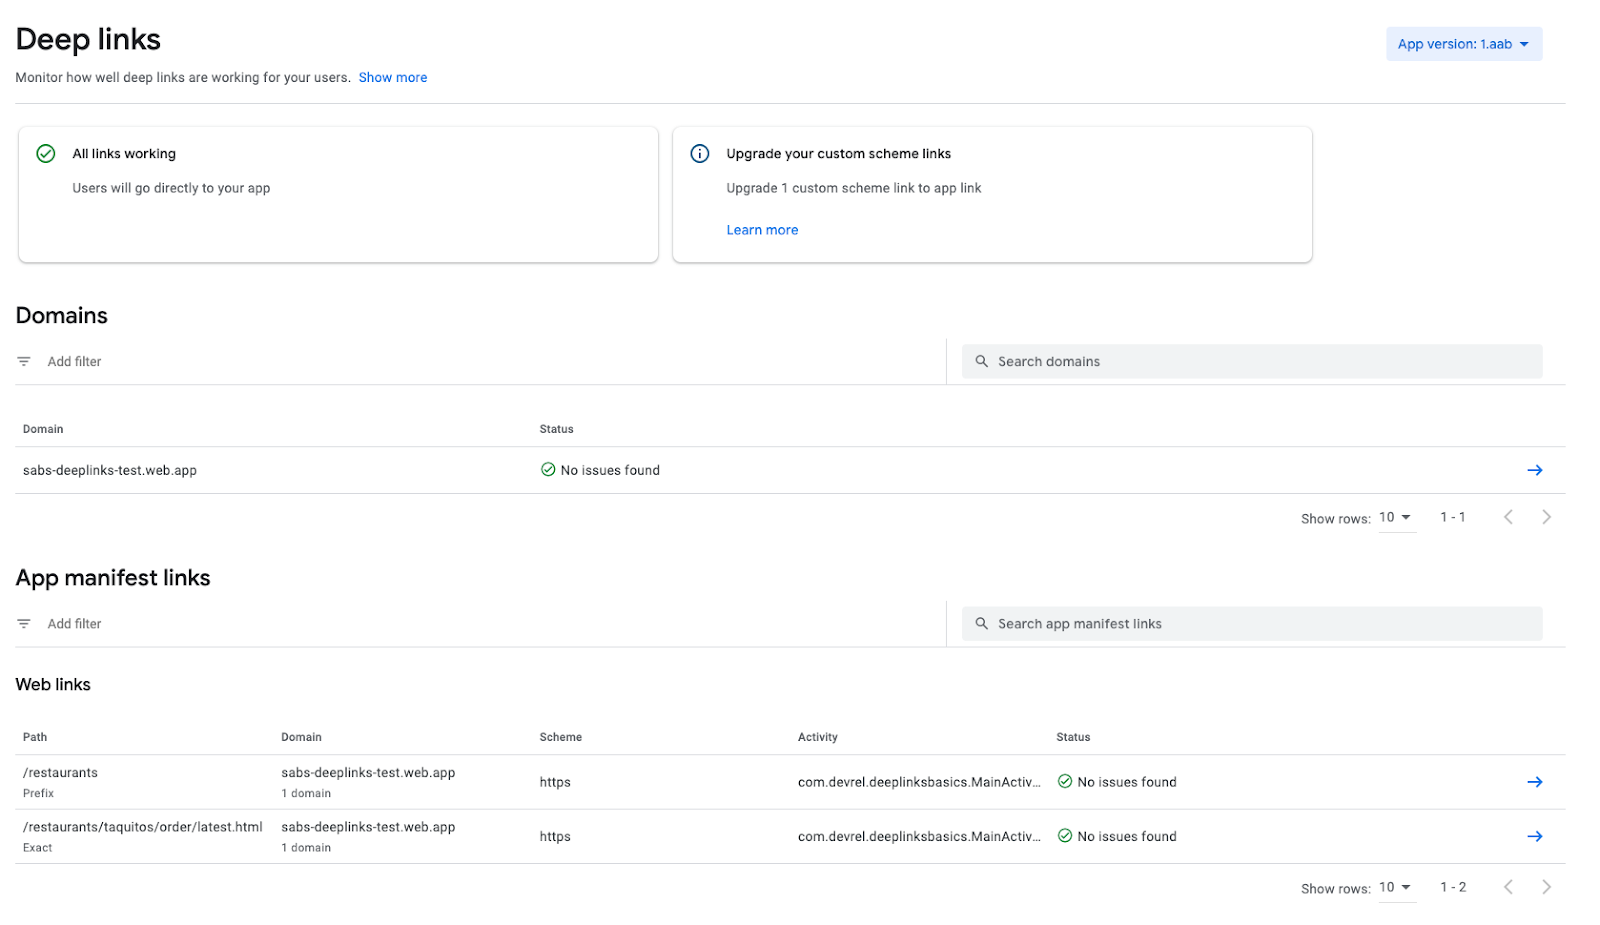
8. Review Play Developer Console Dashboard
You already looked at the deep links dashboard. This dashboard provides all the necessary information to make sure your deep links are working properly. You can even look per app version! It shows you the domains, links, and custom links that were added in your manifest file. It even shows where to update the assetlinks.json file in case there is a problem.
9. Conclusion
Congratulations, you've successfully built your first Android App Links application!
You understand the process to design, configure, create, and test your Android App Links. This process has many different parts, which is why this codelab aggregates all these details so you can be successful in your Android OS development.
You now know the key steps for Android App Links to work.