
RelativeLayout is a view group that displays child views in relative
positions. The position of each view can be specified as relative to sibling elements (such as to
the left-of or below another view) or in positions relative to the parent RelativeLayout area (such as aligned to the bottom, left or center).
Note: For better performance and tooling support, you should instead build your layout with ConstraintLayout.

A RelativeLayout is a very powerful utility for designing a user interface
because it can eliminate nested view groups and keep your layout hierarchy flat, which improves
performance. If you find yourself using several nested LinearLayout groups,
you may be able to replace them with a single RelativeLayout.
Positioning Views
RelativeLayout lets child views specify their position relative to the
parent view or to each other (specified by ID). So you can align two elements by right border, or
make one below another, centered in the screen, centered left, and so on. By default, all child
views are drawn at the top-left of the layout, so you must define the position of each view
using the various layout properties available from RelativeLayout.LayoutParams.
Some of the many layout properties available to views in a RelativeLayout
include:
android:layout_alignParentTop- If
"true", makes the top edge of this view match the top edge of the parent. android:layout_centerVertical- If
"true", centers this child vertically within its parent. android:layout_below- Positions the top edge of this view below the view specified with a resource ID.
android:layout_toRightOf- Positions the left edge of this view to the right of the view specified with a resource ID.
These are just a few examples. All layout attributes are documented at RelativeLayout.LayoutParams.
The value for each layout property is either a boolean to
enable a layout position relative to the parent RelativeLayout or an ID that
references another view in the layout against which the view should be positioned.
In your XML layout, dependencies against other views in the layout can be declared in any order. For example, you can declare that "view1" be positioned below "view2" even if "view2" is the last view declared in the hierarchy. The example below demonstrates such a scenario.
Example
Each of the attributes that control the relative position of each view are emphasized.
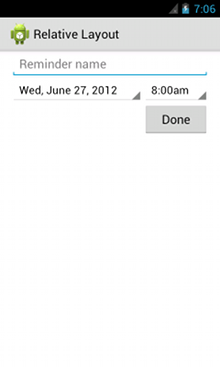
<?xml version="1.0" encoding="utf-8"?>
<RelativeLayout xmlns:android="http://schemas.android.com/apk/res/android"
    android:layout_width="match_parent"
    android:layout_height="match_parent"
    android:paddingLeft="16dp"
    android:paddingRight="16dp" >
    <EditText
        android:id="@+id/name"
        android:layout_width="match_parent"
        android:layout_height="wrap_content"
        android:hint="@string/reminder" />
    <Spinner
        android:id="@+id/dates"
        android:layout_width="0dp"
        android:layout_height="wrap_content"
        android:layout_below="@id/name"
        android:layout_alignParentLeft="true"
        android:layout_toLeftOf="@+id/times" />
    <Spinner
        android:id="@id/times"
        android:layout_width="96dp"
        android:layout_height="wrap_content"
        android:layout_below="@id/name"
        android:layout_alignParentRight="true" />
    <Button
        android:layout_width="96dp"
        android:layout_height="wrap_content"
        android:layout_below="@id/times"
        android:layout_alignParentRight="true"
        android:text="@string/done" />
</RelativeLayout>
For details about all the layout attributes available to each child view of a RelativeLayout, see RelativeLayout.LayoutParams.