

Gemini Developer API cho phép bạn truy cập vào các mô hình Gemini của Google, giúp bạn xây dựng các tính năng AI tạo sinh tiên tiến vào ứng dụng Android của mình, bao gồm cả tính năng trò chuyện bằng ngôn ngữ tự nhiên, tạo hình ảnh (bằng Nano Banana) và tạo văn bản dựa trên văn bản, hình ảnh, âm thanh và video đầu vào.
Để truy cập vào các mô hình Gemini Pro và Flash, bạn có thể sử dụng Gemini Developer API với Firebase AI Logic. API này giúp bạn bắt đầu mà không cần thẻ tín dụng và cung cấp một gói miễn phí hào phóng. Sau khi xác thực quá trình tích hợp với một nhóm nhỏ người dùng, bạn có thể mở rộng quy mô bằng cách chuyển sang gói trả phí.
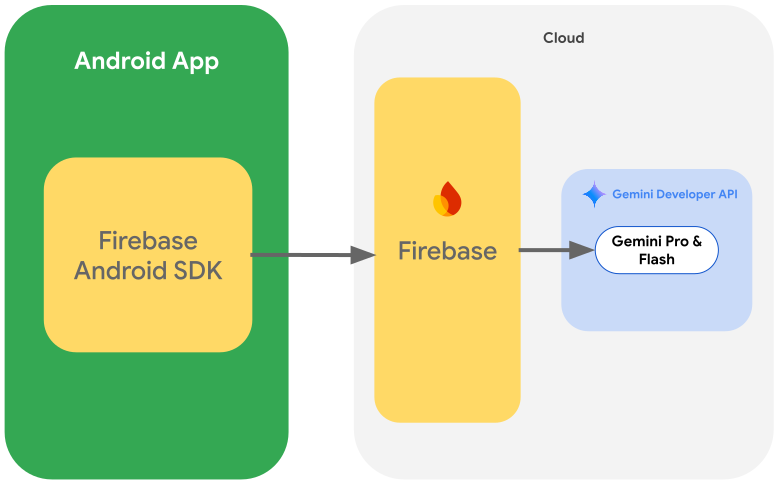
Bắt đầu
Trước khi tương tác với Gemini API trực tiếp từ ứng dụng, trước tiên, bạn cần làm một số việc, bao gồm làm quen với việc đưa ra câu lệnh cũng như thiết lập Firebase và ứng dụng để sử dụng SDK.
Thử nghiệm với câu lệnh
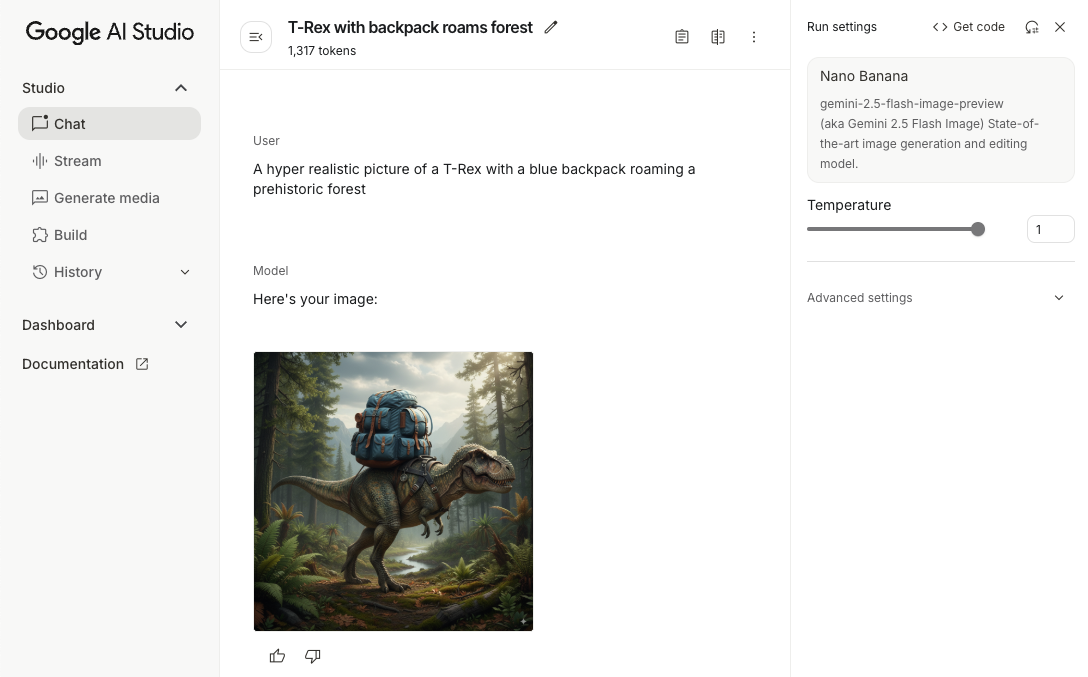
Việc thử nghiệm với câu lệnh có thể giúp bạn tìm ra cách diễn đạt, nội dung và định dạng tốt nhất cho ứng dụng Android của mình. Google AI Studio là một Môi trường phát triển tích hợp (IDE) mà bạn có thể dùng để tạo nguyên mẫu và thiết kế câu lệnh cho các trường hợp sử dụng của ứng dụng.
Việc tạo câu lệnh hiệu quả cho trường hợp sử dụng của bạn đòi hỏi phải thử nghiệm nhiều, đây là một phần quan trọng của quy trình. Bạn có thể tìm hiểu thêm về việc đưa ra câu lệnh trong tài liệu về Firebase.
Sau khi hài lòng với câu lệnh, hãy nhấp vào nút <> để nhận các đoạn mã mà bạn có thể thêm vào mã của mình.
Thiết lập dự án Firebase và kết nối ứng dụng với Firebase
Sau khi bạn đã sẵn sàng gọi API từ ứng dụng, hãy làm theo hướng dẫn trong "Bước 1" của hướng dẫn bắt đầu sử dụng Firebase AI Logic để thiết lập Firebase và bật các API và dịch vụ bắt buộc.
Thêm phần phụ thuộc vào Gradle
Thêm các phần phụ thuộc sau đây vào Gradle cho mô-đun ứng dụng:
Kotlin
dependencies {
  // ... other androidx dependencies

  // Import the BoM for the Firebase platform
  implementation(platform("com.google.firebase:firebase-bom:34.15.0"))

  // Add the dependencies for the Firebase AI Logic and App Check libraries
  // When using the BoM, you don't specify versions in Firebase library dependencies
  implementation("com.google.firebase:firebase-ai")
  implementation("com.google.firebase:firebase-appcheck-debug")
}
Java
dependencies {
  // Import the BoM for the Firebase platform
  implementation(platform("com.google.firebase:34.15.0"))

  // Add the dependencies for the Firebase AI Logic and App Check libraries
  // When using the BoM, you don't specify versions in Firebase library dependencies
  implementation("com.google.firebase:firebase-ai")
  implementation("com.google.firebase:firebase-appcheck-debug")

  // Required for one-shot operations (to use `ListenableFuture` from Guava Android)
  implementation("com.google.guava:guava:31.0.1-android")

  // Required for streaming operations (to use `Publisher` from Reactive Streams)
  implementation("org.reactivestreams:reactive-streams:1.0.4")
}
Định cấu hình nhà cung cấp gỡ lỗi Kiểm tra ứng dụng cho quá trình phát triển cục bộ
Kể từ đầu tháng 7 năm 2026, trong quy trình thiết lập có hướng dẫn cho AI Logic trong Bảng điều khiển Firebase, tính năng Kiểm tra ứng dụng Firebase sẽ tự động được thực thi để bảo vệ Gemini API. Đối với quá trình phát triển cục bộ, bạn cần định cấu hình nhà cung cấp gỡ lỗi Kiểm tra ứng dụng để bỏ qua quy trình chứng thực mà vẫn duy trì việc thực thi tính năng Kiểm tra ứng dụng.
Trong bản dựng gỡ lỗi, hãy định cấu hình tính năng Kiểm tra ứng dụng để sử dụng nhà máy nhà cung cấp gỡ lỗi:
Kotlin
Firebase.initialize(context = this)
Firebase.appCheck.installAppCheckProviderFactory(
    DebugAppCheckProviderFactory.getInstance(),
)
Java
FirebaseApp.initializeApp(/*context=*/ this);
FirebaseAppCheck firebaseAppCheck = FirebaseAppCheck.getInstance();
firebaseAppCheck.installAppCheckProviderFactory(
        DebugAppCheckProviderFactory.getInstance());
Lấy mã gỡ lỗi:
Chạy ứng dụng trong trình mô phỏng hoặc trên thiết bị kiểm thử.
Tìm mã gỡ lỗi Kiểm tra ứng dụng trong nhật ký của bạn. Ví dụ:
D DebugAppCheckProvider: Enter this debug secret into the allow list
in the Firebase Console for your project: 123a4567-b89c-12d3-e456-789012345678
Sao chép mã (ví dụ:
123a4567-b89c-12d3-e456-789012345678).
Đăng ký mã gỡ lỗi với tính năng Kiểm tra ứng dụng:
Trong Bảng điều khiển Firebase, hãy chuyển đến thẻ Bảo mật > Kiểm tra ứng dụng > Ứng dụng.
Tìm ứng dụng của bạn, nhấp vào trình đơn mục khác (), rồi chọn Quản lý mã gỡ lỗi.
Làm theo hướng dẫn trên màn hình để đăng ký mã gỡ lỗi.
Để biết thông tin chi tiết về nhà cung cấp gỡ lỗi (bao gồm cả cách lấy mã gỡ lỗi mới), hãy xem tài liệu chính thức về tính năng Kiểm tra ứng dụng.
Khởi chạy mô hình tạo sinh
Bắt đầu bằng cách tạo thực thể GenerativeModel và chỉ định tên mô hình:
Kotlin
// Start by instantiating a GenerativeModel and specifying the model name: val model = Firebase.ai(backend = GenerativeBackend.googleAI()) .generativeModel("gemini-2.5-flash")
Java
GenerativeModel firebaseAI = FirebaseAI.getInstance(GenerativeBackend.googleAI()) .generativeModel("gemini-2.5-flash"); GenerativeModelFutures model = GenerativeModelFutures.from(firebaseAI);
Tìm hiểu thêm về các mô hình hiện có để sử dụng với Gemini Developer API. Bạn cũng có thể tìm hiểu thêm về cách định cấu hình các tham số của mô hình.
Tương tác với Gemini Developer API từ ứng dụng của bạn
Giờ đây, bạn đã thiết lập Firebase và ứng dụng để sử dụng SDK, bạn đã sẵn sàng tương tác với Gemini Developer API từ ứng dụng của mình.
Tạo văn bản
Để tạo câu trả lời dạng văn bản, hãy gọi generateContent() bằng câu lệnh của bạn.
Kotlin
scope.launch { val response = model.generateContent("Write a story about a magic backpack.") }
Java
Content prompt = new Content.Builder() .addText("Write a story about a magic backpack.") .build(); ListenableFuture<GenerateContentResponse> response = model.generateContent(prompt); Futures.addCallback(response, new FutureCallback<GenerateContentResponse>() { @Override public void onSuccess(GenerateContentResponse result) { String resultText = result.getText(); } @Override public void onFailure(Throwable t) { t.printStackTrace(); } }, executor);
Tạo văn bản từ hình ảnh và các nội dung đa phương tiện khác
Bạn cũng có thể tạo văn bản từ một câu lệnh bao gồm văn bản cộng với hình ảnh hoặc các nội dung đa phương tiện khác. Khi gọi generateContent(), bạn có thể truyền nội dung đa phương tiện dưới dạng dữ liệu nội tuyến.
Ví dụ: để sử dụng ảnh bitmap, hãy sử dụng loại nội dung image:
Kotlin
scope.launch { val response = model.generateContent( content { image(bitmap) text("what is the object in the picture?") } ) }
Java
Content content = new Content.Builder() .addImage(bitmap) .addText("what is the object in the picture?") .build(); ListenableFuture<GenerateContentResponse> response = model.generateContent(content); Futures.addCallback(response, new FutureCallback<GenerateContentResponse>() { @Override public void onSuccess(GenerateContentResponse result) { String resultText = result.getText(); } @Override public void onFailure(Throwable t) { t.printStackTrace(); } }, executor);
Để truyền tệp âm thanh, hãy sử dụng loại nội dung inlineData:
Kotlin
scope.launch { val contentResolver = applicationContext.contentResolver contentResolver.openInputStream(audioUri).use { stream -> stream?.let { val bytes = it.readBytes() val prompt = content { inlineData(bytes, "audio/mpeg") // Specify the appropriate audio MIME type text("Transcribe this audio recording.") } val response = model.generateContent(prompt) } } }
Java
ContentResolver resolver = applicationContext.getContentResolver(); try (InputStream stream = resolver.openInputStream(audioUri)) { File audioFile = new File(new URI(audioUri.toString())); int audioSize = (int) audioFile.length(); byte[] audioBytes = new byte[audioSize]; if (stream != null) { stream.read(audioBytes, 0, audioBytes.length); stream.close(); // Provide a prompt that includes audio specified earlier and text Content prompt = new Content.Builder() .addInlineData(audioBytes, "audio/mpeg") // Specify the appropriate audio MIME type .addText("Transcribe what's said in this audio recording.") .build(); // To generate text output, call `generateContent` with the prompt ListenableFuture<GenerateContentResponse> response = model.generateContent(prompt); Futures.addCallback(response, new FutureCallback<GenerateContentResponse>() { @Override public void onSuccess(GenerateContentResponse result) { String text = result.getText(); Log.d(TAG, (text == null) ? "" : text); } @Override public void onFailure(Throwable t) { Log.e(TAG, "Failed to generate a response", t); } }, executor); } else { Log.e(TAG, "Error getting input stream for file."); // Handle the error appropriately } } catch (IOException e) { Log.e(TAG, "Failed to read the audio file", e); } catch (URISyntaxException e) { Log.e(TAG, "Invalid audio file", e); }
Và để cung cấp tệp video, hãy tiếp tục sử dụng loại nội dung inlineData:
Kotlin
scope.launch { val contentResolver = applicationContext.contentResolver contentResolver.openInputStream(videoUri).use { stream -> stream?.let { val bytes = it.readBytes() val prompt = content { inlineData(bytes, "video/mp4") // Specify the appropriate video MIME type text("Describe the content of this video") } val response = model.generateContent(prompt) } } }
Java
ContentResolver resolver = applicationContext.getContentResolver(); try (InputStream stream = resolver.openInputStream(videoUri)) { File videoFile = new File(new URI(videoUri.toString())); int videoSize = (int) videoFile.length(); byte[] videoBytes = new byte[videoSize]; if (stream != null) { stream.read(videoBytes, 0, videoBytes.length); stream.close(); // Provide a prompt that includes video specified earlier and text Content prompt = new Content.Builder() .addInlineData(videoBytes, "video/mp4") .addText("Describe the content of this video") .build(); // To generate text output, call generateContent with the prompt ListenableFuture<GenerateContentResponse> response = model.generateContent(prompt); Futures.addCallback(response, new FutureCallback<GenerateContentResponse>() { @Override public void onSuccess(GenerateContentResponse result) { String resultText = result.getText(); System.out.println(resultText); } @Override public void onFailure(Throwable t) { t.printStackTrace(); } }, executor); } } catch (IOException e) { e.printStackTrace(); } catch (URISyntaxException e) { e.printStackTrace(); }
Tương tự, bạn cũng có thể truyền tài liệu PDF (application/pdf) và tài liệu văn bản thuần tuý (text/plain) bằng cách truyền Loại MIME tương ứng làm tham số.
Trò chuyện nhiều lượt
Bạn cũng có thể hỗ trợ các cuộc trò chuyện nhiều lượt. Khởi chạy cuộc trò chuyện bằng hàm startChat(). Bạn có thể tuỳ ý cung cấp cho mô hình một nhật ký tin nhắn. Sau đó, hãy gọi hàm sendMessage() để gửi tin nhắn trò chuyện.
Kotlin
val chat = model.startChat( history = listOf( content(role = "user") { text("Hello, I have 2 dogs in my house.") }, content(role = "model") { text("Great to meet you. What would you like to know?") } ) ) scope.launch { val response = chat.sendMessage("How many paws are in my house?") }
Java
Content.Builder userContentBuilder = new Content.Builder(); userContentBuilder.setRole("user"); userContentBuilder.addText("Hello, I have 2 dogs in my house."); Content userContent = userContentBuilder.build(); Content.Builder modelContentBuilder = new Content.Builder(); modelContentBuilder.setRole("model"); modelContentBuilder.addText("Great to meet you. What would you like to know?"); Content modelContent = modelContentBuilder.build(); List<Content> history = Arrays.asList(userContent, modelContent); // Initialize the chat ChatFutures chat = model.startChat(history); // Create a new user message Content.Builder messageBuilder = new Content.Builder(); messageBuilder.setRole("user"); messageBuilder.addText("How many paws are in my house?"); Content message = messageBuilder.build(); // Send the message ListenableFuture<GenerateContentResponse> response = chat.sendMessage(message); Futures.addCallback(response, new FutureCallback<GenerateContentResponse>() { @Override public void onSuccess(GenerateContentResponse result) { String resultText = result.getText(); System.out.println(resultText); } @Override public void onFailure(Throwable t) { t.printStackTrace(); } }, executor);
Tạo hình ảnh trên Android bằng Nano Banana
Mô hình Gemini 2.5 Flash Image (còn gọi là Nano Banana) có thể tạo và chỉnh sửa hình ảnh bằng cách tận dụng kiến thức và khả năng suy luận trên thế giới. Mô hình này tạo ra hình ảnh phù hợp theo ngữ cảnh, kết hợp hoặc xen kẽ liền mạch văn bản và hình ảnh đầu ra. Mô hình này cũng có thể tạo hình ảnh chính xác với các chuỗi văn bản dài và hỗ trợ chỉnh sửa hình ảnh bằng ngôn ngữ tự nhiên mà vẫn duy trì ngữ cảnh.
Hướng dẫn này mô tả cách sử dụng các mô hình Gemini Image (các mô hình Nano Banana) bằng SDK Firebase AI Logic cho Android. Tìm thêm thông tin chi tiết về cách tạo hình ảnh bằng Gemini trong tài liệu về Firebase.
Khởi chạy mô hình tạo sinh
Tạo thực thể GenerativeModel và chỉ định tên mô hình gemini-2.5-flash-image-preview. Xác minh rằng bạn định cấu hình responseModalities để bao gồm cả TEXT và IMAGE.
Kotlin
val model = Firebase.ai(backend = GenerativeBackend.googleAI()).generativeModel( modelName = "gemini-2.5-flash-image-preview", // Configure the model to respond with text and images (required) generationConfig = generationConfig { responseModalities = listOf( ResponseModality.TEXT, ResponseModality.IMAGE ) } )
Java
GenerativeModel ai = FirebaseAI.getInstance(GenerativeBackend.googleAI()).generativeModel( "gemini-2.5-flash-image-preview", // Configure the model to respond with text and images (required) new GenerationConfig.Builder() .setResponseModalities(Arrays.asList(ResponseModality.TEXT, ResponseModality.IMAGE)) .build() ); GenerativeModelFutures model = GenerativeModelFutures.from(ai);
Tạo hình ảnh (chỉ nhập văn bản)
Bạn có thể hướng dẫn mô hình Gemini tạo hình ảnh bằng cách cung cấp câu lệnh chỉ bằng văn bản:
Kotlin
scope.launch { // Provide a text prompt instructing the model to generate an image val prompt = "A hyper realistic picture of a t-rex with a blue bag pack roaming a pre-historic forest." // To generate image output, call `generateContent` with the text input val generatedImageAsBitmap: Bitmap? = model.generateContent(prompt) .candidates.first().content.parts.filterIsInstance<ImagePart>() .firstOrNull()?.image }
Java
// Provide a text prompt instructing the model to generate an image Content prompt = new Content.Builder() .addText("Generate an image of the Eiffel Tower with fireworks in the background.") .build(); // To generate an image, call `generateContent` with the text input ListenableFuture<GenerateContentResponse> response = model.generateContent(prompt); Futures.addCallback(response, new FutureCallback<GenerateContentResponse>() { @Override public void onSuccess(GenerateContentResponse result) { // iterate over all the parts in the first candidate in the result object for (Part part : result.getCandidates().get(0).getContent().getParts()) { if (part instanceof ImagePart) { ImagePart imagePart = (ImagePart) part; // The returned image as a bitmap Bitmap generatedImageAsBitmap = imagePart.getImage(); break; } } } @Override public void onFailure(Throwable t) { t.printStackTrace(); } }, executor);
Chỉnh sửa hình ảnh (nhập văn bản và hình ảnh)
Bạn có thể yêu cầu mô hình Gemini chỉnh sửa hình ảnh hiện có bằng cách cung cấp cả văn bản và một hoặc nhiều hình ảnh trong câu lệnh:
Kotlin
scope.launch { // Provide a text prompt instructing the model to edit the image val prompt = content { image(bitmap) text("Edit this image to make it look like a cartoon") } // To edit the image, call `generateContent` with the prompt (image and text input) val generatedImageAsBitmap: Bitmap? = model.generateContent(prompt) .candidates.first().content.parts.filterIsInstance<ImagePart>().firstOrNull()?.image // Handle the generated text and image }
Java
// Provide an image for the model to edit Bitmap bitmap = BitmapFactory.decodeResource(resources, R.drawable.scones); // Provide a text prompt instructing the model to edit the image Content promptcontent = new Content.Builder() .addImage(bitmap) .addText("Edit this image to make it look like a cartoon") .build(); // To edit the image, call `generateContent` with the prompt (image and text input) ListenableFuture<GenerateContentResponse> response = model.generateContent(promptcontent); Futures.addCallback(response, new FutureCallback<GenerateContentResponse>() { @Override public void onSuccess(GenerateContentResponse result) { // iterate over all the parts in the first candidate in the result object for (Part part : result.getCandidates().get(0).getContent().getParts()) { if (part instanceof ImagePart) { ImagePart imagePart = (ImagePart) part; Bitmap generatedImageAsBitmap = imagePart.getImage(); break; } } } @Override public void onFailure(Throwable t) { t.printStackTrace(); } }, executor);
Lặp lại và chỉnh sửa hình ảnh thông qua cuộc trò chuyện nhiều lượt
Để có phương pháp chỉnh sửa hình ảnh bằng ngôn ngữ tự nhiên, bạn có thể sử dụng cuộc trò chuyện nhiều lượt. Điều này cho phép bạn đưa ra các yêu cầu tiếp theo để tinh chỉnh nội dung chỉnh sửa mà không cần gửi lại hình ảnh gốc.
Trước tiên, hãy khởi chạy cuộc trò chuyện bằng startChat(), bạn có thể tuỳ ý cung cấp nhật ký tin nhắn. Sau đó, hãy sử dụng sendMessage() cho các tin nhắn tiếp theo:
Kotlin
scope.launch { // Create the initial prompt instructing the model to edit the image val prompt = content { image(bitmap) text("Edit this image to make it look like a cartoon") } // Initialize the chat val chat = model.startChat() // To generate an initial response, send a user message with the image and text prompt var response = chat.sendMessage(prompt) // Inspect the returned image var generatedImageAsBitmap: Bitmap? = response .candidates.first().content.parts.filterIsInstance<ImagePart>().firstOrNull()?.image // Follow up requests do not need to specify the image again response = chat.sendMessage("But make it old-school line drawing style") generatedImageAsBitmap = response .candidates.first().content.parts.filterIsInstance<ImagePart>().firstOrNull()?.image }
Java
// Provide an image for the model to edit Bitmap bitmap = BitmapFactory.decodeResource(resources, R.drawable.scones); // Initialize the chat ChatFutures chat = model.startChat(); // Create the initial prompt instructing the model to edit the image Content prompt = new Content.Builder() .setRole("user") .addImage(bitmap) .addText("Edit this image to make it look like a cartoon") .build(); // To generate an initial response, send a user message with the image and text prompt ListenableFuture<GenerateContentResponse> response = chat.sendMessage(prompt); // Extract the image from the initial response ListenableFuture<Bitmap> initialRequest = Futures.transform(response, result -> { for (Part part : result.getCandidates().get(0).getContent().getParts()) { if (part instanceof ImagePart) { ImagePart imagePart = (ImagePart) part; return imagePart.getImage(); } } return null; }, executor); // Follow up requests do not need to specify the image again ListenableFuture<GenerateContentResponse> modelResponseFuture = Futures.transformAsync( initialRequest, generatedImage -> { Content followUpPrompt = new Content.Builder() .addText("But make it old-school line drawing style") .build(); return chat.sendMessage(followUpPrompt); }, executor); // Add a final callback to check the reworked image Futures.addCallback(modelResponseFuture, new FutureCallback<GenerateContentResponse>() { @Override public void onSuccess(GenerateContentResponse result) { for (Part part : result.getCandidates().get(0).getContent().getParts()) { if (part instanceof ImagePart) { ImagePart imagePart = (ImagePart) part; Bitmap generatedImageAsBitmap = imagePart.getImage(); break; } } } @Override public void onFailure(Throwable t) { t.printStackTrace(); } }, executor);
Những điểm cần lưu ý và hạn chế
Hãy lưu ý những điểm cần lưu ý và hạn chế sau:
- Định dạng đầu ra: Hình ảnh được tạo dưới dạng PNG với kích thước tối đa là 1024 px.
- Loại đầu vào: Mô hình này không hỗ trợ đầu vào âm thanh hoặc video để tạo hình ảnh.
- Hỗ trợ ngôn ngữ: Để có hiệu suất tốt nhất, hãy sử dụng các ngôn ngữ sau:
tiếng Anh (
en), tiếng Tây Ban Nha (Mexico) (es-mx), tiếng Nhật (ja-jp), tiếng Trung giản thể (zh-cn) và tiếng Hindi (hi-in). - Vấn đề về quá trình tạo:
- Quá trình tạo hình ảnh có thể không phải lúc nào cũng kích hoạt, đôi khi chỉ tạo ra đầu ra dạng văn bản. Hãy yêu cầu đầu ra dạng hình ảnh một cách rõ ràng (ví dụ: "tạo hình ảnh", "cung cấp hình ảnh khi bạn tiếp tục", "cập nhật hình ảnh").
- Mô hình có thể ngừng tạo trong quá trình. Hãy thử lại hoặc thử một câu lệnh khác.
- Mô hình có thể tạo văn bản dưới dạng hình ảnh. Hãy yêu cầu đầu ra dạng văn bản một cách rõ ràng (ví dụ: "tạo văn bản tường thuật cùng với hình minh hoạ").
Để biết thêm thông tin chi tiết, hãy xem tài liệu về Firebase.
Các bước tiếp theo
Sau khi thiết lập ứng dụng, hãy cân nhắc các bước tiếp theo sau đây:
- Xem lại ứng dụng mẫu Firebase Hướng dẫn nhanh cho Android và Danh mục mẫu AI cho Android trên GitHub.
- Chuẩn bị ứng dụng của bạn cho quá trình phát hành công khai, bao gồm thiết lập tính năng Kiểm tra ứng dụng Firebase để bảo vệ Gemini API khỏi hành vi sử dụng sai mục đích của các ứng dụng trái phép.
- Tìm hiểu thêm về Firebase AI Logic trong tài liệu về Firebase .