

पिछली रिलीज़ की तरह, Android 15 में भी कुछ ऐसे बदलाव किए गए हैं जिनसे आपके ऐप्लिकेशन पर असर पड़ सकता है. यहां दिए गए बदलाव, सिर्फ़ उन ऐप्लिकेशन पर लागू होते हैं जो Android 15 या इसके बाद के वर्शन को टारगेट कर रहे हैं. अगर आपका ऐप्लिकेशन, Android 15 या इसके बाद के वर्शन को टारगेट कर रहा है, तो आपको अपने ऐप्लिकेशन में बदलाव करना चाहिए, ताकि इन व्यवहारों को सही तरीके से सपोर्ट किया जा सके. हालांकि, ऐसा सिर्फ़ उन मामलों में करें जहां यह लागू होता है.
Android 15 पर चलने वाले सभी ऐप्लिकेशन पर असर डालने वाले बदलावों की सूची भी ज़रूर देखें. इससे कोई फ़र्क़ नहीं पड़ता कि आपके ऐप्लिकेशन का targetSdkVersion क्या है.
मुख्य फ़ंक्शन
Android 15, Android सिस्टम की कई मुख्य सुविधाओं में बदलाव करता है या उन्हें बेहतर बनाता है.
फ़ोरग्राउंड सेवाओं में बदलाव
We are making the following changes to foreground services with Android 15.
- Data sync foreground service timeout behavior
- New media processing foreground service type
- Restrictions on
BOOT_COMPLETEDbroadcast receivers launching foreground services - Restrictions on starting foreground services while an app holds the
SYSTEM_ALERT_WINDOWpermission
Data sync foreground service timeout behavior
Android 15 में, dataSync के लिए टाइम आउट का नया तरीका जोड़ा गया है. यह तरीका, Android 15 (एपीआई लेवल 35) या उसके बाद के वर्शन को टारगेट करने वाले ऐप्लिकेशन के लिए है. यह व्यवहार, mediaProcessing फ़ोरग्राउंड सेवा के नए टाइप पर भी लागू होता है.
सिस्टम, किसी ऐप्लिकेशन की dataSync सेवाओं को 24 घंटे में कुल छह घंटे तक चलने की अनुमति देता है. इसके बाद, सिस्टम चल रही सेवा के Service.onTimeout(int, int) तरीके को कॉल करता है. इसे Android 15 में लॉन्च किया गया था. इस दौरान, सेवा के पास Service.stopSelf() को कॉल करने के लिए कुछ सेकंड होते हैं. Service.onTimeout() को कॉल करने के बाद, सेवा को फ़ोरग्राउंड सेवा नहीं माना जाता. अगर सेवा Service.stopSelf() को कॉल नहीं करती है, तो सिस्टम में कोई इंटरनल अपवाद दिखता है. अपवाद को Logcat में इस मैसेज के साथ लॉग किया जाता है:
Fatal Exception: android.app.RemoteServiceException: "A foreground service of
type dataSync did not stop within its timeout: [component name]"
इस बदलाव की वजह से होने वाली समस्याओं से बचने के लिए, इनमें से एक या एक से ज़्यादा काम किए जा सकते हैं:
- अपनी सेवा में
Service.onTimeout(int, int)का नया तरीका लागू करें. जब आपके ऐप्लिकेशन को कॉलबैक मिल जाए, तोstopSelf()को कुछ सेकंड के अंदर कॉल करना न भूलें. (अगर ऐप्लिकेशन को तुरंत नहीं रोका जाता, तो सिस्टम गड़बड़ी जनरेट करता है.) - पक्का करें कि आपके ऐप्लिकेशन की
dataSyncसेवाएं किसी भी 24 घंटे में कुल छह घंटे से ज़्यादा न चलें (जब तक कि उपयोगकर्ता टाइमर को रीसेट करके ऐप्लिकेशन से इंटरैक्ट न करे). dataSyncफ़ोरग्राउंड सेवाओं को सिर्फ़ उपयोगकर्ता के सीधे इंटरैक्शन के ज़रिए शुरू करें. सेवा शुरू होने पर, आपका ऐप्लिकेशन फ़ोरग्राउंड में होता है. इसलिए, ऐप्लिकेशन के बैकग्राउंड में जाने के बाद भी, आपकी सेवा के पास पूरे छह घंटे होते हैं.dataSyncफ़ोरग्राउंड सेवा का इस्तेमाल करने के बजाय, किसी अन्य एपीआई का इस्तेमाल करें.
अगर आपके ऐप्लिकेशन की dataSync फ़ोरग्राउंड सेवाएं पिछले 24 में छह घंटे तक चली हैं, तो आपके पास dataSync की दूसरी फ़ोरग्राउंड सेवा शुरू करने का विकल्प नहीं है. जब तक उपयोगकर्ता आपके ऐप्लिकेशन को फ़ोरग्राउंड में न ले जाए (इससे टाइमर रीसेट हो जाता है). किसी दूसरी dataSync फ़ोरग्राउंड सेवा को शुरू करने की कोशिश करने पर, सिस्टम ForegroundServiceStartNotAllowedException का गड़बड़ी का मैसेज दिखाता है. जैसे, "फ़ोरग्राउंड सेवा के लिए समयसीमा खत्म हो चुकी है" डेटा सिंक करें.
टेस्ट करना
अपने ऐप्लिकेशन के व्यवहार की जांच करने के लिए, डेटा सिंक टाइम आउट की सुविधा चालू की जा सकती है. भले ही, आपका ऐप्लिकेशन Android 15 को टारगेट न करता हो. हालांकि, यह ज़रूरी है कि ऐप्लिकेशन Android 15 वाले डिवाइस पर चल रहा हो. टाइम आउट की सुविधा चालू करने के लिए, यहां दिया गया adb निर्देश चलाएं:
adb shell am compat enable FGS_INTRODUCE_TIME_LIMITS your-package-name
टाइम आउट की अवधि में भी बदलाव किया जा सकता है, ताकि यह आसानी से जांचा जा सके कि तय सीमा पूरी होने पर आपका ऐप्लिकेशन कैसा व्यवहार करता है. टाइम आउट की नई अवधि सेट करने के लिए, यह adb कमांड चलाएं:
adb shell device_config put activity_manager data_sync_fgs_timeout_duration duration-in-milliseconds
New media processing foreground service type
Android 15 में, फ़ोरग्राउंड सेवा का एक नया टाइप mediaProcessing जोड़ा गया है. यह सेवा टाइप, मीडिया फ़ाइलों को ट्रांसकोड करने जैसे कामों के लिए सही है. उदाहरण के लिए, कोई मीडिया ऐप्लिकेशन किसी ऑडियो फ़ाइल को डाउनलोड कर सकता है और उसे चलाने से पहले, किसी दूसरे फ़ॉर्मैट में बदल सकता है. mediaProcessing फ़ोरग्राउंड सेवा का इस्तेमाल करके, यह पक्का किया जा सकता है कि ऐप्लिकेशन बैकग्राउंड में होने पर भी कन्वर्ज़न जारी रहे.
सिस्टम किसी ऐप्लिकेशन की mediaProcessing सेवाओं को 24 घंटों में कुल छह घंटे चलाने की अनुमति देता है. इसके बाद, सिस्टम, मौजूदा सेवा के Service.onTimeout(int, int) तरीके को कॉल करता है (Android 15 में शुरू किया गया). फ़िलहाल, Service.stopSelf() को कॉल करने के लिए सेवा को कुछ सेकंड मिलेंगे. अगर सेवा Service.stopSelf() को कॉल नहीं करती है, तो सिस्टम में कोई इंटरनल अपवाद दिखता है. अपवाद को Logcat में लॉग इन किया जाता है जिसमें यह मैसेज शामिल है:
Fatal Exception: android.app.RemoteServiceException: "A foreground service of
type mediaProcessing did not stop within its timeout: [component name]"
अपवाद से बचने के लिए, इनमें से कोई एक काम किया जा सकता है:
- अपनी सेवा में
Service.onTimeout(int, int)का नया तरीका लागू करें. जब आपके ऐप्लिकेशन को कॉलबैक मिलता है, तो कुछ सेकंड के अंदरstopSelf()को कॉल करना न भूलें. (अगर ऐप्लिकेशन को तुरंत नहीं रोका जाता, तो सिस्टम गड़बड़ी जनरेट करता है.) - पक्का करें कि आपके ऐप्लिकेशन की
mediaProcessingसेवाएं, 24 घंटे में कुल छह घंटे से ज़्यादा न चलें. ऐसा तब तक नहीं होगा, जब तक उपयोगकर्ता ऐप्लिकेशन के साथ इंटरैक्ट करके, टाइमर को रीसेट नहीं करता. - सीधे उपयोगकर्ता के साथ इंटरैक्शन होने पर ही,
mediaProcessingफ़ोरग्राउंड सेवाएं शुरू करें. सेवा शुरू होने के समय, आपका ऐप्लिकेशन फ़ोरग्राउंड में होता है. इसलिए, ऐप्लिकेशन के बैकग्राउंड में चलने के बाद, आपकी सेवा को पूरे छह घंटे तक चालू रखा जाता है. mediaProcessingफ़ोरग्राउंड सेवा का इस्तेमाल करने के बजाय, WorkManager जैसे अन्य एपीआई का इस्तेमाल करें.
अगर आपके ऐप्लिकेशन की mediaProcessing फ़ोरग्राउंड सेवाएं पिछले 24 में छह घंटों तक चली हैं, तो mediaProcessing फ़ोरग्राउंड सेवा को तब तक शुरू नहीं किया जा सकता, जब तक
उपयोगकर्ता आपके ऐप्लिकेशन को फ़ोरग्राउंड में न ले जाए (इससे टाइमर रीसेट हो जाता है). अगर कोई दूसरी mediaProcessing फ़ोरग्राउंड सेवा शुरू करने की कोशिश की जाती है, तो सिस्टम ForegroundServiceStartNotAllowedException को गड़बड़ी का मैसेज दिखाता है. जैसे, "mediaProcessing टाइप की फ़ोरग्राउंड सेवा के लिए, समयसीमा पहले ही खत्म हो चुकी है".
mediaProcessing सेवा टाइप के बारे में ज़्यादा जानकारी के लिए, Android 15 के लिए फ़ोरग्राउंड सेवा टाइप में हुए बदलाव: मीडिया प्रोसेसिंग देखें.
टेस्ट करना
अपने ऐप्लिकेशन के काम करने के तरीके की जांच करने के लिए, मीडिया प्रोसेसिंग के टाइम आउट को चालू किया जा सकता है. भले ही, आपका ऐप्लिकेशन Android 15 को टारगेट न करता हो (जब तक कि ऐप्लिकेशन, Android 15 डिवाइस पर चल रहा हो). टाइम आउट की सुविधा चालू करने के लिए, यह adb कमांड चलाएं:
adb shell am compat enable FGS_INTRODUCE_TIME_LIMITS your-package-name
टाइम आउट की अवधि में बदलाव भी किया जा सकता है. इससे यह जांचना आसान हो जाता है कि
तय सीमा पूरी होने पर, आपका ऐप्लिकेशन कैसे काम करता है. टाइम आउट की नई अवधि सेट करने के लिए, यह adb कमांड चलाएं:
adb shell device_config put activity_manager media_processing_fgs_timeout_duration duration-in-milliseconds
Restrictions on BOOT_COMPLETED broadcast receivers launching foreground services
BOOT_COMPLETED ब्रॉडकास्ट रिसीवर के लिए, फ़ोरग्राउंड सेवाएं लॉन्च करने से जुड़ी नई पाबंदियां हैं. BOOT_COMPLETED रिसीवर को
फ़ोरग्राउंड सेवाओं के ये टाइप हैं:
dataSynccameramediaPlaybackphoneCallmediaProjectionmicrophone(यह पाबंदीmicrophoneके लिए तब से लागू है Android 14)
अगर BOOT_COMPLETED रिसीवर इनमें से किसी भी तरह के फ़ोरग्राउंड को लॉन्च करने की कोशिश करता है
सिस्टम, ForegroundServiceStartNotAllowedException की जानकारी देता है.
टेस्ट करना
अपने ऐप्लिकेशन के व्यवहार की जांच करने के लिए, ये नई पाबंदियां चालू की जा सकती हैं. भले ही, आपका ऐप्लिकेशन Android 15 को टारगेट न करता हो. हालांकि, यह ज़रूरी है कि ऐप्लिकेशन Android 15 वाले डिवाइस पर चल रहा हो. यहां दिया गया adb निर्देश चलाएं:
adb shell am compat enable FGS_BOOT_COMPLETED_RESTRICTIONS your-package-name
डिवाइस को रीस्टार्ट किए बिना BOOT_COMPLETED ब्रॉडकास्ट भेजने के लिए,
नीचे दिया गया adb निर्देश चलाएं:
adb shell am broadcast -a android.intent.action.BOOT_COMPLETED your-package-name
Restrictions on starting foreground services while an app holds the SYSTEM_ALERT_WINDOW permission
Previously, if an app held the SYSTEM_ALERT_WINDOW permission, it could launch
a foreground service even if the app was currently in the background (as
discussed in exemptions from background start restrictions).
If an app targets Android 15, this exemption is now narrower. The app now needs
to have the SYSTEM_ALERT_WINDOW permission and also have a visible overlay
window. That is, the app needs to first launch a
TYPE_APPLICATION_OVERLAY window and the window
needs to be visible before you start a foreground service.
If your app attempts to start a foreground service from the background without
meeting these new requirements (and it does not have some other exemption), the
system throws ForegroundServiceStartNotAllowedException.
If your app declares the SYSTEM_ALERT_WINDOW permission
and launches foreground services from the background, it may be affected by this
change. If your app gets a ForegroundServiceStartNotAllowedException, check
your app's order of operations and make sure your app already has an active
overlay window before it attempts to start a foreground service from the
background. You can check if your overlay window is currently visible
by calling View.getWindowVisibility(), or you
can override View.onWindowVisibilityChanged()
to get notified whenever the visibility changes.
Testing
To test your app's behavior, you can enable these new restrictions even if your
app is not targeting Android 15 (as long as the app is running on an Android 15
device). To enable these new restrictions on starting foreground services
from the background, run the following adb command:
adb shell am compat enable FGS_SAW_RESTRICTIONS your-package-name
'परेशान न करें' मोड की ग्लोबल सेटिंग में बदलाव करने की सुविधा को ऐप्लिकेशन के लिए उपलब्ध कराने से जुड़े बदलाव
Apps that target Android 15 (API level 35) and higher can no longer change the
global state or policy of Do Not Disturb (DND) on a device (either by modifying
user settings, or turning off DND mode). Instead, apps must contribute an
AutomaticZenRule, which the system combines into a global policy with the
existing most-restrictive-policy-wins scheme. Calls to existing APIs that
previously affected global state (setInterruptionFilter,
setNotificationPolicy) result in the creation or update of an implicit
AutomaticZenRule, which is toggled on and off depending on the call-cycle of
those API calls.
Note that this change only affects observable behavior if the app is calling
setInterruptionFilter(INTERRUPTION_FILTER_ALL) and expects that call to
deactivate an AutomaticZenRule that was previously activated by their owners.
OpenJDK API में हुए बदलाव
Android 15, Android की कोर लाइब्रेरी को रीफ़्रेश करने का काम जारी रखता है, ताकि उन्हें OpenJDK LTS की नई रिलीज़ में मौजूद सुविधाओं के साथ अलाइन किया जा सके.
इनमें से कुछ बदलावों का असर, Android 15 (एपीआई लेवल 35) को टारगेट करने वाले ऐप्लिकेशन की कंपैटिबिलिटी पर पड़ सकता है:
स्ट्रिंग फ़ॉर्मैट करने वाले एपीआई में बदलाव: अब
String.format()औरFormatter.format()एपीआई का इस्तेमाल करते समय, आर्ग्युमेंट इंडेक्स, फ़्लैग, चौड़ाई, और सटीक वैल्यू की पुष्टि ज़्यादा सख्ती से की जाएगी:String.format(String, Object[])String.format(Locale, String, Object[])Formatter.format(String, Object[])Formatter.format(Locale, String, Object[])
उदाहरण के लिए, जब फ़ॉर्मैट स्ट्रिंग में 0 के आर्ग्युमेंट इंडेक्स (
%0) का इस्तेमाल किया जाता है, तो यह अपवाद दिखता है:IllegalFormatArgumentIndexException: Illegal format argument index = 0इस मामले में, फ़ॉर्मैट स्ट्रिंग में
%1का आर्ग्युमेंट इंडेक्स 1 इस्तेमाल करके समस्या को ठीक किया जा सकता है.Arrays.asList(...).toArray()के कॉम्पोनेंट टाइप में बदलाव:Arrays.asList(...).toArray()का इस्तेमाल करने पर, नतीजे के तौर पर मिलने वाले ऐरे का कॉम्पोनेंट टाइप अबObjectहै. यह, अंडरलाइंग ऐरे के एलिमेंट का टाइप नहीं है. इसलिए, नीचे दिया गया कोडClassCastExceptionदिखाता है:String[] elements = (String[]) Arrays.asList("one", "two").toArray();इस मामले में, नतीजे के तौर पर मिले ऐरे में
Stringको कॉम्पोनेंट टाइप के तौर पर बनाए रखने के लिए,Collection.toArray(Object[])का इस्तेमाल किया जा सकता है:String[] elements = Arrays.asList("two", "one").toArray(new String[0]);भाषा कोड हैंडल करने के तरीके में बदलाव:
LocaleAPI का इस्तेमाल करते समय, हिब्रू, येडिश, और इंडोनेशियाई भाषा के कोड अब उनके पुराने फ़ॉर्मैट में नहीं बदले जाएंगे (हिब्रू:iw, येडिश:ji, और इंडोनेशियाई:in). इनमें से किसी एक भाषा के लिए भाषा कोड तय करते समय, आईएसओ 639-1 से कोड इस्तेमाल करें (हिब्रू:he, येडिश:yi, और इंडोनेशियाई:id).रैंडम इंट सीक्वेंसेस में बदलाव: https://bugs.openjdk.org/browse/JDK-8301574 में किए गए बदलावों के बाद, अब
Random.ints()तरीके,Random.nextInt()तरीकों की तुलना में संख्याओं का अलग क्रम दिखाते हैं:आम तौर पर, इस बदलाव से ऐप्लिकेशन के काम करने के तरीके पर कोई असर नहीं पड़ता. हालांकि, आपके कोड को
Random.ints()तरीकों से जनरेट किए गए क्रम केRandom.nextInt()से मेल खाने की उम्मीद नहीं करनी चाहिए.
SequencedCollection एपीआई का इस्तेमाल करने के लिए, अपने ऐप्लिकेशन के बिल्ड कॉन्फ़िगरेशन में compileSdk को अपडेट करने के बाद, आपके ऐप्लिकेशन की कंपैटिबिलिटी पर असर पड़ सकता है. ऐसा तब होगा, जब ऐप्लिकेशन में Android 15 (एपीआई लेवल 35) का इस्तेमाल किया जा रहा हो:
kotlin-stdlibमेंMutableList.removeFirst()औरMutableList.removeLast()एक्सटेंशन फ़ंक्शन के साथ टकरावJava में
Listटाइप को Kotlin मेंMutableListटाइप पर मैप किया जाता है.List.removeFirst()औरList.removeLast()एपीआई, Android 15 (एपीआई लेवल 35) में पेश किए गए हैं. इसलिए, Kotlin कंपाइलर, फ़ंक्शन कॉल (जैसे किlist.removeFirst()) कोkotlin-stdlibमें मौजूद एक्सटेंशन फ़ंक्शन के बजाय, नएListएपीआई के लिए स्टैटिक तौर पर हल करता है.अगर किसी ऐप्लिकेशन को
compileSdkको35पर सेट करके औरminSdkको34या इससे कम पर सेट करके फिर से कंपाइल किया जाता है और फिर उस ऐप्लिकेशन को Android 14 और इससे पहले के वर्शन पर चलाया जाता है, तो रनटाइम गड़बड़ी होती है:java.lang.NoSuchMethodError: No virtual method removeFirst()Ljava/lang/Object; in class Ljava/util/ArrayList;Android Gradle प्लगिन में मौजूद
NewApilint विकल्प, एपीआई के इन नए इस्तेमाल का पता लगा सकता है../gradlew lintMainActivity.kt:41: Error: Call requires API level 35 (current min is 34): java.util.List#removeFirst [NewApi] list.removeFirst()रनटाइम एक्सेप्शन और लिंट की गड़बड़ियों को ठीक करने के लिए, Kotlin में
removeFirst()औरremoveLast()फ़ंक्शन कॉल को क्रमशःremoveAt(0)औरremoveAt(list.lastIndex)से बदला जा सकता है. अगर Android Studio Ladybug | 2024.1.3 या इसके बाद के वर्शन का इस्तेमाल किया जा रहा है, तो इसमें इन गड़बड़ियों को तुरंत ठीक करने का विकल्प भी मिलता है.अगर लिंट का विकल्प बंद कर दिया गया है, तो
@SuppressLint("NewApi")औरlintOptions { disable 'NewApi' }हटाएं.Java में अन्य तरीकों के साथ टकराव
मौजूदा टाइप में नए तरीके जोड़े गए हैं. उदाहरण के लिए,
ListऔरDeque. ऐसा हो सकता है कि ये नए तरीके, अन्य इंटरफ़ेस और क्लास में एक ही नाम और आर्ग्युमेंट टाइप वाले तरीकों के साथ काम न करें. अगर किसी तरीके के सिग्नेचर में टकराव होता है और वह काम नहीं करता है, तोjavacकंपाइलर, बिल्ड-टाइम की गड़बड़ी दिखाता है. उदाहरण के लिए:गड़बड़ी का पहला उदाहरण:
javac MyList.javaMyList.java:135: error: removeLast() in MyList cannot implement removeLast() in List public void removeLast() { ^ return type void is not compatible with Object where E is a type-variable: E extends Object declared in interface Listगड़बड़ी का दूसरा उदाहरण:
javac MyList.javaMyList.java:7: error: types Deque<Object> and List<Object> are incompatible; public class MyList implements List<Object>, Deque<Object> { both define reversed(), but with unrelated return types 1 errorगड़बड़ी का तीसरा उदाहरण:
javac MyList.javaMyList.java:43: error: types List<E#1> and MyInterface<E#2> are incompatible; public static class MyList implements List<Object>, MyInterface<Object> { class MyList inherits unrelated defaults for getFirst() from types List and MyInterface where E#1,E#2 are type-variables: E#1 extends Object declared in interface List E#2 extends Object declared in interface MyInterface 1 errorबिल्ड से जुड़ी इन गड़बड़ियों को ठीक करने के लिए, इन इंटरफ़ेस को लागू करने वाली क्लास को, मिलते-जुलते रिटर्न टाइप के साथ इस तरीके को बदलना चाहिए. उदाहरण के लिए:
@Override
public Object getFirst() {
    return List.super.getFirst();
}
सुरक्षा
Android 15 में ऐसे बदलाव किए गए हैं जिनसे सिस्टम की सुरक्षा को बढ़ावा मिलता है. इससे ऐप्लिकेशन और उपयोगकर्ताओं को नुकसान पहुंचाने वाले ऐप्लिकेशन से बचाने में मदद मिलती है.
प्रतिबंधित टीएलएस वर्शन
Android 15 restricts the usage of TLS versions 1.0 and 1.1. These versions had previously been deprecated in Android, but are now disallowed for apps targeting Android 15.
बैकग्राउंड में सुरक्षित तरीके से गतिविधि शुरू करना
Android 15, उपयोगकर्ताओं को नुकसान पहुंचाने वाले ऐप्लिकेशन से सुरक्षित रखता है. साथ ही, उन्हें अपने डिवाइसों पर ज़्यादा कंट्रोल देता है. इसके लिए, Android 15 में ऐसे बदलाव किए गए हैं जिनसे बैकग्राउंड में काम करने वाले नुकसान पहुंचाने वाले ऐप्लिकेशन, अन्य ऐप्लिकेशन को फ़ोरग्राउंड में नहीं ला पाते. साथ ही, वे अपनी अनुमतियों को नहीं बढ़ा पाते और उपयोगकर्ता के इंटरैक्शन का गलत इस्तेमाल नहीं कर पाते. Android 10 (एपीआई लेवल 29) के बाद से, बैकग्राउंड में ऐप्लिकेशन लॉन्च करने पर पाबंदी लगा दी गई है.
अन्य बदलाव
PendingIntentक्रिएटर्स के लिए, बैकग्राउंड में गतिविधि शुरू करने की सुविधा को डिफ़ॉल्ट रूप से ब्लॉक करने की सुविधा जोड़ी गई है. इससे ऐप्लिकेशन को गलती सेPendingIntentबनाने से रोकने में मदद मिलती है. इसका गलत इस्तेमाल नुकसान पहुंचाने वाले लोग या इकाइयां कर सकती हैं.- किसी ऐप्लिकेशन को तब तक फ़ोरग्राउंड में न लाएं, जब तक
PendingIntentभेजने वाला व्यक्ति इसकी अनुमति न दे. इस बदलाव का मकसद, नुकसान पहुंचाने वाले ऐप्लिकेशन को बैकग्राउंड में गतिविधियां शुरू करने की सुविधा का गलत इस्तेमाल करने से रोकना है. डिफ़ॉल्ट रूप से, ऐप्लिकेशन को टास्क स्टैक को फ़ोरग्राउंड में लाने की अनुमति नहीं होती है. ऐसा तब तक नहीं किया जा सकता, जब तक कि क्रिएटर, बैकग्राउंड गतिविधि लॉन्च करने की अनुमतियां न दे या भेजने वाले के पास बैकग्राउंड गतिविधि लॉन्च करने की अनुमतियां न हों. - यह कंट्रोल करना कि टास्क स्टैक में सबसे ऊपर मौजूद गतिविधि अपना टास्क कैसे पूरा कर सकती है. अगर सबसे ऊपर मौजूद गतिविधि कोई टास्क पूरा करती है, तो Android उस टास्क पर वापस चला जाएगा जो आखिरी बार चालू था. इसके अलावा, अगर कोई नॉन-टॉप ऐक्टिविटी अपना टास्क पूरा कर लेती है, तो Android होम स्क्रीन पर वापस चला जाएगा. यह नॉन-टॉप ऐक्टिविटी के टास्क को पूरा होने से नहीं रोकेगा.
- अन्य ऐप्लिकेशन से, अपनी टास्क में कोई भी गतिविधि लॉन्च करने से रोकना. इस बदलाव से, नुकसान पहुंचाने वाले ऐप्लिकेशन को लोगों को फ़िश करने से रोका जा सकेगा. इसके लिए, वे ऐसी गतिविधियां करते हैं जो दूसरे ऐप्लिकेशन से की गई लगती हैं.
- बैकग्राउंड में गतिविधि शुरू करने के लिए, न दिखने वाली विंडो को शामिल न करें. इससे, नुकसान पहुंचाने वाले ऐप्लिकेशन को बैकग्राउंड गतिविधि लॉन्च करने की सुविधा का गलत इस्तेमाल करने से रोका जा सकता है. ऐसा इसलिए, ताकि वे लोगों को नुकसान पहुंचाने वाला या आपत्तिजनक कॉन्टेंट न दिखा सकें.
ज़्यादा सुरक्षित इंटेंट
Android 15 introduces StrictMode for
intents.
In order to see detailed logs about Intent usage violations, use following
method:
Kotlin
fun onCreate() {
    StrictMode.setVmPolicy(VmPolicy.Builder()
        .detectUnsafeIntentLaunch()
        .build()
    )
}
Java
public void onCreate() {
    StrictMode.setVmPolicy(new VmPolicy.Builder()
            .detectUnsafeIntentLaunch()
            .build());
}
उपयोगकर्ता अनुभव और सिस्टम यूज़र इंटरफ़ेस (यूआई)
Android 15 में कुछ ऐसे बदलाव किए गए हैं जिनसे उपयोगकर्ताओं को बेहतर और आसान अनुभव मिलेगा.
विंडो इंसर्ट में बदलाव
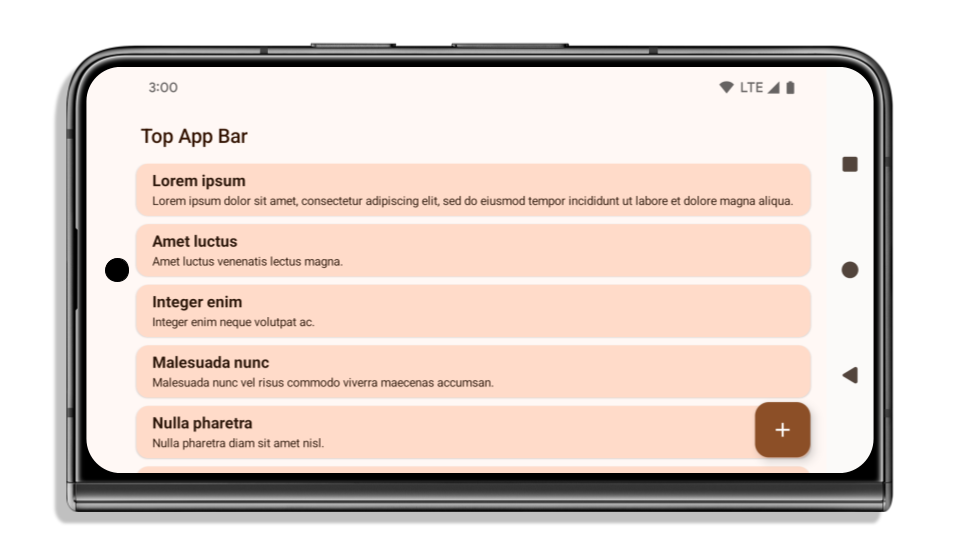
Android 15 में, विंडो इनसेट से जुड़े दो बदलाव किए गए हैं: डिफ़ॉल्ट रूप से, स्क्रीन के किनारों तक विंडो दिखती है. साथ ही, कॉन्फ़िगरेशन में भी बदलाव किए गए हैं. जैसे, सिस्टम बार का डिफ़ॉल्ट कॉन्फ़िगरेशन.
Edge-to-edge enforcement
Apps are edge-to-edge by default on devices running Android 15 if the app is targeting Android 15 (API level 35).

This is a breaking change that might negatively impact your app's UI. The changes affect the following UI areas:
- Gesture handle navigation bar
- Transparent by default.
- Bottom offset is disabled so content draws behind the system navigation bar unless insets are applied.
setNavigationBarColorandR.attr#navigationBarColorare deprecated and don't affect gesture navigation.setNavigationBarContrastEnforcedandR.attr#navigationBarContrastEnforcedcontinue to have no effect on gesture navigation.
- 3-button navigation
- Opacity set to 80% by default, with color possibly matching the window background.
- Bottom offset disabled so content draws behind the system navigation bar unless insets are applied.
setNavigationBarColorandR.attr#navigationBarColorare set to match the window background by default. The window background must be a color drawable for this default to apply. This API is deprecated but continues to affect 3-button navigation.setNavigationBarContrastEnforcedandR.attr#navigationBarContrastEnforcedis true by default, which adds an 80% opaque background across 3-button navigation.
- Status bar
- Transparent by default.
- The top offset is disabled so content draws behind the status bar unless insets are applied.
setStatusBarColorandR.attr#statusBarColorare deprecated and have no effect on Android 15.setStatusBarContrastEnforcedandR.attr#statusBarContrastEnforcedare deprecated but still have an effect on Android 15.
- Display cutout
layoutInDisplayCutoutModeof non-floating windows must beLAYOUT_IN_DISPLAY_CUTOUT_MODE_ALWAYS.SHORT_EDGES,NEVER, andDEFAULTare interpreted asALWAYSso that users don't see a black bar caused by the display cutout and appear edge-to-edge.
The following example shows an app before and after targeting Android 15 (API level 35), and before and after applying insets. This example is not comprehensive, this might appear differently on Android Auto.


What to check if your app is already edge-to-edge
If your app is already edge-to-edge and applies insets, you are mostly unimpacted, except in the following scenarios. However, even if you think you aren't impacted, we recommend you test your app.
- You have a non-floating window, such as an
Activitythat usesSHORT_EDGES,NEVERorDEFAULTinstead ofLAYOUT_IN_DISPLAY_CUTOUT_MODE_ALWAYS. If your app crashes on launch, this might be due to your splashscreen. You can either upgrade the core splashscreen dependency to 1.2.0-alpha01 or later or setwindow.attributes.layoutInDisplayCutoutMode = WindowManager.LayoutInDisplayCutoutMode.always. - There might be lower-traffic screens with occluded UI. Verify these
less-visited screens don't have occluded UI. Lower-traffic screens include:
- Onboarding or sign-in screens
- Settings pages
What to check if your app is not already edge-to-edge
If your app is not already edge-to-edge, you are most likely impacted. In addition to the scenarios for apps that are already edge-to-edge, you should consider the following:
- If your app uses Material 3 Components (
androidx.compose.material3) in compose, such asTopAppBar,BottomAppBar, andNavigationBar, these components are likely not impacted because they automatically handle insets. - If your app is using Material 2 Components (
androidx.compose.material) in Compose, these components don't automatically handle insets. However, you can get access to the insets and apply them manually. In androidx.compose.material 1.6.0 and later, use thewindowInsetsparameter to apply the insets manually forBottomAppBar,TopAppBar,BottomNavigation, andNavigationRail. Likewise, use thecontentWindowInsetsparameter forScaffold. - If your app uses views and Material Components
(
com.google.android.material), most views-based Material Components such asBottomNavigationView,BottomAppBar,NavigationRailView, orNavigationView, handle insets and require no additional work. However, you need to addandroid:fitsSystemWindows="true"if usingAppBarLayout. - For custom composables, apply the insets manually as padding. If your
content is within a
Scaffold, you can consume insets using theScaffoldpadding values. Otherwise, apply padding using one of theWindowInsets. - If your app is using views and
BottomSheet,SideSheetor custom containers, apply padding usingViewCompat.setOnApplyWindowInsetsListener. ForRecyclerView, apply padding using this listener and also addclipToPadding="false".
What to check if your app must offer custom background protection
If your app must offer custom background protection to 3-button navigation or
the status bar, your app should place a composable or view behind the system bar
using WindowInsets.Type#tappableElement() to get the 3-button
navigation bar height or WindowInsets.Type#statusBars.
Additional edge-to-edge resources
See the Edge to Edge Views and Edge to Edge Compose guides for additional considerations on applying insets.
Deprecated APIs
The following APIs are deprecated but not disabled:
R.attr#enforceStatusBarContrastR.attr#navigationBarColor(for 3 button navigation, with 80% alpha)Window#isStatusBarContrastEnforcedWindow#setNavigationBarColor(for 3 button navigation, with 80% alpha)Window#setStatusBarContrastEnforced
The following APIs are deprecated and disabled:
R.attr#navigationBarColor(for gesture navigation)R.attr#navigationBarDividerColorR.attr#statusBarColorWindow#setDecorFitsSystemWindowsWindow#getNavigationBarColorWindow#getNavigationBarDividerColorWindow#getStatusBarColorWindow#setNavigationBarColor(for gesture navigation)Window#setNavigationBarDividerColorWindow#setStatusBarColor
Stable configuration
अगर आपका ऐप्लिकेशन, Android 15 (एपीआई लेवल 35) या इसके बाद के वर्शन को टारगेट करता है, तो Configuration अब सिस्टम बार को शामिल नहीं करता है. अगर लेआउट का हिसाब लगाने के लिए, Configuration क्लास में स्क्रीन साइज़ का इस्तेमाल किया जाता है, तो आपको इसे बेहतर विकल्पों से बदलना चाहिए. जैसे, अपनी ज़रूरत के हिसाब से सही ViewGroup, WindowInsets या WindowMetricsCalculator.
Configuration, एपीआई 1 से उपलब्ध है. आम तौर पर, इसे Activity.onConfigurationChanged से हासिल किया जाता है. इससे विंडो डेंसिटी, ओरिएंटेशन, और साइज़ जैसी जानकारी मिलती है. Configuration से मिले विंडो साइज़ की एक अहम खासियत यह है कि इसमें पहले सिस्टम बार शामिल नहीं होते थे.
कॉन्फ़िगरेशन साइज़ का इस्तेमाल आम तौर पर संसाधन चुनने के लिए किया जाता है. जैसे, /res/layout-h500dp. यह अब भी इस्तेमाल का मान्य उदाहरण है. हालांकि, लेआउट का हिसाब लगाने के लिए इसका इस्तेमाल करने से हमेशा मना किया गया है. अगर आपने ऐसा किया है, तो आपको अब इससे दूर हो जाना चाहिए. आपको Configuration की जगह, अपनी ज़रूरत के हिसाब से कोई और बेहतर विकल्प इस्तेमाल करना चाहिए.
अगर इसका इस्तेमाल लेआउट का हिसाब लगाने के लिए किया जाता है, तो सही ViewGroup का इस्तेमाल करें. जैसे, CoordinatorLayout या ConstraintLayout. अगर इसका इस्तेमाल सिस्टम के नेवबार की ऊंचाई का पता लगाने के लिए किया जाता है, तो WindowInsets का इस्तेमाल करें. अगर आपको अपने ऐप्लिकेशन की विंडो का मौजूदा साइज़ जानना है, तो computeCurrentWindowMetrics का इस्तेमाल करें.
यहां दी गई सूची में, उन फ़ील्ड के बारे में बताया गया है जिन पर इस बदलाव का असर पड़ा है:
Configuration.screenWidthDpऔरscreenHeightDpसाइज़ में अब सिस्टम बार शामिल नहीं होते.screenWidthDpऔरscreenHeightDpमें हुए बदलावों का असर,Configuration.smallestScreenWidthDpपर सीधे तौर पर नहीं पड़ता.Configuration.orientationपर, स्क्वेयर जैसे डिवाइसों परscreenWidthDpऔरscreenHeightDpमें हुए बदलावों का असर पड़ता है.Display.getSize(Point)पर,Configurationमें किए गए बदलावों का असर सीधे तौर पर नहीं पड़ता. एपीआई लेवल 30 से, इस सुविधा का इस्तेमाल बंद कर दिया गया है.Display.getMetrics(), एपीआई लेवल 33 से ही इस तरह काम कर रहा है.
elegantTextHeight एट्रिब्यूट डिफ़ॉल्ट रूप से सही पर सेट होता है
For apps targeting Android 15 (API level 35), the
elegantTextHeight TextView attribute
becomes true by default, replacing the compact font used by default with some
scripts that have large vertical metrics with one that is much more readable.
The compact font was introduced to prevent breaking layouts; Android 13 (API
level 33) prevents many of these breakages by allowing the text layout to
stretch the vertical height utilizing the fallbackLineSpacing
attribute.
In Android 15, the compact font still remains in the system, so your app can set
elegantTextHeight to false to get the same behavior as before, but it is
unlikely to be supported in upcoming releases. So, if your app supports the
following scripts: Arabic, Lao, Myanmar, Tamil, Gujarati, Kannada, Malayalam,
Odia, Telugu or Thai, test your app by setting elegantTextHeight to true.

elegantTextHeight behavior for apps targeting Android 14 (API level 34) and lower.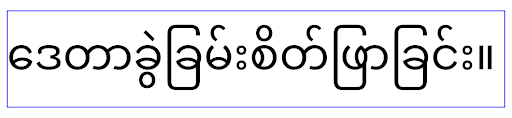
elegantTextHeight behavior for apps targeting Android 15.जटिल अक्षर के आकार के लिए, TextView की चौड़ाई में बदलाव होता है
In previous versions of Android, some cursive fonts or languages that have
complex shaping might draw the letters in the previous or next character's area.
In some cases, such letters were clipped at the beginning or ending position.
Starting in Android 15, a TextView allocates width for drawing enough space
for such letters and allows apps to request extra paddings to the left to
prevent clipping.
Because this change affects how a TextView decides the width, TextView
allocates more width by default if the app targets Android 15 (API level 35) or
higher. You can enable or disable this behavior by calling the
setUseBoundsForWidth API on TextView.
Because adding left padding might cause a misalignment for existing layouts, the
padding is not added by default even for apps that target Android 15 or higher.
However, you can add extra padding to preventing clipping by calling
setShiftDrawingOffsetForStartOverhang.
The following examples show how these changes can improve text layout for some fonts and languages.

<TextView
    android:fontFamily="cursive"
    android:text="java" />

<TextView
    android:fontFamily="cursive"
    android:text="java"
    android:useBoundsForWidth="true"
    android:shiftDrawingOffsetForStartOverhang="true" />
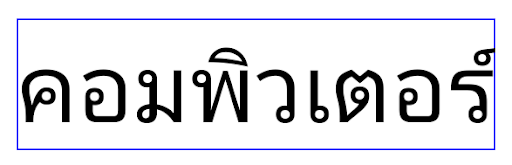
<TextView
    android:text="คอมพิวเตอร์" />

<TextView
    android:text="คอมพิวเตอร์"
    android:useBoundsForWidth="true"
    android:shiftDrawingOffsetForStartOverhang="true" />
EditText के लिए, स्थान-भाषा के हिसाब से लाइन की ऊंचाई का डिफ़ॉल्ट मान
Android के पिछले वर्शन में, टेक्स्ट लेआउट, टेक्स्ट की ऊंचाई को बढ़ा देता था, ताकि मौजूदा स्थानीय भाषा से मैच करने वाले फ़ॉन्ट की लाइन की ऊंचाई पूरी की जा सके. उदाहरण के लिए, अगर कॉन्टेंट जैपनीज़ में था, तो टेक्स्ट की ऊंचाई थोड़ी ज़्यादा हो गई, क्योंकि जैपनीज़ फ़ॉन्ट की लाइन की ऊंचाई, लैटिन फ़ॉन्ट की लाइन की ऊंचाई से थोड़ी ज़्यादा होती है. हालांकि, लाइन हाइट में इन अंतरों के बावजूद, इस्तेमाल किए जा रहे स्थानीय भाषा के बावजूद, EditText एलिमेंट का साइज़ एक जैसा था, जैसा कि इस इमेज में दिखाया गया है:

EditText एलिमेंट दिखाने वाले तीन बॉक्स, जिनमें इंग्लिश (en), जैपनीज़ (ja), और बर्मीज़ (my) भाषा का टेक्स्ट हो सकता है. EditText की ऊंचाई एक जैसी है, भले ही इन भाषाओं की लाइन की ऊंचाई एक-दूसरे से अलग हो.Android 15 (एपीआई लेवल 35) को टारगेट करने वाले ऐप्लिकेशन के लिए, EditText के लिए कम से कम लाइन हाइट तय की गई है. इससे, तय की गई लोकेल के रेफ़रंस फ़ॉन्ट से मैच करने में मदद मिलती है. इसकी जानकारी इस इमेज में दी गई है:

EditText एलिमेंट दिखाने वाले तीन बॉक्स, जिनमें इंग्लिश (en), जैपनीज़ (ja), और बर्मीज़ (my) भाषा का टेक्स्ट हो सकता है. EditText की ऊंचाई में अब इन भाषाओं के फ़ॉन्ट के लिए, डिफ़ॉल्ट लाइन की ऊंचाई को शामिल करने के लिए स्पेस शामिल है.ज़रूरत पड़ने पर, आपका ऐप्लिकेशन useLocalePreferredLineHeightForMinimum एट्रिब्यूट को false पर सेट करके, पहले जैसा व्यवहार वापस ला सकता है. साथ ही, आपका ऐप्लिकेशन Kotlin और Java में setMinimumFontMetrics एपीआई का इस्तेमाल करके, कस्टम मिनिमम वर्टिकल मेट्रिक सेट कर सकता है.
कैमरा और मीडिया
Android 15 में, Android 15 या इसके बाद के वर्शन को टारगेट करने वाले ऐप्लिकेशन के लिए, कैमरा और मीडिया के काम करने के तरीके में ये बदलाव किए गए हैं.
ऑडियो फ़ोकस का अनुरोध करने से जुड़ी पाबंदियां
Apps that target Android 15 (API level 35) must be the top app or running a
foreground service in order to request audio focus. If an app
attempts to request focus when it does not meet one of these requirements, the
call returns AUDIOFOCUS_REQUEST_FAILED.
You can learn more about audio focus at Manage audio focus.
गैर-एसडीके से जुड़ी पाबंदियां अपडेट की गईं
Android 15 में, पाबंदी वाले गैर-एसडीके इंटरफ़ेस की अपडेट की गई सूचियां शामिल हैं. ये सूचियां, Android डेवलपर के साथ मिलकर काम करने और हाल ही में हुई इंटरनल टेस्टिंग के आधार पर बनाई गई हैं. हम यह पक्का करते हैं कि गैर-एसडीके इंटरफ़ेस को प्रतिबंधित करने से पहले, सार्वजनिक विकल्प उपलब्ध हों.
अगर आपका ऐप्लिकेशन Android 15 को टारगेट नहीं करता है, तो हो सकता है कि इनमें से कुछ बदलावों का असर आप पर तुरंत न पड़े. हालांकि, आपके ऐप्लिकेशन के टारगेट एपीआई लेवल के हिसाब से, आपका ऐप्लिकेशन कुछ गैर-एसडीके इंटरफ़ेस ऐक्सेस कर सकता है. हालांकि, किसी भी गैर-एसडीके तरीके या फ़ील्ड का इस्तेमाल करने से, आपके ऐप्लिकेशन के काम न करने का जोखिम हमेशा ज़्यादा होता है.
अगर आपको पक्का नहीं है कि आपका ऐप्लिकेशन, गैर-एसडीके इंटरफ़ेस का इस्तेमाल करता है या नहीं, तो यह पता लगाने के लिए अपने ऐप्लिकेशन की जांच करें. अगर आपका ऐप्लिकेशन, गैर-एसडीके इंटरफ़ेस पर निर्भर करता है, तो आपको एसडीके के विकल्पों पर माइग्रेट करने की योजना बनानी चाहिए. हालांकि, हम समझते हैं कि कुछ ऐप्लिकेशन के पास, गैर-एसडीके इंटरफ़ेस इस्तेमाल करने के लिए मान्य वजहें होती हैं. अगर आपको अपने ऐप्लिकेशन में किसी सुविधा के लिए, गैर-एसडीके इंटरफ़ेस के इस्तेमाल का कोई विकल्प नहीं मिल रहा है, तो आपको नया सार्वजनिक एपीआई का अनुरोध करना चाहिए.
Android के इस वर्शन में हुए बदलावों के बारे में ज़्यादा जानने के लिए, Android 15 में, SDK टूल के अलावा अन्य इंटरफ़ेस से जुड़ी पाबंदियों में हुए अपडेट देखें. आम तौर पर, SDK टूल के बाहर के इंटरफ़ेस के बारे में ज़्यादा जानने के लिए, SDK टूल के बाहर के इंटरफ़ेस पर लगी पाबंदियां देखें.