什麼是條件模組裝置指定?
裝置指定功能可讓您根據裝置硬體,為裝置提供條件式功能模組。舉例來說,您可以選擇將某項功能提供給高階裝置,但不提供給無法使用該功能的裝置 (以便節省這類裝置的儲存空間)。這項功能是以 Play Feature Delivery 中的功能模組概念為基礎。您可以定義指定條件 (目前根據 RAM、特定裝置型號或可用的系統功能),並為特定裝置群組指定模組,如下所示。
開發人員旅程
整體而言,如要在現有應用程式中整合裝置指定功能,您必須按照下列步驟操作:
- 開發僅供特定裝置硬體使用的功能。
- 以功能模組的形式導入這項功能。
- 在 AndroidManifest.xml 的模組條件部分中指定要將這項功能提供給哪些裝置群組。
- 建立裝置指定設定,讓 Play 瞭解如何為使用者裝置提供功能模組。
- 設定 Google Play Developer API (如果尚未完成設定的話)。您會使用這個 API 將 DT 設定傳送至 Play。
- 按照步驟建立 DT 設定。
- 將 AAB 上傳至 Play 並進行測試,確認所有設定皆正確無誤。
歡迎參閱這份文件,瞭解如何使用 Android Gradle 外掛程式為條件式供應程序新增裝置指定設定。
使用裝置指定功能建立條件式功能模組
在應用程式中新增功能模組
Play Feature Delivery 可讓您依特定條件提供應用程式的特定功能,或讓使用者視需要下載功能,詳情請參閱這篇簡介文章。您可以使用裝置指定功能,依特定條件將功能提供給指派至指定群組的裝置。
如要使用 DT 進行條件式供應,您必須使用 bundletool
1.7.0 以上版本。因此,您必須明確指定 Android Gradle 外掛程式的 bundletool 版本。您可以在 build.gradle
根檔案建構指令碼部分完成這項操作:
buildscript {
dependencies {
classpath "com.android.tools.build:bundletool:1.7.0"
...
}
...
}
如要建立功能模組,請按照這篇文章的操作說明將 Android 應用程式模組化。
功能開發完成後,您可以根據功能 AndroidManifest.xml
中的裝置指定方式,設定適用的供應條件。您必須在 dist:module
元素的 dist:conditions
中提供裝置群組條件。如要瞭解關於條件的一般性資訊,請參閱這個網頁。在裝置群組中,您可以使用新條件指定要提供這項功能的所有群組,如下所示:
<dist:device-groups>
<dist:device-group dist:name="..." />
...
</dist:device-groups>
舉例來說,假設您定義了名為「_my_group1」的裝置群組 (請參考下方的「建立裝置指定設定」一節,瞭解如何定義裝置群組)。如果某個功能模組應該只提供給屬於「_my_group1」裝置群組的裝置,其 AndroidManifest.xml
應如下所示:
<manifest ...>
...
<dist:module dist:title="...">
<dist:delivery>
<dist:install-time>
<dist:conditions>
<dist:device-groups>
<dist:device-group dist:name="my_group_1"/>
</dist:device-groups>
...
</dist:conditions>
</dist:install-time>
</dist:delivery>
</dist:module>
...
</manifest>
如果某項功能同時指定「_my_group1」和「 _my_group2」,其 AndroidManifest.xml
應如下所示:
<manifest ...>
...
<dist:module dist:title="...">
<dist:delivery>
<dist:install-time>
<dist:conditions>
<dist:device-groups>
<dist:device-group dist:name="my_group_1"/>
<dist:device-group dist:name="my_group_2"/>
</dist:device-groups>
...
</dist:conditions>
</dist:install-time>
</dist:delivery>
</dist:module>
...
</manifest>
完成上述步驟後,您就可以建立 Android App Bundle (AAB)。
本機測試
建議您先在本機測試應用程式套件,確認所有設定皆正確無誤後,再繼續進行後續步驟。使用 bundletool
即可在本機建構及測試應用程式,並明確指定正確的裝置群組。首先,您將使用 build-apks
產生一組 .apks 檔案,然後使用 install-apks
將應用程式部署至已連結的裝置。您也可以透過 device-groups
標記指定要安裝的群組。如要進一步瞭解本機測試的方法,請參閱這篇文章。請注意,這個頁面尚未更新 DT 的資訊,因此不含「device-groups」標記。
bundletool build-apks --bundle=/path/to/app.aab --output=/path/to/app.apks --local-testingbundletool install-apks --apks=/path/to/app.apks --device-groups=my_group_1,my_group_2
其他做法:您也可以使用 extract-apks
擷取特定裝置的一組 APK (使用 get-device-spec
並指定該裝置的裝置群組)。
bundletool get-device-spec --output=/path/to/device-spec.json --device-groups=my_group_1,my_group_2bundletool extract-apks --apks=/path/to/existing_APK_set.apks --output-dir=/path/to/device_specific_APK_set.apks --device-spec=/path/to/device-spec.json
透過 Google Play Developer API 建立裝置指定設定
開始使用 Google Play Developer API (如果尚未完成設定的話)
如要設定裝置指定功能 (定義裝置群組),您必須使用 Android Publisher API 將設定上傳至 Google Play。如要進一步瞭解 API,請點選上述連結。另外,請按照這篇文章的幾個步驟操作,包括:
您可以按這裡查看 API 參考資料。如果您之後選擇透過 API 上傳建構項目,就會使用 Edits
方法。此外,建議您在使用 API 之前,先詳閱這個網頁。
使用 Device Targeting Configuration API
您可以使用下列 API 呼叫建立裝置指定設定:
建立裝置指定設定
HTTP 要求 | POST https://androidpublisher.googleapis.com/androidpublisher/v3/applications/{packageName}/deviceTierConfigs |
路徑參數 | 不適用 |
要求主體 | 裝置指定設定 |
回應主體 | 裝置指定設定 |
裝置指定設定物件
{
device_groups: [
{
name: string,
device_selectors: [
{
device_ram : {
min_bytes: integer
max_bytes: integer
},
included_device_ids: [
{
build_brand: string,
build_device: string
}
],
excluded_device_ids: [
{
build_brand: string,
build_device: string
}
],
required_system_features: [
{
name: string
}
],
forbidden_system_features: [
{
name: string
}
]
}
]
}
]
}
欄位:
- device_tier_config_id (整數):與裝置指定設定相對應的 ID
device_groups (物件):群組定義
- name (字串):裝置群組名稱 (您定義的字串 ID)
- device_selectors (物件):群組的裝置要求。裝置必須符合這些要求才能歸類到這個群組
- device_ram (物件):裝置 RAM 需求
- min_bytes (整數):RAM 最低需求 (以位元組為單位)
- max_bytes (整數):RAM 最高需求 (以位元組為單位)
- included_device_ids (物件):要納入這個選取條件的裝置型號 (每個群組最多 10000 個 device_ids)。裝置必須列在這個清單中才符合選取條件。這只是選取條件中的其中一項必要條件。如要符合選取條件,裝置還必須滿足其他條件 (想瞭解如何合併選取條件的要求,請參閱下方的注意事項)
- build_brand (字串):裝置製造商
- build_device (字串):裝置型號代碼
- excluded_device_ids (物件):要在這個選取條件中排除的裝置型號 (每個群組最多 10000 個 device_ids)。即使裝置符合選取條件中的所有條件,只要列在這個清單上,就會視為與選取條件不符。
- build_brand (字串):裝置製造商
- build_device (字串):裝置型號代碼
required_system_features (物件):裝置必須具有的功能 (每個群組最多 100 個)。如果裝置沒有這些功能,選取條件就不會納入該裝置。裝置必須具有這個清單中的所有系統功能,才能符合選取條件。這只是選取條件中的其中一項必要條件。如要符合選取條件,裝置還必須滿足其他條件 (想瞭解如何合併選取條件的要求,請參閱下方的注意事項)。
系統功能參考資料
- name (字串):系統功能
forbidden_system_features (物件):裝置不得具有的功能 (每個群組最多 100 個)。選取條件不會納入具有這些功能的裝置。即使裝置符合選取條件中的所有條件,只要具有這個清單中的任何系統功能,就會視為與選取條件不符。
系統功能參考資料
- name (字串):系統功能
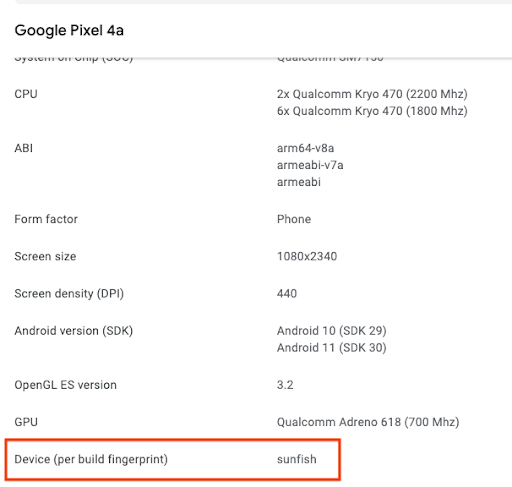
您可以使用 Google Play 管理中心的「裝置目錄」,以下列任一方式找出裝置製造商和型號代碼的正確格式:
透過「裝置目錄」查看個別裝置,找出裝置的製造商和型號代碼,這些資訊的位置如以下範例所示 (Google Pixel 4a 的製造商為「Google」,型號代碼為「sunfish」)。
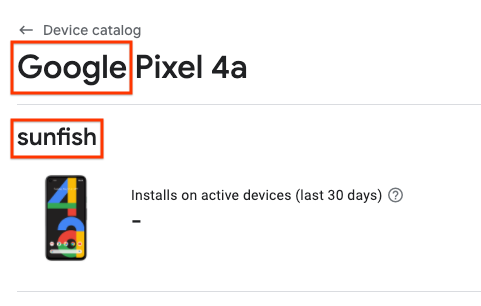
下載支援裝置的 CSV 檔案,並將「製造商」和「型號代碼」資訊分別用於「build_brand」和「build_device」欄位。
舉例來說,下列群組符合 RAM 超過 4 GB 的所有裝置,除了 Pixel 5 (Google redfin) 和 RAM 小於 4 GB 的 Pixel 3 (Google Blueline) 以外。
device_groups: [
{
name: "my_group_1",
device_selectors: [
{
device_ram: {
min_bytes: 4294967296
},
excluded_device_ids: [
{
build_brand: "google",
build_device: "redfin"
}
]
},
{
included_device_ids: [
{
build_brand: "google",
build_device: "blueline"
}
]
}
]
}
]
您可以用下列方式表示:
[ (RAM > 4GB) AND NOT (google redfin) ] OR [ (google blueline) ]
您必須先按照驗證裝置指定設定的說明操作,再將設定上傳到 Google Play。
根據 ID 取得裝置指定設定
您可以使用下列呼叫,根據 ID 擷取特定的裝置指定設定:
HTTP 要求 | GEThttps://androidpublisher.googleapis.com/androidpublisher/v3/applications/{packageName}/deviceTierConfigs/{deviceTierConfigId} |
路徑參數 | 不適用 |
要求主體 | 不適用 |
回應主體 | 裝置指定設定 |
取得裝置指定設定清單
您可以透過下列呼叫取得最新的 10 個裝置指定設定,也可以使用「page_token」查詢參數,以最適當的方式指定十個裝置指定設定:
HTTP 要求 | GEThttps://androidpublisher.googleapis.com/androidpublisher/v3/applications/{packageName}/deviceTierConfigs |
路徑參數 | 不適用 |
查詢參數 | page_token (選用):指定 10 個 DTC 的特定群組。如果您已建立超過 10 個 DTC,而且您要查看的 DTC 較舊 (建立時間早於最近的 10 個 DTC),這個參數就非常實用。 |
要求主體 | 不適用 |
回應主體 | 裝置指定設定清單
|
驗證裝置指定設定
bundletool
包含兩個指令,可協助您確認裝置指定設定能否正常運作,再上傳到 Google Play。
使用 bundletool print-device-targeting-config
即可驗證 JSON 檔案的語法是否正確,並以更易閱讀的格式呈現裝置群組。
bundletool print-device-targeting-config --config=mydtc.json
您可以使用 bundletool evaluate-device-targeting-config
評估哪些群組與特定裝置相符。將目標裝置連結至工作站並使用 --connected-device
標記;或者,您也可以手動編譯含有裝置屬性的 JSON 檔案,然後透過 --device-properties
標記提供該檔案。
bundletool evaluate-device-targeting-config --config=mydtc.json --connected-device
bundletool evaluate-device-targeting-config --config=mydtc.json --device-properties=deviceproperties.json
裝置屬性檔案應為 DeviceProperties protobuf 結構的 JSON 檔案。例如:
{
"ram": 2057072640,
"device_id": {
"build_brand":"google",
"build_device":"redfin"
},
"system_features": [
{
"name":"android.hardware.bluetooth"
},
{
"name":"android.hardware.camera"
}
]
}
將 Android App Bundle 上傳至 Google Play
透過 API
您可以使用 Google Play Developer API 將 Android App Bundle 上傳到 Google Play,然後將特定的裝置指定設定連結至您建構的 AAB。
歡迎參閱 Edits 方法的概要簡介。您也可以參閱這篇文章,透過更深入的範例瞭解如何在 Google Play 管理中心的不同測試群組中進行發布 (如果您參閱最後一個連結的文章,建議您使用支援 AAB 的 API,而不是該頁面上所列支援 APK 的 API)。如要指定您建構的 AAB 裝置層級設定,您必須在呼叫 edits.bundle.upload
方法時,將設定 ID 新增至「deviceTierConfigId」查詢參數,例如:
https://androidpublisher.googleapis.com/upload/androidpublisher/v3/applications/{packageName}/edits/{editId}/bundles?deviceTierConfigId="{deviceTierConfigId}"
透過 Google Play 管理中心
請按照這篇文章的操作說明上傳 Android App Bundle。您的 App Bundle 會套用最新的 DTC 設定。
輔助工具
可讓您快速建立設定的輔助工具:Curl
以下是指令列工具 curl 的使用範例,包括建立新裝置指定設定、使用 Edits API 建立新編輯內容、上傳新的 AAB (與特定裝置指定設定建立關聯)、設定測試群組/發布設定,以及提交編輯內容 (從而公開發布變更)。請務必瞭解以下項目的位置:
- 與您的 API 用戶端對應的金鑰
- 應用程式的套件名稱
首先,請建立裝置指定設定,並記下您成功呼叫時所收到的「deviceTierConfigId」。
curl -H "$(oauth2l header --json $HOME/{apiKey} androidpublisher)" -XPOST -H "Content-Type: application/json" -d "{ device_groups: [ { name: "my_group_1", device_selectors: [ { device_ram: { min_bytes: 4294967296 }, excluded_device_ids: [ { build_brand: "google", build_device: "redfin" } ] }, { included_device_ids: [ { build_brand: "google", build_device: "blueline" } ] } ] } ] }" https://androidpublisher.googleapis.com/androidpublisher/v3/applications/{packageName}/deviceTierConfigs
開始編輯:系統會顯示編輯內容的 ID 和到期時間。請儲存下列呼叫的 ID。
curl -H "$(oauth2l header --json $HOME/{apiKey} androidpublisher)" -XPOST https://androidpublisher.googleapis.com/androidpublisher/v3/applications/{packageName}/edits
上傳 AAB,將裝置指定設定 (deviceTierConfigId) 指定為查詢參數:如果呼叫成功,系統會顯示您建構的 AAB 版本代碼、sha1 和 sha256。請儲存版本代碼以進行下一個呼叫。
curl -H "$(oauth2l header --json $HOME/{apiKey} androidpublisher)" --data-binary @$HOME/{aabFile} -H "Content-Type: application/octet-stream" -XPOST https://androidpublisher.googleapis.com/upload/androidpublisher/v3/applications/{packageName}/edits/{editID}/bundles?deviceTierConfigId="{deviceTierConfigId}
將 AAB 指派至所需測試群組 (如要進行測試,建議您使用內部測試群組。不過,您也可以使用其他測試群組,詳情情參閱這篇文章)。您將在該測試群組中進行簡單的發布作業,不必提供版本資訊。如要進一步瞭解階段推出的做法、草稿版本以及版本資訊,請參閱這個頁面。如果這是您第一次使用 Publisher API,建議您以草稿版本的形式建立 AAB,然後在 Google Play 管理中心完成版本設定,確保所有設定正確無誤。
curl -H "$(oauth2l header --json $HOME/{apiKey} androidpublisher)" -XPUT -H "Content-Type: application/json" -d "{ releases: [{status: '{status}', versionCodes: ['{versionCode}'] }]}" https://androidpublisher.googleapis.com/androidpublisher/v3/applications/{packageName}/edits/{editID}/tracks/{track}
修訂變更 (請注意,執行這項作業後,Play 上的相關測試群組就會反映所有變更)。
curl -H "$(oauth2l header --json $HOME/{apiKey} androidpublisher)" -XPOST https://androidpublisher.googleapis.com/androidpublisher/v3/applications/{packageName}/edits/{editID}:commit