什麼是裝置層級指定?
「裝置層級指定」功能可讓您根據裝置的硬體,為裝置提供同一個資產的不同版本,例如解析度等等。舉例來說,您可以選擇為低階裝置提供低解析度資產以提升效能,並為高階裝置提供高解析度資產以提升圖像品質。這樣一來,您只會向使用者的裝置提供必要資產,而不會增加整體遊戲大小。這項功能是以 Play Asset Delivery 中的資產包概念為基礎。您可以定義層級條件 (目前根據 RAM、特定裝置型號或可用的系統功能),最多可使用 5 個層級,如下所示。
如同 Play Asset Delivery,裝置層級指定功能支援 API 16 (Jelly Bean 4.1) 以上版本,不過在搭載 API 19 (KitKat 4.4.X) 以下版本的裝置上,無論裝置版本為何,系統都會提供預設層級。
開發人員旅程
整體而言,如要在現有遊戲中整合 DTT,您必須按照下列步驟操作:
- 在遊戲中整合裝置層級指定功能以及 Play Asset Delivery。
- 在遊戲中整合 Play Asset Delivery (如果尚未整合的話)。
- 將資產分為多個「資產包」。
- 將程式碼和資產打包在一起,做為要上傳至 Play 的最終 Android App Bundle 構件。
- 建立裝置層級指定功能的設定,讓 Play 瞭解如何為使用者裝置提供資產。
- 設定 Google Play Developer API (如果尚未完成設定的話)。您會使用這個 API 將 DTT 設定傳送至 Play。
- 按照步驟建立 DTT 設定。
- 將 AAB 上傳至 Play 並進行測試,確認所有設定皆正確無誤。
在第一個部分中,您將發現指南內容會根據您使用的建構系統產生分支。您選擇的系統取決於您使用的引擎和現有設定。
- Gradle (適用於 Java 和原生遊戲):如果是使用 Gradle 建構的遊戲,請按照下列步驟設定建構系統,透過 DTT 支援建立 AAB。
- 如果您將遊戲匯出到 Gradle 並在此完成建構,建議您按照下列指示操作 (例如匯出至 Gradle 的 Unity 遊戲)。
- Unity 外掛程式:我們會為您提供 Unity 套件,只要匯入至 Unity 專案,即可設定及建構內含 DTT 支援的 AAB。
在應用程式中設定裝置層級指定功能
在遊戲中整合 Play Asset Delivery (如果尚未完成的話)
Play Asset Delivery (PAD) 可讓您在安裝期間或執行階段動態供應遊戲資產,詳情請參閱這篇簡介文章。如果您使用裝置層級指定功能,Play 就會根據您為不同裝置層級指定的層級設定提供資產包。建議您按照下列指南在遊戲中整合 PAD (也就是建立資產包及在遊戲中導入擷取功能),然後修改專案程式碼,啟用裝置層級指定功能。
Gradle
如果是使用 Gradle 建構的遊戲,請按照這篇文章的操作說明使用 Gradle 建構資產包,然後按照下列操作說明在遊戲中整合資產包擷取功能:
- Java
- 原生
- 匯出至 Gradle 的 Unity 遊戲
- 透過 JNI 使用 Java 程式庫 (例如 Unity 內建的 JNI)。
Unity
如果是使用 Unity 建構的遊戲,請按照這些操作說明使用 AssetPackConfig
類別設定資產包。
建立裝置層級專屬目錄
使用 Gradle
現在,您要將資產分到接下來要定義的 N 個層級中 (最多 5 個)。請利用您在上一個步驟中建立的現有資產套件目錄建立 DTT 目錄,找出適當的資料夾,然後在後方加上 #tier_0、#tier_1、#tier_2 等字串 (如下所示)。在遊戲中使用資產包時,您不必為資料夾加上後置字串,系統會在建構程序中自動移除後置字串。
完成上一個步驟後,結果可能如下所示:
...
.../level1/src/main/assets/character-textures#tier_2/
.../level1/src/main/assets/character-textures#tier_1/
.../level1/src/main/assets/character-textures#tier_0/
...
存取資料夾中的檔案時,只要使用相同路徑即可,不必加上後置字串。在這個範例中,我以 level1/assets/character-textures/
做為參照,不包含任何後置字串。
使用 Unity
如要新增採用 DTT 的資產包,您可以使用下列 AssetPackConfig
方法:
/// Package the specified raw assets in the specified folders,
/// keyed by DeviceTier, in an AssetPack with the specified delivery mode.
public void AddAssetsFolders(
string assetPackName,
IDictionary<DeviceTier, string> deviceTierToAssetPackDirectoryPath,
AssetPackDeliveryMode deliveryMode)
/// Package the specified AssetBundle files, which vary only by DeviceTier,
/// in an AssetPack with the specified delivery mode.
public void AddAssetBundles(
IDictionary<DeviceTier, string> deviceTierToAssetBundleFilePath,
AssetPackDeliveryMode deliveryMode)
舉例來說,假設您為角色設定了三個 AssetBundles
,而且細膩程度不一。
如要將這些 AssetBundles
對應至相應的裝置層級,請使用以下程式碼片段。
var assetPackConfig = new AssetPackConfig();
var tiers = new Dictionary<DeviceTier, string>
{
{0, "Assets/LowPoly/Character"},
{1, "Assets/Mid/Character"},
{2, "Assets/Detailed/Character"}
};
assetPackConfig.AddAssetBundles(tiers, AssetPackDeliveryMode.OnDemand);
建立 Android App Bundle
Gradle
在專案的 build.gradle
檔案中設定依附元件,以便取得下列版本的 Android Gradle 外掛程式和 bundletool (或更新的版本):
buildscript {
dependencies {
classpath 'com.android.tools.build:gradle:4.2.0'
classpath "com.android.tools.build:bundletool:1.7.1"
...
}
...
}
您也必須將 Gradle 更新至 6.7.1 以上版本。您可以在專案的 gradle/wrapper/gradle-wrapper.properties
中更新。
distributionUrl=https://services.gradle.org/distributions/gradle-6.7.1-all.zip
最後,您需使用 Play Asset Delivery 程式庫;如果您仍使用單體 Play Core 程式庫,請將其更新至 1.8.3 以上版本。建議您改用 Play Asset Delivery 程式庫,並盡可能更新至最新版本。
dependencies {
implementation 'com.google.android.play:asset-delivery:2.0.1'
...
}
在主要應用程式模組的 build.gradle
檔案中,啟用 DTT 分割功能:
android {
bundle {
deviceTier {
enableSplit true
}
...
}
...
}
完成上述步驟後,您就可以建立 Android App Bundle (AAB)。
Bundletool
使用 bundletool 建構套件,並且在進行自訂 AAB 的步驟時,將以下程式碼加入 BundleConfig.pb
檔案。
{
...
"optimizations": {
"splitsConfig": {
"splitDimension": [
...
{
"value": "DEVICE_TIER",
"negate": false,
"suffixStripping": {
"enabled": true,
}
}],
}
}
}
Unity
設定將 DTT 資產包納入 AssetPackConfig
後,您可以沿用該設定,並採用下列其中一個方法建立 AAB:
// Configures the build system to use the newly created assetPackConfig when
// calling Google > Build and Run or Google > Build Android App
Bundle.AssetPackConfigSerializer.SaveConfig(assetPackConfig);
// Alternatively, use BundleTool.BuildBundle to build an App Bundle from script
BuildBundle(new buildPlayerOptions(), assetPackConfig)
本機測試
建議您先在本機測試應用程式套件,確認所有設定皆正確無誤後,再繼續進行後續步驟。使用 bundletool
(1.8.0 以上版本) 即可在本機建構及測試應用程式,並明確指定正確的裝置層級。首先,您將使用 build-apks
產生一組 .apks
檔案,然後使用 install-apks
將應用程式部署至已連結的裝置。您也可以透過 device-tier 標記指定要安裝的層級。如要進一步瞭解本機測試的方法,請參閱這篇文章。請注意,這個頁面尚未更新 DTT 的資訊,因此不含 device-tier
標記。
bundletool build-apks --bundle=/path/to/app.aab --output=/path/to/app.apks --local-testing
bundletool install-apks --apks=/path/to/app.apks --device-tier=1
其他做法:您也可以使用 extract-apks
擷取特定裝置的一組 APK。不過,如果您在指定該裝置的層級時使用 get-device-spec
,就「無法」搭配使用 --local-testing
標記。也就是說,您將無法測試快速追蹤或隨選資產包。
bundletool get-device-spec --output=/path/to/device-spec.json --device-tier=1
bundletool extract-apks --apks=/path/to/existing_APK_set.apks --output-dir=/path/to/device_specific_APK_set.apks --device-spec=/path/to/device-spec.json
Unity
只要啟用 --local-testing
標記,「Google」->「建構及執行」選單選項就會建構及執行遊戲。不過,您無法指定傳入 install-apks
指令的 device-tier 標記。
如果要指定 0 以外的 device-tier 標記,請按照下列步驟操作:
- 使用「Google」->「建立 Android App Bundle」選單選項建立 AAB。
- 按照上一節的操作說明,對建構的 AAB 執行
bundletool
、build-apks
和install-apks
。
透過 Google Play Developer API 建立裝置層級設定
開始使用 Google Play Developer API (如果尚未完成設定的話)
如要設定裝置層級指定功能 (例如定義每個層級的規定),您必須使用 Android Publisher API 將設定上傳至 Google Play。如要進一步瞭解 API,請點選上述連結。另外,請按照這篇文章的幾個步驟操作,包括:
您可以按這裡查看 API 參考資料。如果您之後選擇透過 API 上傳您建構的 AAB,就會使用 Edits 方法。此外,建議您在使用 API 之前,先詳閱這個網頁。
使用 Device Tier Configuration API
您可以使用下列 API 呼叫建立裝置層級設定:
建立裝置層級設定
HTTP 要求 | POST https://androidpublisher.googleapis.com/androidpublisher/v3/applications/{packageName}/deviceTierConfigs |
路徑參數 | 不適用 |
要求主體 | 裝置層級設定 |
回應主體 | 裝置層級設定 |
裝置層級設定物件
裝置層級定義有以下 2 個步驟:
- 定義一組裝置群組。
- 為裝置群組指派層級,以定義裝置層級組合。
裝置群組為一組裝置,且所有裝置都符合您在設定中定義的選取條件。
選取條件可以定義裝置端 RAM 和型號相關需求。
系統會依您選擇的名稱識別群組,而且群組可重複。
接著,您可以為群組排名,定義裝置層級組合:每個裝置層級皆由其層級和裝置群組定義。
如果裝置與多個層級相符,就會取得當中最高層級的內容。
{ device_groups: [ { name: string, device_selectors: [ { device_ram: { min_bytes: integer max_bytes: integer }, included_device_ids: [ { build_brand: string, build_device: string } ], excluded_device_ids: [ { build_brand: string, build_device: string } ], required_system_features: [ { name: string } ], forbidden_system_features: [ { name: string } ] } ] } ], device_tier_set: { device_tiers: [ { level: int, device_group_names: [string] } ] } }
欄位:
- device_confid_id (整數):與這個裝置層級設定相對應的 ID
device_groups (物件):群組定義
- name (字串):裝置群組名稱 (您定義的字串 ID)
- device_selectors (物件):群組的裝置要求。裝置必須符合這些要求才能歸類到這個群組
- device_ram (物件):裝置 RAM 需求
- min_bytes (整數,含下限):RAM 需求下限 (以位元組為單位)
- max_bytes (整數,不含上限):RAM 需求上限 (以位元組為單位)
- included_device_ids (物件):要納入這個選取條件中的裝置型號 (每個群組最多 10000 個 device_ids)。裝置必須列在這個清單中才符合選取條件。這只是選取條件中的其中一項必要條件。如要符合選取條件,裝置還必須滿足其他需求 (想瞭解如何合併選取條件的需求,請參閱上方的注意事項)
- build_brand (字串):裝置製造商
- build_device (字串):裝置型號代碼
- excluded_device_ids (物件):要從這個選取條件中排除的裝置型號 (每個群組最多 10000 個 device_ids)。即使裝置符合選取條件中的所有其他需求,只要列在這個清單上,就會視為不符合選取條件。
- build_brand (字串):裝置製造商
- build_device (字串):裝置型號代碼
required_system_features (物件):裝置必須具有的功能 (每個群組最多 100 個功能)。如果裝置沒有這些功能,選取條件就不會納入該裝置。裝置必須具有這個清單中的所有系統功能,才能符合選取條件。這只是選取條件中的其中一項必要條件。如要符合選取條件,裝置還必須滿足其他條件 (想瞭解如何合併選取條件的要求,請參閱上方的注意事項)。
系統功能參考資料
- name (字串):系統功能
forbidden_system_features (物件):裝置不得具有指定的功能 (每個群組最多 100 項功能),才能納入此選取條件中。即使裝置符合選取條件中的所有其他需求,只要具有這個清單中的任何系統功能,就會視為不符選取條件。
系統功能參考資料
- name (字串):系統功能
device_tiers (物件):層級定義
- level (整數):層級數
- group_name (字串陣列):屬於這個層級的裝置群組名稱
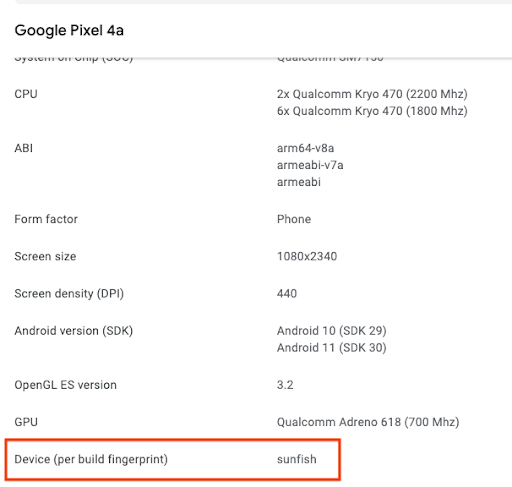
您可以使用 Google Play 管理中心的裝置目錄,以下列任一方式找出裝置製造商和型號代碼的正確格式:
使用裝置目錄檢查個別裝置,在如下方範例所示的位置找出製造商和型號代碼 (Google Pixel 4a 的製造商為「Google」,型號代碼為「sunfish」)。
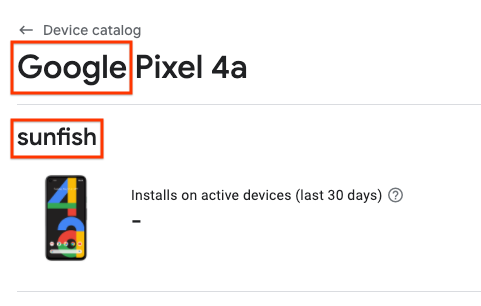
下載支援裝置的 CSV 檔案,並將「製造商」和「型號代碼」資訊分別用於「build_brand」和「build_device」欄位。
以下是含有 3 個層級的設定範例:層級 2 使用裝置群組「high」(包含 RAM 超過 7 GB 的所有裝置和 Pixel 4),層級 1 使用裝置群組「medium」(包含 RAM 容量為 4 至 7 GB 的所有裝置),層級 0 則是隱含定義的通用群組。
{
device_groups: [
{
name: 'high',
device_selectors: [
{
device_ram: {
min_bytes: 7516192768
},
},
{
included_device_ids: [
{
build_brand: 'google',
build_device: 'flame'
}
],
}
]
},
{
name: 'medium',
device_selectors: [
{
device_ram: {
min_bytes: 4294967296,
max_bytes: 7516192768
},
}
]
}
],
device_tier_set: {
device_tiers: [
{
level: 1,
device_group_names: [
'medium'
]
},
{
level: 2,
device_group_names: [
'high'
]
}
]
}
}
您可以先按照「驗證裝置指定設定」的說明操作,再將設定上傳到 Google Play。
根據 ID 取得裝置層級設定
您可以使用下列呼叫,根據 ID 擷取特定的裝置層級設定:
HTTP 要求 |
GET https://androidpublisher.googleapis.com/androidpublisher/v3/applications/{packageName}/deviceTierConfigs/{deviceTierConfigId}
|
路徑參數 | 不適用 |
要求主體 | 不適用 |
回應主體 | 裝置層級設定 |
取得裝置層級設定清單
您可以透過下列呼叫取得最新的 10 個裝置層級設定,也可以使用「page_token」查詢參數,以最適當的方式指定十個裝置層級:
HTTP 要求 | GET https://androidpublisher.googleapis.com/androidpublisher/v3/applications/{packageName}/deviceTierConfigs |
路徑參數 | 不適用 |
查詢參數 | page_token (選用):指定 10 個 DTC 的特定群組。如果您建立的 DTC 超過 10 個,而且想查看的 DTC 並不是最近建立的 10 個 DTC,這個參數就非常實用。 |
要求主體 | 不適用 |
回應主體 | 裝置層級設定清單 page_token |
驗證裝置指定設定
bundletool
包含兩個指令,可在上傳到 Play 之前確認裝置指定設定是否正常運作。
使用 bundletool print-device-targeting-config
即可驗證 JSON 檔案的語法是否正確,並以更易讀的格式呈現裝置群組與層級。
bundletool print-device-targeting-config --config=mydtc.json
您可以使用 bundletool evaluate-device-targeting-config
評估特定裝置符合哪些群組和層級,方法是將目標裝置連結至工作站並使用 --connected-device
標記,或者手動編譯內含裝置屬性的 JSON 檔案,然後透過 --device-properties
標記提供該檔案。
bundletool evaluate-device-targeting-config --config=mydtc.json --connected-device
bundletool evaluate-device-targeting-config --config=mydtc.json --device-properties=deviceproperties.json
裝置屬性檔案應為 DeviceProperties protobuf 結構的 JSON 檔案。例如:
{
"ram": 2057072640,
"device_id": {
"build_brand":"google",
"build_device":"redfin"
},
"system_features": [
{
"name":"android.hardware.bluetooth"
},
{
"name":"android.hardware.camera"
}
]
}
將 Android App Bundle 上傳至 Google Play
透過 API
您可以使用 Google Play Developer API 將 Android App Bundle 上傳到 Google Play,然後將特定的裝置層級指定設定連結至您建構的 AAB。
歡迎參閱 Edits 方法的概要簡介。您也可以參閱這篇文章,透過更深入的範例瞭解如何在 Google Play 管理中心的不同測試群組中進行發布 (如果您參閱最後一個連結的文章,建議您使用支援 AAB 的 API,而不是該頁面上所列支援 APK 的 API)。如要指定您建構的裝置層級設定,您必須在呼叫 edits.bundle.upload
方法時,將設定 ID 新增至 deviceTierConfigId
查詢參數,例如:
https://androidpublisher.googleapis.com/upload/androidpublisher/v3/applications/{packageName}/edits/{editId}/bundles?deviceTierConfigId="{deviceTierConfigId}
透過 Google Play 管理中心
請按照這篇文章的操作說明上傳 Android App Bundle。您的 App Bundle 會套用最新的 DTC 設定。
如要驗證是否正確建構應用程式套件,請依序前往「應用程式套件探索工具」(選取正確的版本) >「供應」,然後點選每個資產包,就會顯示您建立的 N 個層級。在以下範例中,我的資產包「main_asset」有 3 個層級,分別是層級 0、1 和 2。
確認供應的層級是否正確
請使用以下方法確保只為裝置供應正確的層級內容
adb shell pm path {packageName} |
您應該會看到如下內容:
package:{...}/base.apk
package:{...}/split_config.en.apk
package:{...}/split_config.xxhdpi.apk
package:{...}/split_main_asset.apk
package:{...}/split_main_asset.config.tier_2.apk
輔助工具
透過 curl 快速開始使用
以下是指令列工具 curl 的使用範例,包括建立新裝置層級設定、使用 Edits API 建立新編輯內容、上傳新的 AAB (同時將其與特定裝置層級設定建立關聯)、設定測試群組/發布設定,以及修訂編輯內容 (從而公開發布變更)。請務必瞭解以下項目的位置:
- 與您的 API 用戶端對應的金鑰
- 應用程式的套件名稱
首先,請建立裝置層級設定,並記下您成功呼叫時所收到的 deviceTierConfigId
。
curl -H "$(oauth2l header --json $HOME/{apiKey} androidpublisher)" -XPOST -H "Content-Type: application/json" -d "{ device_groups: [ { name: 'high', device_selectors: [ { device_ram: { min_bytes: 7516192768 }, }, { included_device_ids: [ { build_brand: 'google', build_device: 'flame' } ], } ] }, { name: 'medium', device_selectors: [ { device_ram: { min_bytes: 4294967296, max_bytes: 7516192768 }, } ] } ], device_tier_set: { device_tiers: [ { level: 1, device_group_names: [ 'medium' ] }, { level: 2, device_group_names: [ 'high' ] } ] } }" https://androidpublisher.googleapis.com/androidpublisher/v3/applications/{packageName}/deviceTierConfigs
開始編輯:系統會顯示編輯內容的 ID 和到期時間。請儲存下列呼叫的 ID。
curl -H "$(oauth2l header --json $HOME/{apiKey} androidpublisher)" -XPOST https://androidpublisher.googleapis.com/androidpublisher/v3/applications/{packageName}/edits
上傳 AAB,將裝置層級設定指定為查詢參數:如果呼叫成功,系統會顯示您建構的 AAB 版本代碼、sha1 和 sha256。請儲存版本代碼以進行下一個呼叫。
curl -H "$(oauth2l header --json $HOME/{apiKey} androidpublisher)" --data-binary @$HOME/{aabFile} -H "Content-Type: application/octet-stream" -XPOST https://androidpublisher.googleapis.com/upload/androidpublisher/v3/applications/{packageName}/edits/{editID}/bundles?deviceTierConfigId="{dttConfigID}"
將 AAB 指派至所需測試群組 (如要進行測試,建議您使用內部測試群組。不過,您也可以使用其他測試群組,詳情情參閱這篇文章)。您將在該測試群組中進行簡單的發布作業,不必提供版本資訊。如要進一步瞭解階段推出的做法、草稿版本以及版本資訊,請參閱這個頁面。如果這是您第一次使用 Publisher API,建議您以草稿版本的形式建立 AAB,然後在 Google Play 管理中心完成版本設定,確保所有設定正確無誤。
curl -H "$(oauth2l header --json $HOME/{apiKey} androidpublisher)" -XPUT -H "Content-Type: application/json" -d "{ releases: [{status: '{status}'</code>, <code><strong>versionCodes</strong></code>: <code>['{versionCode}']</code> <code><strong>}]}</strong></code>" <code>https://androidpublisher.googleapis.com/androidpublisher/v3/applications/{packageName}/edits/{editID}/tracks/{track}
修訂變更 (請注意,執行這項作業後,Play 上的相關測試群組就會反映所有變更)。
curl -H "$(oauth2l header --json $HOME/{apiKey} androidpublisher)" -XPOST https://androidpublisher.googleapis.com/androidpublisher/v3/applications/{packageName}/edits/{editID}:commit