
One of Android's most important features is an app's ability to send the user to another app
based on an "action" it would like to perform. For example, if
your app has the address of a business that you'd like to show on a map, you don't have to build
an activity in your app that shows a map. Instead, you can create a request to view the address
using an Intent. The Android system then starts an app that's able to show
the address on a map.
As explained in the first class, Building Your First App, you must use intents to navigate between activities in your own app. You generally do so with an explicit intent, which defines the exact class name of the component you want to start. However, when you want to have a separate app perform an action, such as "view a map," you must use an implicit intent.
This lesson shows you how to create an implicit intent for a particular action, and how to use it to start an activity that performs the action in another app. Also see the video embedded here to understand why it's important that you include runtime checks for your implicit intents.
Build an implicit intent
Implicit intents do not declare the class name of the component to start, but instead declare an action to perform. The action specifies the thing you want to do, such as view, edit, send, or get something.
Associate intent actions with data
Intents often also include data associated
with the action, such as the address you want to view, or the email message you want to send.
Depending on the intent you want to create, the data might be a Uri,
one of several other data types, or the intent might not need data at all.
If your data is a Uri, there's a simple Intent() constructor you can use to define the action and
data.
For example, here's how to create an intent to initiate a phone call using the Uri data to specify the telephone number:
Kotlin
val callIntent: Intent = Uri.parse("tel:5551234").let { number ->
    Intent(Intent.ACTION_DIAL, number)
}
Java
Uri number = Uri.parse("tel:5551234");
Intent callIntent = new Intent(Intent.ACTION_DIAL, number);
When your app invokes this intent by calling startActivity(), the Phone app initiates a call to the given phone number.
Here are a couple other intents and their action and Uri data
pairs:
View a map
Kotlin
// Map point based on address
val mapIntent: Intent = Uri.parse(
        "geo:0,0?q=1600+Amphitheatre+Parkway,+Mountain+View,+California"
).let { location ->
    // Or map point based on latitude/longitude
    // val location: Uri = Uri.parse("geo:37.422219,-122.08364?z=14") // z param is zoom level
    Intent(Intent.ACTION_VIEW, location)
}
Java
// Map point based on address
Uri location = Uri.parse("geo:0,0?q=1600+Amphitheatre+Parkway,+Mountain+View,+California");
// Or map point based on latitude/longitude
// Uri location = Uri.parse("geo:37.422219,-122.08364?z=14"); // z param is zoom level
Intent mapIntent = new Intent(Intent.ACTION_VIEW, location);
View a web page
Kotlin
val webIntent: Intent = Uri.parse("https://www.android.com").let { webpage ->
    Intent(Intent.ACTION_VIEW, webpage)
}
Java
Uri webpage = Uri.parse("https://www.android.com");
Intent webIntent = new Intent(Intent.ACTION_VIEW, webpage);
Add extras to an intent
Other kinds of implicit intents require "extra" data that provide different data types,
such as a string. You can add one or more pieces of extra data using the various putExtra() methods.
By default, the system determines the appropriate MIME type required by an intent based on the
Uri data that's included. If you don't include a Uri in the
intent, you should usually use setType() to specify the type
of data associated with the intent. Setting the MIME type further specifies which kinds of
activities should receive the intent.
Here are some more intents that add extra data to specify the desired action:
Send an email with an attachment
Kotlin
Intent(Intent.ACTION_SEND).apply {
    // The intent does not have a URI, so declare the "text/plain" MIME type
    type = "text/plain"
    putExtra(Intent.EXTRA_EMAIL, arrayOf("jan@example.com")) // recipients
    putExtra(Intent.EXTRA_SUBJECT, "Email subject")
    putExtra(Intent.EXTRA_TEXT, "Email message text")
    putExtra(Intent.EXTRA_STREAM, Uri.parse("content://path/to/email/attachment"))
    // You can also attach multiple items by passing an ArrayList of Uris
}
Java
Intent emailIntent = new Intent(Intent.ACTION_SEND);
// The intent does not have a URI, so declare the "text/plain" MIME type
emailIntent.setType(HTTP.PLAIN_TEXT_TYPE);
emailIntent.putExtra(Intent.EXTRA_EMAIL, new String[] {"jan@example.com"}); // recipients
emailIntent.putExtra(Intent.EXTRA_SUBJECT, "Email subject");
emailIntent.putExtra(Intent.EXTRA_TEXT, "Email message text");
emailIntent.putExtra(Intent.EXTRA_STREAM, Uri.parse("content://path/to/email/attachment"));
// You can also attach multiple items by passing an ArrayList of Uris
Create a calendar event
Note: This intent for a calendar event is supported only with API level 14 and higher.
Kotlin
// Event is on January 23, 2021 -- from 7:30 AM to 10:30 AM.
Intent(Intent.ACTION_INSERT, Events.CONTENT_URI).apply {
    val beginTime: Calendar = Calendar.getInstance().apply {
        set(2021, 0, 23, 7, 30)
    }
    val endTime = Calendar.getInstance().apply {
        set(2021, 0, 23, 10, 30)
    }
    putExtra(CalendarContract.EXTRA_EVENT_BEGIN_TIME, beginTime.timeInMillis)
    putExtra(CalendarContract.EXTRA_EVENT_END_TIME, endTime.timeInMillis)
    putExtra(Events.TITLE, "Ninja class")
    putExtra(Events.EVENT_LOCATION, "Secret dojo")
}
Java
// Event is on January 23, 2021 -- from 7:30 AM to 10:30 AM.
Intent calendarIntent = new Intent(Intent.ACTION_INSERT, Events.CONTENT_URI);
Calendar beginTime = Calendar.getInstance();
beginTime.set(2021, 0, 23, 7, 30);
Calendar endTime = Calendar.getInstance();
endTime.set(2021, 0, 23, 10, 30);
calendarIntent.putExtra(CalendarContract.EXTRA_EVENT_BEGIN_TIME, beginTime.getTimeInMillis());
calendarIntent.putExtra(CalendarContract.EXTRA_EVENT_END_TIME, endTime.getTimeInMillis());
calendarIntent.putExtra(Events.TITLE, "Ninja class");
calendarIntent.putExtra(Events.EVENT_LOCATION, "Secret dojo");
Note: It's important that you define your Intent to be as specific as possible. For example, if you want to display an image
using the ACTION_VIEW intent, you should specify a MIME type of
image/*. This prevents apps that can "view" other types of data (like a map app) from being
triggered by the intent.
Start an activity with the intent
Once you have created your Intent and set the extra info, call startActivity() to send it to the system:
Kotlin
startActivity(intent)
Java
startActivity(intent);
Handle the situation where no app can receive an intent
Although many intents are successfully handled by another app that's installed
on the device—such as a phone, email, or calendar app—your app should prepare
for the situation where no activity can handle your app's intent. Whenever you
invoke an intent, be ready to catch an
ActivityNotFoundException,
which occurs if there's no other activity that can handle your app's intent:
Kotlin
try {
    startActivity(intent)
} catch (e: ActivityNotFoundException) {
    // Define what your app should do if no activity can handle the intent.
}
Java
try {
    startActivity(intent);
} catch (ActivityNotFoundException e) {
    // Define what your app should do if no activity can handle the intent.
}
After you catch this exception, decide what your app should do next. This next step depends on the specific characteristics of the intent that you tried to invoke. For example, if you know of a specific app that can handle the intent, provide a link for the user to download the app. Learn more about how to link to your product on Google Play.
Disambiguation dialog
If the system identifies more than one activity that can handle the intent, it displays a dialog (sometimes referred to as the "disambiguation dialog") for the user to select which app to use, as shown in figure 1. If there is only one activity that handles the intent, the system immediately starts it.
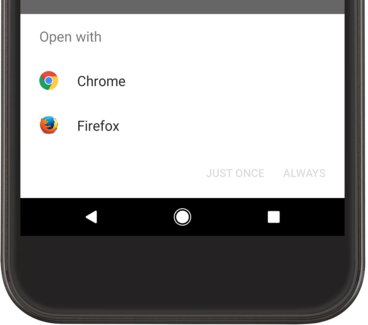
Figure 1. Example of the selection dialog that appears when more than one app can handle an intent.
Complete example
Here's a complete example that shows how to create an intent to view a map, verify that an app exists to handle the intent, then start it:
Kotlin
// Build the intent.
val location = Uri.parse("geo:0,0?q=1600+Amphitheatre+Parkway,+Mountain+View,+California")
val mapIntent = Intent(Intent.ACTION_VIEW, location)

// Try to invoke the intent.
try {
    startActivity(mapIntent)
} catch (e: ActivityNotFoundException) {
    // Define what your app should do if no activity can handle the intent.
}
Java
// Build the intent.
Uri location = Uri.parse("geo:0,0?q=1600+Amphitheatre+Parkway,+Mountain+View,+California");
Intent mapIntent = new Intent(Intent.ACTION_VIEW, location);

// Try to invoke the intent.
try {
    startActivity(mapIntent);
} catch (ActivityNotFoundException e) {
    // Define what your app should do if no activity can handle the intent.
}
Show an app chooser

Figure 2. A chooser dialog.
Notice that when you start an activity by passing your Intent to startActivity() and there is more than one app that responds to
the intent, the user can select which app to use by default (by selecting a checkbox at the bottom
of the dialog; see figure 1). This is nice when performing an action for which the user
generally wants to use the same app every time, such as when opening a web page (users
likely use just one web browser) or taking a photo (users likely prefer one camera).
However, if the action to be performed could be handled by multiple apps and the user might prefer a different app each time—such as a "share" action, for which users might have several apps through which they might share an item—you should explicitly show a chooser dialog as shown in figure 2. The chooser dialog forces the user to select which app to use for the action every time (the user cannot select a default app for the action).
To show the chooser, create an Intent using createChooser() and pass it to startActivity(). For example:
Kotlin
val intent = Intent(Intent.ACTION_SEND)

// Create intent to show chooser
val chooser = Intent.createChooser(intent, /* title */ null)

// Try to invoke the intent.
try {
    startActivity(chooser)
} catch (e: ActivityNotFoundException) {
    // Define what your app should do if no activity can handle the intent.
}
Java
Intent intent = new Intent(Intent.ACTION_SEND);

// Create intent to show chooser
Intent chooser = Intent.createChooser(intent, /* title */ null);

// Try to invoke the intent.
try {
    startActivity(chooser);
} catch (ActivityNotFoundException e) {
    // Define what your app should do if no activity can handle the intent.
}
This displays a dialog with a list of apps that respond to the intent passed
to the
createChooser() method. The title parameter may be
supplied if the action is not
ACTION_SEND or
ACTION_SEND_MULTIPLE