
Before you start adding license verification to your application, you need to set up your Google Play publishing account, your development environment, and any test accounts required to verify your implementation.
Setting Up a Publisher Account
If you don't already have a publisher account for Google Play, you need to register for one using your Google Account and agree to the Google Play terms of service.
For more information, see Get Started with Publishing.
If you already have a publisher account on Google Play, use your Play Console to set up licensing.
Using the Google Play Console, you can:
- Obtain an app-specific public key for licensing
- Debug and test an application's licensing implementation, prior to publishing the application
- Publish the applications to which you have added licensing support
Administrative settings for licensing
You can manage several administrative controls for Google Play licensing in the Play Console. The controls let you:
- Set up multiple "test accounts," identified by email address. The licensing server allows users signed in to test accounts on a device or emulator to send license checks and receive static test responses. You can set up accounts in the Account Details page of the Play Console.
- Configure static test responses that the server sends, when it receives a license check for an application uploaded to the publisher account, from a user signed in to the publisher account or a test account. You can set test responses in the Account Details page of the Play Console.
- Obtain the app's public key for licensing. When you are implementing licensing in an application, you must copy the public key string into the application. You can obtain the app's public key for licensing in the Services & APIs page (under All Applications).
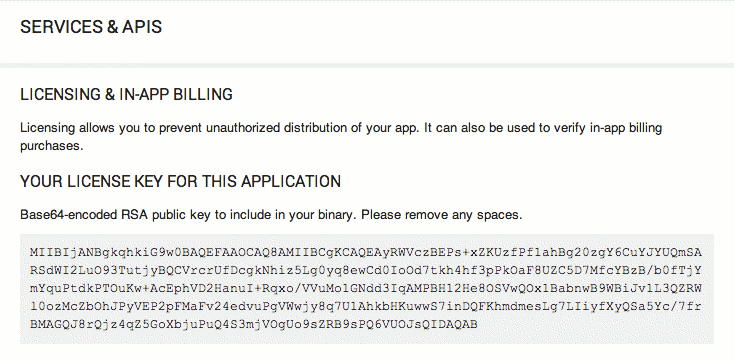
Figure 1. An app's license key is available from the Services & APIs page in the Play Console.
For more information about how to work with test accounts and static test responses, see Setting Up a Testing Environment, below.
Setting Up the Development Environment
Setting up your environment for licensing involves these tasks:
- Setting up the runtime environment for development
- Downloading the LVL into your SDK
- Setting up the Licensing Verification Library
- Including the LVL library project in your application
The sections below describe these tasks. When you are done with setup, you can begin Adding Licensing to Your App.
To get started, you need to set up a proper runtime environment on which you can run, debug, and test your application's implementation of license checking and enforcement.
Setting up the runtime environment
As described earlier, applications check licensing status not by contacting the licensing server directly, but by binding to a service provided by the Google Play application and initiating a license check request. The Google Play service then handles the direct communication with the licensing server and finally routes the response back to your application. To debug and test licensing in your application, you need to set up a runtime environment that includes the necessary Google Play service, so that your application is able to send license check requests to the licensing server.
There are two types of runtime environment that you can use:
- An Android-powered device that includes the Google Play application, or
- An Android emulator running the Google APIs Add-on, API level 8 (release 2) or higher
Running on a device
To use an Android-powered device for debugging and testing licensing, the device must:
- Run a compatible version of Android 1.5 or later (API level 3 or higher) platform, and
- Run a system image on which the Google Play client application is preinstalled.
If Google Play is not preinstalled in the system image, your application won't be able to communicate with the Google Play licensing server.
For general information about how to set up a device for use in developing Android applications, see Using Hardware Devices.
Running on an Android emulator
If you don't have a device available, you can use an Android emulator for debugging and testing licensing.
Because the Android platforms provided in the Android SDK do not include Google Play, you need to download the Google APIs Add-On platform, API level 8 (or higher), from the SDK repository. After downloading the add-on, you need to create an AVD configuration that uses that system image.
The Google APIs Add-On does not include the full Google Play client. However, it does provide:
- A Google Play background service that implements the
ILicensingServiceremote interface, so that your application can send license checks over the network to the licensing server. - A set of underlying account services that let you add a Google Account on
the AVD and sign in using your publisher account or test account credentials.
Signing in using your publisher or test account enables you to debug and test your application without having publish it. For more information see Signing in to an authorized account, below.
Several versions of the Google APIs add-on are available through the SDK Manager, but only the version for Android 2.2 and higher includes the necessary Google Play services.
To set up an emulator for adding licensing to an application, follow these steps:
- Launch the Android SDK Manager, available under the Android Studio Tools menu
(Tools > Android > SDK Manager) or by executing
<sdk>/tools/android sdk. - Select and download Google APIs for the Android version you'd like to target (must be Android 2.2 or higher).
- When the download is complete, open the AVD Manager, available under the Android Studio
Tools menu (Tools > Android > AVD Manager) or by executing
<sdk>/tools/android avd. - In the Android Virtual Device Manager window, select + Create Virtual Device to set the configuration details for the new AVD.
- In the Virtual Device Configuration window, select device hardware, then select Next.
- Select a Google API as the system image to run on the new AVD, then select Next.
- Assign a descriptive name to the AVD and then set the other configuration details as needed.
- Select Finish to create the new AVD configuration, which will appear in the list of available Android Virtual Devices.
If you are not familiar with AVDs or how to use them, see Managing Virtual Devices.
Updating your project configuration
After you set up a runtime environment that meets the requirements described
above — either on an actual device or on an emulator — make sure to
update your application project or build scripts as needed, so that your compiled
.apk files that use licensing are deployed into that environment.
In particular, if you are developing in Android Studio, make sure that you set up a
Run/Debug Configuration that targets the appropriate device or AVD.
You do not need to make any changes to your application's build configuration, provided that the project is already configured to compile against a standard Android 1.5 (API level 3) or higher library. Adding licensing to an application should have no impact whatsoever on the application's build configuration.
Setting Up the Licensing Verification Library
You will need to set up LVL in your development environment, either as an Android library project or by copying (or importing) the library sources directly into your existing application package. In general, using the LVL as a library project is recommended, since it lets you reuse your licensing code across multiple applications and maintain it more easily over time. Note that the LVL is not designed to be compiled separately and added to an application as a static .jar file.
The recommended way of using the LVL is setting it up as a new Android
library project. A library project is a type of development project
that holds shared Android source code and resources. Other Android application
projects can reference the library project and, at build time, include its
compiled sources in their .apk files. In the context of licensing,
this means that you can do most of your licensing development once, in a library
project, then include the library sources in your various application projects.
In this way, you can easily maintain a uniform implementation of licensing
across all of your projects and maintain it centrally. If you aren't familiar
with library projects or how to use them, see
Managing Projects.
If you are working in Android Studio, you need to add the LVL to your project as a new module.
- Use the "Import Module from Source" window to import a library module by selecting File > New > Import Module.
- In the Import Module from Source window, in Source directory, enter the LVL's
librarydirectory (the directory containing the library's AndroidManifest.xml file) as the project root (<sdk>/extras/google/play_licensing/library/AndroidManifest.xml), then select Next. - Select Finish to import the library module.
For more information about how to work with library modules in Android Studio, see Create an Android Library.
Including the LVL library project sources in your application
If you want to use the LVL sources as a library project, you need to add a reference to the LVL library project in your application project properties. This tells build tools to include the LVL library project sources in your application at compile time. The process for adding a reference to a library project depends on your development environment, as described below.
If you are developing in Android Studio, you should already have added the library module to your project, as described in the previous section. If you haven't done that already, do it now before continuing.
If you are developing using the SDK command-line tools, navigate to the
directory containing your application project and open the
project.properties file. Add a line to the file that specifies the
android.library.reference.<n> key and the path to the
library. For example:
android.library.reference.1=path/to/library_project
Alternatively, you can use this command to update the project properties, including the reference to the library project:
android update lib-project
--target <target_ID> \
--path path/to/my/app_project \
--library path/to/my/library_project
For more information about working with library projects, see Setting up a Library Project.
Setting Up the Testing Environment
The Google Play Console provides configuration tools that let you and others test licensing on your application before it is published. As you are implementing licensing, you can make use of the Play Console tools to test your application's Policy and handling of different licensing responses and error conditions.
The main components of the test environment for licensing include:
- A "Test response" configuration in your publisher account that lets you set the static licensing response returned, when the server processes a license check for an application uploaded to the publisher account, from a user signed in to the publisher account or a test account.
- An optional set of test accounts that will receive the static test response when they check the license of an application that you have uploaded (regardless whether the application is published or not).
- A runtime environment for the application that includes the Google Play application or Google APIs Add-On, on which the user is signed in to the publisher account or one of the test accounts.
Setting up the test environment properly involves:
- Setting static test responses that are returned by the licensing server.
- Setting up test accounts as needed.
- Signing in properly to an emulator or device, before initiating a license check test.
The sections below provide more information.
Setting test responses for license checks
Google Play provides a configuration setting in your publisher account that lets you override the normal processing of a license check and return a specified static response code. The setting is for testing only and applies only to license checks for applications that you have uploaded, made by any user signed in to an emulator or device using the credentials of the publisher account or a registered test account. For other users, the server always processes license checks according to normal rules.
To set a test response for your account, sign in to your publisher account and click "Edit Profile". In the Edit Profile page, locate the Test Response menu in the Licensing panel, shown below. You can select from the full set of valid server response codes to control the response or condition you want to test in your application.
In general, you should make sure to test your application's licensing implementation with every response code available in the Test Response menu. For a description of the codes, see Server Response Codes in the Licensing Reference.
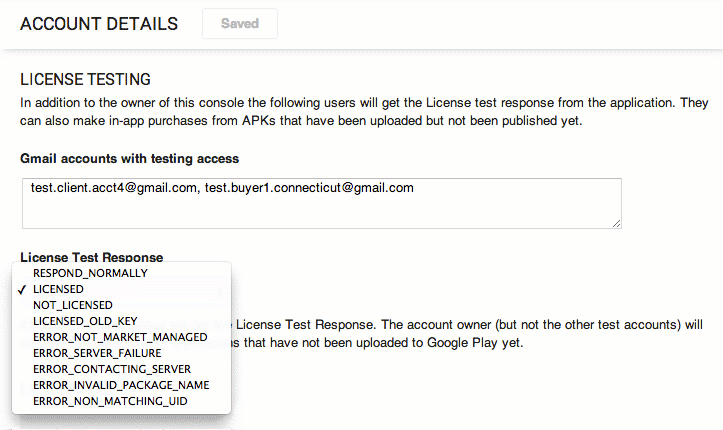
Figure 2. The License Testing panel of your Account details page lets you set up test accounts and manage test responses.
Note that the test response that you configure applies account-wide — that is, it applies not to a single application, but to all applications associated with the publisher account. If you are testing multiple applications at once, changing the test response will affect all of those applications on their next license check (if the user is signed in to the emulator or device using the publisher account or a test account).
Before you can successfully receive a test response for a license check, you must sign in to the device or emulator on which the application is installed, and from which it is querying the server. Specifically, you must sign using either your publisher account or one of the test accounts that you have set up. For more information about test accounts, see the next section.
See Server Response Codes for a list of test responses available and their meanings.
Setting up test accounts
In some cases, you might want to let multiple teams of developers test licensing on applications that will ultimately be published through your publisher account, but without giving them access to your publisher account's sign-in credentials. To meet that need, the Google Play Console lets you set up one or more optional test accounts — accounts that are authorized to query the licensing server and receive static test responses from your publisher account.
Test accounts are standard Google Accounts that you register on your publisher account, such that they will receive the test response for applications that you have uploaded. Developers can then sign in to their devices or emulators using the test account credentials and initiate license checks from installed applications. When the licensing server receives a license check from a user of a test account, it returns the static test response configured for the publisher account.
Necessarily, there are limitations on the access and permissions given to users signed in through test accounts, including:
- Test account users can query the licensing server only for applications that are already uploaded to the publisher account.
- Test account users do not have permission to upload applications to your publisher account.
- Test account users do not have permission to set the publisher account's static test response.
The table below summarizes the differences in capabilities, between the publisher account, a test account, and any other account.
Table 1. Differences in account types for testing licensing.
| Account Type | Can check license before upload? | Can receive test response? | Can set test response? |
|---|---|---|---|
| Publisher account | Yes | Yes | Yes |
| Test account | No | Yes | No |
| Other | No | No | No |
Registering test accounts on the publisher account
To get started, you need to register each test account in your publisher account. As shown in Figure 2, you register test accounts in the Licensing panel of your publisher account's Edit Profile page. Simply enter the accounts as a comma-delimited list and click Save to save your profile changes.
You can use any Google Account as a test account. If you want to own and control the test accounts, you can create the accounts yourself and distribute the credentials to your developers or testers.
Handling application upload and distribution for test account users
As mentioned above, users of test accounts can only receive static test responses for applications that are uploaded to the publisher account. Since those users do not have permission to upload applications, as the publisher you will need to work with those users to collect apps for upload and distribute uploaded apps for testing. You can handle collection and distribution in any way that is convenient.
Once an application is uploaded and becomes known to the licensing server,
developers and testers can continue modify the application in their local
development environment, without having to upload new versions. You only need to
upload a new version if the local application increments the
versionCode attribute in the manifest file.
Distributing your public key to test account users
The licensing server handles static test responses in the normal way, including signing the license response data, adding extras parameters, and so on. To support developers who are implementing licensing using test accounts rather than the publisher account, you will need to distribute the app's public key for licensing to them. Developers without access to the Play Console do not have access to the app's public key, and without the key they won't be able to verify license responses.
Note that if you decide to generate a new licensing key pair for the app for some reason, you need to notify all users of test accounts. For testers, you can embed the new key in the application package and distribute it to users. For developers, you will need to distribute the new key to them directly.
Signing in to an authorized account in the runtime environment
The licensing service is designed to determine whether a given user is licensed to use a given application — during a license check, the Google Play application gathers the user ID from the primary account on the system and sends it to the server, together with the package name of the application and other information. However, if there is no user information available, the license check cannot succeed, so the Google Play application terminates the request and returns an error to the application.
During testing, to ensure that your application can successfully query the licensing server, you must make sure that you sign in to an account on the device or emulator using:
- The credentials of a publisher account, or
- The credentials of a test account that is registered with a publisher account
Signing in to a Google Account on an emulator
If you are testing licensing on an emulator, you need to sign in to a Google account on the emulator. If you do not see an option to create a new Google account, the problem might be that your AVD is running a standard Android system image, rather than the Google APIs Add-On, API 8 (release 2) or higher.
For more information, see Setting up the runtime environment, above.
Signing in using a publisher account offers the advantage of letting your applications receive static test responses even before the applications are uploaded to the Play Console.
If you are part of a larger organization or are working with external groups on applications that will be published through your site, you will more likely want to distribute test accounts instead, then use those to sign in during testing.
To sign in on a device or emulator, follow the steps below. The preferred approach is to sign in as the primary account — however, if there are other accounts already in use on the device or emulator, you can create an additional account and sign in to it using the publisher or test account credentials.
- Open Settings > Accounts & sync
- Select Add Account and choose to add a Google Account.
- Select Next and then Sign in.
- Enter the username and password of either the publisher account or a test account that is registered in the publisher account.
- Select Sign in. The system signs you in to the new account.
Once you are signed in, you can begin testing licensing in your application (if you have completed the LVL integration steps above). When your application initiates a license check, it will receive a response containing the static test response configured on the publisher account.
Note that, if you are using an emulator, you will need to sign in to the publisher account or test account each time you wipe data when restarting the emulator.
Once you've completed the setup procedures, continue to Adding Licensing to Your App.