
1. Before you begin
This codelab covers WorkManager, a backwards compatible, flexible, and simple library for deferrable background work. WorkManager is the recommended task scheduler on Android for deferrable work, with a guarantee to execute.
Prerequisites
- Knowledge of StateFlow and ViewModel. If you're new to these classes, check out the ViewModel and State in Compose Codelab (specifically for ViewModel and State) or Read and update data with Room Codelab (specifically for Flow and StateFlow).
- Knowledge of repositories and dependency injection. For a refresher, check out Add repository and Manual DI.
- Able to implement coroutines in your app.
What you'll learn
- How to add WorkManager to your project.
- How to schedule a simple task.
- How to configure input and output parameters for workers.
- How to chain workers.
What you'll do
- Modify a starter app to use WorkManager.
- Implement a work request to blur an image.
- Implement a serial group of work by chaining work.
- Pass data into and out of the work being scheduled.
What you'll need
- The latest stable version of Android Studio
- An internet connection
2. App overview
These days, smartphones are almost too good at taking pictures. Gone are the days when a photographer might take a reliably blurry picture of something mysterious.
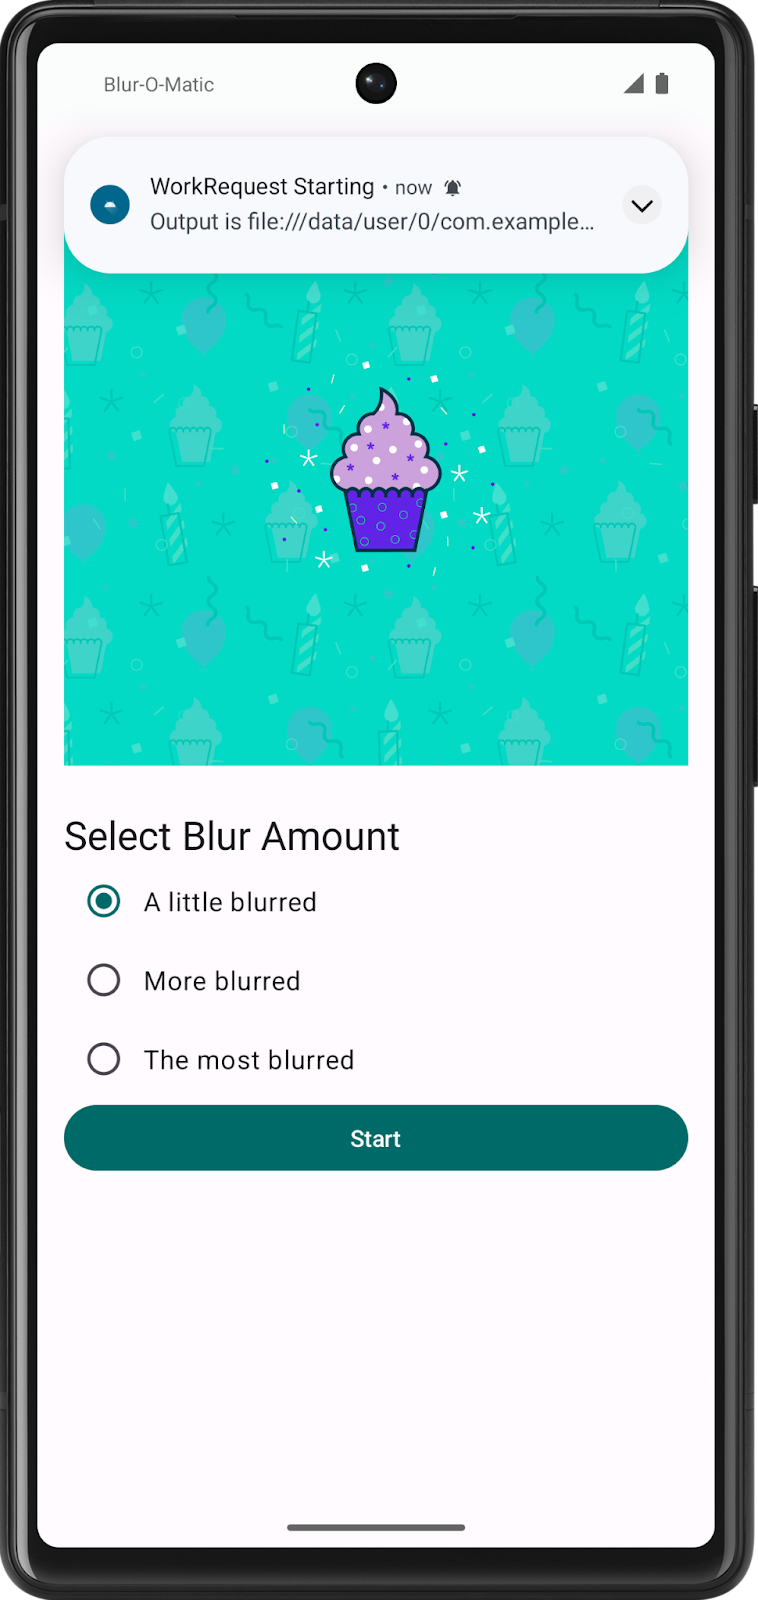
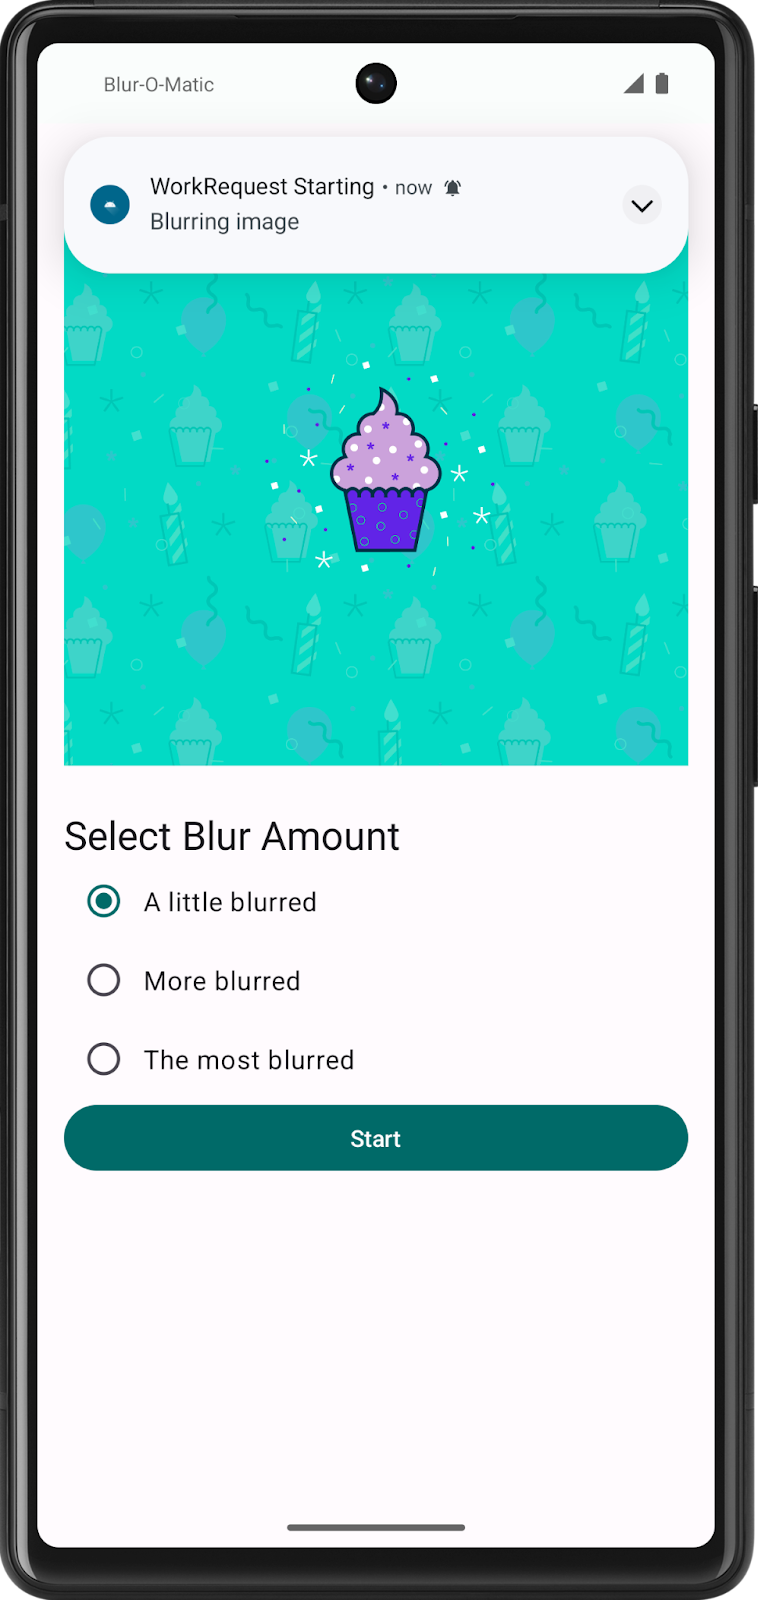
In this codelab, you'll work on Blur-O-Matic, an app that blurs photos and saves the results to a file. Was that the Loch Ness monster or a toy submarine? With Blur-O-Matic, no one will ever know!
|
|
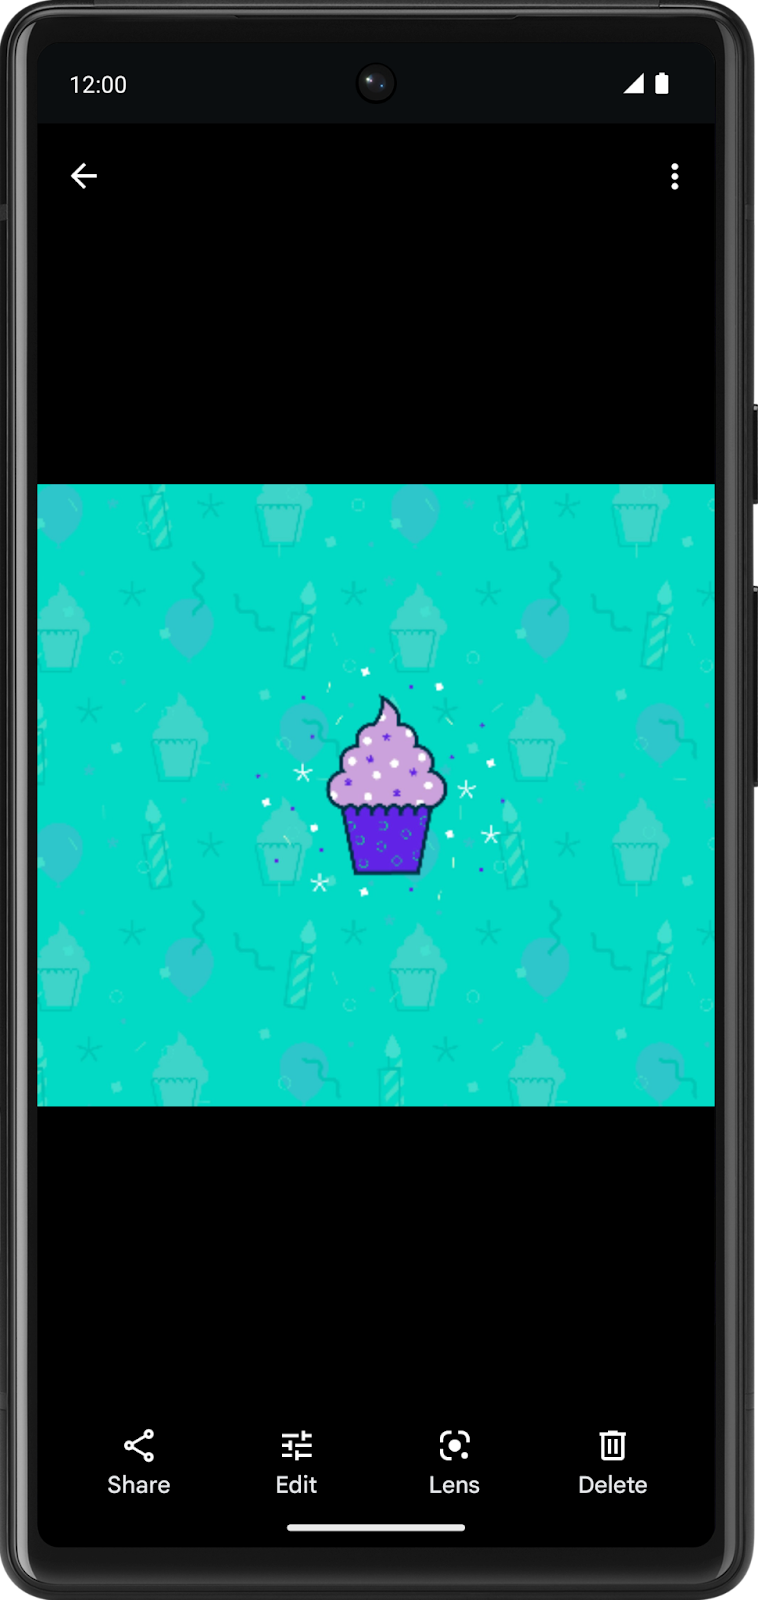
The screen has radio buttons where you can select how blurry you'd like your image to be. Clicking the Start button blurs and saves the image.
Right now, the app does not apply any blurring nor save the final image.
This codelab focuses on adding WorkManager to the app, creating workers to clean up temporary files that are created in blurring an image, blurring an image, and saving a final copy of the image which you can view when you click the See File button. You also learn how to monitor the status of the background work and update the app's UI accordingly.
3. Explore the Blur-O-Matic starter app
Get the starter code
To get started, download the starter code:
Alternatively, you can clone the GitHub repository for the code:
$ git clone https://github.com/google-developer-training/basic-android-kotlin-compose-training-workmanager.git
$ cd basic-android-kotlin-compose-training-workmanager
$ git checkout starter
You can browse the code for the Blur-o-matic app in this GitHub repository.
Run starter code
To familiarize yourself with the starter code, complete the following steps:
- Open the project with the starter code in Android Studio.
- Run the app on an Android device or an emulator.
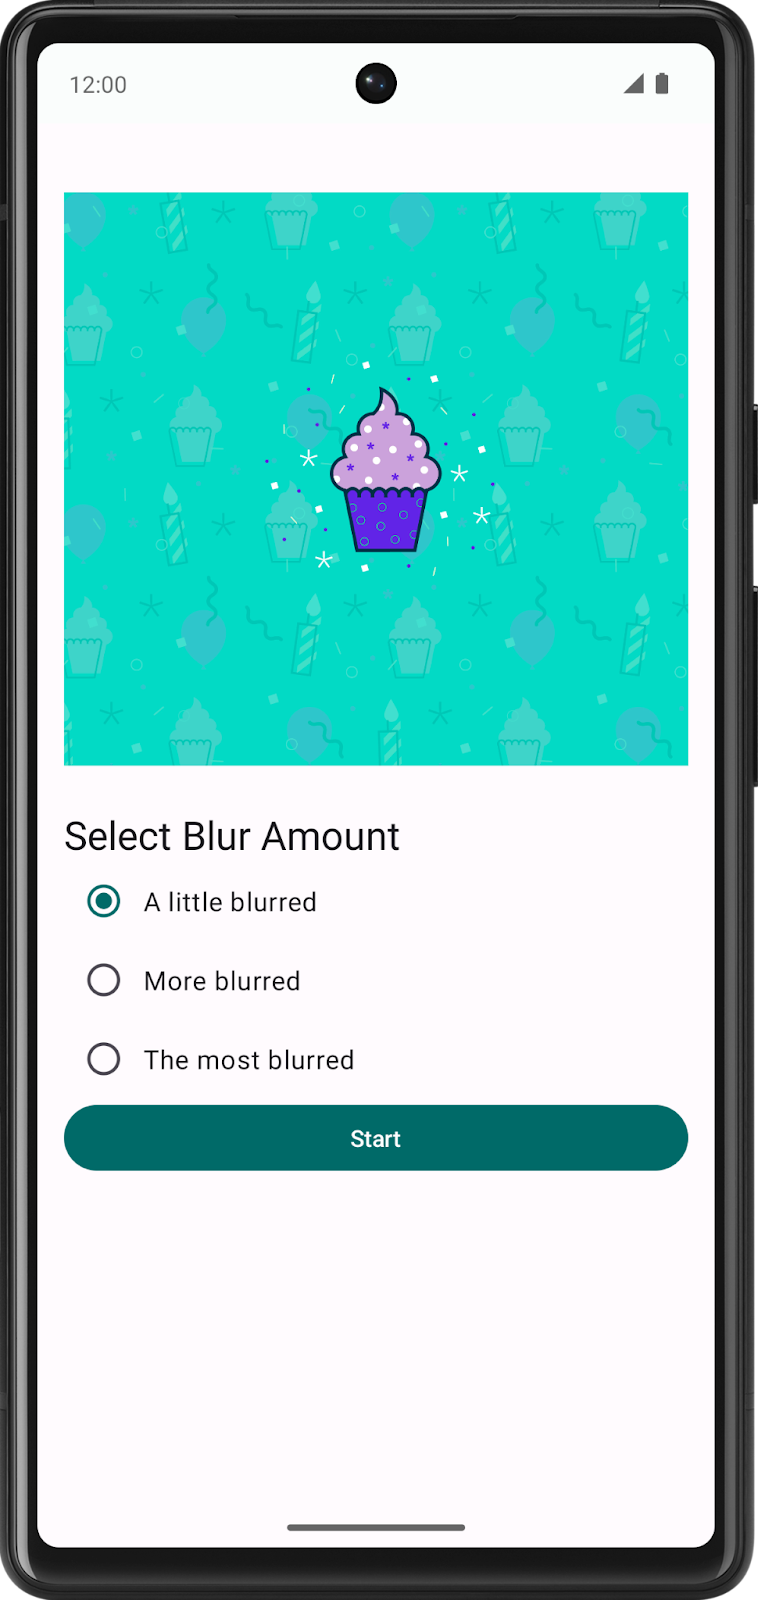
The screen has radio buttons that let you select the amount of blur for your image. When you click the Start button, the app blurs and saves the image.
Right now, the app does not apply any amount of blur when you click the Start button.
Starter code walkthrough
In this task, you familiarize yourself with the structure of the project. The following lists provide a walkthrough of the important files and folders in the project.
WorkerUtils: Convenience methods which you later use to displayNotificationsand code to save a bitmap to file.BlurViewModel: This view model stores the state of the app and interacts with the repository.WorkManagerBluromaticRepository: The class where you start the background work with WorkManager.Constants: A static class with some constants you use during the codelab.BluromaticScreen: Contains composable functions for the UI and interacts with theBlurViewModel. The composable functions show the image and include radio buttons to select the desired blur level.
4. What is WorkManager?
WorkManager is part of Android Jetpack and an Architecture Component for background work that needs a combination of opportunistic and guaranteed execution. Opportunistic execution means that WorkManager does your background work as soon as it can. Guaranteed execution means that WorkManager takes care of the logic to start your work under a variety of situations, even if you navigate away from your app.
WorkManager is an incredibly flexible library that has many additional benefits. Some of these benefits include:
- Support for both asynchronous one-off and periodic tasks.
- Support for constraints, such as network conditions, storage space, and charging status.
- Chaining of complex work requests, such as running work in parallel.
- Output from one work request used as input for the next.
- Handling API-level compatibility back to API level 14 (see note).
- Working with or without Google Play services.
- Following system health best practices.
- Support to easily display state of work requests in the app's UI.
5. When to use WorkManager
The WorkManager library is a good choice for tasks that you need to complete. The running of these tasks is not dependent on the app continuing to run after the work is enqueued. The tasks run even if the app is closed or the user returns to the home screen.
Some examples of tasks that are a good use of WorkManager:
- Periodically querying for latest news stories.
- Applying filters to an image and then saving the image.
- Periodically syncing local data with the network.
WorkManager is one option for running a task off of the main thread but it is not a catch-all for running every type of task off of the main thread. Coroutines are another option that previous codelabs discuss.
For more details about when to use WorkManager, check out the Guide to background work.
6. Add WorkManager to your app
WorkManager requires the following gradle dependency. This is already included in the build file:
app/build.gradle.kts
dependencies {
    // WorkManager dependency
    implementation("androidx.work:work-runtime-ktx:2.8.1")
}
You must use the most current stable release version of work-runtime-ktx in your app.
If you change the version, make sure to click Sync Now to sync your project with the updated gradle files.
7. WorkManager Basics
There are a few WorkManager classes you need to know about:
Worker/CoroutineWorker: Worker is a class that performs work synchronously on a background thread. As we are interested in asynchronous work, we can use CoroutineWorker, which has interoperability with Kotlin Coroutines. In this app, you extend from the CoroutineWorker class and override thedoWork()method. This method is where you put the code for the actual work you want to perform in the background.WorkRequest: This class represents a request to do some work. AWorkRequestis where you define if the worker needs to be run once or periodically. Constraints can also be placed on theWorkRequestthat require certain conditions are met before the work runs. One example is that the device is charging before starting the requested work. You pass in yourCoroutineWorkeras part of creating yourWorkRequest.WorkManager: This class actually schedules yourWorkRequestand makes it run. It schedules aWorkRequestin a way that spreads out the load on system resources, while honoring the constraints you specify.
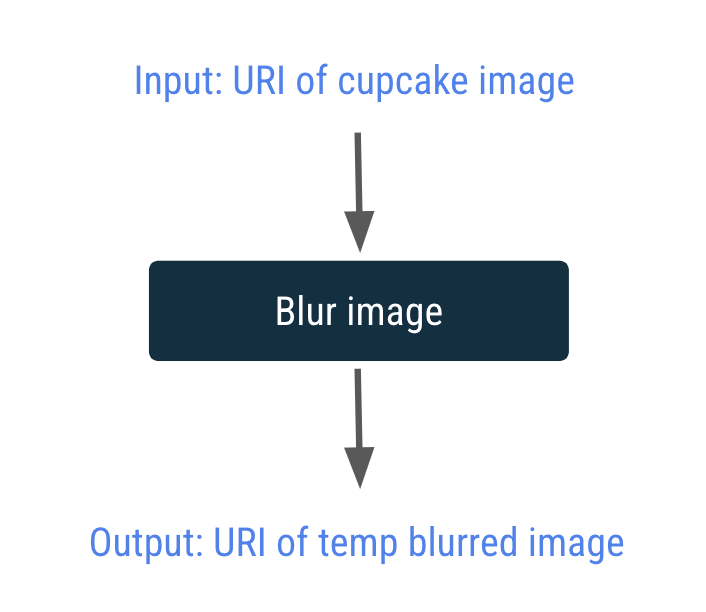
In your case, you define a new BlurWorker class, which contains the code to blur an image. When you click the Start button, WorkManager creates and then enqueues a WorkRequest object.
8. Create the BlurWorker
In this step, you take an image in the res/drawable folder called android_cupcake.png and run a few functions on it in the background. These functions blur the image.
- Right-click on the package
com.example.bluromatic.workersin your Android project pane and select New -> Kotlin Class/File. - Name the new Kotlin class
BlurWorker. Extend it fromCoroutineWorkerwith the required constructor parameters.
workers/BlurWorker.kt
import androidx.work.CoroutineWorker
import androidx.work.WorkerParameters
import android.content.Context

class BlurWorker(ctx: Context, params: WorkerParameters) : CoroutineWorker(ctx, params) {
}
The BlurWorker class extends the CoroutineWorker class instead of the more general Worker class. The CoroutineWorker class implementation of the doWork() is a suspending function, which lets it run asynchronous code that a Worker cannot do. As detailed in the guide Threading in WorkManager, "CoroutineWorker is the recommended implementation for Kotlin users."
At this point, Android Studio draws a red wiggly line under class BlurWorker that indicates an error.

If you place your cursor over the text class BlurWorker, the IDE displays a popup with additional information regarding the error.
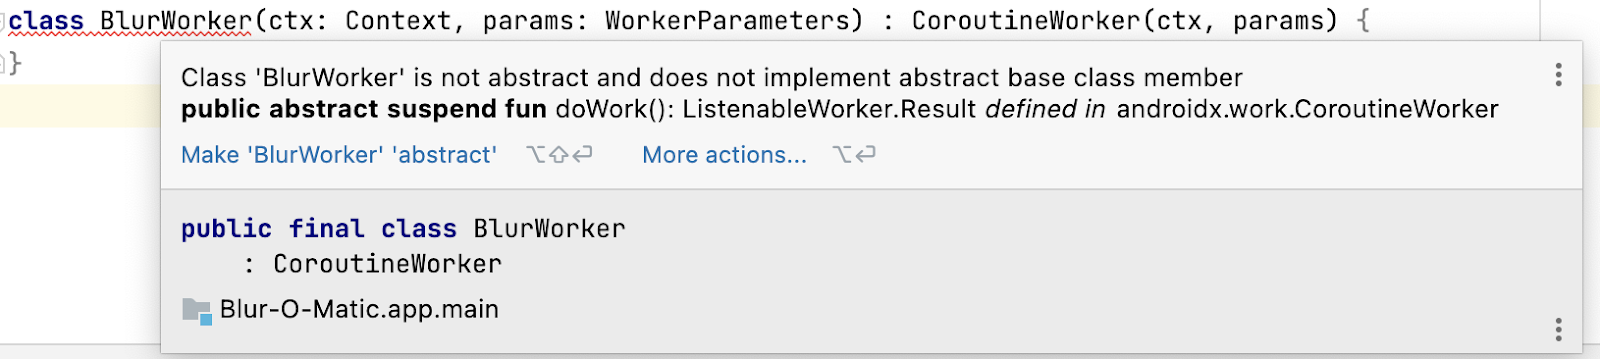
The error message indicates that you did not override the doWork() method as required.
In the doWork() method, write code to blur the cupcake image shown.
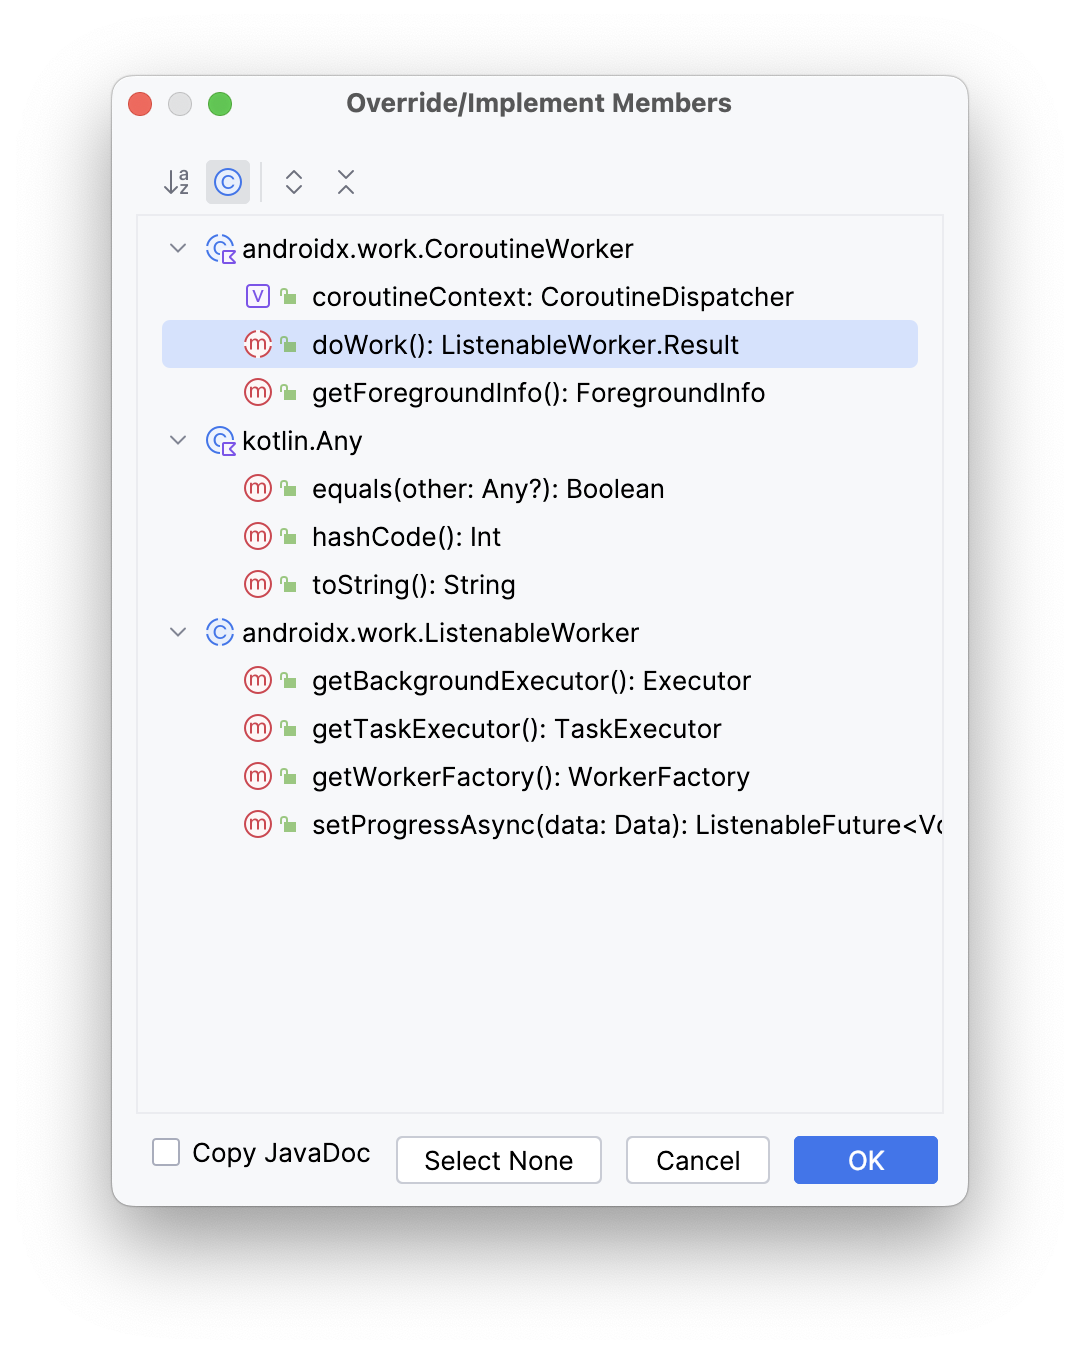
Follow these steps to fix the error and implement the doWork() method:
- Place your cursor inside the class code by clicking on the text "BlurWorker".
- From the Android Studio menu, select Code > Override Methods...
- From the Override Members popup, select
doWork(). - Click OK.
- Immediately before the class declaration, create a variable named
TAGand assign it the valueBlurWorker. Note that this variable is not specifically related to thedoWork()method, but you use it later in calls toLog().
workers/BlurWorker.kt
private const val TAG = "BlurWorker"

class BlurWorker(ctx: Context, params: WorkerParameters) : CoroutineWorker(ctx, params) {
...
- To better see when work executes, you need to utilize
WorkerUtil'smakeStatusNotification()function. This function lets you easily display a notification banner at the top of the screen.
Inside the doWork() method, use the makeStatusNotification()function to display a status notification and notify the user that the blur worker has started and is blurring the image.
workers/BlurWorker.kt
import com.example.bluromatic.R
...
override suspend fun doWork(): Result {

    makeStatusNotification(
        applicationContext.resources.getString(R.string.blurring_image),
        applicationContext
    )
...
- Add a
return try...catchcode block, which is where the actual blur image work is performed.
workers/BlurWorker.kt
...
        makeStatusNotification(
            applicationContext.resources.getString(R.string.blurring_image),
            applicationContext
        )

        return try {
        } catch (throwable: Throwable) {
        }
...
- In the
tryblock, add a call toResult.success(). - In the
catchblock, add a call toResult.failure().
workers/BlurWorker.kt
...
        makeStatusNotification(
            applicationContext.resources.getString(R.string.blurring_image),
            applicationContext
        )

        return try {
            Result.success()
        } catch (throwable: Throwable) {
            Result.failure()
        }
...
- In the
tryblock, create a new variable namedpictureand populate it with the bitmap returned from calling theBitmapFactory.decodeResource()method and passing in the application's resource package and the resource id of the cupcake image.
workers/BlurWorker.kt
...
        return try {
            val picture = BitmapFactory.decodeResource(
                applicationContext.resources,
                R.drawable.android_cupcake
            )

            Result.success()
...
- Blur the bitmap by calling the
blurBitmap()function and pass in thepicturevariable and a value of1(one) for theblurLevelparameter. - Save the result in a new variable named
output.
workers/BlurWorker.kt
...
            val picture = BitmapFactory.decodeResource(
                applicationContext.resources,
                R.drawable.android_cupcake
            )

            val output = blurBitmap(picture, 1)

            Result.success()
...
- Create a new variable
outputUriand populate it with a call to thewriteBitmapToFile()function. - In the call to
writeBitmapToFile(), pass the application context and theoutputvariable as arguments.
workers/BlurWorker.kt
...
            val output = blurBitmap(picture, 1)

            // Write bitmap to a temp file
            val outputUri = writeBitmapToFile(applicationContext, output)

            Result.success()
...
- Add code to display a notification message to the user that contains the
outputUrivariable.
workers/BlurWorker.kt
...
            val outputUri = writeBitmapToFile(applicationContext, output)

            makeStatusNotification(
                "Output is $outputUri",
                applicationContext
            )

            Result.success()
...
- In the
catchblock, log an error message to indicate an error occurred while attempting to blur the image. The call toLog.e()passes the previously definedTAGvariable, an appropriate message, and the exception being thrown.
workers/BlurWorker.kt
...
        } catch (throwable: Throwable) {
            Log.e(
                TAG,
                applicationContext.resources.getString(R.string.error_applying_blur),
                throwable
            )
            Result.failure()
        }
...
A CoroutineWorker, by default, runs as Dispatchers.Default but can be changed by calling withContext() and passing in the desired dispatcher.
- Create a
withContext()block. - Inside the call to
withContext()passDispatchers.IOso the lambda function runs in a special thread pool for potentially blocking IO operations. - Move the previously written
return try...catchcode into this block.
...
        return withContext(Dispatchers.IO) {

            return try {
                // ...
            } catch (throwable: Throwable) {
                // ...
            }
        }
...
Android Studio displays the following error because you cannot call return from within a lambda function.
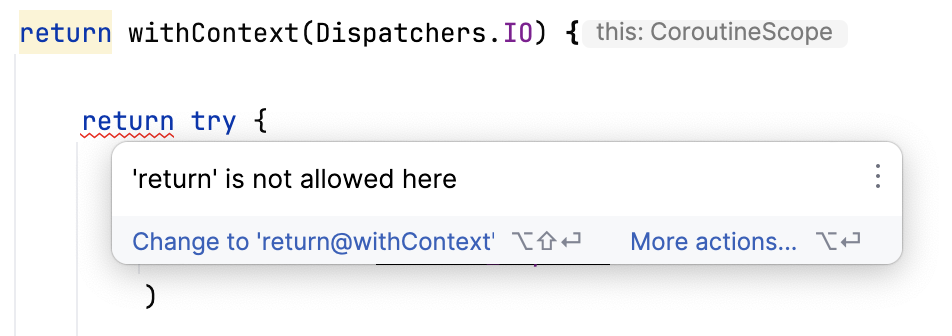
This error can be fixed by adding a label as shown in the popup.
...
            //return try {
            return@withContext try {
...
Because this Worker runs very quickly, it is recommended to add a delay in the code to emulate slower running work.
- Inside the
withContext()lambda, add a call to thedelay()utility function and pass in theDELAY_TIME_MILLISconstant. This call is strictly for the codelab to provide a delay between notification messages.
import com.example.bluromatic.DELAY_TIME_MILLIS
import kotlinx.coroutines.delay

...
        return withContext(Dispatchers.IO) {

            // This is an utility function added to emulate slower work.
            delay(DELAY_TIME_MILLIS)


                val picture = BitmapFactory.decodeResource(
...
9. Update WorkManagerBluromaticRepository
The repository handles all interactions with the WorkManager. This structure adheres to the design principle of separation of concerns and is a recommended Android architecture pattern.
- In the
data/WorkManagerBluromaticRepository.ktfile, inside theWorkManagerBluromaticRepositoryclass, create a private variable namedworkManagerand store aWorkManagerinstance in it by callingWorkManager.getInstance(context).
data/WorkManagerBluromaticRepository.kt
import androidx.work.WorkManager
...
class WorkManagerBluromaticRepository(context: Context) : BluromaticRepository {

    // New code
    private val workManager = WorkManager.getInstance(context)
...
Create and enqueue the WorkRequest in WorkManager
Alright, time to make a WorkRequest and tell WorkManager to run it! There are two types of WorkRequests:
OneTimeWorkRequest: AWorkRequestthat only executes once.PeriodicWorkRequest: AWorkRequestthat executes repeatedly on a cycle.
You only want the image to blur one time when the Start button is clicked.
This work occurs in the applyBlur() method, which you call when you click the Start button.
The following steps are completed inside the applyBlur() method.
- Populate a new variable named
blurBuilderby creating aOneTimeWorkRequestfor the blur worker and calling theOneTimeWorkRequestBuilderextension function from WorkManager KTX.
data/WorkManagerBluromaticRepository.kt
import com.example.bluromatic.workers.BlurWorker
import androidx.work.OneTimeWorkRequestBuilder
...
override fun applyBlur(blurLevel: Int) {
    // Create WorkRequest to blur the image
    val blurBuilder = OneTimeWorkRequestBuilder<BlurWorker>()
}
- Start the work by calling the
enqueue()method on yourworkManagerobject.
data/WorkManagerBluromaticRepository.kt
import com.example.bluromatic.workers.BlurWorker
import androidx.work.OneTimeWorkRequestBuilder
...
override fun applyBlur(blurLevel: Int) {
    // Create WorkRequest to blur the image
    val blurBuilder = OneTimeWorkRequestBuilder<BlurWorker>()

    // Start the work
    workManager.enqueue(blurBuilder.build())
}
- Run the app and see the notification when you click the Start button.
At this time, the image is blurred the same amount, regardless of which option you select. In later steps, the blur amount changes based on the option selected.
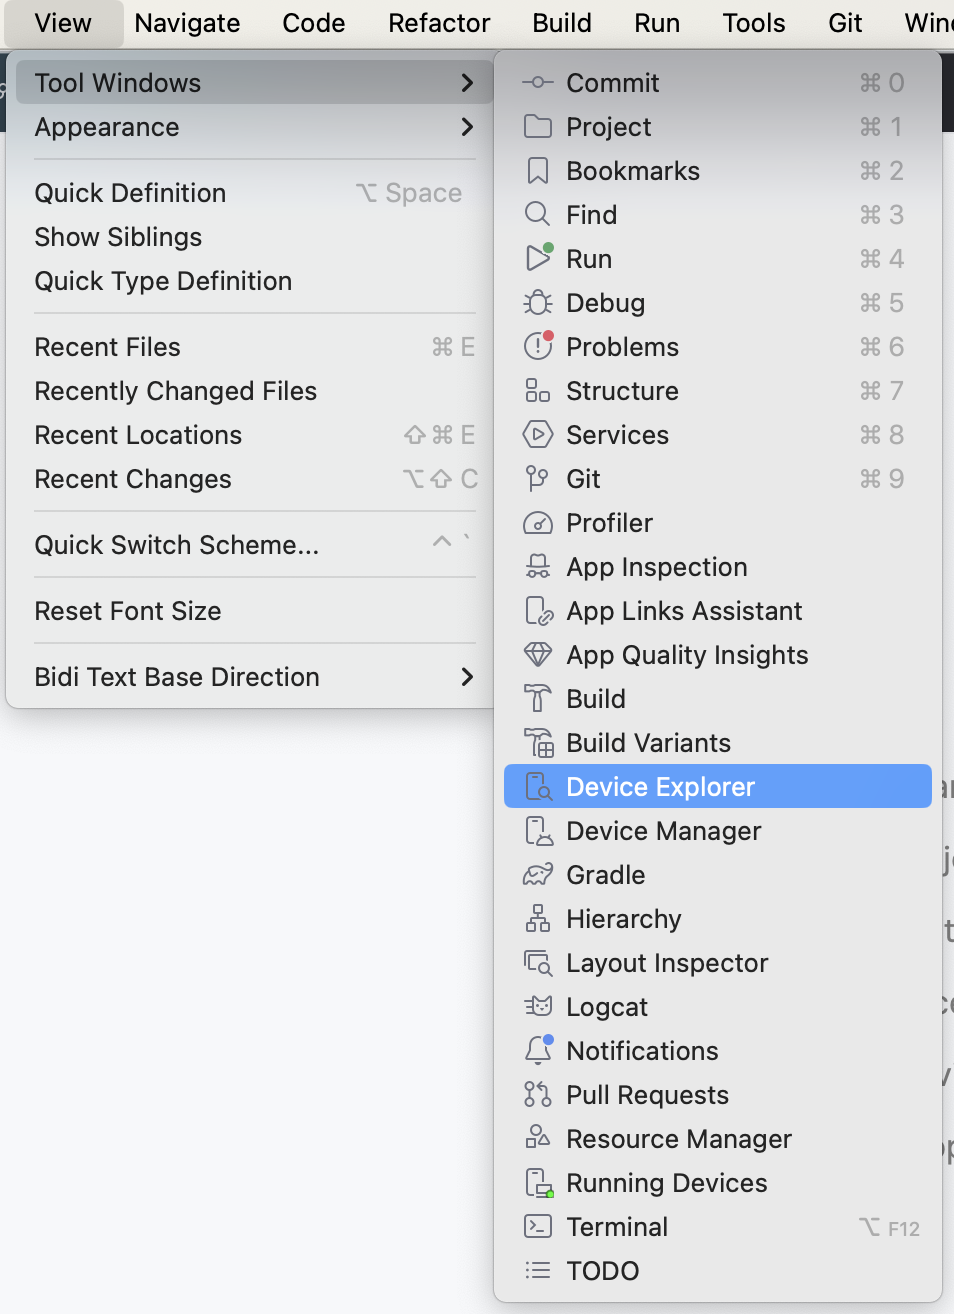
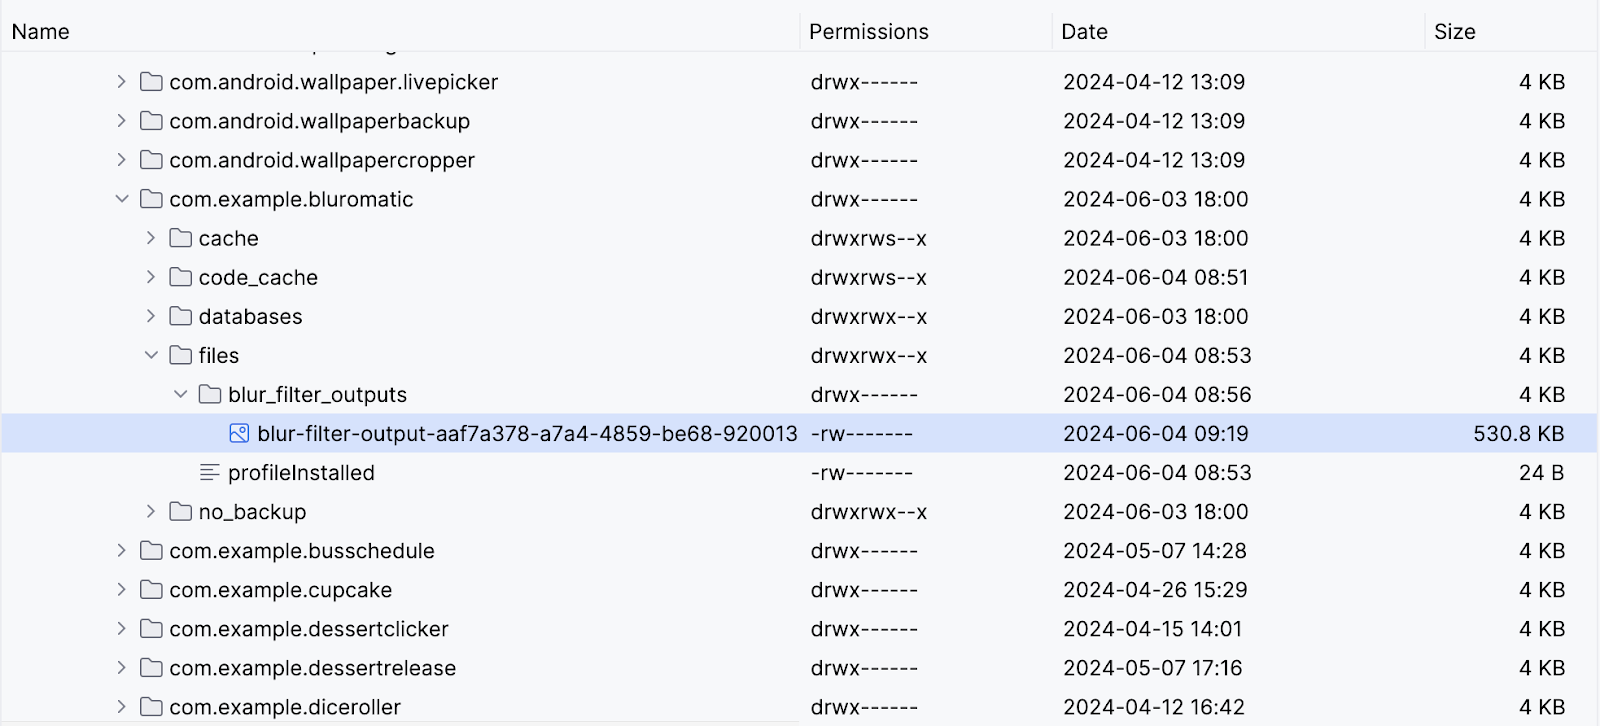
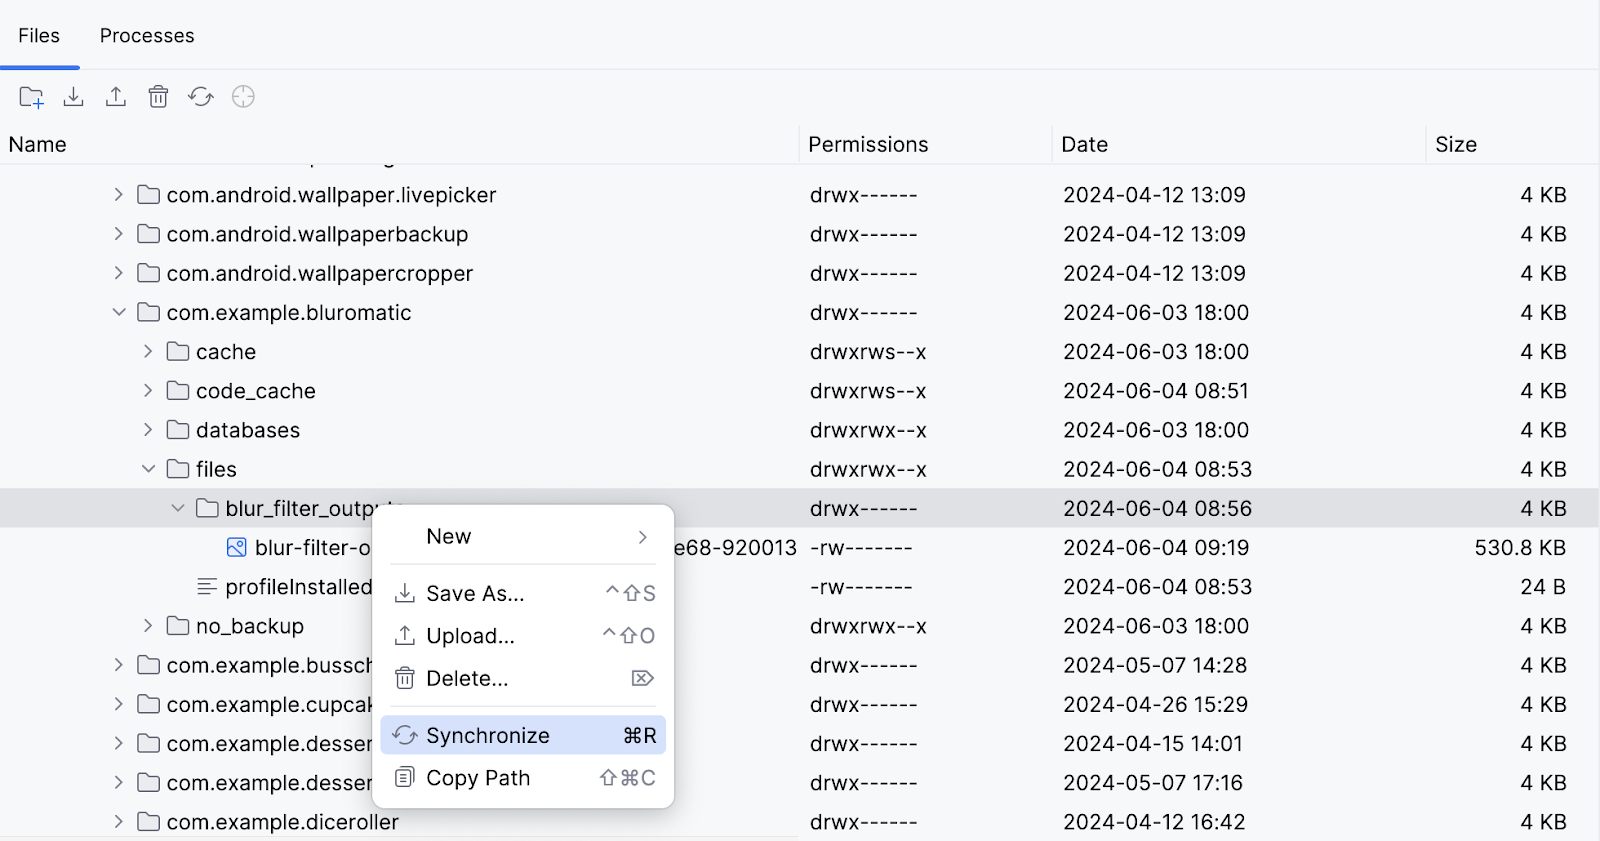
To confirm that the image successfully blurs, you can open the Device Explorer in Android Studio:
Then navigate to data > data > com.example.bluromatic > files > blur_filter_outputs > <URI> and confirm that the cupcake image is in fact blurred:
10. Input data and output data
Blurring the image asset in the resources directory is all well and good, but for Blur-O-Matic to really be the revolutionary image editing app it's destined to be, you need to let the user blur the image they see on screen and then show them the blurred result.
To do this, we provide the URI of the cupcake image displayed as the input to our WorkRequest and then use the output of our WorkRequest to display the final blurred image.
Input and output are passed in and out of a worker via Data objects. Data objects are lightweight containers for key/value pairs. They are meant to store a small amount of data that might pass into and out of a worker from the WorkRequest.
In the next step, you're going to pass the URI to the BlurWorker by creating an input data object.
Create input data object
- In the
data/WorkManagerBluromaticRepository.ktfile, inside theWorkManagerBluromaticRepositoryclass, create a new private variable namedimageUri. - Populate the variable with the image URI by calling the context method
getImageUri().
data/WorkManagerBluromaticRepository.kt
import com.example.bluromatic.getImageUri
...
class WorkManagerBluromaticRepository(context: Context) : BluromaticRepository {

    private var imageUri: Uri = context.getImageUri() // <- Add this
    private val workManager = WorkManager.getInstance(context)
...
The app code contains the createInputDataForWorkRequest() helper function for creating input data objects.
data/WorkManagerBluromaticRepository.kt
// For reference - already exists in the app
private fun createInputDataForWorkRequest(blurLevel: Int, imageUri: Uri): Data {
    val builder = Data.Builder()
    builder.putString(KEY_IMAGE_URI, imageUri.toString()).putInt(BLUR_LEVEL, blurLevel)
    return builder.build()
}
First the helper function creates a Data.Builder object. It then puts the imageUri and the blurLevel into it as key/value pairs. A Data object is then created and returned when it calls return builder.build().
- To set the input data object for the WorkRequest, you call the
blurBuilder.setInputData()method. You can create and pass the data object in one step by calling thecreateInputDataForWorkRequest()helper function as the argument. For the call tocreateInputDataForWorkRequest()function, pass in theblurLevelvariable and theimageUrivariable.
data/WorkManagerBluromaticRepository.kt
override fun applyBlur(blurLevel: Int) {
     // Create WorkRequest to blur the image
    val blurBuilder = OneTimeWorkRequestBuilder<BlurWorker>()

    // New code for input data object
    blurBuilder.setInputData(createInputDataForWorkRequest(blurLevel, imageUri))

    workManager.enqueue(blurBuilder.build())
}
Access the input data object
Now let's update the doWork() method in the BlurWorker class to get the URI and the blur level that were passed in by the input data object. If a value for the blurLevel was not provided, it will be defaulted to 1.
Inside the doWork() method:
- Create a new variable named
resourceUriand populate the variable by callinginputData.getString()and passing in the constantKEY_IMAGE_URIthat was used as the key when creating the input data object.
val resourceUri = inputData.getString(KEY_IMAGE_URI)
- Create a new variable named
blurLevel. Populate the variable by callinginputData.getInt()and passing in the constantBLUR_LEVELthat was used as the key when creating the input data object. In case this key/value pair has not been created, provide a default value of1(one).
workers/BlurWorker.kt
import com.example.bluromatic.KEY_BLUR_LEVEL
import com.example.bluromatic.KEY_IMAGE_URI
...
override fun doWork(): Result {

    // ADD THESE LINES
    val resourceUri = inputData.getString(KEY_IMAGE_URI)
    val blurLevel = inputData.getInt(KEY_BLUR_LEVEL, 1)

    // ... rest of doWork()
}
With the URI, now let's blur the image of the cupcake on screen.
- Check that the
resourceUrivariable is populated. If it is not populated, your code should throw an exception. The code that follows is using therequire()statement which throws anIllegalArgumentExceptionif the first argument evaluates to false.
workers/BlurWorker.kt
return@withContext try {
    // NEW code
    require(!resourceUri.isNullOrBlank()) {
        val errorMessage =
            applicationContext.resources.getString(R.string.invalid_input_uri)
            Log.e(TAG, errorMessage)
            errorMessage
    }
Since the image source is passed in as a URI, we need a ContentResolver object to read the contents pointed to by the URI.
- Add a
contentResolverobject to theapplicationContextvalue.
workers/BlurWorker.kt
...
    require(!resourceUri.isNullOrBlank()) {
        // ...
    }
    val resolver = applicationContext.contentResolver
...
- Because the image source is now the passed in URI, use
BitmapFactory.decodeStream()instead ofBitmapFactory.decodeResource()to create the Bitmap object.
workers/BlurWorker.kt
import android.net.Uri
...
//     val picture = BitmapFactory.decodeResource(
//         applicationContext.resources,
//         R.drawable.android_cupcake
//     )

    val resolver = applicationContext.contentResolver

    val picture = BitmapFactory.decodeStream(
        resolver.openInputStream(Uri.parse(resourceUri))
    )
- Pass the
blurLevelvariable in the call to theblurBitmap()function.
workers/BlurWorker.kt
//val output = blurBitmap(picture, 1)
val output = blurBitmap(picture, blurLevel)
Create the output data object
You're now done with this Worker and can return the output URI as an output data object in Result.success(). Providing the output URI as an output data object makes it easily accessible to other workers for further operations. This approach is useful in the next section when you create a chain of workers.
To do this, complete the following steps:
- Preceding the
Result.success()code, create a new variable namedoutputData. - Populate this variable by calling the
workDataOf()function and use constantKEY_IMAGE_URIfor the key and variableoutputUrias the value. TheworkDataOf()function creates a Data object from the passed in key and value pair.
workers/BlurWorker.kt
import androidx.work.workDataOf
// ...
val outputData = workDataOf(KEY_IMAGE_URI to outputUri.toString())
- Update the
Result.success()code to take this new Data object as an argument.
workers/BlurWorker.kt
//Result.success()
Result.success(outputData)
- Remove the code that displays the notification as it is no longer needed because the output Data object now uses the URI.
workers/BlurWorker.kt
// REMOVE the following notification code
//makeStatusNotification(
//    "Output is $outputUri",
//    applicationContext
//)
Run your app
At this point, when you run your app, you can expect it to compile. You can see the blurred image through the Device Explorer but not on the screen yet.
Note that you might need to Synchronize to see your images:
Great work! You've blurred an input image using WorkManager!
11. Chain your Work
Right now, you're doing a single work task—blurring the image. This task is a great first step, but the app is still missing some core functionality:
- The app doesn't clean up temporary files.
- The app doesn't actually save the image to a permanent file.
- The app always blurs the picture the same amount.
You can use a WorkManager chain of work to add this functionality. WorkManager lets you create separate WorkerRequests that run in order or in parallel.
In this section, you create a chain of work that looks like the following:
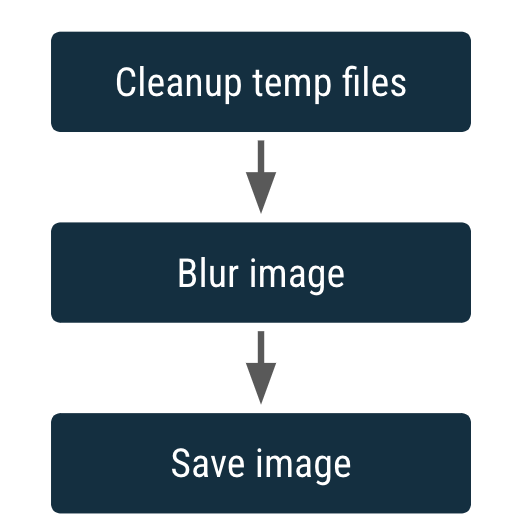
The boxes represent the WorkRequests.
Another feature of chaining is its ability to accept input and produce output. The output of one WorkRequest becomes the input of the next WorkRequest in the chain.
You already have a CoroutineWorker to blur an image, but you also need a CoroutineWorker to clean up temp files and a CoroutineWorker to save the image permanently.
Create CleanupWorker
The CleanupWorker deletes the temporary files, if they exist.
- Right-click on the package
com.example.bluromatic.workersin your Android project pane and select New -> Kotlin Class/File. - Name the new Kotlin class
CleanupWorker. - Copy the code for CleanupWorker.kt, as shown in the following code example.
Since file manipulation is out of scope for this codelab, you can copy the following code for the CleanupWorker.
workers/CleanupWorker.kt
package com.example.bluromatic.workers

import android.content.Context
import android.util.Log
import androidx.work.CoroutineWorker
import androidx.work.WorkerParameters
import com.example.bluromatic.DELAY_TIME_MILLIS
import com.example.bluromatic.OUTPUT_PATH
import com.example.bluromatic.R
import kotlinx.coroutines.Dispatchers
import kotlinx.coroutines.delay
import kotlinx.coroutines.withContext
import java.io.File

/**
 * Cleans up temporary files generated during blurring process
 */
private const val TAG = "CleanupWorker"

class CleanupWorker(ctx: Context, params: WorkerParameters) : CoroutineWorker(ctx, params) {

    override suspend fun doWork(): Result {
        /** Makes a notification when the work starts and slows down the work so that it's easier
         * to see each WorkRequest start, even on emulated devices
         */
        makeStatusNotification(
            applicationContext.resources.getString(R.string.cleaning_up_files),
            applicationContext
        )

        return withContext(Dispatchers.IO) {
            delay(DELAY_TIME_MILLIS)

            return@withContext try {
                val outputDirectory = File(applicationContext.filesDir, OUTPUT_PATH)
                if (outputDirectory.exists()) {
                    val entries = outputDirectory.listFiles()
                    if (entries != null) {
                        for (entry in entries) {
                            val name = entry.name
                            if (name.isNotEmpty() && name.endsWith(".png")) {
                                val deleted = entry.delete()
                                Log.i(TAG, "Deleted $name - $deleted")
                            }
                        }
                    }
                }
                Result.success()
            } catch (exception: Exception) {
                Log.e(
                    TAG,
                    applicationContext.resources.getString(R.string.error_cleaning_file),
                    exception
                )
                Result.failure()
            }
        }
    }
}
Create SaveImageToFileWorker
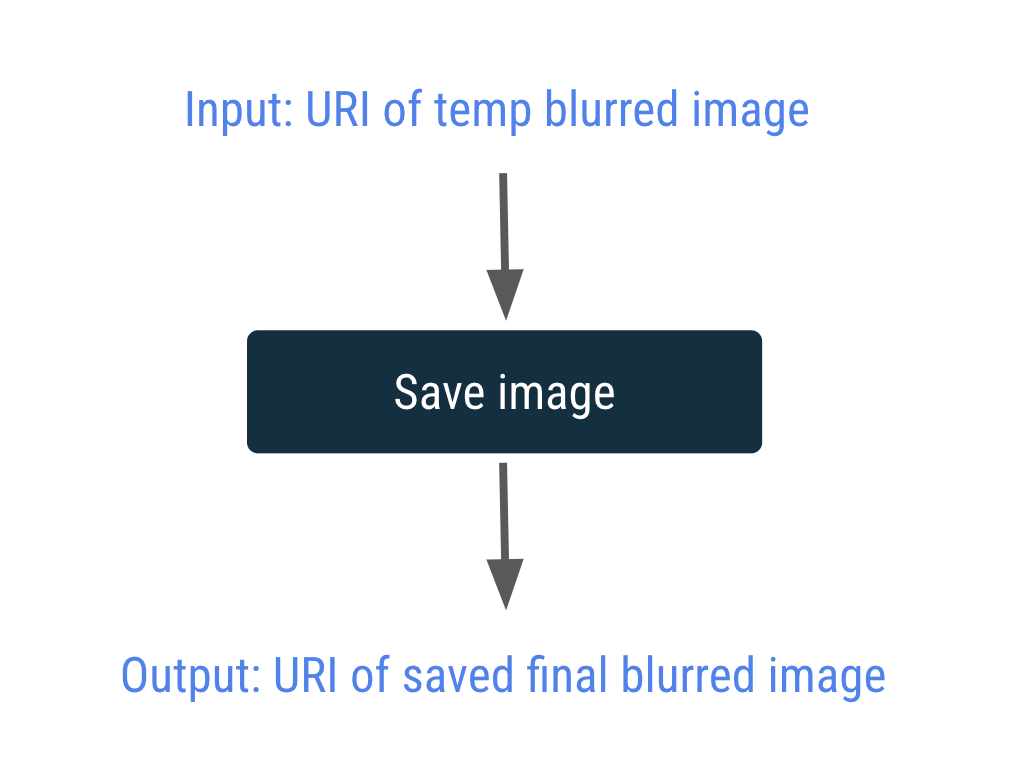
The SaveImageToFileWorker class saves the temporary file to a permanent file.
The SaveImageToFileWorker takes input and output. The input is a String of the temporarily blurred image URI, stored with the key KEY_IMAGE_URI. The output is a String of the saved blurred image URI, stored with the key KEY_IMAGE_URI.
- Right-click on the package
com.example.bluromatic.workersin your Android project pane and select New -> Kotlin Class/File. - Name the new Kotlin class
SaveImageToFileWorker. - Copy the SaveImageToFileWorker.kt code as shown in the following example code.
Since file manipulation is out of scope for this codelab, you can copy the following code for the SaveImageToFileWorker. In the provided code, notice how the resourceUri and output values are retrieved and stored with the key KEY_IMAGE_URI. This process is very similar to the code you previously wrote for the input and output data objects.
workers/SaveImageToFileWorker.kt
package com.example.bluromatic.workers

import android.content.Context
import android.graphics.BitmapFactory
import android.net.Uri
import android.provider.MediaStore
import android.util.Log
import androidx.work.CoroutineWorker
import androidx.work.WorkerParameters
import androidx.work.workDataOf
import com.example.bluromatic.DELAY_TIME_MILLIS
import com.example.bluromatic.KEY_IMAGE_URI
import com.example.bluromatic.R
import kotlinx.coroutines.Dispatchers
import kotlinx.coroutines.delay
import kotlinx.coroutines.withContext
import java.text.SimpleDateFormat
import java.util.Locale
import java.util.Date

/**
 * Saves the image to a permanent file
 */
private const val TAG = "SaveImageToFileWorker"

class SaveImageToFileWorker(ctx: Context, params: WorkerParameters) : CoroutineWorker(ctx, params) {

    private val title = "Blurred Image"
    private val dateFormatter = SimpleDateFormat(
        "yyyy.MM.dd 'at' HH:mm:ss z",
        Locale.getDefault()
    )

    override suspend fun doWork(): Result {
        // Makes a notification when the work starts and slows down the work so that
        // it's easier to see each WorkRequest start, even on emulated devices
        makeStatusNotification(
            applicationContext.resources.getString(R.string.saving_image),
            applicationContext
        )

        return withContext(Dispatchers.IO) {
            delay(DELAY_TIME_MILLIS)

            val resolver = applicationContext.contentResolver
            return@withContext try {
                val resourceUri = inputData.getString(KEY_IMAGE_URI)
                val bitmap = BitmapFactory.decodeStream(
                    resolver.openInputStream(Uri.parse(resourceUri))
                )
                val imageUrl = MediaStore.Images.Media.insertImage(
                    resolver, bitmap, title, dateFormatter.format(Date())
                )
                if (!imageUrl.isNullOrEmpty()) {
                    val output = workDataOf(KEY_IMAGE_URI to imageUrl)

                    Result.success(output)
                } else {
                    Log.e(
                        TAG,
                        applicationContext.resources.getString(R.string.writing_to_mediaStore_failed)
                    )
                    Result.failure()
                }
            } catch (exception: Exception) {
                Log.e(
                    TAG,
                    applicationContext.resources.getString(R.string.error_saving_image),
                    exception
                )
                Result.failure()
            }
        }
    }
}
Create a chain of work
Currently, the code only creates and runs a single WorkRequest.
In this step, you modify the code to create and execute a chain of WorkRequests instead of just one blur image request.
In the chain of WorkRequests, your first work request is to clean up the temporary files.
- Instead of calling
OneTimeWorkRequestBuilder, callworkManager.beginWith().
Calling the beginWith() method returns a WorkContinuation object and creates the starting point for a chain of WorkRequests with the first work request in the chain.
data/WorkManagerBluromaticRepository.kt
import androidx.work.OneTimeWorkRequest
import com.example.bluromatic.workers.CleanupWorker
// ...
    override fun applyBlur(blurLevel: Int) {
        // Add WorkRequest to Cleanup temporary images
        var continuation = workManager.beginWith(OneTimeWorkRequest.from(CleanupWorker::class.java))

        // Add WorkRequest to blur the image
        val blurBuilder = OneTimeWorkRequestBuilder<BlurWorker>()
...
You can add to this chain of work requests by calling the then() method and passing in a WorkRequest object.
- Remove the call to
workManager.enqueue(blurBuilder.build()), which was only enqueueing one work request. - Add the next work request to the chain by calling the
.then()method.
data/WorkManagerBluromaticRepository.kt
...
//workManager.enqueue(blurBuilder.build())

// Add the blur work request to the chain
continuation = continuation.then(blurBuilder.build())
...
- Create a work request to save the image and add it to the chain.
data/WorkManagerBluromaticRepository.kt
import com.example.bluromatic.workers.SaveImageToFileWorker

...
continuation = continuation.then(blurBuilder.build())

// Add WorkRequest to save the image to the filesystem
val save = OneTimeWorkRequestBuilder<SaveImageToFileWorker>()
    .build()
continuation = continuation.then(save)
...
- To start the work, call the
enqueue()method on the continuation object.
data/WorkManagerBluromaticRepository.kt
...
continuation = continuation.then(save)

// Start the work
continuation.enqueue()
...
This code produces and runs the following chain of WorkRequests: a CleanupWorker WorkRequest followed by a BlurWorker WorkRequest followed by a SaveImageToFileWorker WorkRequest.
- Run the app.
You are now able to click Start and see notifications when the different workers execute. You can still see the blurred image in the Device Explorer, and in an upcoming section, you add an extra button so that users can see the blurred image on the device.
In the following screenshots, notice that the notification message displays which worker is currently running.


Notice that the output folder contains multiple blurred images—images that are in intermediate blurred stages and the final image that displays the image with the blur amount you selected.
Superb work! Now, you can clean up the temporary files, blur an image, and save it!
12. Get the solution code
To download the code for the finished codelab, you can use these commands:
$ git clone https://github.com/google-developer-training/basic-android-kotlin-compose-training-workmanager.git
$ cd basic-android-kotlin-compose-training-workmanager
$ git checkout intermediate
Alternatively, you can download the repository as a zip file, unzip it, and open it in Android Studio.
If you want to see the solution code for this codelab, view it on GitHub.
13. Conclusion
Congratulations! You've finished the Blur-O-Matic app and in the process learned about:
- Adding WorkManager to your Project
- Scheduling a
OneTimeWorkRequest - Input and Output parameters
- Chaining work together
WorkRequests
WorkManager supports a lot more than we could cover in this codelab, including repetitive work, a testing support library, parallel work requests, and input mergers.
To learn more, go to the Schedule tasks with WorkManager documentation.