
1. Introduction
Watch the animation above (Ongoing Activity demo). Note: Animated gifs only animate through one time. If you missed the animation, reload the page.
From the watch face, you will notice an animated icon appears (for a timer) and if a user taps on it, it launches the app powering the timer.
An Ongoing Activity is a new feature in Wear OS that allows an Ongoing Notification to appear on additional surfaces within the Wear OS user interface which allows users to stay more engaged with long running activities.
Ongoing Notifications are typically used to indicate a Notification has a background task that the user is actively engaged with (for example, playing music) or is pending in some way and therefore occupying the device (for example, a file download, sync operation, or an active network connection).
For example, a Wear OS user may use a timer app to time an event and then navigate away from that app to start some other task (review the weather, start a workout, etc.).
When the user navigates away from the timer app, the app will generally transition to an Ongoing Notification tied to some background work (services, alarm managers, etc.) to keep the user informed of how much time is left on their timer.
The user can view the Notification for updates and can interact with that Notification as well.
However, to view the Notification, the user will still have to swipe into the notification tray below the watch face and find the right Notification which isn't as convenient as other surfaces.
With the Ongoing Activity API, an app can expose information to multiple new, convenient surfaces on Wear OS to keep the user engaged.
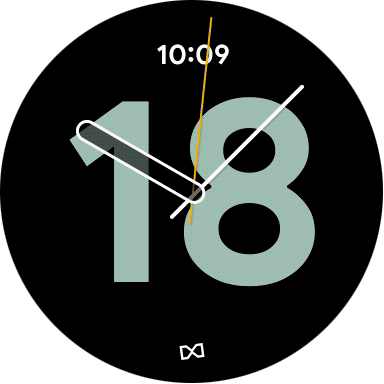
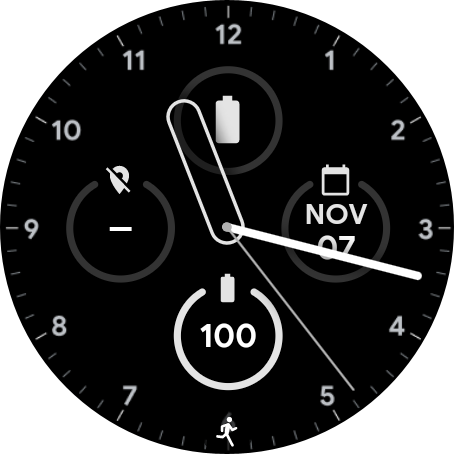
In the case of the Timer app, the information can appear on the user's watch face as a tappable icon (activity indicator at the bottom of screenshot):
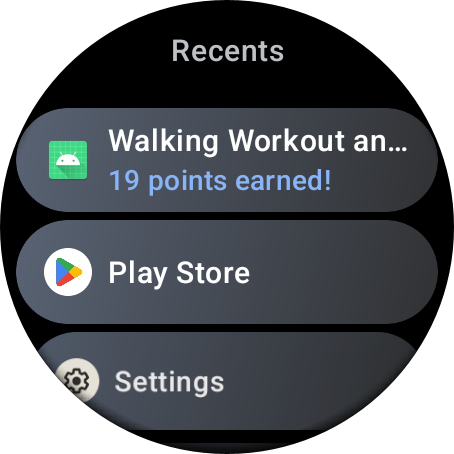
The Timer app can also appear in the Recents section of the global app launcher which lists any Ongoing Activities:

Global Launcher
Best of all, you only need to add about 10 lines of code to do it!
What you will learn
- Create and customize an Ongoing Activity
- Tie an Ongoing Activity to an Ongoing Notification
- Test an Ongoing Activity on a device/emulator
- Add interaction to your Ongoing Activity (tap)
What you will build
You'll extend an existing Walk Tracking App with a custom Ongoing Activity that displays the Walking Points for an active walk on the main watch face and in the Recents section of the app launcher.
Prerequisites
- Basic understanding of Android development
- Basic understanding of Kotlin and coroutines
2. Getting set up
In this step, you will set up your environment and download a starter project.
What you will need
- Android Studio
- Wear OS emulator (API level >= 30)
- Ongoing Activities are only available on API level 30 or greater
- New to emulators? Here's how to set it up.
Download code
If you have git installed, you can simply run the command below to clone the code from this repo. To check whether git is installed, type git --version in the terminal or command line and verify that it executes correctly.
git clone https://github.com/android/codelab-ongoing-activity.git
cd ongoing-activity
If you do not have git, you can click the following button to download all the code for this codelab:
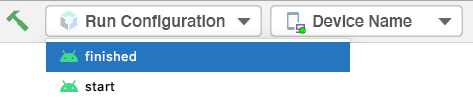
You can run either module in Android Studio at any time by changing the run configuration in the toolbar.
Open project in Android Studio
- On the Welcome to Android Studio window select Open
- Select the folder
[Download Location] - When Android Studio has imported the project, test that you can run the
startandfinishedmodules on a Wear OS emulator or physical device. - The
startmodule should look like the screenshot below. It's where you will be doing all your work.
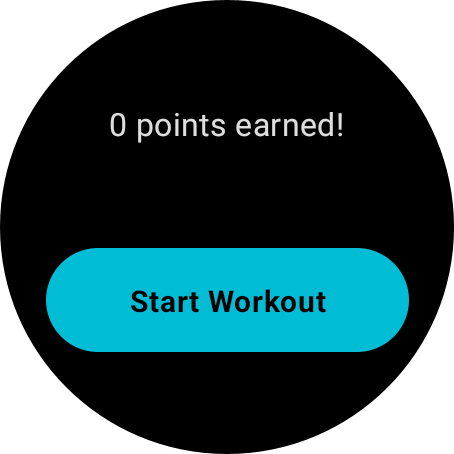
Try out the app by starting a walking workout. You should notice that you start earning points every ~3 seconds. (The app uses mock data, so you don't have to actually walk around.)
Try swiping out of the app. If you navigate below the watch face to the navigation tray, you should be able to find the Ongoing Notification that continues tracking your walking points.
Tapping into it looks like this:
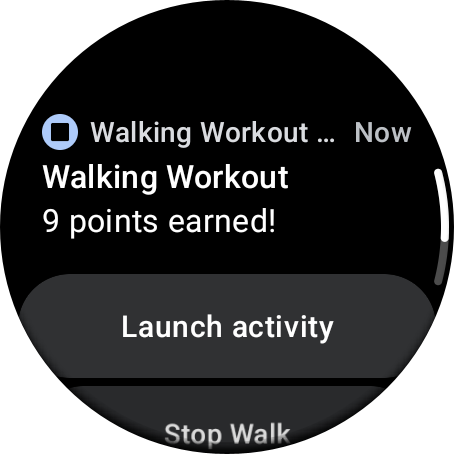
Feel free to stop the walk.
By the end of this code lab, the same walking information will appear on the watch face and in the Recents section of the global app launcher.
App showing up on the watch face (see Activity Indicator at the bottom):
App showing up in Recents section of the App launcher:
Explore the start code
In the start module:
build.gradlecontains a basic app configuration. It includes the dependencies necessary to create an Ongoing Activity.manifest > AndroidManifest.xmlincludes the parts necessary to mark this as a Wear OS application.java > ... > data > WalkingWorkoutsRepository.ktlinks to theWalkingWorkoutsDataStore.ktclass to store walking points and status of a walk workout. Don't worry about the details, you won't need to review these classes for this code lab.java > ... > MainApplication.ktcreates a singleton of the repository. Don't worry about the details, you won't need to review these classes for this code lab.java > ... > ForegroundOnlyWalkingWorkoutService.ktcontains code for starting and stopping a walking workout. If a workout is active and the user navigates away from the app, it will unbind from the Activity and start an Ongoing Notification to keep the user informed of their workout points (using mocked data). This is where we will add our Ongoing Activity code (near the Notification code).java > ... > MainActivity.ktcontains a UI for the user to start/stop a walking workout. The activity binds to the service above to let that handle all the workout tasks.java > ... > MainViewModel.ktis a simpleViewModelto handle non-UI code inMainActivity.kt. Don't worry about the details, you won't need to review these classes for this code lab.
3. Review the app
The app is already a functioning Walking Workout app.
As you've seen in earlier steps, you can launch the app and start/stop a walking workout. As time passes during an active workout, you accrue walking points.
Points are reset for each new walk.
If you navigate away from the app during an active workout, you can swipe down to see an Ongoing Notification that continues to update you on your progress.
From that Notification, you can either stop the workout from the Notification or open the app.
Normally, you would calculate the walking points from location and sensor data with a proprietary algorithm. In our case, we are just mocking the data to keep things simple.
How does it work?
The MainActivity creates the user interface, links to a ViewModel for updates on workout status / walking points, and binds to a service.
When a workout starts or stops, the MainActivity calls a start or stop equivalent method in the Service to handle the heavy lifting of tracking the workout.
If the user navigates away, the MainActivity simply unbinds from the service.
Most of the magic happens in the ForegroundOnlyWalkingWorkoutService. This is the class that starts/stops the workouts and saves any changes in status or walking points to the repository.
The service also transitions to a foreground service and ties itself to an Ongoing Notification if the user navigates away from the MainActivity during a session.
The Ongoing Notification carries on the work of tracking a workout and is tied to the service above as a Foreground Service.
Don't worry if you don't understand all the details. The important thing is to understand this is a functioning app with its Notification already built out. We just want to extend that Notification to be visible on more surfaces with an Ongoing Activity.
That Notification code is in the ForegroundOnlyWalkingWorkoutService , and that is where you do all the work for this code lab.
4. Create an Ongoing Activity
Review the dependencies
In this step, we won't be coding. Instead we will review the Ongoing Activity dependencies.
Open the app/build.gradle file in the start module and search for "TODO: Review dependencies for Ongoing Activity".
You should see this:
Step 1
    // TODO: Review dependencies for Ongoing Activity.
    implementation libs.androidx.wear.ongoing
    // Includes LocusIdCompat and new Notification categories for Ongoing Activity.
    implementation libs.androidx.core.ktx
The first dependency is required to use the Wear OS Ongoing Activity API.
The second dependency is to get the latest features of the Notification APIs that support various features used in conjunction with an Ongoing Activity. The following two features can apply to Ongoing Notifications and therefore can also be applied to Ongoing Activities:
- Category - Android uses some pre-defined system-wide categories to determine whether to disturb the user with a given notification when the user has enabled Do Not Disturb mode. The Category determines the priority of the Ongoing Activity on the watch face. New categories were added recently to support Wear.
- LocusId - Locus is a new concept introduced in Android 10 (API Level 29) and lets the Android system correlate state between different subsystems such as content capture, shortcuts, and notifications. If you have multiple launchers, you can use the locus id to tie your Ongoing Activity to a specific dynamic
Shortcut, so it appears properly in the Recents section of the app launcher.
Review the Ongoing Notification code
In this step, we won't be doing any coding. Instead, we will just review the Notification code.
Open the ForegroundOnlyWalkingWorkoutService.kt file in the start module and search for "TODO: Review Notification builder code".
You should see this:
Step 2
// TODO: Review Notification builder code.
val notificationBuilder = notificationCompatBuilder
    .setStyle(bigTextStyle)
    .setContentTitle(titleText)
    .setContentText(mainText)
    .setSmallIcon(R.mipmap.ic_launcher)
    .setDefaults(NotificationCompat.DEFAULT_ALL)
    // Makes Notification an Ongoing Notification (a Notification with a background task).
    .setOngoing(true)
    // Android uses some pre-defined system-wide categories to determine whether to
    // disturb the user with a given notification when the user has enabled Do Not Disturb
    // mode. The Category determines the priority of the Ongoing Activity and new
    // categories were added recently to support Wear
    .setCategory(NotificationCompat.CATEGORY_WORKOUT)
    .setVisibility(NotificationCompat.VISIBILITY_PUBLIC)
    .addAction(
        R.drawable.ic_walk, getString(R.string.launch_activity),
        activityPendingIntent
    )
    .addAction(
        R.drawable.ic_cancel,
        getString(R.string.stop_walking_workout_notification_text),
        servicePendingIntent
    )

// TODO: Create an Ongoing Activity.
// SKIP TODO FOR REVIEW STEP

return notificationBuilder.build()
Review the code above and read the comments (skip the later TODO section, that's for a later step).
There is much more Notification code above this chunk that sets everything up for this builder.
However, for this codelab, we just need to focus on the setOngoing() call and setCategory() in the notification builder.
The Category helps Wear OS determine the priority of the Notification for the watch face.
The setOngoing() call makes our Notification an Ongoing Notification, that is, a Notification with a background task that the user is actively engaged with, for example, tracking a walking workout.
We create this Notification when the user has an active walking workout and navigates away from the MainActivity.
Create an Ongoing Activity
An Ongoing Activity must be tied to an Ongoing Notification. We have our Ongoing Notification, so now let's create an Ongoing Activity.
Search for "TODO: Create an Ongoing Activity" and replace the "// SKIP TODO FOR REVIEW STEP" line with the code below.
Step 4
// TODO: Create an Ongoing Activity.
val ongoingActivityStatus = Status.Builder()
    // Sets the text used across various surfaces.
    .addTemplate(mainText)
    .build()

val ongoingActivity =
    OngoingActivity.Builder(applicationContext, NOTIFICATION_ID, notificationBuilder)
        // Sets icon that will appear on the watch face in active mode. If it isn't set,
        // the watch face will use the static icon in active mode.
        .setAnimatedIcon(R.drawable.animated_walk)
        // Sets the icon that will appear on the watch face in ambient mode.
        // Falls back to Notification's smallIcon if not set. If neither is set,
        // an Exception is thrown.
        .setStaticIcon(R.drawable.ic_walk)
        // Sets the tap/touch event, so users can re-enter your app from the
        // other surfaces.
        // Falls back to Notification's contentIntent if not set. If neither is set,
        // an Exception is thrown.
        .setTouchIntent(activityPendingIntent)
        // In our case, sets the text used for the Ongoing Activity (more options are
        // available for timers and stop watches).
        .setStatus(ongoingActivityStatus)
        .build()

// Applies any Ongoing Activity updates to the notification builder.
// This method should always be called right before you build your notification,
// since an Ongoing Activity doesn't hold references to the context.
ongoingActivity.apply(applicationContext)
Before you create an Ongoing Activity, first create an Ongoing Activity Status which includes the text that will appear on the various Wear OS surfaces.
We set the text using .addTemplate() on the Status.Builder to the same main text we use for our Notification.
You can actually customize how text appears (specify colors, bold, etc.), but we're keeping our text simple for this code lab. However, if you would like to learn more, read the Ongoing Activity Guide.
Next we create the OngoingActivity itself. We pass the context, a notification id, and the notification builder we created above this code into the OngoingActivity.Builder()'s constructor.
The notification id and the NotificationCompat.Builder instance are important to tie the OngoingActivity to the Ongoing Notification.
First we set an animated icon (for the watch face in active mode) and a static icon (for the watch face in ambient mode).
Next we set a touch event, and finally the text using the Status object we created earlier before closing out the statement with .build().
The OngoingActivity user interface is provided using the icon and the Status's text. The touch event allows the user to tap back into the app from the watch face or Recents section of the global app launcher.
Finally, we call apply() on the Ongoing Activity and pass the context. This is the final step that applies any changes in Ongoing Activity to the notification builder.
That's it, we're done!
When the notificationManager.notify(NOTIFICATION_ID, notification) is called with this Notification, it will now appear on the new surfaces!
Now run your app on the new Wear OS emulator or device.
Start a walk from the app and swipe to exit the app.
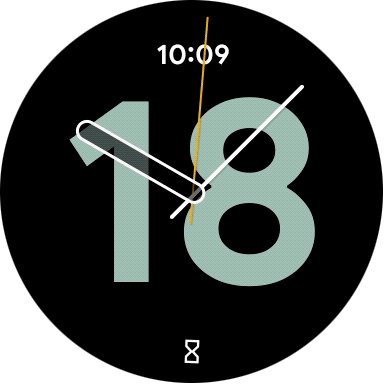
On the watch face, you should now see a little walking person icon like this (but animated):
If you tap on the icon, you will go back into the app!
Exit the app again and now tap the app launcher button on your Wear OS device.
You should something like this:
If you click tap on the walking app in the Recents section, you should again enter the app!
5. Congratulations
Congratulations! You learned how to build an Ongoing Activity on Wear OS!
Ongoing Activities are a great way to engage users on new surfaces in Wear.
What's next?
Check out the other Wear OS codelabs: