
1. Before you begin
This codelab teaches you about the data layer and how it fits into your overall app architecture.
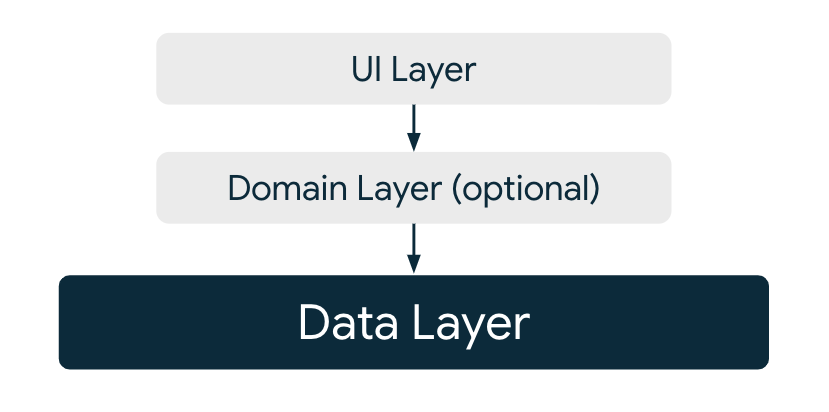
Figure 1. Diagram showing the data layer as the layer which the domain and UI layers are dependent on.
You'll build the data layer for a task management app. You'll create data sources for a local database and a network service, and a repository which exposes, updates, and synchronizes data.
Prerequisites
- This is an intermediate codelab, and you should have a basic understanding of how Android apps are built (see below for beginner learning resources).
- Experience with Kotlin, including lambdas, Coroutines and Flows. To learn about writing Kotlin in Android apps, check out Unit 1 of the Android Basics in Kotlin course.
- A basic understanding of the Hilt (dependency injection) and Room (database storage) libraries.
- Some experience with Jetpack Compose. Units 1 to 3 of the Android Basics in Compose course are a great place to learn about Compose.
- Optional: Read the architecture overview and data layer guides.
- Optional: Complete the Room codelab.
What you'll learn
In this codelab, you'll learn how to:
- Create repositories, data sources and data models for effective, scalable data management.
- Expose data to other architectural layers.
- Handle asynchronous data updates and complex or long-running tasks.
- Synchronize data between multiple data sources.
- Create tests that verify the behavior of your repositories and data sources.
What you'll build
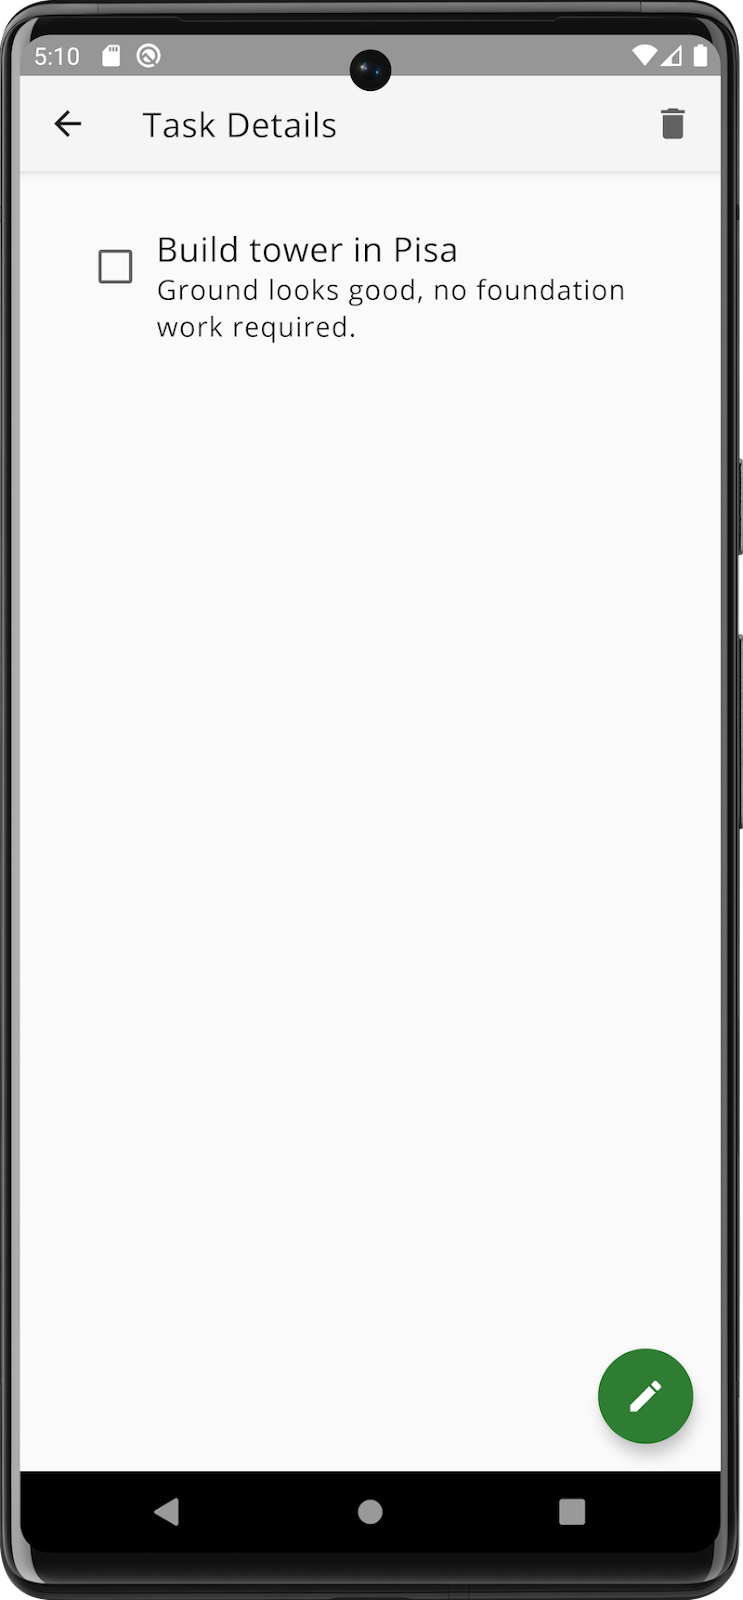
You'll build a task management app that allows you to add tasks and mark them as completed.
You won't write the app from scratch. Instead, you'll work on an app that already has a UI layer. The UI layer in this app contains screens and screen-level state holders implemented using ViewModels.
During the codelab you'll add the data layer, then connect it to the existing UI layer, allowing the app to become fully functional.
|
|
Figure 2. Screenshot of task list screen. | Figure 3. Screenshot of task details screen. |

2. Get set up
- Download the code:
https://github.com/android/architecture-samples/archive/refs/heads/data-codelab-start.zip
- Alternatively, you can clone the GitHub repository for the code:
git clone https://github.com/android/architecture-samples.git
git checkout data-codelab-start
- Open Android Studio and load the
architecture-samplesproject.
Folder structure
- Open the Project explorer in Android view.
Under the java/com.example.android.architecture.blueprints.todoapp folder there are several folders.
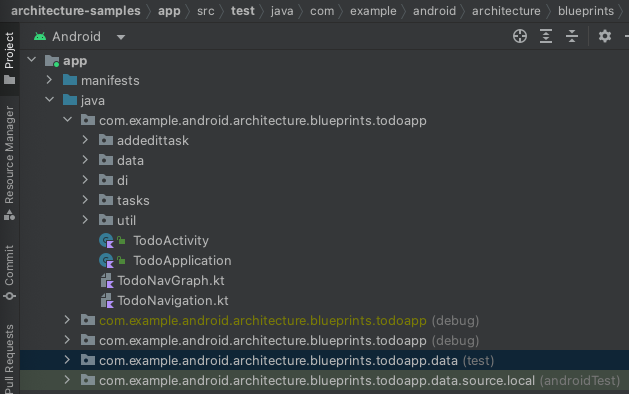
Figure 4. Screenshot showing Android Studio's Project explorer window in Android view.
<root>contains app-level classes, such as for navigation, the main activity and the application class.addedittaskcontains the UI feature that allows users to add and edit tasks.datacontains the data layer. You work mostly in this folder.dicontains Hilt modules for dependency injection.taskscontains the UI feature that allows users to view and update lists of tasks.utilcontains utility classes.
There are also two test folders, indicated by the text in parenthesis at the end of the folder name.
androidTestfollows the same structure as<root>but contains instrumented tests.testfollows the same structure as<root>but contains local tests.
Run the project
- Click the green play icon in the top toolbar.

Figure 5. Screenshot showing the Android Studio run configuration, target device, and run button.
You should see the Task List screen with a loading spinner that never disappears.
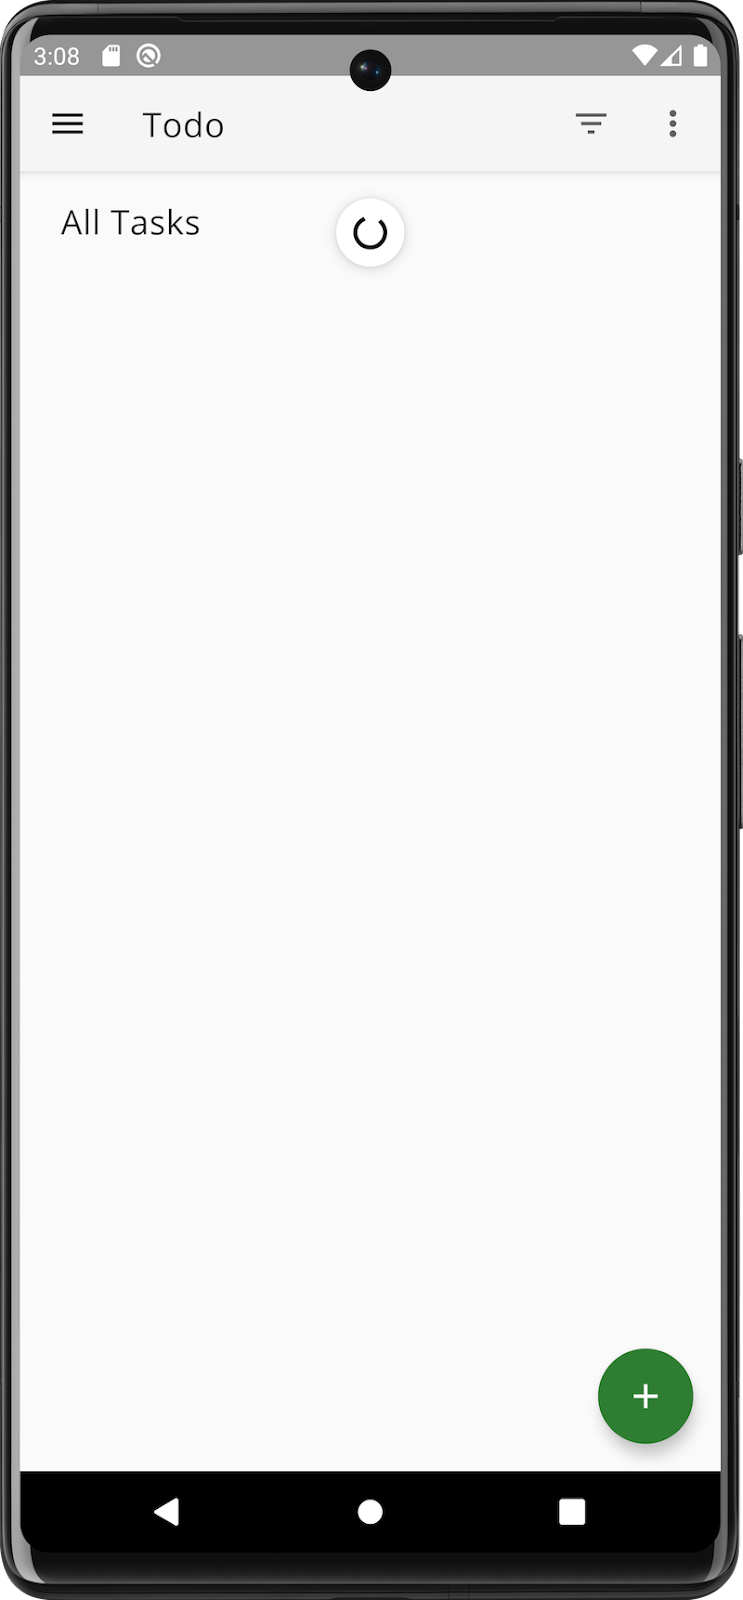
Figure 6. Screenshot of the app in its starting state with an infinite loading spinner.
By the end of the codelab, a list of tasks will be displayed on this screen.
You can view the final code in the codelab by checking out the data-codelab-final branch.
git checkout data-codelab-final
Just remember to stash your changes first!
3. Learn about the data layer
In this codelab, you build the data layer for the app.
The data layer, as its name suggests, is an architectural layer that manages your application data. It also contains business logic—the real-world business rules that determine how application data must be created, stored, and modified. This separation of concerns makes the data layer reusable, allowing it to be presented on multiple screens, share information between different parts of the app, and reproduce business logic outside of the UI for unit testing.
The key component types that make up the data layer are data models, data sources and repositories.
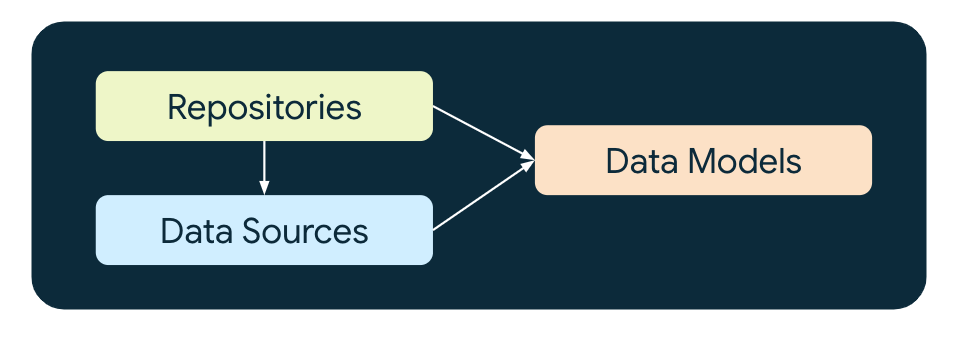
Figure 7. Diagram showing the component types in the data layer, including dependencies between data models, data sources, and repositories.
Data models
The application data is usually represented as data models. These are in-memory representations of the data.
Since this app is a task management app, you need a data model for a task. Here's the Task class:
data class Task(
    val id: String
    val title: String = "",
    val description: String = "",
    val isCompleted: Boolean = false,
) { ... }
A key point about this model is that it is immutable. Other layers cannot change the task properties; they must use the data layer if they want to make changes to a task.
Internal and external data models
Task is an example of an external data model. It is exposed externally by the data layer and can be accessed by other layers. Later on, you define internal data models that are only used inside the data layer.
It's good practice to define a data model for each representation of a business model. In this app, there are three data models.
Model name | External or internal to the data layer? | Represents | Associated data source |
| External | A task that can be used everywhere in the app, only stored in memory or when saving application state | N/A |
| Internal | A task stored in a local database |
|
| Internal | A task that has been retrieved from a network server |
|
Data sources
A data source is a class responsible for reading and writing data to a single source such as a database or a network service.
In this app, there are two data sources:
TaskDaois a local data source which reads and writes to a database.NetworkTaskDataSourceis a network data source which reads and writes to a network server.
Repositories
A repository should manage a single data model. In this app, you create a repository that manages Task models. The repository:
- Exposes a list of
Taskmodels. - Provides methods for creating and updating a
Taskmodel. - Executes business logic, such as creating a unique ID for each task.
- Combines or maps internal data models from data sources into
Taskmodels. - Synchronizes data sources.
Get ready to code!
- Switch to the Android view and expand the
com.example.android.architecture.blueprints.todoapp.datapackage:
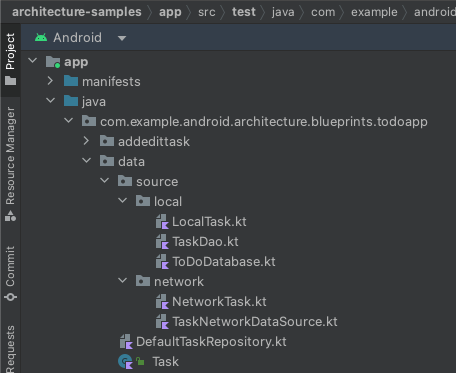
Figure 8. The Project explorer window showing folders and files.
The Task class has already been created so that the rest of the app compiles. From now on, you create most of the data layer classes from scratch by adding the implementations to the empty .kt files provided.
4. Store data locally
In this step you create a data source and a data model for a Room database that stores tasks locally on the device.
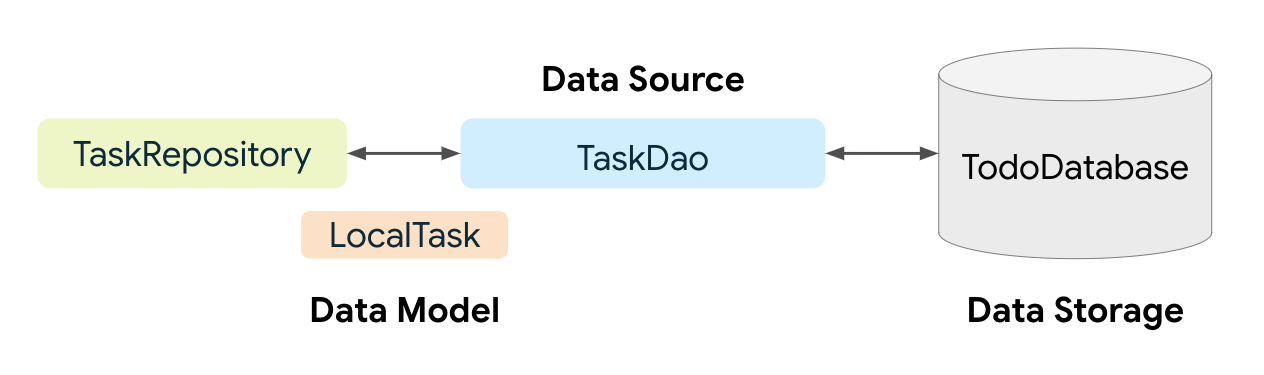
Figure 9. Diagram showing the relationship between task repository, model, data source, and database.
Create a data model
To store data in a Room database you need to create a database entity.
- Open the file
LocalTask.ktinsidedata/source/local, and then add the following code to it:
@Entity(
    tableName = "task"
)
data class LocalTask(
    @PrimaryKey val id: String,
    var title: String,
    var description: String,
    var isCompleted: Boolean,
)
The LocalTask class represents data stored in a table named task in the Room database. It is strongly coupled to Room and shouldn't be used for other data sources such as DataStore.
The Local prefix in the class name is used to indicate that this data is stored locally. It is also used to distinguish this class from the Task data model, which is exposed to the other layers in the app. Put another way, LocalTask is internal to the data layer, and Task is external to the data layer.
Create a data source
Now that you have a data model, create a data source to create, read, update, and delete ( CRUD) LocalTask models. Since you are using Room, you can use a Data Access Object (the @Dao annotation) as the local data source.
- Create a new Kotlin interface in the file named
TaskDao.kt.
@Dao
interface TaskDao {

    @Query("SELECT * FROM task")
    fun observeAll(): Flow<List<LocalTask>>

    @Upsert
    suspend fun upsert(task: LocalTask)

    @Upsert
    suspend fun upsertAll(tasks: List<LocalTask>)

    @Query("UPDATE task SET isCompleted = :completed WHERE id = :taskId")
    suspend fun updateCompleted(taskId: String, completed: Boolean)

    @Query("DELETE FROM task")
    suspend fun deleteAll()
}
Methods for reading data are prefixed with observe. They are non-suspending functions that return a Flow. Each time the underlying data changes, a new item is emitted into the stream. This useful feature of the Room library (and many other data storage libraries) means you can listen for data changes rather than polling the database for new data.
The methods for writing data are suspending functions because they are performing I/O operations.
Update the database schema
The next thing you need to do is update the database so that it stores LocalTask models.
- Open
ToDoDatabase.ktand changeBlankEntitytoLocalTask. - Remove
BlankEntityand any redundantimportstatements. - Add a method to return the DAO named
taskDao.
The updated class should look like this:
@Database(entities = [LocalTask::class], version = 1, exportSchema = false)
abstract class ToDoDatabase : RoomDatabase() {

    abstract fun taskDao(): TaskDao
}
Update Hilt configuration
This project uses Hilt for dependency injection. Hilt needs to know how to create TaskDao so that it can be injected into the classes that use it.
- Open
di/DataModules.ktand add the following method to theDatabaseModule:
    @Provides
    fun provideTaskDao(database: ToDoDatabase) : TaskDao = database.taskDao()
You now have all the pieces required to read and write tasks to a local database.
5. Test the local data source
In the last step, you wrote quite a lot of code, but how do you know it works correctly? It's easy to make a mistake with all those SQL queries in TaskDao. Create tests to verify that TaskDao behaves as it should.
Tests aren't part of the app, so they should be placed in a different folder. There are two testing folders indicated by the text in brackets at the end of the package names:

Figure 10. Screenshot showing the test and androidTest folders in Project explorer.
androidTestcontains tests which run on an Android emulator or device. These are known as instrumented tests.testcontains tests run on your host machine, also known as local tests.
TaskDao requires a Room database (which can only be created on an Android device), so to test it you need to create an instrumented test.
Create the test class
- Expand the
androidTestfolder and openTaskDaoTest.kt. Inside it, create an empty class namedTaskDaoTest.
class TaskDaoTest {

}
Add a test database
- Add
ToDoDatabaseand initialize it before each test.
    private lateinit var database: ToDoDatabase

    @Before
    fun initDb() {
        database = Room.inMemoryDatabaseBuilder(
            getApplicationContext(),
            ToDoDatabase::class.java
        ).allowMainThreadQueries().build()
    }
This will create an in-memory database before each test. An in-memory database is much faster than a disk-based database. This makes it a good choice for automated tests in which the data does not need to persist for longer than the tests.
Add a test
Add a test that verifies that a LocalTask can be inserted, and that the same LocalTask can be read using TaskDao.
The tests in this codelab all follow the given, when, then structure:
Given | An empty database |
When | A task is inserted and you start observing the tasks stream |
Then | The first item in the tasks stream matches the task that was inserted |
- Start by creating a failing test. This verifies that the test is actually running and that the correct objects and their dependencies are tested.
@Test
fun insertTaskAndGetTasks() = runTest {

    val task = LocalTask(
        title = "title",
        description = "description",
        id = "id",
        isCompleted = false,
    )
    database.taskDao().upsert(task)

    val tasks = database.taskDao().observeAll().first()

    assertEquals(0, tasks.size)
}
- Run the test by clicking Play next to the test in the gutter.

Figure 11. Screenshot showing the test Play button in the code editor gutter.
You should see the test fail inside the test results window with the message expected:<0> but was:<1>. This is expected because the number of tasks in the database is one, not zero.
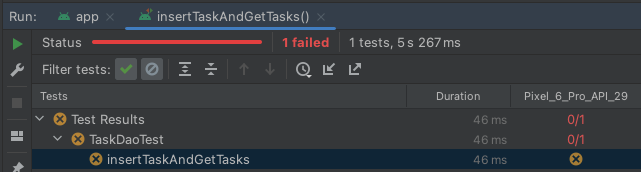
Figure 12. Screenshot showing a failing test.
- Remove the existing
assertEqualsstatement. - Add code to test that one and only one task is provided by the data source and it is the same task which was inserted.
The ordering of parameters to assertEquals should always be the expected value then the actual value**.**
assertEquals(1, tasks.size)
assertEquals(task, tasks[0])
- Run the test again. You should see the test pass inside the test results window.
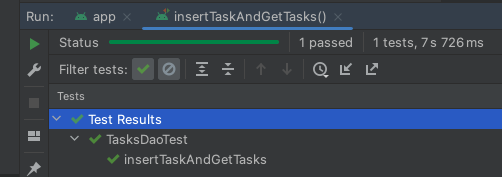
Figure 13. Screenshot showing a passing test.
6. Create a network data source
It's great that tasks can be saved locally on the device, but what if you also want to save and load those tasks to a network service? Perhaps your Android app is just one way in which users can add tasks to their TODO list. Tasks could also be managed via a website or desktop application. Or maybe you just want to provide an online data backup so that users can restore the app data even if they change their device.
In these scenarios, you usually have a network-based service that all clients, including your Android app, can use to load and save data.
In this next step, you create a data source to communicate with this network service. For the purposes of this codelab, this is a simulated service that doesn't connect to a live network service, but gives you an idea of how this could be implemented in a real app.
About the network service
In the example, the network API is very simple. It performs just two operations:
- Save all tasks, overwriting any previously written data.
- Load all tasks, which provides a list of all tasks that are currently saved on the network service.
Model the network data
When obtaining data from a network API it's common for that data to be represented differently from how it is locally. The network representation of a task might have extra fields, or might use different types or field names to represent the same values.
To account for these differences, create a data model specific to the network.
- Open the file
NetworkTask.ktfound indata/source/network, and then add the following code to represent the fields:
data class NetworkTask(
    val id: String,
    val title: String,
    val shortDescription: String,
    val priority: Int? = null,
    val status: TaskStatus = TaskStatus.ACTIVE
) {
    enum class TaskStatus {
        ACTIVE,
        COMPLETE
    }
}
Here are the differences between LocalTask and NetworkTask:
- The task description is named
shortDescriptioninstead ofdescription. - The
isCompletedfield is represented as astatusenum, which has two possible values:ACTIVEandCOMPLETE. - It contains an extra
priorityfield, which is an integer.
Create the network data source
- Open
TaskNetworkDataSource.kt, and then create a class namedTaskNetworkDataSourcewith the following content:
class TaskNetworkDataSource @Inject constructor() {

    // A mutex is used to ensure that reads and writes are thread-safe.
    private val accessMutex = Mutex()
    private var tasks = listOf(
        NetworkTask(
            id = "PISA",
            title = "Build tower in Pisa",
            shortDescription = "Ground looks good, no foundation work required."
        ),
        NetworkTask(
            id = "TACOMA",
            title = "Finish bridge in Tacoma",
            shortDescription = "Found awesome girders at half the cost!"
        )
    )

    suspend fun loadTasks(): List<NetworkTask> = accessMutex.withLock {
        delay(SERVICE_LATENCY_IN_MILLIS)
        return tasks
    }

    suspend fun saveTasks(newTasks: List<NetworkTask>) = accessMutex.withLock {
        delay(SERVICE_LATENCY_IN_MILLIS)
        tasks = newTasks
    }
}

private const val SERVICE_LATENCY_IN_MILLIS = 2000L
This object simulates interaction with the server, including a simulated delay of two seconds each time loadTasks or saveTasks is called. This could represent network or server response latency.
It also includes some test data that you use later to verify that tasks can be loaded from the network successfully.
If your real server API uses HTTP, consider using a library like Ktor or Retrofit to build your network data source.
7. Create the task repository
The pieces are all coming together.
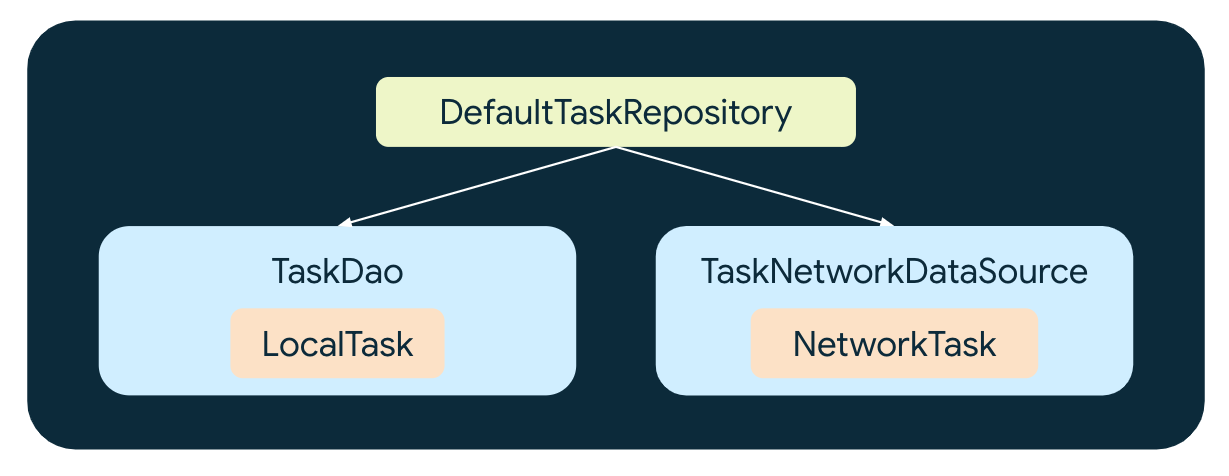
Figure 14. Diagram showing the dependencies of DefaultTaskRepository.
We have two data sources—one for local data (TaskDao) and one for network data (TaskNetworkDataSource). Each allows reads and writes, and has its own representation of a task (LocalTask and NetworkTask, respectively).
Now it's time to create a repository that uses these data sources and provides an API so that other architectural layers can access this task data.
Expose data
- Open
DefaultTaskRepository.ktin thedatapackage, and then create a class namedDefaultTaskRepository, which takesTaskDaoandTaskNetworkDataSourceas dependencies.
class DefaultTaskRepository @Inject constructor(
    private val localDataSource: TaskDao,
    private val networkDataSource: TaskNetworkDataSource,
) {

}
Data should be exposed using flows. This allows callers to be notified of changes over time to that data.
- Add a method named
observeAll, which returns a stream ofTaskmodels using aFlow.
fun observeAll() : Flow<List<Task>> {
    // TODO add code to retrieve Tasks
}
Repositories should expose data from a single source of truth. That is, data should come from only one data source. This could be an in-memory cache, a remote server, or, in this case, the local database.
The tasks in the local database can be accessed using TaskDao.observeAll, which conveniently returns a flow. But it's a flow of LocalTask models, in which LocalTask is an internal model that should not be exposed to other architectural layers.
You need to transform LocalTask into a Task. This is an external model that forms part of the data layer API.
Map internal models to external models
To perform this conversion, you need to map the fields from LocalTask to the fields in Task.
- Create extension functions for this in
LocalTask.
// Convert a LocalTask to a Task
fun LocalTask.toExternal() = Task(
    id = id,
    title = title,
    description = description,
    isCompleted = isCompleted,
)

// Convenience function which converts a list of LocalTasks to a list of Tasks
fun List<LocalTask>.toExternal() = map(LocalTask::toExternal) // Equivalent to map { it.toExternal() }
Now, whenever you need to transform LocalTask into a Task, you can just call toExternal.
- Use your newly created
toExternalfunction insideobserveAll:
fun observeAll(): Flow<List<Task>> {
    return localDataSource.observeAll().map { tasks ->
        tasks.toExternal()
    }
}
Each time the tasks data changes in the local database, a new list of LocalTask models is emitted into the flow. Each LocalTask is then mapped to a Task.
Great! Now other layers can use observeAll in order to obtain all the Task models from your local database and be notified whenever those Task models change.
Update data
A TODO app isn't much good if you can't create and update tasks. You now add methods to do that.
Methods for creating, updating, or deleting data are one-shot operations, and should be implemented using suspend functions.
- Add a method named
create, which takes atitleanddescriptionas parameters and returns the ID of the newly created task.
suspend fun create(title: String, description: String): String {
}
Note that the data layer API forbids a Task from being created by other layers by only providing a create method that accepts individual parameters, not a Task. This approach encapsulates:
- The business logic for creating a unique task ID.
- Where the task is stored after initial creation.
- Add a method to create a task ID
// This method might be computationally expensive
private fun createTaskId() : String {
    return UUID.randomUUID().toString()
}
- Create a task ID using the newly added
createTaskIdmethod
suspend fun create(title: String, description: String): String {
    val taskId = createTaskId()
}
Don't block the main thread
But wait! What if the task ID creation is computationally expensive? Perhaps it uses cryptography to create a hash key for the ID, which takes several seconds. This could lead to UI jank if called on the main thread.
The data layer has a responsibility to ensure that long-running or complex tasks do not block the main thread.
To fix this, specify a coroutine dispatcher to be used to execute these instructions.
- First, add a
CoroutineDispatcheras a dependency toDefaultTaskRepository. Use the already created@DefaultDispatcherqualifier (defined indi/CoroutinesModule.kt) to tell Hilt to inject this dependency withDispatchers.Default. TheDefaultdispatcher is specified because it's optimized for CPU intensive work. Read more about coroutine dispatchers here.
class DefaultTaskRepository @Inject constructor(
   private val localDataSource: TaskDao,
   private val networkDataSource: TaskNetworkDataSource,
   @DefaultDispatcher private val dispatcher: CoroutineDispatcher,
)
- Now, place the call to
UUID.randomUUID().toString()inside awithContextblock.
val taskId = withContext(dispatcher) {
    createTaskId()
}
Read more about threading in the data layer.
Create and store the task
- Now that you have a task ID, use it along with the supplied parameters to create a new
Task.
suspend fun create(title: String, description: String): String {
    val taskId = withContext(dispatcher) {
        createTaskId()
    }
    val task = Task(
        title = title,
        description = description,
        id = taskId,
    )
}
Before inserting the task into the local data source you need to map it to a LocalTask.
- Add the following extension function to the end of
LocalTask. This is the inverse mapping function toLocalTask.toExternal, which you created earlier.
fun Task.toLocal() = LocalTask(
    id = id,
    title = title,
    description = description,
    isCompleted = isCompleted,
)
- Use this inside
createto insert the task into the local data source, and then return thetaskId.
suspend fun create(title: String, description: String): Task {
    ...
    localDataSource.upsert(task.toLocal())
    return taskId
}
Complete the task
- Create an additional method,
complete, which marks theTaskas complete.
suspend fun complete(taskId: String) {
    localDataSource.updateCompleted(taskId, true)
}
You now have some useful methods for creating and completing tasks.
Synchronize data
In this app, the network data source is used as an online backup that is updated each time data is written locally. Data is loaded from the network each time the user requests a refresh.
The following diagrams summarize the behavior for each operation type.
Operation type | Repository methods | Steps | Data movement |
Load |
| Load data from local database |
|
Save |
| 1. Write data to local database2. Copy all data to network, overwriting everything |
|
Refresh |
| 1. Load data from network2. Copy it into local database, overwriting everything |
|
 Figure 15. Diagram showing data flow from local data source to the task repository.
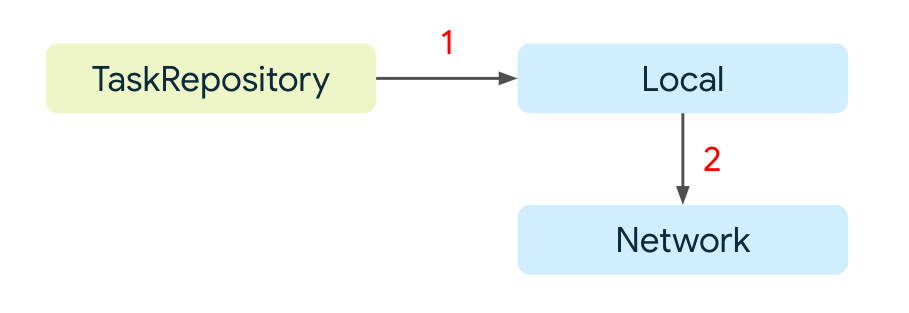 Figure 16. Diagram showing data flow from the task repository to the local data source, then to the network data source.
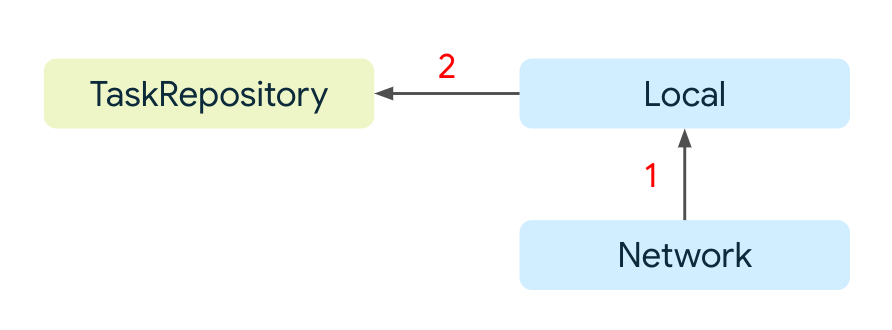 Figure 17. Diagram showing data flow from the network data source to the local data source, then to the task repository.
Save and refresh network data
Your repository already loads tasks from the local data source. To complete the synchronization algorithm, you need to create methods to save and refresh data from the network data source.
- First, create mapping functions from
LocalTasktoNetworkTaskand vice versa insideNetworkTask.kt. It is equally valid to place the functions insideLocalTask.kt.
fun NetworkTask.toLocal() = LocalTask(
    id = id,
    title = title,
    description = shortDescription,
    isCompleted = (status == NetworkTask.TaskStatus.COMPLETE),
)

fun List<NetworkTask>.toLocal() = map(NetworkTask::toLocal)

fun LocalTask.toNetwork() = NetworkTask(
    id = id,
    title = title,
    shortDescription = description,
    status = if (isCompleted) { NetworkTask.TaskStatus.COMPLETE } else { NetworkTask.TaskStatus.ACTIVE }
)

fun List<LocalTask>.toNetwork() = map(LocalTask::toNetwork)
Here you can see the advantage of having separate models for each data source—the mapping of one data type to another is encapsulated into separate functions.
- Add the
refreshmethod at the end ofDefaultTaskRepository.
suspend fun refresh() {
    val networkTasks = networkDataSource.loadTasks()
    localDataSource.deleteAll()
    val localTasks = withContext(dispatcher) {
        networkTasks.toLocal()
    }
    localDataSource.upsertAll(networkTasks.toLocal())
}
This replaces all the local tasks with those from the network. withContext is used for the bulk toLocal operation because there are an unknown number of tasks, and each mapping operation could be computationally expensive.
- Add the
saveTasksToNetworkmethod to the end ofDefaultTaskRepository.
private suspend fun saveTasksToNetwork() {
    val localTasks = localDataSource.observeAll().first()
    val networkTasks = withContext(dispatcher) {
        localTasks.toNetwork()
    }
    networkDataSource.saveTasks(networkTasks)
}
This replaces all the network tasks with those from the local data source.
- Now update the existing methods, which update tasks
createandcompleteso that the local data is saved to the network when it changes.
    suspend fun create(title: String, description: String): String {
        ...
        saveTasksToNetwork()
        return taskId
    }

     suspend fun complete(taskId: String) {
        localDataSource.updateCompleted(taskId, true)
        saveTasksToNetwork()
    }
Don't make the caller wait
If you were to run this code, you'd notice that saveTasksToNetwork blocks. This means that callers of create and complete are forced to wait until the data is saved to the network before they can be sure that the operation has completed. In the simulated network data source this is only two seconds, but in a real app it might be much longer—or never if there's no network connection.
This is unnecessarily restrictive and will likely cause a poor user experience—no one wants to wait to create a task, especially when they're busy!
A better solution is to use a different coroutine scope in order to save the data to the network. This allows the operation to complete in the background without making the caller wait for the result.
- Add a coroutine scope as a parameter to
DefaultTaskRepository.
class DefaultTaskRepository @Inject constructor(
    // ...other parameters...
    @ApplicationScope private val scope: CoroutineScope,
)
The Hilt qualifier @ApplicationScope (defined in di/CoroutinesModule.kt) is used to inject a scope that follows the lifecycle of the app.
- Wrap the code inside
saveTasksToNetworkwithscope.launch.
    private fun saveTasksToNetwork() {
        scope.launch {
            val localTasks = localDataSource.observeAll().first()
            val networkTasks = withContext(dispatcher) {
                localTasks.toNetwork()
            }
            networkDataSource.saveTasks(networkTasks)
        }
    }
Now saveTasksToNetwork returns immediately and the tasks are saved to the network in the background.
8. Test the task repository
Whew, that's a lot of functionality added to your data layer. It's time to verify that it all works by creating unit tests for DefaultTaskRepository.
You need to instantiate the subject under test (DefaultTaskRepository) with test dependencies for the local and network data sources. First, you need to create those dependencies.
- In the Project Explorer window, expand the
(test)folder, and then expand thesource.localfolder and openFakeTaskDao.kt.
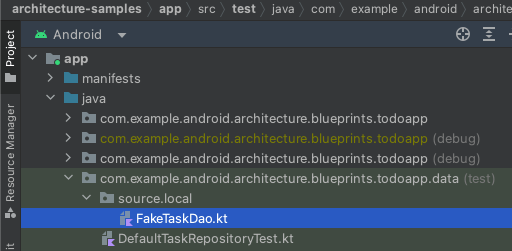
Figure 18. Screenshot showing FakeTaskDao.kt in the Project folder structure.
- Add the following contents:
class FakeTaskDao(initialTasks: List<LocalTask>) : TaskDao {

    private val _tasks = initialTasks.toMutableList()
    private val tasksStream = MutableStateFlow(_tasks.toList())

    override fun observeAll(): Flow<List<LocalTask>> = tasksStream

    override suspend fun upsert(task: LocalTask) {
        _tasks.removeIf { it.id == task.id }
        _tasks.add(task)
        tasksStream.emit(_tasks)
    }

    override suspend fun upsertAll(tasks: List<LocalTask>) {
        val newTaskIds = tasks.map { it.id }
        _tasks.removeIf { newTaskIds.contains(it.id) }
        _tasks.addAll(tasks)
    }

    override suspend fun updateCompleted(taskId: String, completed: Boolean) {
        _tasks.firstOrNull { it.id == taskId }?.let { it.isCompleted = completed }
        tasksStream.emit(_tasks)
    }

    override suspend fun deleteAll() {
        _tasks.clear()
        tasksStream.emit(_tasks)
    }
}
In a real app, you'd also create a fake dependency to replace TaskNetworkDataSource (by having the fake and the real objects implement a common interface), but for the purposes of this codelab you use it directly.
- Inside
DefaultTaskRepositoryTest, add the following.
A rule that sets the main dispatcher to be used in all tests. |
Some test data. |
The test dependencies for the local and network data sources. |
The subject under test: |
class DefaultTaskRepositoryTest {

    private var testDispatcher = UnconfinedTestDispatcher()
    private var testScope = TestScope(testDispatcher)

    private val localTasks = listOf(
        LocalTask(id = "1", title = "title1", description = "description1", isCompleted = false),
        LocalTask(id = "2", title = "title2", description = "description2", isCompleted = true),
    )

    private val localDataSource = FakeTaskDao(localTasks)
    private val networkDataSource = TaskNetworkDataSource()
    private val taskRepository = DefaultTaskRepository(
        localDataSource = localDataSource,
        networkDataSource = networkDataSource,
        dispatcher = testDispatcher,
        scope = testScope
    )
}
Great! Now you can start writing unit tests. There are three main areas you should test: reads, writes, and data sync.
Test exposed data
Here's how you can test that the repository is exposing data correctly. The test is given in the given, when, then structure. For example:
Given | The local data source has some existing tasks |
When | The tasks stream is obtained from the repository using |
Then | The first item in the tasks stream matches the external representation of the tasks in the local data source |
- Create a test named
observeAll_exposesLocalDatawith the following contents:
@Test
fun observeAll_exposesLocalData() = runTest {
    val tasks = taskRepository.observeAll().first()
    assertEquals(localTasks.toExternal(), tasks)
}
Use the first function to obtain the first item from the tasks stream.
Test data updates
Next up, write a test that verifies that a task is created and saved to the network data source.
Given | An empty database |
When | A task is created by calling |
Then | The task is created in both local and network data sources |
- Create a test named
onTaskCreation_localAndNetworkAreUpdated.
@Test
    fun onTaskCreation_localAndNetworkAreUpdated() = testScope.runTest {
        val newTaskId = taskRepository.create(
            localTasks[0].title,
            localTasks[0].description
        )

        val localTasks = localDataSource.observeAll().first()
        assertEquals(true, localTasks.map { it.id }.contains(newTaskId))

        val networkTasks = networkDataSource.loadTasks()
        assertEquals(true, networkTasks.map { it.id }.contains(newTaskId))
    }
Next, verify that when a task is completed it is written correctly to the local data source and saved to the network data source.
Given | The local data source contains a task |
When | That task is completed by calling |
Then | The local data and the network data is also updated |
- Create a test named
onTaskCompletion_localAndNetworkAreUpdated.
    @Test
    fun onTaskCompletion_localAndNetworkAreUpdated() = testScope.runTest {
        taskRepository.complete("1")

        val localTasks = localDataSource.observeAll().first()
        val isLocalTaskComplete = localTasks.firstOrNull { it.id == "1" } ?.isCompleted
        assertEquals(true, isLocalTaskComplete)

        val networkTasks = networkDataSource.loadTasks()
        val isNetworkTaskComplete =
            networkTasks.firstOrNull { it.id == "1"} ?.status == NetworkTask.TaskStatus.COMPLETE
        assertEquals(true, isNetworkTaskComplete)
    }
Test data refresh
Lastly, test that the refresh operation is successful.
Given | The network data source contains data |
When |
|
Then | the local data is the same the network data |
- Create a test named
onRefresh_localIsEqualToNetwork
@Test
    fun onRefresh_localIsEqualToNetwork() = runTest {
        val networkTasks = listOf(
            NetworkTask(id = "3", title = "title3", shortDescription = "desc3"),
            NetworkTask(id = "4", title = "title4", shortDescription = "desc4"),
        )
        networkDataSource.saveTasks(networkTasks)

        taskRepository.refresh()

        assertEquals(networkTasks.toLocal(), localDataSource.observeAll().first())
    }
That's it! Run the tests and they should all pass.
9. Update the UI layer
Now you know the data layer works, it's time to connect it to the UI layer.
Update the view model for the task list screen
Start with TasksViewModel. This is the view model for displaying the first screen in the app—the list of all currently active tasks.
- Open this class and add
DefaultTaskRepositoryas a constructor parameter.
@HiltViewModel
class TasksViewModel @Inject constructor(
    private val savedStateHandle: SavedStateHandle,
    private val taskRepository: DefaultTaskRepository,
) : ViewModel () { /* ... */ }
- Initialize the
tasksStreamvariable using the repository.
private val tasksStream = taskRepository.observeAll()
Your view model now has access to all the tasks provided by the repository, and will receive a new list of tasks each time the data changes—in just one line of code!
- All that remains is to connect the user actions to their corresponding methods in the repository. Find the
completemethod and update it to:
fun complete(task: Task, completed: Boolean) {
    viewModelScope.launch {
        if (completed) {
            taskRepository.complete(task.id)
            showSnackbarMessage(R.string.task_marked_complete)
        } else {
            ...
       }
    }
}
- Do the same with
refresh.
    fun refresh() {
        _isLoading.value = true
        viewModelScope.launch {
            taskRepository.refresh()
            _isLoading.value = false
        }
    }
Update the view model for the add task screen
- Open
AddEditTaskViewModeland addDefaultTaskRepositoryas a constructor parameter, the same as you did in the previous step.
class AddEditTaskViewModel @Inject constructor(
    savedStateHandle: SavedStateHandle,
    private val taskRepository: DefaultTaskRepository,
)
- Update the
createmethod to the following:
    private fun createNewTask() = viewModelScope.launch {
        taskRepository.create(uiState.value.title, uiState.value.description)
        _uiState.update {
            it.copy(isTaskSaved = true)
        }
    }
Run the app
- It's the moment you've been waiting for—time to run the app. You should see a screen showing You have no tasks!.

Figure 19. Screenshot of the app's tasks screen when there are no tasks.
- Tap on the three dots in the top-right corner, and then press Refresh.
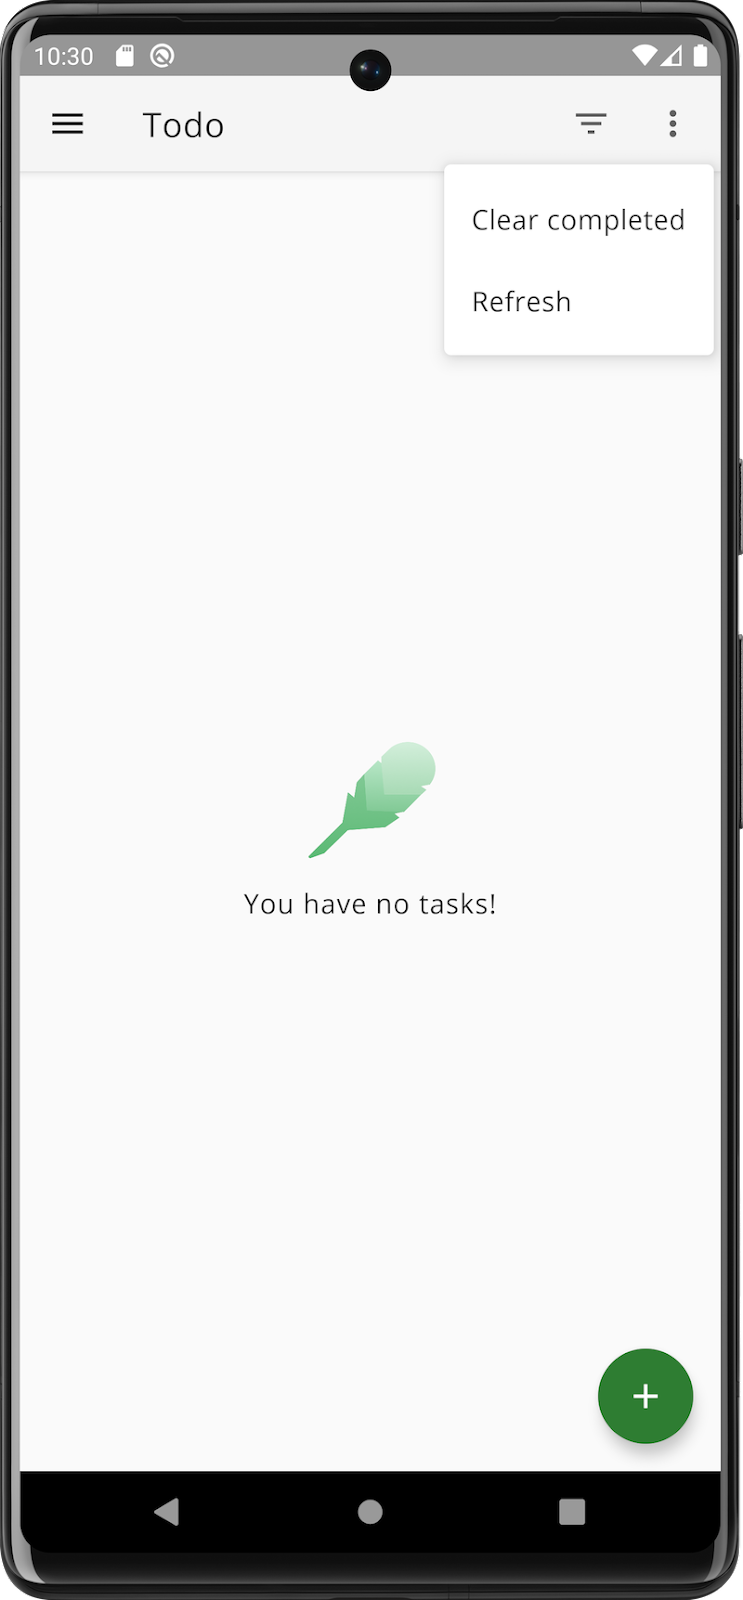
Figure 20. Screenshot of the app's tasks screen with the action menu displayed.
You should see a loading spinner appear for two seconds, and then the test tasks that you added earlier should appear.

Figure 21. Screenshot of the app's tasks screen with two tasks displayed.
- Now tap on the plus sign in the bottom-right corner in order to add a new task. Complete the title and description fields.
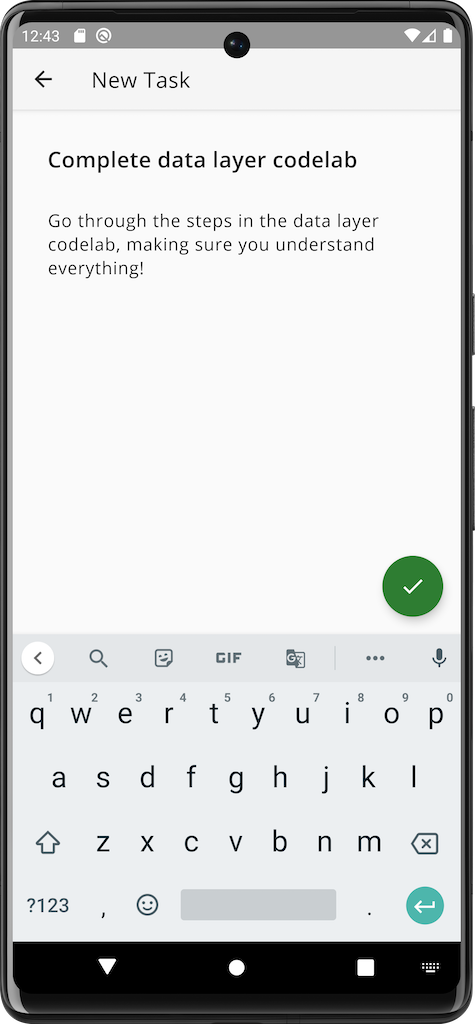
Figure 22. Screenshot of the app's add task screen.
- Tap the tick button in the bottom-right corner in order to save the task.
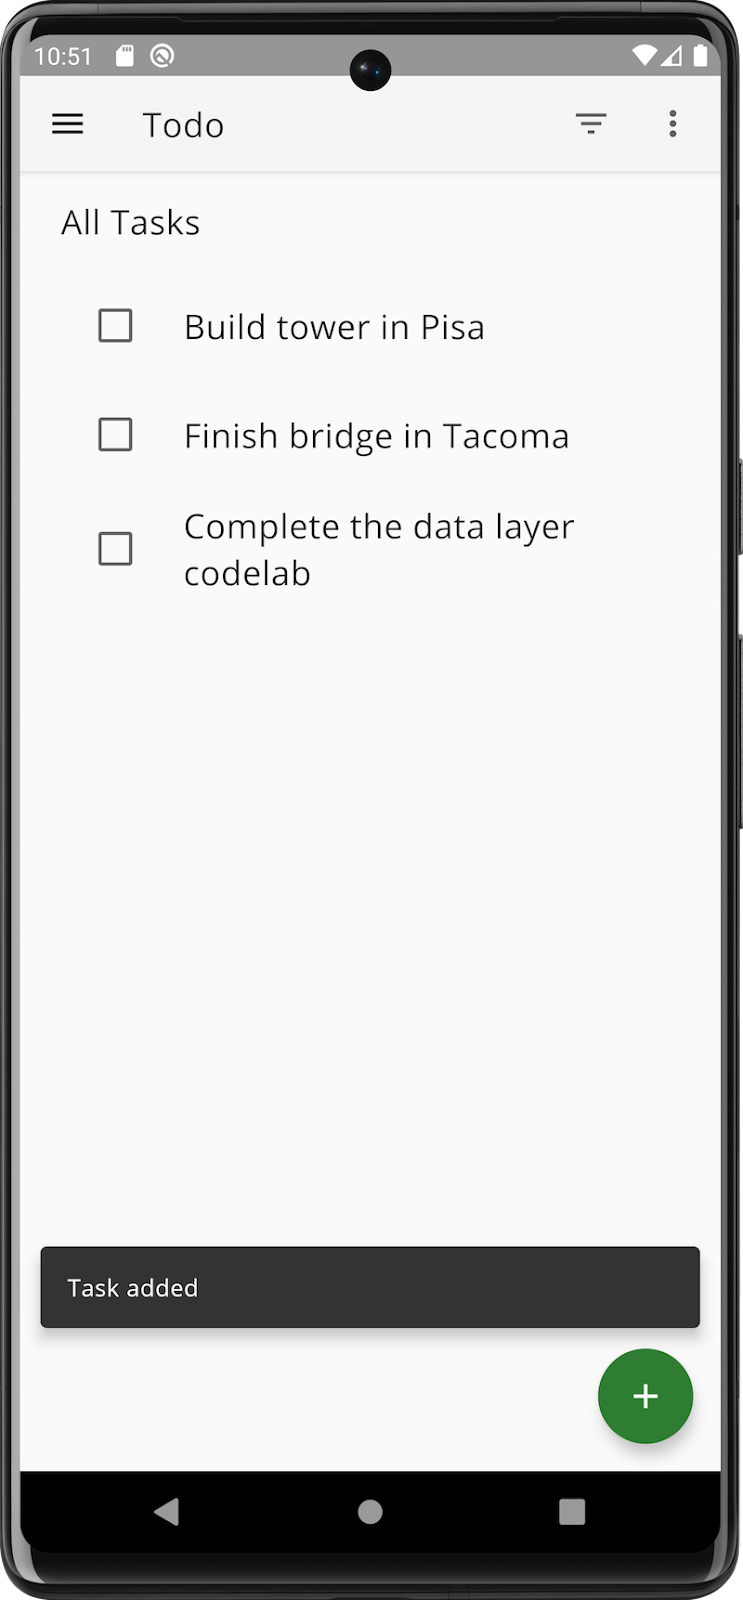
Figure 23. Screenshot of the app's tasks screen after a task has been added.
- Select the checkbox next to the task in order to mark the task as complete.
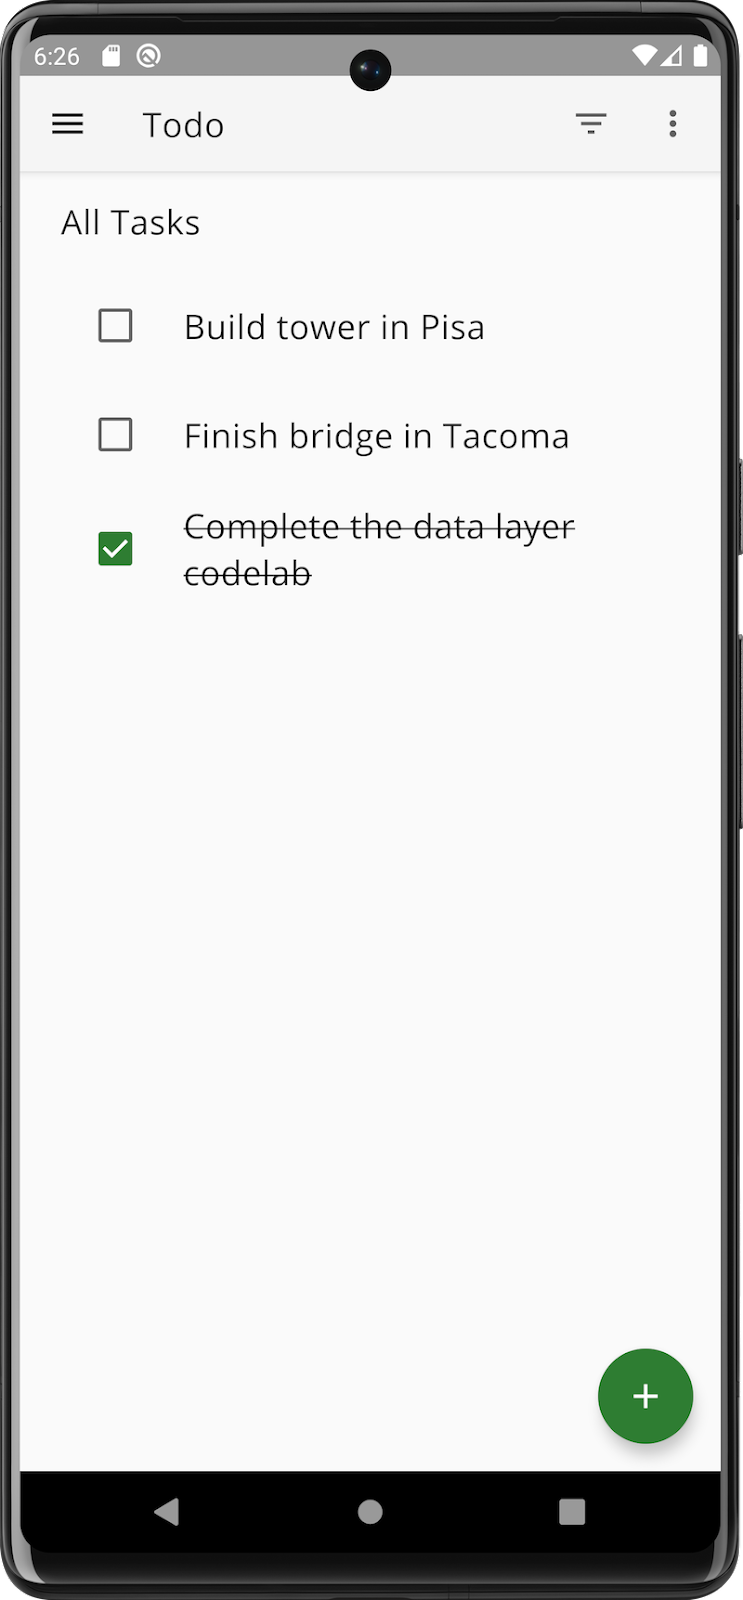
Figure 24. Screenshot of the app's tasks screen showing a task that has been completed.
10. Congratulations!
You successfully created a data layer for an app.
The data layer forms a critical part of your application architecture. It is a foundation on which other layers can be built, so getting it right enables your app to scale with the needs of your users and your business.
What you learned
- The role of the data layer in Android app architecture.
- How to create data sources and models.
- The role of repositories, and how they expose data and provide one-time methods to update data.
- When to change the coroutine dispatcher, and why it's important to do so.
- Data synchronization using multiple data sources.
- How to create unit and instrumented tests for common data layer classes.
A further challenge
If you want another challenge, implement the following features:
- Reactivate a task after it's been marked as complete.
- Edit a task's title and description by tapping on it.
No instructions are provided—it's all up to you! If you get stuck, look at the fully functional app on the main branch.
git checkout main
Next steps
To learn more about the data layer, check out the official documentation and the guide for offline-first apps. You can also learn about the other architectural layers— the UI layer and the domain layer.
For a more complex, real-world sample, look at the Now in Android app.