サイズ変更が可能なビットマップ(9-patch ファイル)を作成する
コレクションでコンテンツを整理
必要に応じて、コンテンツの保存と分類を行います。
Draw 9-patch ツールは、Android Studio に組み込まれている WYSIWYG エディタです。このツールを使用すると、ビューのコンテンツと画面のサイズに合わせて自動的にサイズが変更されるビットマップ画像を作成できます。画像内に描画されるインジケーターに基づいて、画像の選択した部分を水平方向または垂直方向に拡大 / 縮小できます。
NinePatch グラフィックの概要と仕組みについては、NinePatch ドローアブルをご覧ください。
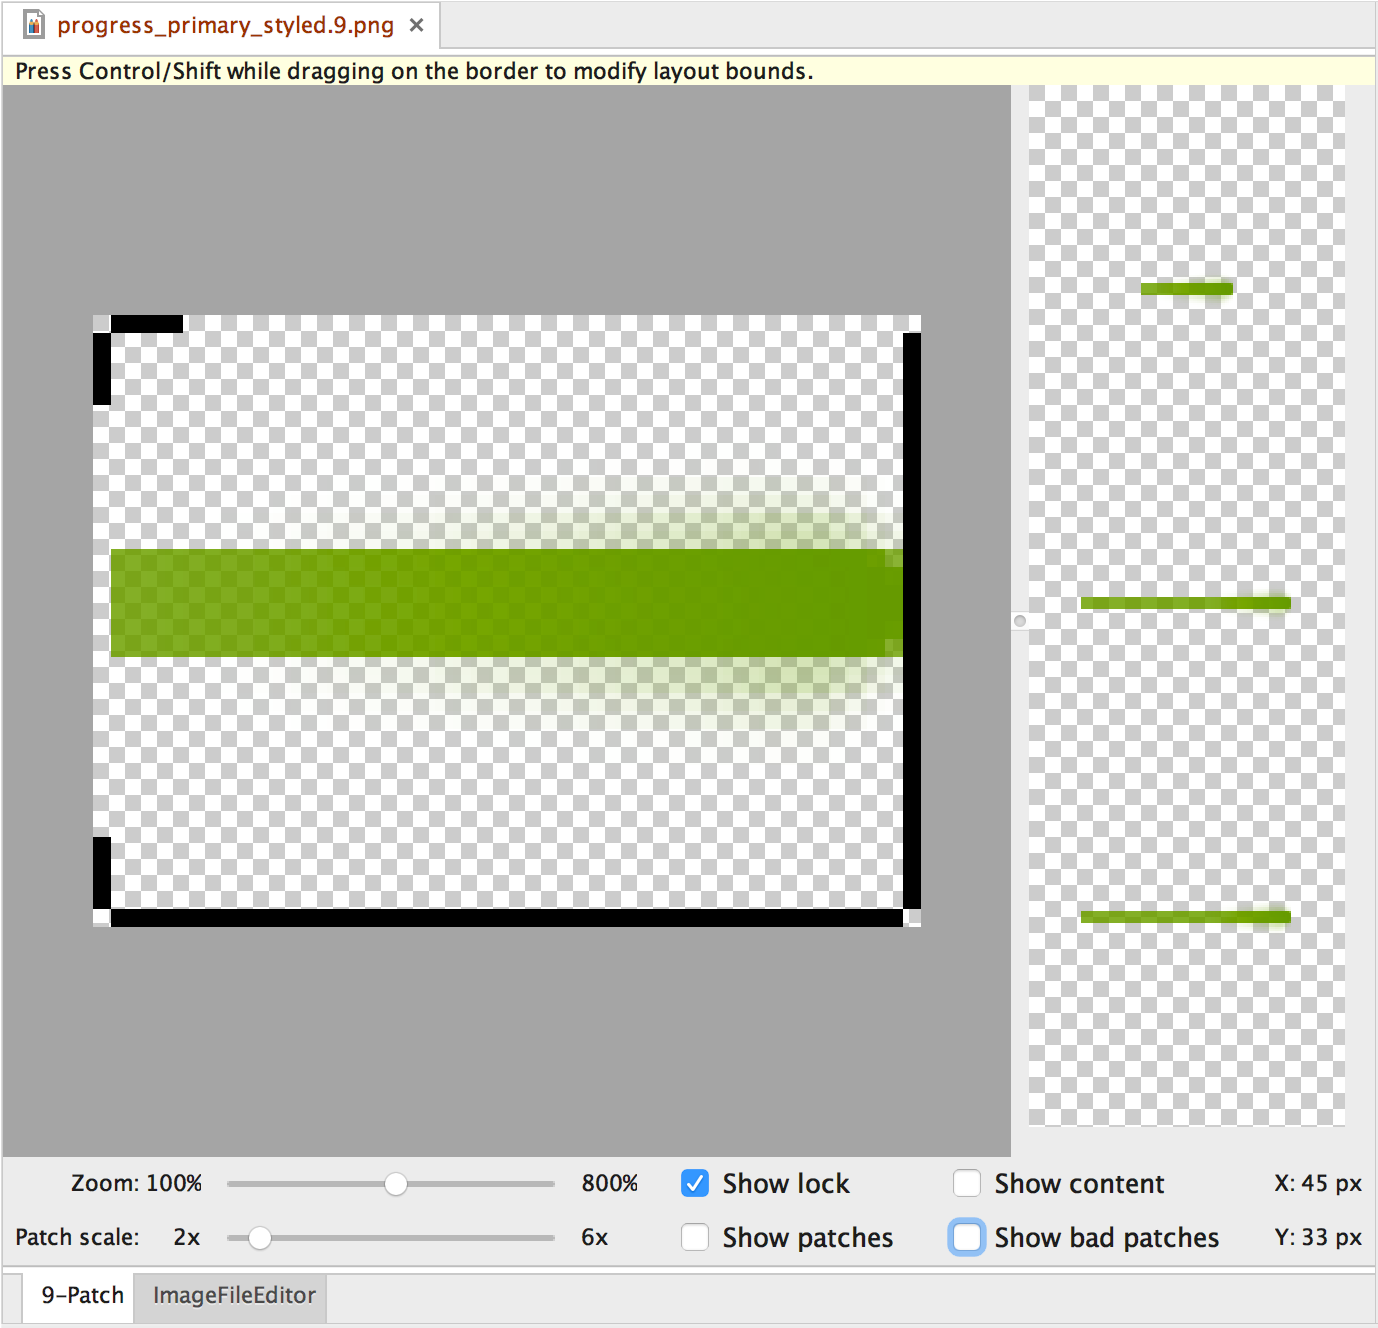
図 1. NinePatch 画像が表示されている Android Studio の Draw 9-patch ツール。
Android Studio の Draw 9-patch ツールを使用して NinePatch グラフィックを作成する手順を次に示します。前提として、NinePatch 画像の作成に使用する PNG 画像が必要です。
- Android Studio で、NinePatch 画像の作成に使用する PNG 画像を右クリックし、[Create 9-patch file] をクリックします。
- NinePatch 画像のファイル名を入力して、[OK] をクリックします。
.9.png
ファイル拡張子が付いた画像ファイルが作成されます。
- 新たに作成した NinePatch ファイルをダブルクリックして、Android Studio で開きます。
表示されるワークスペースの左のペインは描画領域で、伸縮可能なパッチとコンテンツ領域の線を編集できます。右のペインはプレビュー領域で、グラフィックを伸縮したときのプレビューを表示できます。
- 1 ピクセルの外周線内をクリックして、伸縮可能なパッチと(オプションの)コンテンツ領域を定義する線を引きます。
右クリックすると、前に描画した線を消去できます(Mac では Shift キーを押しながらクリックします)。
- 完了したら、[File] > [Save] をクリックして、変更内容を保存します。
Android Studio で既存の NinePatch ファイルを開くには、ファイルをダブルクリックします。
NinePatch グラフィックを適切に縮小するには、伸縮可能な領域のサイズを少なくとも 2x2 ピクセルにする必要があります。そうしないと、縮小したときに領域が表示されなくなる可能性があります。拡大 / 縮小中に補間によって境界線の色が変わることを防ぐには、伸縮可能な領域の周囲のグラフィックに 1 ピクセルの安全余白を設けます。
注: 通常の PNG ファイル(*.png
)は、画像の周囲に 1 ピクセルの空白の枠線が追加された状態で読み込まれます。この枠線の内側に、伸縮可能なパッチとコンテンツ領域を描画できます。前に保存した NinePatch ファイル(*.9.png
)にはすでに描画領域が存在するため、描画領域は追加されず、そのまま読み込まれます。
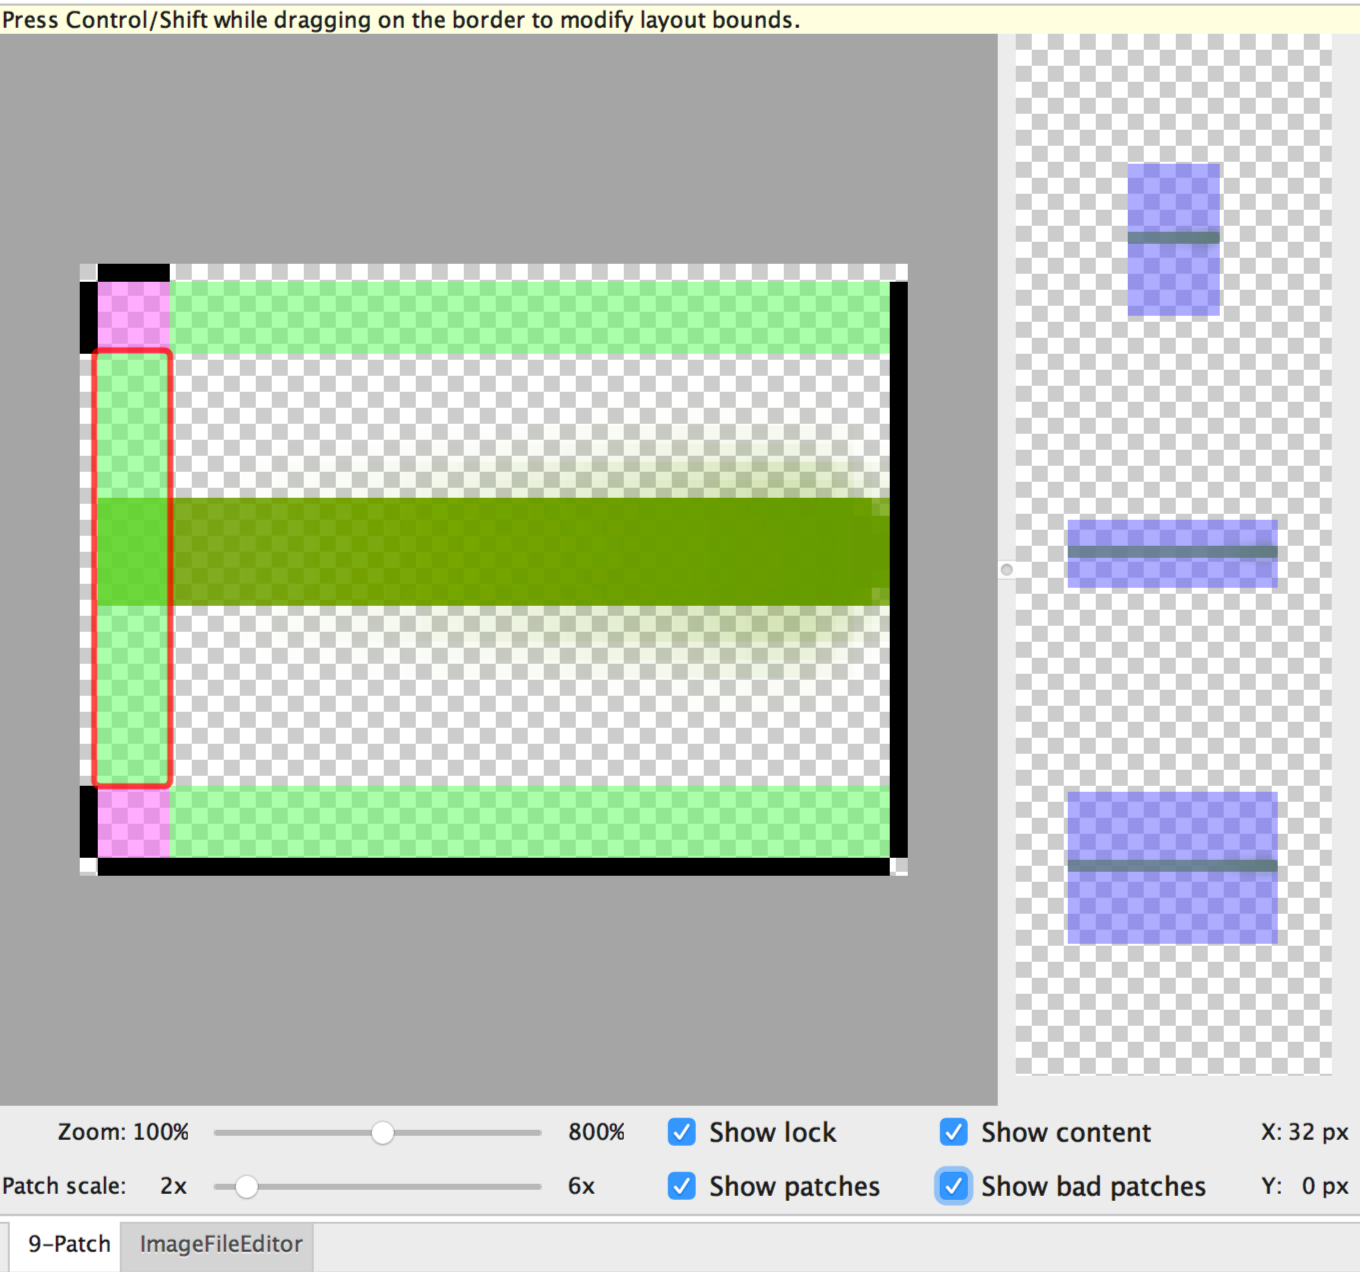
図 2. コンテンツ、パッチ、不適切なパッチが表示されている Android Studio の NinePatch 画像。
オプションのコントロールには次のものがあります。
- Zoom: 描画領域内のグラフィックのズームレベルを調整します。
- Patch scale: プレビュー領域内の画像のスケールを調整します。
- Show lock: マウスオーバーにより、グラフィックの描画不可能領域を視覚化します。
- Show patches: 描画領域内に伸縮可能なパッチのプレビューを表示します。図 2 のように、伸縮可能なパッチがピンク色で示されます。
- Show content: プレビュー画像内のコンテンツ領域をハイライト表示します。図 2 のように、コンテンツを表示できる領域が紫色で示されます。
- Show bad patches: 図 2 のように、伸縮するとグラフィックにアーティファクトが発生する可能性があるパッチ領域の周囲に赤い枠線を追加表示します。不適切なパッチをすべて取り除くと、伸縮した画像が明瞭に見えるようになります。
このページのコンテンツやコードサンプルは、コンテンツ ライセンスに記載のライセンスに従います。Java および OpenJDK は Oracle および関連会社の商標または登録商標です。
最終更新日 2025-07-27 UTC。
[[["わかりやすい","easyToUnderstand","thumb-up"],["問題の解決に役立った","solvedMyProblem","thumb-up"],["その他","otherUp","thumb-up"]],[["必要な情報がない","missingTheInformationINeed","thumb-down"],["複雑すぎる / 手順が多すぎる","tooComplicatedTooManySteps","thumb-down"],["最新ではない","outOfDate","thumb-down"],["翻訳に関する問題","translationIssue","thumb-down"],["サンプル / コードに問題がある","samplesCodeIssue","thumb-down"],["その他","otherDown","thumb-down"]],["最終更新日 2025-07-27 UTC。"],[],[],null,["# Create resizable bitmaps (9-patch files)\n\nThe Draw 9-patch tool is a WYSIWYG editor included in Android Studio. The tool lets you create\nbitmap images that automatically resize to accommodate the contents of the view and the size of\nthe screen. You can scale selected parts of the image horizontally or vertically based on indicators\ndrawn within the image.\n\nFor an introduction to NinePatch graphics and how they work, read\n[NinePatch drawables](/guide/topics/graphics/2d-graphics#nine-patch).\n\n**Figure 1.** Android Studio's\nDraw 9-patch tool displaying a NinePatch image.\n\nFollow these steps to create a NinePatch graphic using the Draw 9-patch tool in Android\nStudio. You'll need the PNG image that you'd like to create a NinePatch image from.\n\n1. In Android Studio, right-click the PNG image you'd like to create a NinePatch image from, then click **Create 9-patch file**.\n2. Enter a filename for your NinePatch image and click **OK** . Your image will be created with the `.9.png` file extension.\n3. Double-click your new NinePatch file to open it in Android Studio. \n\n In the workspace that opens, the left pane is your drawing area, where you can edit\n the lines for the stretchable patches and content area. The right\n pane is the preview area, where you can preview your graphic when stretched.\n4. Click within the 1-pixel perimeter to draw the lines that define the stretchable patches and (optional) the content area. \n\n Right-click to erase\n previously drawn lines (on Mac, hold Shift and click).\n5. When done, click **File** \\\u003e **Save** to save your changes.\n\nTo open an existing NinePatch file in Android\nStudio, double-click the file.\n\nTo make sure that your NinePatch graphics scale down properly, verify that any\nstretchable regions are at least 2x2 pixels in size.\nOtherwise, those regions may disappear when scaled down. To avoid interpolation during scaling\nthat may cause the color at the boundaries to change, provide 1 pixel of extra safe\nspace in the graphics before and after stretchable regions.\n\n**Note:** A normal PNG file (`*.png`) is\nloaded with an empty 1-pixel border added around the image. You can draw\nthe stretchable patches and content area within the border.\nA previously saved NinePatch file (`*.9.png`) is loaded as-is,\nwith no drawing area added because it already exists.\n\n**Figure 2.** A NinePatch image in Android Studio\nshowing content, patches, and bad patches.\n\nOptional controls include:\n\n- **Zoom**: Adjust the zoom level of the graphic in the drawing area.\n- **Patch scale**: Adjust the scale of the images in the preview area.\n- **Show lock**: Visualize the non-drawable area of the graphic on mouse-over.\n- **Show patches**: Preview the pink stretchable patches in the drawing area. Pink indicates a stretchable patch, as shown in figure 2.\n- **Show content**: Highlight the content area in the preview images. Purple indicates the area where content is allowed, as shown in figure 2.\n- **Show bad patches**: Adds a red border around patch areas that may produce artifacts in the graphic when stretched, as shown in figure 2. If you eliminate all bad patches, you will maintain the visual coherence of your stretched image."]]