
1. Before you begin
To create watch faces for Wear OS, developers must use the Watch Face Format, an XML-based format that allows you to create expressive and performant watch faces.
This codelab is aimed at people wishing to either hand-craft watch faces using XML, or at people seeking to better understand the format to help them build their own design tools.
If you want to use graphical tools to create your own watch face, we'd recommend taking a look at existing tools such as Watch Face Studio.
Prerequisites
- Experience with XML.
What you'll do
In this codelab, you will learn:
- How WFF watch faces are packaged
- How create a watch face, including ambient mode
- Adding elements such as shapes
- Incorporating data sources into the watch face
- How to troubleshoot your watch face
You'll build a customizable watch face, with a range of color themes to choose from, built-in step count and date indicator.
What you'll need
- Android Studio Meerkat or later - whilst it is not necessary to use Android Studio directly, this is the easiest way to ensure you've got the Android Build Tools and Platform Tools installed, which will be used.
- Either a Wear OS emulator or a physical Wear OS watch, with developer options enabled.
2. Understanding Watch Face Format project structure
Download the codelab files
To get started, download the codelab files here
$ git clone https://github.com/android/codelab-watch-face-format
Alternatively you can download the repository as a Zip file:
There are two projects In the watch-face-format directory: start and finish. We'll be using the start project, but you can always take a look at the finish project any time you wish, which contains the finished codelab.
Let's inspect the basic structure of the Watch Face Format project. You can either use an editor of your choice, or alternatively open the start project itself in Android Studio using File > Open... and selecting the start directory.
In the start/watchface/src/main directory you'll see the following files, let's take a look at what each one does:
File | Description |
| Just like in a regular Android app, this file contains essential information about the watch face and what is needed to build it. |
| The watch face info file contains meta-data about the watch face, such as how to find the preview image and whether the watch face is customizable. |
| This file contains the definition of the watch face itself. Whilst it is possible to have more than one definition, this is the default file that is used. |
| Every watch face needs a preview image that is used by the system. In order for this project to build, the start/ folder contains a blank preview - we'll update it later |
| These are clock hands which we'll use in our watch face. |
| Just as in an Android app, contains strings that can be used in the watch face. |
Where's the code?
Notice how there is actually no code in the project. Apart from the AndroidManifest.xml file, all the files for the project reside in res/ - the resources directory. This is because Watch Face Format watch faces cannot contain any code: If you try to include Kotlin or Java code, for example, this will not be accepted by the Play Store.
The Wear OS system reads these resources and takes care of building and running your watch face for you. This means there is no need for any runtime or other logic, saving you development effort.
3. Building a watch face
We're going to update each of the files above in order to create a functional watch face.
Preparing the manifest
In order to identify the package as a Watch Face Format watch face, the manifest needs to declare two things:
- That there is no code in the project.
- The Watch Face Format version being used.
First, Update the <application> element to add the hasCode attribute:
<application
    android:label="@string/watch_face_name"
    android:hasCode="false">
Secondly, add a <property> to the <application> element specifying the Watch Face Format version that is used in this watch face:
<property
    android:name="com.google.wear.watchface.format.version"
    android:value="1" />
Defining the watch_face_info file
The watch_face_info.xml file has one mandatory requirement: specifying the location of the preview image. In this project we've supplied a preview image at res/drawable/preview.png. This is a blank file but we'll update it later with an actual screenshot of our finished watch face.
As part of the codelab, we're also going to make our watch face customizable. We declare this as well in the watch_face_info.xml file using the <Editable> element.
Update res/xml/watch_face_info.xml to add the following elements:
<Preview value="@drawable/preview" />
<Editable value="true" />
Writing Watch Face Format XML
The definition of the actual watch face is contained in res/raw/watchface.xml. Inspect this file in your editor. You'll see that the <WatchFace> element defines a width and height for your watch face of 450 by 450. This coordinate space is used throughout the rest of the file, and is used irrespective of the actual pixel dimensions the watch face runs on, scaling up or down accordingly.
The XML is as follows:
<?xml version="1.0"?>
<WatchFace width="450" height="450">
  <Scene>
    <PartText x="0" y="0" width="450" height="450">
      <Text>
        <Font family="SYNC_TO_DEVICE" size="48">Hello, World!</Font>
      </Text>
    </PartText>
  </Scene>
</WatchFace>
For now, this definition is simply going to show "Hello, World!" on the watch - alas, no time yet! - but we'll come back to fix this. Let's look at building the watch face and getting it onto the device.
Building and deploying the watch face
On the command-line, make sure you are in the start directory and issue the command:
./gradlew installDebug
Or on Windows:
gradlew.bat installDebug
This will build the watch face and install it on the device. Long-press on the watch face screen and find the Codelab watch face. Alternatively, to set the watchface from the command-line use:
adb shell am broadcast -a com.google.android.wearable.app.DEBUG_SURFACE --es operation set-watchface --es watchFaceId com.example.codelab
You should now see the watch face on your watch or emulator! Congratulations!

4. Adding the time
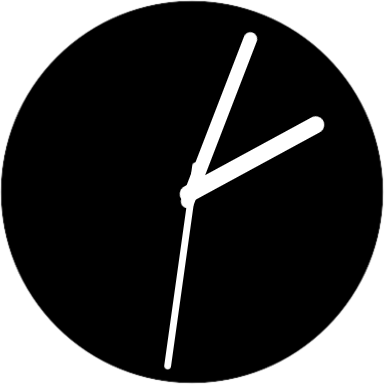
The Watch Face Format supports showing both analog and digital clocks - you can even have both or multiple on a single watch face.
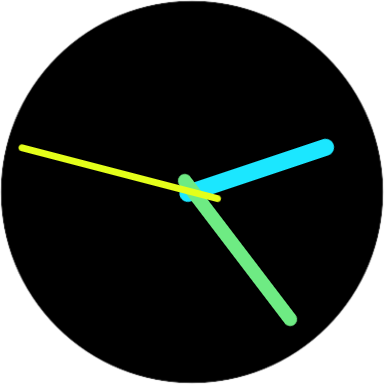
Let's look at how to add an analog clock using the < AnalogClock> element. First, remove the entire < PartText> element from the watchface.xml file and replace it with the following:
<AnalogClock x="0" y="0" width="450" height="450">
  <!-- TODO: Add shadows here later -->
  <HourHand resource="hour"
      x="215" y="50" width="20" height="190"
      pivotX="0.5" pivotY="0.921" >
  </HourHand>
  <MinuteHand resource="minute"
      x="217" y="25" width="16" height="220"
      pivotX="0.5" pivotY="0.9">
  </MinuteHand>
  <SecondHand resource="second"
      x="221" y="15" width="8" height="245"
      pivotX="0.5" pivotY="0.857">
    <Variant mode="AMBIENT" target="alpha" value="0" />
    <Sweep frequency="15" />
  </SecondHand>
</AnalogClock>
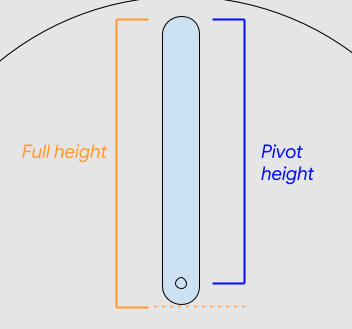
The <AnalogClock> element has height and width of 450 - so it is taking up the whole screen. It also has three child elements: < HourHand>, < MinuteHand> and < SecondHand>. Notice the following about how these are defined:
- Resource: Each of these child elements has a resource attribute, which corresponds to a drawable asset. For example, there is a
hour.pngfile inres/drawable, which is used by the<HourHand>element. Note how there is no need to specify@drawable. - Pivots: The hands are automatically rotated, but the
pivotXandpivotYspecify where the pivot should take place.pivotY, as an example, is calculated as follows:

- Variant: The
<SecondHand>includes a<Variant>child element - this hides the second hand as the watch face will only update every minute when it is in ambient mode.
Now run the following to rebuild and deploy the watch face to your device or emulator:
./gradlew installDebug
This time, we've a working clock, though there's still much we can do to improve it!
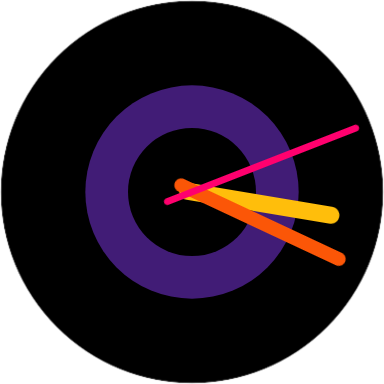
5. Adding color and theming
Part of what makes watch faces fun is the ability to personalize them and make them expressive.
Our watch face is a bit plain at the moment - it's all white - so let's introduce some color! Not only this, let's make the color themes customizable.
Creating the ColorConfiguration
First we'll define the color themes that will be available in the watch face. In watchface.xml find the text <!-- TODO: Add UserConfigurations here --> and replace it with:
<UserConfigurations>
  <ColorConfiguration id="themeColor" displayName="color_label" defaultValue="0">
    <ColorOption id="0" displayName="color_theme_0" colors="#ffbe0b #fb5607 #ff006e #8338ec #883c3c3c" />
    <ColorOption id="1" displayName="color_theme_1" colors="#8ecae6 #219ebc #ffb703 #fb8500 #883c3c3c" />
    <ColorOption id="2" displayName="color_theme_2" colors="#ff595e #ffca3a #8ac926 #1982c4 #883c3c3c" />
    <ColorOption id="3" displayName="color_theme_3" colors="#ff0000 #00ff00 #ff00ff #00ffff #883c3c3c" />
    <ColorOption id="4" displayName="color_theme_4" colors="#ff99c8 #fcf6bd #d0f4de #a9def9 #883c3c3c" />
    <ColorOption id="5" displayName="color_theme_5" colors="#1be7ff #6eeb83 #e4ff1a #ffb800 #883c3c3c" />
  </ColorConfiguration>
</UserConfigurations>
This defines 6 color themes with each theme containing 5 colors. Each theme is a space-separated list of colors, as shown in the colors attribute.
Each of the themes will need a human-friendly name so add the following definitions to the res/values/strings.xml file:
<string name="color_label">Color Theme</string>
<string name="color_theme_0">Bold</string>
<string name="color_theme_1">Magic</string>
<string name="color_theme_2">Breeze</string>
<string name="color_theme_3">Daytime</string>
<string name="color_theme_4">Relaxed</string>
<string name="color_theme_5">Smart</string>
Using the ColorConfiguration
Having defined the color themes, apply them to the watch hands by adding a tintColor attribute to each of them. Modify watchface.xml as it follows:
<HourHand ... tintColor="[CONFIGURATION.themeColor.0]">
...
<MinuteHand ... tintColor="[CONFIGURATION.themeColor.1]">
...
<SecondHand ... tintColor="[CONFIGURATION.themeColor.2]">
The <HourHand> references the first color in the selected theme, the <MinuteHand> the second color and the <SecondHand> the third.
Re-build and deploy the watch face, as before and you'll see it is now in color!

Not only that, but if you long-press on the watch face and tap the settings button, you can select from your 6 color themes!
6. Adding a background color
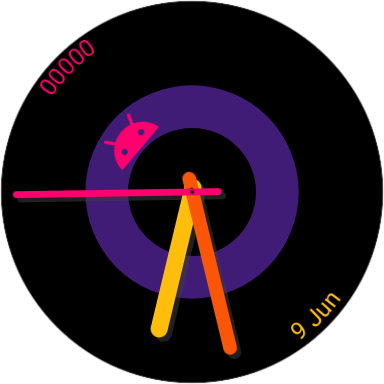
There are a few more things we can do to make this watch face stand out. Let's add a bold background design. Whilst the background will remain predominantly black, this splash of color will help elevate the look.
We'll make use of the Watch Face Format < PartDraw> element which allows you to create a layer for drawing primitives such as lines, rectangles, ovals and arcs. Replace the text: <!-- TODO: Add the background design here --> with the following:
<Group x="100" y="100" width="250" height="250" name="background" alpha="127">
  <Variant mode="AMBIENT" target="alpha" value="0" />
  <PartDraw x="0" y="0" width="250" height="250">
    <Ellipse x="0" y="0" width="250" height="250">
      <Fill color="[CONFIGURATION.themeColor.3]" />
    </Ellipse>
    <Ellipse x="50" y="50" width="150" height="150">
      <Fill color="#000000" />
    </Ellipse>
  </PartDraw>
</Group>
Notice the use of the <Variant> element again: This will remove our background ring when in ambient mode, to minimize the number of pixels lit.
Notice also how we're using the color theme again to select the color of the ring, so keeping the styling across all the elements of the watch face.
7. Validating your watch face
Before we go any further in enhancing the watch face, let's explore how to streamline the development process through the use of the Watch Face Format validator.
The validator is a tool that checks your XML for correctness, saving you time in building and deploying a watch face only to find it doesn't work.
- Download the validator JAR file from the GitHub repository.
- Run the validator against your
watchface.xmlfile
java -jar wff-validator.jar 1 watchface/src/main/res/raw/watchface.xml
If the watch face XML is valid, you'll see a confirmation message, however, if an error is found, details of the error and the location will be displayed, for example:
SEVERE: [Line 18:Column 49]: cvc-complex-type.2.4.a: Invalid content was found starting with element 'PartDrw'
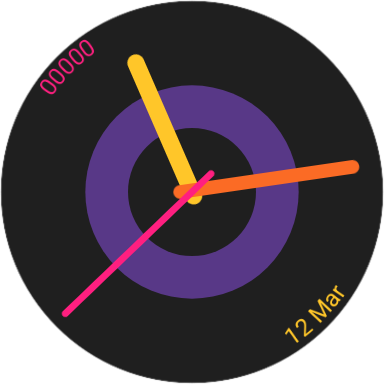
8. Using data sources
The Watch Face Format can make use of a range of different data sources to make your watch face more useful.
Let's add two commonly-used data sources that help give your watch face more utility: The current date (who hasn't forgotten the date before?), and your daily step count.
Each of these elements is placed in a < PartText> container, which is a layer for performing text operations.
Adding the date
Replace the <!-- TODO: Add the date/time element here --> text with the following:
<PartText x="225" y="225" width="225" height="225">
  <Variant mode="AMBIENT" target="alpha" value="0" />
  <TextCircular centerX="0" centerY="0" width="415" height="415" startAngle="180" endAngle="90" align="CENTER" direction="COUNTER_CLOCKWISE">
    <Font family="SYNC_TO_DEVICE" size="28" color="[CONFIGURATION.themeColor.0]">
      <Template>
        <![CDATA[%d %s]]>
        <Parameter expression="[DAY]"/>
        <Parameter expression="[MONTH_S]"/>
      </Template>
    </Font>
  </TextCircular>
</PartText>
In the above snippet, we're making use of < Template> to format two data sources into a string. DAY is an integer from 1-31 and MONTH_S is already a string, so we use the formatting expression %d %s to place the integer and string together.
Surrounding this with a CDATA element is good practice as it avoids whitespace being accidentally incorporated in the rendering, which can affect the positioning and alignment.
Finally, notice again how we've used the color theme again to ensure that this latest addition to the watch face maintains the existing theme.
Adding the step count
Replace the <!-- TODO: Add the step count element here --> text with the following:
<PartText x="0" y="0" width="225" height="225">
  <Variant mode="AMBIENT" target="alpha" value="0" />
  <TextCircular centerX="225" centerY="225" width="415" height="415" startAngle="270" endAngle="360" align="CENTER" direction="CLOCKWISE">
    <Font family="SYNC_TO_DEVICE" size="28" color="[CONFIGURATION.themeColor.2]">
      <Template>
        <![CDATA[%05d]]>
        <Parameter expression="[STEP_COUNT]"/>
      </Template>
    </Font>
  </TextCircular>
</PartText>
The Watch Face Format supports a whole range of different data sources, and the step count is a great addition to any watch face, letting the user keep track of their daily movement and exercise.
Build and deploy the watch face to check these latest additions:
9. Finishing touches and preview
Attention to detail is everything with watch faces, so let's add a couple of additional final flourishes.
Adding shadow to the watch face
The hands of the watch face work well together in their different colors, but they look a bit flat against the watch face. Replace <!-- TODO: Add shadows here later --> with the following, to add shadows behind the watch hands:
<HourHand resource="hour" x="220" y="55" width="20" height="190"
    pivotX="0.5" pivotY="0.921" tintColor="[CONFIGURATION.themeColor.4]">
  <Variant mode="AMBIENT" target="alpha" value="0" />
</HourHand>
<MinuteHand resource="minute" x="222" y="30" width="16" height="220"
    pivotX="0.5" pivotY="0.9" tintColor="[CONFIGURATION.themeColor.4]">
  <Variant mode="AMBIENT" target="alpha" value="0" />
</MinuteHand>
<SecondHand resource="second" x="226" y="20" width="8" height="245"
    pivotX="0.5" pivotY="0.857" tintColor="[CONFIGURATION.themeColor.4]">
  <Variant mode="AMBIENT" target="alpha" value="0" />
  <Sweep frequency="15" />
</SecondHand>
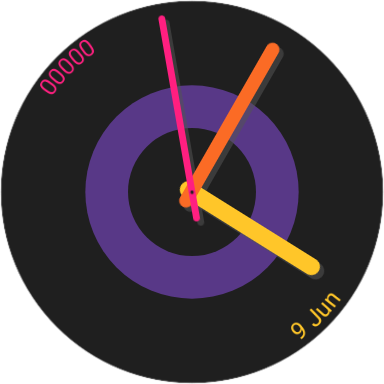
Adding a playful logo
Every well-known watch manufacturer has their logo on their watch faces, so let's add our own! Naturally, let's use the Android logo!
However, seeing as this is a smartwatch, let's do something different and add a logo that can move in response to the angle of the wearer's wrist.
To do this, we're going to place our image inside a < Group> element, and then use a < Transform> element to apply a rotation to the <Group> element, based on the angle of the wrist. Our structure will look like this:
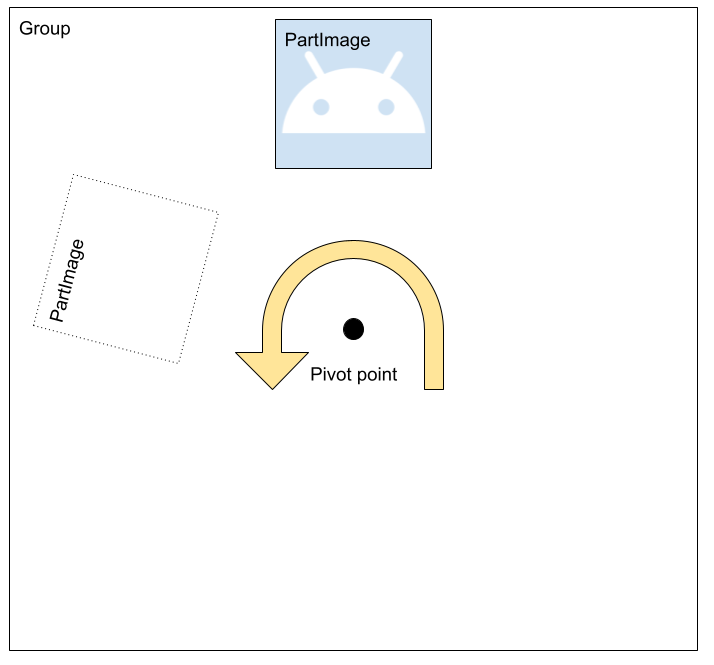
The default pivot point for an element is in the center, so we don't need to adjust the pivotX and pivotY of the <Group>. Applying a <Transform> to the <Group> will rotate the <PartImage> around that central pivot point.
In the <Transform> we use the [ ACCELEROMETER_ANGLE_XY] data source, which represents the sum of the angles in the X and Y direction.
Replace <!-- TODO: Add the Android logo --> with the following snippet:
<Group x="92" y="92" width="266" height="266" name="logo_container">
  <Variant mode="AMBIENT" target="alpha" value="0" />
  <Transform target="angle" mode="BY" value="0.1 * [ACCELEROMETER_ANGLE_XY]" />
  <PartImage x="97" y="0" width="72" height="72"
    tintColor="[CONFIGURATION.themeColor.2]">
    <Image resource="android"/>
  </PartImage>
</Group>
Redeploy your watch face. If you're using a physical device, put it on and move your wrist around to see the Android logo move! If you are using an emulator, open the extended emulator controls and manipulate the X and Y angles in the virtual sensors.
Updating the preview
Remember at the beginning of the codelab we saw that there is a preview.png file, which is used by the system to show a preview of the watch face? Let's now update this to better reflect our finished watch face!
The easiest way to generate a screenshot is using the emulator. With your watch face running, click the screenshot button:
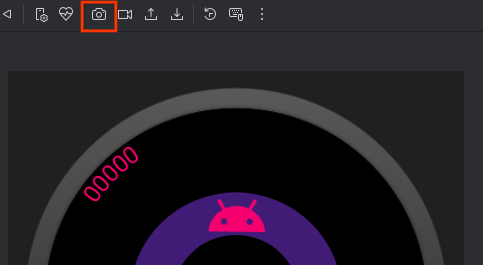
Ensure that the capture is set to Display Shape:
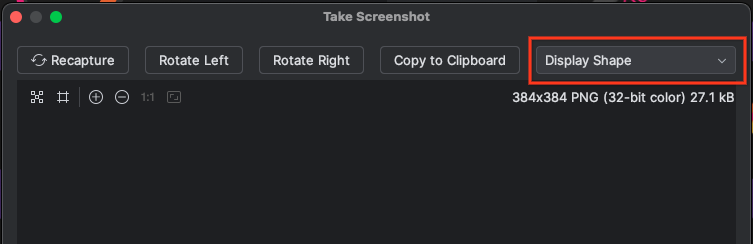
Save the image and replace the res/drawable/preview.png file with this new image. Re-build and deploy your watch face as before.
10. Congratulations
Congratulations! You learned the basics of creating a watch face with the Watch Face Format!
Solution to the codelab
You can get the code for the solution of this codelab from GitHub:
$ git clone https://github.com/android/codelab-watch-face-format
Alternatively you can download the repository as a Zip file:
What's next?
There's a lot more you can do with the Watch Face Format. Here are some suggestions of where to go next:
Enhancing your watch face
- Bring additional data to your watch face by adding Complications
- Consider a digital watch face instead of an analog one.
- Explore further features of the format.
Getting ready to publish
- Take a look at the Memory Footprint tool - this analyzes the memory usage of your watch face and is an essential tool to use before uploading your watch face to Google Play!