
1. Before you begin
This practical codelab will teach you the basics of developing for dual-screen and foldable devices. When you're finished, the app can support foldable devices like Pixel Fold, Microsoft Surface Duo, Samsung Galaxy Z Fold 5, etc.
Prerequisites
To complete this codelab, you need:
- Experience building Android apps
- Experience with Activities, Fragments, View binding, and xml-layouts
What you'll do
Create a simple app that:
- Displays the device features
- Detects when the application is running on a foldable or dual-screen device
- Determines the device state
- Uses Jetpack WindowManager to work with new form factor devices.
What you'll need
- Android Studio Arctic Fox or higher
- A foldable device or emulator
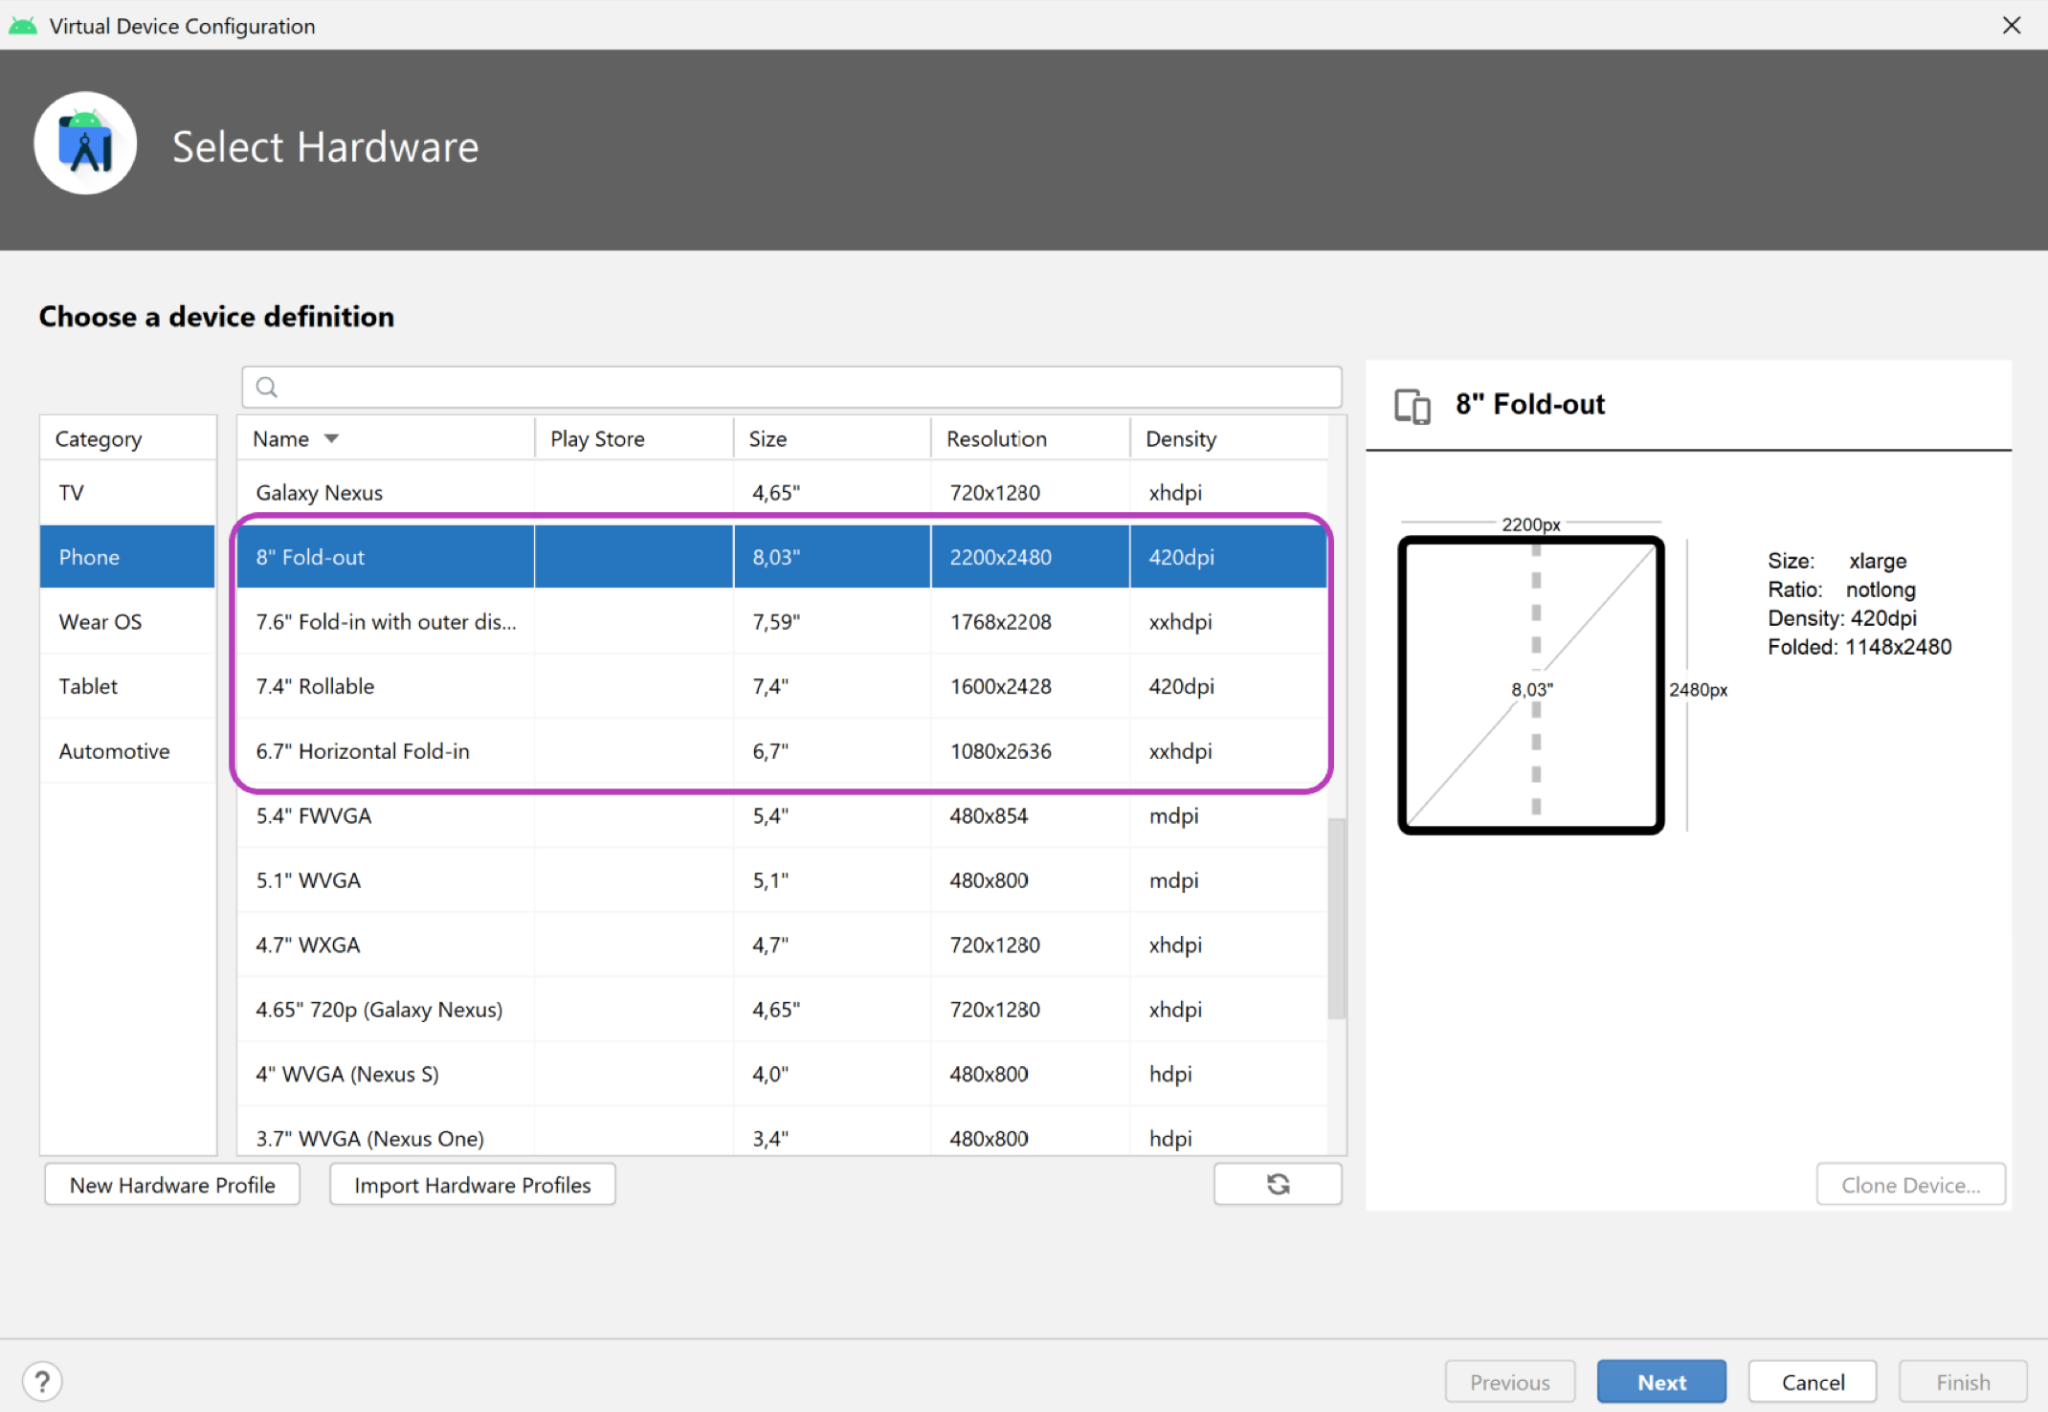
The Android Emulator v30.0.6+ includes foldables support with virtual hinge sensor and 3D view. There are a few foldable emulators you can use, as shown in the image below:
- If you want to use a dual screen emulator, you can download the Microsoft Surface Duo emulator for your platform (Windows, MacOS or GNU/Linux).
2. Single screen devices vs foldable devices
Foldable devices offer users a bigger screen and more versatile user interface than previously available in a mobile device. When folded, these devices are often smaller than a common-size tablet, making them more portable and functional.
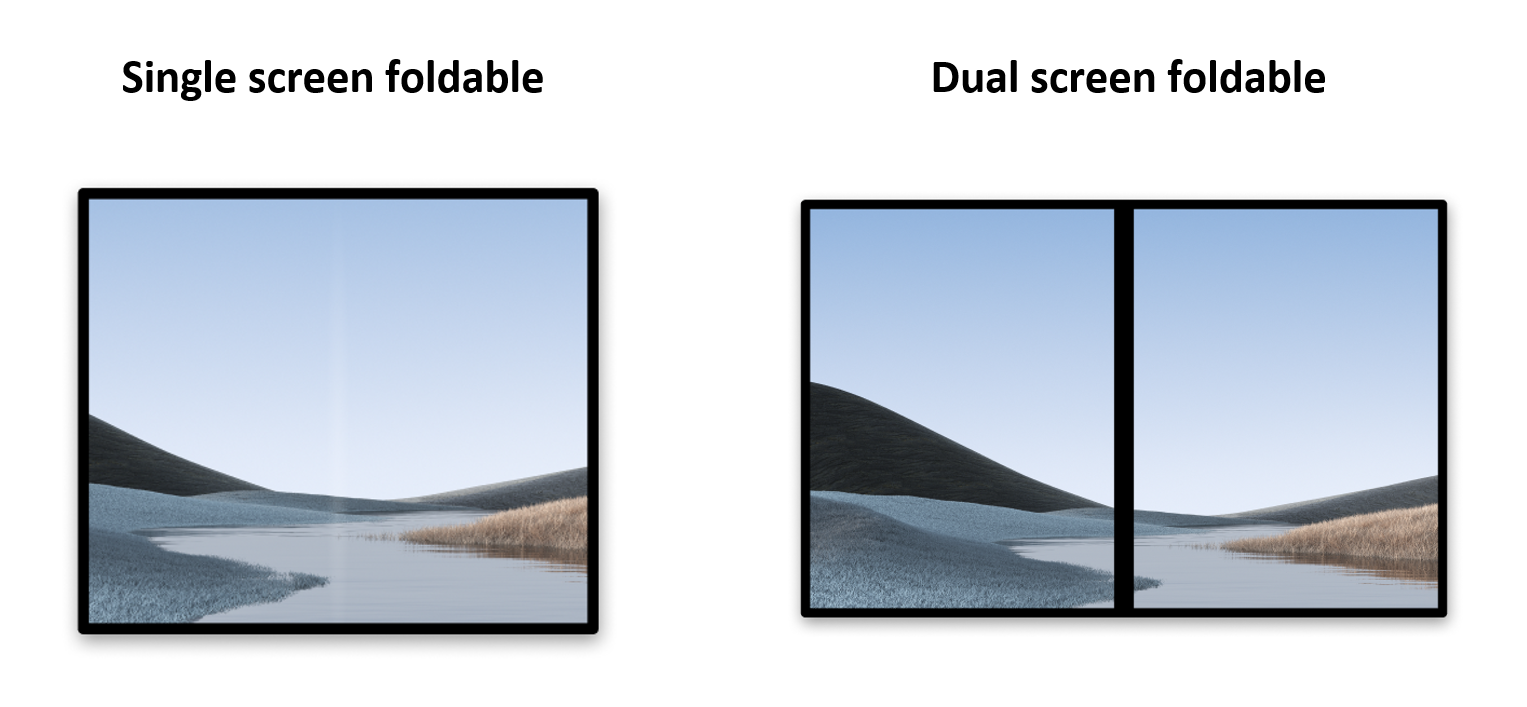
At the time of this writing, there are two types of foldable devices:
- Single-screen foldable devices, with one screen that can be folded. Users can run multiple apps on the same screen at the same time using
multi-windowmode. - Dual-screen foldable devices, with two screens joined by a hinge. These devices can be folded as well, but they have two different logical display regions.
Like tablets and other single screen mobile devices, foldables can:
- Run one app in one of the display regions.
- Run two apps side by side, each one on a different display region (using
multi-windowmode).
Unlike single screen devices, foldable devices also support different postures. Postures can be used to display content in different ways.
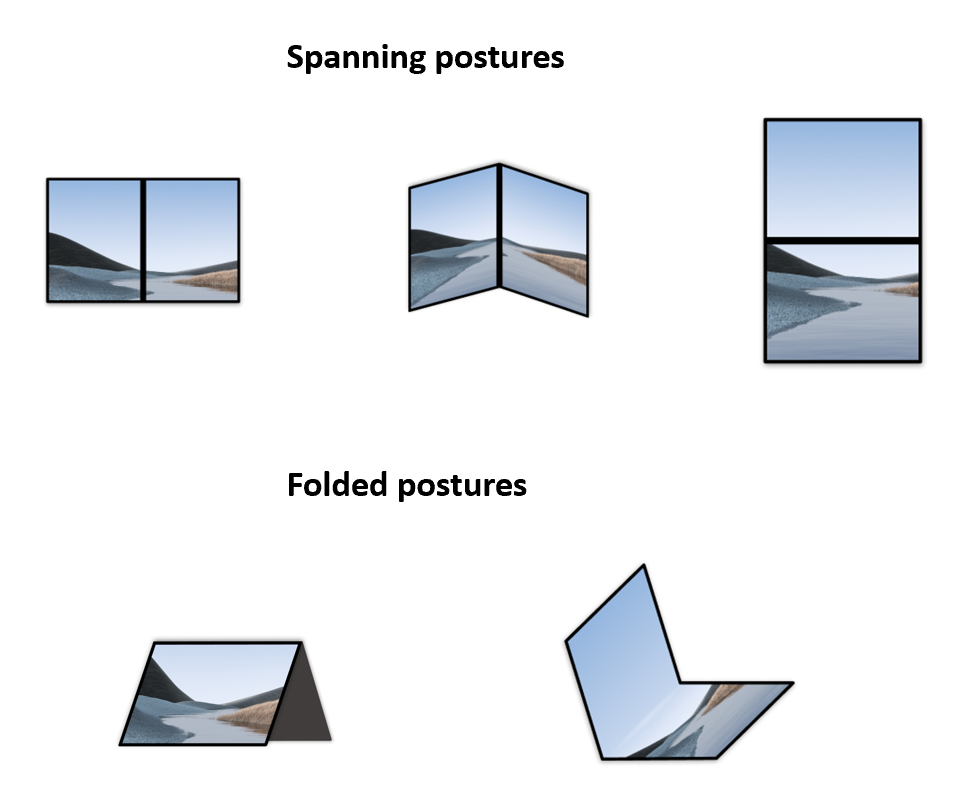
Foldable devices can offer different spanning postures when an app is spanned (displayed) across the whole display region (using all display regions on dual-screen foldable devices).
Foldable devices can also offer folded postures, like tabletop mode, so you can have a logical split between the part of the screen that's flat and the part that's tilted towards you, and tent mode, so you can visualize the content as if the device was using a stand gadget.
3. Jetpack WindowManager
The Jetpack WindowManager library helps application developers support new device form factors and provides a common API surface for various WindowManager features on both old and new platform versions.
Key features
Jetpack WindowManager version 1.5.1 contains the FoldingFeature class that describes a fold in a flexible display or a hinge between two physical display panels. Its API provides access to important information related to the device:
state(): Provides the current posture of the device from a list of defined postures (FLATandHALF_OPENED)isSeparating(): Calculates if aFoldingFeatureshould be thought of as splitting the window into multiple physical areas that can be seen by users as logically separateocclusionType(): Calculates the occlusion mode to determine if aFoldingFeatureoccludes a part of the window.orientation(): ReturnsFoldingFeature.Orientation.HORIZONTALif theFoldingFeaturewidth is greater than the height; otherwise, returnsFoldingFeature.Orientation.VERTICAL.bounds(): Provides aRectinstance that contains the boundaries of the device feature, for example, the boundaries of a physical hinge.
Using the WindowInfoTracker interface you can access windowLayoutInfo() to collect a Flow of WindowLayoutInfo that contains all the available DisplayFeatures.
4. Set up
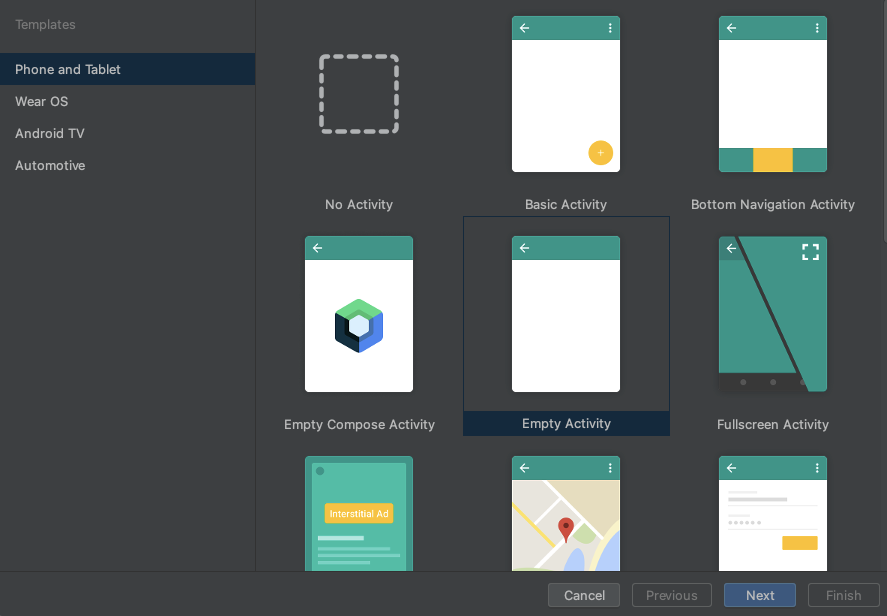
Create a new project and select the "Empty Activity" template:
Leave all the parameters as their default.
Declare dependencies
In order to use Jetpack WindowManager, add the dependency in the build.gradle file for app or module:
app/build.gradle
dependencies {
    ext.windowmanager_version = "1.5.1"

    implementation "androidx.window:window:$windowmanager_version"
    androidTestImplementation "androidx.window:window-testing:$windowmanager_version"

    // Needed to use lifecycleScope to collect the WindowLayoutInfo flow
    implementation "androidx.lifecycle:lifecycle-runtime-ktx:2.6.2"
}
Use WindowManager
Window features can be accessed via WindowManager's WindowInfoTracker interface.
Open the MainActivity.kt source file and call WindowInfoTracker.getOrCreate(this@MainActivity) to initialize the WindowInfoTracker instance associated with the current activity:
MainActivity.kt
import androidx.window.layout.WindowInfoTracker

private lateinit var windowInfoTracker: WindowInfoTracker

override fun onCreate(savedInstanceState: Bundle?) {
        super.onCreate(savedInstanceState)

        windowInfoTracker = WindowInfoTracker.getOrCreate(this@MainActivity)
}
With the WindowInfoTracker instance, get the information about the current window state of the device.
5. Set up the application UI
From Jetpack WindowManager, get information about window metrics, layout, and display configuration. Show this in the main activity layout, using a TextView for each of these.
Create a ConstraintLayout, with three TextViews, centered on screen.
Open the activity_main.xml file and paste the following content:
activity_main.xml
<?xml version="1.0" encoding="utf-8"?>
<androidx.constraintlayout.widget.ConstraintLayout xmlns:android="http://schemas.android.com/apk/res/android"
   xmlns:app="http://schemas.android.com/apk/res-auto"
   xmlns:tools="http://schemas.android.com/tools"
   android:id="@+id/constraint_layout"
   android:layout_width="match_parent"
   android:layout_height="match_parent"
   tools:context=".MainActivity">

    <TextView
        android:id="@+id/window_metrics"
        android:layout_width="wrap_content"
        android:layout_height="wrap_content"
        android:padding="20dp"
        tools:text="Window metrics"
        android:textSize="20sp"
        app:layout_constraintBottom_toTopOf="@+id/layout_change"
        app:layout_constraintStart_toStartOf="parent"
        app:layout_constraintTop_toTopOf="parent"
        app:layout_constraintVertical_chainStyle="packed" />

    <TextView
        android:id="@+id/layout_change"
        android:layout_width="wrap_content"
        android:layout_height="wrap_content"
        android:padding="20dp"
        tools:text="Layout change"
        android:textSize="20sp"
        app:layout_constrainedWidth="true"
        app:layout_constraintBottom_toTopOf="@+id/configuration_changed"
        app:layout_constraintStart_toStartOf="parent"
        app:layout_constraintTop_toBottomOf="@+id/window_metrics" />

    <TextView
        android:id="@+id/configuration_changed"
        android:layout_width="wrap_content"
        android:layout_height="wrap_content"
        android:padding="20dp"
        tools:text="Using one logic/physical display - unspanned"
        android:textSize="20sp"
        app:layout_constraintBottom_toBottomOf="parent"
        app:layout_constraintStart_toStartOf="parent"
        app:layout_constraintTop_toBottomOf="@+id/layout_change" />

</androidx.constraintlayout.widget.ConstraintLayout>
We are now going to connect these UI elements in the code using view binding. To do this we start enabling it in the application's build.gradle file:
app/build.gradle
android {
   // Other configurations

   buildFeatures {
      viewBinding true
   }
}
Sync the gradle project as suggested by Android Studio and use view binding in MainActivity.kt using the following code:
MainActivity.kt
class MainActivity : AppCompatActivity() {
    private lateinit var windowInfoTracker: WindowInfoTracker
    private lateinit var binding: ActivityMainBinding

    override fun onCreate(savedInstanceState: Bundle?) {
        super.onCreate(savedInstanceState)
        binding = ActivityMainBinding.inflate(layoutInflater)
        setContentView(binding.root)

        windowInfoTracker = WindowInfoTracker.getOrCreate(this@MainActivity)
    }
}
6. Visualize the WindowMetrics information
In the onCreate method of the MainActivity, call a function to get and show the WindowMetrics information. Add an obtainWindowMetrics()call in the onCreate method:
MainActivity.kt
override fun onCreate(savedInstanceState: Bundle?) {
   super.onCreate(savedInstanceState)
   binding = ActivityMainBinding.inflate(layoutInflater)
   setContentView(binding.root)

   windowInfoTracker = WindowInfoTracker.getOrCreate(this@MainActivity)

   obtainWindowMetrics()
}
Implement the obtainWindowMetrics method:
MainActivity.kt
import androidx.window.layout.WindowMetricsCalculator

private fun obtainWindowMetrics() {
   val wmc = WindowMetricsCalculator.getOrCreate()
   val currentWM = wmc.computeCurrentWindowMetrics(this).bounds.flattenToString()
   val maximumWM = wmc.computeMaximumWindowMetrics(this).bounds.flattenToString()
   binding.windowMetrics.text =
       "CurrentWindowMetrics: ${currentWM}\nMaximumWindowMetrics: ${maximumWM}"
}
Get an instance of WindowMetricsCalculator through its companion function getOrCreate().
Using that WindowMetricsCalculator instance, set the information into the windowMetrics TextView. Use the values that the functions computeCurrentWindowMetrics.bounds and computeMaximumWindowMetrics.bounds return.
These values provide useful information about the metrics of the area the window occupies.
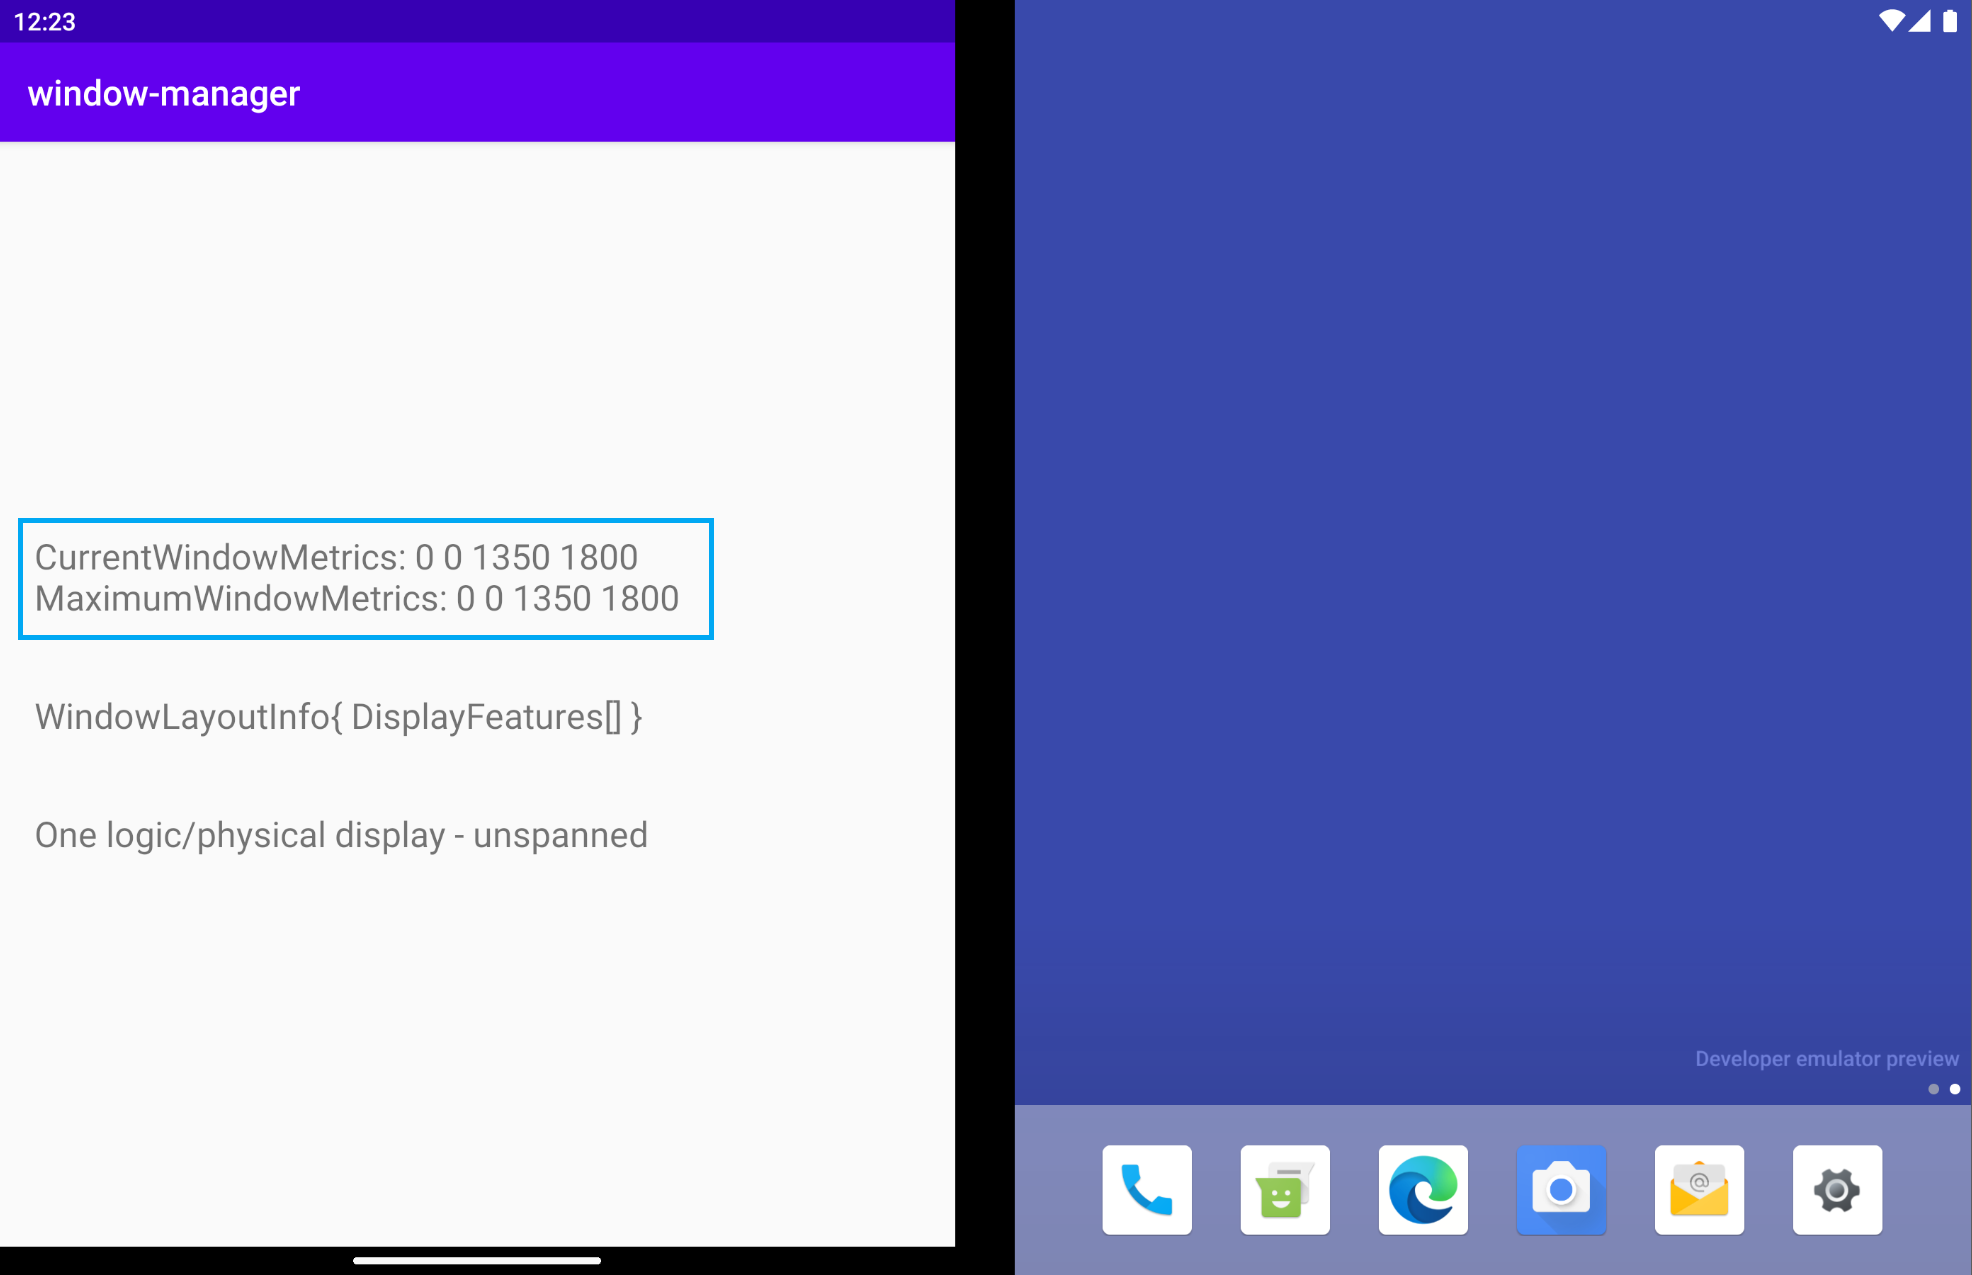
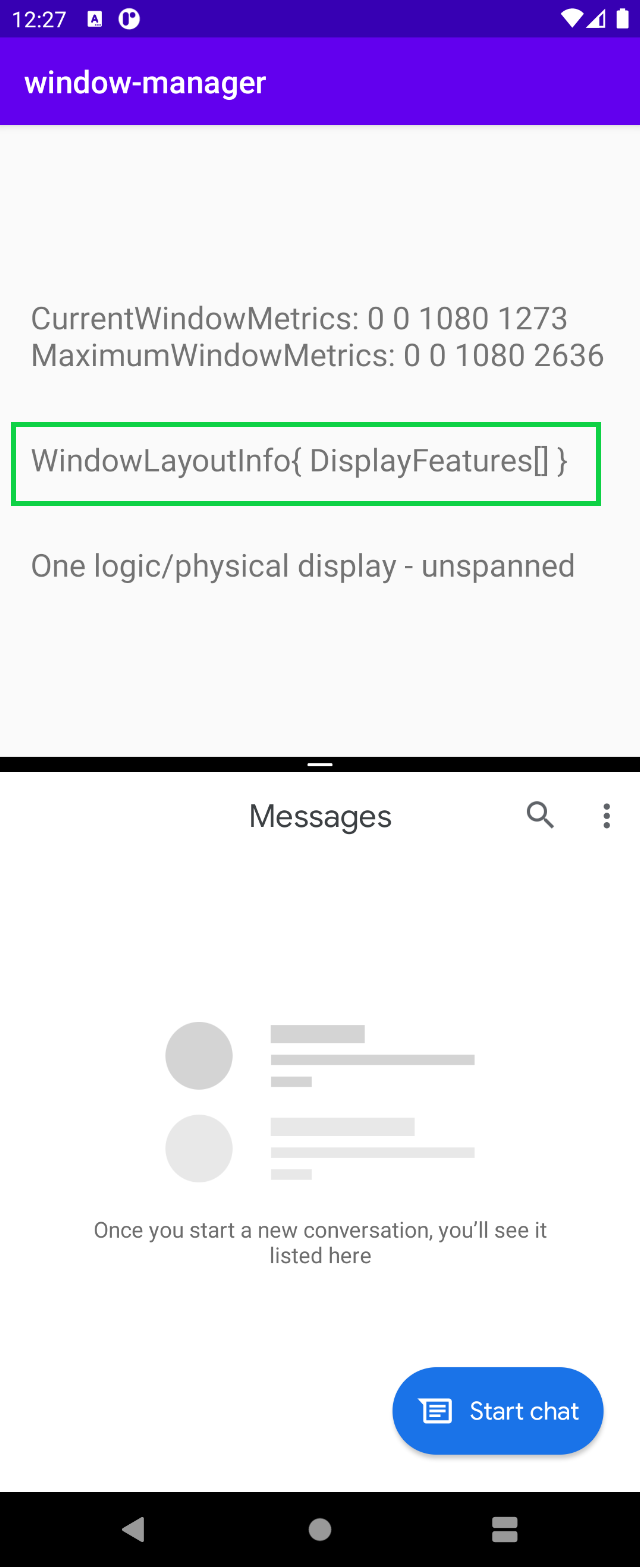
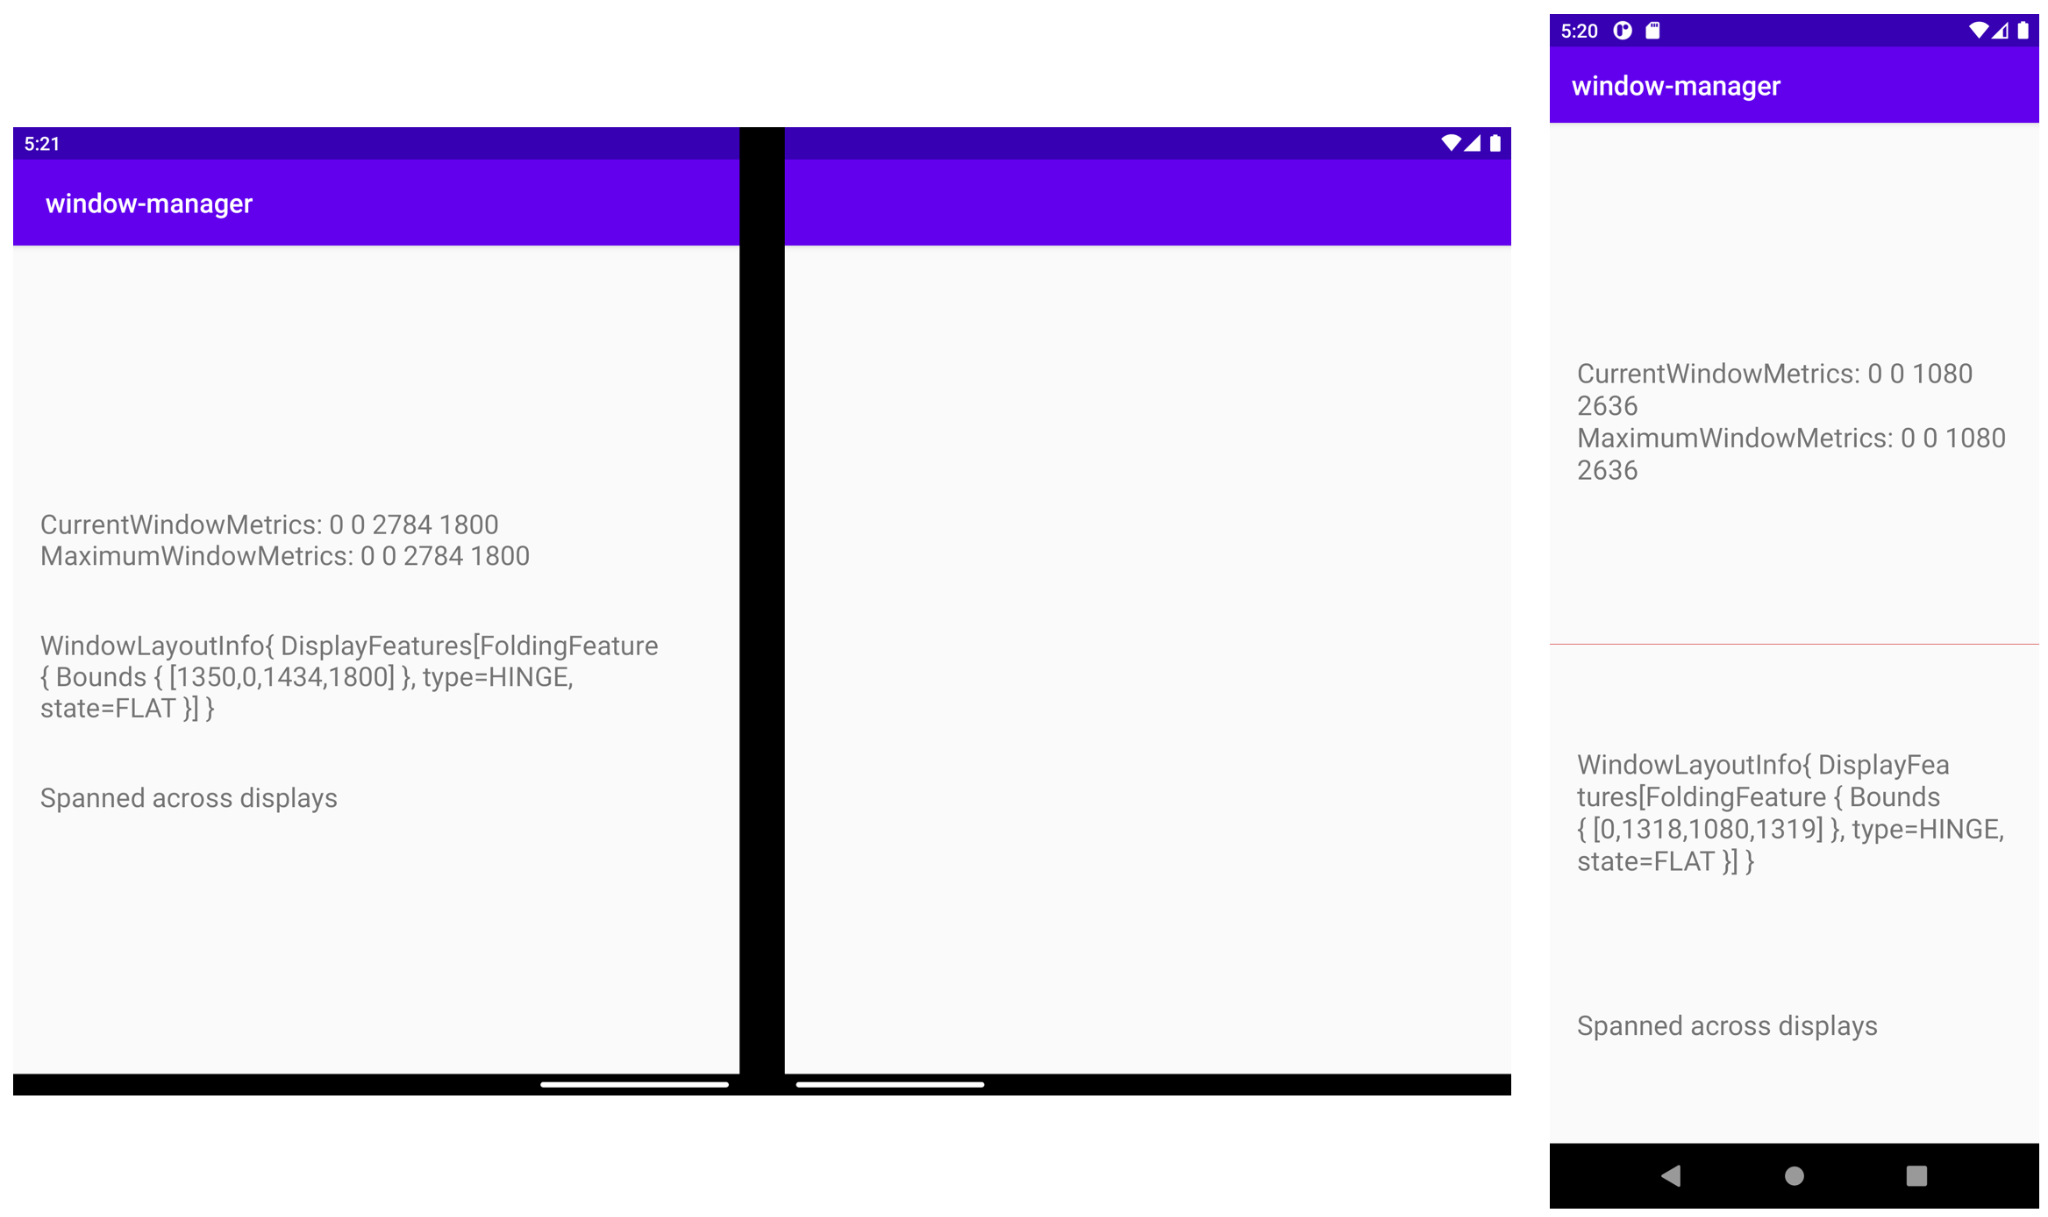
Run the app. In a dual-screen emulator (pictured below), you get the CurrentWindowMetrics that fit with the dimensions of the device that emulator mirrors. You can also see the metrics when the app runs in single-screen mode:
When the app is spanned across displays, the window metrics change like in the image below, so they now reflect the bigger window area used by the app:
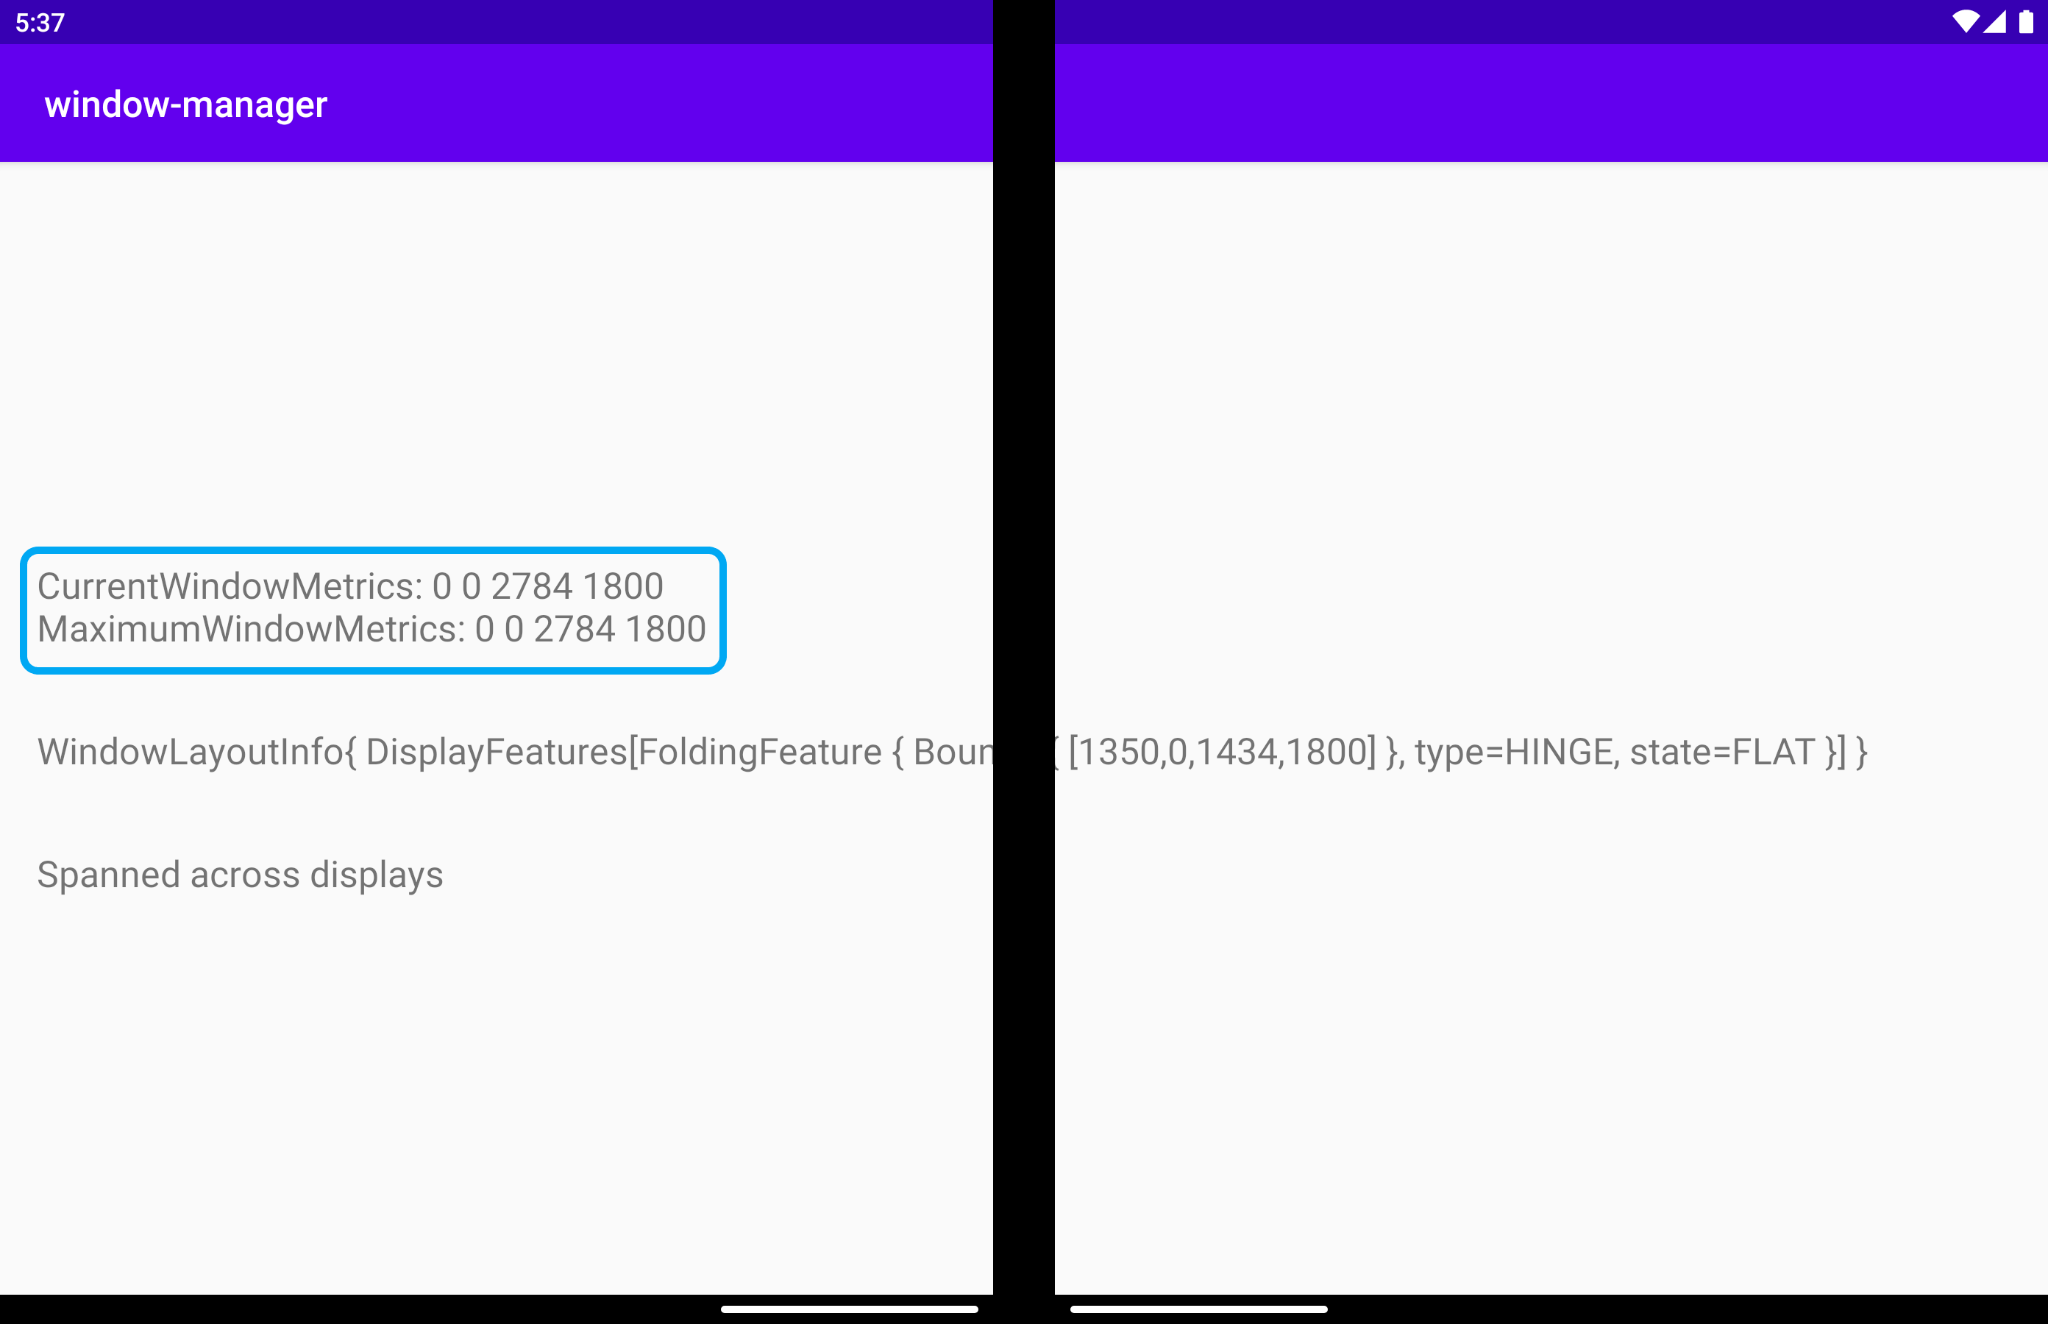
Both the current and maximum window metrics have the same values, since the app is always running and taking the whole available display area, both on single and dual screens.
In a foldable emulator with a horizontal fold the values differ when the app spans the entire physical display and when the app runs in multi-window mode:
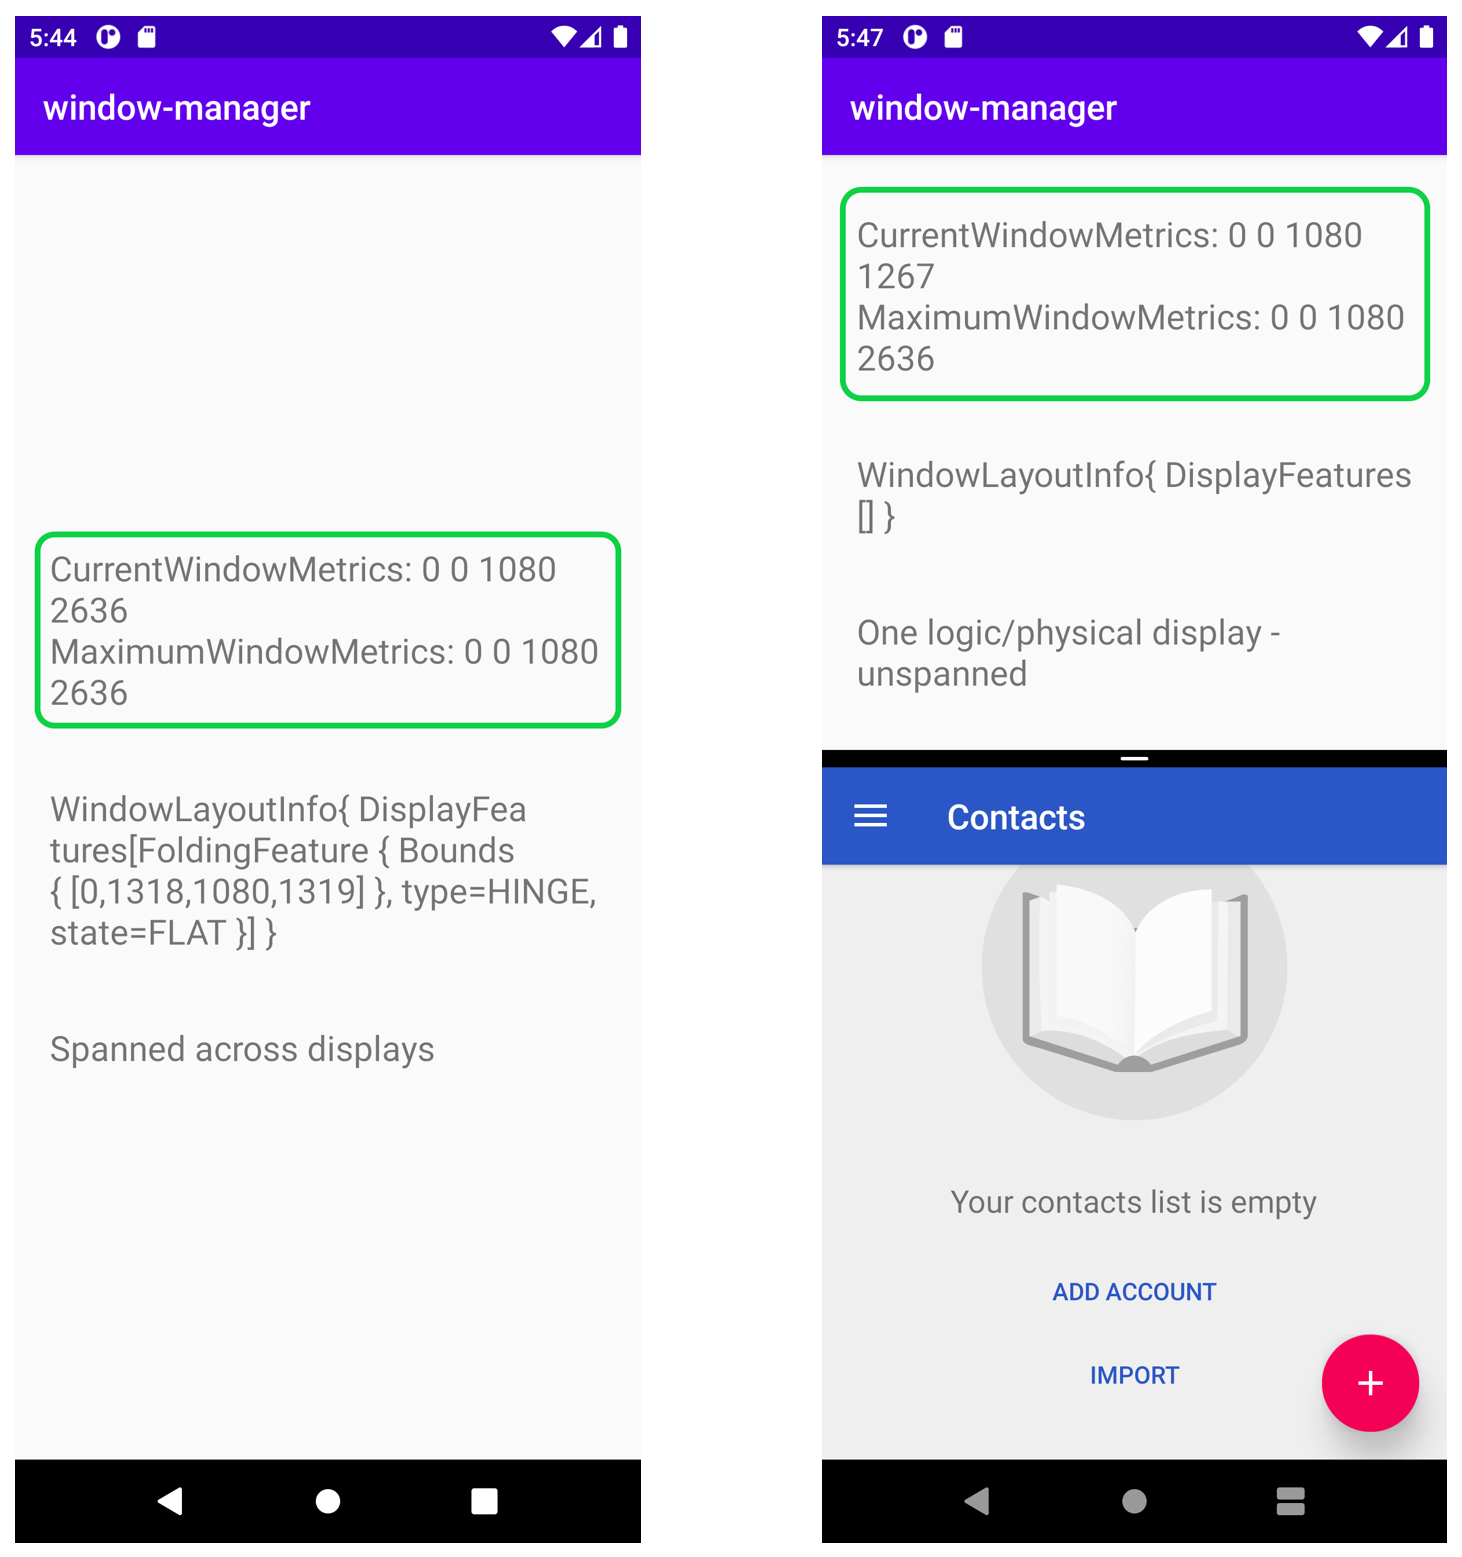
As you can see in the image on the left, both metrics have the same value, since the app running is using the whole display area that is the current and maximum available.
But in the image on the right, with the app running in multi-window mode, you can see how the current metrics show the dimensions of the area the app is running in that specific area (top) of the split-screen mode, and you can see how the maximum metrics show the maximum display area that the device has.
The metrics provided by WindowMetricsCalculator are very useful for determining the area of the window the app is using or can use.
7. Visualize the FoldingFeature information
Now register to receive window layout changes along with the characteristics and boundaries of the DisplayFeatures of the emulator or device.
To collect the information from WindowInfoTracker#windowLayoutInfo(), use the lifecycleScope that is defined for each Lifecycle object. Any coroutine launched in this scope is canceled when the Lifecycle is destroyed. You can access the coroutine scope of the lifecycle either via the lifecycle.coroutineScope or lifecycleOwner.lifecycleScope properties.
In the onCreate method of the MainActivity, call a function to get and show the WindowInfoTracker information. Start by adding an onWindowLayoutInfoChange() call in the onCreate method:
MainActivity.kt
override fun onCreate(savedInstanceState: Bundle?) {
   super.onCreate(savedInstanceState)
   binding = ActivityMainBinding.inflate(layoutInflater)
   setContentView(binding.root)

   windowInfoTracker = WindowInfoTracker.getOrCreate(this@MainActivity)

   obtainWindowMetrics()
   onWindowLayoutInfoChange()
}
Use the implementation of that function to get information whenever a new layout configuration changes.
Define the function signature and skeleton.
MainActivity.kt
private fun onWindowLayoutInfoChange() {
}
With the parameter the function receives, a WindowInfoTracker, get its WindowLayoutInfo data. WindowLayoutInfo contains the list of DisplayFeatures located within the window. For example, a hinge or display fold can go across the window, in which case it might make sense to separate the visual content and interactive elements into two groups (for example, list detail or view controls).
Only the features that are present within the current window bounds are reported. Their positions and sizes can change if the window is moved or resized on screen.
Through the lifecycleScope defined in the lifecycle-runtime-ktx dependency, get a flowof WindowLayoutInfo that contains a list of all display features. Add the body of onWindowLayoutInfoChange:
MainActivity.kt
import androidx.lifecycle.Lifecycle
import androidx.lifecycle.lifecycleScope
import androidx.lifecycle.repeatOnLifecycle
import kotlinx.coroutines.Dispatchers
import kotlinx.coroutines.flow.collect
import kotlinx.coroutines.launch

private fun onWindowLayoutInfoChange() {
    lifecycleScope.launch(Dispatchers.Main) {
        lifecycle.repeatOnLifecycle(Lifecycle.State.STARTED) {
            windowInfoTracker.windowLayoutInfo(this@MainActivity)
                .collect { value ->
                    updateUI(value)
                }
        }
    }
}
The updateUI function is being called from collect . Implement this function to show and print the information received from the flow of WindowLayoutInfo. Check whether the WindowLayoutInfo data has display features. If so, then the display feature is interacting somehow with the app's UI. If the WindowLayoutInfo data does not have any display features, then the app is running in a single-screen device or mode or in multi-window mode.
MainActivity.kt
import androidx.window.layout.WindowLayoutInfo

private fun updateUI(newLayoutInfo: WindowLayoutInfo) {
    binding.layoutChange.text = newLayoutInfo.toString()
    if (newLayoutInfo.displayFeatures.isNotEmpty()) {
        binding.configurationChanged.text = "Spanned across displays"
    } else {
        binding.configurationChanged.text = "One logic/physical display - unspanned"
    }
}
Run the app. In a dual-screen emulator, you have:
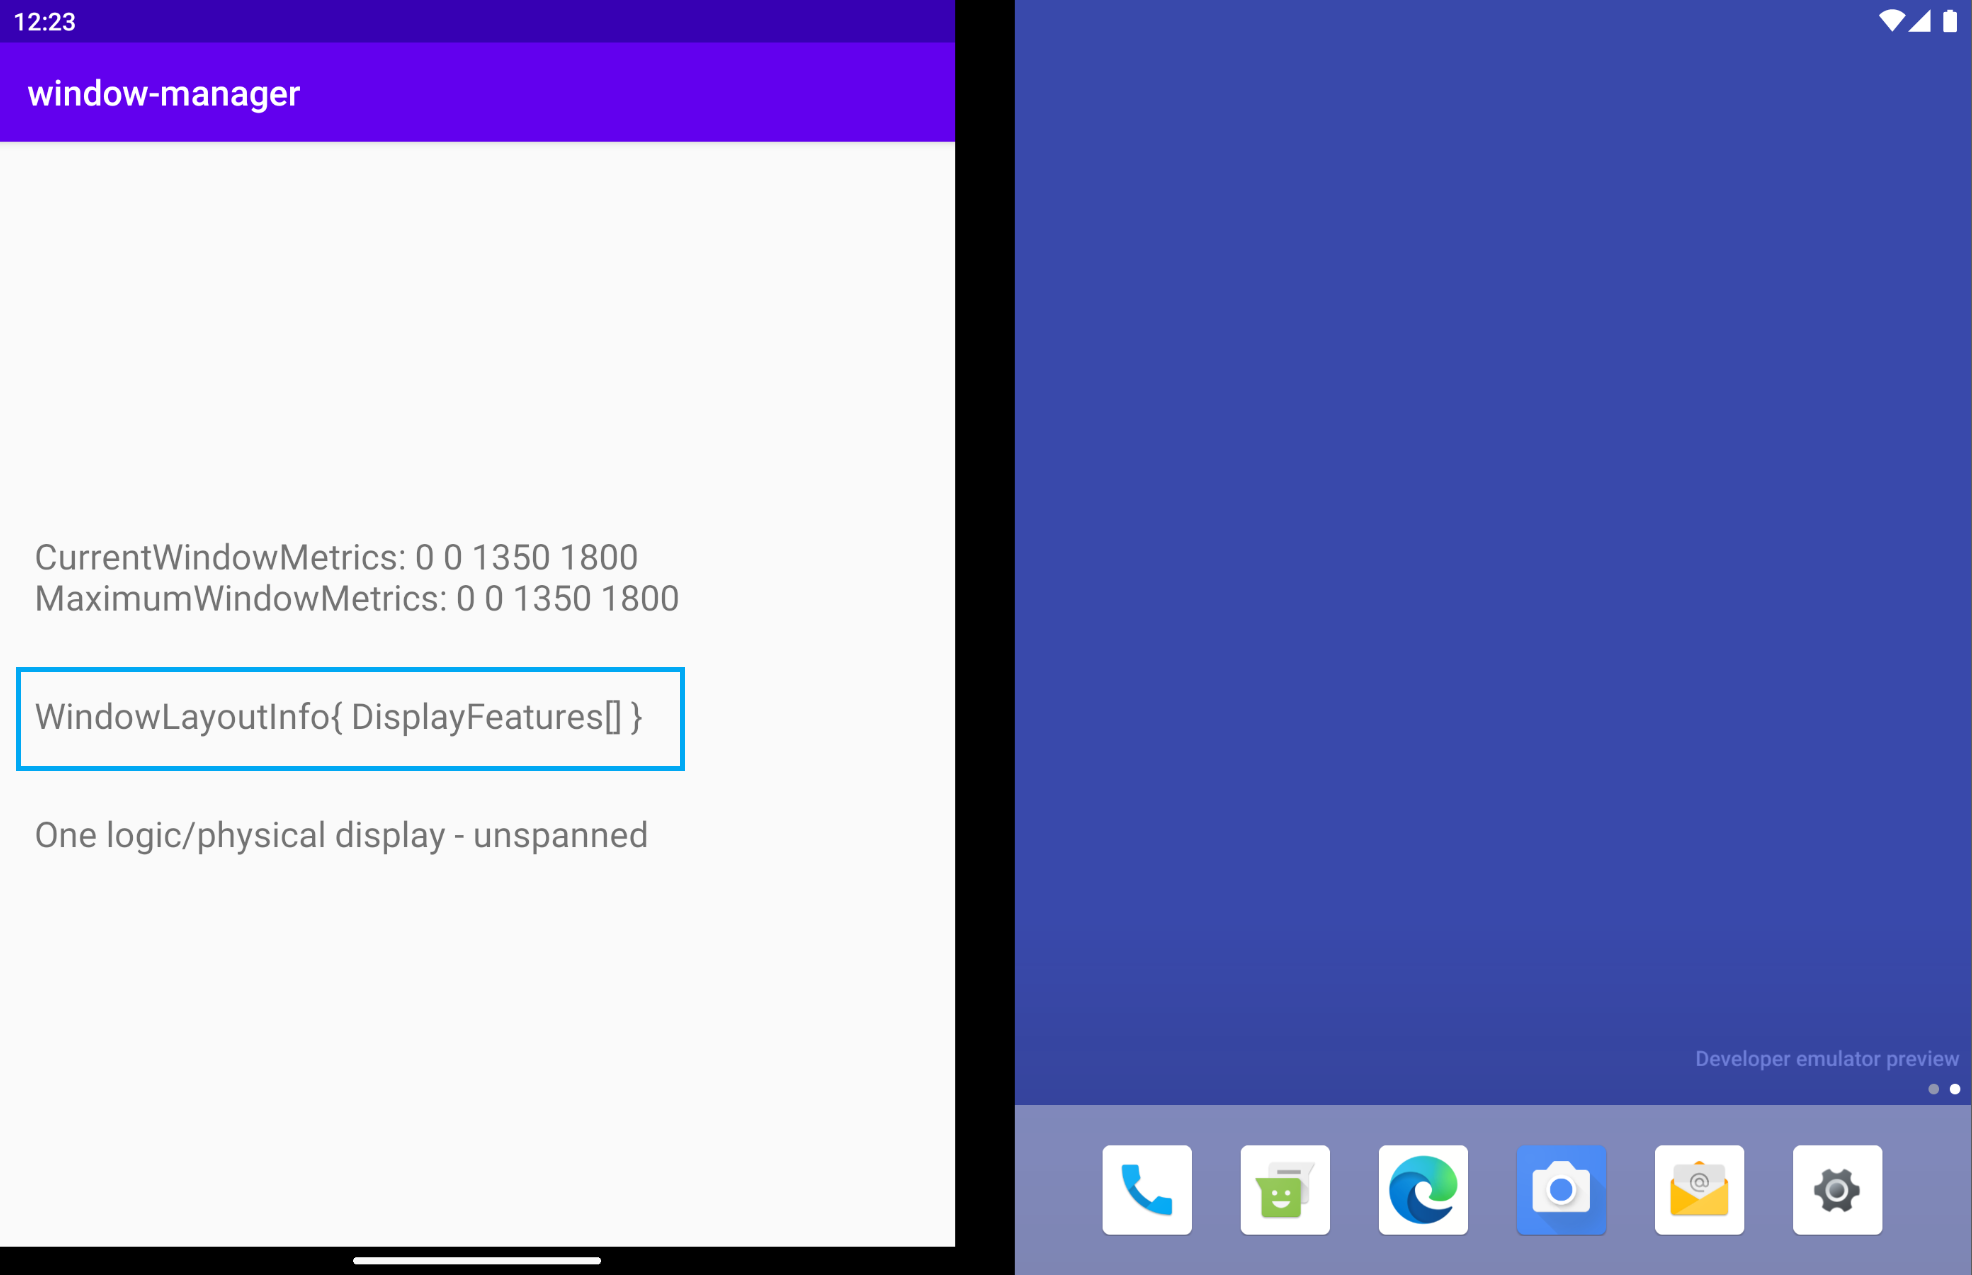
WindowLayoutInfo is empty. It has an empty List<DisplayFeature>. But if you have an emulator with a hinge in the middle, why don't you get the information from WindowManager?
WindowManager (through WindowInfoTracker) will provide the WindowLayoutInfo data (device feature type, device feature boundaries, and device posture) just when the app is spanned across displays (physical or not). So in the previous figure, where the app runs on single screen mode, WindowLayoutInfo is empty.
Having that information, you know in which mode the app is running (single screen mode or spanned across displays), so you can then make changes in your UI/UX, providing a better user experience that's adapted to these specific configurations.
On devices that don't have two physical displays (they don't usually have a physical hinge) apps can run side by side using multi-window mode. On these devices, when the app runs in multi-window mode, the app will act as it would on a single screen like in the previous example. And when the app runs occupying all logic displays, it will act the same as when the app is spanned. See the next figure:
When the app runs in multi-window mode, WindowManager provides an empty List<LayoutInfo>.
In summary, you get WindowLayoutInfo data just when the app runs occupying all logic displays, intersecting the device feature (fold or hinge). In all other cases, you don't get any information. 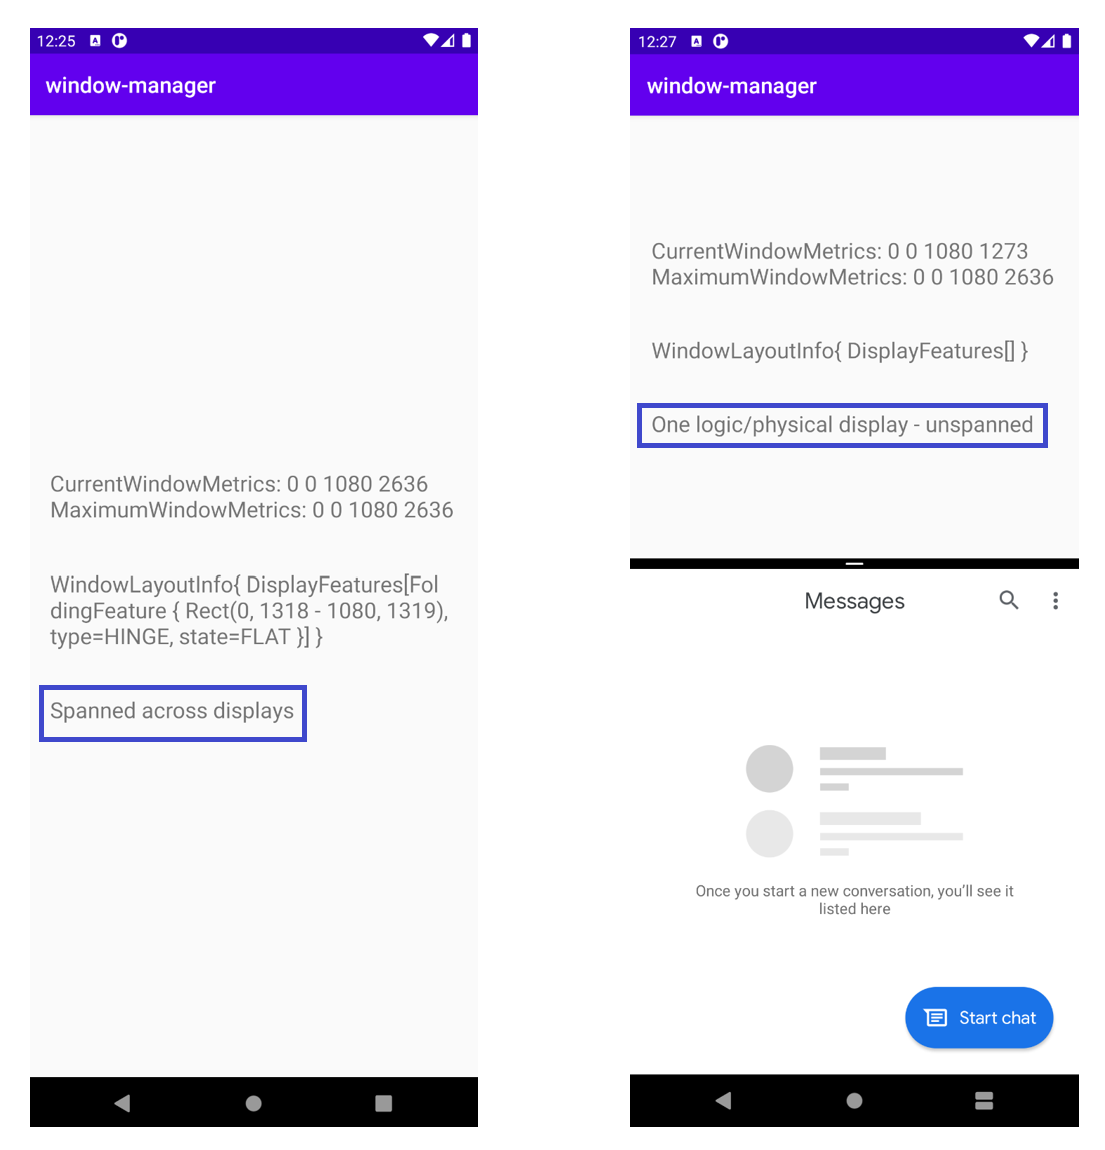
What happens when you span the app across displays? In a dual-screen emulator, WindowLayoutInfo will have a FoldingFeature object that provides data about the device feature: a HINGE, the boundaries of that feature ( Rect (0, 0 - 1434, 1800)), and the posture (state) of the device (FLAT).
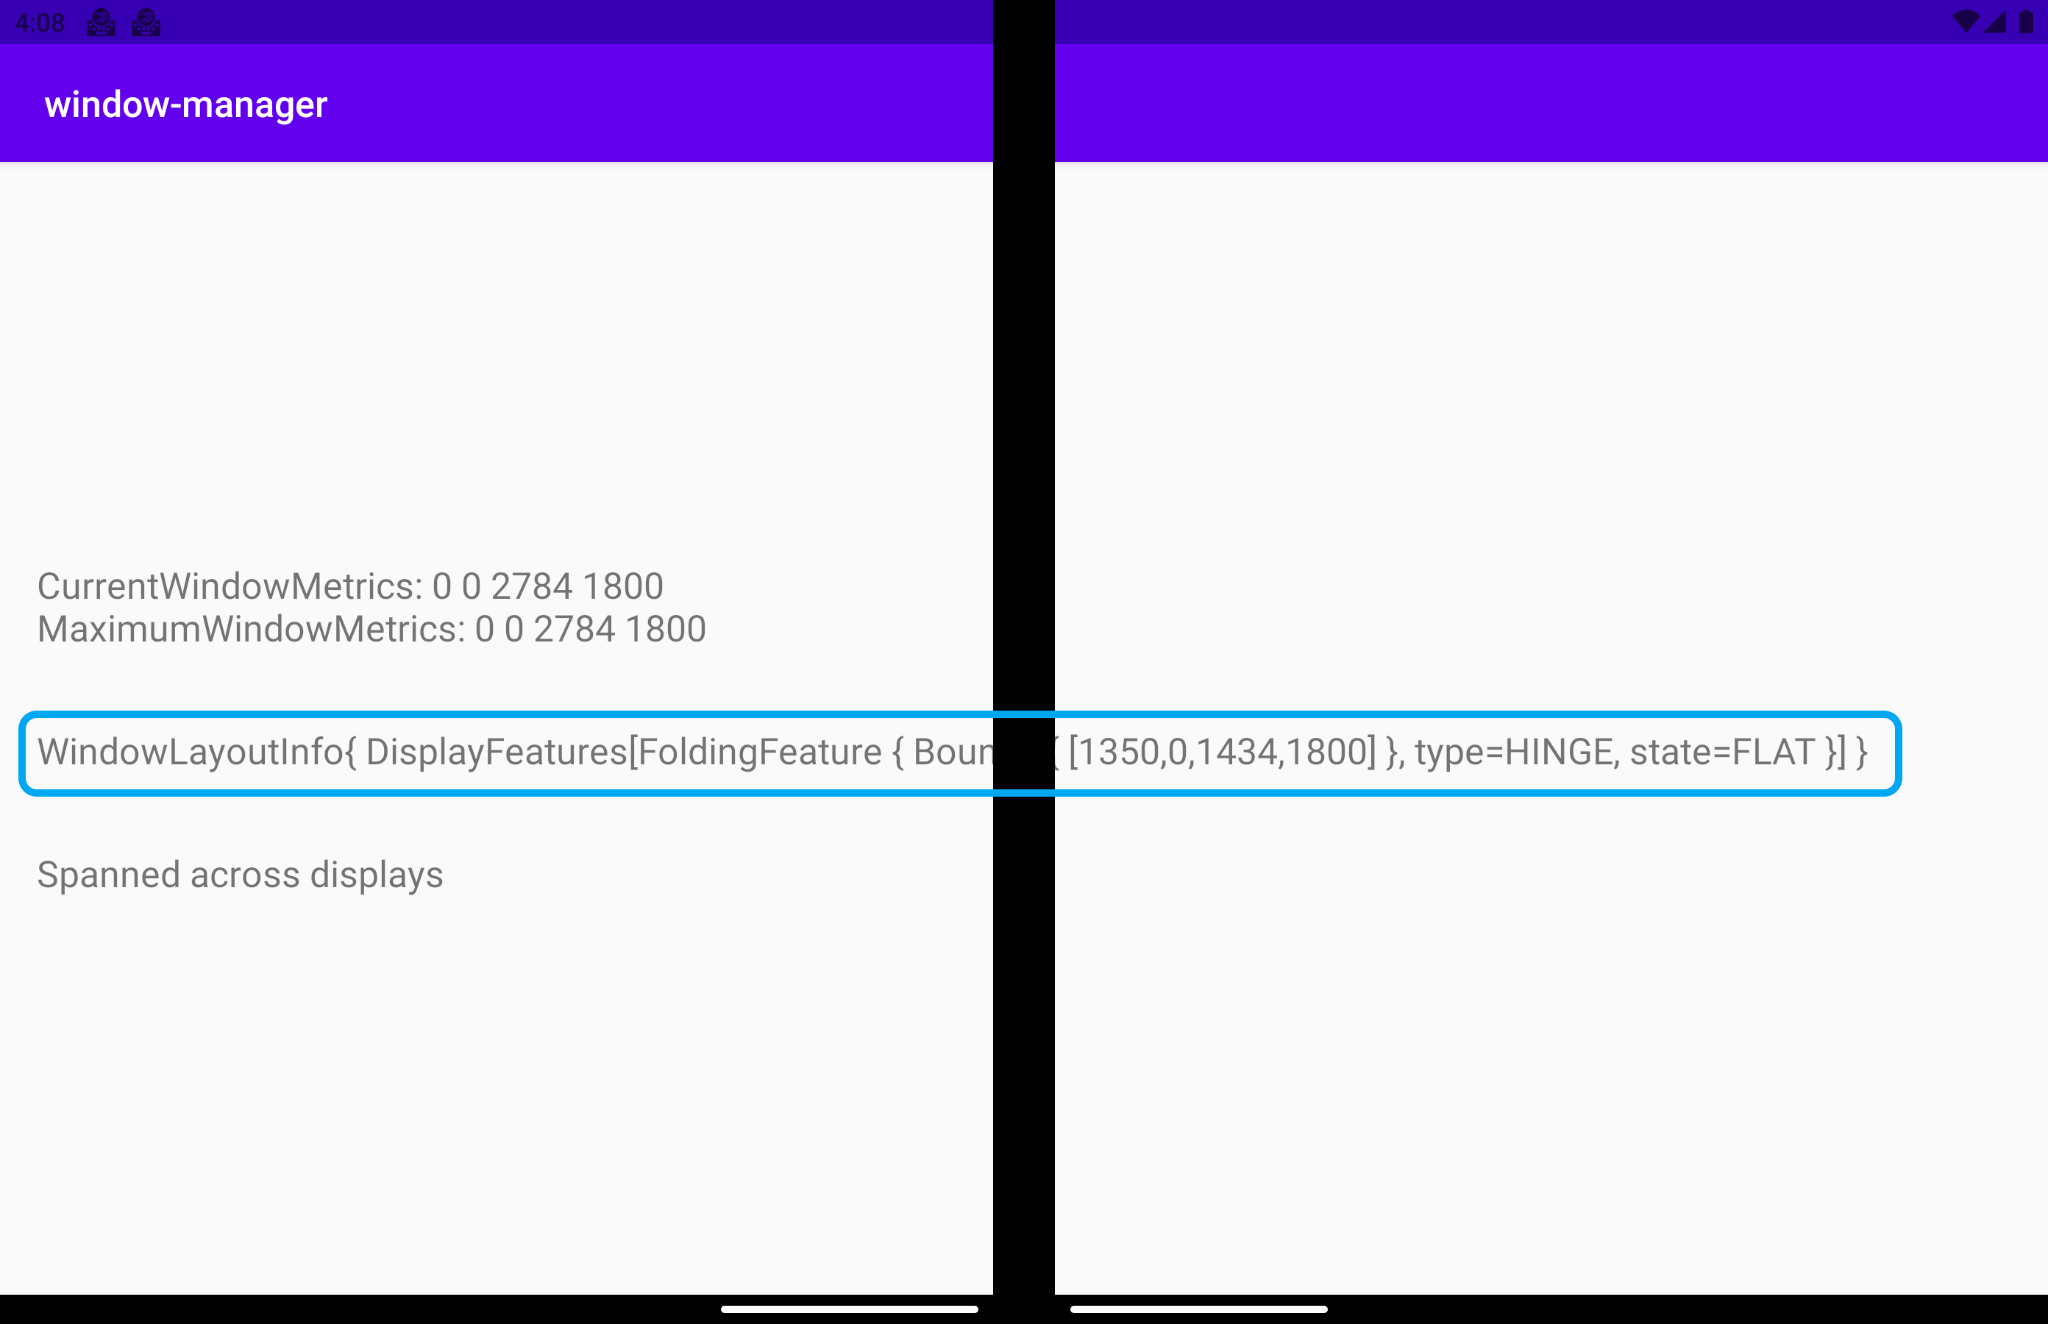
Let's see what each field means:
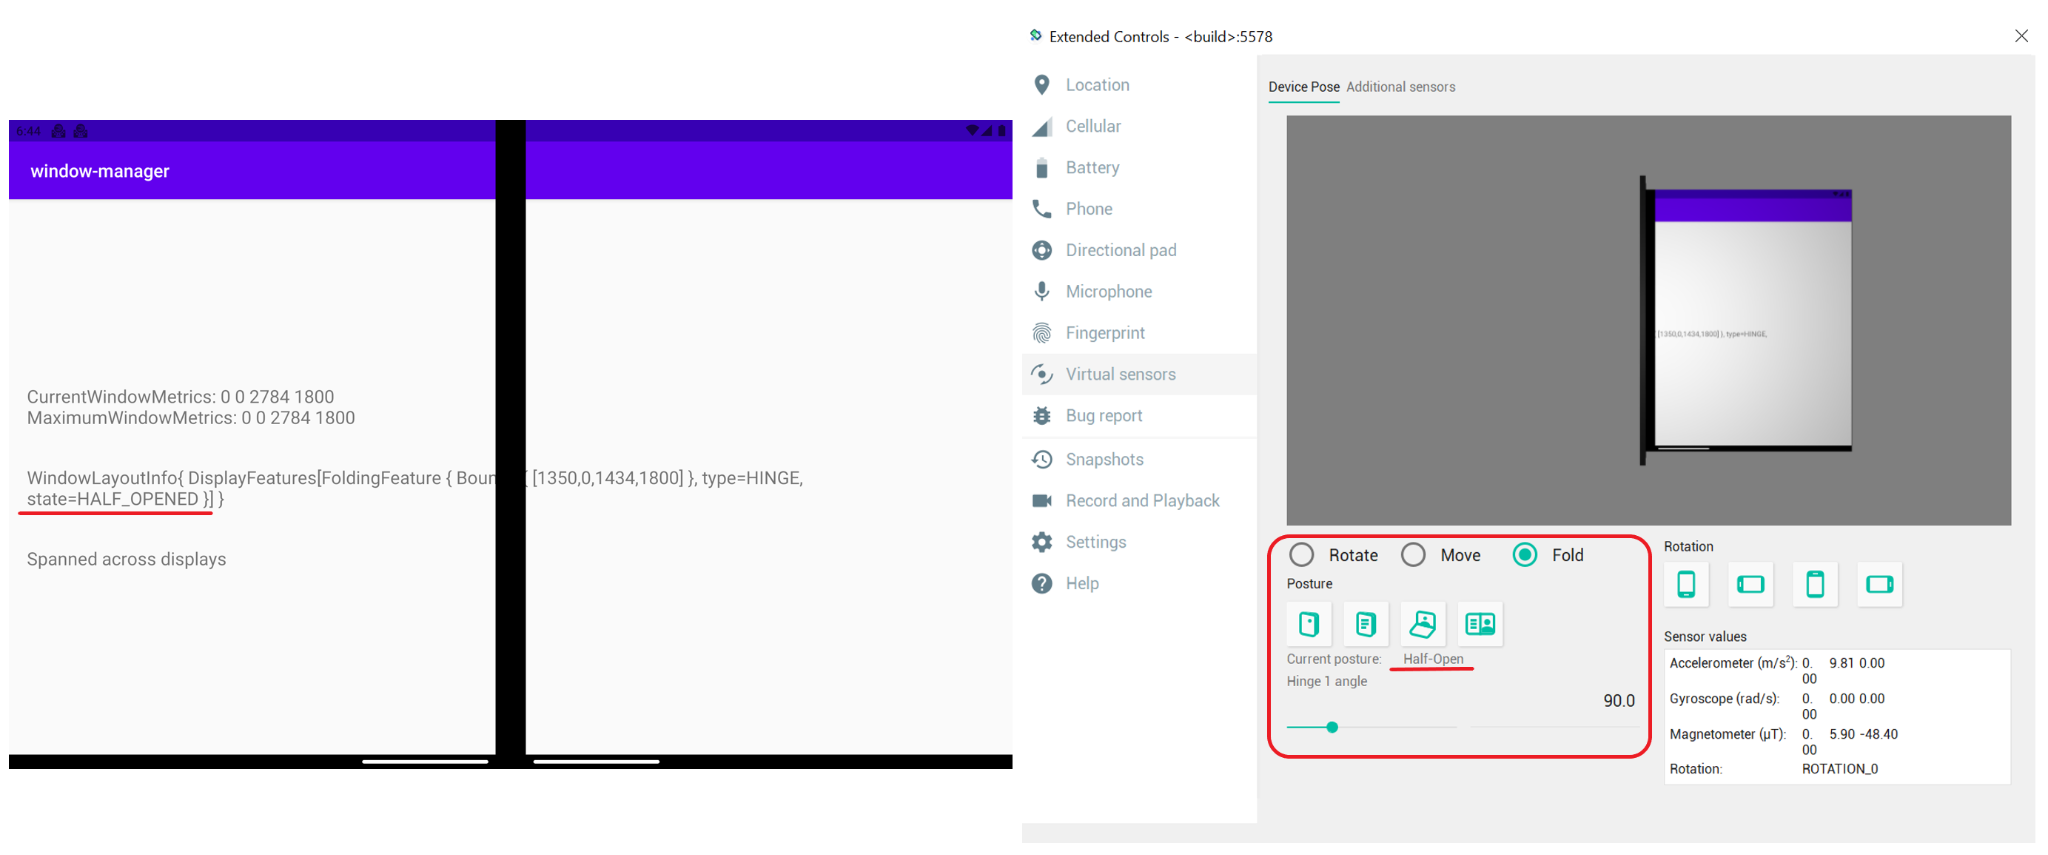
type = TYPE_HINGE: This dual-screen emulator mirrors a real Surface Duo device that has a physical hinge, and this is what WindowManager reports.Bounds[0, 0 - 1434, 1800]: Represents the bounding rectangle of the feature within the application window in the window coordinate space. If you read the dimensions specs of the Surface Duo device, you'll see that the hinge is located at the exact position reported by these bounds (left, top, right, bottom).State: There are two different values that represent the device posture (state) of the device.HALF_OPENED: The foldable device's hinge is in an intermediate position between opened and closed state, and there is a non-flat angle between parts of the flexible screen or between physical screen panels.FLAT: The foldable device is completely open, and the screen space that is presented to the user is flat.
The emulator by default is open at 180 degrees, so the posture that WindowManager returns is FLAT.
If you change the posture of the emulator using the Virtual sensors option to the Half-Open posture, WindowManager will notify you about the new position: HALF_OPENED.
Using WindowManager to adapt your UI/UX
As seen in the figures showing the window layout information, the information shown was cut by the display feature, the same happens here:

This is not an optimal user experience. You can use the information that WindowManager provides in order to adjust your UI/UX.
As you have seen before, when your app is spanned across all different display regions is also when your app intersects with the device feature, so WindowManager provides window layout Information as display state and display boundaries. So here, when the app is spanned, is when you need to use that information and adjust your UI/UX.
What you are going to do then is to adjust the UI/UX you currently have at runtime when your app is spanned so no important information is cut off or hidden by the display feature. You'll create a view that mirrors the device's display feature and will be used as a reference to constrain the TextView that is cut off or hidden, so you don't have missing information anymore.
For learning purposes, color this new view, so it can be easily seen that it is located specifically in the same place the real device display feature is located and with its same dimensions.
Add the new view that you will use as device feature reference in activity_main.xml:
activity_main.xml
<!-- It's not important where this view is placed by default, it will be positioned dynamically at runtime -->
<View
    android:id="@+id/folding_feature"
    android:layout_width="0dp"
    android:layout_height="0dp"
    android:background="@android:color/holo_red_dark"
    android:visibility="gone"
    tools:ignore="MissingConstraints" />
In MainActivity.kt, go to the updateUI() function you used to display the information from a given WindowLayoutInfo, and add a new function call in the if-else case where you had a display feature:
MainActivity.kt
private fun updateUI(newLayoutInfo: WindowLayoutInfo) {
   binding.layoutChange.text = newLayoutInfo.toString()
   if (newLayoutInfo.displayFeatures.isNotEmpty()) {
       binding.configurationChanged.text = "Spanned across displays"
       alignViewToFoldingFeatureBounds(newLayoutInfo)
   } else {
       binding.configurationChanged.text = "One logic/physical display - unspanned"
   }
}
You have added the function alignViewToFoldingFeatureBounds that receives as a parameter the WindowLayoutInfo.
Create that function. Inside the function, create your ConstraintSet in order to apply new constraints to your views. Then, get the display feature boundaries using the WindowLayoutInfo. Since WindowLayoutInfo returns a list of DisplayFeature that is just an interface, cast it to FoldingFeature in order to get access to all the information:
MainActivity.kt
import androidx.constraintlayout.widget.ConstraintSet
import androidx.window.layout.FoldingFeature

private fun alignViewToFoldingFeatureBounds(newLayoutInfo: WindowLayoutInfo) {
   val constraintLayout = binding.constraintLayout
   val set = ConstraintSet()
   set.clone(constraintLayout)

   // Get and translate the feature bounds to the View's coordinate space and current
   // position in the window.
   val foldingFeature = newLayoutInfo.displayFeatures[0] as FoldingFeature
   val bounds = getFeatureBoundsInWindow(foldingFeature, binding.root)


   // Rest of the code to be added in the following steps
}
Define a getFeatureBoundsInWindow()function to translate the feature bounds to the view's coordinate space and current position in the window.
MainActivity.kt
import android.graphics.Rect
import android.view.View
import androidx.window.layout.DisplayFeature

/**
 * Get the bounds of the display feature translated to the View's coordinate space and current
 * position in the window. This will also include view padding in the calculations.
 */
private fun getFeatureBoundsInWindow(
    displayFeature: DisplayFeature,
    view: View,
    includePadding: Boolean = true
): Rect? {
    // Adjust the location of the view in the window to be in the same coordinate space as the feature.
    val viewLocationInWindow = IntArray(2)
    view.getLocationInWindow(viewLocationInWindow)

    // Intersect the feature rectangle in window with view rectangle to clip the bounds.
    val viewRect = Rect(
        viewLocationInWindow[0], viewLocationInWindow[1],
        viewLocationInWindow[0] + view.width, viewLocationInWindow[1] + view.height
    )

    // Include padding if needed
    if (includePadding) {
        viewRect.left += view.paddingLeft
        viewRect.top += view.paddingTop
        viewRect.right -= view.paddingRight
        viewRect.bottom -= view.paddingBottom
    }

    val featureRectInView = Rect(displayFeature.bounds)
    val intersects = featureRectInView.intersect(viewRect)

    // Checks to see if the display feature overlaps with our view at all
    if ((featureRectInView.width() == 0 && featureRectInView.height() == 0) ||
        !intersects
    ) {
        return null
    }

    // Offset the feature coordinates to view coordinate space start point
    featureRectInView.offset(-viewLocationInWindow[0], -viewLocationInWindow[1])

    return featureRectInView
}
With the information about the boundaries of the display feature, you can use it to set the correct height size for your reference view and move it accordingly.
The complete code for alignViewToFoldingFeatureBounds will be:
MainActivity.kt - alignViewToFoldingFeatureBounds
private fun alignViewToFoldingFeatureBounds(newLayoutInfo: WindowLayoutInfo) {
    val constraintLayout = binding.constraintLayout
    val set = ConstraintSet()
    set.clone(constraintLayout)

    // Get and Translate the feature bounds to the View's coordinate space and current
    // position in the window.
    val foldingFeature = newLayoutInfo.displayFeatures[0] as FoldingFeature
    val bounds = getFeatureBoundsInWindow(foldingFeature, binding.root)

    bounds?.let { rect ->
        // Some devices have a 0px width folding feature. We set a minimum of 1px so we
        // can show the view that mirrors the folding feature in the UI and use it as reference.
        val horizontalFoldingFeatureHeight = (rect.bottom - rect.top).coerceAtLeast(1)
        val verticalFoldingFeatureWidth = (rect.right - rect.left).coerceAtLeast(1)

        // Sets the view to match the height and width of the folding feature
        set.constrainHeight(
            R.id.folding_feature,
            horizontalFoldingFeatureHeight
        )
        set.constrainWidth(
            R.id.folding_feature,
            verticalFoldingFeatureWidth
        )

        set.connect(
            R.id.folding_feature, ConstraintSet.START,
            ConstraintSet.PARENT_ID, ConstraintSet.START, 0
        )
        set.connect(
            R.id.folding_feature, ConstraintSet.TOP,
            ConstraintSet.PARENT_ID, ConstraintSet.TOP, 0
        )

        if (foldingFeature.orientation == FoldingFeature.Orientation.VERTICAL) {
            set.setMargin(R.id.folding_feature, ConstraintSet.START, rect.left)
            set.connect(
                R.id.layout_change, ConstraintSet.END,
                R.id.folding_feature, ConstraintSet.START, 0
            )
        } else {
            // FoldingFeature is Horizontal
            set.setMargin(
                R.id.folding_feature, ConstraintSet.TOP,
                rect.top
            )
            set.connect(
                R.id.layout_change, ConstraintSet.TOP,
                R.id.folding_feature, ConstraintSet.BOTTOM, 0
            )
        }

        // Set the view to visible and apply constraints
        set.setVisibility(R.id.folding_feature, View.VISIBLE)
        set.applyTo(constraintLayout)
    }
}
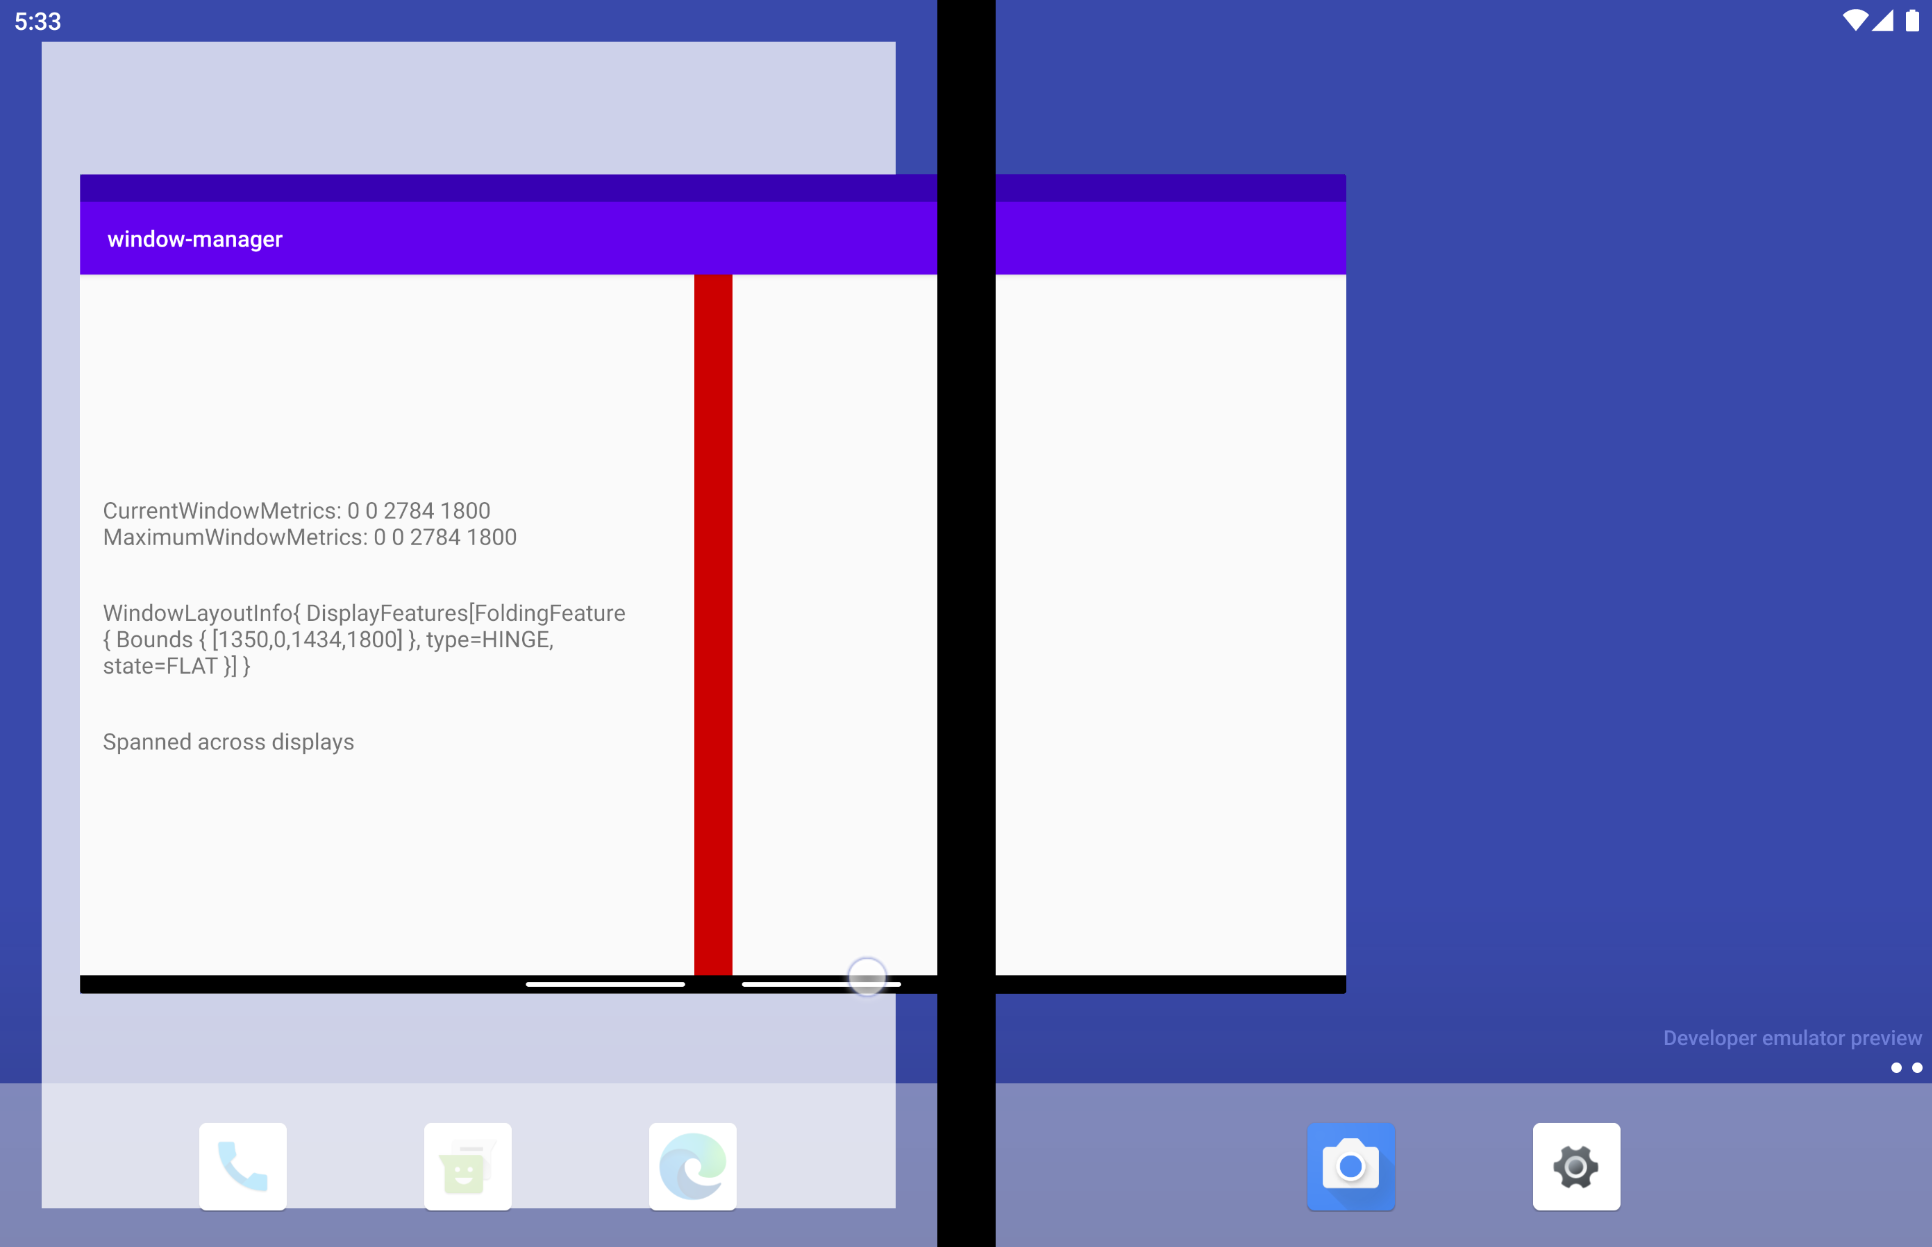
Now the TextView that conflicted with the device display feature takes into consideration where the feature is located, so its content is never cut off or hidden:
In the dual-screen emulator (above, left), you can see how the TextView that displayed the content across displays and that was cut off by the hinge is not cut off anymore, so there is no missing information.
In a foldable emulator (above, right), you'll see a light red line that represents where the fold display feature is located, and the TextView has been placed now below the feature. So when the device is folded (for example, 90 degrees in a laptop posture), no information is affected by the feature.
If you are wondering where the display feature is on the dual-screen emulator (since this is a hinge-type device), the view that represents the feature is hidden by the hinge. But if the app changes from span to unspan, you'll see it in the same position as the feature with the correct height and width.
8. Other Jetpack WindowManager artifacts
WindowManager also comes with other useful artifacts apart from the main one that will help you to interact with the component differently, taking into consideration the current environment you are using while building your apps.
Java artifact
If you are using the Java programming language instead of Kotlin, or if listening for events through callbacks is a better approach for your architecture, the WindowManager's Java artifact can be useful since it provides a Java-friendly API to register and unregister listeners for events through callbacks.
RxJava artifact(s)
If you are already using RxJava (version 2 or 3), you can use specific artifacts that will help you to keep consistency in your code, whether you use Observables or Flowables.
9. Testing using Jetpack WindowManager
Testing foldable postures on any emulator or device can be very useful in order to test how UI elements can be placed around the FoldingFeature.
To achieve that, WindowManger comes with a very useful artifact for instrumented tests.
Let's see how we can use it.
Together with the main WindowManager dependency, we have added the testing artifact in the app build.gradle file: androidx.window:window-testing
The window-testing artifact comes with a useful new TestRule called WindowLayoutInfoPublisherRule that will help test consuming a stream of WindowLayoutInfo values. WindowLayoutInfoPublisherRule allows you to push through different WindowLayoutInfo values on demand.
In order to use it, and from there to create a sample that can help you to test your UI with this new artifact update the testing class created by the Android Studio template. Replace all the code in the ExampleInstrumentedTest class with the following:
ExampleInstrumentedTest.kt
import androidx.test.ext.junit.rules.ActivityScenarioRule
import androidx.test.ext.junit.runners.AndroidJUnit4
import androidx.window.testing.layout.WindowLayoutInfoPublisherRule
import org.junit.Rule
import org.junit.rules.RuleChain
import org.junit.rules.TestRule
import org.junit.runner.RunWith

@RunWith(AndroidJUnit4::class)
class MainActivityTest {
    private val activityRule = ActivityScenarioRule(MainActivity::class.java)
    private val publisherRule = WindowLayoutInfoPublisherRule()

    @get:Rule
    val testRule: TestRule

    init {
        testRule = RuleChain.outerRule(publisherRule).around(activityRule)
    }
}
The mentioned rule has been chained with an ActvityScenarioRule.
In order to mock up a FoldingFeature, the new artifact comes with a couple of very useful functions to do it. Here is the simplest one that provides some default values.
In MainActivity, the TextViews are aligned to the left of the folding feature. Create a test that checks that this was implemented correctly.
Create a test called testText_is_left_of_Vertical_FoldingFeature:
ExampleInstrumentedTest.kt
import androidx.window.layout.FoldingFeature.Orientation.Companion.VERTICAL
import androidx.window.layout.FoldingFeature.State.Companion.FLAT
import androidx.window.testing.layout.FoldingFeature
import androidx.window.testing.layout.TestWindowLayoutInfo
import org.junit.Test

@Test
fun testText_is_left_of_Vertical_FoldingFeature() {
   activityRule.scenario.onActivity { activity ->
       val hinge = FoldingFeature(
           activity = activity,
           state = FLAT,
           orientation = VERTICAL,
           size = 2
       )

       val expected = TestWindowLayoutInfo(listOf(hinge))
       publisherRule.overrideWindowLayoutInfo(expected)
   }

   // Add Assertion with EspressoMatcher here

}
The test FoldingFeature has a FLAT state and its orientation is VERTICAL. We have defined a specific size since we want that the fake FoldingFeature to be shown in the UI in our tests so we can see where it's located on the device.
We use the WindowLayoutInfoPublishRule that we instantiated before to publish the fake FoldingFeaure, so then we can get it as we would with real WindowLayoutInfo data:
The final step is just to test that our UI elements are located where they should be aligned avoiding the FoldingFeature. To do that, we simply use EspressoMatchers, adding the assertion at the end of the test we just created:
ExampleInstrumentedTest.kt
import androidx.test.espresso.assertion.PositionAssertions
import androidx.test.espresso.matcher.ViewMatchers.withId

onView(withId(R.id.layout_change)).check(
    PositionAssertions.isCompletelyLeftOf(withId(R.id.folding_feature))
)
The complete test is going to be:
ExampleInstrumentedTest.kt
@Test
fun testText_is_left_of_Vertical_FoldingFeature() {
    activityRule.scenario.onActivity { activity ->
        val hinge = FoldingFeature(
            activity = activity,
            state = FoldingFeature.State.FLAT,
            orientation = FoldingFeature.Orientation.VERTICAL,
            size = 2
        )
        val expected = TestWindowLayoutInfo(listOf(hinge))
        publisherRule.overrideWindowLayoutInfo(expected)
    }
    onView(withId(R.id.layout_change)).check(
        PositionAssertions.isCompletelyLeftOf(withId(R.id.folding_feature))
    )
}
val horizontal_hinge = FoldingFeature(
   activity = activity,
   state = FLAT,
   orientation = HORIZONTAL,
   size = 2
)
You can now run your test on a device or emulator to check that the application behaves as expected. Note that you don't need a foldable device or emulator to run this test.
10. Congratulations!
Jetpack WindowManager helps developers with new form factor devices such as foldables.
The information WindowManager provides is very helpful in adapting Android apps to foldable devices to deliver a better user experience.
As a summary, in this codelab you have learned:
- What foldable devices are
- Differences between the different foldable devices
- Differences between foldable devices, single-screen devices, and tablets
- The Jetpack WindowManager API
- Using Jetpack WindowManager and adapting our apps to new device form factors
- Testing using Jetpack WindowManager