
1. Introduction
Last Updated: Oct 27, 2022
Why a resizable surface?
Historically, your app could have lived in the same window for its whole life cycle.
But with the availability of new form factors, such as foldable devices, and new display modes such as multi-window and multi-display, you can't assume this will be true anymore.
In particular, let's see some of the most important considerations when developing an app targeting large screen and foldable devices:
- Don't assume your app will live in a portrait-shaped window. Requesting a fixed orientation is still supported in Android 12L, but we're now giving device manufacturers the option of overriding the app's request for a preferred orientation.
- Don't assume any fixed dimension or aspect ratio for your app. Even if you set
resizeableActivity = "false", your app can be used in multi-window mode on large screens (>=600dp) on API level 31 and higher. - Don't assume a fixed relationship between the orientation of the screen and the camera. The Android Compatibility Definition Document specifies that a camera image sensor "MUST be oriented so that the long dimension of the camera aligns with the screen's long dimension." Starting with API level 32, camera clients that query the orientation on foldable devices can receive a value that can dynamically change depending on the device/fold state.
- Don't assume the size of the inset can't change. The new taskbar is reported to applications as an inset, and when used with gesture navigation, the taskbar can be hidden and shown dynamically.
- Don't assume your app has exclusive access to the camera. While your app is in multi-window mode, other apps can obtain exclusive access to shared resources like camera and microphone.
It's time to ensure that your camera app is working well in every scenario by learning how to transform the camera output to fit resizable surfaces and how to use the APIs that Android is offering to handle different use cases.
What you'll build
In this codelab, you're going to build a simple app that displays the camera preview. You will start with a naive camera app that locks the orientation and declares itself as not resizable, and you will see how it behaves on Android 12L.
Then you will update the source code to make sure the preview is always displayed well in every scenario. The result is a camera app that correctly handles configuration changes and automatically transforms the surface to match the preview.
What you'll learn
- How Camera2 previews are displayed on Android surfaces
- The relationship between sensor orientation, display rotation, and aspect ratio
- How to transform a surface to match the aspect ratio of the camera preview and the rotation of the display
What you'll need
- A recent version of Android Studio
- Basic knowledge of developing Android applications
- Basic knowledge of Camera2 APIs
- A device or emulator running Android 12L
2. Setup
Get the starting code
To understand the behavior on Android 12L, you will start with a camera app that locks the orientation and declares itself as not resizable.
If you have Git installed, you can simply run the command below. To check whether Git is installed, type git --version in the terminal or command line and verify that it executes correctly.
git clone https://github.com/android/codelab-android-camera2-preview.git
If you do not have Git, you can click the following button to download all the code for this codelab:
Open the first module
In Android Studio, open the first module located under /step1.
Android Studio will prompt you to set the SDK path. You may want to follow the recommendations for updating the IDE and SDK tools if you encounter any problems.

If you're asked to use the latest Gradle version, go ahead and update it.
Prepare the device
As of the publication date of this codelab, there is a limited set of physical devices that can run Android 12L.
You can find the list of devices and the instructions to install 12L here: https://developer.android.com/about/versions/12/12L/get
Whenever possible, use a physical device to test camera apps, but in case you want to use an emulator, make sure to create one with a large screen (e.g., Pixel C) and with API level 32.
Prepare a subject to frame
When working with cameras, I like to have a standard subject I can point at to appreciate the differences in settings, orientation, and scaling.
For this codelab, I will use a printed version of this square-shaped image. 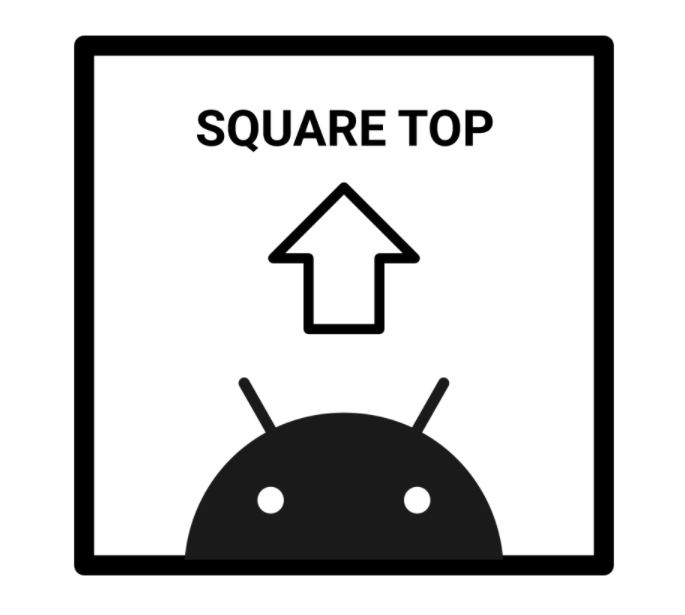
If in any case the arrow doesn't point to the top or the square becomes another geometrical figure . . . something needs to be fixed!
3. Run and observe
Position the device in portrait mode and run the code on module 1. Make sure to allow the Camera2 Codelab app to take pictures and record video while using the app. As you can see, the preview is correctly displayed and uses the screen's space efficiently.
Now, rotate the device to landscape:
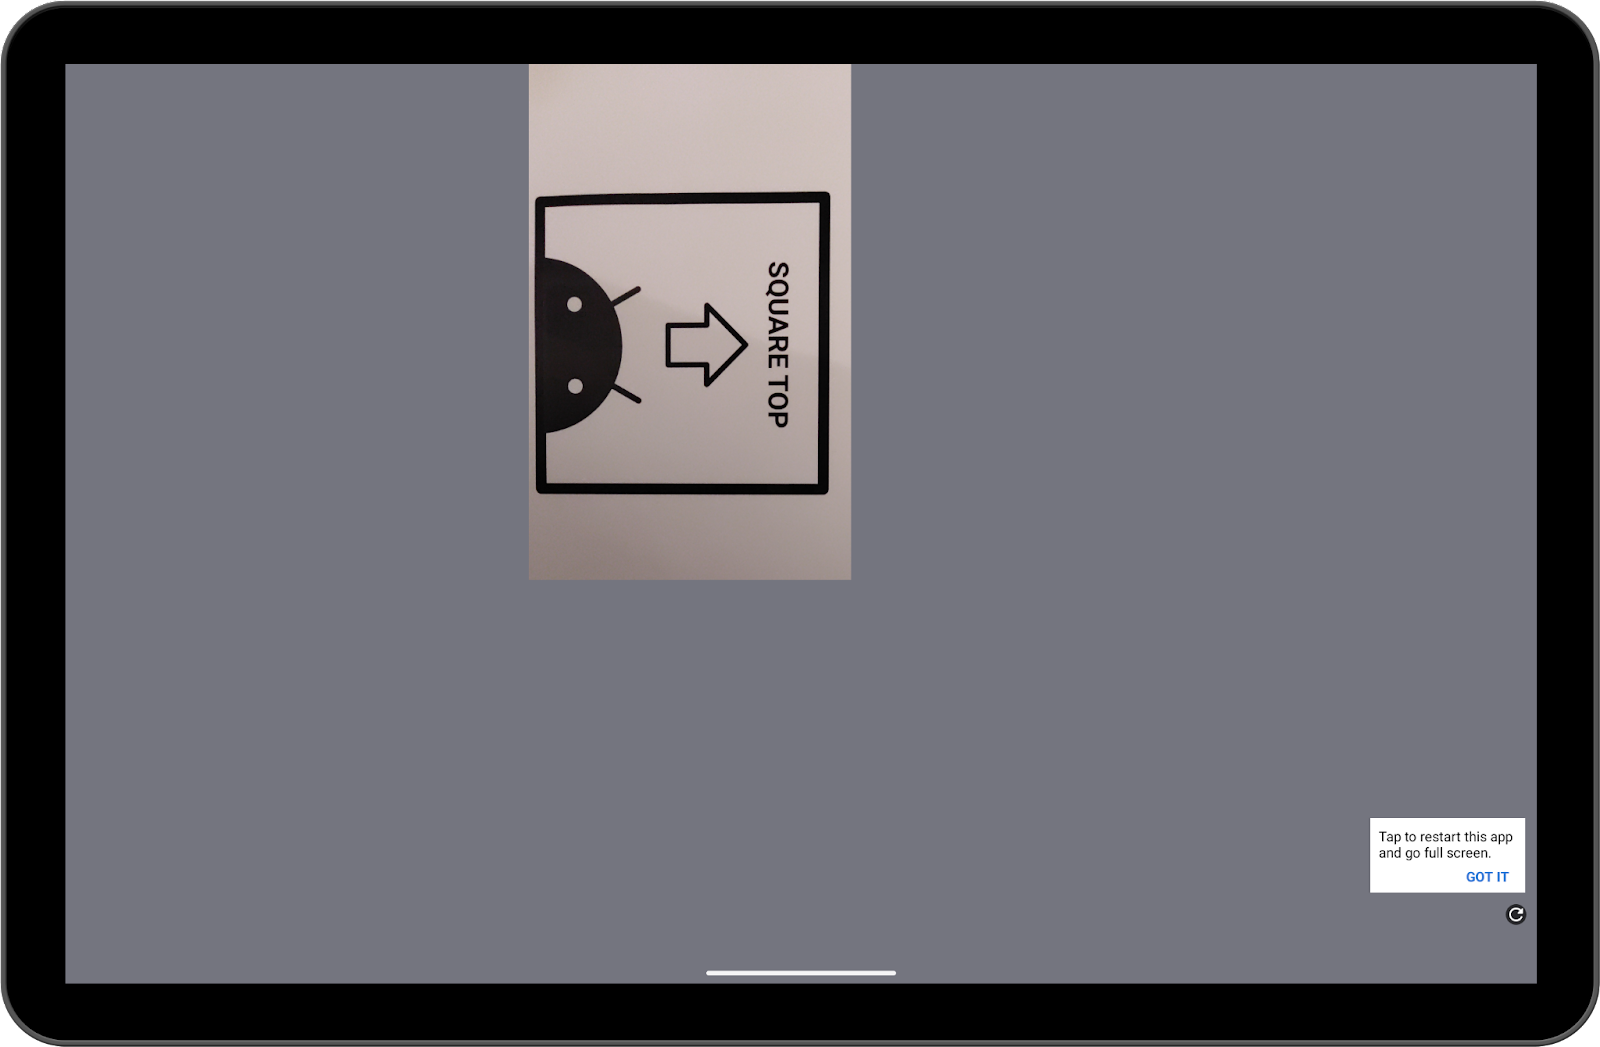
That's definitely not great. Now click the refresh button in the bottom right corner.
It should be a little better, but still not optimal.
What you see is the behavior of the compatibility mode of Android 12L. Apps that lock their orientation in portrait can be letterboxed when the device is rotated to landscape and the screen density is higher than 600dp.
While this mode preserves the original aspect ratio, it also provides a suboptimal user experience, as most of the screen space is unused.
Furthermore, in this case the preview is incorrectly rotated by 90 degrees.
Now put the device back in portrait, and start split-screen mode.
You can resize the window by dragging the central divider.
See how the resizing impacts the camera preview. Is it distorted? Does it maintain the same aspect ratio?
4. The quick fix
Since compatibility mode is triggered only for apps that lock the orientation and are not resizable, you may be tempted to just update the flags in the manifest to avoid it.
Go ahead and try it:
step1/AndroidManifest.xml
<activity
    android:name=".CameraActivity"
    android:exported="true"
    android:resizeableActivity="true">
    <intent-filter>
        <action android:name="android.intent.action.MAIN" />

        <category android:name="android.intent.category.LAUNCHER" />
    </intent-filter>
</activity>
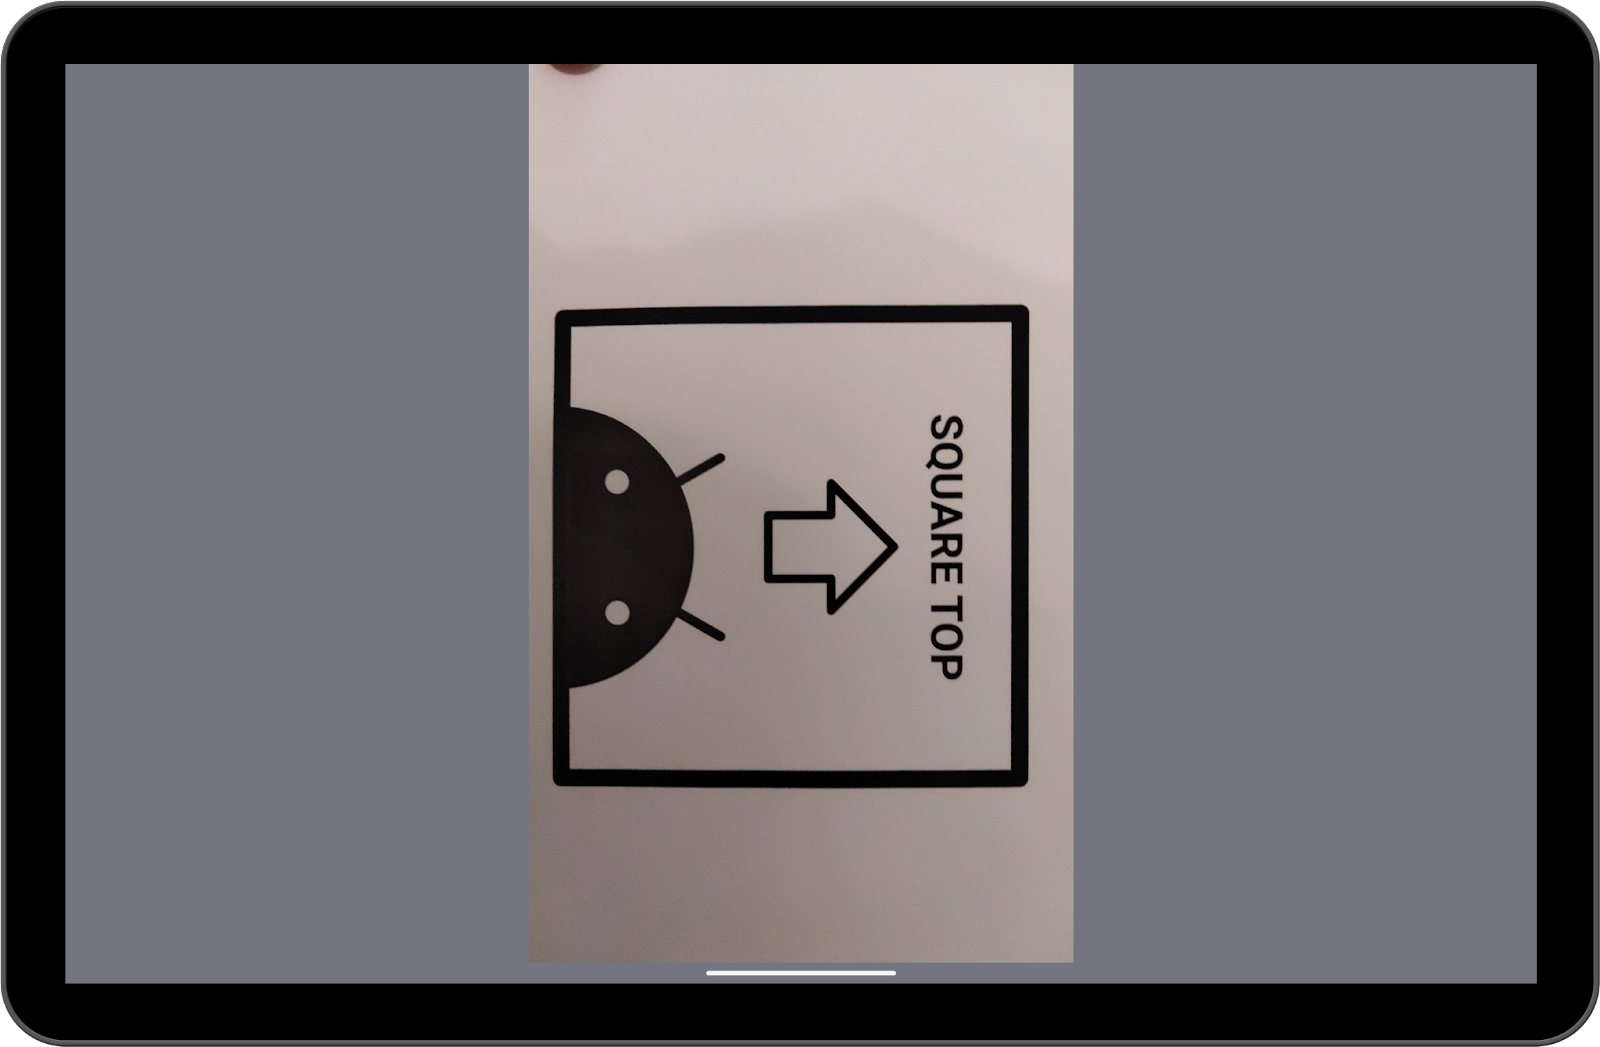
Now build the app and run it again in landscape orientation. You should see something like this:
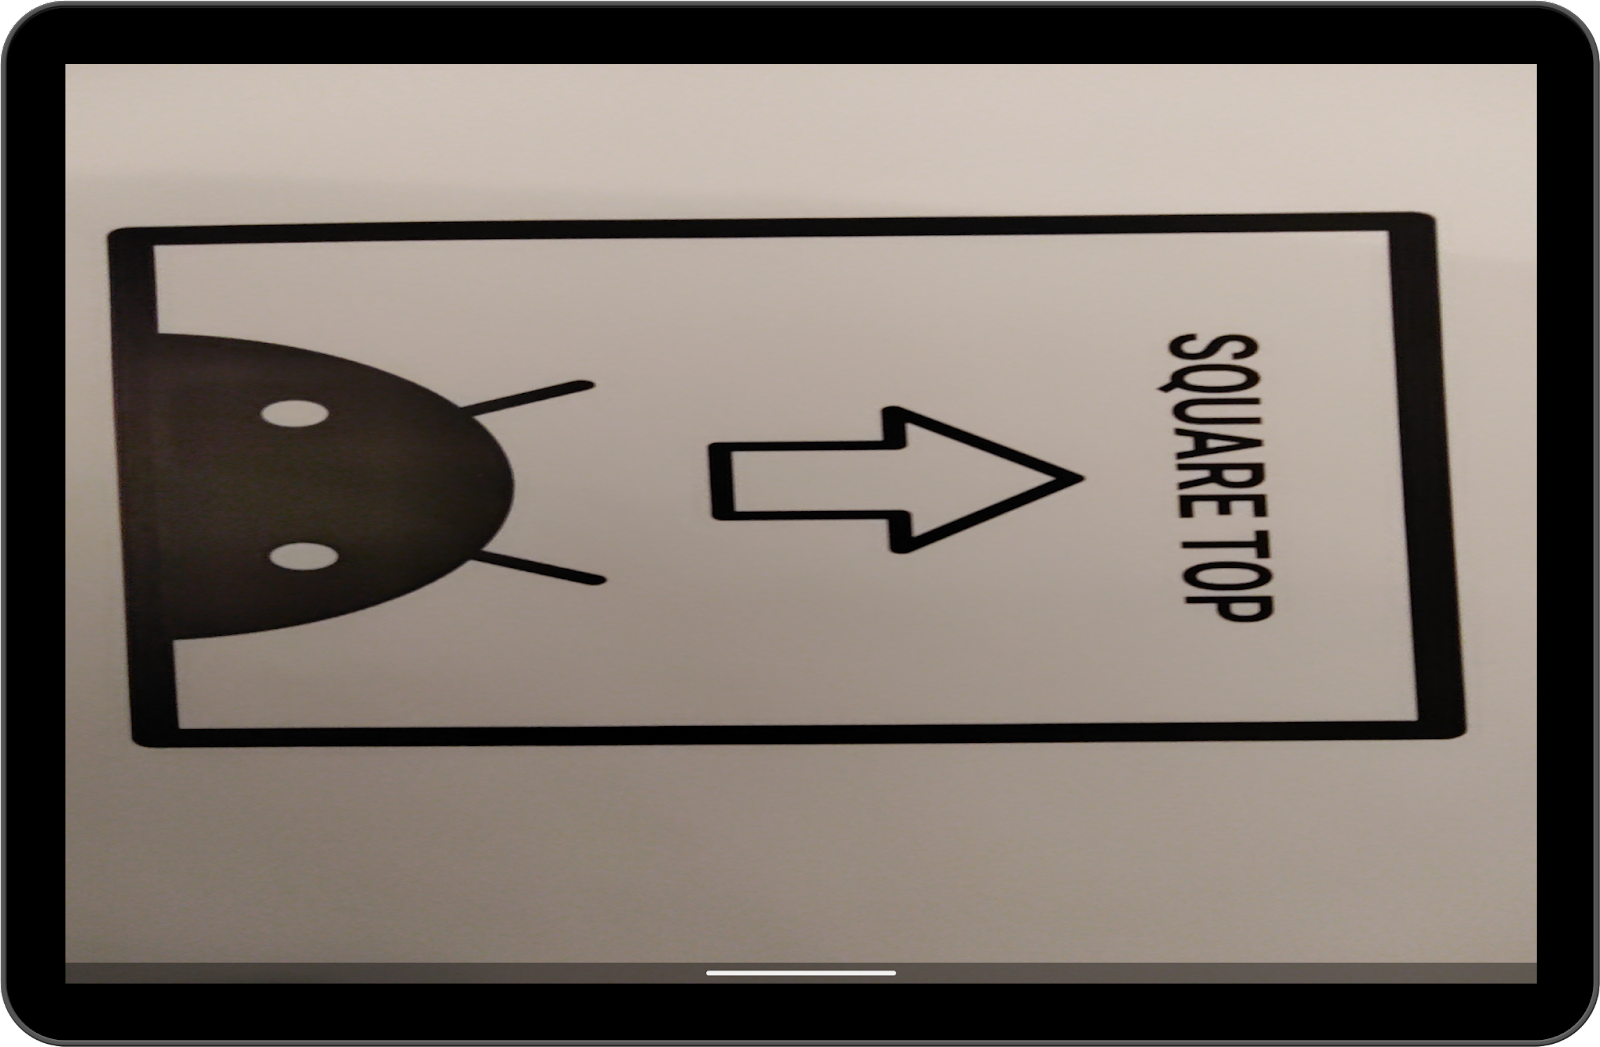
The arrow doesn't point to the top, and that is not a square!
Since the app was not designed to work in multi-window mode or in different orientations, it does not expect any changes in the window size, leading to the issues you just experienced.
5. Handle configuration changes
Let's start by telling the system we want to handle configuration changes by ourselves. Open step1/AndroidManifest.xml and add the following lines:
step1/AndroidManifest.xml
<activity
    android:name=".CameraActivity"
    android:exported="true"
    android:configChanges="keyboard|keyboardHidden|orientation|screenSize|screenLayout|smallestScreenSize|uiMode"
    android:resizeableActivity="true">
    <intent-filter>
        <action android:name="android.intent.action.MAIN" />

        <category android:name="android.intent.category.LAUNCHER" />
    </intent-filter>
</activity>
Now you should also update step1/CameraActivity.kt to recreate a CameraCaptureSession every time the surface size changes.
Go to line 232 and call the function createCaptureSession():
step1/CameraActivity.kt
override fun onSurfaceTextureSizeChanged(
    surface: SurfaceTexture,
    width: Int,
    height: Int
) {
    createCaptureSession()
}
There is one caveat here: onSurfaceTextureSizeChanged is not called after a 180-degrees rotation (the size doesn't change!). It also does not trigger onConfigurationChanged, so the only option we have is to instantiate a DisplayListener and check for rotations of 180 degrees. Since the device has four orientations (portrait, landscape, reverse portrait, and reverse landscape) defined by the integer numbers 0, 1, 2, and 3, we need to check for a rotation difference of 2.
Add the following code:
step1/CameraActivity.kt
/** DisplayManager to listen to display changes */
private val displayManager: DisplayManager by lazy {
    applicationContext.getSystemService(DISPLAY_SERVICE) as DisplayManager
}

/** Keeps track of display rotations */
private var displayRotation = 0

...

override fun onAttachedToWindow() {
    super.onAttachedToWindow()
    displayManager.registerDisplayListener(displayListener, mainLooperHandler)
}

override fun onDetachedFromWindow() {
    super.onDetachedFromWindow()
    displayManager.unregisterDisplayListener(displayListener)
}

private val displayListener = object : DisplayManager.DisplayListener {
    override fun onDisplayAdded(displayId: Int) {}
    override fun onDisplayRemoved(displayId: Int) {}
    override fun onDisplayChanged(displayId: Int) {
        val difference = displayManager.getDisplay(displayId).rotation - displayRotation
        displayRotation = displayManager.getDisplay(displayId).rotation

        if (difference == 2 || difference == -2) {
            createCaptureSession()
        }
    }
}
Now we are sure that the capture session is recreated in any case. It's time to learn about the hidden relationship between camera orientations and display rotations.
6. Sensor orientation and display rotations
We refer to natural orientation as the orientation in which users tend to "naturally" use a device. For example, natural orientation is likely landscape for a laptop and portrait for a phone. For a tablet this can be any of the two.
Starting from this definition, we can define two other concepts.
We call camera orientation the angle between the camera sensor and the natural orientation of the device. This is likely dependent on how the camera is physically mounted on the device and that the sensor is supposed to be always aligned with the long side of the screen (see the CDD).
Considering that it may be difficult to define the long side for a foldable device—as it can physically transform its geometry—starting from API level 32, this field is not static anymore, but it can be dynamically retrieved from the CameraCharacteristics object.
Another concept is device rotation,which measures how much the device is physically rotated from its natural orientation.
Since we usually only want to handle four different orientations, we can consider only angles that are multiples of 90 and get this information by multiplying the value returned from Display.getRotation() by 90.
By default, the TextureView already compensates for the camera orientation, but it does not handle the display rotation, resulting in previews that are incorrectly rotated.
This can be solved by simply rotating the target SurfaceTexture. Let's update the function CameraUtils.buildTargetTexture to accept the surfaceRotation: Int parameter and to apply the transformation to the surface:
step1/CameraUtils.kt
fun buildTargetTexture(
    containerView: TextureView,
    characteristics: CameraCharacteristics,
    surfaceRotation: Int
): SurfaceTexture? {

    val previewSize = findBestPreviewSize(Size(containerView.width, containerView.height), characteristics)

    val surfaceRotationDegrees = surfaceRotation * 90

    val halfWidth = containerView.width / 2f
    val halfHeight = containerView.height / 2f

    val matrix = Matrix()

    // Rotate to compensate display rotation
    matrix.postRotate(
        -surfaceRotationDegrees.toFloat(),
        halfWidth,
        halfHeight
    )

    containerView.setTransform(matrix)

    return containerView.surfaceTexture?.apply {
        setDefaultBufferSize(previewSize.width, previewSize.height)
    }
}
Then you can call it by modifying line 138 of CameraActivity in this way:
step1/CameraActivity.kt
val targetTexture = CameraUtils.buildTargetTexture(
textureView, cameraManager.getCameraCharacteristics(cameraID))
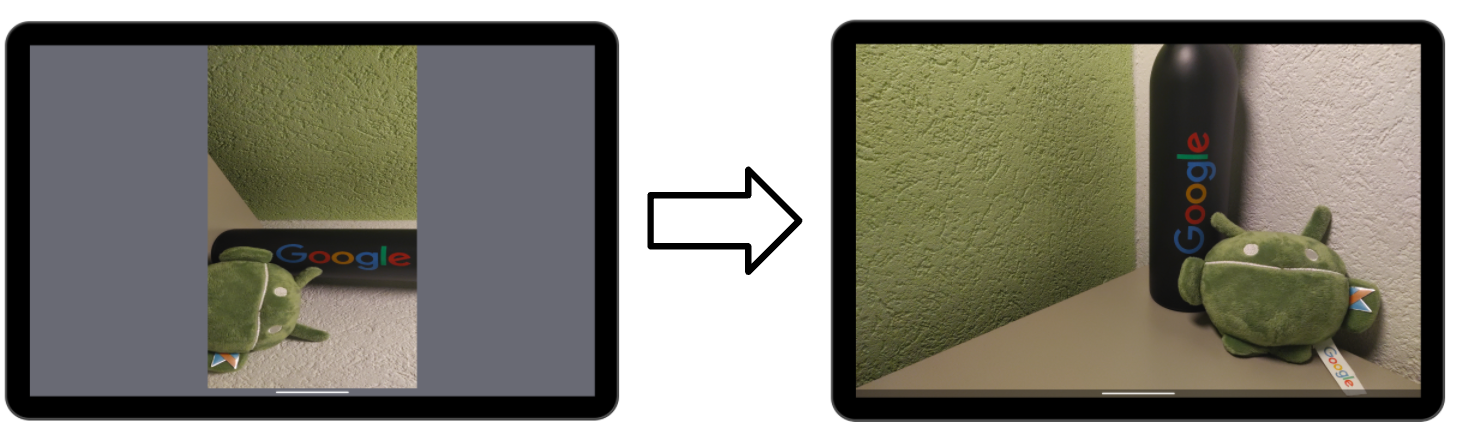
Running the app now results in a preview like this:
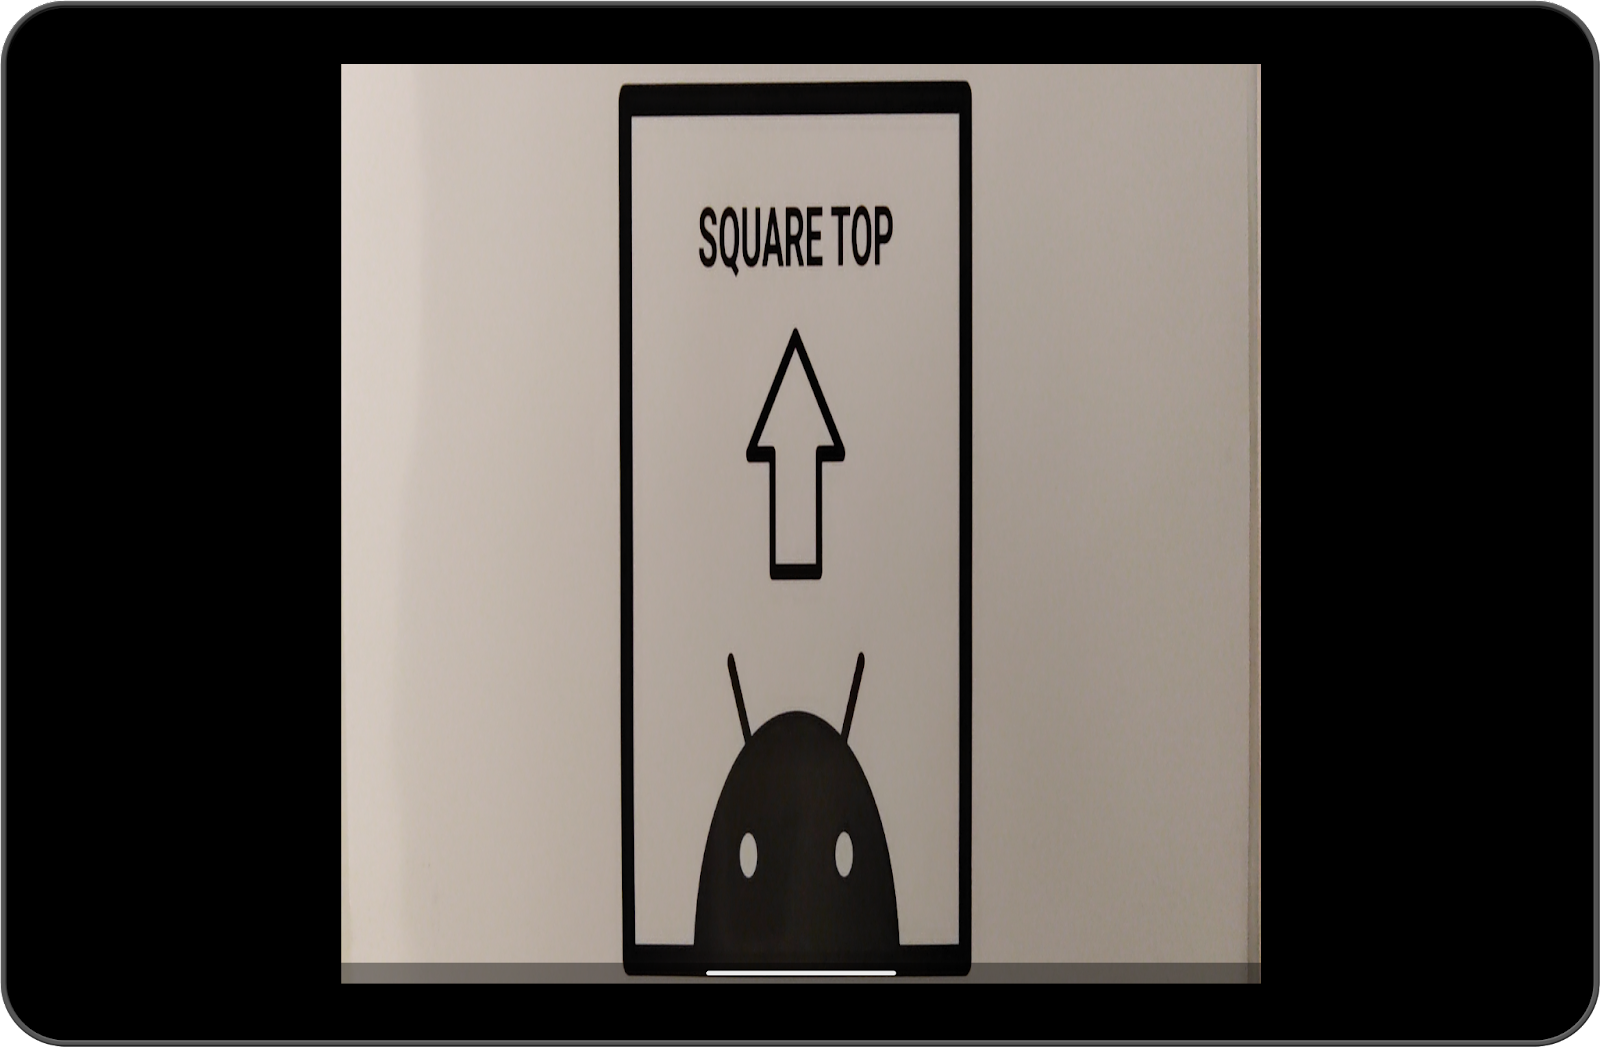
The arrow now points to the top, but the container is still not a square. Let's see how to fix this in the last step.
Scaling the viewfinder
The last step is to scale the surface to match the aspect ratio of the camera output.
The issue of the previous step is happening because by default the TextureView scales its content to fit the whole window. This window can have a different aspect ratio than the camera preview, so it may be stretched or distorted.
We can fix this in two steps:
- Calculate the scaling factors the
TextureViewapplied to itself by default, and reverse that transformation - Calculate and apply the right scaling factor (which needs to be the same for both the x and y axes)
To calculate the correct scaling factor, we need to take into account the difference between camera orientation and display rotation. Open step1/CameraUtils.kt and add the following function to compute the relative rotation between the sensor orientation and the display rotation:
step1/CameraUtils.kt
/**
 * Computes the relative rotation between the sensor orientation and the display rotation.
 */
private fun computeRelativeRotation(
    characteristics: CameraCharacteristics,
    deviceOrientationDegrees: Int
): Int {
    val sensorOrientationDegrees =
        characteristics.get(CameraCharacteristics.SENSOR_ORIENTATION) ?: 0

    // Reverse device orientation for front-facing cameras
    val sign = if (characteristics.get(CameraCharacteristics.LENS_FACING) ==
        CameraCharacteristics.LENS_FACING_FRONT
    ) 1 else -1

    return (sensorOrientationDegrees - (deviceOrientationDegrees * sign) + 360) % 360
}
Knowing the value returned from computeRelativeRotation is critical because it makes us understand if the original preview has been rotated before being scaled.
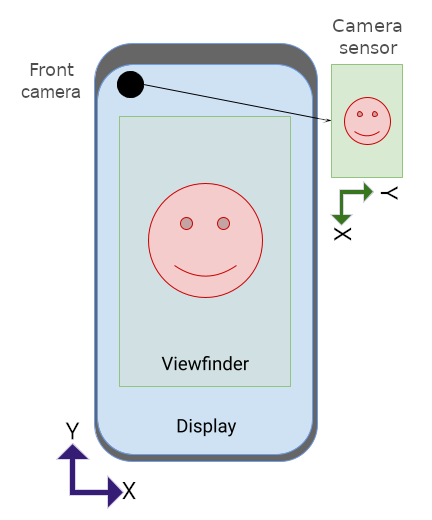
For example, for a phone in its natural orientation, the camera output is landscape shaped, and it gets rotated by 90 degrees before being displayed on screen.
On the other hand, for a Chromebook in its natural orientation, the camera output is directly displayed on screen without any additional rotation.
Have a look again at the following cases:
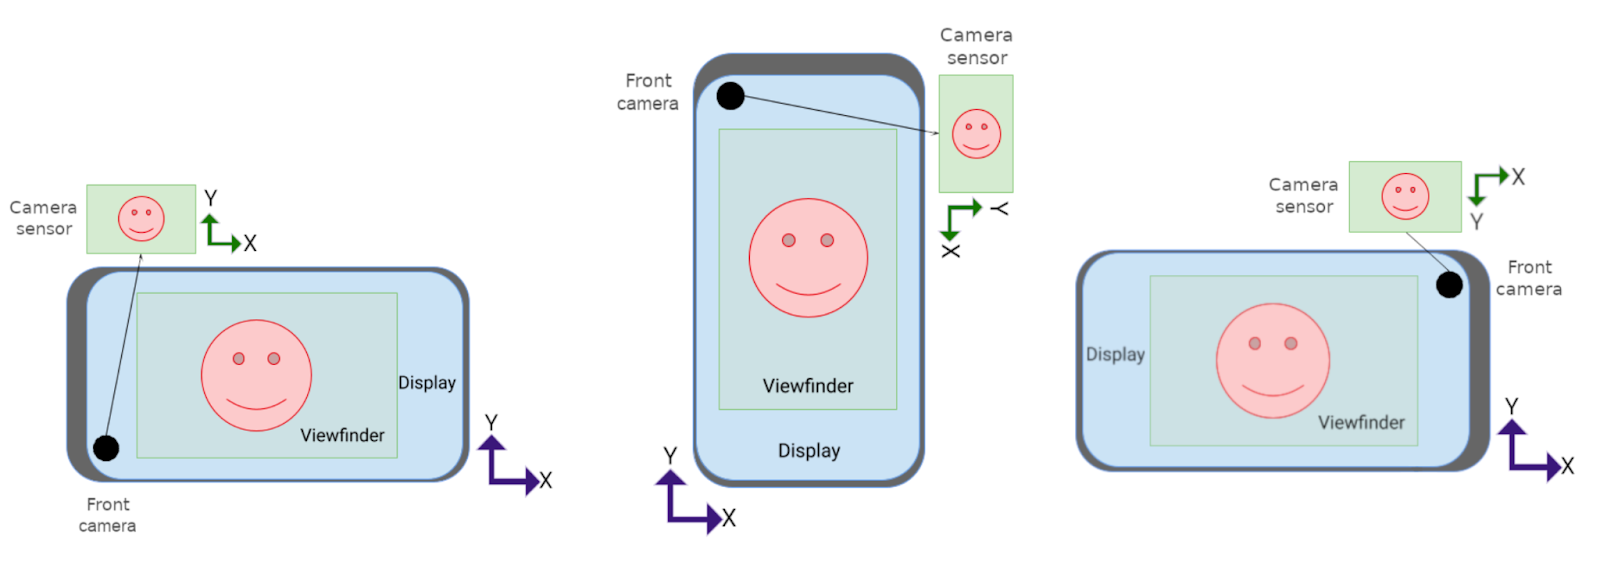 In the second (middle) case, the x-axis of the camera output is displayed over the y-axis of the screen and vice versa, that means that the width and height of the camera output are being inverted during the transformation. In the other cases, they are kept the same, although a rotation is still required in the third scenario.
We can generalize those cases with the formula:
val isRotationRequired =
        computeRelativeRotation(characteristics, surfaceRotationDegrees) % 180 != 0
With this information, we can now update the function to scale the surface:
step1/CameraUtils.kt
fun buildTargetTexture(
        containerView: TextureView,
        characteristics: CameraCharacteristics,
        surfaceRotation: Int
    ): SurfaceTexture? {

        val surfaceRotationDegrees = surfaceRotation * 90
        val windowSize = Size(containerView.width, containerView.height)
        val previewSize = findBestPreviewSize(windowSize, characteristics)
        val sensorOrientation =
            characteristics.get(CameraCharacteristics.SENSOR_ORIENTATION) ?: 0
        val isRotationRequired =
            computeRelativeRotation(characteristics, surfaceRotationDegrees) % 180 != 0

        /* Scale factor required to scale the preview to its original size on the x-axis */
        var scaleX = 1f
        /* Scale factor required to scale the preview to its original size on the y-axis */
        var scaleY = 1f

        if (sensorOrientation == 0) {
            scaleX =
                if (!isRotationRequired) {
                    windowSize.width.toFloat() / previewSize.height
                } else {
                    windowSize.width.toFloat() / previewSize.width
                }

            scaleY =
                if (!isRotationRequired) {
                    windowSize.height.toFloat() / previewSize.width
                } else {
                    windowSize.height.toFloat() / previewSize.height
                }
        } else {
            scaleX =
                if (isRotationRequired) {
                    windowSize.width.toFloat() / previewSize.height
                } else {
                    windowSize.width.toFloat() / previewSize.width
                }

            scaleY =
                if (isRotationRequired) {
                    windowSize.height.toFloat() / previewSize.width
                } else {
                    windowSize.height.toFloat() / previewSize.height
                }
        }

        /* Scale factor required to fit the preview to the TextureView size */
        val finalScale = max(scaleX, scaleY)
        val halfWidth = windowSize.width / 2f
        val halfHeight = windowSize.height / 2f

        val matrix = Matrix()

        if (isRotationRequired) {
            matrix.setScale(
                1 / scaleX * finalScale,
                1 / scaleY * finalScale,
                halfWidth,
                halfHeight
            )
        } else {
            matrix.setScale(
                windowSize.height / windowSize.width.toFloat() / scaleY * finalScale,
                windowSize.width / windowSize.height.toFloat() / scaleX * finalScale,
                halfWidth,
                halfHeight
            )
        }

        // Rotate to compensate display rotation
        matrix.postRotate(
            -surfaceRotationDegrees.toFloat(),
            halfWidth,
            halfHeight
        )

        containerView.setTransform(matrix)

        return containerView.surfaceTexture?.apply {
            setDefaultBufferSize(previewSize.width, previewSize.height)
        }
    }
Build the app, run it, and enjoy your shiny camera preview!
Bonus: change the default animation
If you want to avoid the default animation on rotation, which may look atypical for camera apps, you can change it with a jumpcut animation for a smoother transition by adding the following code to the activity onCreate() method:
val windowParams: WindowManager.LayoutParams = window.attributes
windowParams.rotationAnimation = WindowManager.LayoutParams.ROTATION_ANIMATION_JUMPCUT
window.attributes = windowParams
7. Congratulations
What you've learned:
- How unoptimized apps behave on Android 12L in compatibility mode
- How to handle configuration changes
- The difference between concepts like camera orientation, display rotation, and the device's natural orientation
- The default behavior of the
TextureView - How to scale and rotate the surface to correctly display the camera preview in every scenario!