
1. Introduction
Activity embedding, introduced in Android 12L (API level 32), enables activity-based apps to display multiple activities simultaneously on large screens to create two-pane layouts such as list-detail.
The Build a list-detail layout with activity embedding and Material Design codelab covered how to use XML or Jetpack WindowManager API calls to create a list-detail layout.
This codelab guides you through a few newly released features for activity embedding, which further improve your app experience on large screen devices. The features include pane expansion, activity pinning, and full screen dialog dim.
Prerequisites
- Completion of the Build a list-detail layout with Activity Embedding and Material Design codelab
- Experience working in Android Studio, including virtual device setup with Android 15
What you'll learn
How to:
- Enable pane expansion
- Implement activity pinning with one of the split windows
- Use full screen dialog dim
What you'll need
- Recent version of Android Studio
- Android phone or emulator with Android 15
- Android large tablet or emulator with smallest width greater than 600dp
2. Setup
Get the sample app
Step 1: Clone the repo
Clone the large screen codelabs Git repository:
git clone https://github.com/android/large-screen-codelabs
or download and unarchive the large screen codelabs zip file:
Step 2: Inspect the codelab source files
Navigate to the activity-embedding-advanced folder.
Step 3: Open the codelab project
In Android Studio, open the Kotlin or Java project
The activity-embedding-advanced folder in the repo and zip file contains two Android Studio projects: one in Kotlin, one in Java. Open the project of your choice. Codelab snippets are provided in both languages.
Create virtual devices
If you do not have an Android phone, small tablet, or large tablet at API level 35 or higher, open Device Manager in Android Studio and create any of the following virtual devices you require:
- Phone — Pixel 8, API level 35 or higher
- Tablet — Pixel Tablet, API level 35 or higher
3. Run the app
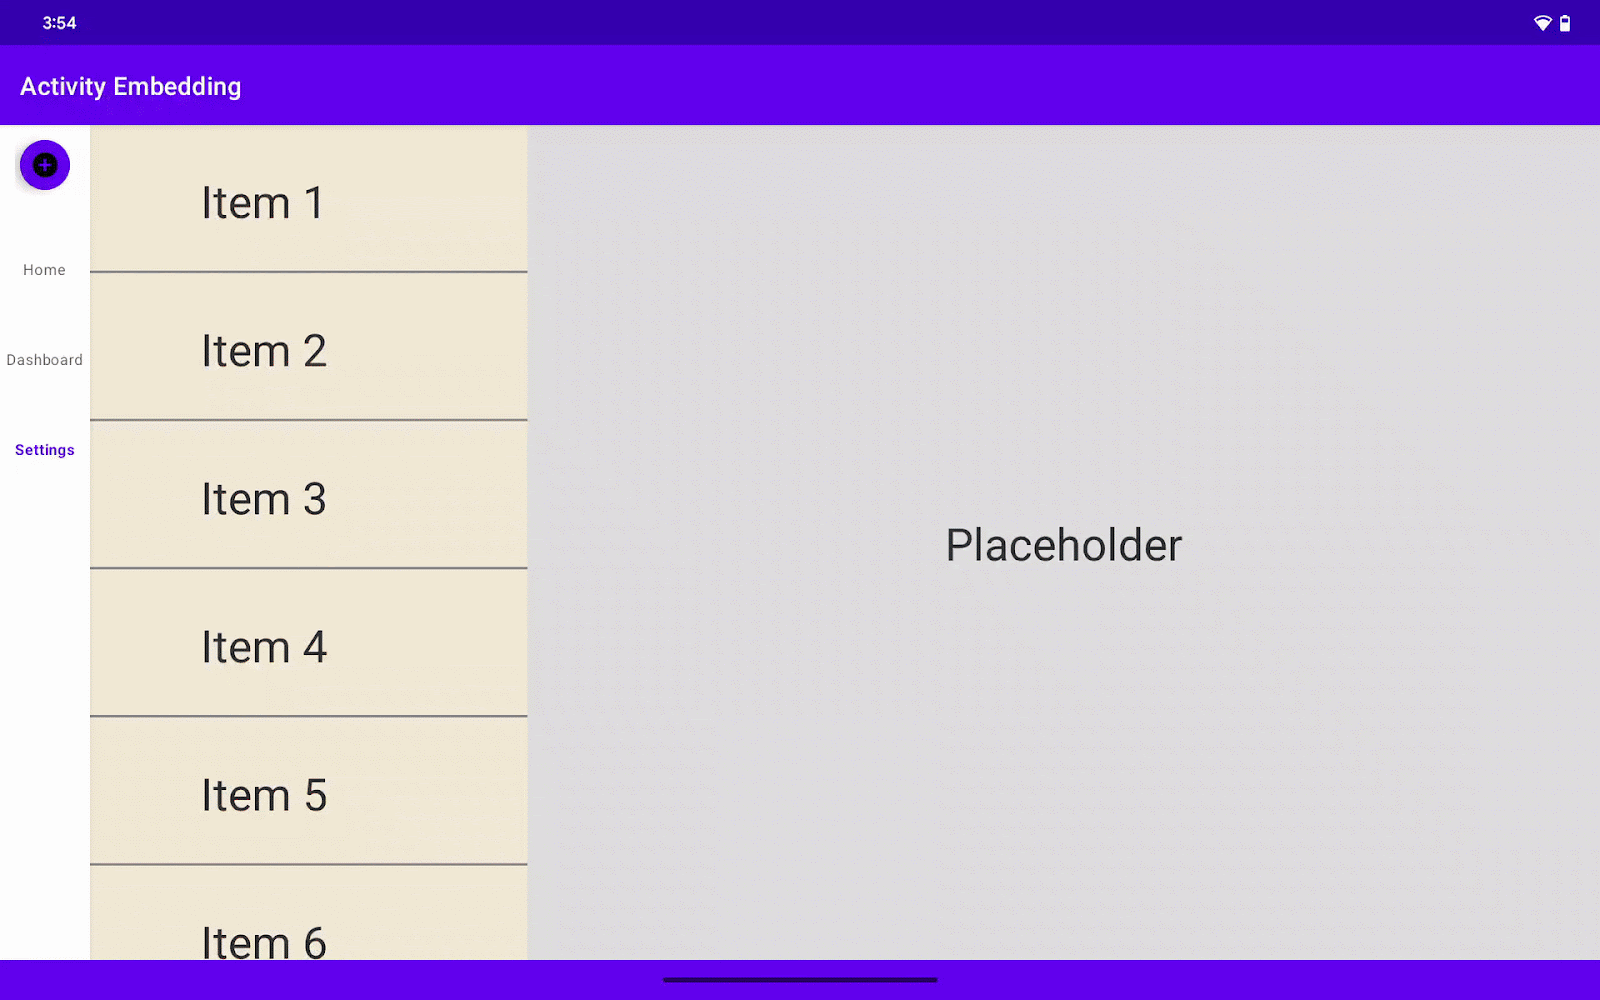
The sample app displays a list of items. When the user selects an item, the app displays information about the item.
The app consists of three activities:
ListActivity— Contains a list of items in aRecyclerViewDetailActivity— Displays information about a list item when the item is selected from the listSummaryActivity— Displays a summary of information when the Summary list item is selected
Continue from previous codelab
In the codelab Build a list-detail layout with activity embedding and Material Design, we developed an application featuring a list-detail view using activity embedding with navigation facilitated by both a navigation rail and a bottom navigation bar.
- Run the app on a large tablet or the Pixel emulator in portrait mode. You'll see the main list screen and a navigation bar at the bottom.
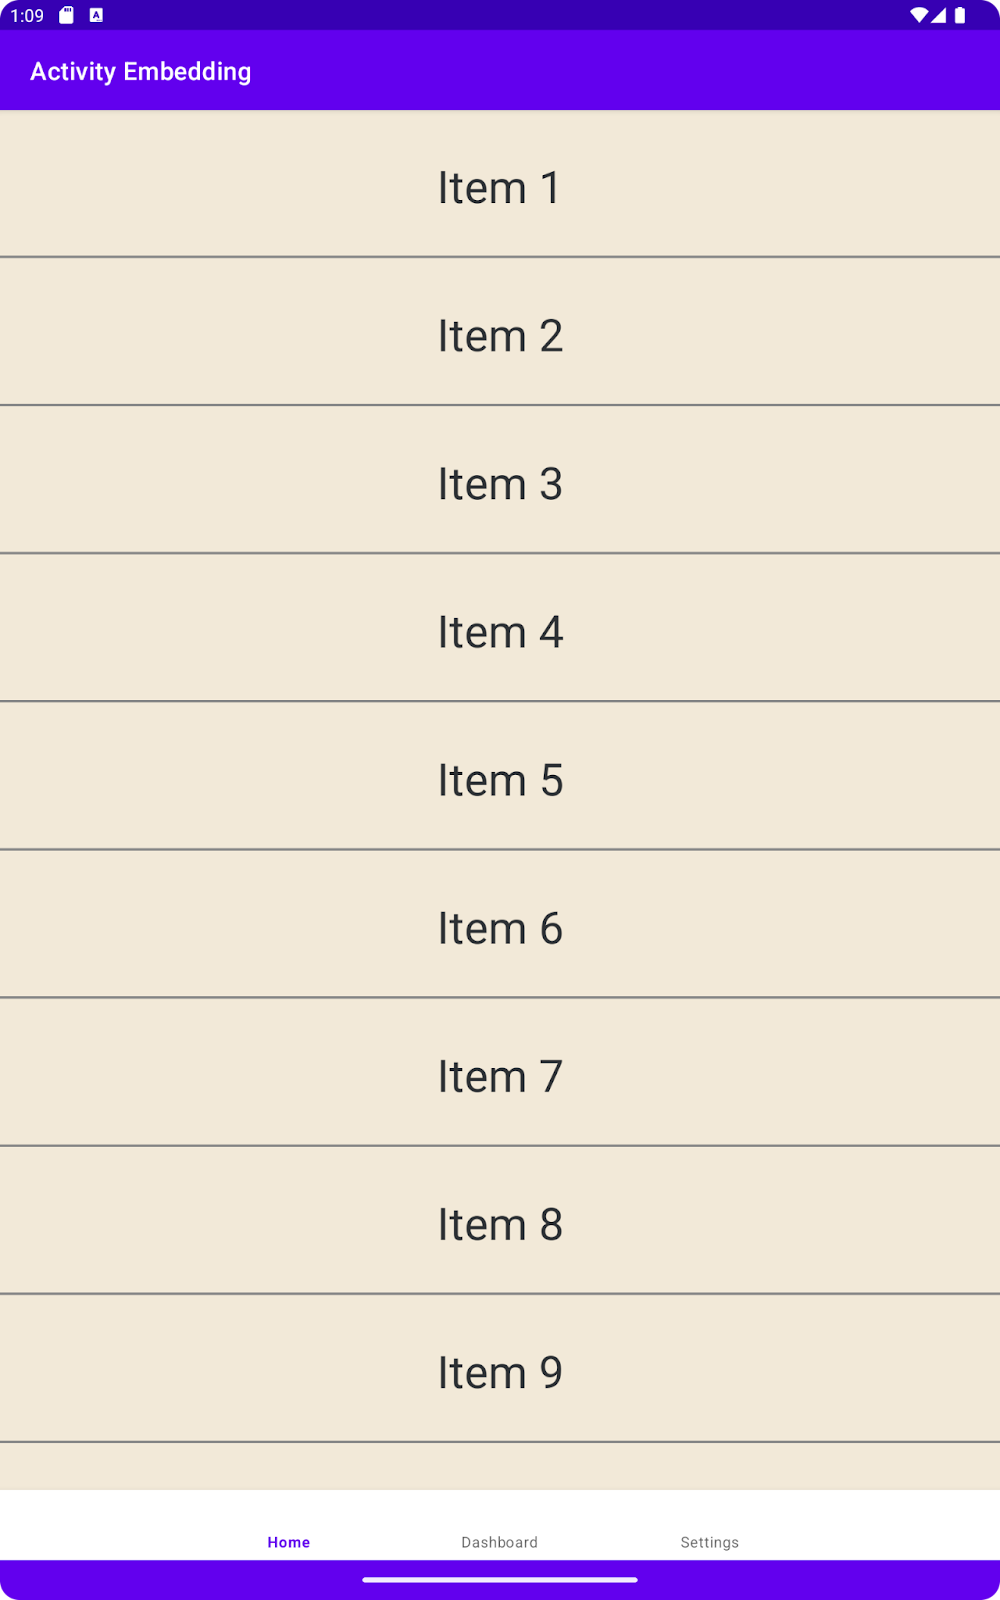
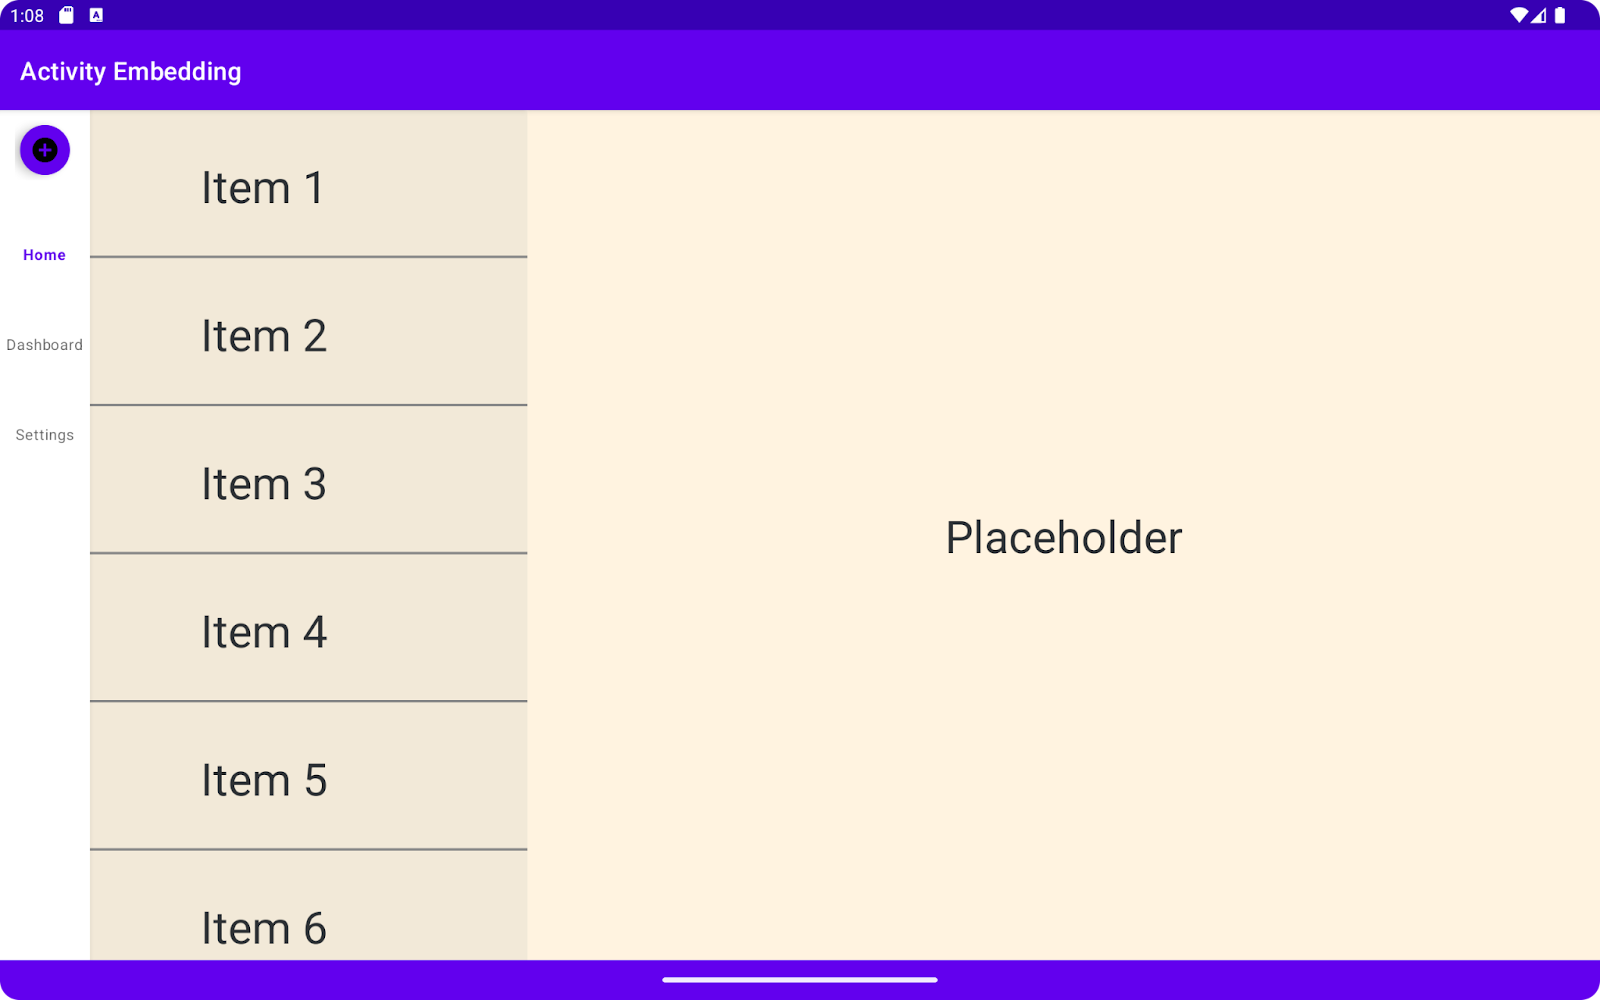
- Turn your tablet sideways (landscape). The display should split, showing the list on one side and details on the other. The navigation bar at the bottom should be replaced by a vertical navigation rail.
New features with activity embedding
Ready to level-up your dual-pane layout? In this codelab, we'll add some cool new features to enhance your users' experience. Here's what we'll be building:
- Let's make those panes dynamic! We'll implement pane expansion, giving your users the ability to resize (or expand) the panes for a customized view.
- Let's give your users the power to prioritize! With Activity Pinning, users can keep their most important tasks always on the screen.
- Need to focus on a specific task? We'll add a full screen dim feature to gently fade out distractions and let users concentrate on what matters most.
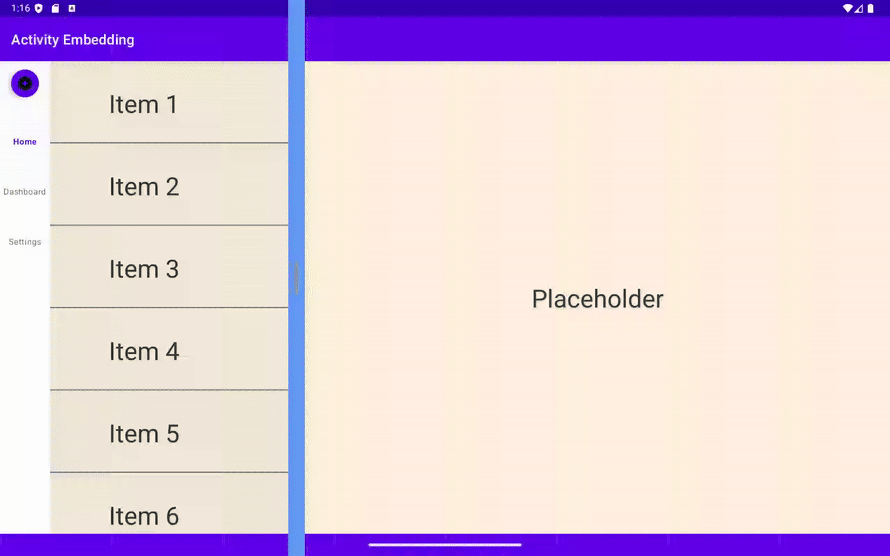
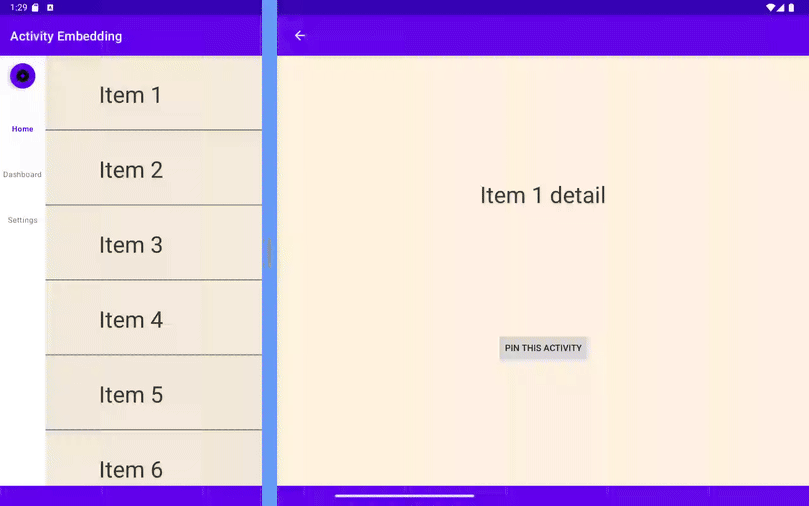
4. Pane expansion
When using a dual-pane layout on a large screen, in many cases users need to focus on one of the split panes while keeping the other one on the screen, for example, reading articles on one side while keeping a chat conversation list on the other. It is common that users would like to resize the panes to allow focus on one activity.
To achieve this goal, activity embedding adds a new API to enable you to give users the opportunity to change the split ratio and customize the resizing transition.
Add dependency
First, add WindowManager 1.4 to your build.gradle file.
Note: Some of the features in this library work only on Android 15 (API level 35) and higher.
build.gradle
implementation 'androidx.window:window:1.4.0-alpha02'
Customize the window divider
Create a DividerAttributes instance and add it to SplitAttributes. This object configures the overall behavior of your split layout. You can use color, width, and drag range properties of DividerAttributes to enhance user experience.
Customize the divider:
- Check the WindowManager Extensions API level. Since the pane expansion feature is only available on API level 6 and above, this applies to the rest of the new features as well.
- Create
DividerAttributes: To style the divider between your panes, create aDividerAttributesobject. This object allows you to set:
- color: Change the color of the divider to match your app's theme or create visual separation.
- widthDp: Adjust the width of the divider for better visibility or a more subtle look.
- Add to
SplitAttributes: Once you've customized your divider, add it to yourDividerAttributesobject. - Set drag range (optional): You can also control how far users can drag the divider to resize the panes.
DRAG_RANGE_SYSTEM_DEFAULT: Use this special value to let the system determine a suitable drag range based on the device's screen size and form factor.- Custom value (between 0.33 and 0.66): Set your own drag range to limit how much users can resize the panes. Remember, if they drag past this limit, the split layout will be disabled.
Replace splitAttributes with the following code.
SplitManager.kt
val splitAttributesBuilder: SplitAttributes.Builder = SplitAttributes.Builder()
   .setSplitType(SplitAttributes.SplitType.ratio(0.33f))
   .setLayoutDirection(SplitAttributes.LayoutDirection.LEFT_TO_RIGHT)

if (WindowSdkExtensions.getInstance().extensionVersion >= 6) {
   splitAttributesBuilder.setDividerAttributes(
       DividerAttributes.DraggableDividerAttributes.Builder()
           .setColor(getColor(context, R.color.divider_color))
           .setWidthDp(4)
           .setDragRange(
               DividerAttributes.DragRange.DRAG_RANGE_SYSTEM_DEFAULT)
           .build()
   )
}
val splitAttributes: SplitAttributes = splitAttributesBuilder.build()
SplitManager.java
SplitAttributes.Builder splitAttributesBuilder = new SplitAttributes.Builder()
        .setSplitType(SplitAttributes.SplitType.ratio(0.33f))
        .setLayoutDirection(SplitAttributes.LayoutDirection.LEFT_TO_RIGHT);

if (WindowSdkExtensions.getInstance().getExtensionVersion() >= 6) {
    splitAttributesBuilder.setDividerAttributes(
            new DividerAttributes.DraggableDividerAttributes.Builder()
                    .setColor(ContextCompat.getColor(context, R.color.divider_color))
                    .setWidthDp(4)
                    .setDragRange(DividerAttributes.DragRange.DRAG_RANGE_SYSTEM_DEFAULT)
                    .build()
    );
}
SplitAttributes splitAttributes = splitAttributesBuilder.build();
Create divider_color.xml in res/color folder with the following content.
<?xml version="1.0" encoding="utf-8"?>
<selector xmlns:android="http://schemas.android.com/apk/res/android">
   <item android:color="#669df6" />
</selector>
Run it!
That's it. Build and run the sample app.
You should see the pane expansion and be able to drag it around.
Change split ratio in older versions
Important compatibility note: The pane expansion feature is only available on WindowManager Extensions 6 or above, which means you need Android 15 (API level 35) or higher.
However, you'll still want to provide a good experience for users on older Android versions.
On Android 14 (API level 34) and lower, you can still provide dynamic split ratio adjustments using the SplitAttributesCalculator class. This offers a way to maintain some level of user control over the layout, even without pane expansion.
Curious about the optimal way to use these features? We'll cover all the best practices and insider tips in the "Best Practices" section.
5. Activity pinning
Ever wanted to keep one part of your split-screen view fixed while navigating freely in the other? Think of reading a long article on one side while still being able to interact with other app content on the other half.
That's where activity pinning comes in! It lets you pin one of the split windows in place so it stays on the screen even as you navigate within the other window. This provides a more focused and productive multitasking experience for your users.
Add the pinning button
First, let's add a button in DetailActivity. The application pins this DetailActivity when users click the button.
Make the following changes to activity_detail.xml:
- Add an ID to the
ConstraintLayout
android:id="@+id/detailActivity"
- Add a button at the bottom of the layout
<androidx.appcompat.widget.AppCompatButton
      android:id="@+id/pinButton"
      android:layout_width="wrap_content"
      android:layout_height="wrap_content"
      android:text="@string/pin_this_activity"
      app:layout_constraintBottom_toBottomOf="parent"
      app:layout_constraintEnd_toEndOf="parent"
      app:layout_constraintStart_toStartOf="parent"
      app:layout_constraintTop_toBottomOf="@id/textViewItemDetail"/>
- Constrain the
TextViewbottom to the top of the button
app:layout_constraintBottom_toTopOf="@id/pinButton"
Remove this line in TextView.
app:layout_constraintBottom_toBottomOf="parent"
Here's the complete XML code for your activity_detail.xml layout file, including the PIN THIS ACTIVITY button we just added:
<androidx.constraintlayout.widget.ConstraintLayout
    xmlns:android="http://schemas.android.com/apk/res/android"
    xmlns:app="http://schemas.android.com/apk/res-auto"
    xmlns:tools="http://schemas.android.com/tools"
    android:id="@+id/detailActivity"
    android:layout_width="match_parent"
    android:layout_height="match_parent"
    android:background="@color/white"
    tools:context=".DetailActivity">

  <TextView
      android:id="@+id/textViewItemDetail"
      android:layout_width="wrap_content"
      android:layout_height="wrap_content"
      android:textSize="36sp"
      android:textColor="@color/obsidian"
      app:layout_constraintBottom_toTopOf="@id/pinButton"
      app:layout_constraintEnd_toEndOf="parent"
      app:layout_constraintStart_toStartOf="parent"
      app:layout_constraintTop_toTopOf="parent" />

  <androidx.appcompat.widget.AppCompatButton
      android:id="@+id/pinButton"
      android:layout_width="wrap_content"
      android:layout_height="wrap_content"
      android:text="@string/pin_this_activity"
      app:layout_constraintBottom_toBottomOf="parent"
      app:layout_constraintEnd_toEndOf="parent"
      app:layout_constraintStart_toStartOf="parent"
      app:layout_constraintTop_toBottomOf="@id/textViewItemDetail"/>

</androidx.constraintlayout.widget.ConstraintLayout>
Add string pin_this_activity to res/values/strings.xml.
<string name="pin_this_activity">PIN THIS ACTIVITY</string>
Connect the pinning button
- Declare the variable: In your
DetailActivity.ktfile, declare a variable to hold a reference to the PIN THIS ACTIVITY button:
DetailActivity.kt
private lateinit var pinButton: Button
DetailActivity.java
private Button pinButton;
- Find the button in the layout and add a
setOnClickListener()callback.
DetailActivity.kt / onCreate
pinButton = findViewById(R.id.pinButton)
pinButton.setOnClickListener {
 pinActivityStackExample(taskId)
}
DetailActivity.java / onCreate()
Button pinButton = findViewById(R.id.pinButton);
pinButton.setOnClickListener( (view) => {
        pinActivityStack(getTaskId());

});
- Create a new method called
pinActivityStackExamplein yourDetailActivityclass. We'll implement the actual pinning logic here.
DetailActivity.kt
private fun pinActivityStackExample(taskId: Int) {

 val splitAttributes: SplitAttributes = SplitAttributes.Builder()
   .setSplitType(SplitAttributes.SplitType.ratio(0.66f))
   .setLayoutDirection(SplitAttributes.LayoutDirection.LEFT_TO_RIGHT)
   .build()

 val pinSplitRule = SplitPinRule.Builder()
   .setSticky(true)
   .setDefaultSplitAttributes(splitAttributes)
   .build()

 SplitController.getInstance(applicationContext).pinTopActivityStack(taskId, pinSplitRule)
}
DetailActivity.java
private void pinActivityStackExample(int taskId) {
    SplitAttributes splitAttributes = new SplitAttributes.Builder()
            .setSplitType(SplitAttributes.SplitType.ratio(0.66f))
            .setLayoutDirection(SplitAttributes.LayoutDirection.LEFT_TO_RIGHT)
            .build();

    SplitPinRule pinSplitRule = new SplitPinRule.Builder()
            .setSticky(true)
            .setDefaultSplitAttributes(splitAttributes)
            .build();

    SplitController.getInstance(getApplicationContext()).pinTopActivityStack(taskId, pinSplitRule);
}
Note:
- Only one activity can be pinned at a time. Unpin the currently pinned activity with
unpinTopActivityStack()
before you pin another one.
- To enable pane expansion when pinning the activity, call
setDividerAttributes()
for the newly created
SplitAttributes
as well.
Back navigation changes
With WindowManager 1.4, the behavior of back navigation changed. The back event is sent to the last focused activity when using button navigation.
Button navigation:
- With button navigation, the back event is now consistently sent to the last focused activity. This simplifies back navigation behavior, making it more predictable for users.
Gesture navigation:
- Android 14 (API level 34) and lower: The back gesture sends the event to the activity where the gesture occurred, which can lead to unexpected behavior in split-screen scenarios.
- Android 15 (API level 35) and higher:
- Same-app activities: The back gesture consistently finishes the top activity, regardless of swipe direction, providing a more unified experience.
- Different-app activities (overlay): The back event goes to the last activity in focus, aligning with the behavior of button navigation.
Run it!
Build and run the sample app.
Pin the activity
- Navigate to the
DetailActivityscreen. - Tap the PIN THIS ACTIVITY button.
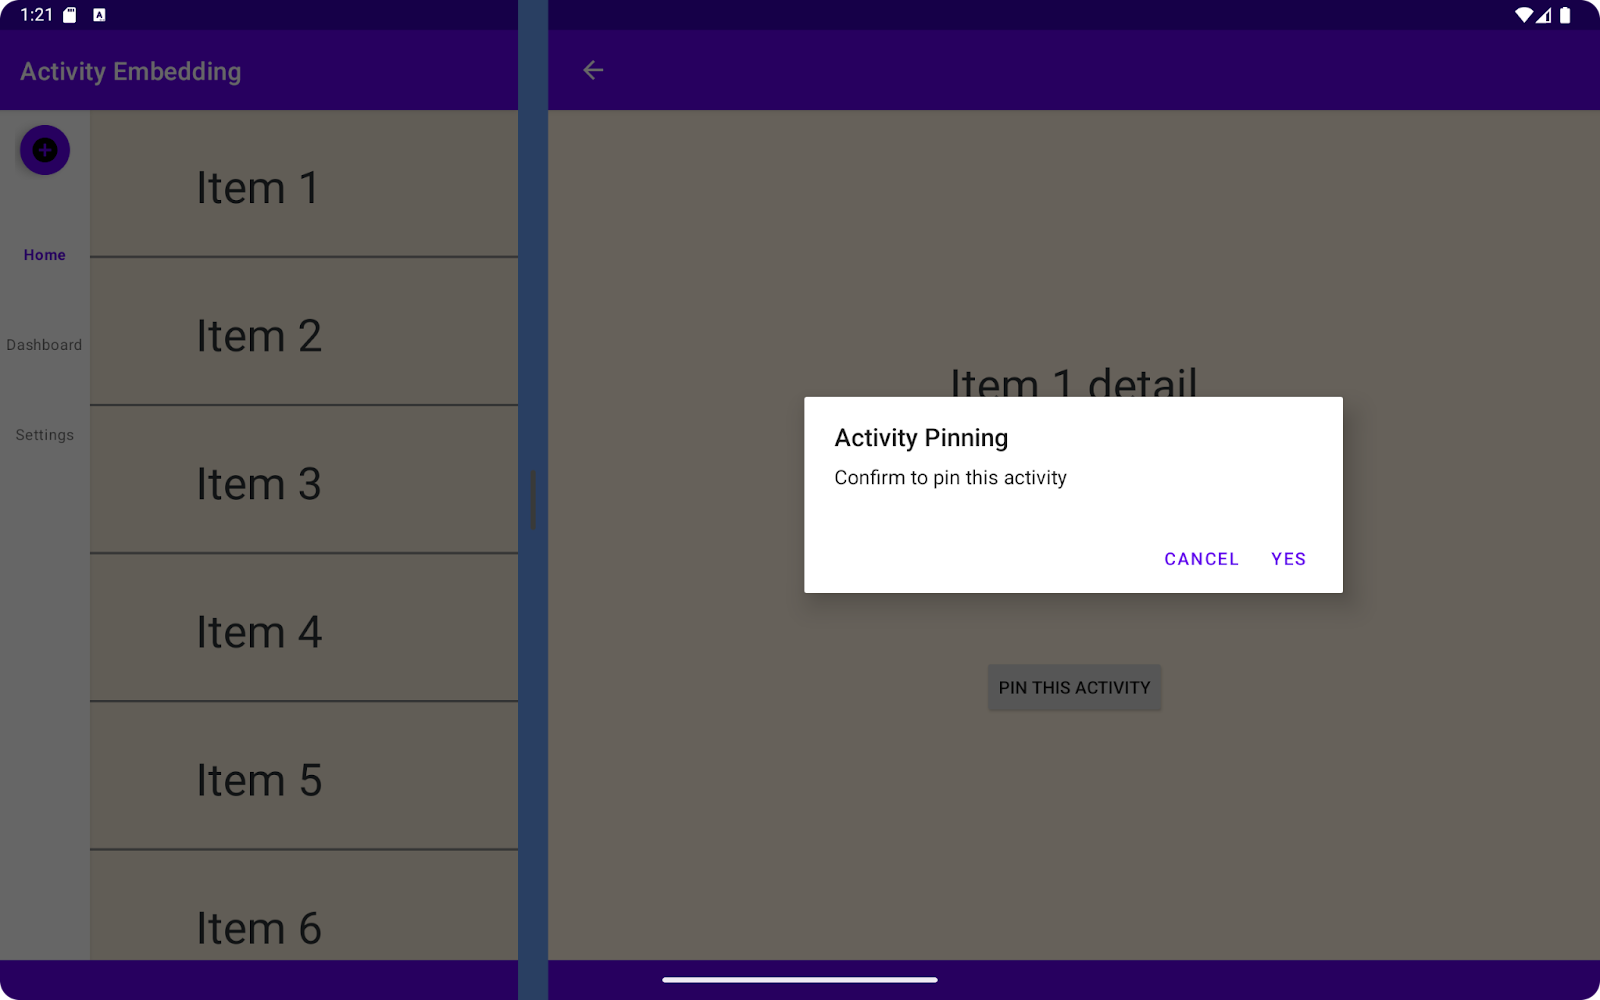
6. Full screen dialog dim
While activity embedding facilitates split-screen layouts, dialogs in previous versions only dimmed their own activity's container. This could create a disjointed visual experience, especially when you want the dialog to take center stage.
The solution: WindowManager 1.4
- We've got you covered! With WindowManager 1.4, dialogs now dim the entire app window by default (
DimAreaBehavior.Companion.ON_TASK), providing a more immersive and focused feel. - Need the old behavior back? No problem! You can still choose to dim only the activity's container using
ON_ACTIVITY_STACK.
|
|
|
|
Here's how you can use the ActivityEmbeddingController to manage full screen dimming behavior:
Note: Full-screen dialog dim is available with WindowManager Extensions 5 or later.
SplitManager.kt / createSplit()
with(ActivityEmbeddingController.getInstance(context)) {
   if (WindowSdkExtensions.getInstance().extensionVersion  >= 5) {
       setEmbeddingConfiguration(
           EmbeddingConfiguration.Builder()
               .setDimAreaBehavior(ON_TASK)
               .build()
       )
   }
}
SplitManager.java / createSplit()
ActivityEmbeddingController controller = ActivityEmbeddingController.getInstance(context);
if (WindowSdkExtensions.getInstance().getExtensionVersion()  >= 5) {
    controller.setEmbeddingConfiguration(
        new EmbeddingConfiguration.Builder()
            .setDimAreaBehavior(EmbeddingConfiguration.DimAreaBehavior.ON_TASK)
            .build()
    );
}
To showcase the full screen dim feature, we'll introduce an alert dialog that prompts the user for confirmation before pinning the activity. Upon appearing, this dialog dims the entire application window, not just the container where the activity resides.
DetailActivity.kt
pinButton.setOnClickListener {
 showAlertDialog(taskId)
}

...
private fun showAlertDialog(taskId: Int) {
 val builder = AlertDialog.Builder(this)
 builder.setTitle(getString(R.string.dialog_title))
 builder.setMessage(getString(R.string.dialog_message))
 builder.setPositiveButton(getString(R.string.button_yes)) { _, _ ->
   if (WindowSdkExtensions.getInstance().extensionVersion  >= 6) {
     pinActivityStackExample(taskId)
   }
 }
 builder.setNegativeButton(getString(R.string.button_cancel)) { _, _ ->
   // Cancel
 }
 val dialog: AlertDialog = builder.create()
 dialog.show()
}
DetailActivity.java
pinButton.setOnClickListener(new View.OnClickListener() {
   @Override
   public void onClick(View v) {
       showAlertDialog(getTaskId());
   }
});

...

private void showAlertDialog(int taskId) {
   AlertDialog.Builder builder = new AlertDialog.Builder(this);
   builder.setTitle(getString(R.string.dialog_title));
   builder.setMessage(getString(R.string.dialog_message));

   builder.setPositiveButton(getString(R.string.button_yes), new DialogInterface.OnClickListener() {
       @Override
       public void onClick(DialogInterface dialog, int which) {
           if (WindowSdkExtensions.getInstance().getExtensionVersion() >= 6) {
               pinActivityStackExample(taskId);
           }
       }
   });
   builder.setNegativeButton(getString(R.string.button_cancel), new DialogInterface.OnClickListener() {
       @Override
       public void onClick(DialogInterface dialog, int which) {
           // Cancel
       }
   });
   AlertDialog dialog = builder.create();
   dialog.show();
}
Add the following strings to res/values/strings.xml.
<!-- Dialog information -->
<string name="dialog_title">Activity Pinning</string>
<string name="dialog_message">Confirm to pin this activity</string>
<string name="button_yes">Yes</string>
<string name="button_cancel">Cancel</string>
Run it!
Build and run the sample app.
Click the pin activity button:
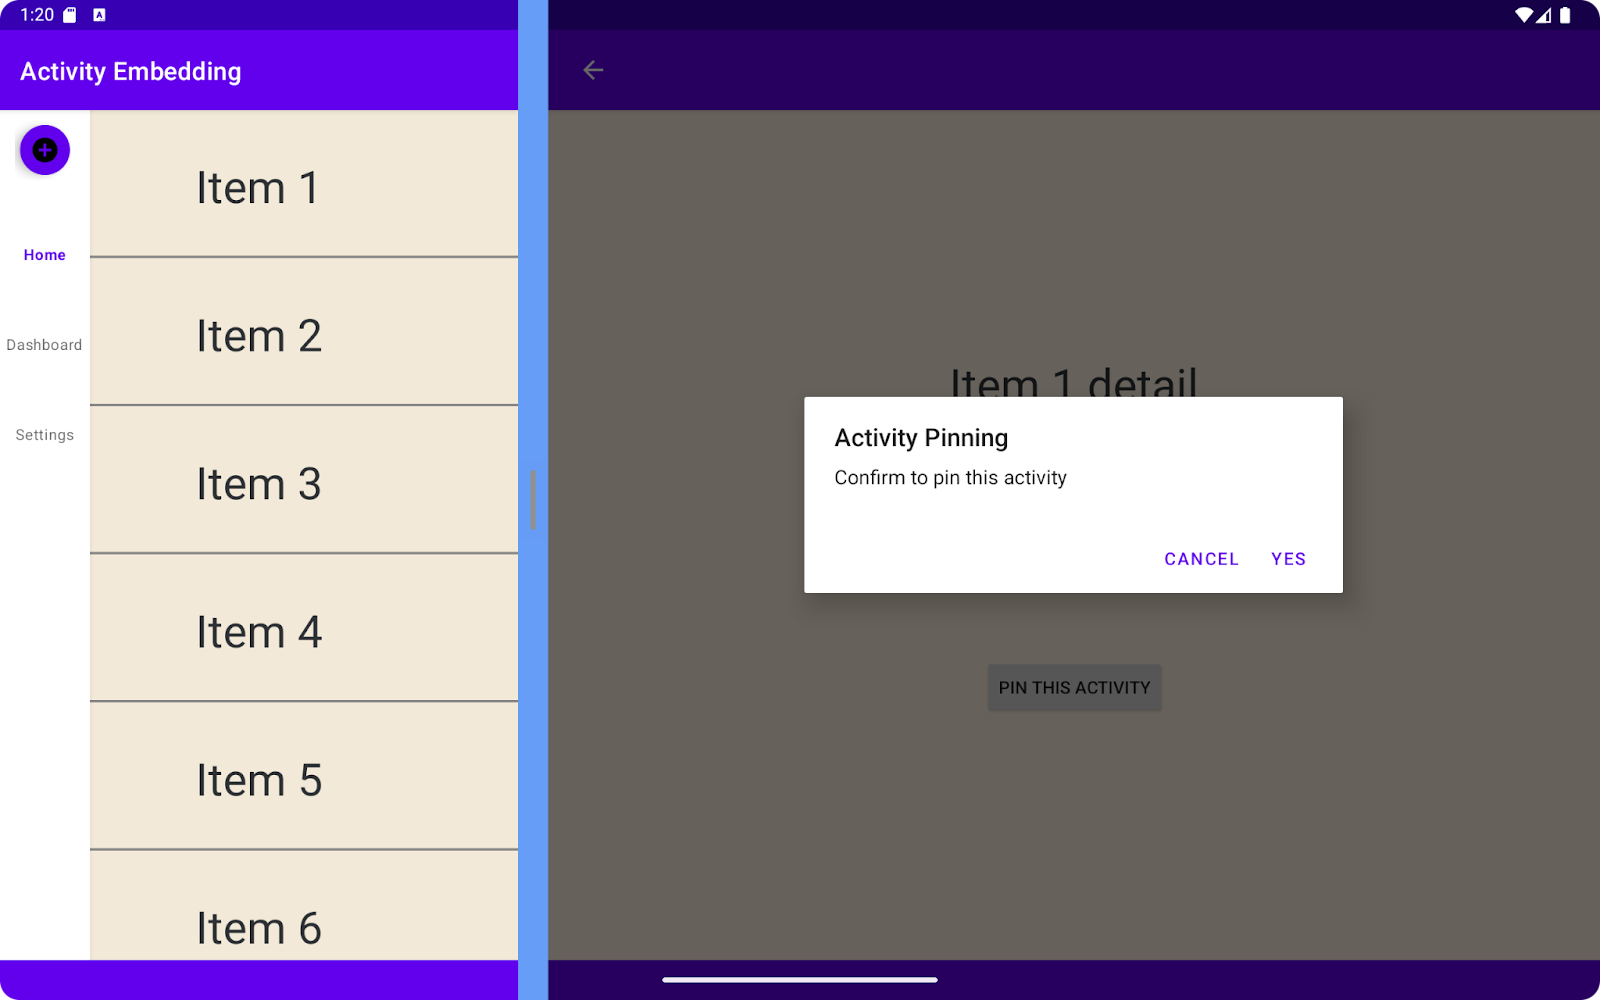
- An alert dialog appears, prompting you to confirm the pinning action.
- Notice how the entire screen, including both split panes, is dimmed, focusing attention on the dialog.
7. Best practices
Allow users to turn off dual-pane layout
To make the transition to new layouts smoother, let's give users the ability to switch between dual-pane and single-column views. We can achieve this using SplitAttributesCalculator and SharedPreferences to store user preferences.
Change split ratio on Android 14 and lower
We've explored pane expansion, which provides a great way for users to adjust the split ratio on Android 15 and higher. But how can we offer a similar level of flexibility to users on older Android versions?
Let's dive into how the SplitAttributesCalculator can help us achieve this and ensure a consistent experience across a wider range of devices.
Here's an example of how it looks:
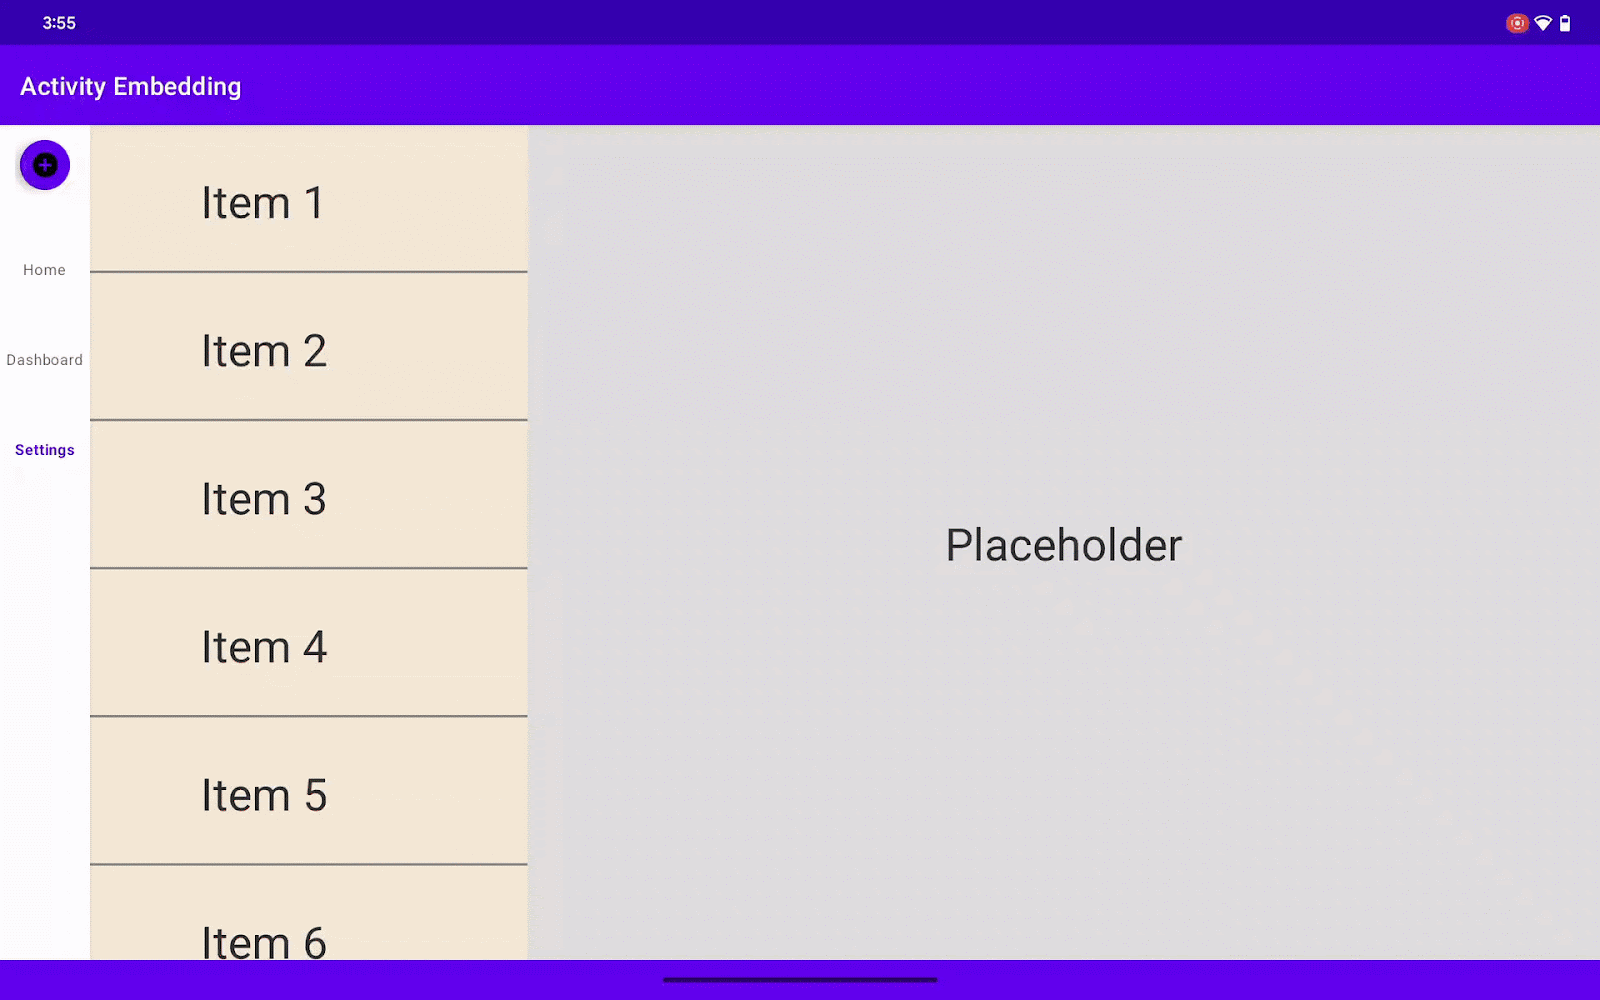
Create settings screen
To begin, let's create a dedicated settings screen for user configuration.
Within this settings screen, we'll incorporate a switch to enable or disable the activity embedding feature for the entire application. Additionally, we'll include a progress bar that allows users to adjust the split ratio of the dual-pane layout. Note that the split ratio value will only be applied if the activity embedding switch is turned on.
After the user sets values in SettingsActivity, we save them in SharedPreferences to be used later in other places in the application.
build.gradle
Add preference dependency.
implementation 'androidx.preference:preference-ktx:1.2.1' // Kotlin
Or
implementation 'androidx.preference:preference:1.2.1' // Java
SettingsActivity.kt
package com.example.activity_embedding

import android.os.Bundle
import android.view.MenuItem
import androidx.appcompat.app.AppCompatActivity
import androidx.preference.PreferenceFragmentCompat
import androidx.preference.SeekBarPreference
import androidx.preference.SwitchPreferenceCompat

class SettingsActivity : AppCompatActivity() {

  override fun onCreate(savedInstanceState: Bundle?) {
    super.onCreate(savedInstanceState)
    setContentView(R.layout.settings_activity)
    if (savedInstanceState == null) {
      supportFragmentManager
        .beginTransaction()
        .replace(R.id.settings, SettingsFragment())
        .commit()
    }
    supportActionBar?.setDisplayHomeAsUpEnabled(true)
  }

  override fun onOptionsItemSelected(item: MenuItem): Boolean {
    if (item.itemId == android.R.id.home) finishActivity()
    return super.onOptionsItemSelected(item)
  }

  private fun finishActivity() { finish() }

  class SettingsFragment : PreferenceFragmentCompat() {
    override fun onCreatePreferences(savedInstanceState: Bundle?, rootKey: String?) {
      setPreferencesFromResource(R.xml.root_preferences, rootKey)
findPreference<SwitchPreferenceCompat>("dual_pane")?.setOnPreferenceChangeListener { _, newValue ->
        if (newValue as Boolean) {
          this.activity?.let {
            SharePref(it.applicationContext).setAEFlag(true)
          }
        } else {
          this.activity?.let {
            SharePref(it.applicationContext).setAEFlag(false)
          }
        }
        this.activity?.finish()
        true
      }

      val splitRatioPreference: SeekBarPreference? = findPreference("split_ratio")
      splitRatioPreference?.setOnPreferenceChangeListener { _, newValue ->
        if (newValue is Int) {
          this.activity?.let { SharePref(it.applicationContext).setSplitRatio(newValue.toFloat()/100) }
        }
        true
      }
    }
  }
}
SettingsActivity.java
package com.example.activity_embedding;

import android.os.Bundle;
import android.view.MenuItem;

import androidx.appcompat.app.AppCompatActivity;
import androidx.preference.PreferenceFragmentCompat;
import androidx.preference.SeekBarPreference;
import androidx.preference.SwitchPreferenceCompat;

public class SettingsActivity extends AppCompatActivity {

    @Override
    protected void onCreate(Bundle savedInstanceState) {
        super.onCreate(savedInstanceState);
        setContentView(R.layout.settings_activity);
        if (savedInstanceState == null) {
            getSupportFragmentManager()
                .beginTransaction()
                .replace(R.id.settings, new SettingsFragment())
                .commit();
        }
        if (getSupportActionBar() != null) {
            getSupportActionBar().setDisplayHomeAsUpEnabled(true);
        }
    }

    @Override
    public boolean onOptionsItemSelected(MenuItem item) {
        if (item.getItemId() == android.R.id.home) {
            finishActivity();
            return true;
        }
        return super.onOptionsItemSelected(item);
    }

    private void finishActivity() {
        finish();
    }

    public static class SettingsFragment extends PreferenceFragmentCompat {
        @Override
        public void onCreatePreferences(Bundle savedInstanceState, String rootKey) {
            setPreferencesFromResource(R.xml.root_preferences, rootKey);

            SwitchPreferenceCompat dualPanePreference = findPreference("dual_pane");
            if (dualPanePreference != null) {
                dualPanePreference.setOnPreferenceChangeListener((preference, newValue) -> {
                    boolean isDualPane = (Boolean) newValue;
                    if (getActivity() != null) {
                        SharePref sharePref = new SharePref(getActivity().getApplicationContext());
                        sharePref.setAEFlag(isDualPane);
                        getActivity().finish();
                    }
                    return true;
                });
            }

            SeekBarPreference splitRatioPreference = findPreference("split_ratio");
            if (splitRatioPreference != null) {
                splitRatioPreference.setOnPreferenceChangeListener((preference, newValue) -> {
                    if (newValue instanceof Integer) {
                        float splitRatio = ((Integer) newValue) / 100f;
                        if (getActivity() != null) {
                            SharePref sharePref = new SharePref(getActivity().getApplicationContext());
                            sharePref.setSplitRatio(splitRatio);
                        }
                    }
                    return true;
                });
            }
        }
    }
}
Add settings_activity.xml in the layout folder
settings_activity.xml
<LinearLayout xmlns:android="http://schemas.android.com/apk/res/android"
   android:layout_width="match_parent"
   android:layout_height="match_parent">

   <FrameLayout
       android:id="@+id/settings"
       android:layout_width="match_parent"
       android:layout_height="match_parent" />
</LinearLayout>
Add SettingsActivity to your manifest file.
<activity
   android:name=".SettingsActivity"
   android:exported="false"
   android:label="@string/title_activity_settings" />
Configure split rules for SettingsActivity.
SplitManager.kt / createSplit()
val settingActivityFilter = ActivityFilter(
   ComponentName(context, SettingsActivity::class.java),
   null
)
val settingActivityFilterSet = setOf(settingActivityFilter)
val settingActivityRule = ActivityRule.Builder(settingActivityFilterSet)
   .setAlwaysExpand(true)
   .build()
ruleController.addRule(settingActivityRule)
SplitManager.java / createSplit()
Set<ActivityFilter> settingActivityFilterSet = new HashSet<>();
ActivityFilter settingActivityFilter = new ActivityFilter(
        new ComponentName(context, SettingsActivity.class),
        null
);
settingActivityFilterSet.add(settingActivityFilter);
ActivityRule settingActivityRule = new ActivityRule.Builder(settingActivityFilterSet)
        .setAlwaysExpand(true).build();
ruleController.addRule(settingActivityRule);
Here's the code to save user settings in SharedPreferences .
SharedPref.kt
package com.example.activity_embedding

import android.content.Context
import android.content.SharedPreferences

class SharePref(context: Context) {
    private val sharedPreferences: SharedPreferences =
        context.getSharedPreferences("my_app_preferences", Context.MODE_PRIVATE)

    companion object {
        private const val AE_FLAG = "is_activity_embedding_enabled"
        private const val SPLIT_RATIO = "activity_embedding_split_ratio"
        const val DEFAULT_SPLIT_RATIO = 0.3f
    }

    fun setAEFlag(isEnabled: Boolean) {
        sharedPreferences.edit().putBoolean(AE_FLAG, isEnabled).apply()
    }

    fun getAEFlag(): Boolean = sharedPreferences.getBoolean(AE_FLAG, true)

    fun getSplitRatio(): Float = sharedPreferences.getFloat(SPLIT_RATIO, DEFAULT_SPLIT_RATIO)

    fun setSplitRatio(ratio: Float) {
        sharedPreferences.edit().putFloat(SPLIT_RATIO, ratio).apply()
    }
}
SharedPref.java
package com.example.activity_embedding;

import android.content.Context;
import android.content.SharedPreferences;

public class SharePref {
    private static final String PREF_NAME = "my_app_preferences";
    private static final String AE_FLAG = "is_activity_embedding_enabled";
    private static final String SPLIT_RATIO = "activity_embedding_split_ratio";
    public static final float DEFAULT_SPLIT_RATIO = 0.3f;

    private final SharedPreferences sharedPreferences;

    public SharePref(Context context) {
        this.sharedPreferences = context.getSharedPreferences(PREF_NAME, Context.MODE_PRIVATE);
    }

    public void setAEFlag(boolean isEnabled) {
        SharedPreferences.Editor editor = sharedPreferences.edit();
        editor.putBoolean(AE_FLAG, isEnabled);
        editor.apply();
    }

    public boolean getAEFlag() {
        return sharedPreferences.getBoolean(AE_FLAG, true);
    }

    public float getSplitRatio() {
        return sharedPreferences.getFloat(SPLIT_RATIO, DEFAULT_SPLIT_RATIO);
    }

    public void setSplitRatio(float ratio) {
        SharedPreferences.Editor editor = sharedPreferences.edit();
        editor.putFloat(SPLIT_RATIO, ratio);
        editor.apply();
    }
}
You also need a preference screen layout xml, create root_preferences.xml under res/xml with the following code.
<PreferenceScreen xmlns:app="http://schemas.android.com/apk/res-auto"
   xmlns:android="http://schemas.android.com/apk/res/android">
   <PreferenceCategory app:title="@string/split_setting_header">

       <SwitchPreferenceCompat
           app:key="dual_pane"
           app:title="@string/dual_pane_title" />

       <SeekBarPreference
           app:key="split_ratio"
           app:title="@string/split_ratio_title"
           android:min="0"
           android:max="100"
           app:defaultValue="50"
           app:showSeekBarValue="true" />
   </PreferenceCategory>
</PreferenceScreen>
And add the following to res/values/strings.xml.
<string name="title_activity_settings">SettingsActivity</string>
<string name="split_setting_header">Dual Pane Display</string>
<string name="dual_pane_title">Dual Pane</string>
<string name="split_ratio_title">Split Ratio</string>
Add SettingsActivity to the menu
Let's connect our newly created SettingsActivity to a navigation destination, so users can easily access it from the app's main interface.
- In your
ListActivityfile, declare variables for the bottom navigation bar and the left navigation rail:
ListActivity.kt
private lateinit var navRail: NavigationRailView private lateinit var bottomNav: BottomNavigationView
ListActivity.java
private NavigationRailView navRail; private BottomNavigationView bottomNav;
- Inside the
onCreate()method of yourListActivity, usefindViewByIdto connect these variables to the corresponding views in your layout; - Add an
OnItemSelectedListenerto both the bottom navigation bar and the navigation rail to handle item selection events:
ListActivity.kt / onCreate()
navRail  = findViewById(R.id.navigationRailView)
bottomNav = findViewById(R.id.bottomNavigationView)

val menuListener = NavigationBarView.OnItemSelectedListener { item ->
    when (item.itemId) {
        R.id.navigation_home -> {
            true
        }
        R.id.navigation_dashboard -> {
            true
        }
        R.id.navigation_settings -> {
            startActivity(Intent(this, SettingsActivity::class.java))
            true
        }
        else -> false
    }
}

navRail.setOnItemSelectedListener(menuListener)
bottomNav.setOnItemSelectedListener(menuListener)
ListActivity.java / onCreate()
NavigationRailView navRail = findViewById(R.id.navigationRailView);
BottomNavigationView bottomNav = findViewById(R.id.bottomNavigationView);

NavigationBarView.OnItemSelectedListener menuListener = new NavigationBarView.OnItemSelectedListener() {
   @Override
   public boolean onNavigationItemSelected(@NonNull MenuItem item) {
       switch (item.getItemId()) {
           case R.id.navigation_home:
               // Handle navigation_home selection
               return true;
           case R.id.navigation_dashboard:
               // Handle navigation_dashboard selection
               return true;
           case R.id.navigation_settings:
               startActivity(new Intent(ListActivity.this, SettingsActivity.class));
               return true;
           default:
               return false;
       }
   }
};

navRail.setOnItemSelectedListener(menuListener);
bottomNav.setOnItemSelectedListener(menuListener);
The application reads SharedPreferences and renders the app either in split mode or SPLIT_TYPE_EXPAND mode.
- When the window configuration changes, the program checks whether the split window constraint is satisfied (if width > 840dp)
- And the app checks the
SharedPreferencesvalue to see if the user has enabled split window for display, otherwise it returnsSplitAttributewith theSPLIT_TYPE_EXPANDtype. - If split window is enabled, the app reads the
SharedPreferencesvalue to get the split ratio. This only works when theWindowSDKExtensionsversion is less than 6, since version 6 already supports pane expansion and ignores the split ratio setting. Instead, developers could allow users to drag the divider on the UI.
ListActivity.kt / onCreate()
...

SplitController.getInstance(this).setSplitAttributesCalculator{
       params -> params.defaultSplitAttributes
   if (params.areDefaultConstraintsSatisfied) {
       setWiderScreenNavigation(true)

       if (SharePref(this.applicationContext).getAEFlag()) {
           if (WindowSdkExtensions.getInstance().extensionVersion  < 6) {
               // Read a dynamic split ratio from shared preference.
               val currentSplit = SharePref(this.applicationContext).getSplitRatio()
               if (currentSplit != SharePref.DEFAULT_SPLIT_RATIO) {
                   return@setSplitAttributesCalculator SplitAttributes.Builder()
                       .setSplitType(SplitAttributes.SplitType.ratio(SharePref(this.applicationContext).getSplitRatio()))
                     .setLayoutDirection(SplitAttributes.LayoutDirection.LEFT_TO_RIGHT)
                       .build()
               }
           }
           return@setSplitAttributesCalculator params.defaultSplitAttributes
       } else {
           SplitAttributes.Builder()
               .setSplitType(SPLIT_TYPE_EXPAND)
               .build()
       }
   } else {
       setWiderScreenNavigation(false)
       SplitAttributes.Builder()
           .setSplitType(SPLIT_TYPE_EXPAND)
           .build()
   }
}

...
ListActivity.java / onCreate()
...
SplitController.getInstance(this).setSplitAttributesCalculator(params -> {
   if (params.areDefaultConstraintsSatisfied()) {
       setWiderScreenNavigation(true);

       SharePref sharedPreference = new SharePref(this.getApplicationContext());
       if (sharedPreference.getAEFlag()) {
           if (WindowSdkExtensions.getInstance().getExtensionVersion()  < 6) {
               // Read a dynamic split ratio from shared preference.
               float currentSplit = sharedPreference.getSplitRatio();
               if (currentSplit != SharePref.DEFAULT_SPLIT_RATIO) {
                   return new SplitAttributes.Builder()
                           .setSplitType(SplitAttributes.SplitType.ratio(sharedPreference.getSplitRatio()))
                           .setLayoutDirection(SplitAttributes.LayoutDirection.LEFT_TO_RIGHT)
                           .build();
               }
           }
           return params.getDefaultSplitAttributes();
       } else {
           return new SplitAttributes.Builder()
                   .setSplitType(SPLIT_TYPE_EXPAND)
                   .build();
       }
   } else {
       setWiderScreenNavigation(false);
       return new SplitAttributes.Builder()
               .setSplitType(SPLIT_TYPE_EXPAND)
               .build();
   }
});

...
To trigger SplitAttributesCalculator after setting changes, we need to invalidate the current attributes We do this by calling invalidateVisibleActivityStacks() from ActivityEmbeddingController; before WindowManager 1.4, the method is called
invalidateTopVisibleSplitAttributes.
ListActivity.kt / onResume()
override fun onResume() {
   super.onResume()
   ActivityEmbeddingController.getInstance(this).invalidateVisibleActivityStacks()
}
ListActivity.java / onResume()
@Override
public void onResume() {
    super.onResume();
    ActivityEmbeddingController.getInstance(this).invalidateVisibleActivityStacks();
}
Run it!
Build and run the sample app.
Explore the settings:
- Navigate to the settings screen.
- Toggle the Enable Split Window switch on and off.
- Adjust the split ratio slider (if available on your device).
Observe the layout changes:
- On devices running Android 14 and lower: The layout should switch between single-pane and dual-pane modes based on the switch, and the split ratio should change when you adjust the slider.
- On devices running Android 15 and higher: Pane expansion should allow you to resize the panes dynamically, regardless of the slider setting.
8. Congratulations!
Well done! You've successfully enhanced your app with powerful new features using activity embedding and WindowManager. Your users will now enjoy a more flexible, intuitive, and engaging experience on large screens, regardless of their Android version.
9. Learn more
- Developer guide — Activity embedding
- Reference documentation — androidx.window.embedding