1. Avant de commencer
Cet atelier de programmation vous explique le processus de création d'un widget d'application pour SociaLite. Vous allez d'abord créer un simple widget Glance pour l'ajouter à SociaLite et à votre écran d'accueil. Ensuite, vous ajouterez un état zéro au widget à l'aide des composants et d'un thème Glance. Puis, l'atelier de programmation vous apprendra à prendre en charge une interaction utilisateur afin de sélectionner votre contact favori à partir de votre widget. Enfin, vous apprendrez à mettre à jour votre widget à partir de votre application.
Prérequis
- Avoir des connaissances de base en Kotlin.
- Avoir terminé l'atelier de programmation Configurer Android Studio ou s'être familiarisé avec l'utilisation d'Android Studio et des applis de test dans un émulateur d'Android 15 ou sur un appareil physique équipé d'Android 15.
- Avoir des connaissances de base de Hilt.
- Avoir des connaissances de base de Compose. Glance n'utilise pas de composables de Jetpack Compose, mais il réutilise son framework et son style de codage.
Ce que vous allez apprendre dans cet atelier de programmation
- Comment configurer votre application pour prendre en charge les widgets
- Comment utiliser les composants Glance pour créer une mise en page responsive
- Comment utiliser
GlanceThemepour prendre en charge les couleurs dynamiques sur les écrans d'accueil de vos utilisateurs - Comment gérer les interactions d'utilisateurs dans votre widget
- Comment mettre à jour votre widget depuis l'application
Ce dont vous avez besoin
- La dernière version d'Android Studio.
- Un appareil de test ou un émulateur équipé d'Android 12 ou version ultérieure.
- Le SDK Android 12 ou version ultérieure.
2. Configuration
Télécharger le code de démarrage
- Si vous avez terminé les ateliers de programmation Gérer les mesures d'application bord à bord dans Android 15 ou Ajouter la prise en charge des animations pour la prévisualisation du Retour, continuez vers la section Ajouter un widget, car vous possédez déjà le code de démarrage.
- Téléchargez le code de démarrage sur GitHub.
Sinon, vous pouvez cloner le dépôt et vérifier la branche codelab_improve_android_experience_2024.
 git clone git@github.com:android/socialite.git
 cd socialite
 git checkout codelab_improve_android_experience_2024
- Ouvrez SociaLite dans Android Studio, puis exécutez l'appli sur votre appareil ou émulateur Android 15. L'écran qui s'affiche ressemble à celui-ci :
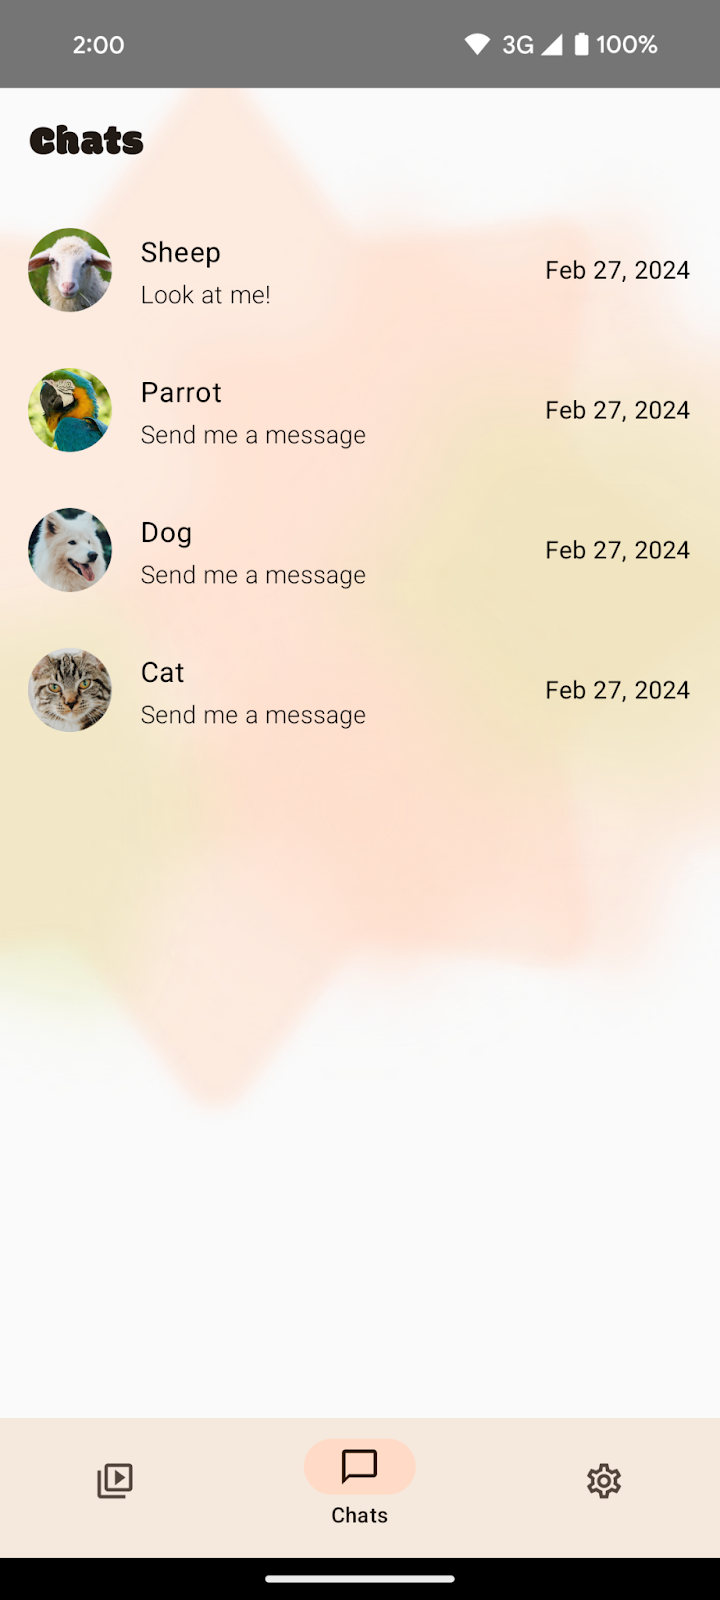
SociaLite avec la navigation par gestes
3. Ajouter un widget
Que sont les widgets ?
Un widget est un élément de votre application qui peut être intégré à l'intérieur d'autres applications Android. Il s'agit plus couramment de l'écran d'accueil de l'utilisateur.
Ajouter des widgets à votre application peut permettre à vos utilisateurs de démarrer rapidement des tâches courantes, d'afficher des informations lisibles en un coup d'œil et de personnaliser leurs appareils avec votre contenu.
Qu'est-ce que Glance ?
Jetpack Glance est une bibliothèque pour écrire des widgets en Kotlin à l'aide d'une API semblable à Compose. Elle contient plusieurs des mêmes avantages de Compose, tels que la recomposition, le code d'UI déclaratif écrit en Kotlin et les composants définis. Glance supprime en grande partie le besoin d'utiliser des vues XML à distance dans vos widgets.
Créer un widget
Les widgets sur Android sont déclarés dans l'AndroidManifest en tant qu'élément <receiver>. Ce récepteur doit être importé, gérer l'intent d'action android.appwidget.action.APPWIDGET_UPDATE et fournir un fichier de paramètres de widget d'application par le biais d'un élément de métadonnées nommé android.appwidget.provider.
Ajouter un widget à SociaLite

Vous souhaitez ajouter un widget à SociaLite qui permet aux utilisateurs de voir leur contact favori et de vérifier s'ils ont reçu des messages non lus de cette personne. Si c'est le cas, appuyer sur le widget devrait rediriger l'utilisateur vers la discussion avec son contact favori. En outre, vous utilisez les composants Glance et la thématisation pour vous assurer que votre widget s'affiche au mieux à l'aide d'un responsive design et de couleurs dynamiques.
Pour commencer, vous ajoutez un widget "Hello World" statique à SociaLite. Ensuite, vous développez les fonctionnalités de votre widget.
Pour ce faire, procédez comme suit :
- Ajoutez les dépendances Glance à votre application.
- Créez une implémentation de
GlanceAppWidget. - Créez un élément
GlanceAppWidgetReceiver. - Configurez votre widget avec un fichier XML d'informations de widget d'application.
- Ajoutez les informations de widget d'application et de récepteur au fichier
AndroidManifest.xml.
Ajouter Glance à votre projet
Le code de démarrage a ajouté les versions de Glance et les coordonnées de la bibliothèque au catalogue de version de SociaLite : libs.versions.toml.
libs.versions.toml
[versions]
//..

glance = "1.1.1"

[libraries]
glance-appwidget = { group = "androidx.glance", name = "glance-appwidget", version.ref = "glance" }
glance-material = { group = "androidx.glance", name = "glance-material3", version.ref = "glance" }
En outre, les dépendances de Glance sont incluses dans le fichier app/build.gradle.kts de SociaLite.
build.gradle.kts
dependencies {
...
implementation(libs.glance.appwidget)
implementation(libs.glance.material)

...
}
- Si vous modifiez ces fichiers, synchronisez le projet pour télécharger les bibliothèques Glance.
Créer votre GlanceAppWidget et votre GlanceAppWidgetReceiver
Android utilise un broadcast receiver pour signaler à SociaLite qu'un widget a été ajouté, qu'il a besoin d'être mis à jour ou qu'il a été supprimé. Glance fournit une classe de récepteur abstraite, GlanceAppWidgetReceiver, qui développe AppWidgetProvider.
Les implémentations GlanceAppWidgetReceiver sont également en charge de fournir des instances du GlanceAppWidget. Cette classe affiche les composables de Glance dans des vues à distance.
Le code de démarrage inclut deux classes : SocialiteAppWidget, qui développe GlanceAppWidget, et SocialiteAppWidgetReceiver, qui développe GlanceAppWidgetReceiver.
Pour commencer, procédez comme suit :
- Accédez au package
widgetdansapp/src/main/java/com/google/android/samples/socialite/. - Ouvrez la classe
SociaLiteAppWidget. Cette classe remplace la méthodeprovideGlance. - Remplacez le
TODOpar un appel versprovideContent, puis faites passer la fonction composable de votre widget comme paramètre. Pour le moment, le widget n'affiche que le messageHello World, mais vous ajoutez davantage de fonctionnalités ultérieurement dans cet atelier de programmation.
package com.google.android.samples.socialite.widget

import android.content.Context
import androidx.glance.GlanceId
import androidx.glance.GlanceTheme
import androidx.glance.appwidget.GlanceAppWidget
import androidx.glance.appwidget.provideContent
import androidx.glance.text.Text

class SociaLiteAppWidget : GlanceAppWidget() {
   override suspend fun provideGlance(context: Context, id: GlanceId) {
       provideContent {
           GlanceTheme {
               Text("Hello World")
           }
       }
   }
}
- Ouvrez la classe
SociaLiteAppWidgetReceiverdans le packagewidget. Pour le moment, votre récepteur fournit une instance de votreSociaLiteWidget, mais vous ajoutez davantage de fonctionnalités dans une prochaine section. - Remplacez le
TODOpar le constructeurSociaLiteAppWidget():
package com.google.android.samples.socialite.widget

import androidx.glance.appwidget.GlanceAppWidget
import androidx.glance.appwidget.GlanceAppWidgetReceiver

class SociaLiteAppWidgetReceiver : GlanceAppWidgetReceiver() {
   override val glanceAppWidget: GlanceAppWidget = SociaLiteAppWidget()
}
Vous êtes désormais prêt à configurer Android pour afficher votre widget et permettre aux utilisateurs de l'ajouter sur leur écran d'accueil.
Ajouter les informations d'app-widget-provider
- Effectuez un clic droit sur **
res/xml** > Nouveau > fichier de ressources XML. - Saisissez
socialite_widget_infocomme nom de fichier etappwidget-providercomme élément racine, puis cliquez sur OK. Ce fichier inclut les métadonnées pour votreappwidgetutilisé par unAppWidgetHostpour afficher le widget au début. - Ajoutez le code suivant au fichier
socialite_widget_info.xml:
<appwidget-provider xmlns:android="http://schemas.android.com/apk/res/android"
   android:resizeMode="horizontal|vertical"
   android:updatePeriodMillis="3600000"
   android:minHeight="128dp"
   android:minWidth="128dp"

   android:minResizeHeight="128dp"
   android:minResizeWidth="128dp"
   android:configure="com.google.android.samples.socialite.widget.SociaLiteAppWidgetConfigActivity"
   android:widgetFeatures="configuration_optional|reconfigurable"
   android:previewImage="@drawable/widget_preview"
   android:maxResizeHeight="512dp"
   android:maxResizeWidth="512dp"
   android:targetCellWidth="2"
   android:targetCellHeight="2"
   android:initialLayout="@layout/glance_default_loading_layout">
</appwidget-provider>
Le tableau suivant fournit une présentation des attributs dans ce code et décrit chacun d'entre eux :
Nom de l'attribut | Description |
| Votre widget peut être redimensionné verticalement et horizontalement. |
| Spécifiez la taille par défaut du widget lorsqu'il est ajouté à l'écran d'accueil. |
| Contrôle le moment où l'hôte de widget peut décider d'actualiser votre widget. Votre application peut mettre à jour votre widget à chaque exécution et affiche de nouvelles informations. |
| Définit la taille à laquelle vous pouvez redimensionner le widget. |
| Spécifiez la taille minimale par défaut du widget lorsqu'il est ajouté à l'écran d'accueil. |
| Fournit une mise en page initiale qui s'affiche pendant que Glance effectue le rendu des composables. |
| Fournit une image statique du widget à afficher dans le sélecteur de widgets. |
| Indiquez plusieurs fonctionnalités prises en charge par le widget. Ce sont des conseils sur l'hôte du widget qui ne modifient pas réellement le comportement du widget. |
| Le nom de la classe d'activité de configuration. Il s'agit d'une activité qui configure le widget ultérieurement. |
Pour afficher tous les attributs disponibles, y compris les fonctionnalités dans l'API 31 ou version ultérieure, consultez AppWidgetProviderInfo.
Mettre à jour AndroidManifest et tester
Vous pouvez enfin mettre à jour le fichier AndroidManifest.xml et tester votre widget. Vous définissez un élément receiver comme étant un enfant de l'élément application dans le fichier. Ce récepteur gère l'intent APPWIDGET_UPDATE et fournit vos métadonnées appwidget au lanceur d'applications Android.
Pour commencer, procédez comme suit :
- Créez un élément
receiverpour queSociaLiteAppWidgetReceiversoit exporté. Copiez et collez les éléments suivants dans votre fichierAndroidManifest.xmlaprès l'élémentapplication:
<receiver
   android:name=".widget.SociaLiteAppWidgetReceiver"
   android:exported="true"
   android:label="Favorite Contact">

   <intent-filter>
       <action android:name="android.appwidget.action.APPWIDGET_UPDATE" />
   </intent-filter>

   <meta-data
       android:name="android.appwidget.provider"
       android:resource="@xml/socialite_widget_info" />
</receiver>
- Compilez et exécutez votre application.
- Une fois l'application en cours d'exécution, ajoutez le widget à votre écran d'accueil. Par exemple, sur un Pixel, appuyez de manière prolongée sur votre arrière-plan, puis sélectionnez Widgets > SociaLite. Vous devriez être capable d'ajouter votre widget à votre écran d'accueil.
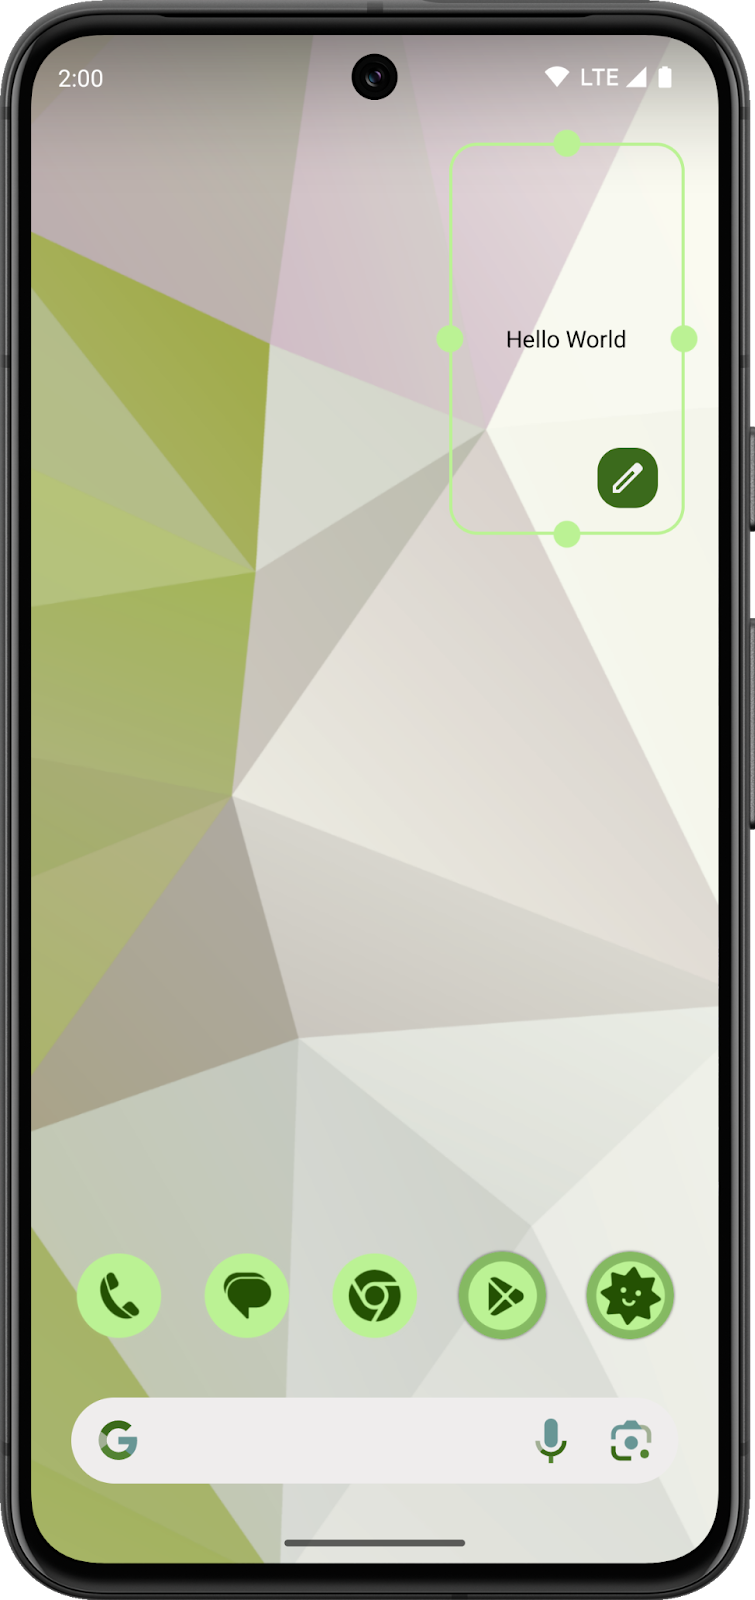
Votre widget indique "Hello World" et présente un arrière-plan transparent. Certes, ce n'est pas encore le widget le plus esthétique ni le plus fonctionnel. Dans la section suivante, vous allez ajouter une mise en page plus complexe et embellir le widget avec un peu de couleurs Material Design.
4. Améliorer la conception
Désormais, vous disposez d'un widget statique sur lequel il manque de nombreuses fonctionnalités pour qu'il devienne vraiment utile. Un bon widget effectue les opérations suivantes :
- Il veille à ce que le contenu reste concis et à jour, et le fonctionnement simple.
- Il réduit les espaces gênants grâce à une mise en page redimensionnable.
- Il applique des couleurs depuis l'arrière-plan de l'hôte du widget d'application.
Pour une discussion approfondie sur la composition d'un bon widget, consultez la page Widgets.
Ajouter un échafaudage
Vous mettez maintenant à jour votre widget à afficher dans le composant Scaffold de Glance.
Le Scaffold est fourni par la bibliothèque Glance. Il s'agit d'une API d'emplacement simple pour afficher une UI de widget avec une TitleBar. Elle définit la couleur d'arrière-plan sur GlanceTheme.colors.widgetBackground et applique une marge intérieure. Ce sera votre composant de premier niveau.
Pour commencer, procédez comme suit :
- Remplacez votre implémentation de
SociaLiteAppWidgetavec le code suivant :
package com.google.android.samples.socialite.widget

import android.content.Context
import androidx.compose.runtime.Composable
import androidx.glance.GlanceId
import androidx.glance.GlanceModifier
import androidx.glance.GlanceTheme
import androidx.glance.ImageProvider
import androidx.glance.appwidget.GlanceAppWidget
import androidx.glance.appwidget.components.Scaffold
import androidx.glance.appwidget.components.TitleBar
import androidx.glance.appwidget.provideContent
import androidx.glance.layout.fillMaxSize
import androidx.glance.text.Text
import com.google.android.samples.socialite.R

class SociaLiteAppWidget : GlanceAppWidget() {
   override suspend fun provideGlance(context: Context, id: GlanceId) {
       provideContent {
           GlanceTheme() {
               Content()
           }
       }
   }

   @Composable
   private fun Content() {
       Scaffold(titleBar = {TitleBar(startIcon = ImageProvider(R.drawable.ic_launcher_monochrome), title = "SociaLite")},
           modifier = GlanceModifier.fillMaxSize()) {
           Text("Hello World")
       }
   }
}
- Pour consulter vos mises à jour, relancez l'application, puis ajoutez une nouvelle copie du widget à votre écran d'accueil.
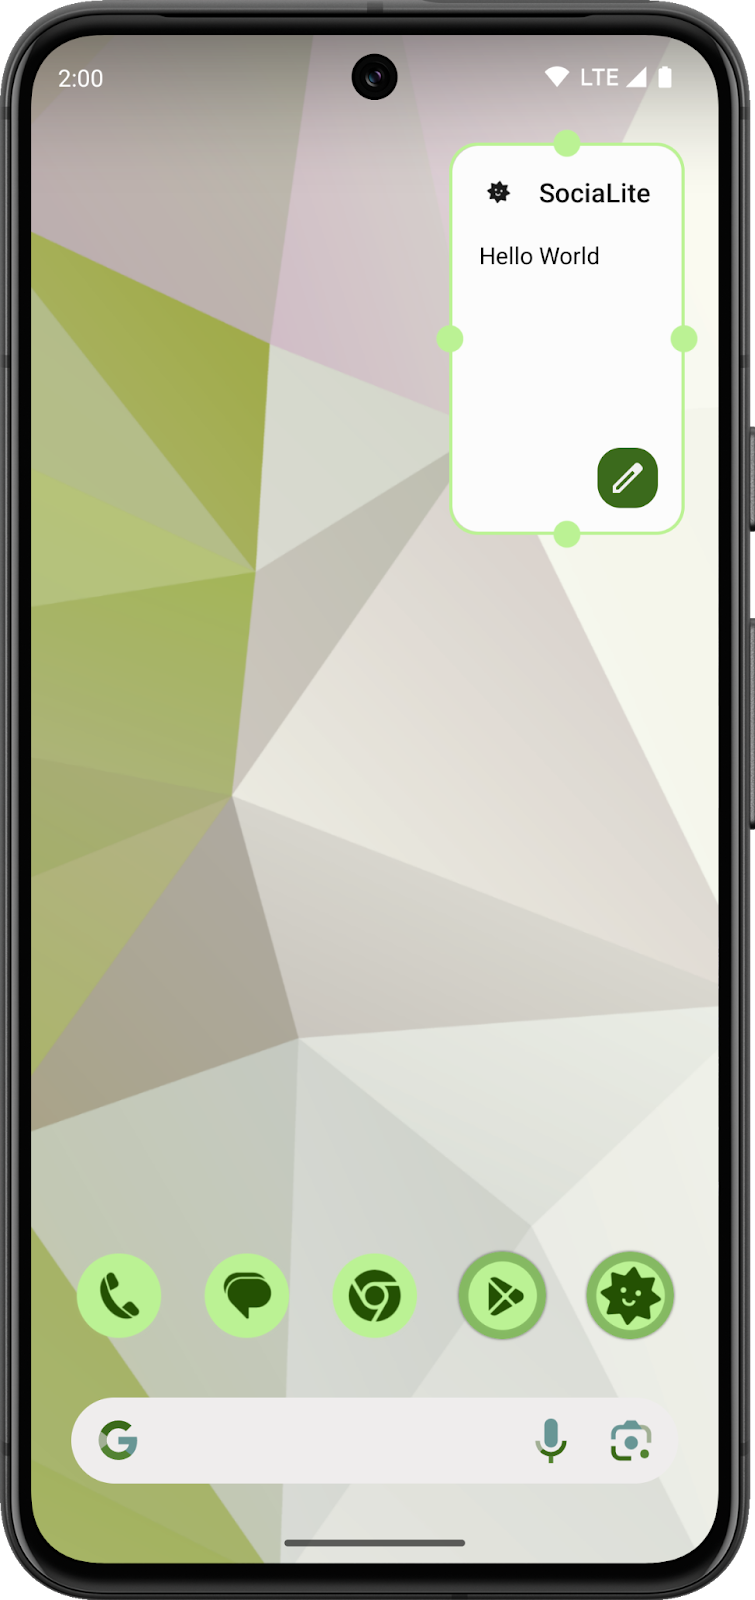
N'oubliez pas, les widgets sont des vues distantes qui sont affichées par un hôte externe. Plus tard, vous ajouterez la capacité de mettre à jour votre widget automatiquement à l'intérieur de l'application. D'ici là, vous devez ajouter le widget du sélecteur de widgets pour afficher les modifications de codes.
Comme vous pouvez le voir, le résultat est bien meilleur, mais lorsque vous comparez votre widget à d'autres, les couleurs ne semblent pas harmonieuses. Sur les écrans d'accueil, il est prévu que les widgets définissent leurs couleurs en fonction des paramètres de thème de l'utilisateur. Avec les jetons de couleurs dynamiques, vous pouvez faire en sorte que le thème de votre widget s'adapte au thème et au fond d'écran de votre appareil.
Ajouter des couleurs dynamiques
Maintenant, vous ajoutez le jeton de couleur widgetBackground à l'arrière-plan de l'échafaudage et les jetons de couleurs onSurface à votre texte TitleBar et aux composants de textes. Pour mettre à jour votre style de texte, vous devez importer la classe Glance TextStyle. Pour mettre à jour l'arrière-plan de l'échafaudage, vous définissez la propriété backgroundColor de Scaffold sur GlanceTheme.colors.widgetBackground.
Pour commencer, procédez comme suit :
- Incluez la nouvelle importation dans le fichier
SociaLiteAppWidget.kt.
//Add to the imports section of your Kotlin code.
import androidx.glance.text.TextStyle
- Mettez à jour votre composable
Contentpour ajouterwidgetBackground.
Scaffold(
   titleBar = {
       TitleBar(
           textColor = GlanceTheme.colors.onSurface,
           startIcon = ImageProvider(R.drawable.ic_launcher_monochrome),
           title = "SociaLite",
       )
   },
   backgroundColor = GlanceTheme.colors.widgetBackground,
   modifier = GlanceModifier.fillMaxSize(),
) {
   Text(text = "Hello World", style = TextStyle(color = GlanceTheme.colors.onSurface))
}
- Pour consulter vos mises à jour, relancez l'application et ajoutez une nouvelle copie du widget à votre écran d'accueil.
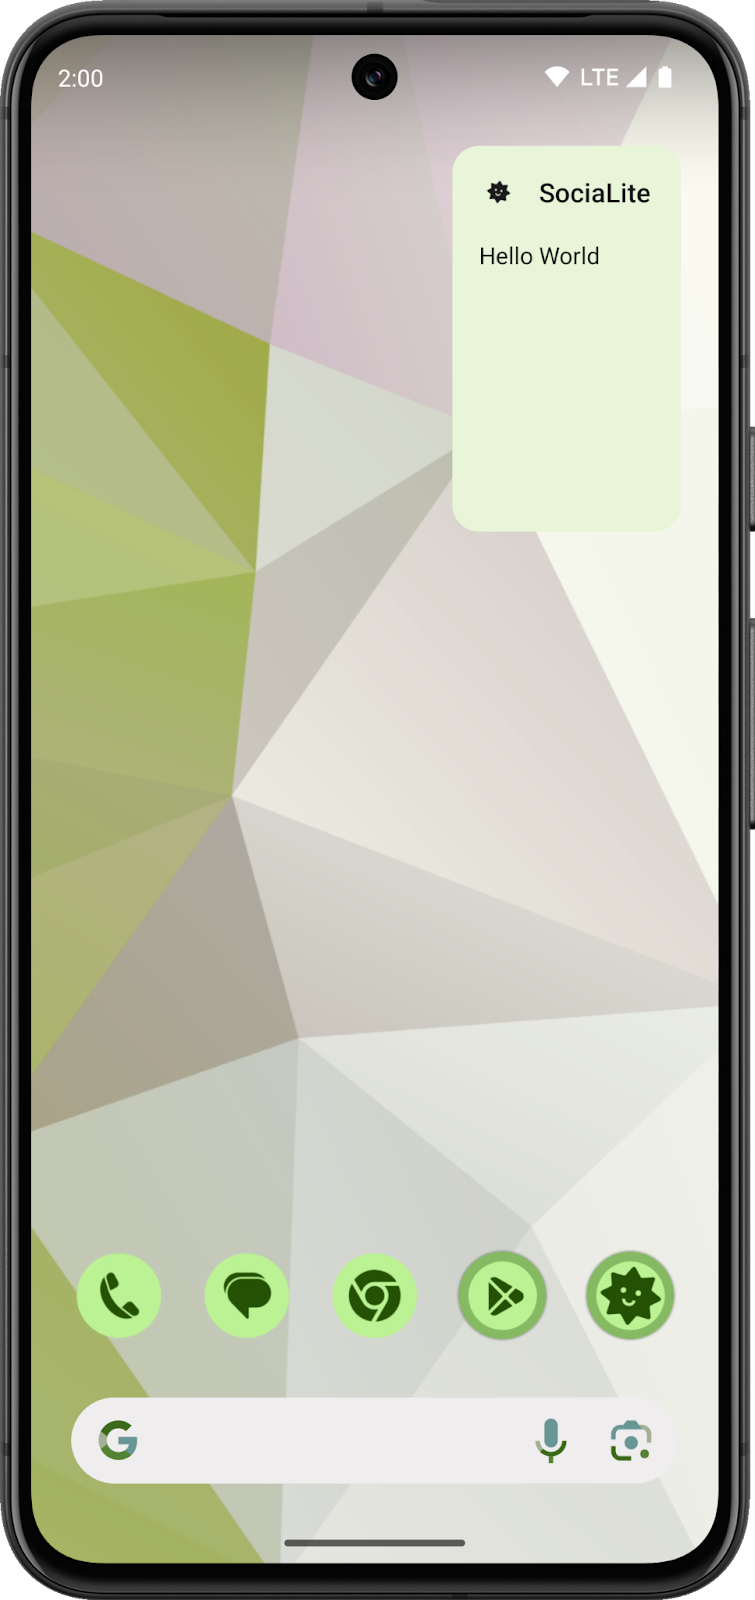
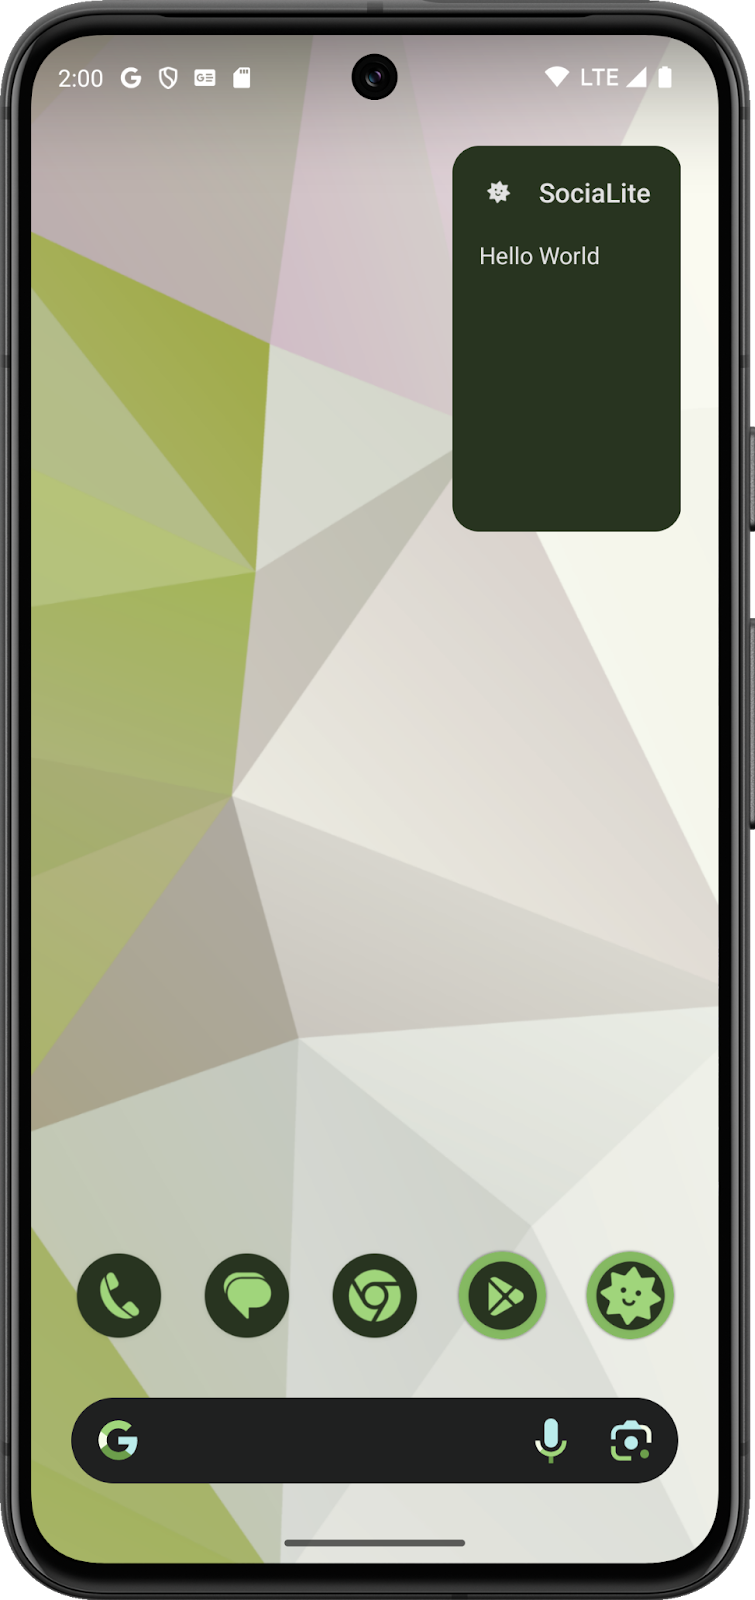
Il correspond aux thèmes d'autres widgets sur votre écran d'accueil et effectue automatiquement la mise à jour des couleurs si vous modifiez votre arrière-plan ou activez le mode sombre. Pour un arrière-plan vraiment coloré, le widget s'adapte à la section de l'arrière-plan sur laquelle il repose.
|
|
Ajouter un état zéro
Maintenant, vous devez réfléchir à l'état et à la configuration de votre widget. Lorsqu'un widget est ajouté à l'écran d'accueil et qu'une configuration est nécessaire, il est généralement préférable d'afficher un état zéro. L'état zéro invite un utilisateur à configurer le widget. Vous ajoutez une activité de configuration à votre widget en l'associant depuis l'état zéro.
Cet atelier de programmation fournit des classes pour stocker l'état de configuration d'un widget, y accéder et le modifier. Vous ajouterez le code pour mettre à jour l'UI de votre widget afin d'afficher cet état et de créer une action lambda pour gérer des actions d'un simple geste d'utilisateur.
Examiner le modèle de widget
Prenez un moment pour examiner les classes du package com.google.android.samples.socialite.widget.model.
Cela inclut la classe WidgetModel ainsi que les classes WidgetModelDao et WidgetModelRepository. Ces classes sont déjà présentes dans le code de démarrage de l'atelier de programmation et gèrent l'état persistant des widgets sur la base de données Room sous-jacente. En outre, ces classes utilisent Hilt pour gérer leurs cycles de vie.
La classe WidgetModel contient un widgetId attribué par Android, le contactId du contact SociaLite qu'il affiche, un displayName et une photo à afficher et un opérateur booléen si le contact présente des messages non lus. Ces valeurs sont consommées par les composables SociaLiteAppWidget et affichées dans le widget.
WidgetModelDao est un objet d'accès aux données qui abstrait l'accès à la base de données de SociaLite. WidgetModelRepository fournit des fonctions utiles pour créer, lire, mettre à jour et supprimer les instances WidgetModel. Ces classes sont créées par Hilt et injectées dans l'application avec une injection de dépendances.
- Ouvrez le fichier
WidgetModel.ktdans le packagemodelqui se trouve dans le répertoireapp/src/main/java/com/google/android/samples/socialite/widget/model/.
Il s'agit d'une classe data avec une annotation Entity. Android attribue un identifiant dédié à chaque instance de widget. Cet identifiant est utilisé par SociaLite comme une clé primaire pour les données de modèle. Chaque instance du modèle suit les informations de base du contact associé ainsi que la présence de messages non lus du contact.
@Entity(
    foreignKeys = [
        ForeignKey(
            entity = Contact::class,
            parentColumns = ["id"],
            childColumns = ["contactId"],
            onDelete = ForeignKey.CASCADE,
        ),
    ],
    indices = [
        Index("widgetId"),
        Index("contactId"),
    ],
)
data class WidgetModel(
    @PrimaryKey val widgetId: Int,
    val contactId: Long,
    val displayName: String,
    val photo: String,
    val unreadMessages: Boolean = false,
) : WidgetState
L'état zéro
Vous voudrez faire en sorte que votre composable Content charge le modèle de widget du WidgetModelRepository et affiche l'état zéro si aucun modèle n'est disponible ; sinon vous voudrez afficher le contenu normal de votre widget. Pour le moment, il s'agira de votre message "Hello World", mais dans la prochaine partie, vous allez créer une meilleure interface.
Vous remplacerez votre composable Content avec une expression when qui affiche soit le composable ZeroState, soit un espace réservé Text.
- Dans la méthode
provideGlance, à l'extérieur de votre composable, obtenez une référence vers leWidgetModelRepositoryet l'identifiant de widget actuel. Ajoutez les lignes suivantes avantprovideContentdans la méthodeSociaLiteAppWidgetprovideGlance.
override suspend fun provideGlance(context: Context, id: GlanceId) {
   val widgetId = GlanceAppWidgetManager(context).getAppWidgetId(id)
   val repository = WidgetModelRepository.get(context)
Il se peut que vous ayez besoin d'ajouter les importations suivantes :
import com.google.android.samples.socialite.widget.model.WidgetModel
import com.google.android.samples.socialite.widget.model.WidgetModelRepository
import com.google.android.samples.socialite.widget.model.WidgetState.Loading
import androidx.glance.appwidget.GlanceAppWidgetManager
- Dans la fonction composable
Content, ajoutez le dépôt et l'identifiant de widget comme paramètres, et utilisez-les pour charger votre modèle. Mettez à jour la signature de la fonction du composableContent, puis ajoutez la ligne suivante :
private fun Content(repository: WidgetModelRepository, widgetId: Int) {
   val model = repository.loadModel(widgetId).collectAsState(Loading).value
- Si Android Studio n'ajoute pas les importations suivantes automatiquement, ajoutez-les manuellement :
import androidx.compose.runtime.collectAsState
Vous devez également mettre à jour provideGlance pour transférer l'identifiant de widget et le dépôt vers Content.
Remplacez provideGlance par ce qui suit :
override suspend fun provideGlance(context: Context, id: GlanceId) {
        val widgetId = GlanceAppWidgetManager(context).getAppWidgetId(id)
        val repository = WidgetModelRepository.get(context)

        provideContent {
            GlanceTheme {
                Content(repository, widgetId)
            }
        }
    }
- Dans votre fonction composable
Content, déterminez quel état afficher en fonction de l'existence ou non d'un modèle. Déplacez leScaffoldet le contenu de widget dans le composableZeroStateen remplaçant le composantScaffoldet son contenu avec ceci lors du blocage :
   when (model) {
       is WidgetModel -> {Text("Hello World")}
       else -> ZeroState(widgetId)
   }
Le composable ZeroState est déjà inclus dans le code de démarrage dans le package com.google.android.samples.socialite.widget.ui.
- Si Android Studio n'a pas automatiquement importé le package
com.google.android.samples.socialite.widget.ui, ajoutez le code suivant à la section des importations deSociaLiteAppWidget.
import com.google.android.samples.socialite.widget.ui.ZeroState
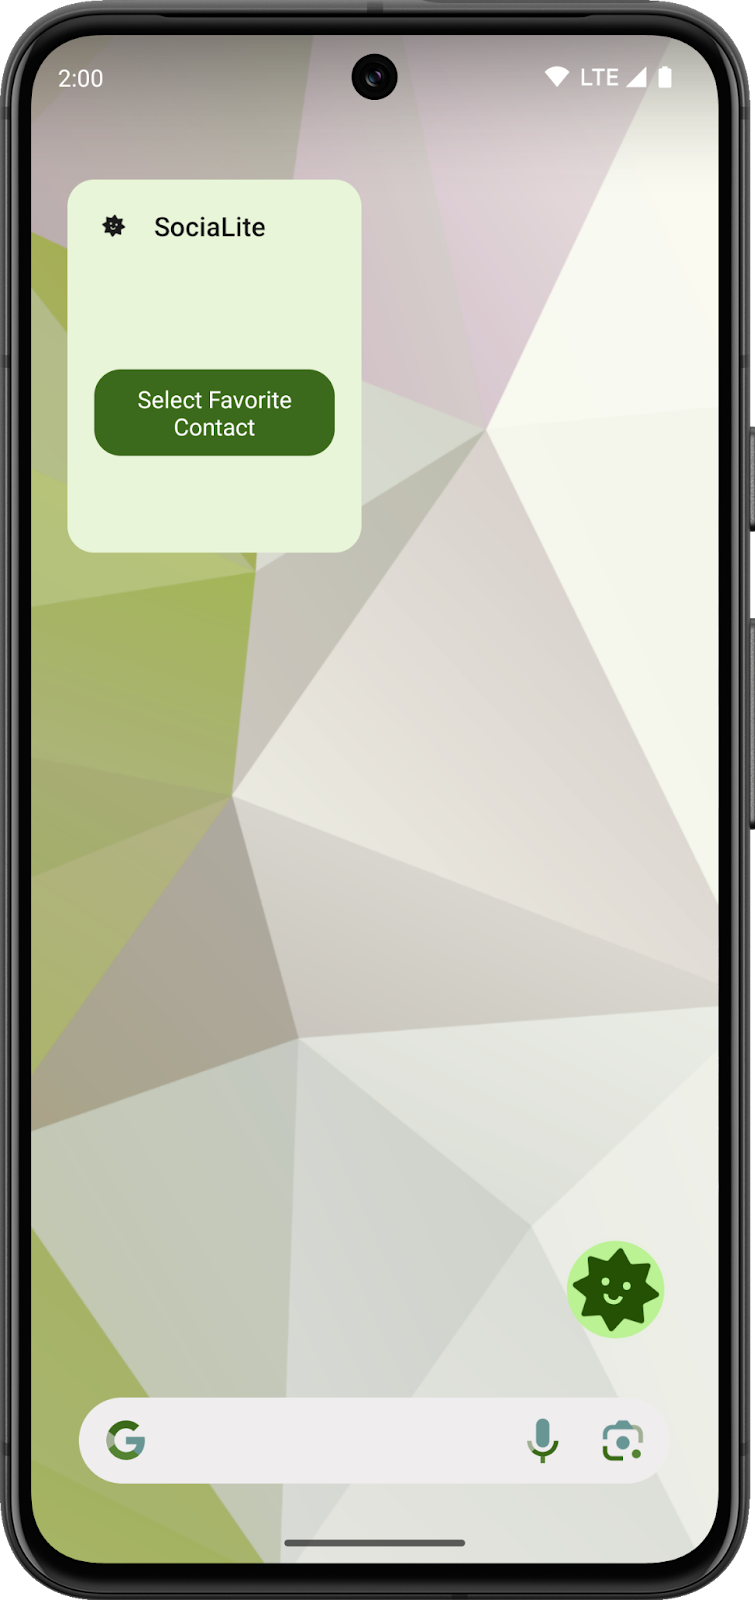
- Pour consulter vos mises à jour, relancez l'application et ajoutez une nouvelle copie du widget à votre écran d'accueil. Vous verrez le widget afficher le composant ZeroState et un bouton. Le bouton ouvrira l'activité de configuration lorsque vous cliquerez dessus et dans la prochaine section, vous mettrez à jour l'état de votre widget depuis cette activité.
|
|
L'activité de configuration
Examinez la fonction composable ZeroState. Cette fonction se trouve dans le package com.google.android.samples.socialite.widget.ui du fichier ZeroState.kt.
@Composable
fun ZeroState(widgetId: Int) {
   val widgetIdKey = ActionParameters.Key<Int>(AppWidgetManager.EXTRA_APPWIDGET_ID)
Scaffold(
   titleBar = {
       TitleBar(
           modifier = GlanceModifier.clickable(actionStartActivity(MainActivity::class.java)),
           textColor = GlanceTheme.colors.onSurface,
           startIcon = ImageProvider(R.drawable.ic_launcher_monochrome),
           title = "SociaLite",
       )
   },
   backgroundColor = GlanceTheme.colors.widgetBackground,
   modifier = GlanceModifier.fillMaxSize(),
) {
   Box(modifier = GlanceModifier.fillMaxSize(), contentAlignment = Alignment.Center) {
       Button(
           text = "Select Favorite Contact",
           onClick = actionStartActivity<SociaLiteAppWidgetConfigActivity>(
               parameters = actionParametersOf(widgetIdKey to widgetId),
           ),
       )
   }
}

}
Le composable Scaffold est déplacé dans le composable ZeroState. Le TitleBar présente le modificateur clickable, qui ouvre l'activité principale de SociaLite. Votre ZeroState utilise le composable Button de Glance pour afficher une incitation à l'action à l'utilisateur qui, lorsque l'on clique dessus, ouvre l'activité SociaLiteAppWidgetConfigActivity et inclut l'identifiant de widget en tant qu'extra intent. Deux de ces actions utilisent la fonction utile actionStartActivity de Glance. Pour en savoir plus sur Actions, consultez Gérer les interactions d'utilisateurs.
- Examinez comment
SociaLiteAppWidgetConfigActivityest utilisé pour mettre à jour la configuration de votre widget. Cette classe est également l'activité de configuration pour votre widget. Les activités de configuration lisent l'extra d'entier d'intent avec la cléAppWidgetManager.*EXTRA_APPWIDGET_ID.* Pour en savoir plus sur les activités de configuration, consultez Autoriser les utilisateurs à configurer des widgets d'application. - Dans
SociaLiteAppWidgetConfigActivity, remplacez leTODOdans la propriétéContactRowonClickavec le code suivant :
{
  coroutineScope.launch {

     widgetModelRepository.createOrUpdate(
       WidgetModel(
           appWidgetId,
           contact.id,
           contact.name,
           contact.iconUri.toString(),
           false,
       ),
     )
     SociaLiteAppWidget().updateAll(this@SociaLiteAppWidgetConfigActivity)
     val resultValue = Intent().putExtra(
       AppWidgetManager.EXTRA_APPWIDGET_ID,
       appWidgetId,
     )
     setResult(RESULT_OK, resultValue)
     finish()
  }
}
Ajoutez les éléments suivants si Android Studio ne le fait pas automatiquement.
import com.google.android.samples.socialite.widget.model.WidgetModel
import androidx.glance.appwidget.updateAll
import kotlinx.coroutines.launch
Ce bloc de code met à jour l'état de votre widget. D'abord, il utilise le dépôt pour enregistrer ou mettre à jour le WidgetModel avec les informations du contact sélectionné. Ensuite, il appelle la fonction de suspension updateAll. Cette fonction met à jour tous les widgets sur l'écran d'accueil et elle peut être appelée depuis n'importe quel emplacement de votre application. Enfin, ce bloc définit le résultat de l'activité de configuration pour signaler qu'il a mis à jour le widget avec succès.
- Exécutez et remplacez votre widget sur l'écran d'accueil. Vous devriez voir le nouvel état zéro.
- Cliquez sur Select favorite contact (Sélectionner un contact favori). Cette action vous redirige vers l'activité de configuration.
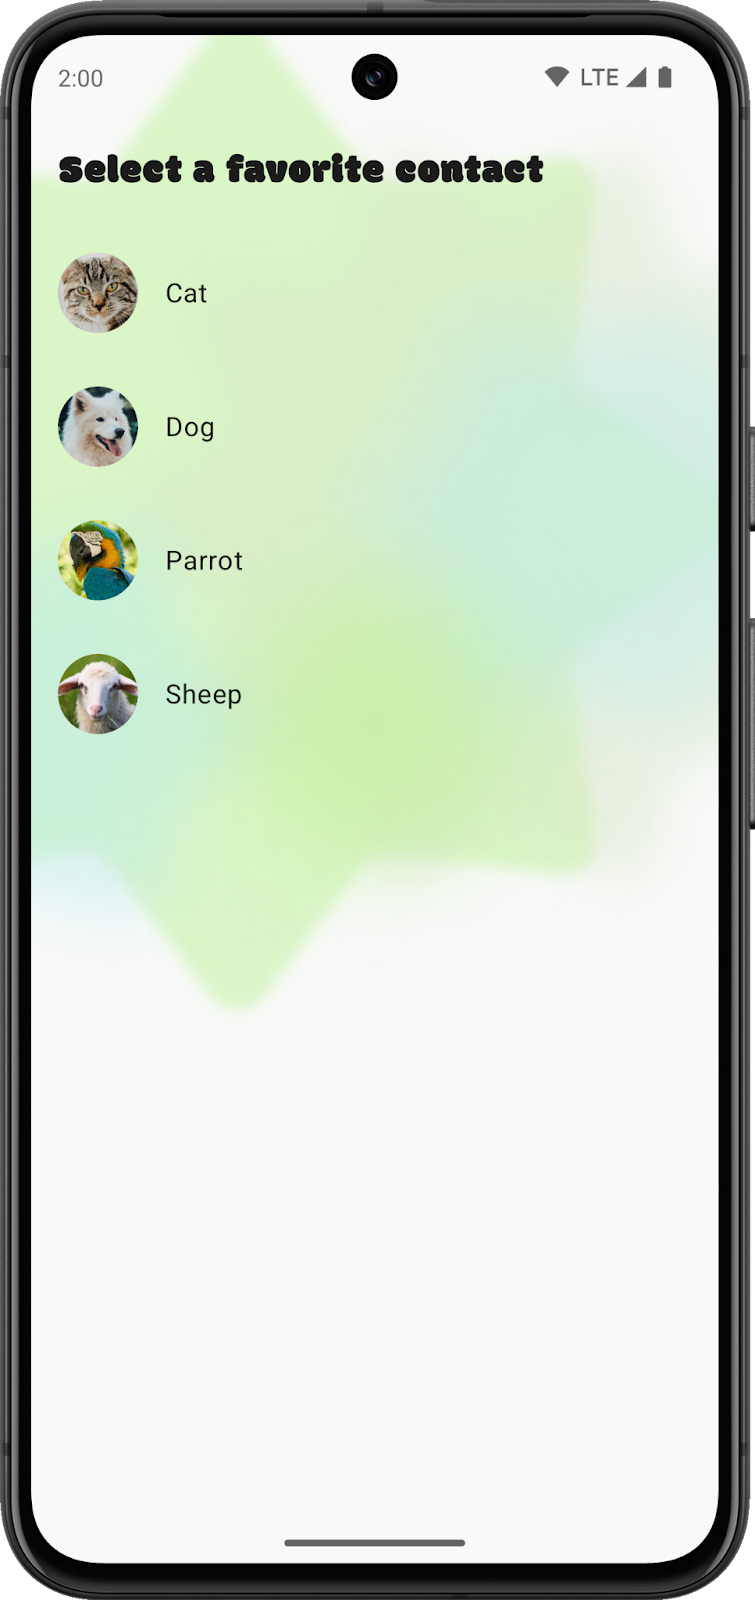

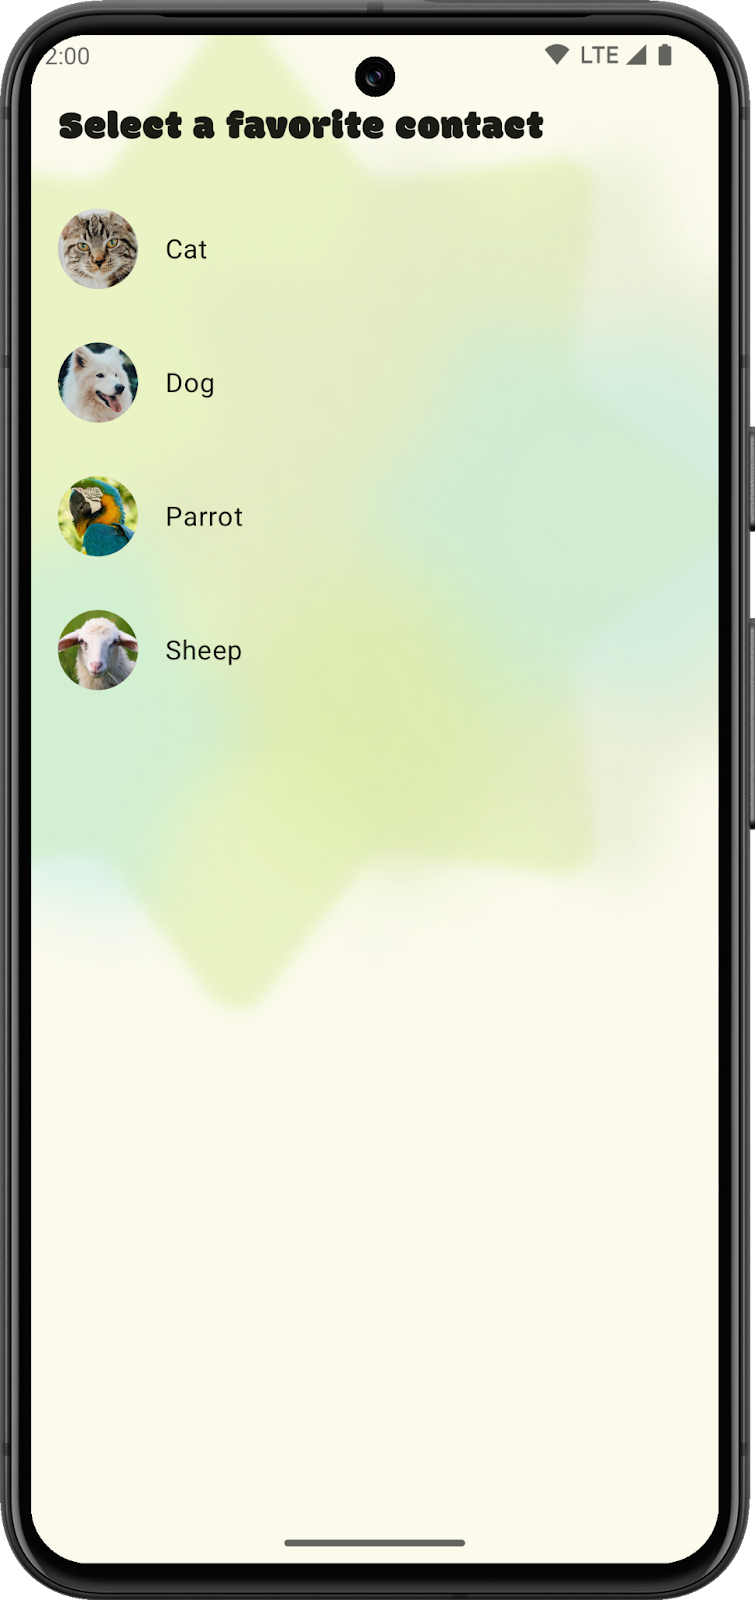
- Sélectionnez un contact. Cette action met à jour votre widget. Toutefois, le widget n'affiche pas encore votre contact favori, car vous ajoutez cette fonctionnalité dans la prochaine section.
Gérer les données de widgets
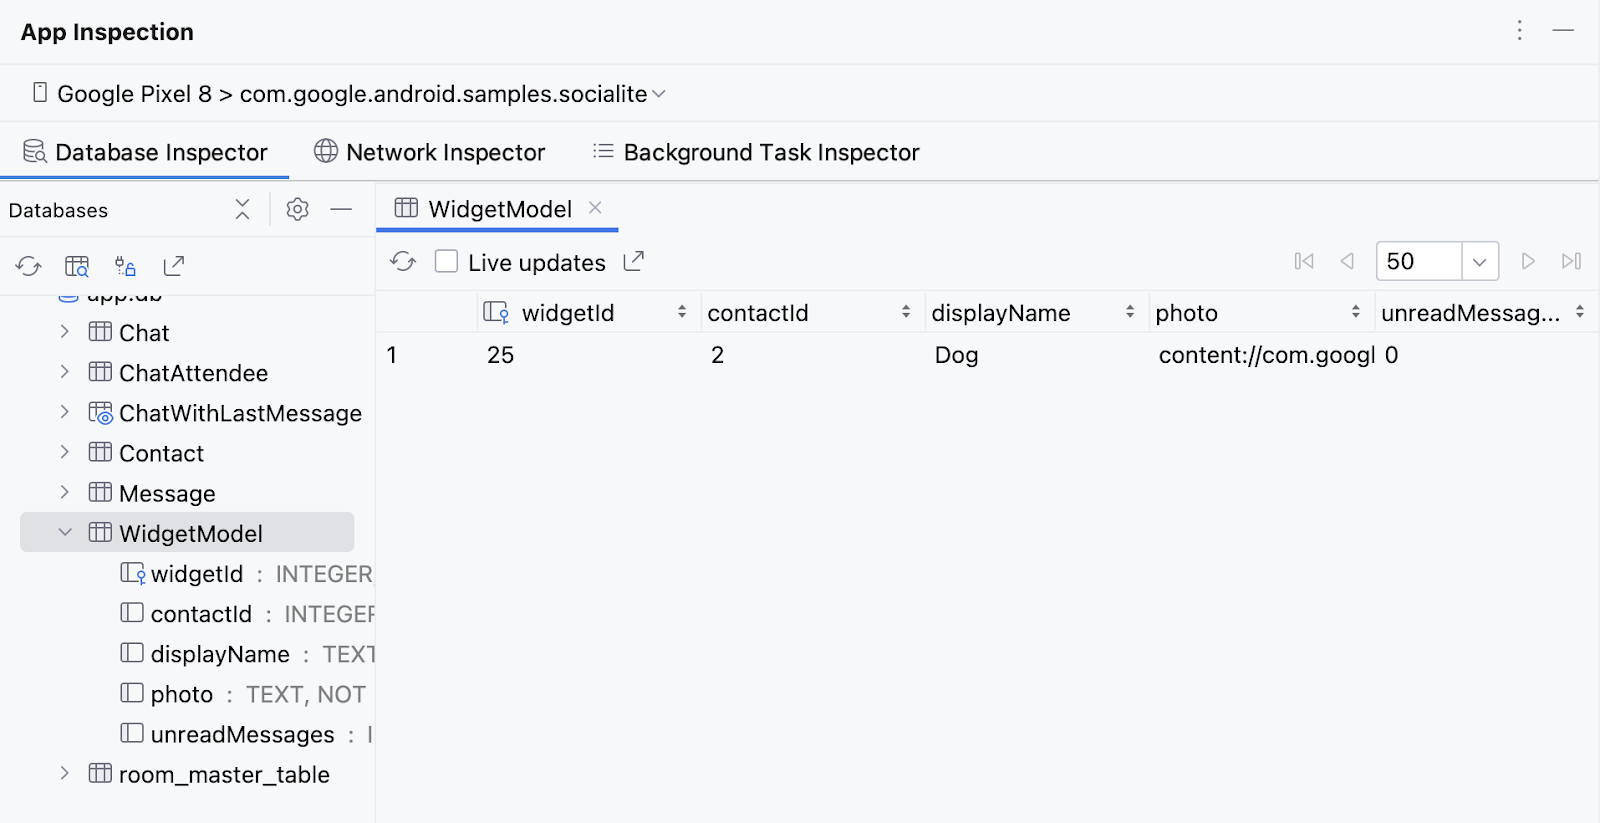
- Ouvrez l'outil Inspection d'application, connectez-vous à un processus si nécessaire, et sélectionnez l'onglet Outil d'inspection de bases de données pour consulter le contenu de la base de données de l'application.
- Sélectionnez un contact favori dans le widget et vérifiez qu'il se mette à jour sur "Hello World". De nouveau dans l'outil d'inspection des applications, vous devriez voir un onglet Modèle de widget avec une entrée pour votre widget. Il se peut que vous deviez actualiser la table ou appuyer sur Infos en direct pour voir les modifications.
- Ajoutez un autre widget et sélectionnez un autre contact. Il se peut que vous deviez appuyer sur Refresh table (Actualiser le tableau) ou Live updates (Infos en direct) pour afficher le nouveau modèle.
- Supprimez le widget et remarquez que le modèle est laissé dans la base de données une fois la suppression effectuée.
Vous pouvez mettre à jour SociaLiteAppWidgetReceiver pour nettoyer votre base de données lorsqu'un widget est supprimé en remplaçant onDeleted.
Pour nettoyer les modèles de widget orphelins, vous pouvez appeler WidgetModelRepository.cleanupWidgetModels. La classe de dépôt est gérée par Hilt et vous devez utiliser l'injection de dépendances pour accéder à son instance.
- Dans
SociaLiteAppWidgetReceiver, ajoutez l'annotation HiltAndroidEntryPointà votre déclaration de classe de récepteur, puis injectez l'instanceWidgetModelRepository. - Appelez
WidgetModelRepository.cleanupWidgetModelsdans le remplacement de la méthode pouronDeleted.
Votre code doit se présenter comme suit :
package com.google.android.samples.socialite.widget

import android.content.Context
import androidx.glance.appwidget.GlanceAppWidget
import androidx.glance.appwidget.GlanceAppWidgetReceiver
import com.google.android.samples.socialite.widget.model.WidgetModelRepository
import dagger.hilt.android.AndroidEntryPoint
import javax.inject.Inject

@AndroidEntryPoint
class SociaLiteAppWidgetReceiver : GlanceAppWidgetReceiver() {
   override val glanceAppWidget: GlanceAppWidget = SociaLiteAppWidget()

   @Inject
   lateinit var repository: WidgetModelRepository

   override fun onDeleted(context: Context, appWidgetIds: IntArray) {
       super.onDeleted(context, appWidgetIds)
       repository.cleanupWidgetModels(context)
   }

}
- Relancez l'application. Vous devriez voir que la ligne du modèle est supprimée de l'inspecteur d'application lorsque le widget est supprimé de l'écran d'accueil.
5. Ajouter l'interface utilisateur de l'application Contacts et mettre à jour lorsque vous recevez de nouveaux messages
Vous êtes arrivé à la dernière section de l'atelier de programmation. Pour cette section, vous implémentez l'UI de contact final pour votre widget et le mettez à jour lorsqu'il y a un message non lu pour le contact.
- Examinez votre classe
WidgetModelRepositorydans le packagemodel.
Vous y trouverez la méthode utile updateUnreadMessagesForContact ; elle met à jour les widgets associés avec un identifiant de contact.
//Don't add this code.
fun updateUnreadMessagesForContact(contactId: Long, unread: Boolean) {
   coroutineScope.launch {
       widgetModelDao.modelsForContact(contactId).filterNotNull().forEach { model ->
           widgetModelDao.update(
             WidgetModel(model.widgetId, model.contactId, model.displayName, model.photo, unread)
           )
           SociaLiteAppWidget().updateAll(appContext)
       }
   }
}
Cette méthode présente deux paramètres : contactId, l'identifiant du contact mis à jour et unread, un booléen de l'état de message non lu. Cette méthode utilise WidgetModelDao pour trouver tous les modèles de widgets qui affichent ce contact et mettre à jour le modèle avec le nouvel état de lecture. Puis, la fonction appelle la méthode SociaLiteAppWidget().updateAll fournie par Glance pour mettre à jour tous les widgets sur l'écran d'accueil de l'utilisateur.
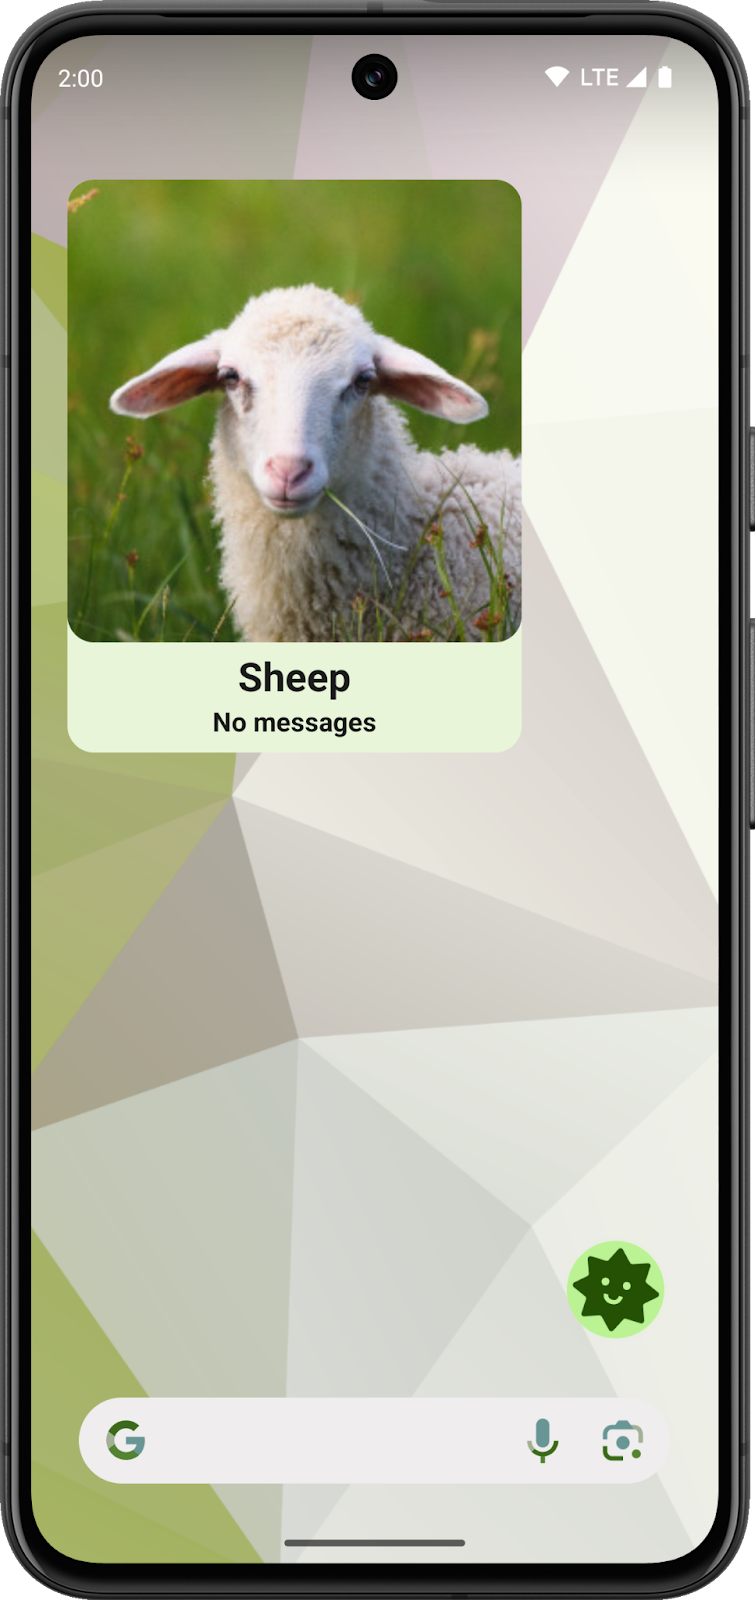
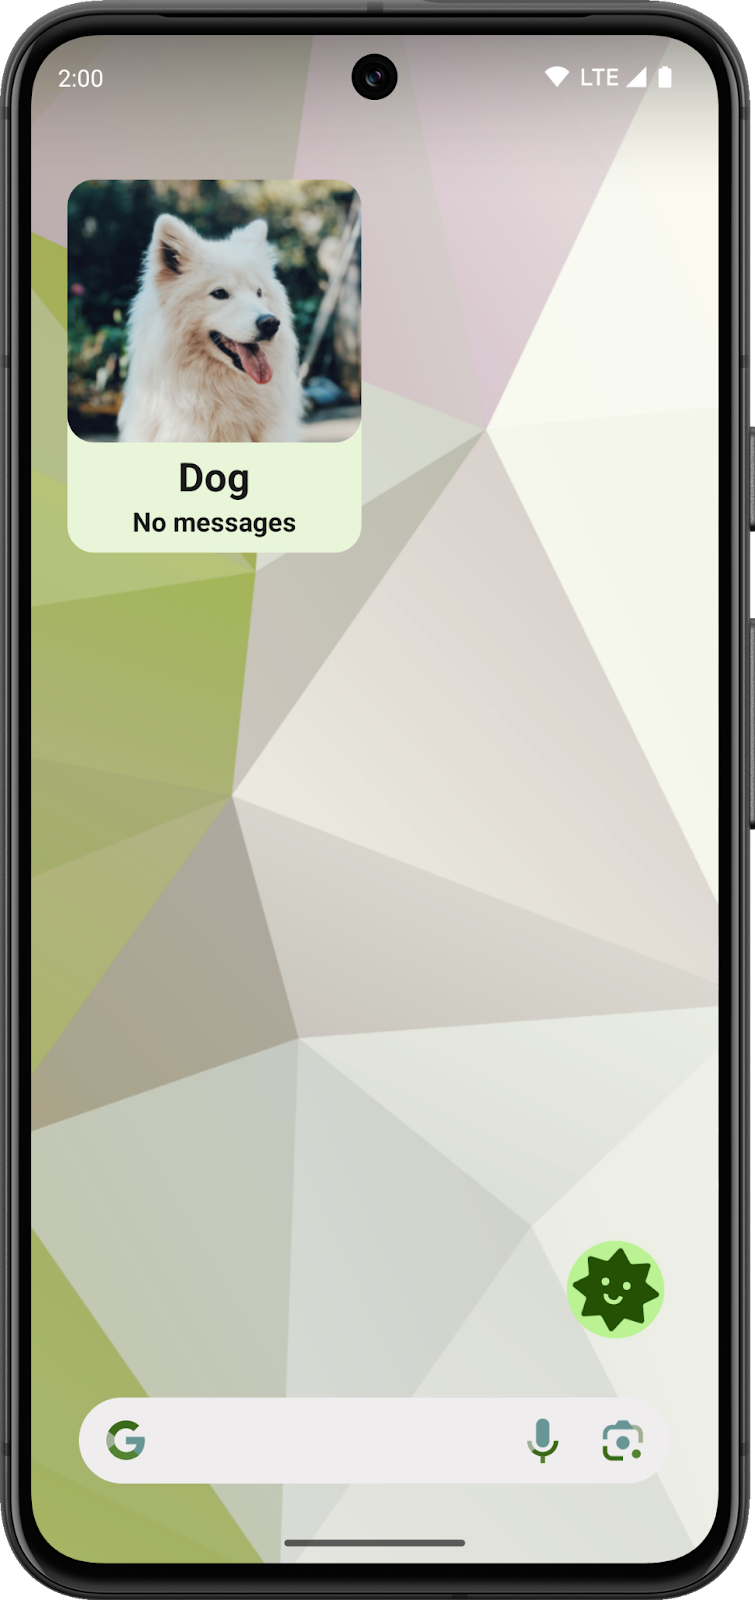
Maintenant que vous comprenez comment la mise à jour d'un widget et de son état s'effectue, vous pouvez créer votre UI de contact, envoyer un message et le regarder se mettre à jour. Pour ce faire, vous mettez à jour SociaLiteAppWidget avec un composable FavoriteContact dans votre mise en page de widget. Dans cette mise en page, vous vérifiez également si vous devez afficher No new messages ou New Messages!.
- Examinez le fichier
FavoriteContact.ktdans le packagecom.google.android.samples.socialite.widget.ui.
//Don't add this code.
@Composable
fun FavoriteContact(model: WidgetModel, onClick: Action) {
   Column(
       modifier = GlanceModifier.fillMaxSize().clickable(onClick)
           .background(GlanceTheme.colors.widgetBackground).appWidgetBackground()
           .padding(bottom = 8.dp),
       verticalAlignment = Alignment.Vertical.Bottom,
       horizontalAlignment = Alignment.Horizontal.CenterHorizontally,
   ) {
       Image(
           modifier = GlanceModifier.fillMaxWidth().wrapContentHeight().defaultWeight()
               .cornerRadius(16.dp),
           provider = ImageProvider(model.photo.toUri()),
           contentScale = ContentScale.Crop,
           contentDescription = model.displayName,
       )
       Column(
           modifier = GlanceModifier.fillMaxWidth().wrapContentHeight().padding(top = 4.dp),
           verticalAlignment = Alignment.Vertical.Bottom,
           horizontalAlignment = Alignment.Horizontal.CenterHorizontally,
       ) {
           Text(
               text = model.displayName,
               style = TextStyle(
                   fontWeight = FontWeight.Bold,
                   fontSize = 24.sp,
                   color = (GlanceTheme.colors.onSurface),
               ),
           )

           Text(
               text = if (model.unreadMessages) "New Message!" else "No messages",
               style = TextStyle(
                   fontWeight = FontWeight.Bold,
                   fontSize = 16.sp,
                   color = (GlanceTheme.colors.onSurface),
               ),
           )
       }
   }
}
- Remplacez
Text("Hello World")dans le composableContentduSociaLiteAppWidgetavec un appel vers votre composableFavoriteContact.
Ce composable prendra le WidgetModel et une Action créée par la fonction Glance actionStartActivity.
- Ajoutez l'appel à votre bloc
whenavant leZeroStatelorsque le modèle n'est pasWidgetModel.
when (model) {
  is WidgetModel -> FavoriteContact(model = model, onClick = actionStartActivity(
     Intent(LocalContext.current.applicationContext, MainActivity::class.java)
         .setAction(Intent.ACTION_VIEW)
         .setFlags(Intent.FLAG_ACTIVITY_CLEAR_TOP)
         .setData("https://socialite.google.com/chat/${model.contactId}".toUri()))
  )
  else -> ZeroState(widgetId)
}
- Si Android Studio n'ajoute pas automatiquement les importations suivantes, procédez dès maintenant comme suit :
import com.google.android.samples.socialite.widget.ui.FavoriteContact
import androidx.glance.appwidget.action.actionStartActivity
import android.content.Intent
import com.google.android.samples.socialite.MainActivity
import androidx.core.net.toUri
- Exécutez votre application.
- Sélectionnez un contact favori, envoyez-lui un message et quittez immédiatement l'application avant qu'il ne réponde. Lorsque vous recevez la réponse, l'état du widget doit changer.
- Cliquez sur le widget pour ouvrir le chat et vérifier que l'état est de nouveau mis à jour lorsque vous revenez à l'écran principal.
6. Félicitations
Vous avez terminé l'atelier de programmation avec succès et avez appris à écrire un widget à l'aide de Glance ! Vous devez être à l'aise avec la création d'un widget esthétique qui semble correct sur beaucoup d'écrans d'accueil, qui gère les entrées utilisateur et qui se met à jour.
Pour obtenir le code de solution dans la branche main, procédez comme suit :
- Si vous avez déjà téléchargé SociaLite, exécutez cette commande :
git checkout main
- Sinon, téléchargez de nouveau le code pour afficher la branche
main:
git clone git@github.com:android/socialite.git

 Écran d'accueil dans le thème clair
 Écran d'accueil dans le thème sombre