
1. Before you begin
This codelab walks you through the process of creating an app widget for SociaLite. First, you will build a simple Glance widget, and add it to SociaLite and your home screen. Next, you will add to the widget a zero state using Glance components and a Glance theme. Then, the codelab will walk you through supporting a user interaction to select your favorite contact from your widget. Finally, you will learn how to update your widget from your app.
Prerequisites
- Basic Kotlin knowledge.
- Completion of the Set up Android Studio codelab, or familiarity with how to use Android Studio and test apps in an Android 15 emulator or on a physical device that runs Android 15.
- Basic Hilt knowledge.
- Basic Compose knowledge. Glance doesn't use composables from Jetpack Compose, but it does reuse the framework and coding style.
What you learn in this codelab
- How to configure your app to support widgets.
- How to use Glance components to build a responsive layout.
- How to use
GlanceThemeto support dynamic color on your users' home screens. - How to handle user interactions in your widget.
- How to update your widget from the app.
What you need
- The latest version of Android Studio.
- A test device or emulator that runs Android 12 or higher.
- The Android 12 or higher SDK.
2. Get set up
Get the starter code
- If you've completed the Handle edge-to-edge enforcements in Android 15 or Add predictive back animations codelabs, proceed to the Add a Widget section because you already have the starter code.
- Download the starter code from GitHub.
Alternatively, you can clone the repository and check out the codelab_improve_android_experience_2024 branch.
 git clone git@github.com:android/socialite.git
 cd socialite
 git checkout codelab_improve_android_experience_2024
- Open SociaLite in Android Studio, and then run the app on your Android 15 device or emulator. You see a screen that looks like the following:
SociaLite with gesture navigation
3. Add a widget
What are widgets?
A widget is a piece of your app that can be embedded inside of other Android apps. Most commonly, this is the user's home screen.
Adding widgets to your app can give your users the ability to quickly start common tasks, view glanceable information, and customize their device with your content.
What is Glance?
Jetpack Glance is a library for writing widgets using a Compose-like API in Kotlin. It has several of the same advantages of Compose, like recomposition, declarative UI code written in Kotlin, and opinionated components. Glance removes much of the need for XML remote views in your widgets.
Create a widget
Widgets on Android are declared in the AndroidManifest as a <receiver> element. This receiver should be exported, handle the android.appwidget.action.APPWIDGET_UPDATE action intent, and provide an app widget settings file through a metadata element named android.appwidget.provider.
Add a widget to SociaLite
You want to add a widget to Socialite that allows users to see their favorite contact and whether they have unread messages from that person. If they do, tapping on the widget should take the user to their favorite contact's chat. Additionally, you use Glance components and theming to make sure that your widget looks its best by using a responsive design and dynamic color.
To begin, you add a static "Hello World" widget to Socialite. Afterward, you expand your widget's capabilities.
To accomplish this, you do following:
- Add the Glance dependencies to your app.
- Create an implementation of
GlanceAppWidget. - Create a
GlanceAppWidgetReceiver. - Configure your widget with an app widget info XML file.
- Add the receiver and app widget info to the
AndroidManifest.xmlfile.
Add Glance to your project
The starter code has added the Glance versions and library coordinates to SociaLite's version catalog: libs.versions.toml.
libs.versions.toml
[versions]
//..

glance = "1.1.1"

[libraries]
glance-appwidget = { group = "androidx.glance", name = "glance-appwidget", version.ref = "glance" }
glance-material = { group = "androidx.glance", name = "glance-material3", version.ref = "glance" }
Additionally, Glance's dependencies are included in SociaLite's app/build.gradle.kts file.
build.gradle.kts
dependencies {
...
implementation(libs.glance.appwidget)
implementation(libs.glance.material)

...
}
- If you modified these files, sync the project to download the Glance libraries.
Create your GlanceAppWidget and GlanceAppWidgetReceiver
Android uses a broadcast receiver to alert SociaLite that a widget was added, needs to be updated, or was removed. Glance provides an abstract receiver class, GlanceAppWidgetReceiver, which extends AppWidgetProvider.
GlanceAppWidgetReceiver implementations are also responsible for providing instances of GlanceAppWidget. This class renders Glance's composables into remote views.
The starter code includes two classes : SocialiteAppWidget, which extends GlanceAppWidget, and SocialiteAppWidgetReceiver, which extends GlanceAppWidgetReceiver.
To begin, follow these steps:
- Navigate to the
widgetpackage inapp/src/main/java/com/google/android/samples/socialite/. - Open the
SociaLiteAppWidgetclass. This class overrides theprovideGlancemethod. - Replace the
TODOwith a call toprovideContentand then pass your widget's composable function as a parameter. For now, the widget only displays the messageHello World, but you add more functionality later in this codelab.
package com.google.android.samples.socialite.widget

import android.content.Context
import androidx.glance.GlanceId
import androidx.glance.GlanceTheme
import androidx.glance.appwidget.GlanceAppWidget
import androidx.glance.appwidget.provideContent
import androidx.glance.text.Text

class SociaLiteAppWidget : GlanceAppWidget() {
   override suspend fun provideGlance(context: Context, id: GlanceId) {
       provideContent {
           GlanceTheme {
               Text("Hello World")
           }
       }
   }
}
- Open the
SociaLiteAppWidgetReceiverclass in thewidgetpackage. For now, your receiver provides an instance of yourSociaLiteWidget, but you add more functionality in an upcoming section. - Replace the
TODOwith theSociaLiteAppWidget()constructor:
package com.google.android.samples.socialite.widget

import androidx.glance.appwidget.GlanceAppWidget
import androidx.glance.appwidget.GlanceAppWidgetReceiver

class SociaLiteAppWidgetReceiver : GlanceAppWidgetReceiver() {
   override val glanceAppWidget: GlanceAppWidget = SociaLiteAppWidget()
}
You're now ready to configure Android to display your widget and allow users to add it to their home screen.
Add app-widget provider information
- Right-click **
res/xml** > New > XML resource file. - Enter
socialite_widget_infoas the filename andappwidget-provideras the root element, and then click OK. This file includes the metadata for yourappwidgetthat's used by anAppWidgetHostto initially display the widget. - Add the following code to the
socialite_widget_info.xmlfile:
<appwidget-provider xmlns:android="http://schemas.android.com/apk/res/android"
   android:resizeMode="horizontal|vertical"
   android:updatePeriodMillis="3600000"
   android:minHeight="128dp"
   android:minWidth="128dp"

   android:minResizeHeight="128dp"
   android:minResizeWidth="128dp"
   android:configure="com.google.android.samples.socialite.widget.SociaLiteAppWidgetConfigActivity"
   android:widgetFeatures="configuration_optional|reconfigurable"
   android:previewImage="@drawable/widget_preview"
   android:maxResizeHeight="512dp"
   android:maxResizeWidth="512dp"
   android:targetCellWidth="2"
   android:targetCellHeight="2"
   android:initialLayout="@layout/glance_default_loading_layout">
</appwidget-provider>
The following table provides an overview of the attributes in this code and describes each of them:
Attribute name | Description |
| Your widget may be resized vertically and horizontally. |
| Specify the default size of the widget when added to the home screen. |
| Controls when the widget host might decide to refresh your widget. Your app can update your widget whenever it's running and has new information to show. |
| Sets how small you can resize the widget to. |
| Specify the minimum default size the widget is when added to the home screen. |
| Provides an initial layout that's displayed while Glance renders composables. |
| Provides a static image of the widget to display in the widget picker. |
| Indicate various features supported by the widget. These are hints to the widget host and don't actually change the behavior of the widget. |
| The name of the configuration activity class. This is an activity that configures the widget later. |
To view all the available attributes, including features in API 31 or higher, see AppWidgetProviderInfo.
Update AndroidManifest and test
Finally, you're ready to update the AndroidManifest.xml file and test your widget. You define a receiver element as a child of the application element in the file. This receiver handles the APPWIDGET_UPDATE intent and provides your appwidget metadata to the Android Launcher.
To begin, follow these steps:
- Create a
receiverelement forSociaLiteAppWidgetReceiverto be exported. Copy and paste the following into yourAndroidManifest.xmlfile after theapplicationelement:
<receiver
   android:name=".widget.SociaLiteAppWidgetReceiver"
   android:exported="true"
   android:label="Favorite Contact">

   <intent-filter>
       <action android:name="android.appwidget.action.APPWIDGET_UPDATE" />
   </intent-filter>

   <meta-data
       android:name="android.appwidget.provider"
       android:resource="@xml/socialite_widget_info" />
</receiver>
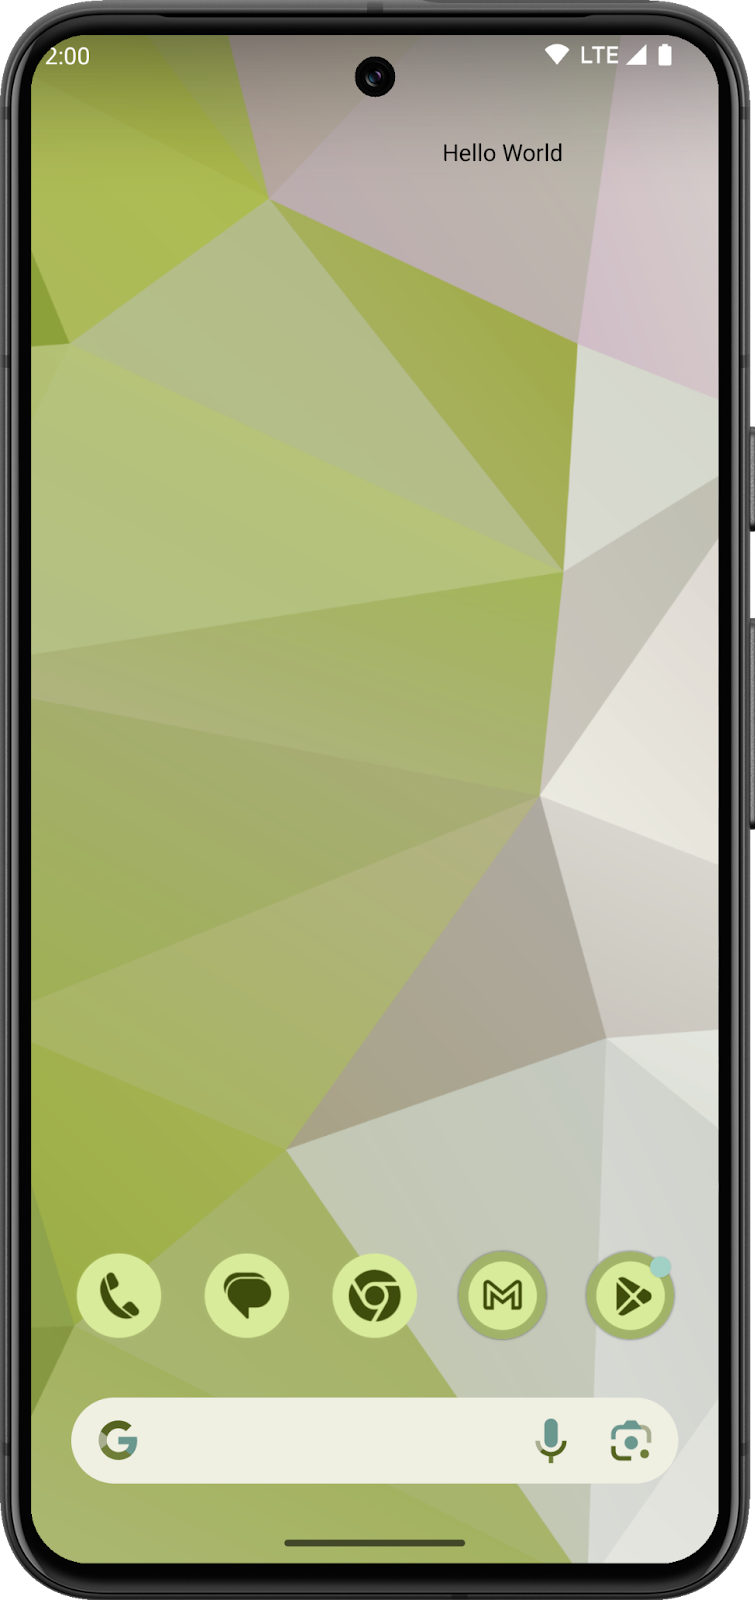
- Compile and run your app.
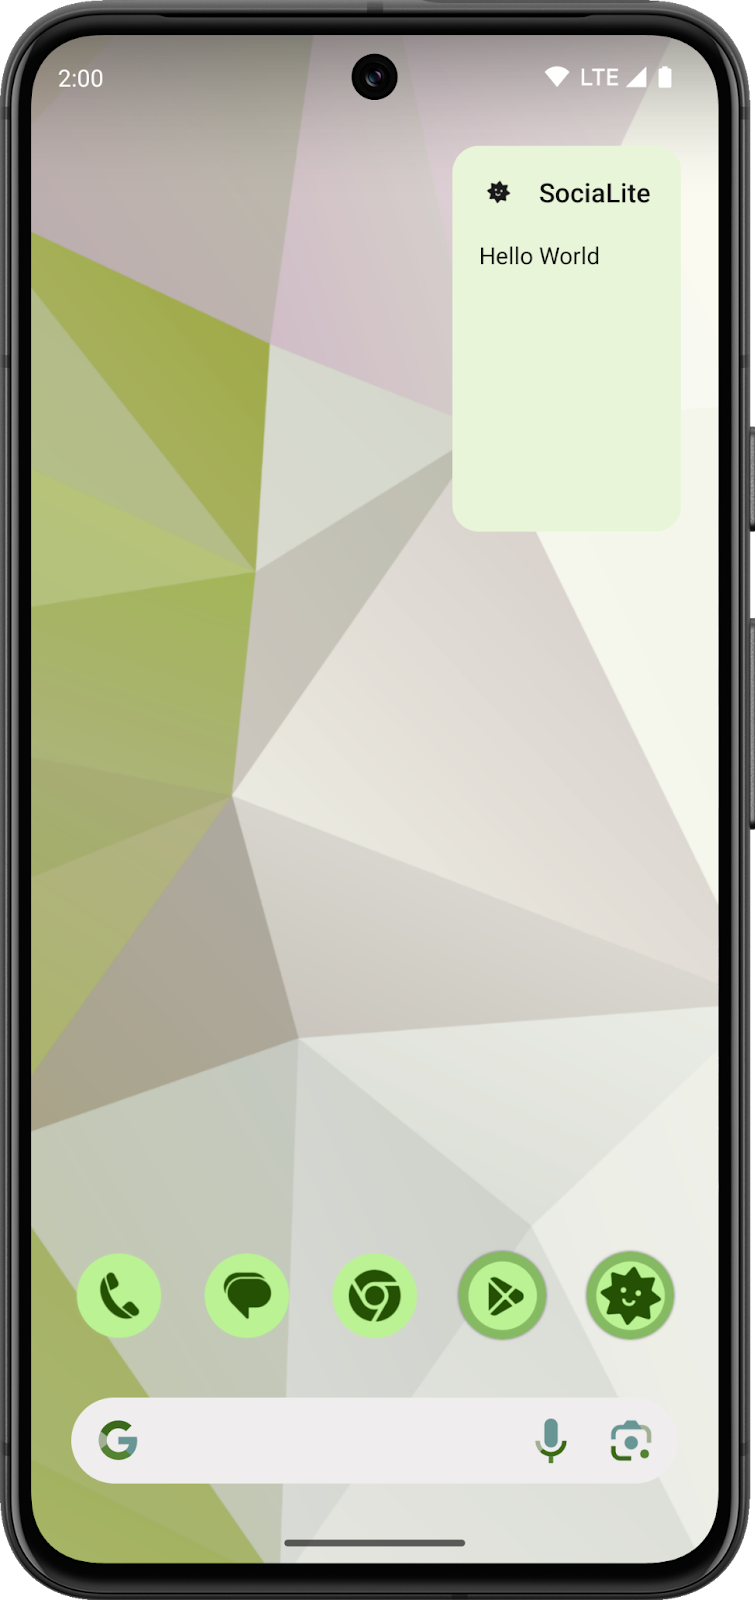
- After the app is running, add the widget to your home screen. For example, on a Pixel, long press your background, select Widgets > SociaLite. You should be able to add your widget to your home screen.
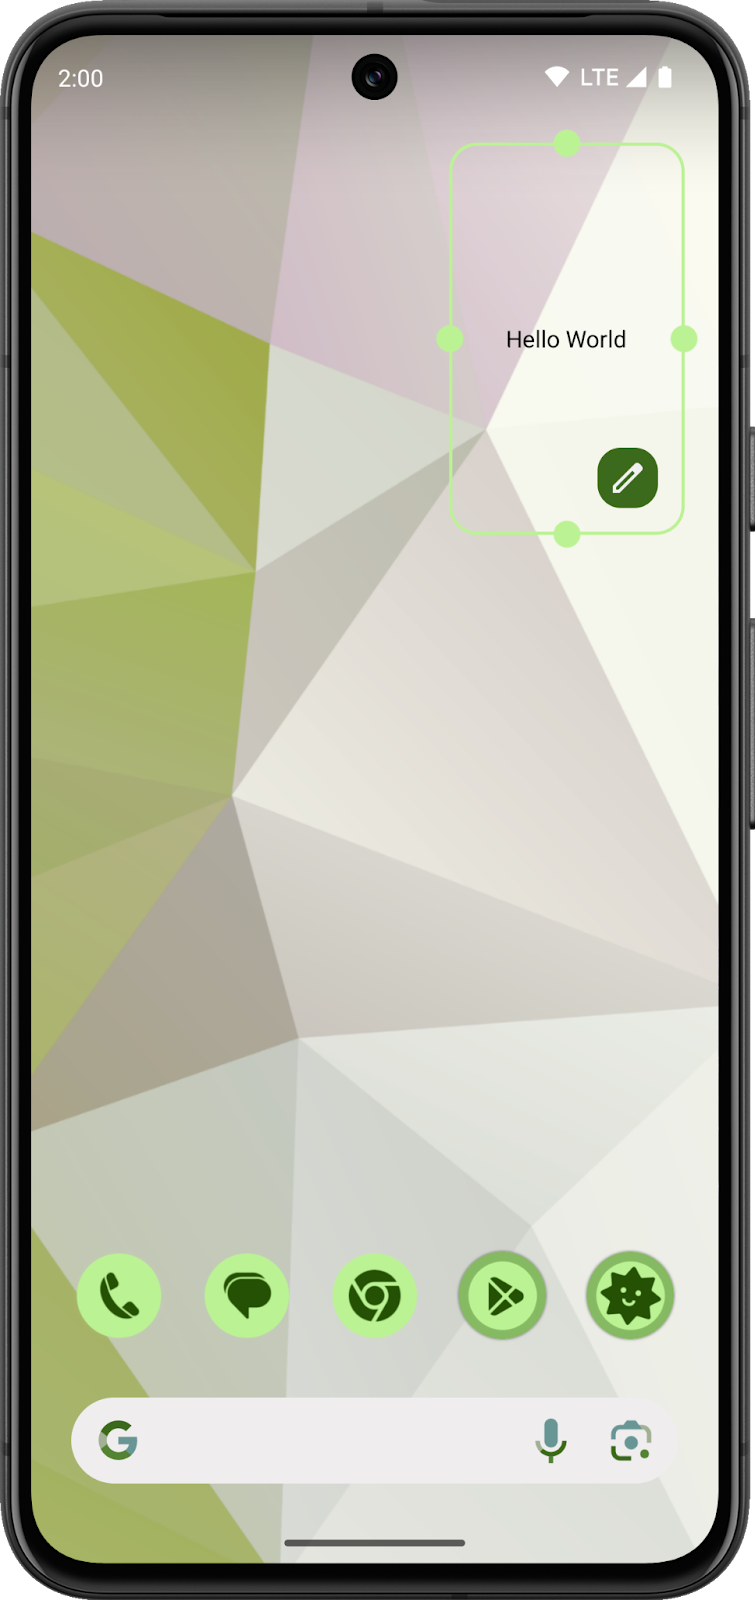
Your widget says "Hello World" and has a transparent background. Admittedly, this isn't the best looking nor most functional widget yet. In the next section, you add a more complicated layout and beautify the widget with a splash of Material Design color.
4. Improve design
Now, you have a static widget that lacks many of the features that make a good widget. A good widget does the following:
- Keeps the content fresh and short, and keeps the functionality simple.
- Minimizes awkward gaps through a resizable layout.
- Applies color from the app widget host background.
For an in-depth discussion of what makes a good widget, see Widgets.
Add a scaffold
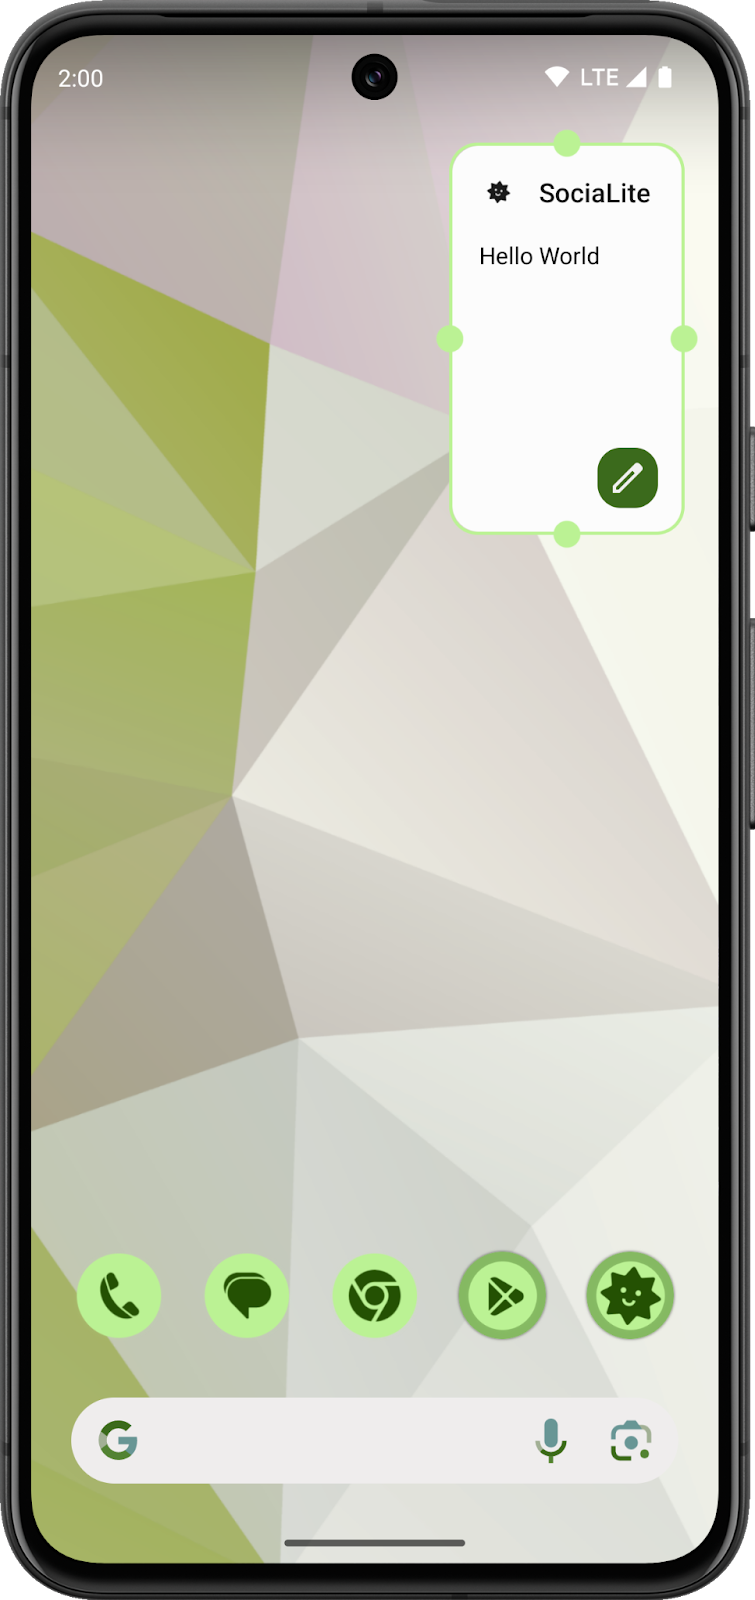
Now you update your widget to display in the Glance Scaffold component.
Scaffold is provided by the Glance library. It's a simple slot API for displaying a widget UI with a TitleBar. It sets the background color to GlanceTheme.colors.widgetBackground and applies padding. It will be your top-level component.
To begin, follow these steps:
- Replace your implementation of
SociaLiteAppWidgetwith the following code:
package com.google.android.samples.socialite.widget

import android.content.Context
import androidx.compose.runtime.Composable
import androidx.glance.GlanceId
import androidx.glance.GlanceModifier
import androidx.glance.GlanceTheme
import androidx.glance.ImageProvider
import androidx.glance.appwidget.GlanceAppWidget
import androidx.glance.appwidget.components.Scaffold
import androidx.glance.appwidget.components.TitleBar
import androidx.glance.appwidget.provideContent
import androidx.glance.layout.fillMaxSize
import androidx.glance.text.Text
import com.google.android.samples.socialite.R

class SociaLiteAppWidget : GlanceAppWidget() {
   override suspend fun provideGlance(context: Context, id: GlanceId) {
       provideContent {
           GlanceTheme() {
               Content()
           }
       }
   }

   @Composable
   private fun Content() {
       Scaffold(titleBar = {TitleBar(startIcon = ImageProvider(R.drawable.ic_launcher_monochrome), title = "SociaLite")},
           modifier = GlanceModifier.fillMaxSize()) {
           Text("Hello World")
       }
   }
}
- To see your updates, rerun the app and then add a new copy of the widget to your home screen.
Remember, widgets are remote views that are displayed by an external host. Later, you add the ability to update your widget inside the app automatically. Until then, you have to add the widget from the widget picker to see code changes.
As you can see, that is a lot better, but when you compare your widget to other widgets, the colors seem off. On home screens, it's expected that widgets set their colors based on the user's theme settings. With dynamic color tokens, you can have your widget's theme adapt to your device's wallpaper and theme.
Add dynamic color
Now you add the widgetBackground color token to the scaffold background and the onSurface color tokens to your TitleBar text and Text components. To update your text style, you need to import the TextStyle Glance class. To update the scaffold background, you set the backgroundColor property of Scaffold to GlanceTheme.colors.widgetBackground.
To begin, follow these steps:
- Include the new import in the
SociaLiteAppWidget.ktfile.
//Add to the imports section of your Kotlin code.
import androidx.glance.text.TextStyle
- Update your
Contentcomposable to addwidgetBackground.
Scaffold(
   titleBar = {
       TitleBar(
           textColor = GlanceTheme.colors.onSurface,
           startIcon = ImageProvider(R.drawable.ic_launcher_monochrome),
           title = "SociaLite",
       )
   },
   backgroundColor = GlanceTheme.colors.widgetBackground,
   modifier = GlanceModifier.fillMaxSize(),
) {
   Text(text = "Hello World", style = TextStyle(color = GlanceTheme.colors.onSurface))
}
- To see your updates, rerun the app and add a new copy of the widget to your home screen.
It matches the themes of other widgets on your home screen, and automatically updates the colors if you change your background or set dark mode. For a really colorful background, the widget adapts to the section of the background on which it sits.
|
|
 Home screen in light theme
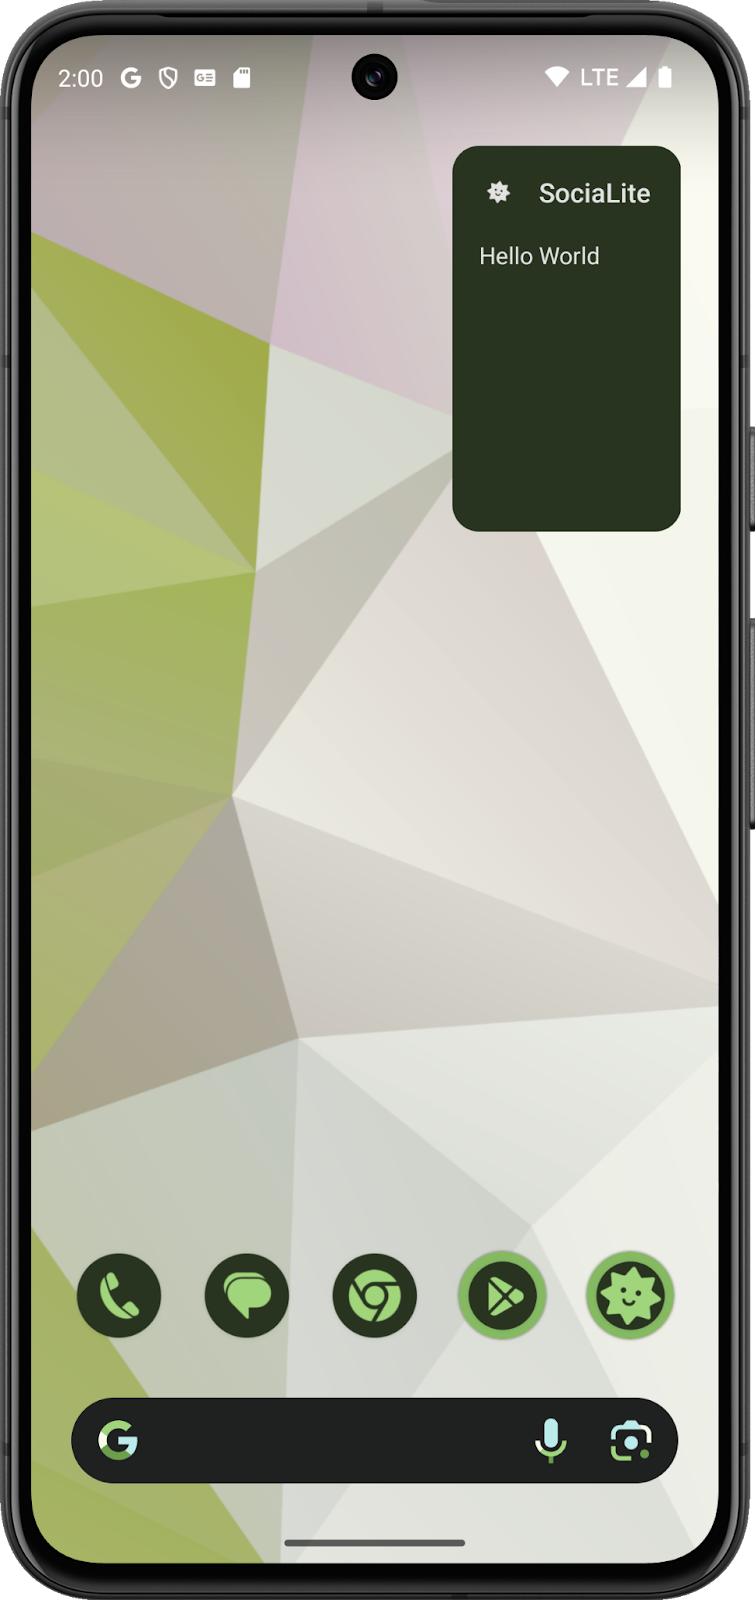 Home screen in dark theme
Add a zero state
Now you need to think about state and configuring your widget. When a widget is added to the home screen and requires configuration, it's usually best to display a zero state. The zero state prompts a user to configure the widget. You add a configuration activity to your widget and link to it from the zero state.
This codelab provides classes to store, access, and modify a widget's configuration state. You will add code to update your widget's UI to display this state, and create a lambda action to handle a user tap actions.
Review the widget model
Take a moment to review the classes in the package com.google.android.samples.socialite.widget.model.
This includes the WidgetModel class, and the WidgetModelDao and WidgetModelRepository classes. These classes are already present in the codelab starter code and handle persisting the state of widgets to the underlying Room database. Additionally, these classes make use of Hilt for managing their lifecycles.
The WidgetModel class contains a widgetId that's assigned by Android, the contactId of the SociaLite contact that it displays, a displayName and photo to be shown, and a Boolean if the contact has unread messages. These are consumed by SociaLiteAppWidget composables and displayed in the widget.
WidgetModelDao is a data access object that abstracts access to the SociaLite database. WidgetModelRepository provides convenience functions to create, read, update, and delete WidgetModel instances. These classes are created by Hilt and injected into the app with dependency injection.
- Open the
WidgetModel.ktfile in themodelpackage found atapp/src/main/java/com/google/android/samples/socialite/widget/model/.
It's a data class with an Entity annotation. Each widget instance is assigned a dedicated ID by Android and this ID is used by SociaLite as a primary key for the model data. Each instance of the model tracks the basic information of the associated contact and whether there are unread messages from the contact.
@Entity(
    foreignKeys = [
        ForeignKey(
            entity = Contact::class,
            parentColumns = ["id"],
            childColumns = ["contactId"],
            onDelete = ForeignKey.CASCADE,
        ),
    ],
    indices = [
        Index("widgetId"),
        Index("contactId"),
    ],
)
data class WidgetModel(
    @PrimaryKey val widgetId: Int,
    val contactId: Long,
    val displayName: String,
    val photo: String,
    val unreadMessages: Boolean = false,
) : WidgetState
The zero state
You want to have your Content composable load the widget's model from the WidgetModelRepository and display the zero state if there is no model available; otherwise, you want to display your widget's normal content. For now, this will be your "Hello World" message, but in the next part you create a better interface.
You will replace your Content composable with a when expression that displays either the ZeroState composable, or a Text placeholder.
- In the
provideGlancemethod, outside of your composable, get a reference to theWidgetModelRepositoryand the current widget ID. Add the following lines beforeprovideContentin theSociaLiteAppWidgetprovideGlancemethod.
override suspend fun provideGlance(context: Context, id: GlanceId) {
   val widgetId = GlanceAppWidgetManager(context).getAppWidgetId(id)
   val repository = WidgetModelRepository.get(context)
You may also need to add the following imports :
import com.google.android.samples.socialite.widget.model.WidgetModel
import com.google.android.samples.socialite.widget.model.WidgetModelRepository
import com.google.android.samples.socialite.widget.model.WidgetState.Loading
import androidx.glance.appwidget.GlanceAppWidgetManager
- In the
Contentcomposable function, add the repository and widget ID as parameters, and use them to load your model. Update theContentcomposable's function signature and add the following line:
private fun Content(repository: WidgetModelRepository, widgetId: Int) {
   val model = repository.loadModel(widgetId).collectAsState(Loading).value
- If Android Studio doesn't add the following import automatically, add it manually:.
import androidx.compose.runtime.collectAsState
You also need to update provideGlance to pass the widget ID and repository to Content.
Replace provideGlance with the following :
override suspend fun provideGlance(context: Context, id: GlanceId) {
        val widgetId = GlanceAppWidgetManager(context).getAppWidgetId(id)
        val repository = WidgetModelRepository.get(context)

        provideContent {
            GlanceTheme {
                Content(repository, widgetId)
            }
        }
    }
- In your
Contentcomposable function, determine which state to show based on whether a model exists. Move theScaffoldand widget content into theZeroStatecomposable by replacing theScaffoldcomponent and its content with this when block:
   when (model) {
       is WidgetModel -> {Text("Hello World")}
       else -> ZeroState(widgetId)
   }
The ZeroState composable is already included in the starter code in the com.google.android.samples.socialite.widget.ui package.
- If Android Studio didn't automatically import the
com.google.android.samples.socialite.widget.uipackage, add the following code to the imports section ofSociaLiteAppWidget.
import com.google.android.samples.socialite.widget.ui.ZeroState
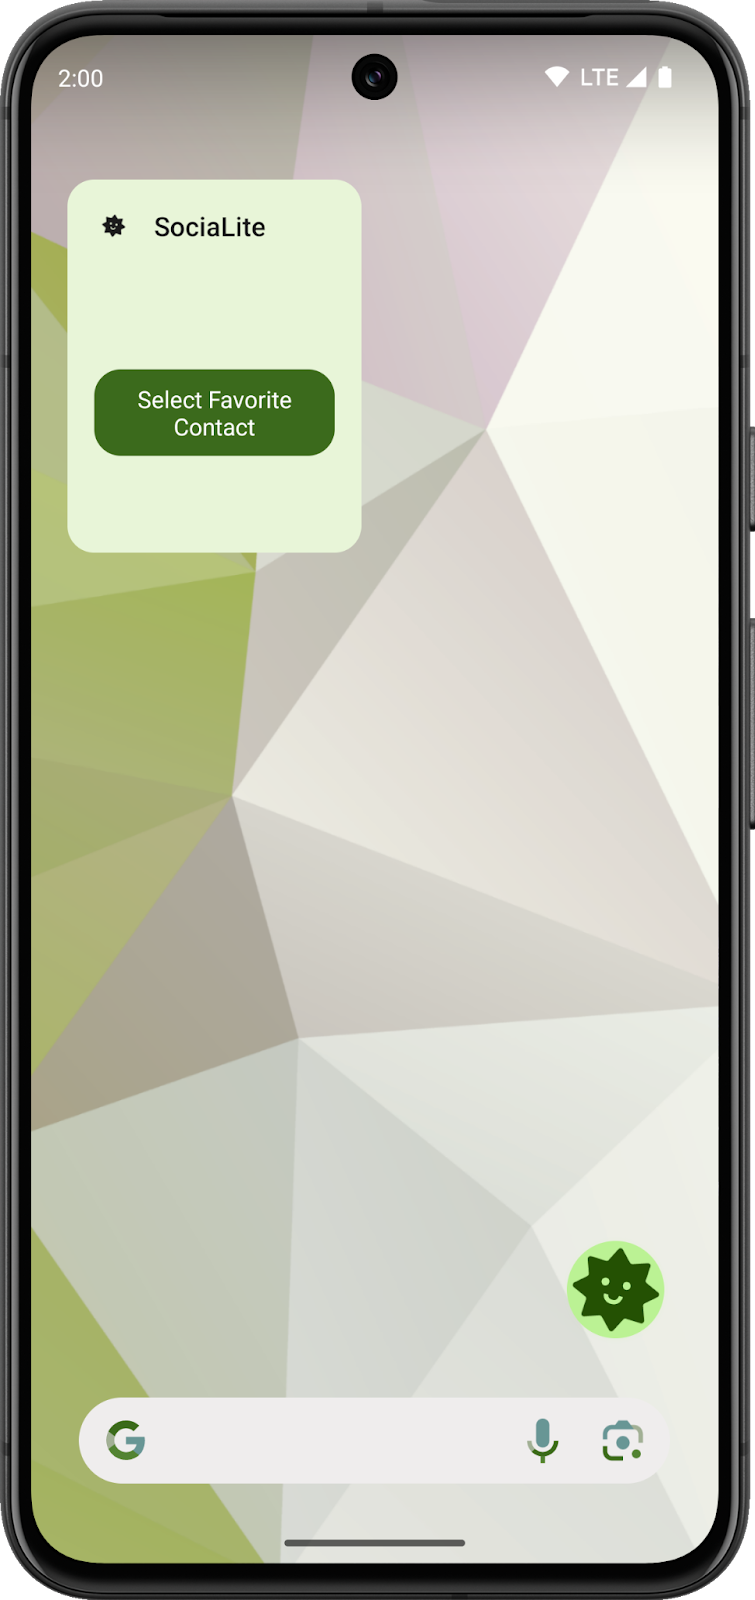
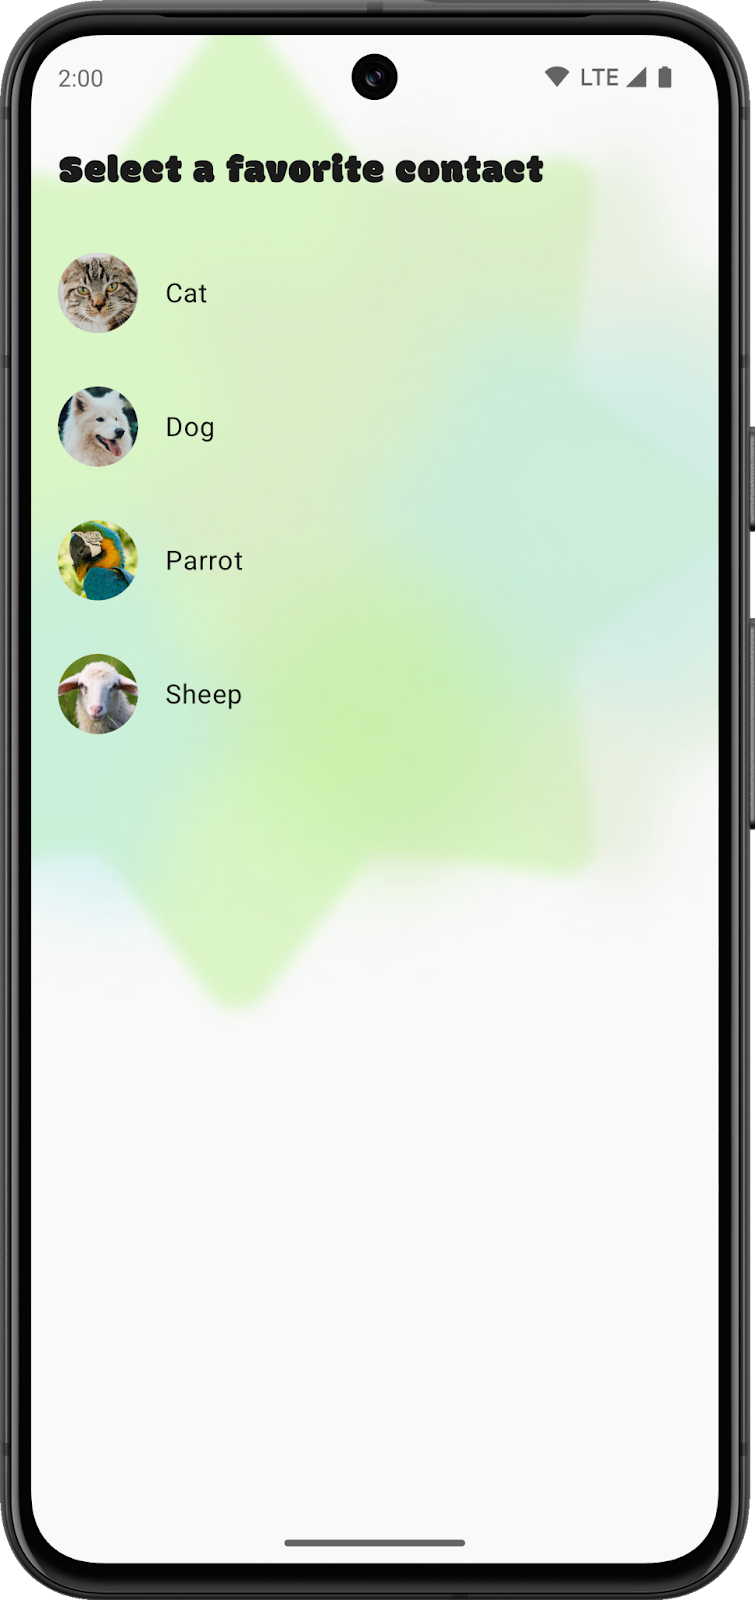
- To see your updates, rerun the app and add a new copy of the widget to your home screen. You will see the widget display the ZeroState component and a Button. The Button will open the configuration activity when you click on it, and in the next section you will update your widget state from this activity.
|
|
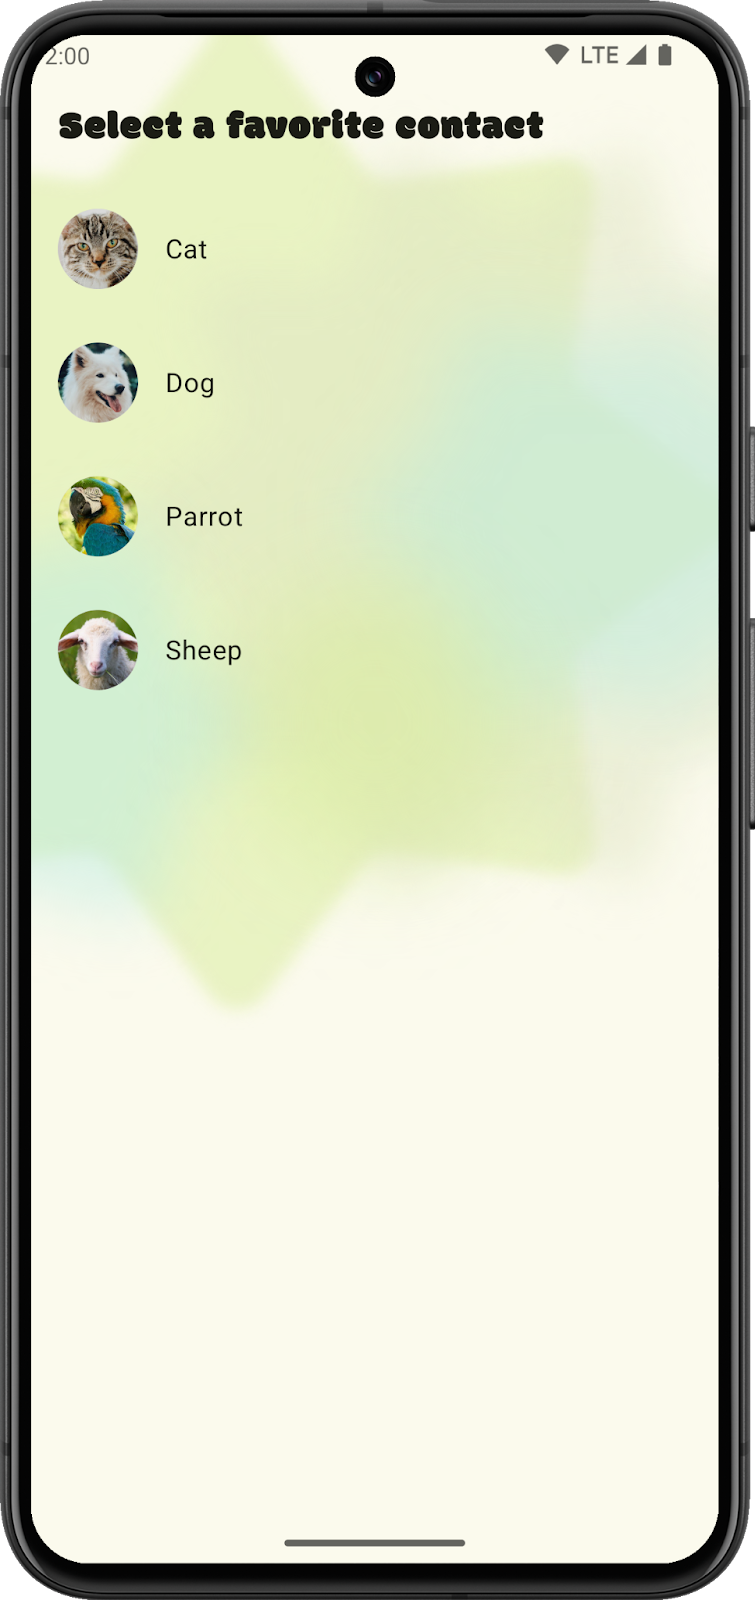
The configuration activity
Review the ZeroState Composable function. This function is found in the package com.google.android.samples.socialite.widget.ui in the ZeroState.kt file.
@Composable
fun ZeroState(widgetId: Int) {
   val widgetIdKey = ActionParameters.Key<Int>(AppWidgetManager.EXTRA_APPWIDGET_ID)
Scaffold(
   titleBar = {
       TitleBar(
           modifier = GlanceModifier.clickable(actionStartActivity(MainActivity::class.java)),
           textColor = GlanceTheme.colors.onSurface,
           startIcon = ImageProvider(R.drawable.ic_launcher_monochrome),
           title = "SociaLite",
       )
   },
   backgroundColor = GlanceTheme.colors.widgetBackground,
   modifier = GlanceModifier.fillMaxSize(),
) {
   Box(modifier = GlanceModifier.fillMaxSize(), contentAlignment = Alignment.Center) {
       Button(
           text = "Select Favorite Contact",
           onClick = actionStartActivity<SociaLiteAppWidgetConfigActivity>(
               parameters = actionParametersOf(widgetIdKey to widgetId),
           ),
       )
   }
}

}
The Scaffold composable is moved into the ZeroState composable. The TitleBar has the clickable modifier, which opens the main activity of SociaLite. Your ZeroState uses the Glance Button composable to display a call-to-action to the user and, when clicked, it opens the SociaLiteAppWidgetConfigActivity activity and includes the widget ID as an intent extra. Both of these actions use Glance's actionStartActivity convenience function. For more information on Actions, see Handle user interaction.
- Review how
SociaLiteAppWidgetConfigActivityis used to update your widget's configuration. This class is also the configuration activity for your widget. Configuration activities read the intent integer extra with the keyAppWidgetManager.*EXTRA_APPWIDGET_ID.*For more information on configuration activities, see Enable users to configure app widgets. - In
SociaLiteAppWidgetConfigActivity, replace theTODOin theContactRowonClickproperty with the following code:
{
  coroutineScope.launch {

     widgetModelRepository.createOrUpdate(
       WidgetModel(
           appWidgetId,
           contact.id,
           contact.name,
           contact.iconUri.toString(),
           false,
       ),
     )
     SociaLiteAppWidget().updateAll(this@SociaLiteAppWidgetConfigActivity)
     val resultValue = Intent().putExtra(
       AppWidgetManager.EXTRA_APPWIDGET_ID,
       appWidgetId,
     )
     setResult(RESULT_OK, resultValue)
     finish()
  }
}
Add the following includes if Android Studio does not do it automatically
import com.google.android.samples.socialite.widget.model.WidgetModel
import androidx.glance.appwidget.updateAll
import kotlinx.coroutines.launch
This code block updates your widget state. First, it uses the repository to save or update the WidgetModel with the information from the selected contact. Next, it calls the updateAll suspend function. This function updates all widgets on the home screen and it may be called from any place in your app. Finally, this block sets the result of the configuration activity to signal that it updated the widget successfully.
- Run and replace your widget on the home screen. You should see the new zero state.
- Click Select favorite contact. Thisl takes you to the configuration activity.
- Select a contact. This updates your widget. However, the widget doesn't display your favorite contact yet because you add that capability in the next section.
Manage widget data
- Open the App inspection tool, connect to a process if necessary, and select the Database inspector tab to look at the contents of the app's database.
- Select a favorite contact in the widget and see that it updates to "Hello World." Back in the App inspection tool, you should see a Widget model tab with one entry for your widget. You may need to refresh the table or press Live updates to see the changes.
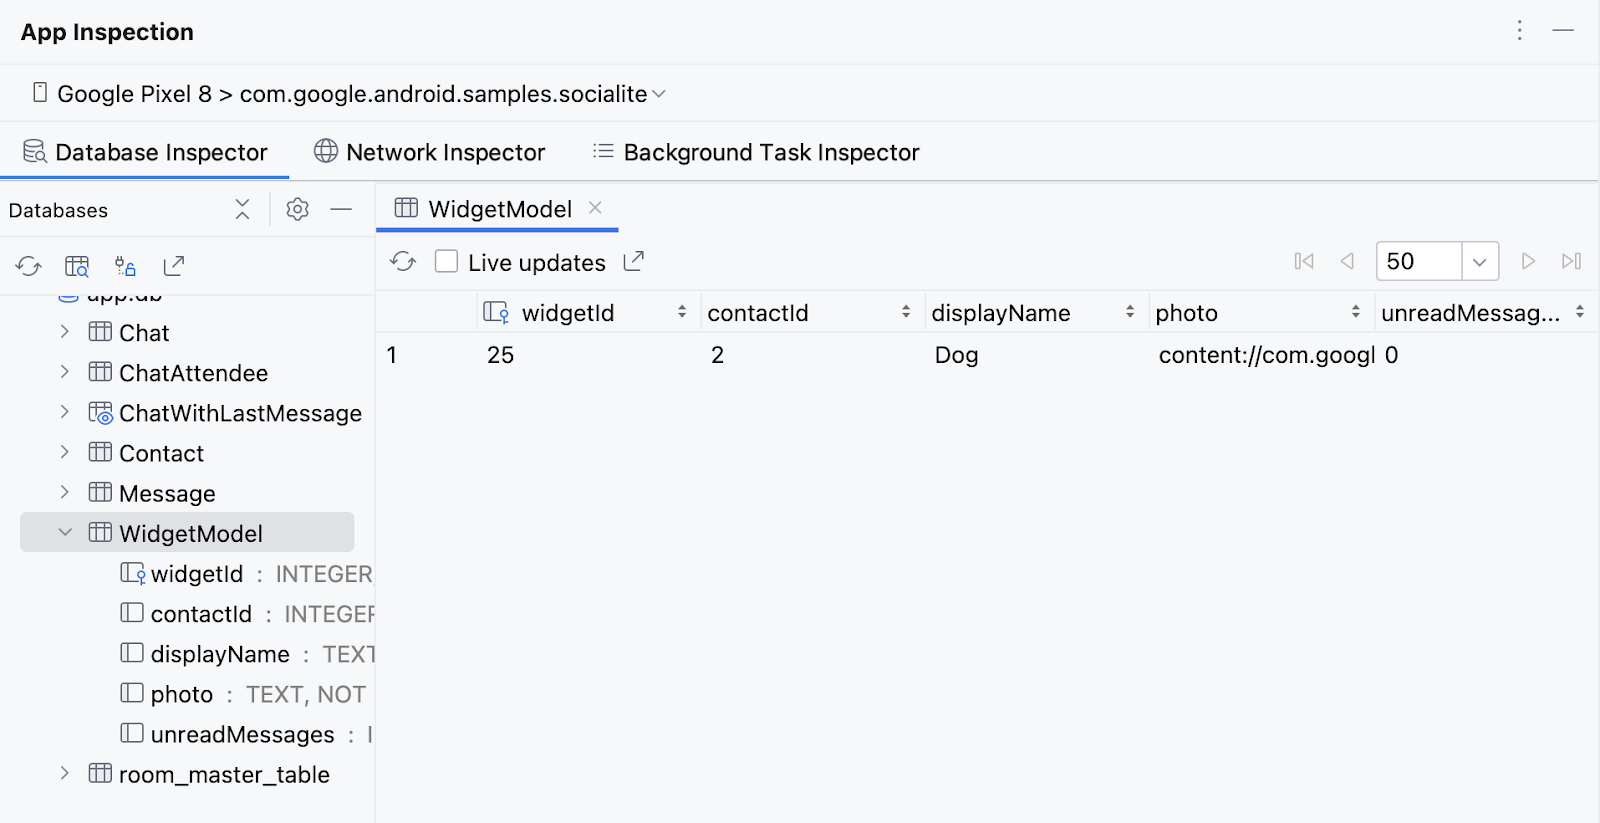
- Add another widget and select another contact. You may need to press Refresh table or Live updates to see the new model.
- Remove the widget and notice that the model is left behind in the database after a widget is removed.
You can update SociaLiteAppWidgetReceiver to clean your database when a widget is removed by overriding onDeleted.
To clean up orphaned widget models, you can call WidgetModelRepository.cleanupWidgetModels. The repository class is managed by Hilt and you need to use dependency injection to access its instance.
- In
SociaLiteAppWidgetReceiver, add theAndroidEntryPointHilt annotation to your receiver class declaration and inject theWidgetModelRepositoryinstance. - Call
WidgetModelRepository.cleanupWidgetModelsin the method override foronDeleted.
Your code should look like this :
package com.google.android.samples.socialite.widget

import android.content.Context
import androidx.glance.appwidget.GlanceAppWidget
import androidx.glance.appwidget.GlanceAppWidgetReceiver
import com.google.android.samples.socialite.widget.model.WidgetModelRepository
import dagger.hilt.android.AndroidEntryPoint
import javax.inject.Inject

@AndroidEntryPoint
class SociaLiteAppWidgetReceiver : GlanceAppWidgetReceiver() {
   override val glanceAppWidget: GlanceAppWidget = SociaLiteAppWidget()

   @Inject
   lateinit var repository: WidgetModelRepository

   override fun onDeleted(context: Context, appWidgetIds: IntArray) {
       super.onDeleted(context, appWidgetIds)
       repository.cleanupWidgetModels(context)
   }

}
- Rerun the app. You should see that the model row is removed in the App inspector when the widget is removed from the home screen.
5. Add the Contact UI and update when new messages arrive
You've entered the final stretch of the codelab. For this section, you implement the final contact UI for your widget and update it when there is an unread message for the contact.
- Review your
WidgetModelRepositoryclass in themodelpackage.
This is where you have the updateUnreadMessagesForContact convenience method; it updates widgets associated with a contact's ID.
//Don't add this code.
fun updateUnreadMessagesForContact(contactId: Long, unread: Boolean) {
   coroutineScope.launch {
       widgetModelDao.modelsForContact(contactId).filterNotNull().forEach { model ->
           widgetModelDao.update(
             WidgetModel(model.widgetId, model.contactId, model.displayName, model.photo, unread)
           )
           SociaLiteAppWidget().updateAll(appContext)
       }
   }
}
This method has two parameters: contactId, the id of the contact being updated and unread, a Boolean of the unread message state. This method uses WidgetModelDao, to find all widget models that show this contact and update the model with the new read state. Then, the function calls the Glance-provided SociaLiteAppWidget().updateAll method to update all widgets on the user's home screen.
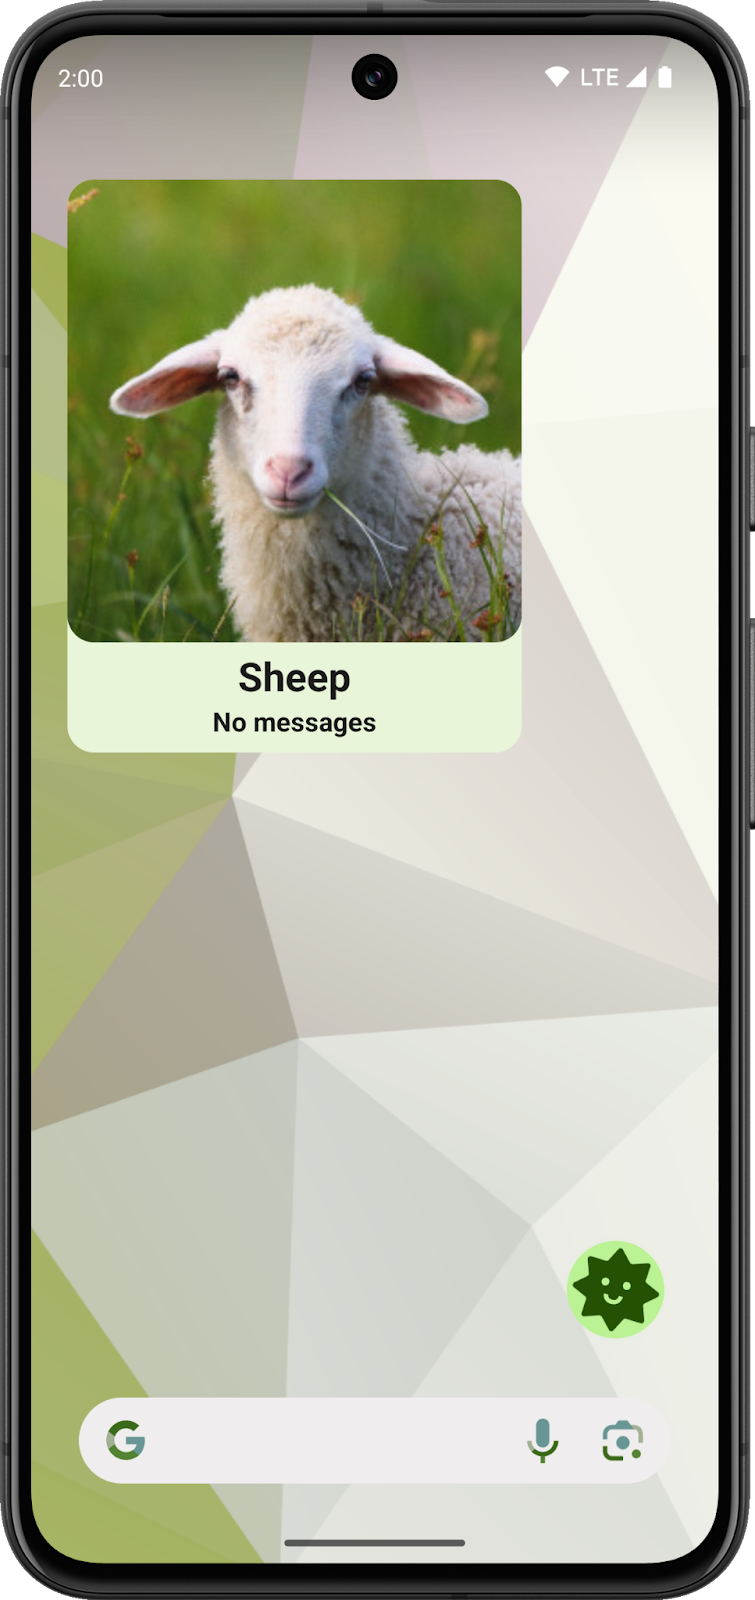
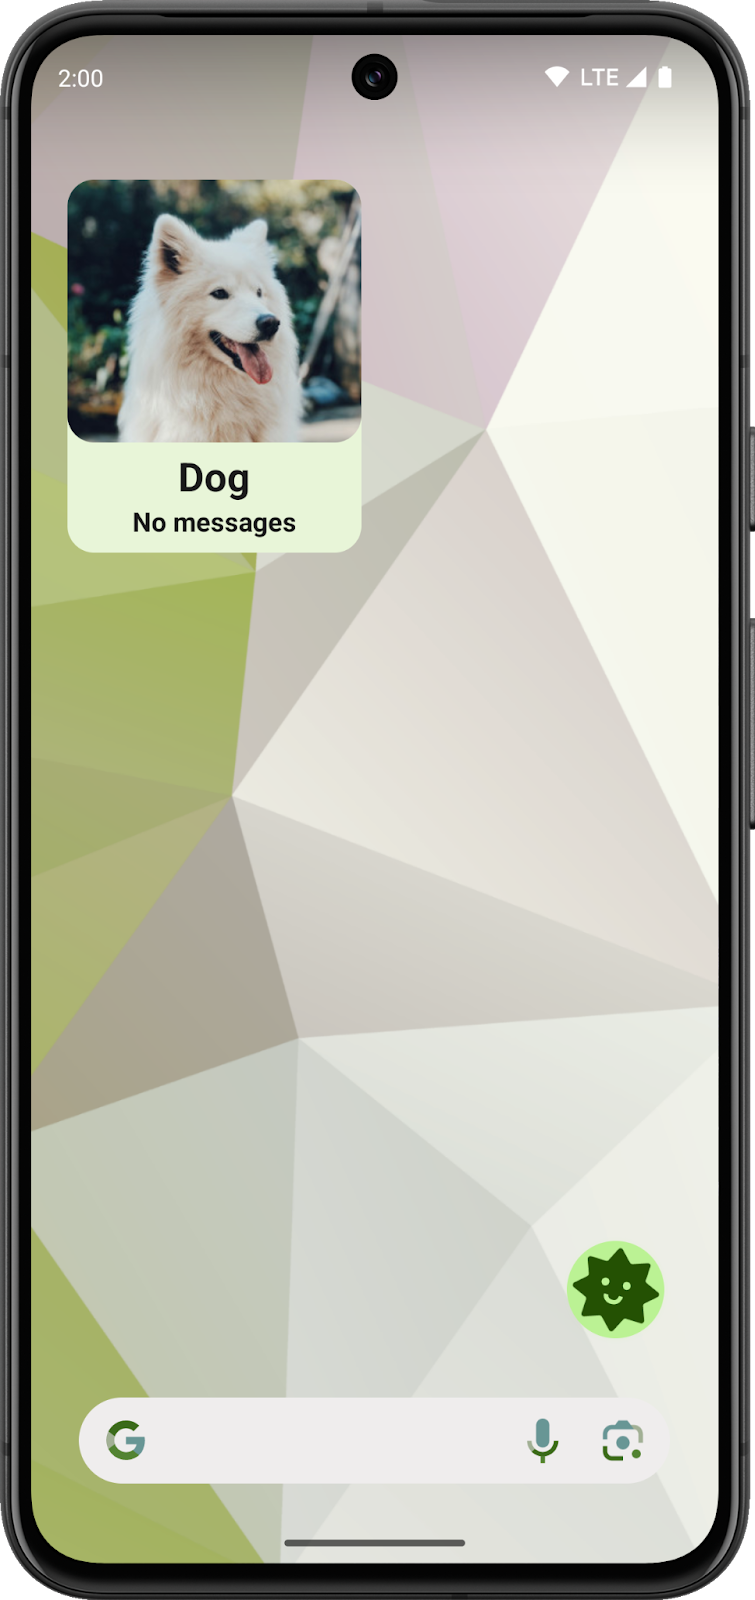
Now that you understand how a widget and its state are updated, you can create your contact UI, send a message, and watch it update. To do so, you update SociaLiteAppWidget with a FavoriteContact composable in your widget layout. In this layout, you also check whether you should display No new messages or a New Messages!.
- Review the
FavoriteContact.ktfile in thecom.google.android.samples.socialite.widget.uipackage.
//Don't add this code.
@Composable
fun FavoriteContact(model: WidgetModel, onClick: Action) {
   Column(
       modifier = GlanceModifier.fillMaxSize().clickable(onClick)
           .background(GlanceTheme.colors.widgetBackground).appWidgetBackground()
           .padding(bottom = 8.dp),
       verticalAlignment = Alignment.Vertical.Bottom,
       horizontalAlignment = Alignment.Horizontal.CenterHorizontally,
   ) {
       Image(
           modifier = GlanceModifier.fillMaxWidth().wrapContentHeight().defaultWeight()
               .cornerRadius(16.dp),
           provider = ImageProvider(model.photo.toUri()),
           contentScale = ContentScale.Crop,
           contentDescription = model.displayName,
       )
       Column(
           modifier = GlanceModifier.fillMaxWidth().wrapContentHeight().padding(top = 4.dp),
           verticalAlignment = Alignment.Vertical.Bottom,
           horizontalAlignment = Alignment.Horizontal.CenterHorizontally,
       ) {
           Text(
               text = model.displayName,
               style = TextStyle(
                   fontWeight = FontWeight.Bold,
                   fontSize = 24.sp,
                   color = (GlanceTheme.colors.onSurface),
               ),
           )

           Text(
               text = if (model.unreadMessages) "New Message!" else "No messages",
               style = TextStyle(
                   fontWeight = FontWeight.Bold,
                   fontSize = 16.sp,
                   color = (GlanceTheme.colors.onSurface),
               ),
           )
       }
   }
}
- Replace
Text("Hello World")in theContentcomposable ofSociaLiteAppWidgetwith a call to yourFavoriteContactcomposable.
This composable will take the WidgetModel and an Action created by the actionStartActivity Glance function.
- Add the call to your
whenblock before theZeroStatewhen the model is notWidgetModel.
when (model) {
  is WidgetModel -> FavoriteContact(model = model, onClick = actionStartActivity(
     Intent(LocalContext.current.applicationContext, MainActivity::class.java)
         .setAction(Intent.ACTION_VIEW)
         .setFlags(Intent.FLAG_ACTIVITY_CLEAR_TOP)
         .setData("https://socialite.google.com/chat/${model.contactId}".toUri()))
  )
  else -> ZeroState(widgetId)
}
- If Android Studio doesn't automatically add the following imports, do so now:
import com.google.android.samples.socialite.widget.ui.FavoriteContact
import androidx.glance.appwidget.action.actionStartActivity
import android.content.Intent
import com.google.android.samples.socialite.MainActivity
import androidx.core.net.toUri
- Run your app.
- Select a favorite contact, send a message, and immediately exit the app before they respond. When the response arrives, the state of the widget should change.
- Click the widget to open the chat and see that the state updated again when you exit to the main screen.
6. Congratulations
You successfully completed the codelab and learned how to write a widget using Glance! You should be comfortable with creating a beautiful widget that looks good on many home screens, handles user input, and updates itself.
To get the solution code in the main branch, follow these steps:
- If you already downloaded SociaLite, run this command:
git checkout main
- Otherwise, download the code again to view the
mainbranch:
git clone git@github.com:android/socialite.git