1. Introduction
Direct Share is a feature that allows apps to show app-specific options directly in the system Intent chooser dialog. Users can then jump directly into your app when sharing content from another app. For example, a messaging app using Direct Share could enable the user to share content direct to a contact, which appears in the chooser dialog. Direct Share makes sharing content quicker and easier.
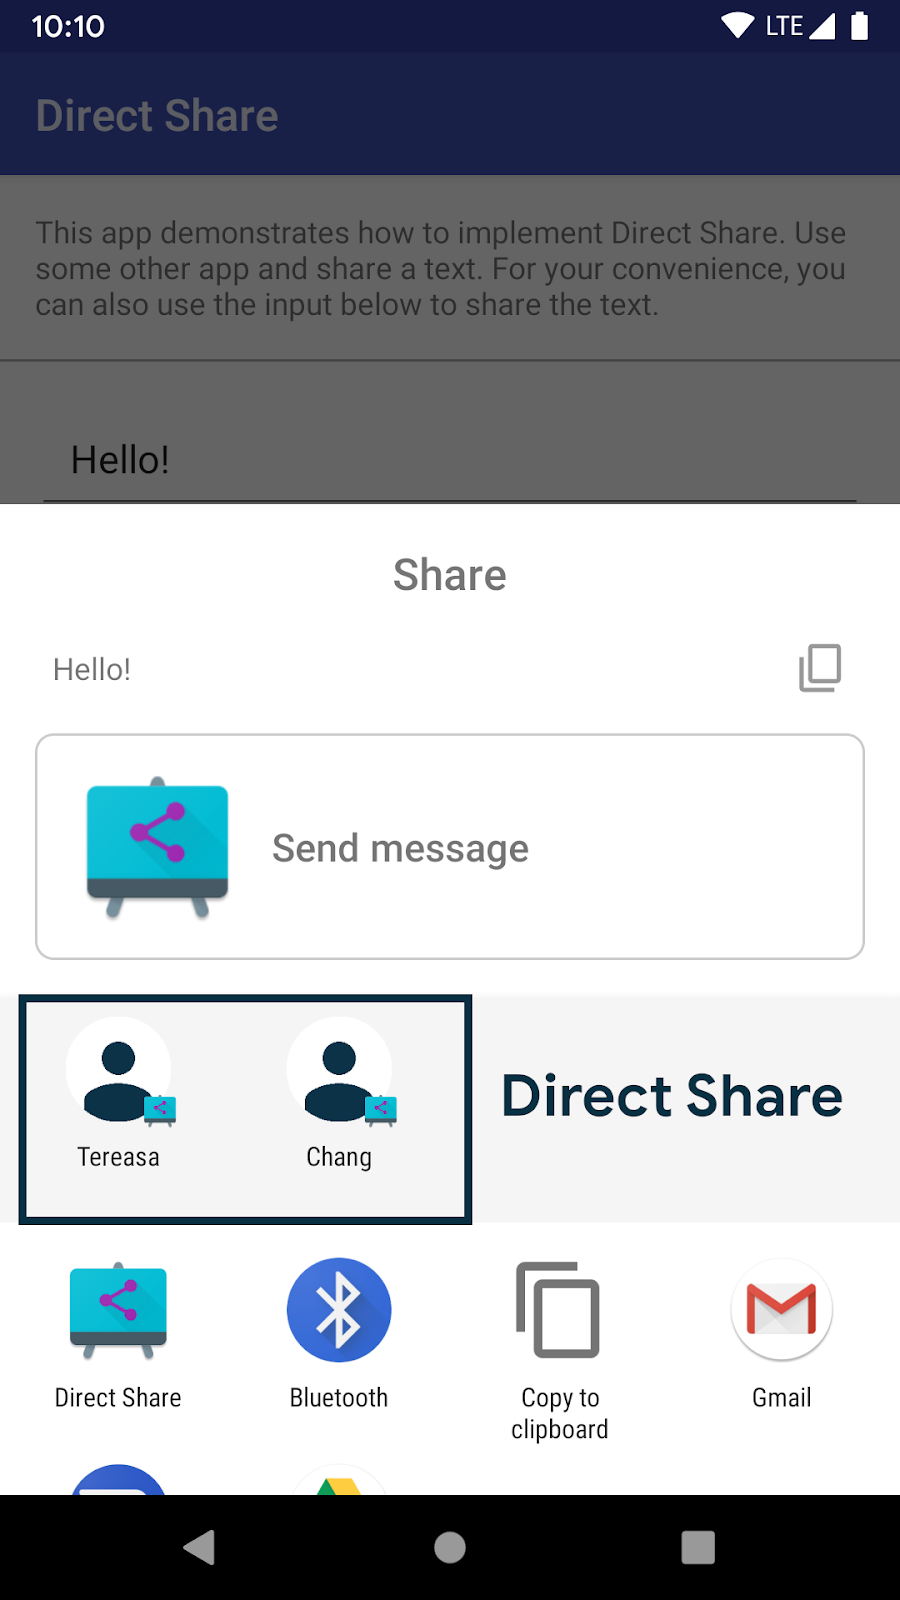
In the image, you can see how the user can quickly select Tereasa or Chang to share the text "Hello!" directly to an app using Direct Share, without having to browse through the list of contacts.
Direct Share works with the concept of Sharing Shortcuts. The app can publish sharing targets in advance, allowing the system Intent chooser dialog to show them when required. To publish share targets, we will use the ShortcutManager API. Any published sharing shortcuts are persisted by the system until the app updates them, or the app is uninstalled.
When shown to the user, the system ranks any applicable shortcuts using a prediction service, which shows shortcuts which are more likely to be used.
This codelab will walk you through implementing Direct Share in your app, including making it backwards compatible with older Android versions.
What you will build
In this codelab, you will work with a messaging app that can receive Intents which contain plain text. When a user shares some text from some other app (or the one we're building), this app will be listed as an option. By using the Direct Share feature, this app also publishes some contacts shown in the system Intent chooser dialog.
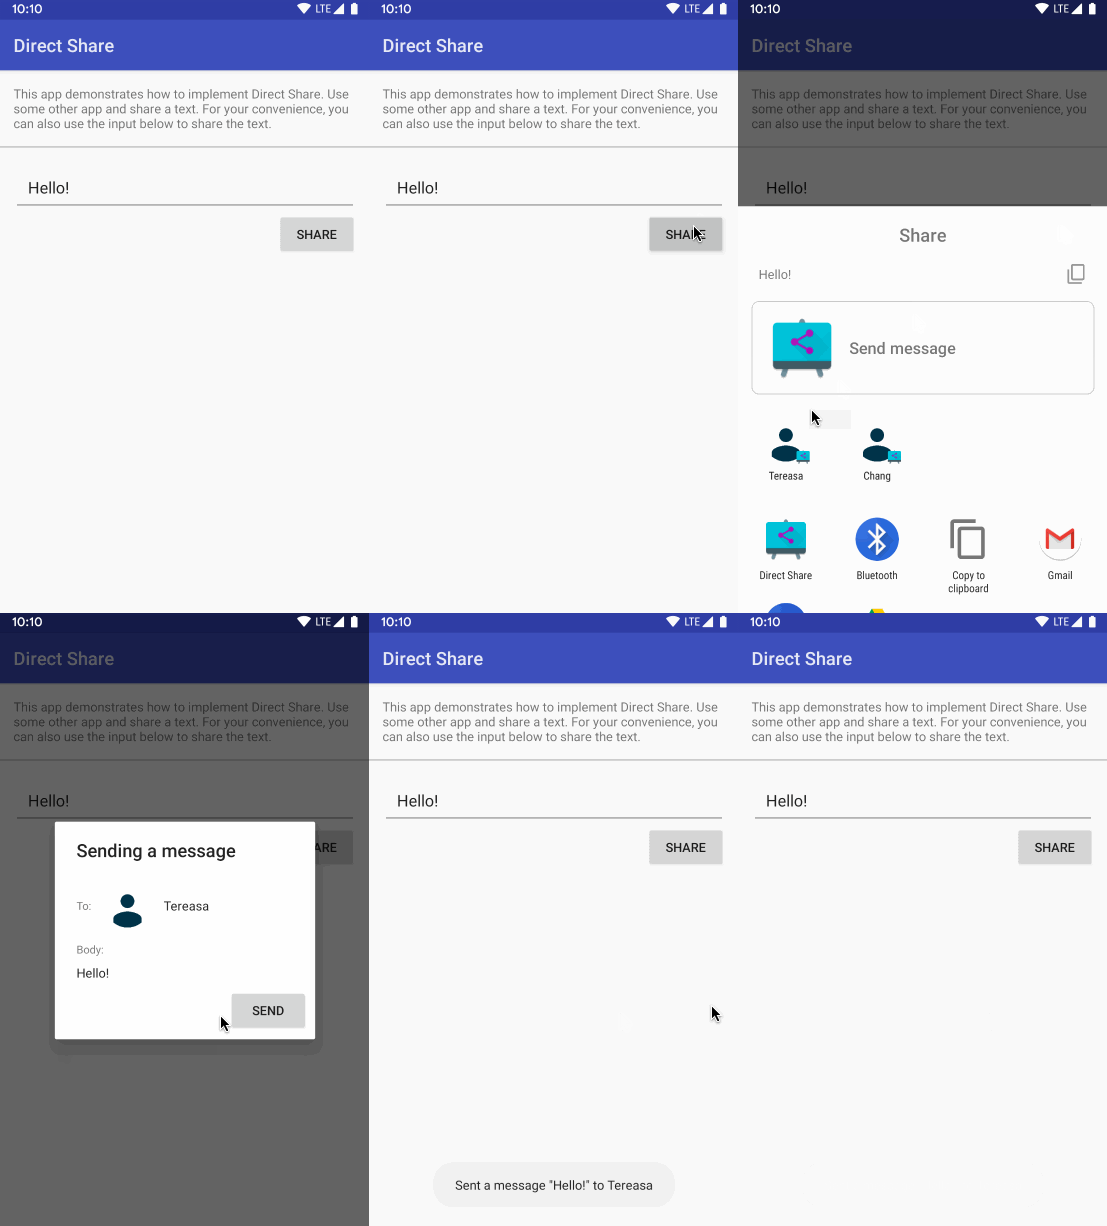
You can see the sample app below:
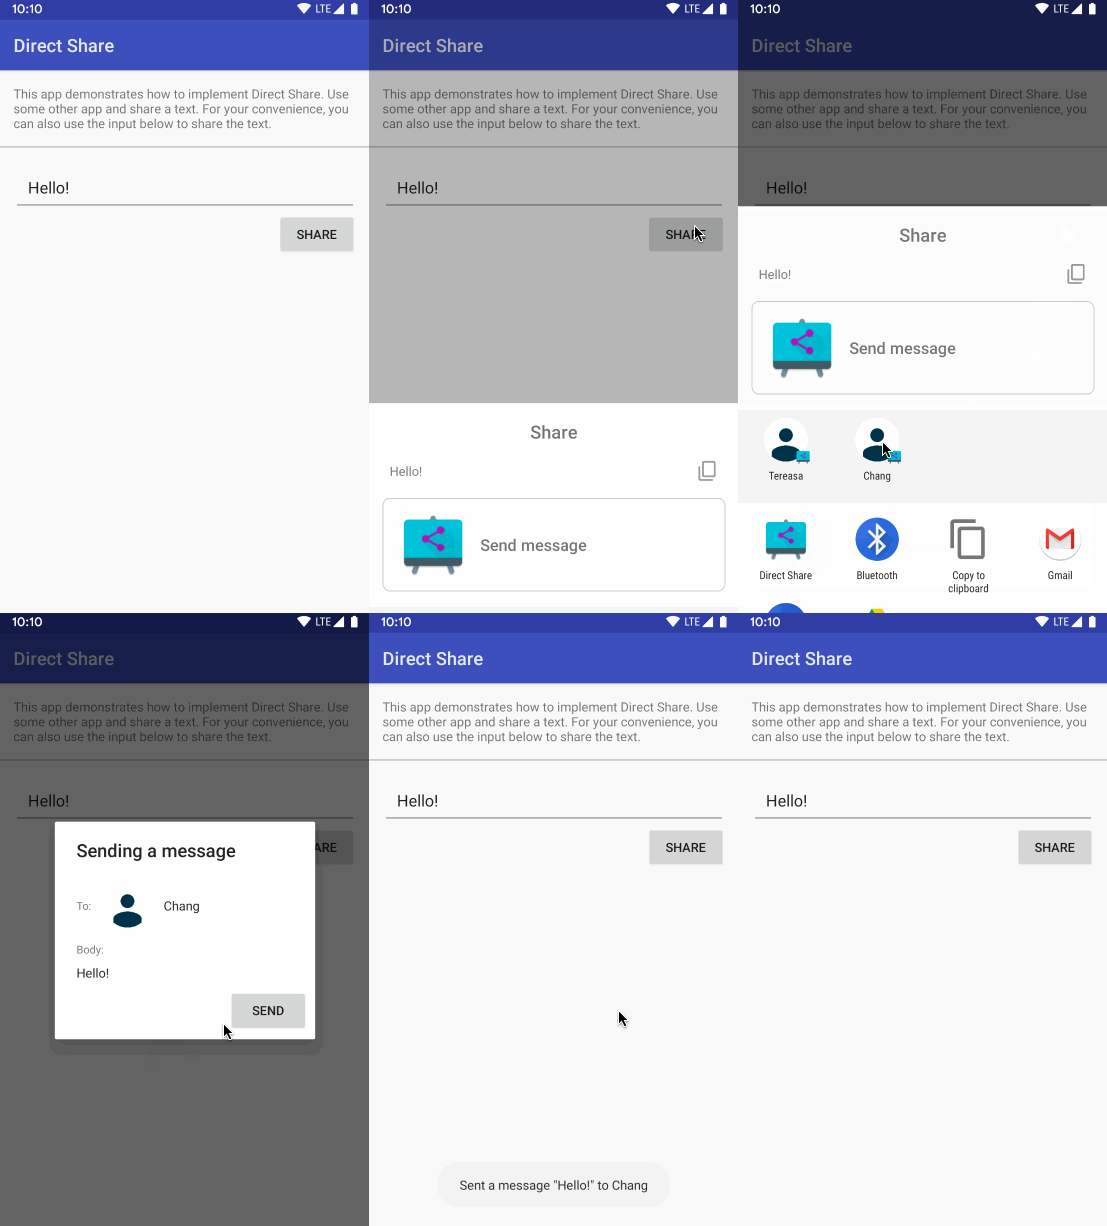
All classes and functionality have already been created for you. You will implement Direct Share specific logic to:
- Publish sharing shortcuts with a specific category
- Make Direct Share backwards compatible with older Android versions
- Add a title and thumbnail to the content preview
What you will learn
- How to implement Direct Share in your app
- How to make Direct Share backwards compatible with older Android versions
- How to show content preview in shared content
Prerequisites
- Basic Kotlin knowledge (this codelab is in Kotlin)
- Android Studio 3.3 or higher
- Emulator or device running API 21+
If you run into any issues (code bugs, grammatical errors, unclear wording, etc.) as you work through this codelab, please report the issue via the Report a mistake link in the lower left corner of the codelab.
2. Getting Started
Get the Code
Get the Direct Share codelab from GitHub:
$ git clone https://github.com/android/codelab-android-direct-share
Alternatively you can download the repository as a Zip file:
Get Android Studio 3.3 or higher
Make sure you are using Android Studio 3.3 or higher.
If you need to download a recent version of Android Studio, you can do so here.
Project set up
The preferred way to implement the Direct Share feature is using the Android Q API's capabilities. This is why your compileSdkVersion needs to be at least "29".
To follow the codelab, open the root folder with Android Studio. It will contain two sub-projects inside it:
direct-share-startcodelab's starting point.direct-share-donesolution to the codelab.
3. Overview of the sample app
This messaging app is able to:
- Share plain text via ACTION_SEND Intents
- Listen for plain text Intents to send messages to contacts
- If there's no contact selected, the user can select a contact
Running the sample app
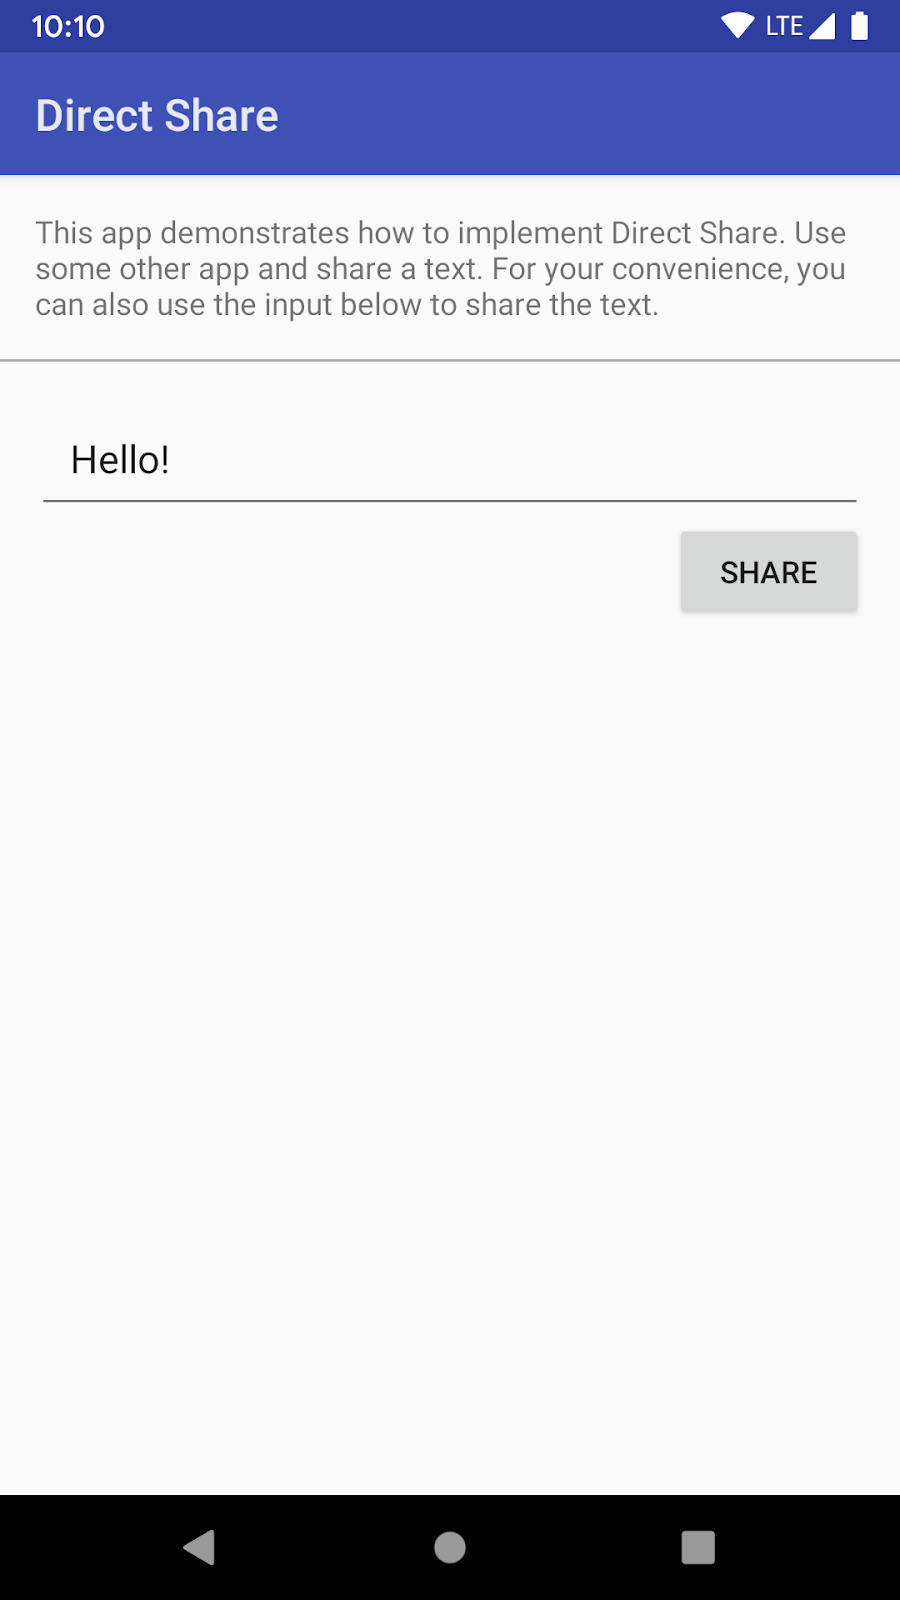
If you run direct-share-start-app, the Share screen (MainActivity.kt) will launch: Type anything you want on the EditText and click Share to share that text to any app.
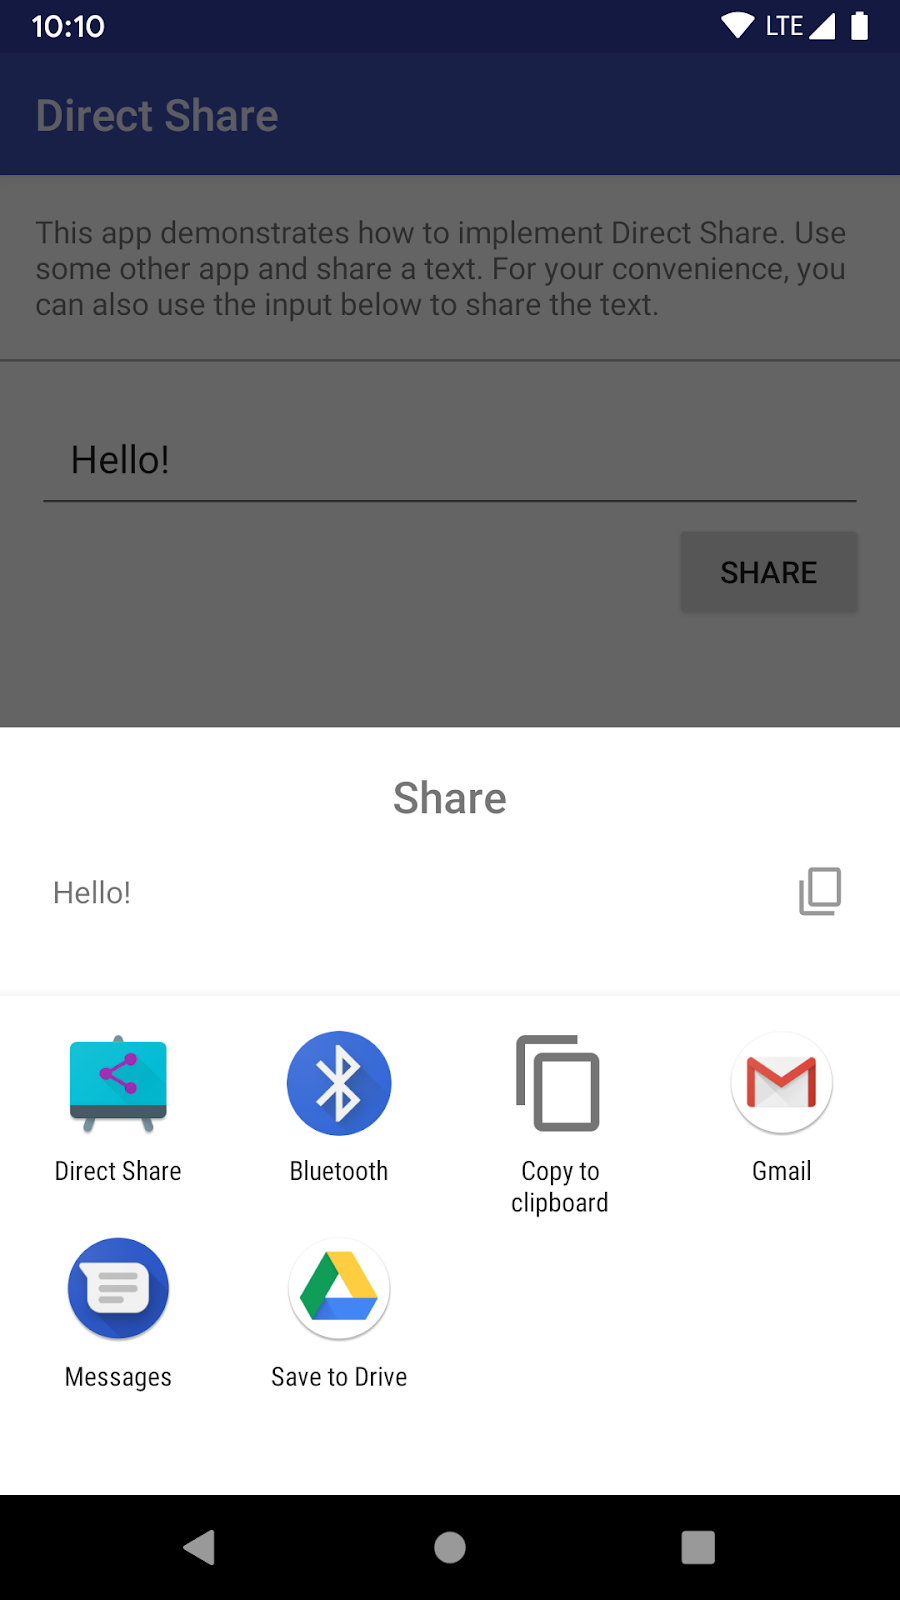
Tapping on Share will trigger an Intent to the system and a system Intent dialog chooser will appear.
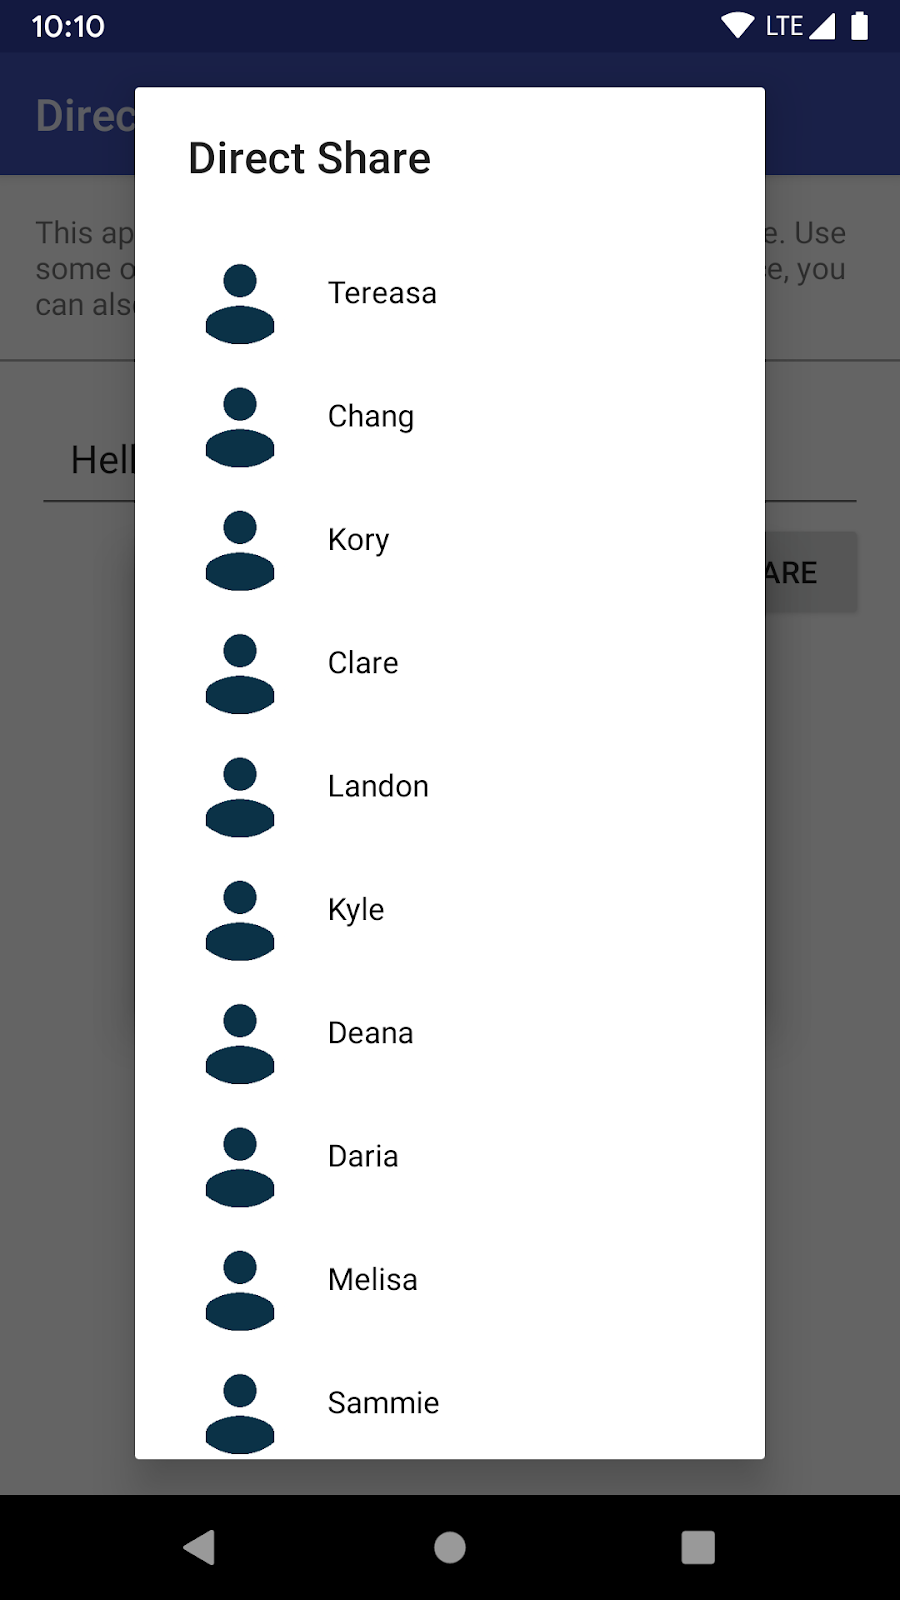
Select contact screen (SelectContactActivity.kt): When the user selects the "Direct Share" messaging app to process the shared text, the user can choose who to share the message with. Notice that the user has to select the app, not a specific contact.
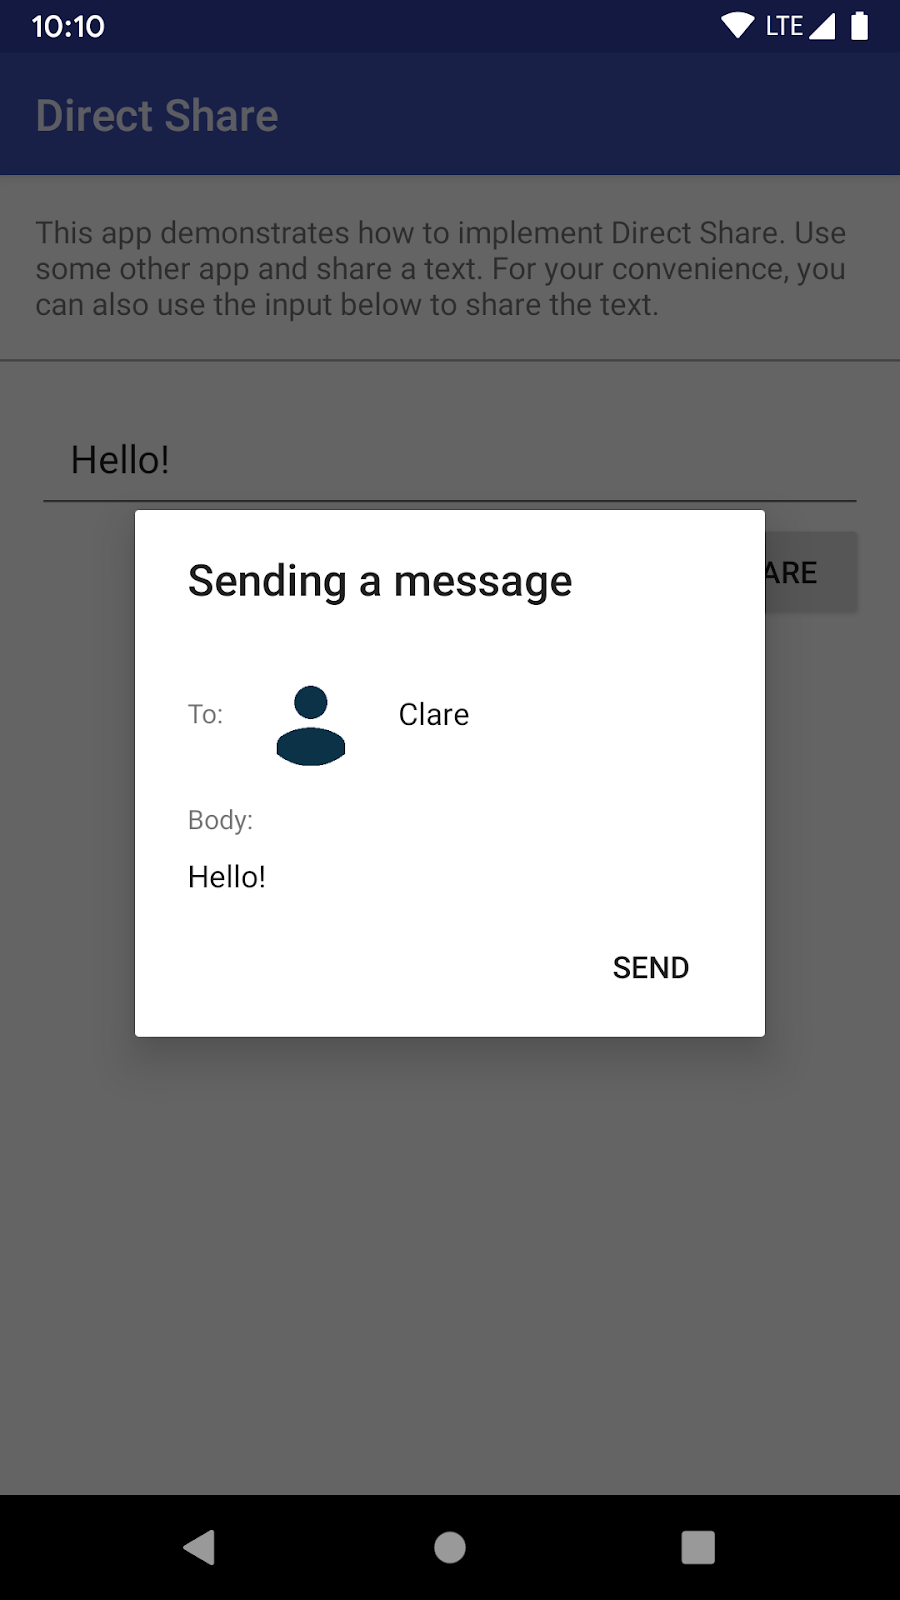
Send message screen (SendMessageActivity.kt): Click send to send a message to a contact. The app will display a Toast as a signal that the message was sent.
4. Declaring Sharing Shortcuts
Direct Share uses the ShortcutManager API to publish sharing shortcuts. It's similar to the App Shortcuts feature.
Let's start working on the app and implement Direct Share. Start with the direct-share-start sub-project.
There are two main steps to follow:
- Declare share-target elements in the application's shortcuts xml resource.
- Publish dynamic shortcuts with matching categories to the declared share-targets with the ShortcutManager API.
Share targets declaration
A share target defines the metadata of a sharing shortcut, including:
- Information about the shared data type
- Categories that can be associated with the sharing shortcut
- Activity that will handle the share Intent
Share targets must be declared in the application's resource file where static shortcuts are also defined. In our example, you can find it in app/src/main/res/xml/shortcuts.xml.
You don't have to do anything at the moment, this file is already available in the project. You can open and see it.
shortcuts.xml
<shortcuts xmlns:android="http://schemas.android.com/apk/res/android">
    <share-target android:targetClass="com.example.android.directshare.SendMessageActivity">
        <data android:mimeType="text/plain" />
        <category android:name="com.example.android.directshare.category.TEXT_SHARE_TARGET" />
    </share-target>
</shortcuts>
Share target definitions are added inside the <shortcuts> root element in the resource file along with other possible static shortcut definitions.
Data element in share-target is similar to the data specification in an intent filter.
Each share-target can have multiple associated categories, which will be solely used to match published shortcuts of an app with its share target definitions. Categories can be any arbitrary string. Internally, the framework will match the category of the sharing shortcut with the category given in the xml resource of the app. The target class will handle the share Intent.
The shortcuts.xml file needs to be declared in an activity whose intent filters are set to the android.intent.action.MAIN action and the android.intent.category.LAUNCHER category in the AndroidManifest.xml file.
Update the AndroidManifest.xml file to declare share targets
Update the code to define share targets in the app.
- Open the
AndroidManifest.xmlfile - Uncomment Step 4 to add a
<meta-data>element to theMainActivitythat references the resource file where the app's share targets are defined
AndroidManifest.xml
<activity
    android:name=".MainActivity"
    android:label="@string/app_name">
    <intent-filter>
        <action android:name="android.intent.action.MAIN" />
        <category android:name="android.intent.category.LAUNCHER" />
    </intent-filter>
    <!-- Reference resource file where the app's shortcuts are defined -->
    <meta-data
        android:name="android.app.shortcuts"
        android:resource="@xml/shortcuts" />
</activity>
5. Using the ShortcutManager API
Once the share target elements are defined, we need to publish dynamic shortcuts that match those definitions with the ShortcutManager API. The sharing shortcuts are persisted in the system until they are updated by the same application or the application is uninstalled. You will need to manually update the list of shortcuts every time you consider it appropriate (e.g. you coud update them either when the user opens the app or the most recent conversations change in a messaging app). The API offers methods to update, remove or add shortcuts.
In the codelab, we use ShortcutManagerCompat available in AndroidX to publish shortcuts since it provides backwards compatibility down to Android M. Use it in your project by adding the androidx:core dependency to your project.
See the dependency already added in the direct-share-start-app/app/build.gradle or build.gradle (Module: direct-share-start-app) file as follows:
build.gradle
implementation "androidx.core:core:${versions.androidxCore}"
Introducing SharingShortcutsManager
The class in charge of interacting with the ShortcutManager in the app is the SharingShortcutsManager. Every time that the user opens the app (i.e. when MainActivity gets launched), we push our sharing shortcuts.
You can see how we interact with it in the MainActivity class:
MainActivity.kt
override fun onCreate(savedInstanceState: Bundle?) {
    super.onCreate(savedInstanceState)
    setContentView(R.layout.activity_main)
    ...
    sharingShortcutsManager = SharingShortcutsManager().also {
        it.pushDirectShareTargets(this)
    }
}
Create categories that match your share-target definition
One of the parameters that we can configure is the list of categories associated to a shortcut. All the shortcuts that we create in this codelab are of the same type. And the type has to match with what we defined previously in the shortcuts.xml file. In this case we defined that SendMessageActivity was associated with category TEXT_SHARE_TARGET in shortcuts.xml.
If you open SharingShortcutsManager.kt, you can see the category defined in a constant variable.
SharingShortcutsManager.kt
/**
 * Category name defined in res/xml/shortcuts.xml that accepts data of type text/plain
 * and will trigger [SendMessageActivity]
 */
private val categoryTextShareTarget = "com.example.android.directshare.category.TEXT_SHARE_TARGET"
Go to the pushDirectShareTargets method now and uncomment the Step 5 code that creates a set of categories that the shortcuts are associated with:
SharingShortcutsManager.kt
fun pushDirectShareTargets(context: Context) {
    ...
    // Category that our sharing shortcuts will be assigned to
    val contactCategories = setOf(categoryTextShareTarget)
    ...
}
6. Anatomy of a Shortcut
Let's explore what we can configure in a shortcut.
Uncomment the code in Step 6 that creates shortcuts and adds them to the list of shortcuts that will get published by the ShortcutManagerCompat. We will go through the code in more detail in this section.
For the simplicity of the sample, we always add the same first four contacts that are defined in the Contact.kt file. If you open it, you can see we create an array with ten contacts and methods to retrieve them.
In the uncommented code, we create a shortcut using the ShortcutInfoCompat.Builder. This makes use of the traditional Builder pattern. It takes a Context object as a parameter which in this case is the Activity that calls this method and a String id.
The id parameter is important since it will identify this shortcut when the target activity receives the sharing intent. The activity will get the id with the EXTRA_SHORTCUT_ID Intent extra. In our case, the id will be the Contact Id which is represented by the position it occupies in the array.
ShortcutInfoCompat.Builder(context, Integer.toString(id))
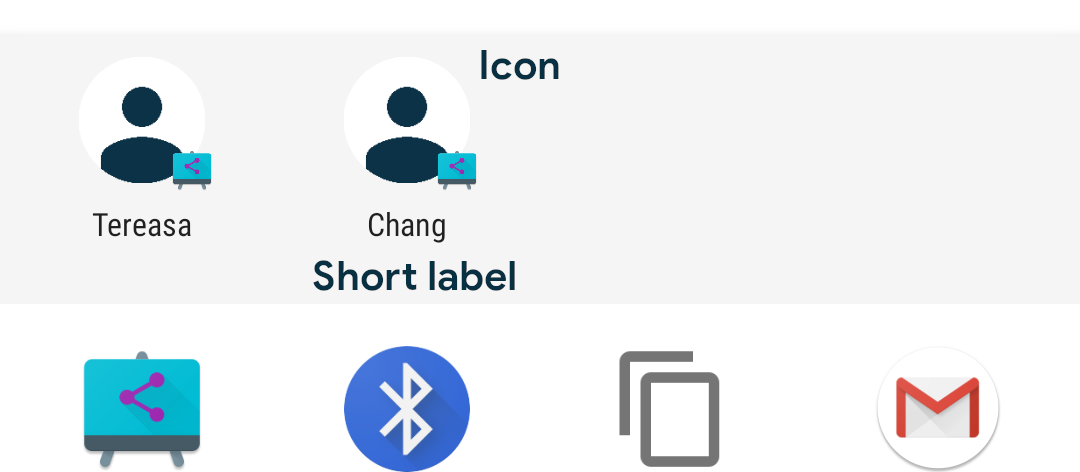
Next, we configure the short label and the icon that will get displayed in the system Intent chooser dialog.
ShortcutInfoCompat.Builder(context, Integer.toString(id))
        .setShortLabel(contact.name)
        // Icon that will be displayed in the share target
        .setIcon(IconCompat.createWithResource(context, contact.icon))
You can see in the image below how setting these attributes modify the UI displayed in the system Intent dialog chooser.
The intent defined in the ShortcutInfoCompat builder is triggered only if the shortcut is opened as a static shortcut. This is important to understand to avoid confusion in the future.
ShortcutInfoCompat.Builder(context, Integer.toString(id))
        ...
        .setIntent(staticLauncherShortcutIntent)
To differentiate that Intent with the one received as a sharing shortcut in this example, we are defining it with an ACTION_DEFAULT action.
// Item that will be sent if the shortcut is opened as a static launcher shortcut
val staticLauncherShortcutIntent = Intent(Intent.ACTION_DEFAULT)
If a shortcut is long-lived, it can be cached by various system services and can appear as a sharing target even if it has been unpublished or removed by the app.
ShortcutInfoCompat.Builder(context, Integer.toString(id))
        // Make this sharing shortcut cached by the system
        // Even if it is unpublished, it can still appear on the sharesheet
        .setLongLived(true)
Categories will be used to filter shortcuts which can handle various share intents or actions. This field is required for shortcuts that are intended to be used as share targets. To assign the category we created before, use the following method:
ShortcutInfoCompat.Builder(context, Integer.toString(id))
        .setCategories(contactCategories)
You can also assign people to shortcuts. This is used for better understanding of user behavior across different apps, and help potential prediction services in the Android framework to provide better suggestions in the chooser dialog. Adding Person info to a shortcut is optional, but strongly recommended. Note that not all share targets can be associated with a person (e.g. share to cloud).
ShortcutInfoCompat.Builder(context, Integer.toString(id))
        // Person objects are used to give better suggestions
        .setPerson(
                Person.Builder()
                        .setName(contact.name)
                        .build()
        )
With all this configuration, our shortcut is ready and we can build it.
ShortcutInfoCompat.Builder(context, Integer.toString(id))
        .build()
The code in Step 6 has created four sharing shortcuts that can already be published.
7. Publishing sharing shortcuts
Now that we have four sharing targets in the array, we can publish them using the ShortcutManagerCompat. Uncomment Step 7 from the SharingShortcutsManager.kt file:
SharingShortcutsManager.kt
ShortcutManagerCompat.addDynamicShortcuts(context, shortcuts)
Triggering the Intent
If the user selects one of our app's Direct Share contacts in the system Intent dialog chooser that matches the share-target that we defined above. The following intent will be triggered:
Action: Intent.ACTION_SEND
ComponentName: { com.example.android.directshare /
                  com.example.android.directshare.SendMessageActivity}
Data: Uri to the shared content
EXTRA_SHORTCUT_ID: <ID of the selected shortcut>
Receiving the Intent
SendMessageActivity will receive the Intent as it was defined in the shortcuts.xml file. Apart from that, the activity also needs to define that is handling that type of Intents in the AndroidManifest.xml file. That is specified in the <intent-filter> tag inside the SendMessageActivity manifest declaration as you can see in the following code:
AndroidManifest.xml
<activity
    android:name=".SendMessageActivity"
    android:label="@string/app_name"
    android:theme="@style/DirectShareDialogTheme">
    <!-- This activity can respond to Intents of ACTION_SEND and with text/plain data -->
    <intent-filter>
        <action android:name="android.intent.action.SEND" />
        <category android:name="android.intent.category.DEFAULT" />
        <data android:mimeType="text/plain" />
    </intent-filter>
</activity>
Open the SendMessageActivity.kt class, let's go through the code. When it starts, it checks the information received in the Intent. If there's no information about the contact, then it launches the SelectContactActivity to select a contact. It will receive the contact selected information in the onActivityResult method.
Running the App
At this point, we can run the app with Steps 1, 2 and 3 uncommented. Since we haven't made it backwards compatible with older Android versions yet, we need to run it with an Android 10 device.
Choosing the app in the chooser dialog
As explained above, if we choose our app to receive the shared text, the user is prompted to select a contact. After selecting the contact, the user can send the shared message.
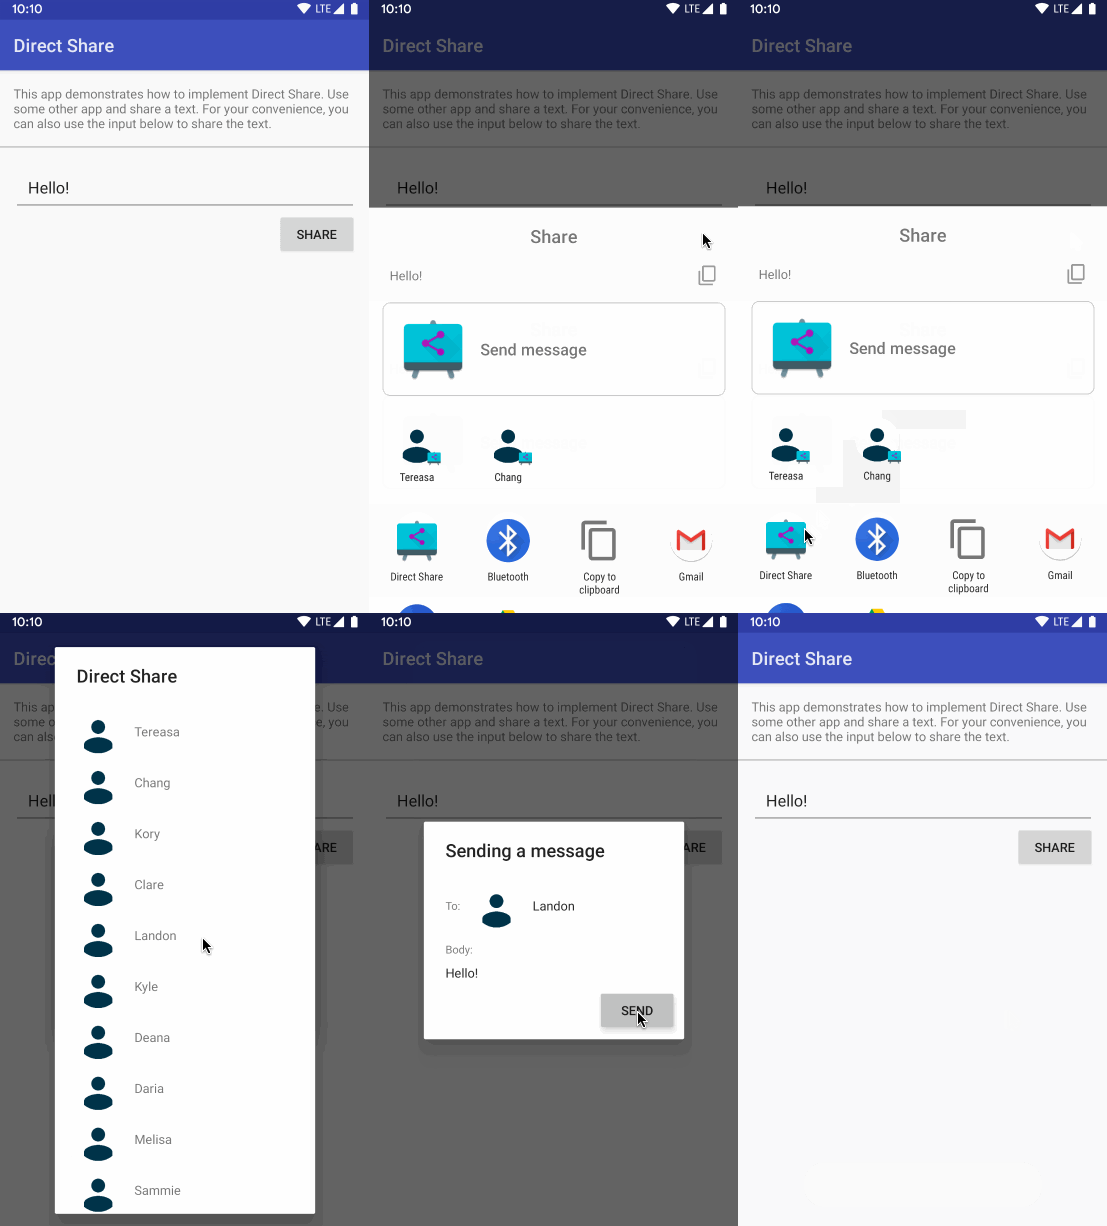
Choosing a Direct Share Contact in the chooser dialog
If we choose a Contact that was published by the Direct Share app, SendMessageActivity can get the ID of the contact with Intent.EXTRA_SHORTCUT_ID. Check the method handleIntent in SendMessageActivity to see how it is implemented.
SendMessageActivity.kt
val shortcutId = intent.getStringExtra(Intent.EXTRA_SHORTCUT_ID)
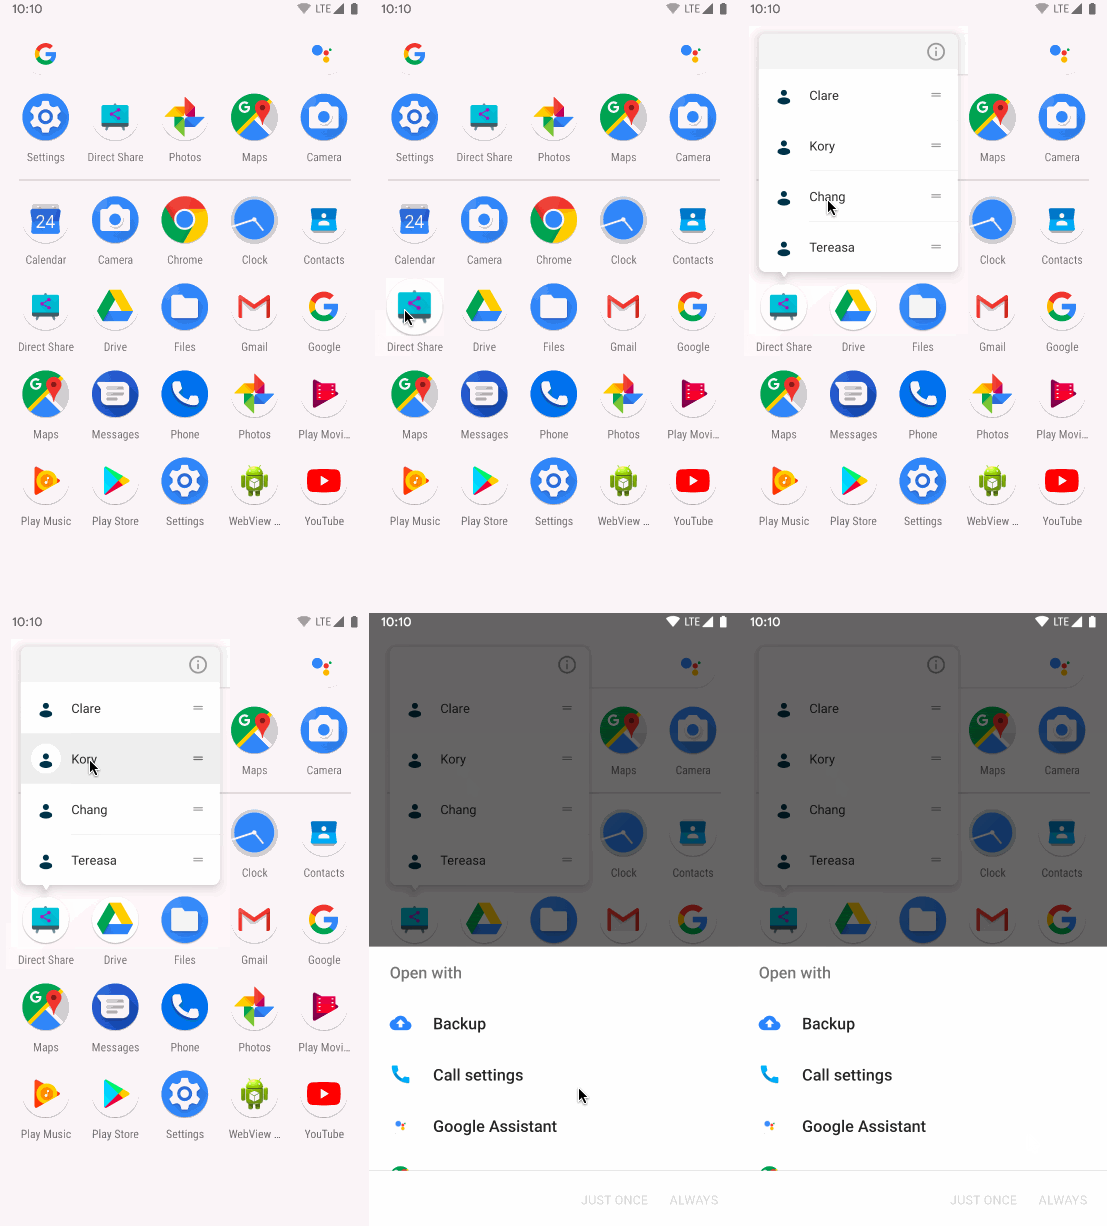
Launching a Direct Share launcher shortcut
If we open one of the sharing shortcuts we published as a launcher shortcut, the system will trigger the Intent.ACTION_DEFAULT Intent that we defined in the ShortcutInfoCompat.Builder.
8. Making Direct Share backwards compatible
Direct Share was first introduced in Android M where you had to implement a service extending ChooserTargetService to provide direct share targets on demand. The way to do that changed in Android Q where we provide direct share targets in advance with the ShortcutManager API.
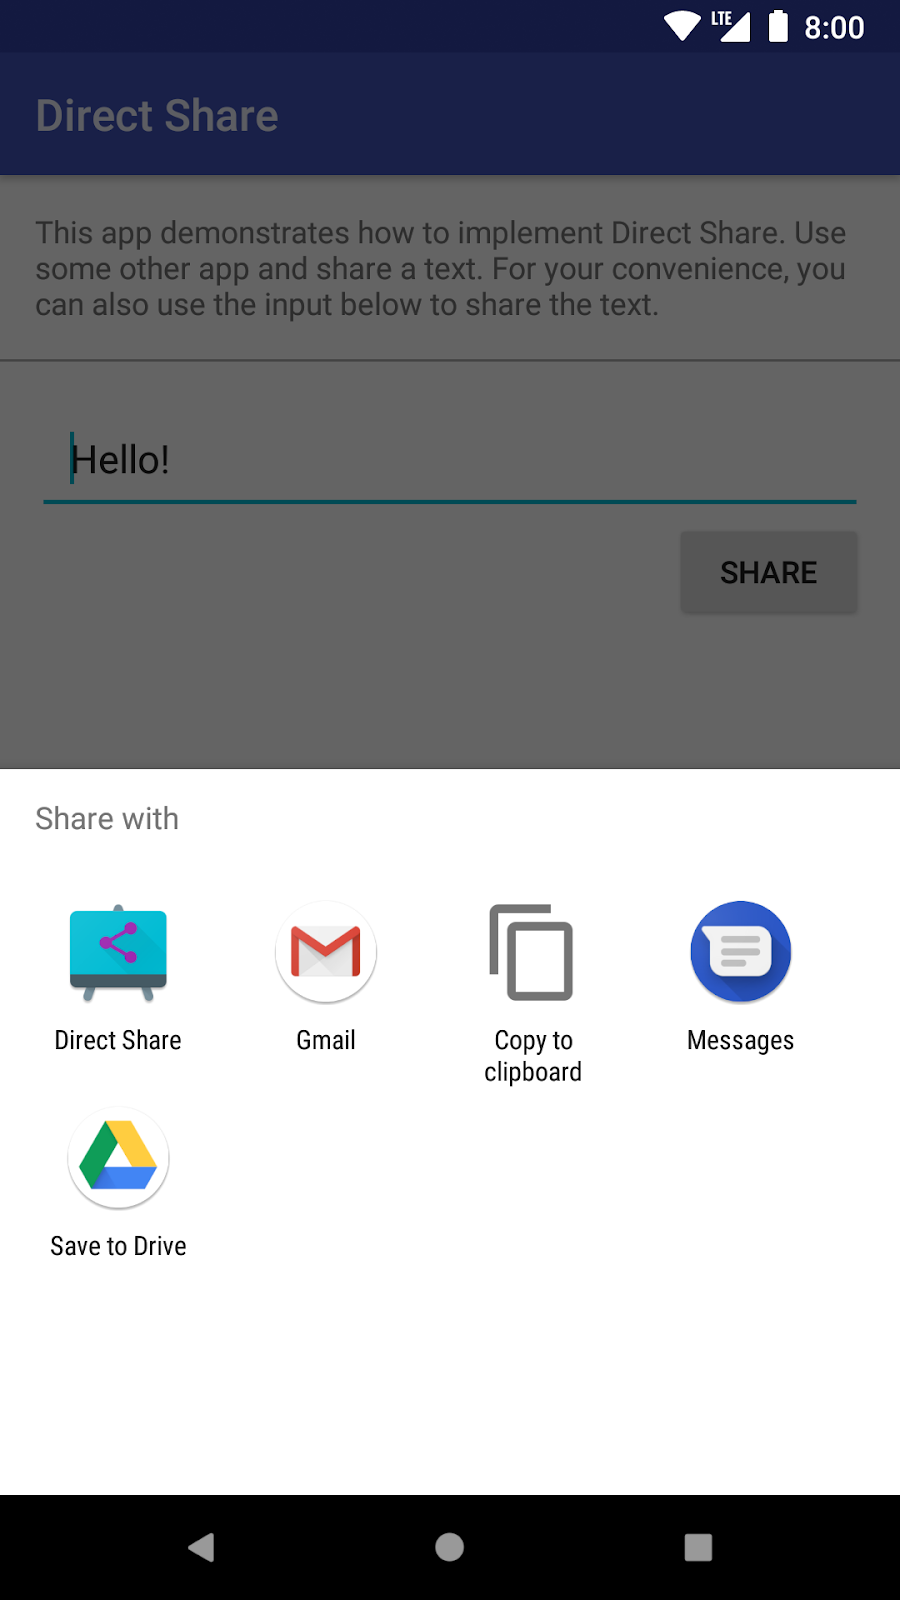
If we run the app on a device with API level 23-28, we can see that the app is listed as an option but there are no direct targets:
We have already mentioned backwards compatibility in previous sections when introducing the ShortcutManagerCompat available in AndroidX. There's still more work to be done though:
- Open the
direct-share-start-app/app/build.gradle(orbuild.gradle (Module: direct-share-start-app)file. There you can see someAndroidXdependencies related to Direct Share. As before, thecoredependency includes ShortcutManagerCompat, and thesharetargetdependency will implement theChooserTargetServiceCompatservice which enables it to work on older Android versions. If you are implementing this in your project, you need these dependencies (or newer).
app/build.gradle
implementation 'androidx.core:core:1.2.0-beta01'
implementation 'androidx.sharetarget:sharetarget:1.0.0-beta01'
- Open the
AndroidManifest.xmlfile and go to theSendMessageActivitydeclaration. Since it receives Intents coming from sharing shortcuts (Direct Share), it needs to provide a<meta-data>tag with the name:android.service.chooser.chooser_target_service. - Uncomment Step 8 to include the service for the backwards compatibility feature.
AndroidManifest.xml
<activity
    android:name=".SendMessageActivity">
    ...
    <meta-data
        android:name="android.service.chooser.chooser_target_service"
        android:value="androidx.sharetarget.ChooserTargetServiceCompat" />
</activity>
Both android.service.chooser.chooser_target_service and androidx.sharetarget.ChooserTargetServiceCompat values are static and always the same. If in your app you handle sharing intents with multiple activities, you will have to add this <meta-data> to all of them.
With those steps, Direct Share is now backwards compatible.
Running the App
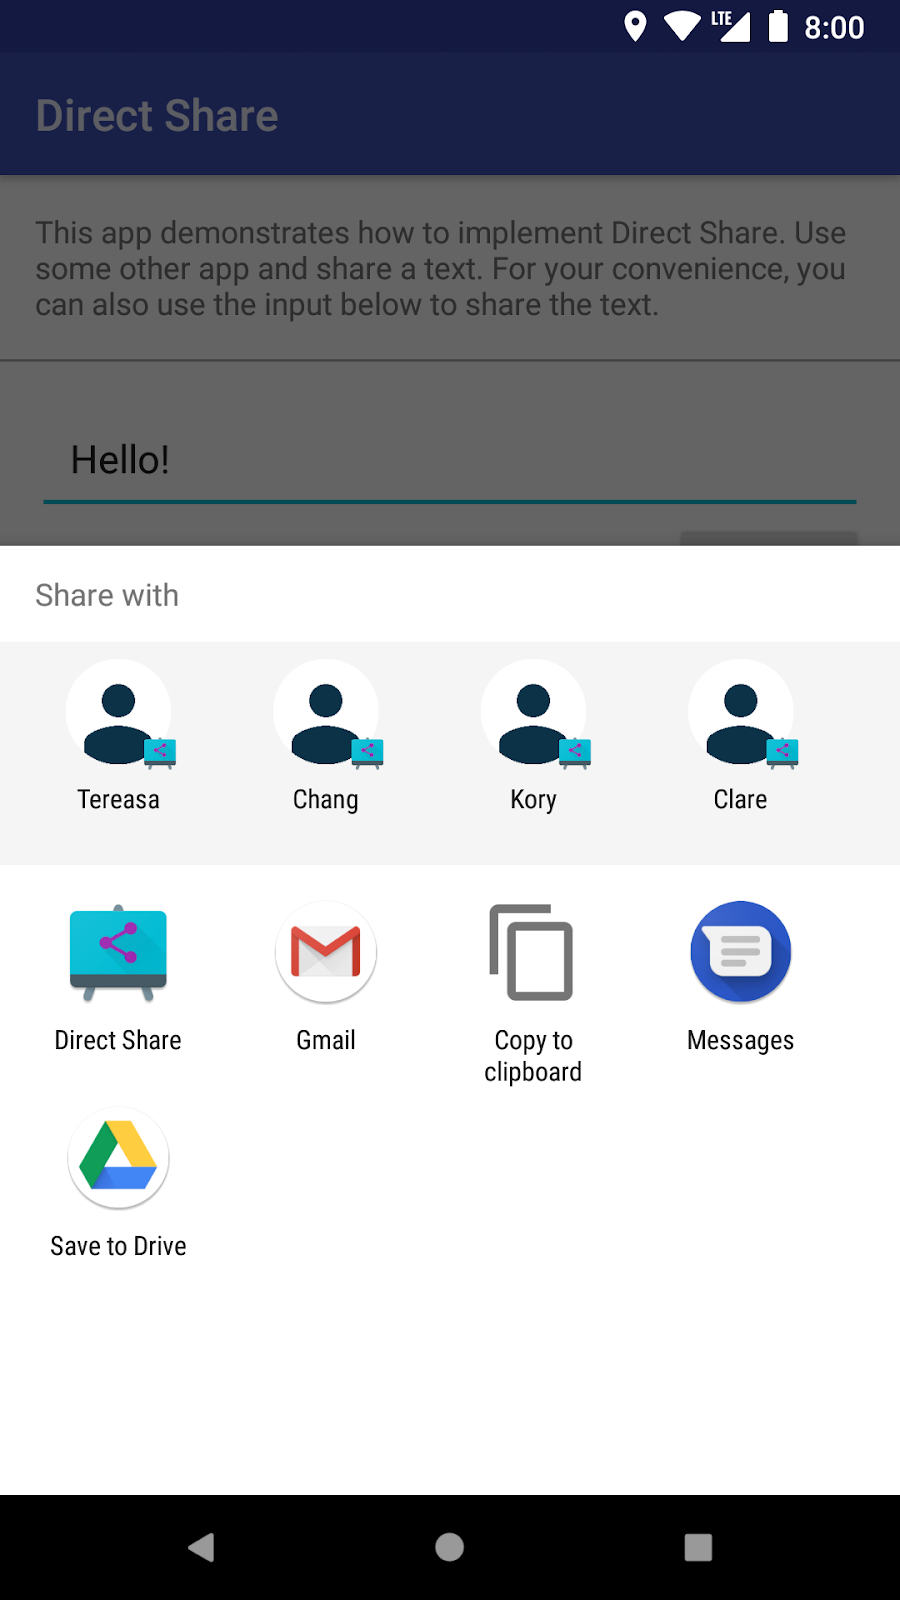
If we implement the steps above then Direct Share works correctly on devices with API level 23-28:
If we run the App on an Android L device, that doesn't have Direct Share, the app will still be listed as an option.
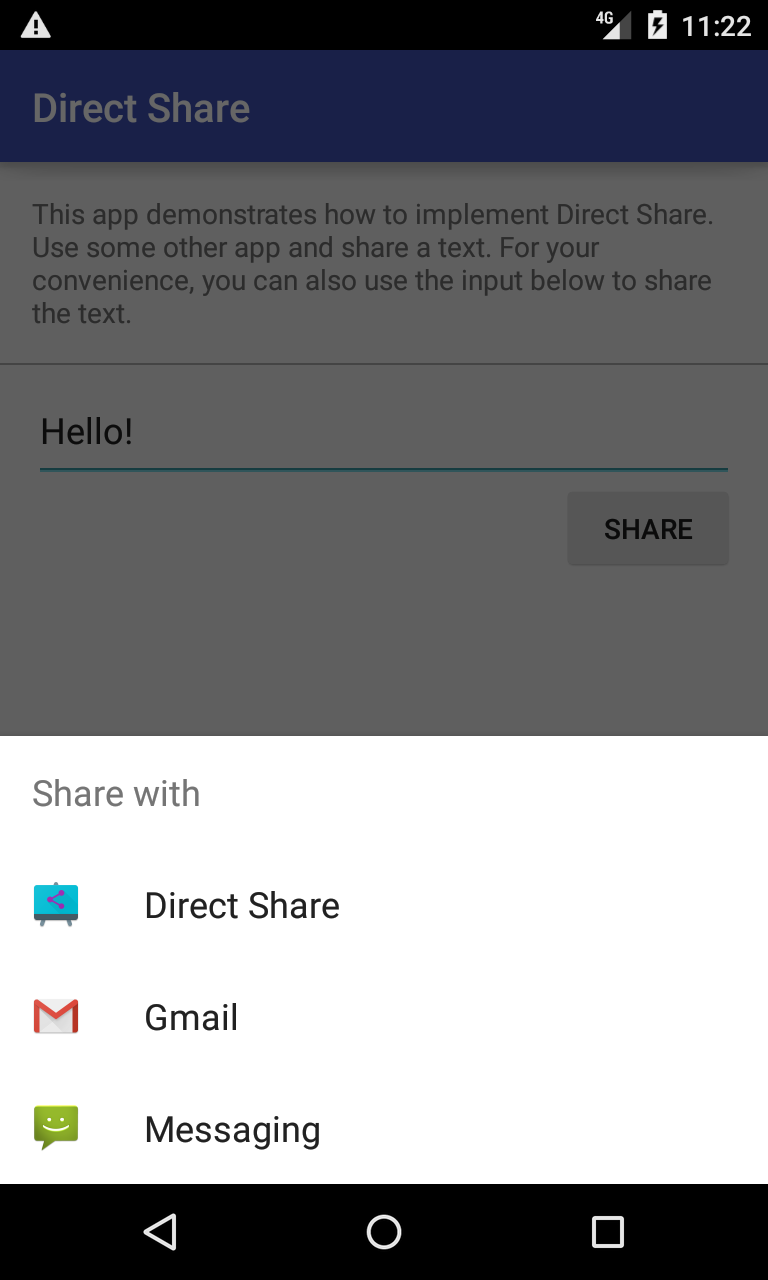
9. Content Preview
When an app shares content, you can show an optional preview of it in Android Q+. The preview can have a title, image, or both.
When sharing images
When using both ACTION_SEND and ACTION_SEND_MULTIPLE along with URIs being shared via EXTRA_STREAM, the system will inspect the mime type, and attempt to render image/file previews in the preview area.
No additional fields are needed. To get proper image preview, please also provide the contentUri in the clipData, as the Intent.ACTION_SEND reference doc specifies.
When sharing text
The previous way of adding a title to the shared content is deprecated. You need to pass the title as an Intent extra using Intent.EXTRA_TITLE.
- Open
MainActivity.ktand find thesharemethod. Uncomment Step 9.1 to add a title to the shared content.
MainActivity.kt
sharingIntent.putExtra(Intent.EXTRA_TITLE, getString(R.string.send_intent_title))
If you run the app, you will see that Send message is the title of the shared content Hello!.
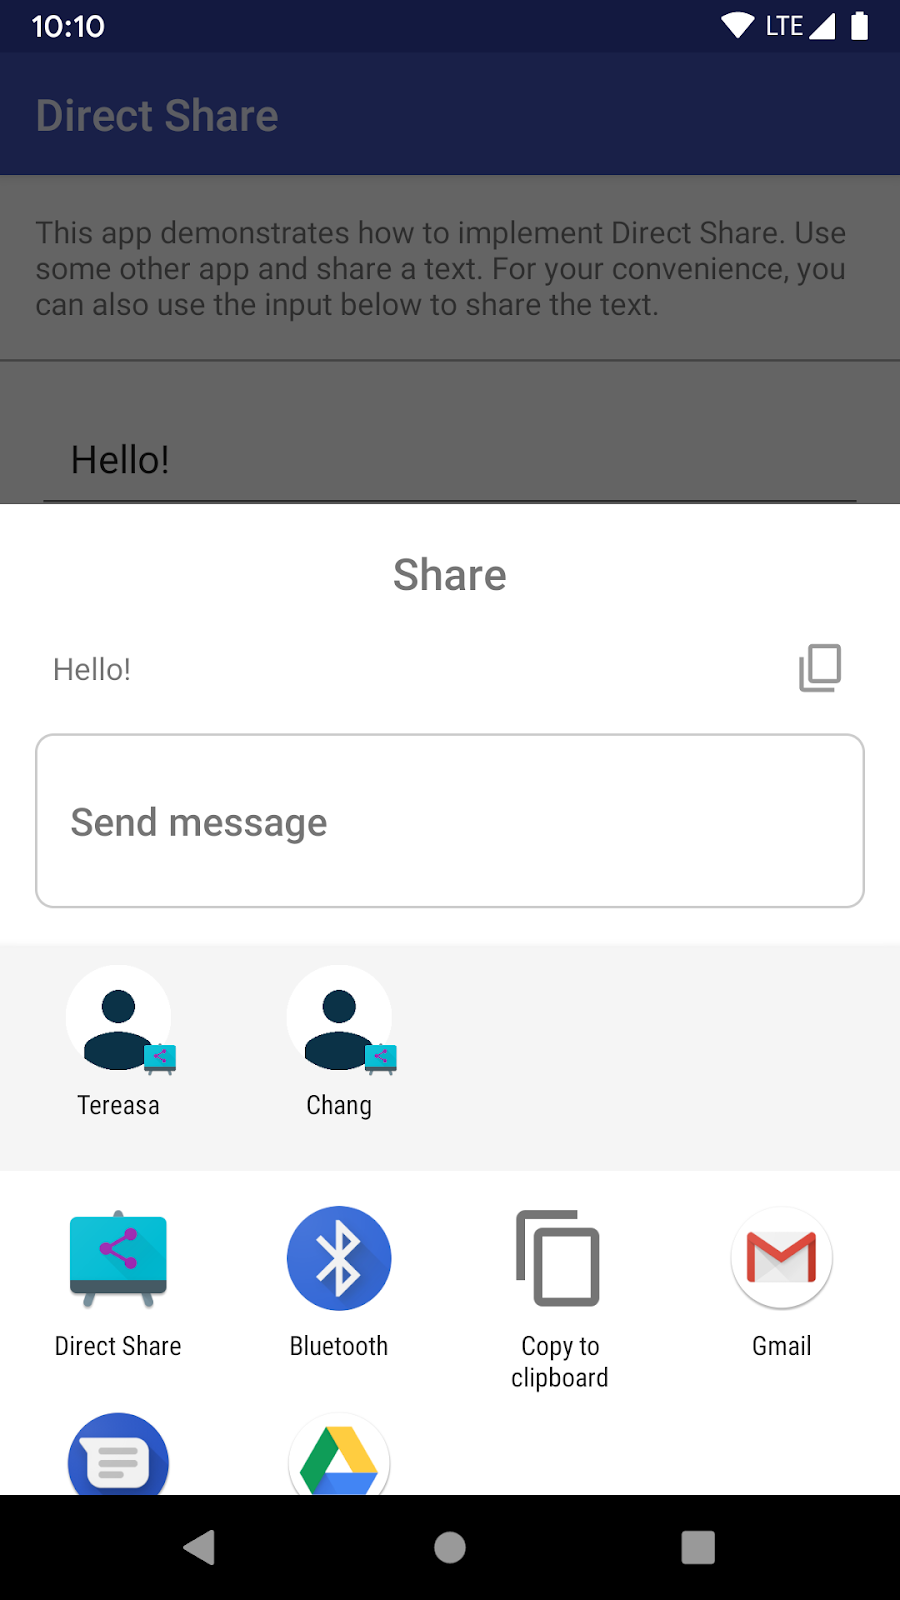
To add a thumbnail to the title, create a content URI with the image you want to display. Set the Uri with the Intent.setClipData(contentUri) method and set the Intent.FLAG_GRANT_READ_URI_PERMISSION flag in the Intent.
- In the still in the
share()method, uncomment Step 9.2 to add a thumbnail to the shared content.
MainActivity.kt
val thumbnail = getClipDataThumbnail()
thumbnail?.let {
    sharingIntent.clipData = it
    sharingIntent.flags = Intent.FLAG_GRANT_READ_URI_PERMISSION
}
Create content Uri
Take a look at the getClipDataThumbnail() method in MainActivity.kt, we create the content Uri as follows:
MainActivity.kt
val contentUri = saveThumbnailImage()
ClipData.newUri(contentResolver, null, contentUri)
...
contentUri is the Uri of the launcher image that we save to cache (in the images folder) in the saveThumbnailImage() method. The contentResolver needs access to the folder that we just declared. To do that:
- Open the
AndroidManifest.xmlfile. - Inside the
<application>tag, uncomment Step 9.3. This will define a FileProvider what will be able to create and share the content Uri safely.
AndroidManifest.xml
<provider
    android:name="androidx.core.content.FileProvider"
    android:authorities="com.example.android.directshare.fileprovider"
    android:exported="false"
    android:grantUriPermissions="true">
    <meta-data
        android:name="android.support.FILE_PROVIDER_PATHS"
        android:resource="@xml/file_paths" />
</provider>
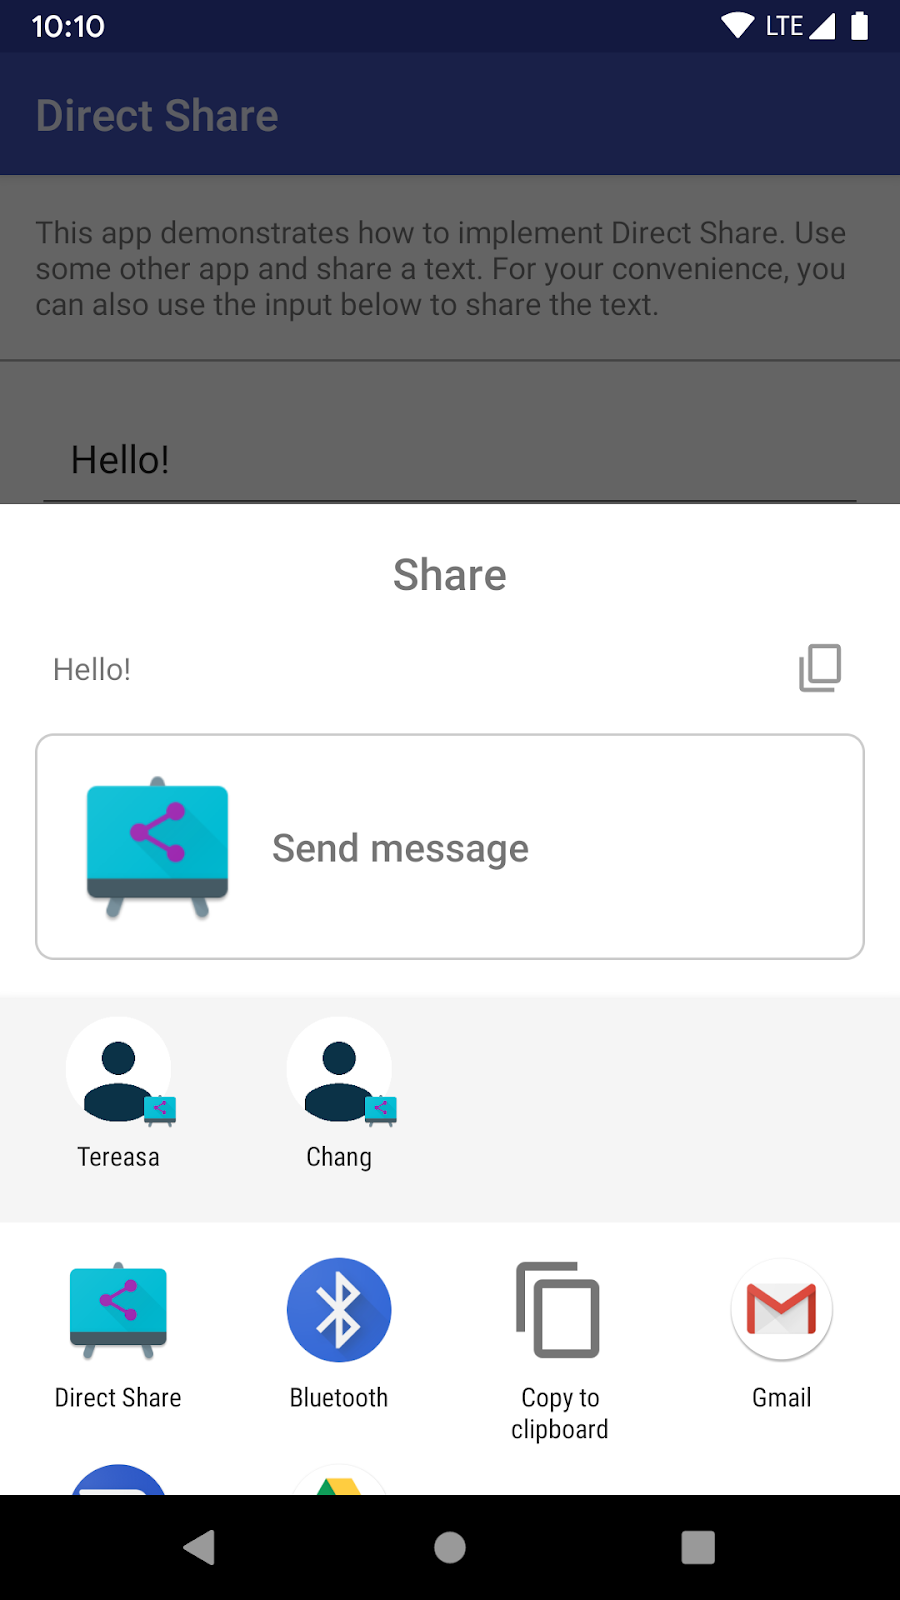
If you run the app on an Android 10 device, you can see a thumbnail image next to the title. The thumbnail will appear as long as the shared content has a title. It won't appear without the title.
10. [Optional] Try Direct Share on your own
There are some improvements that you can make to your code. This is an optional step that you can try on your own:
- Modify the intent that gets triggered when the user taps on a launcher shortcut so that it opens the
SendMessageActivitywith a contact already populated. Tips: The intent needs to be of typeIntent.ACTION_SENDand the contact Id needs to be sent with it. - Modify
SendMessageActivityto process the new Intent.
11. Congratulations!
You're now familiar with the concepts behind Direct Share and you are ready to implement it in your apps. In this codelab you learned about:
- How to implement Direct Share in your app
- How to make Direct Share backwards compatible with older Android versions
- How to show content preview in shared content
