
1. 簡介
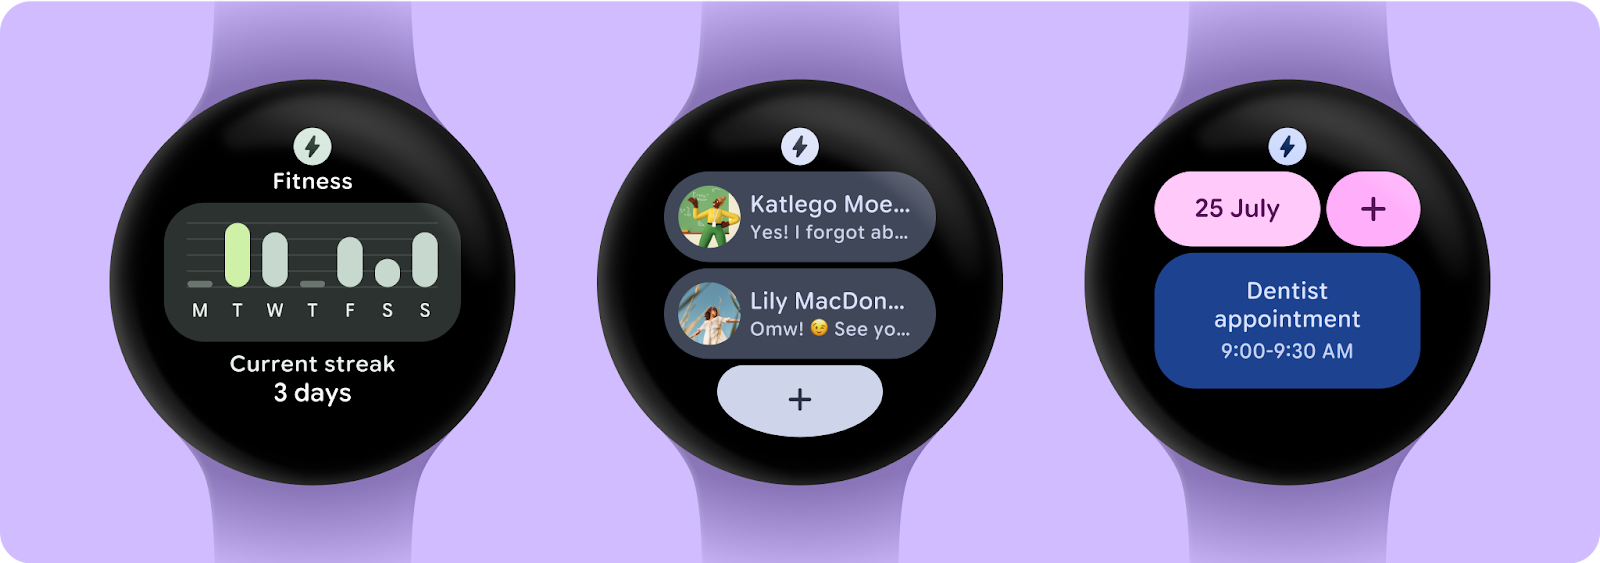
Wear OS 資訊方塊可讓使用者輕鬆存取必要資訊和動作,流暢地處理大小事務。只要滑動錶面,就能查詢最新天氣預報或啟動計時器。
資訊方塊是系統 UI 的一部分,並不是在專屬應用程式容器中執行。我們會使用服務來描述資訊方塊的版面配置和內容,系統 UI 則會視需要顯示資訊方塊。
執行步驟
您會建構訊息應用程式的資訊方塊,用於顯示最近的對話。使用者可以從這個畫面直接跳到下列三項常見操作:
- 開啟對話
- 撰寫新訊息
課程內容
在這個程式碼研究室中,您將瞭解如何編寫自己的 Wear OS 資訊方塊,包括如何:
- 建立
TileService - 在裝置上測試資訊方塊
- 在 Android Studio 中預覽資訊方塊 UI
- 開發資訊方塊 UI
- 新增圖片
- 處理互動
必要條件
- 對 Kotlin 有基本瞭解
2. 開始設定
在這個步驟中,您會設定環境並下載範例專案。
軟硬體需求
- Android Studio Koala 功能推送 | 2024.1.2 Canary 1 以上版本
- Wear OS 裝置或模擬器
如果您不熟悉 Wear OS 的使用方式,建議先參考這篇簡要說明,再開始進行。文章內容包括如何設定及操作 Wear OS 模擬器。
下載程式碼
如果您已安裝 Git,只要執行下列指令即可複製這個存放區的程式碼。
git clone https://github.com/android/codelab-wear-tiles.git
cd codelab-wear-tiles
如果您沒有 Git,可以點選下方按鈕,下載這個程式碼研究室的所有程式碼:
在 Android Studio 中開啟專案
在「Welcome to Android Studio」視窗中,選取  「Open an Existing Project」或依序點選「File」>「Open」,然後選取「Download Location」資料夾。
3. 建立基本資訊方塊
資訊方塊的進入點是資訊方塊服務。在這個步驟中,您必須註冊資訊方塊服務,並定義方塊的版面配置。
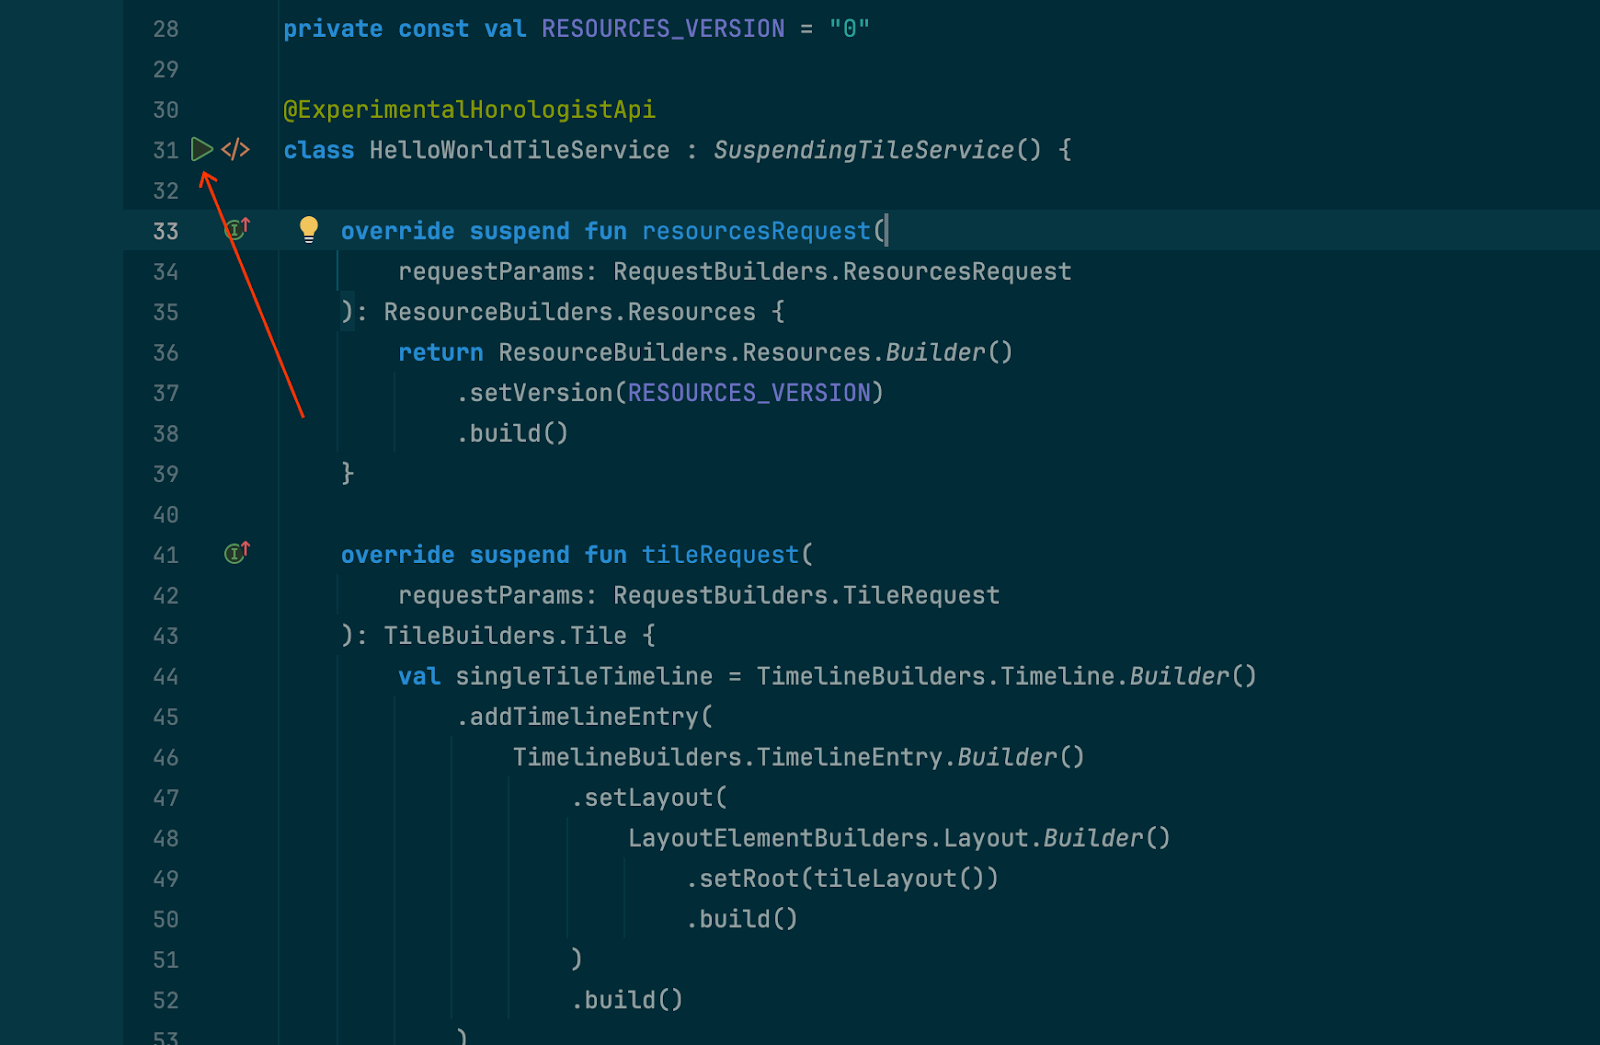
HelloWorldTileService
實作 TileService 的類別需要指定兩個方法:
onTileResourcesRequest(requestParams: ResourcesRequest): ListenableFuture<Resources>onTileRequest(requestParams: TileRequest): ListenableFuture<Tile>
第一個方法會傳回 Resources 物件,在當中將字串 ID 對應至要在資訊方塊中使用的圖片資源。
第二個則會傳回資訊方塊的說明,包括方塊版面配置。請在這裡定義資訊方塊的版面配置,以及資料的繫結方式。
從 start 模組開啟 HelloWorldTileService.kt。您所做的任何變更都會收錄在本模組中。如果您想查看這個程式碼研究室的結果,也可以使用 finished 模組。
HelloWorldTileService 可擴充 SuspendingTileService,後者來自 Horologist Tiles 程式庫,是適合用於 Kotlin 協同程式的包裝函式。Horologist 是 Google 提供的一組程式庫,旨在補充 Wear OS 開發人員常用,但 Jetpack 目前尚未提供的功能。
SuspendingTileService 提供兩個暫停函式,是 TileService 中函式的協同程式對等項目:
suspend resourcesRequest(requestParams: ResourcesRequest): Resourcessuspend tileRequest(requestParams: TileRequest): Tile
如要進一步瞭解協同程式,請參閱 Android 上的 Kotlin 協同程式說明文件。
HelloWorldTileService 尚未完成。我們需要在資訊清單中註冊服務,且需要為 tileLayout 提供實作方式。
註冊資訊方塊服務
資訊方塊服務在資訊清單中完成註冊後,就會顯示在可供使用者新增的資訊方塊清單中。
在 <application> 元素中加入 <service>:
start/src/main/AndroidManifest.xml
<service
    android:name="com.example.wear.tiles.hello.HelloWorldTileService"
    android:icon="@drawable/ic_waving_hand_24"
    android:label="@string/hello_tile_label"
    android:description="@string/hello_tile_description"
    android:exported="true"
    android:permission="com.google.android.wearable.permission.BIND_TILE_PROVIDER">

    <intent-filter>
        <action android:name="androidx.wear.tiles.action.BIND_TILE_PROVIDER" />
    </intent-filter>

    <!-- The tile preview shown when configuring tiles on your phone -->
    <meta-data
        android:name="androidx.wear.tiles.PREVIEW"
        android:resource="@drawable/tile_hello" />
</service>
使用者首次載入資訊方塊或發生載入錯誤時,系統會把圖示和標籤放在預留位置。結尾的中繼資料會定義使用者新增資訊方塊時,在輪轉介面中顯示的預覽圖片。
定義資訊方塊的版面配置
HelloWorldTileService 具有名為 tileLayout 的函式,主體為 TODO()。現在,我們要實際替換程式碼,並定義資訊方塊的版面配置:
start/src/main/java/com/example/wear/tiles/hello/HelloWorldTileService.kt
fun tileLayout(
    context: Context,
    deviceConfiguration: DeviceParametersBuilders.DeviceParameters,
    message: String,
) =
    materialScope(
        context = context,
        deviceConfiguration = deviceConfiguration,
        allowDynamicTheme = false,
    ) {
        primaryLayout(mainSlot = { text(message.layoutString) })
    }
您已成功建立第一個 Wear OS 資訊方塊!立即安裝,看看實際呈現的樣子。
4. 在裝置上測試資訊方塊
只要在執行設定下拉式選單中選取 start 模組,即可在裝置或模擬器上安裝應用程式 (start 模組),然後像使用者一樣手動安裝資訊方塊。
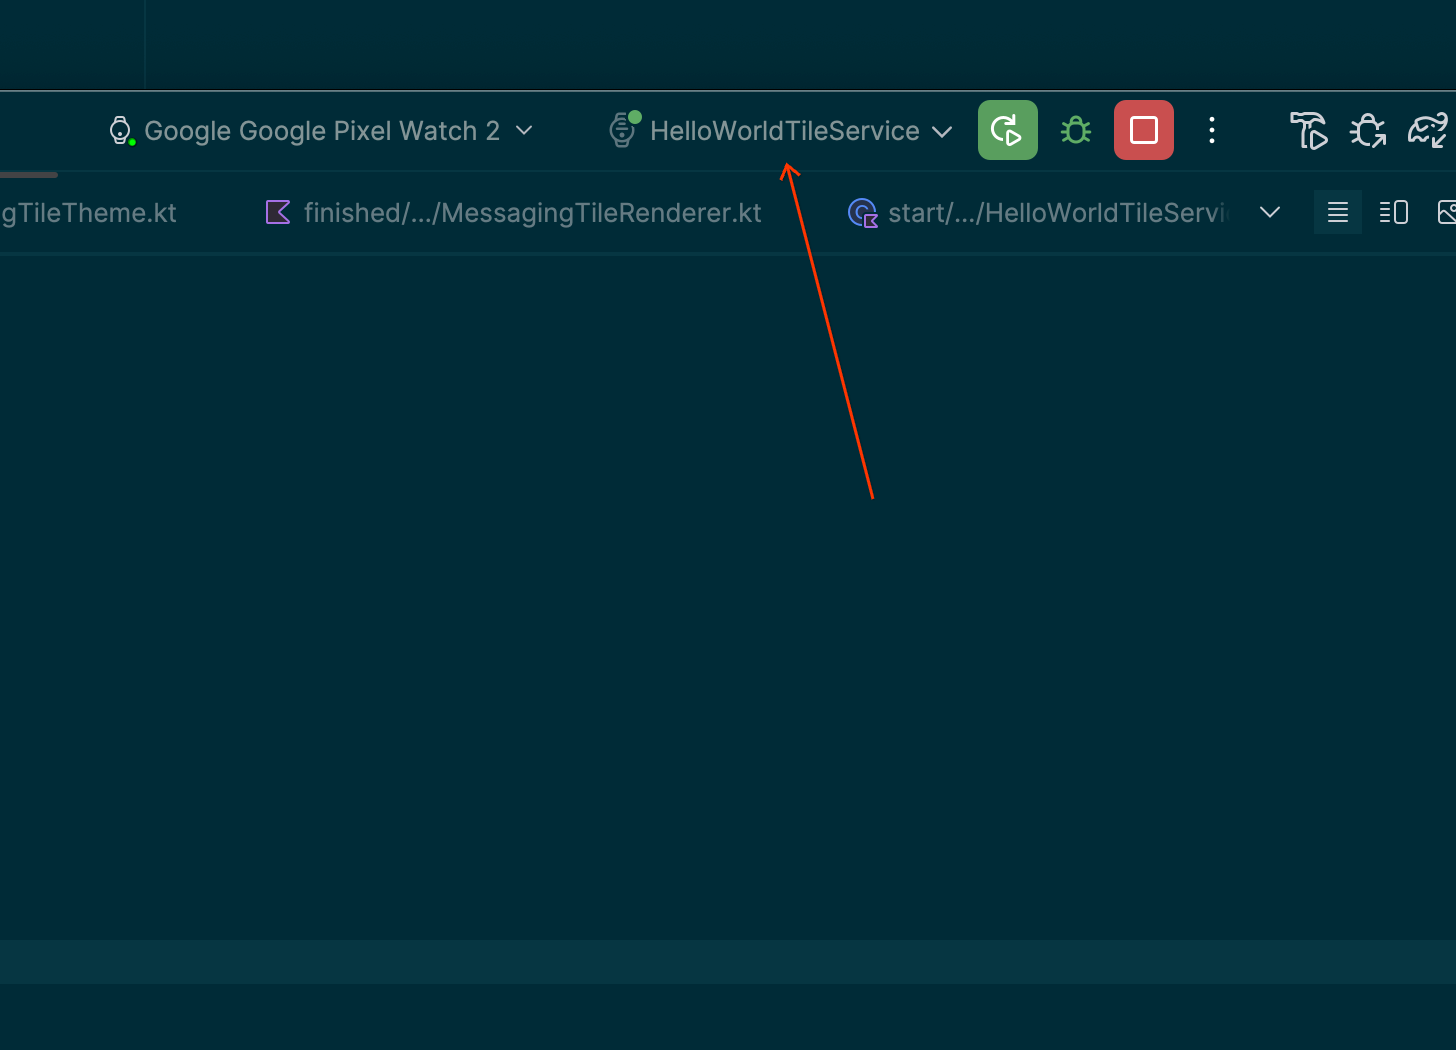
不過,Android Studio 有捷徑可用來執行這項操作:輕觸空白邊中的「run service」圖示 (▷),然後選取「Run ‘HelloWorldTileService'」,即可在已連結的裝置上安裝及啟動資訊方塊。
選取「Run ‘HelloWorldTileService'」,即可在已連結的裝置上建構及執行資訊方塊。您看到的畫面應如下方螢幕截圖所示。
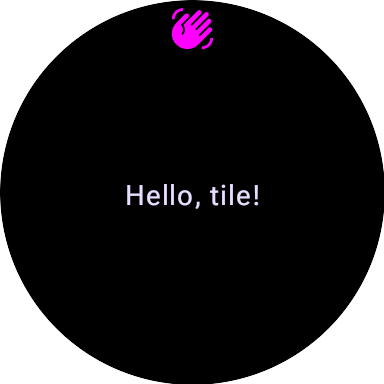
熒幕頂部顯示的「揮手」圖示由系統提供。如要變更,請在資訊清單中修改資訊方塊 <service> 元素的 android:icon 屬性。
為方便起見,這項程序也會建立「HelloWorldTileService」的「run configuration」,供日後使用。
5. 新增預覽函式
我們可以在 Android Studio 中預覽資訊方塊 UI,這可縮短開發 UI 時的回饋循環,提升開發速度。
在 HelloWorldTileService.kt 檔案結尾為 HelloWorldTileService 新增資訊方塊預覽。
start/src/main/java/com/example/wear/tiles/hello/HelloWorldTileService.kt
@Preview(device = WearDevices.SMALL_ROUND, name = "Small Round")
@Preview(device = WearDevices.LARGE_ROUND, name = "Large Round")
internal fun helloLayoutPreview(context: Context): TilePreviewData {
    return TilePreviewData {
        TilePreviewHelper.singleTimelineEntryTileBuilder(
            helloLayout(context, it.deviceConfiguration, "Hello, preview tile!")
        )
            .build()
    }
}
您可以使用「分割」編輯器模式預覽資訊方塊:
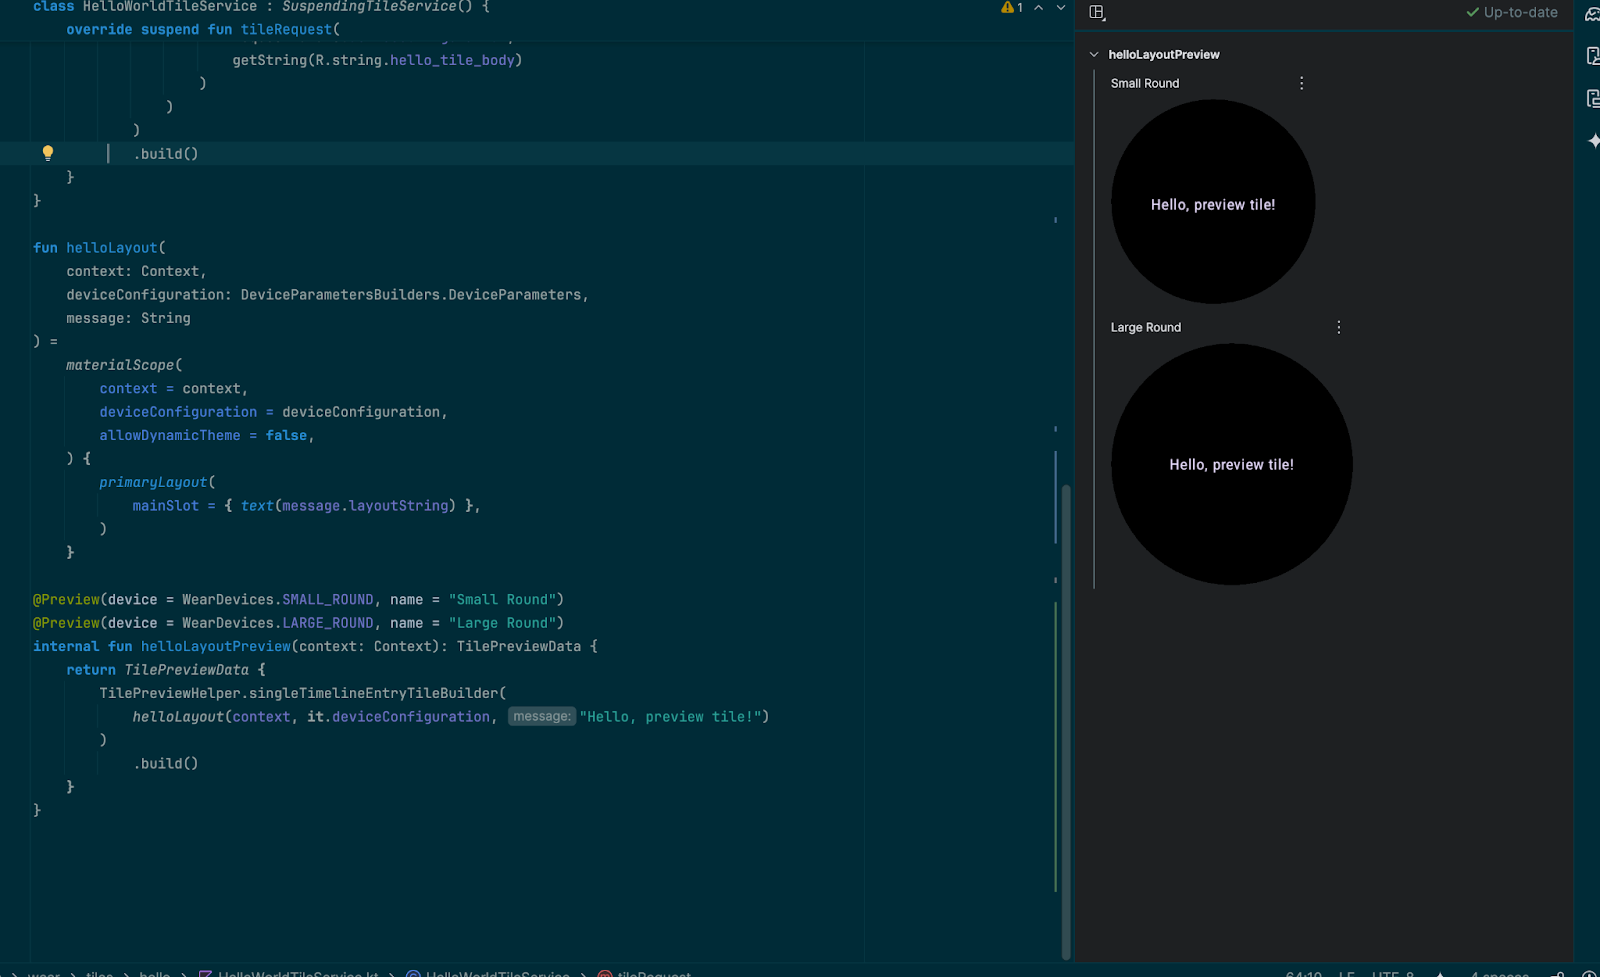
請注意,這裡「沒有」使用 @Composable 註解;雖然 Tiles 使用與可組合函式相同的預覽 UI,但 Tiles 不會使用 Compose,也不具可組合性質。
6. 建構訊息資訊方塊
接下來要建構的訊息資訊方塊比較貼近日常使用情境。這個例子與 HelloWorld 不同,會展示 Material 3 Expressive 元件、顯示圖片,並處理互動以開啟應用程式。
針對這個資訊方塊,我們會使用新的服務 (MessagingTileService) 擴充先前看到的 SuspendingTileService,並向系統提供版面配置和資源。
7. 新增 UI 元件
ProtoLayout 程式庫提供預先建立的元件和版面配置,可讓您建立採用 Wear OS 最新 Material 3 Expressive 設計的資訊方塊。
將 Tiles Material 依附元件新增至 build.gradle 檔案:
start/build.gradle
implementation "androidx.wear.protolayout:protolayout-material3:$protoLayoutVersion"
將版面配置程式碼新增至 tileLayout() 函式,做為 materialScope() 函式的主體。這會建立由兩個資料列 (每列兩個按鈕) 和一個邊緣按鈕組成的版面配置。
找出「TODO() // Add primaryLayout()」這一行,並替換為以下程式碼。
start/src/main/java/com/example/wear/tiles/messaging/tile/Layout.kt
primaryLayout(
    mainSlot = {
        // This layout code assumes "contacts" contains at least 4 elements, for sample code
        // that can handle an arbitrary number of contacts, and also shows different numbers
        // of contacts based on the physical screen size, see
        // <https://github.com/android/wear-os-samples/tree/main/WearTilesKotlin>.
        Column.Builder()
            .apply {
                setWidth(expand())
                setHeight(expand())
                addContent(
                    buttonGroup {
                        buttonGroupItem { contactButton(contacts[0]) }
                        buttonGroupItem { contactButton(contacts[1]) }
                    }
                )
                addContent(DEFAULT_SPACER_BETWEEN_BUTTON_GROUPS)
                addContent(
                    buttonGroup {
                        buttonGroupItem { contactButton(contacts[2]) }
                        buttonGroupItem { contactButton(contacts[3]) }
                    }
                )
            }
            .build()
    },
    bottomSlot = {
        textEdgeButton(
            onClick = clickable(), // TODO: Launch new conversation activity
            labelContent = { text("New".layoutString) },
        )
    },
)
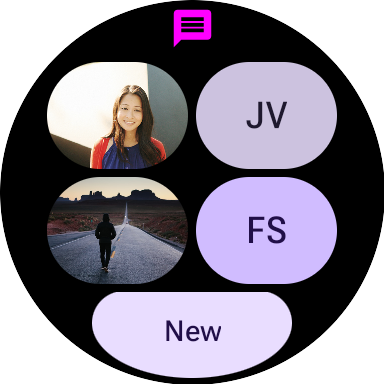
同一個檔案中的 contactButton() 函式會建立個別聯絡人按鈕。如果聯絡人有關聯圖片,就會顯示在按鈕上;否則會使用聯絡人名稱的縮寫。
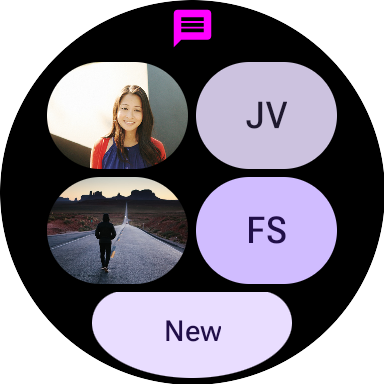
此時您可能會發現,雖然整體版面配置正確,但缺少圖片:
如果將資訊方塊部署至裝置,也會看到相同的內容:

在下一步中,我們會修正缺少圖片的問題。
8. 新增圖片
大致來說,Tiles 包含兩項要素:版面配置 (依字串 ID 參照資源),以及資源本身 (可以是圖片)。
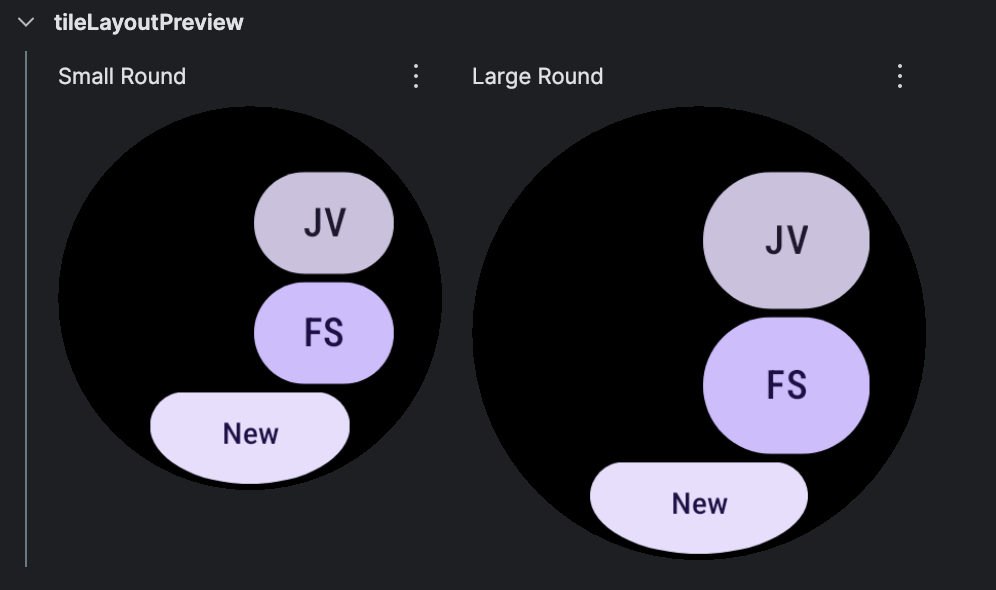
目前程式碼已提供版面配置,但沒有提供資源本身。如要修正預覽畫面,就需要提供圖片「資源」。如要這麼做,請找出「TODO: Add onTileResourceRequest」,然後將以下程式碼新增為 TilePreviewData() 的額外具名引數:
start/src/main/java/com/example/wear/tiles/messaging/tile/Layout.kt
// Additional named argument to TilePreviewData
onTileResourceRequest = { resourcesRequest ->
    Resources.Builder()
        .setVersion(resourcesRequest.version)
        .apply {
            contacts.forEach {
                if (it.avatarSource is AvatarSource.Resource) {
                    addIdToImageMapping(
                        it.imageResourceId(),
                        it.avatarSource.resourceId
                    )
                }
            }
        }
        .build()
}
現在預覽畫面應會顯示圖片:
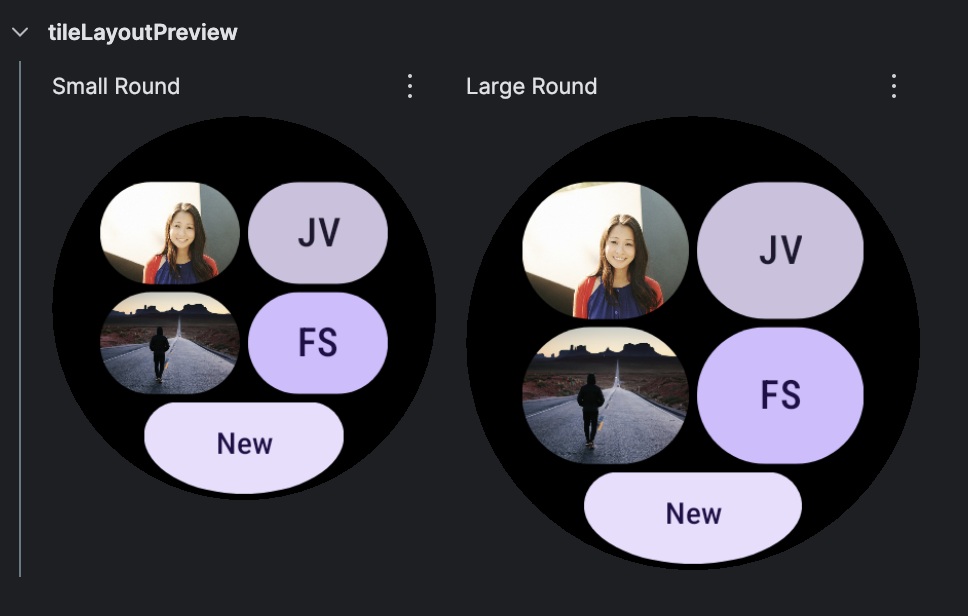
不過,如果資訊方塊已部署至裝置,就會遺失圖片。如要修正這個問題,請將 Service.kt 中的 resourcesRequest() 函式替換為以下內容:
start/src/main/java/com/example/wear/tiles/messaging/tile/Service.kt
override suspend fun resourcesRequest(
    requestParams: ResourcesRequest
): Resources {
    // resourceIds is a list of the ids we need to provide images for. If we're passed an empty
    // list, set resourceIds to all resources.
    val resourceIds =
        requestParams.resourceIds.ifEmpty {
            contacts.map { it.imageResourceId() }
        }

    // resourceMap maps (tile) resource ids to (Android) resource ids.
    val resourceMap =
        contacts
            .mapNotNull {
                when (it.avatarSource) {
                    is AvatarSource.Resource ->
                        it.imageResourceId() to
                            it.avatarSource.resourceId
                    else -> null
                }
            }
            .toMap()
            .filterKeys {
                it in resourceIds
            } // filter to only the resources we need

    // Add images in the resourceMap to the Resources object, and return the result.
    return Resources.Builder()
        .setVersion(requestParams.version)
        .apply {
            resourceMap.forEach { (id, imageResource) ->
                addIdToImageMapping(id, imageResource)
            }
        }
        .build()
}
資訊方塊部署至裝置後,也會顯示圖片了:
在下一步中,我們會處理各個元素的點擊動作。
9. 處理互動
資訊方塊最實用的功能之一,就是提供關鍵使用者旅程的捷徑。這與僅開啟應用程式的應用程式啟動器不同:此處有空間為應用程式的特定畫面提供內容捷徑。
到目前為止,我們一直在使用無引數 clickable() 為方塊和每個按鈕提供的虛擬動作。這對於沒有互動的預覽而言沒有問題,但接下來將說明如何為元素新增動作。
LaunchAction
LaunchAction 可用來啟動活動。我們可以修改 Layout,讓使用者輕觸「New」按鈕時,能啟動「new conversation」使用者歷程。
找出「TODO: Launch new conversation activity」這一行,並將 clickable() 替換為:
start/src/main/java/com/example/wear/tiles/messaging/tile/Layout.kt
clickable(
    id = "new_button",
    action =
        launchAction(
            ComponentName(
                "com.example.wear.tiles",
                "com.example.wear.tiles.messaging.MainActivity",
            ),
            mapOf(
                MainActivity.EXTRA_JOURNEY to
                    ActionBuilders.stringExtra(
                        MainActivity.EXTRA_JOURNEY_NEW
                    )
            ),
        ),
)
重新部署資訊方塊。現在,輕觸「New」就會啟動 MainActivity 並開始「new conversation」使用者歷程,而不會沒有反應:

同樣地,只要修改 Layout,就能在輕觸聯絡人按鈕時,與特定使用者開始對話。
找出「Launch open conversation activity」這一行,並將 clickable() 替換為:
start/src/main/java/com/example/wear/tiles/messaging/tile/Layout.kt
clickable(
    id = contact.id.toString(),
    action =
        launchAction(
            ComponentName(
                "com.example.wear.tiles",
                "com.example.wear.tiles.messaging.MainActivity",
            ),
            mapOf(
                MainActivity.EXTRA_JOURNEY to
                    ActionBuilders.stringExtra(
                        MainActivity
                            .EXTRA_JOURNEY_CONVERSATION
                    ),
                MainActivity.EXTRA_CONVERSATION_CONTACT to
                    ActionBuilders.stringExtra(
                        contact.name
                    ),
            ),
        ),
)
重新部署資訊方塊。現在,輕觸聯絡人後,就能與對方開始對話,而不會沒有反應:

10. 恭喜
恭喜!您已瞭解如何建構適用於 Wear OS 的資訊方塊!