1. Introduction
Last Updated: 2023-06-12
What is Play Asset Delivery
Play Asset Delivery is Google Play's solution for delivering large amounts of game assets by extending the Android App Bundle format. Play Asset Delivery offers developers flexible delivery methods and high performance. It has a small API footprint and is free to use. All asset packs are hosted and served on Google Play so you don't need to use a content delivery network (CDN) to get your game resources to players. Play Asset Delivery includes a feature called Texture Compression Format Targeting (TCFT). With TCFT, you can include multiple versions of texture assets using different texture compression formats inside your asset packs. At install time, Google Play will select the most appropriate compression format for a specific device and only download and install texture assets matching the selected compression format. This optimizes install size, since unused compression formats are not downloaded.
What you'll build
You'll be taking an example app that embeds runtime data files directly into its application package as assets and modifying it to use Play Asset Delivery and asset packs.
What you'll learn
In this codelab, you'll be learning how to:
- Integrate the Play Core library into a game.
- Create asset packs for use with Play Asset Delivery.
- Create directory names that guide TCFT.
- Initialize and use the Asset Pack Manager API to download and access asset packs.
- Test locally on a generated build and also on a build distributed from Google Play.
- Handle potential conditions like requesting permission to download large asset packs over a mobile data network if wi-fi is not available.
What you'll need
- Android Studio 4.1 or later
- An Android device, connected to your computer, that has Developer options and USB debugging enabled. You will run the game on this device.
- A Google Developer account, and access to the Play Console to upload your app.
2. Getting set up
Native project support with the Android NDK and CMake
If you have not previously worked with native projects in Android Studio, you may need to install the Android NDK and CMake. If you already have them installed, proceed to Getting the example project.
Checking that the NDK is installed
Launch Android Studio. When the Welcome to Android Studio window is displayed, open the Configure dropdown menu and select the SDK Manager option.
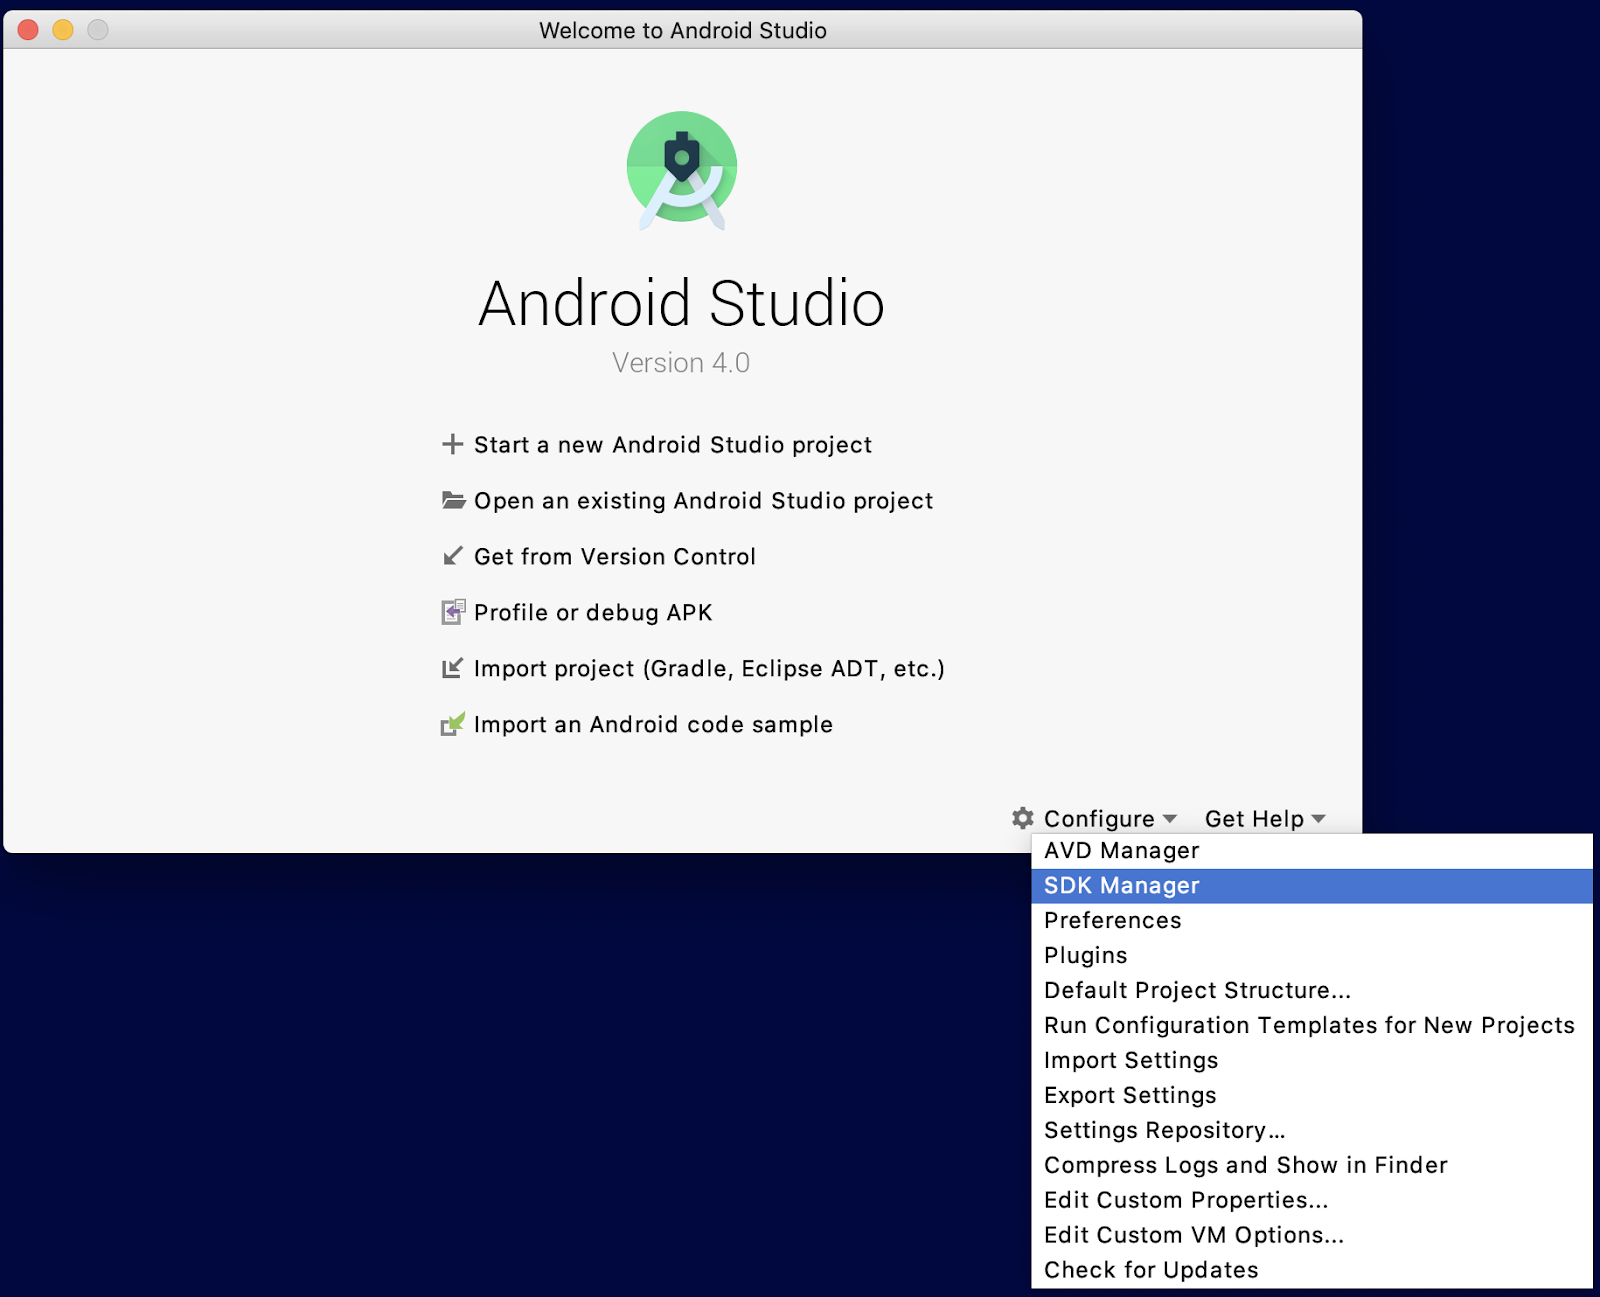
If you already have a project open, you can instead open the Tools menu and select SDK Manager. The SDK Manager window will open. In the sidebar, select in order: Appearance & Behavior -> System Settings -> Android SDK. Select the SDK Tools tab in the Android SDK pane to display a list of installed tool options.
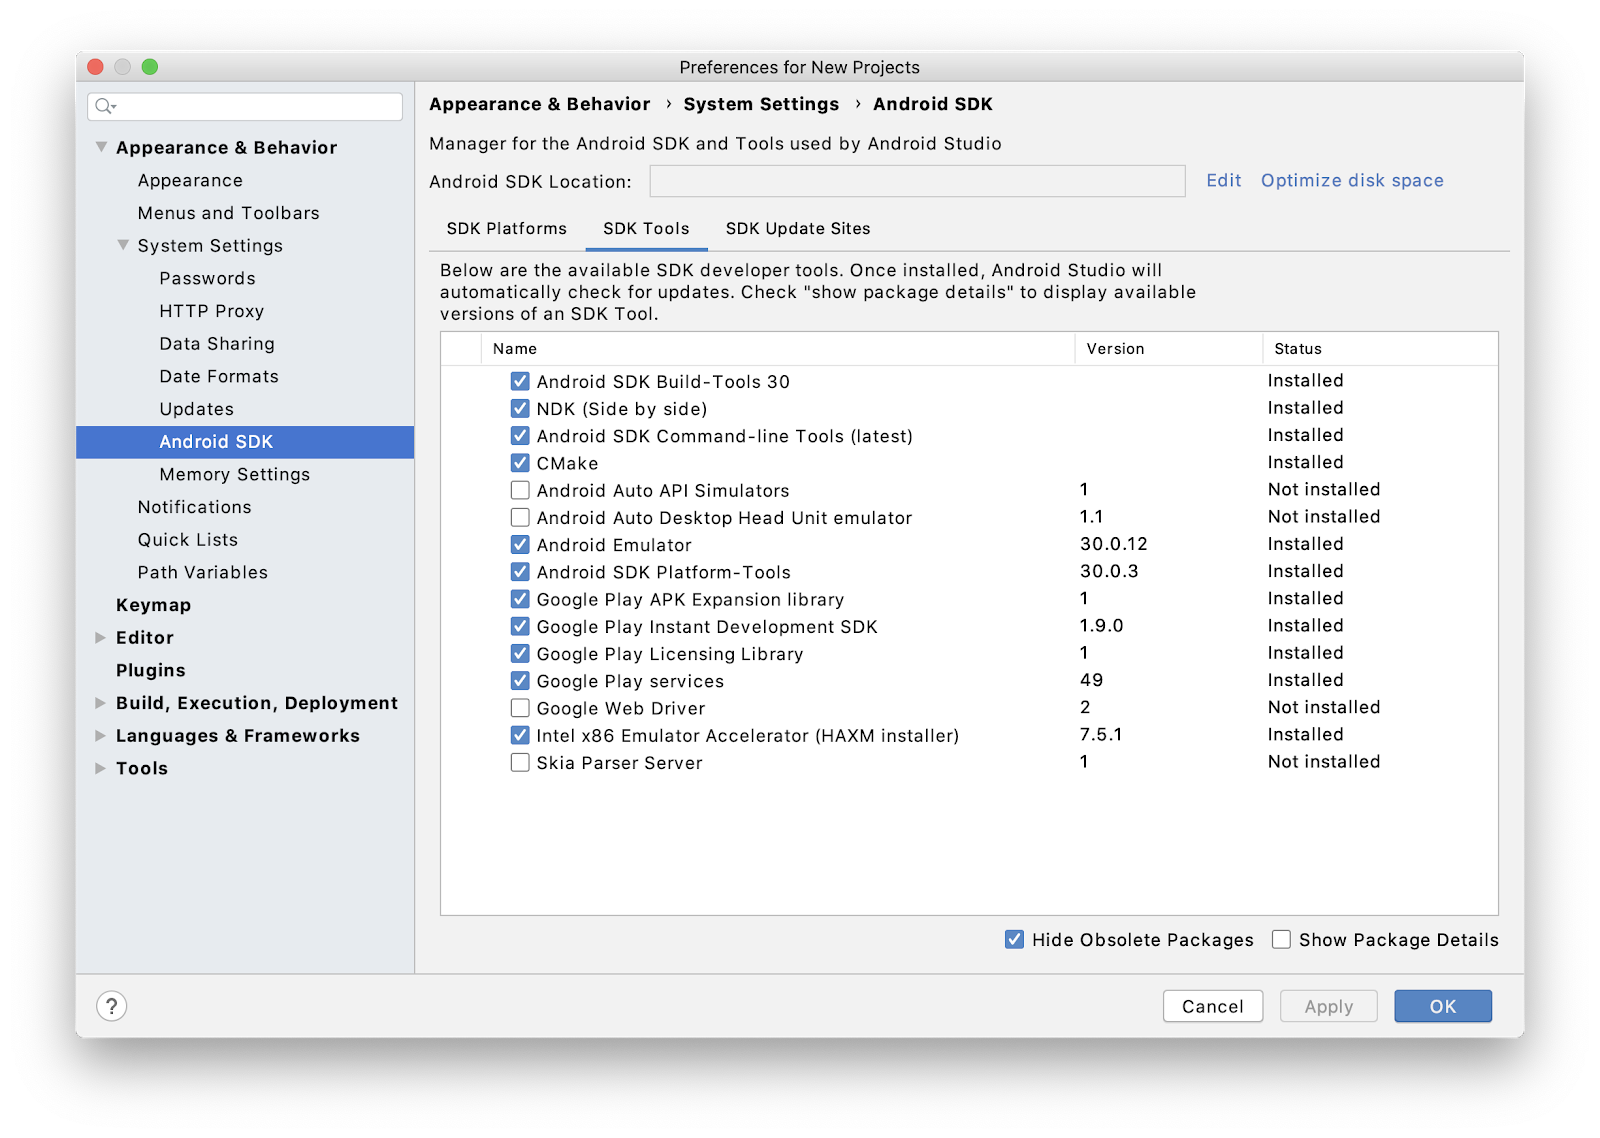
If NDK (Side by side) and CMake are not checked, check their checkboxes and click the Apply button at the bottom of the window to install them. You may then close the Android SDK window by selecting the OK button. The version of the NDK being installed by default will change over time with subsequent NDK releases. If you need to install a specific version of the NDK, follow the instructions in the Android Studio reference for installing the NDK under the section "Install a specific version of the NDK".
Getting the example project
The example project consists of a parent directory containing two subdirectories, start and final. Each subdirectory is an Android Studio project. The start subdirectory has the version of the project we will be modifying in this codelab. The final subdirectory is a reference of what the project should look like at the end of the modifications.
Cloning the repo
The code for this codelab is located in the Android games-samples repository on GitHub. From the command line, change to the directory you wish to contain the root games-samples directory and clone it from GitHub: git clone https://github.com/android/games-samples.git. The root directory of the codelab in your local clone of the repository is games-samples/codelabs/native-gamepad.
Setting up submodules
The sample project uses the Dear ImGui library for its user interface. The Dear ImGui library is referenced as a git submodule in the native-gamepad/third-party directory. From the command line change the directory to the new codelabs/native-gamepad directory and run: git submodule update --init --recursive to set up the submodule.
Installing bundletool
We will need to use the bundletool package to set up builds for local testing on a device. Follow these steps:
- Visit the bundletool releases page. Look for the latest release. Download the
bundletool-all-(version).jarfile of the latest release. - Copy the .jar file you just downloaded to the
native-gamepad/startdirectory.
Test the project
In Android Studio, open the project located at native-gamepad/start. Make sure that a device is connected, then select Build -> Make Project and Run -> Run ‘app' to test the demo. The end result on device should look like this: 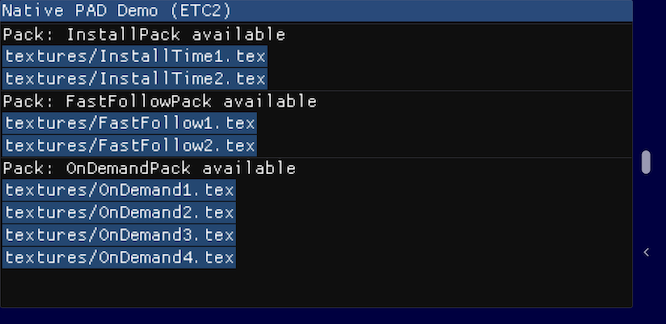
About the project
The example project is intentionally minimalistic to focus on the specifics of implementing Play Asset Delivery. In its current state, all of the asset files are embedded directly in the application package using the standard assets/ directory. The demo has a basic ‘game asset manager' class, but much of its implementation is still missing. We will be filling out that implementation with code that uses the Asset Pack Manager API in the Play Core library.
3. Import the Play Core library into the project
The Asset Pack Manager API for implementing Play Asset Delivery is located in the Play Core library. We will begin by integrating the Play Core library into our sample project.
Downloading the native Play Core Library distribution
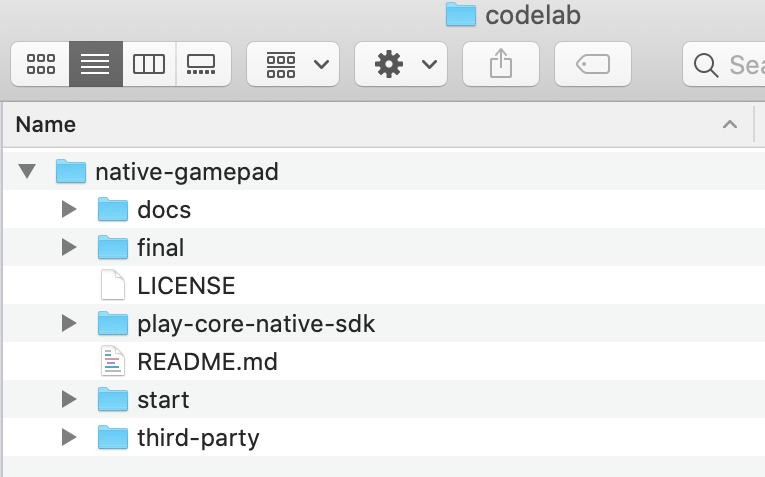
The Play Core library has a native SDK distributed as a .zip file. Visit the Google Play Core Library Overview page for the download link. After downloading and extracting the .zip file, copy the play-core-native-sdk directory into the root native-gamepad directory you cloned from GitHub. The end result should look like this:
Updating build.gradle
In Android Studio, locate the app's build.gradle file in the project pane by expanding the start -> start -> app directories. Open the build.gradle file and find the line containing apply plugin: 'com.android.application'. Below that line add the following text:
// Define a path to the extracted Play Core SDK files.
// If using a relative path, wrap it with file() since CMake requires absolute paths.
def playcoreDir = file('../../play-core-native-sdk')
Next, find the externalNativeBuild section containing the '-DANDROID_STL=c++_static' statement. In it, replace the existing block with the following text:
       externalNativeBuild {
            cmake {
               arguments "-DANDROID_STL=c++_static",
                         "-DPLAYCORE_LOCATION=$playcoreDir"
            }
        }
Next, find the buildTypes section. In it, replace the existing release section with the following text:
       release {
            minifyEnabled = false
            proguardFiles getDefaultProguardFile('proguard-android.txt'),
                          'proguard-rules.pro',
                          '$playcoreDir/proguard/common.pgcfg',
                          '$playcoreDir/proguard/per-feature-proguard-files'
        }
Finally, at the bottom of the file, add the following text:
dependencies {
    // Use the Play Core AAR included with the SDK.
    implementation files("$playcoreDir/playcore.aar")
}
After completing your edits, save the build.gradle file and click Sync Now in the upper right of the Android Studio window if prompted.
Updating CMakeLists.txt
In Android Studio, locate the CMakeLists.txt file in the project pane by expanding the start -> start -> app -> src -> main -> cpp directories. Open the CMakeLists.txt file.
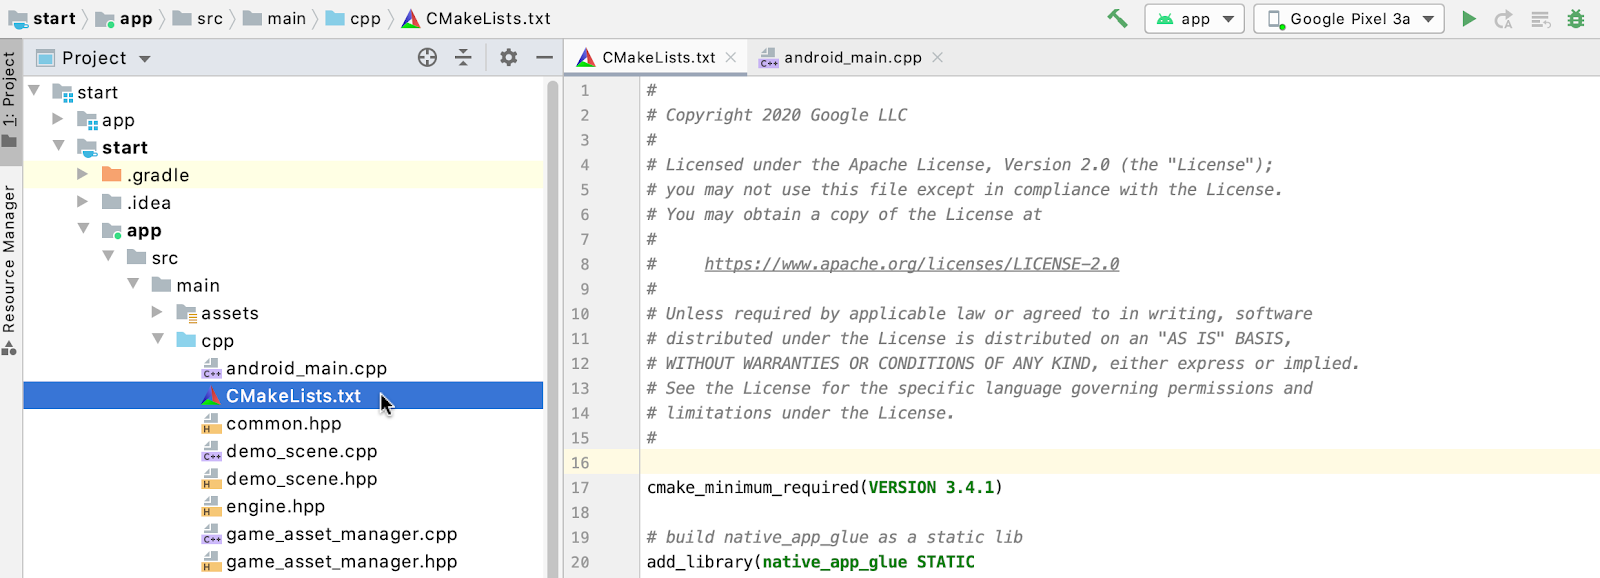
First, near the top of the CMakeLists.txt file, below the cmake_minimum_required line, insert the following text::
# Add a static library called "playcore" built with the c++_static STL.
include(${PLAYCORE_LOCATION}/playcore.cmake)
add_playcore_static_library()
Next, find the target_include_directories(game PRIVATE ...) command further down in the CMakeLists.txt file and add a ${PLAYCORE_LOCATION/include line to the list of include directories. The end result should look like this:
target_include_directories(game PRIVATE
        ${CMAKE_CURRENT_SOURCE_DIR}
        ${PLAYCORE_LOCATION}/include
        ${IMGUI_BASE_DIR}
        ${ANDROID_NDK}/sources/android/native_app_glue)
Finally, find the target_link_libraries command near the bottom of the CMakeLists.txt file and add playcore to the list of libraries. The end result should look like this:
target_link_libraries(game
        android
        playcore
        imgui
        native_app_glue
        atomic
        EGL
        GLESv3
        log)
After finishing the edits, save the CMakeLists.txt file and select the Build -> Refresh Linked C++ Projects menu item.
4. Creating asset packs
The example project currently stores its runtime data files in the app/src/main/assets directory. The build process takes all the files stored in the assets directory and embeds them in the application package. These embedded asset files are accessed from native code via the Asset module in the Android NDK.
We will be creating new directories for asset packs and moving the existing runtime data files out of the assets directory into our new asset pack directories.
Creating and populating the asset pack directories
We will be creating three asset pack directories, one representing each delivery type available to asset packs: install-time, fast-follow and on-demand. Inside each asset pack we will create two texture subdirectories to hold texture files. One texture directory will be our default, and will hold texture files compressed using the ETC2 format. The second texture directory will hold texture files compressed using the ASTC format. For this second directory, we take the name of the default directory and append a suffix that is used to denote the texture compression format used inside it. For ASTC, this suffix is #tcf_astc.
Install-time asset pack
To create an asset pack for the install-time assets, follow these steps:
- In the root directory
start, create a directory calledInstallPack. - In the
InstallPackdirectory, create abuild.gradlefile and copy the following into it:
apply plugin: 'com.android.asset-pack'

assetPack {
    packName = "InstallPack" // Directory name for the asset pack
    dynamicDelivery {
        deliveryType = "install-time"
    }
}
- In the
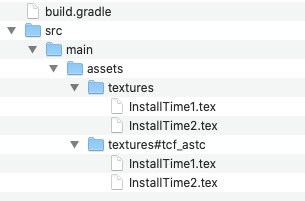
InstallPackdirectory, create a series of subdirectories:src/main/assets src/main/assets/texturesandsrc/main/assets/textures#tcf_astc - Move the
InstallTime1.texandInstallTime2.texfiles out ofapp/src/main/assets/texturesinto theInstallPack/src/main/assets/texturesdirectory. - Move the
InstallTime1.texandInstallTime2.texfiles out ofapp/src/main/assets/textures/astcinto theInstallPack/src/main/assets/textures#tcf_astcdirectory.
Fast-follow asset pack
To create an asset pack for the fast-follow assets, follow these steps:
- In the root directory
start, create a directory calledFastFollowPack. - In the
FastFollowPackdirectory, create abuild.gradlefile and copy the following into it:
apply plugin: 'com.android.asset-pack'

assetPack {
    packName = "FastFollowPack" // Directory name for the asset pack
    dynamicDelivery {
        deliveryType = "fast-follow"
    }
}
- In the
FastFollowPackdirectory, create a series of subdirectories:src/main/assets,src/main/assets/textures, andsrc/main/assets/textures#tcf_astc - Move the
FastFollow1.texandFastFollow2.texfiles out ofapp/src/main/assets/texturesinto theFastFollowPack/src/main/assets/texturesdirectory. - Move the
FastFollow1.texandFastFollow2.texfiles out ofapp/src/main/assets/textures/astcinto theInstallPack/src/main/assets/textures#tcf_astcdirectory.
On-demand asset pack
To create an asset pack for the on-demand assets, follow these steps:
- In the root directory
start, create a directory calledOnDemandPack. - In the
OnDemandPackdirectory, create abuild.gradlefile and copy the following into it:
apply plugin: 'com.android.asset-pack'

assetPack {
    packName = "OnDemandPack" // Directory name for the asset pack
    dynamicDelivery {
        deliveryType = "on-demand"
    }
}
- In the
OnDemandPackdirectory, create a series of subdirectories:src/main/assets src/main/assets/texturesandsrc/main/assets/textures#tcf_astc - Move the
OnDemand1.texthroughOnDemand4.texfiles out ofapp/src/main/assets/texturesinto theOnDemandPack/src/main/assets/texturesdirectory. - Move the
OnDemand1.texthroughOnDemand4.texfiles out ofapp/src/main/assets/textures/astcinto theOnDemandPack/src/main/assets/textures#tcf_astcdirectory.
The directory structure of each asset pack should match the following:
Updating the project gradle files
To generate our asset packs using the new directories, we need to make some additions to project gradle files.
Updating build.gradle
Open the app's build.gradle file in Android Studio and add the following lines inside the android {} section:
    assetPacks = [ ":InstallPack", ":FastFollowPack", ":OnDemandPack"]

    bundle {
        texture {
            enableSplit true
        }
    }
Updating settings.gradle
Open the settings.gradle file in Android Studio and add the following lines at the bottom of the file:
include ':InstallPack'
include ':FastFollowPack'
include ':OnDemandPack'
Save your changes and click on Sync Now if prompted in Android Studio.
5. Implementing asset pack support
The example project already has a ‘game asset manager' class. However, in its current form, it only handles internal assets embedded in the application package. We will now add the code to make it aware of, and able to use, asset packs.
Examining the existing code
In the Android Studio project pane, expand start -> app -> src -> main -> cpp to display the primary source code files of the example project. Most of our work will be done in the game_asset_manager.cpp source file. To get an overview of the GameAssetManager class, open the game_asset_manager.hpp header file.
Asset pack names
For simplicity, there are only three asset packs in this example, one for each category of asset pack defined by Play Asset Delivery:
- Install-time asset packs, which are embedded in the application package and accessed the same way as traditional application assets
- Fast-follow asset packs, which are not included in the application package, but are automatically downloaded from the Google Play store as soon as the app is installed
- On-demand asset packs, which are not downloaded from Google Play until specifically requested by the application
The asset pack names are defined as constants at the top of the game_asset_manager.hpp header file; these names match the names used in the asset pack build.gradle files:
static const char *INSTALL_ASSETPACK_NAME = "InstallPack";
static const char *FASTFOLLOW_ASSETPACK_NAME = "FastFollowPack";
static const char *ONDEMAND_ASSETPACK_NAME = "OnDemandPack";
Asset pack types and status
The example project's GameAssetManager class defines enums in the header file for types of asset packs and status of asset packs. Many of these are not yet used since our app is starting from a place of only using internal assets, not asset packs. This will change as we build out asset pack support.
      enum GameAssetPackType {
            // This asset pack type is always available and included in the application package
            GAMEASSET_PACKTYPE_INTERNAL = 0,
            // This asset pack type is downloaded separately but is an automatic download after
            // app installation
            GAMEASSET_PACKTYPE_FASTFOLLOW,
            // This asset pack type is only downloaded when specifically requested
            GAMEASSET_PACKTYPE_ONDEMAND
        };

        enum GameAssetStatus {
            // The named asset pack was not recognized as a valid asset pack name
            GAMEASSET_NOT_FOUND = 0,

            // The asset pack is waiting for information about its status to become available
            GAMEASSET_WAITING_FOR_STATUS,

            // The asset pack needs to be downloaded to the device
            GAMEASSET_NEEDS_DOWNLOAD,

            // The asset pack is large enough to require explicit authorization to download
            // over a mobile data connection as wi-fi is currently unavailable
            GAMEASSET_NEEDS_MOBILE_AUTH,

            // The asset pack is in the process of downloading to the device
            GAMEASSET_DOWNLOADING,

            // The asset pack is ready to be used
            GAMEASSET_READY,

            // The asset pack is pending the results of a request for download cancellation,
            // deletion or cellular download authorization
            GAMEASSET_PENDING_ACTION,

            // The asset pack is in an error state and cannot be used or downloaded
            GAMEASSET_ERROR
        };
To focus on the actual integration of the Play Asset Delivery API, even though many of these game asset statuses are not currently being set in the application, the game UI code located in the demo_scene.cpp file is already set up to handle them once we make our modifications.
Updating the asset pack types
Open the game_asset_manager.cpp file. Find the const AssetPackDefinition AssetPacks[] array declaration. Note that all three asset pack definitions are using the GameAssetManager::GAMEASSET_PACKTYPE_INTERNAL type. Now that we have set up actual asset packs to replace the embedded assets, we need to update the types of the entries that map to the new external asset packs.
Begin by changing the type of the second asset pack, the one using FASTFOLLOW_ASSETPACK_NAME, from GameAssetManager::GAMEASSET_PACKTYPE_INTERNAL to GameAssetManager::GAMEASSET_PACKTYPE_FASTFOLLOW.
Next, change the type of the third asset pack, the one using ONDEMAND_ASSETPACK_NAME, from GameAssetManager::GAMEASSET_PACKTYPE_INTERNAL to GameAssetManager::GAMEASSET_PACKTYPE_ONDEMAND. The end result should look like this:
   const AssetPackDefinition AssetPacks[] = {
            {
                    GameAssetManager::GAMEASSET_PACKTYPE_INTERNAL,
                    ELEMENTS_OF(InstallFileList),
                    INSTALL_ASSETPACK_NAME,
                    InstallFileList
            },
            {
                    GameAssetManager::GAMEASSET_PACKTYPE_FASTFOLLOW,
                    ELEMENTS_OF(FastFollowFileList),
                    FASTFOLLOW_ASSETPACK_NAME,
                    FastFollowFileList
            },
            {
                    GameAssetManager::GAMEASSET_PACKTYPE_ONDEMAND,
                    ELEMENTS_OF(OnDemandFileList),
                    ONDEMAND_ASSETPACK_NAME,
                    OnDemandFileList
            }
    };
API initialization, shutdown, event updates
Continuing work in the game_asset_manager.cpp file, we will now add the header file for the asset pack library, add calls to the asset pack API initialization and shutdown functions, and add calls to the asset pack API functions that respond to pause and resume events.
Asset pack API header file
Find the list of #include statements at the top of the file. At the bottom of the list, add the following line to include the asset pack API header from the Play Core Library SDK:
#include "play/asset_pack.h"
Initialization
Before using the Play Core Asset Pack Manager, it must be initialized.
Find the class definition of the GameAssetManagerInternals class. At the very bottom of the class definition, add the mAssetPackManagerInitialized variable with the following line:
bool mAssetPackManagerInitialized;
Next, find the GameAssetManagerInternals::GameAssetManagerInternals constructor body and replace the mAssetPackErrorMessage = "Generic Asset Error"; statement with the following code:
    // Initialize the asset pack manager
    AssetPackErrorCode assetPackErrorCode = AssetPackManager_init(jvm, nativeActivity);
    if (assetPackErrorCode == ASSET_PACK_NO_ERROR) {
        LOGD("GameAssetManager: Initialized Asset Pack Manager");
        mAssetPackErrorMessage = "No Error";
        mAssetPackManagerInitialized = true;
    } else {
        mAssetPackManagerInitialized = false;
        SetAssetPackErrorStatus(assetPackErrorCode, NULL, "GameAssetManager: Asset Pack Manager initialization");
    }
Do not be concerned if syntax highlighting flags the SetAssetPackErrorStatus function as not being defined, we will be adding it shortly. We will add one more piece of code to the constructor, a section that will iterate the list of asset packs and call the Asset Pack Manager API AssetPackManager_requestInfo function to request information about their status. Insert the following code at the end of the constructor body:
   if (mAssetPackManagerInitialized) {
        // Start asynchronous requests to get information about our asset packs
        for (int i = 0; i < mAssetPackCount; ++i) {
            const char *packName = AssetPacks[i].mPackName;
            assetPackErrorCode = AssetPackManager_requestInfo(&packName, 1);
            if (assetPackErrorCode == ASSET_PACK_NO_ERROR) {
                LOGD("GameAssetManager: Requested asset pack info for %s", packName);
            } else {
                mAssetPackManagerInitialized = false;
                SetAssetPackErrorStatus(assetPackErrorCode, mAssetPacks[i],
                                        "GameAssetManager: requestInfo");
                break;
            }
        }
    }
Shutdown
Locate the GameAssetManagerInternals::~GameAssetManagerInternals destructor and add the following code at the bottom of the function:
    // Shut down the asset pack manager
    AssetPackManager_destroy();
Pause and Resume
The Asset Pack Manager needs to be informed about application pause and resume events. Find the GameAssetManager::OnPause function and add the following line:
AssetPackManager_onPause();
Then find the GameAssetManager::OnResume function and add the following line:
AssetPackManager_onResume();
Making requests and processing status
We will be adding code to enable making the following requests to the Asset Pack Manager API:
- Requesting download of an asset pack
- Requesting cancellation of an in-progress asset pack download
- Requesting the removal of an asset pack from the device
- Requesting the user's permission to download a large asset pack over a mobile data connection if a wi-fi network is not available
In addition, we will also be adding code to check and manage the status of asset packs and asset pack operations. Finally, we will implement a utility function for generating descriptive error messages.
Adding the function declarations
Return to the class declaration of the GameAssetManagerInternals class. Locate the SetAssetPackInitialStatus function declaration, and below it add the following code:
        // Asset Pack Manager support functions below
        bool GetAssetPackManagerInitialized() const { return mAssetPackManagerInitialized; }

        // Requests
        bool RequestAssetPackDownload(const char *assetPackName);
        void RequestAssetPackCancelDownload(const char *assetPackName);
        bool RequestAssetPackRemoval(const char *assetPackName);
        void RequestMobileDataDownloads();

        // Update processing
        void UpdateAssetPackBecameAvailable(AssetPackInfo *assetPackInfo);
        void UpdateAssetPackFromDownloadState(AssetPackInfo *assetPackInfo,
                                               AssetPackDownloadState *downloadState);
        void UpdateMobileDataRequestStatus();

        // Error reporting utility
        void SetAssetPackErrorStatus(const AssetPackErrorCode assetPackErrorCode,
                                     AssetPackInfo *assetPackInfo, const char *message);
Changing initial asset pack status
Locate the GameAssetManagerInternals::SetAssetPackInitialStatus function definition. Since it can no longer be assumed that all assets are internal and ready, we will modify SetAssetPackInitialStatus to set external asset packs as waiting for status. Replace the existing code in the function with the code below:
   if (info.mDefinition->mPackType == GameAssetManager::GAMEASSET_PACKTYPE_INTERNAL) {
        // if internal assume we are present on device and ready to be used
        info.mAssetPackStatus = GameAssetManager::GAMEASSET_READY;
        info.mAssetPackCompletion = 1.0f;
    } else {
        // mark as waiting for status since the asset pack status query is
        // an async operation
        info.mAssetPackStatus = GameAssetManager::GAMEASSET_WAITING_FOR_STATUS;
    }
Adding the request functions
Place the new functions below in order, the first immediately following the SetAssetPackInitialStatus function declaration.
Our first request function calls the AssetPackManager_requestDownload function to request a download of the specified asset pack. Add the following code:
bool GameAssetManagerInternals::RequestAssetPackDownload(const char *assetPackName) {
    LOGD("GameAssetManager: RequestAssetPackDownload %s", assetPackName);
    AssetPackErrorCode assetPackErrorCode = AssetPackManager_requestDownload(&assetPackName, 1);
    bool success = (assetPackErrorCode == ASSET_PACK_NO_ERROR);

    if (success) {
        ChangeAssetPackStatus(GetAssetPackByName(assetPackName),
                GameAssetManager::GAMEASSET_DOWNLOADING);
    } else {
        SetAssetPackErrorStatus(assetPackErrorCode, GetAssetPackByName(assetPackName),
                                "GameAssetManager: requestDownload");
    }
    return success;
}
The next request function calls the AssetPackManager_cancelDownload function to request cancellation of an in-progress download. Add the following code:
void GameAssetManagerInternals::RequestAssetPackCancelDownload(const char *assetPackName) {
    LOGD("GameAssetManager: RequestAssetPackCancelDownload %s", assetPackName);
    // Request cancellation of the download, this is a request, it is not guaranteed
    // that the download will be canceled.
    AssetPackManager_cancelDownload(&assetPackName, 1);
}
Our third request function calls the AssetPackManager_requestRemoval function to request removal of an asset pack that is currently present on the device. Add the following code:
bool GameAssetManagerInternals::RequestAssetPackRemoval(const char *assetPackName) {
    LOGD("GameAssetManager: RequestAssetPackRemoval %s", assetPackName);
    AssetPackErrorCode assetPackErrorCode = AssetPackManager_requestRemoval(assetPackName);
    bool success = (assetPackErrorCode == ASSET_PACK_NO_ERROR);

    if (success) {
        ChangeAssetPackStatus(GetAssetPackByName(assetPackName),
                              GameAssetManager::GAMEASSET_PENDING_ACTION);

    } else {
        SetAssetPackErrorStatus(assetPackErrorCode, GetAssetPackByName(assetPackName),
                                "GameAssetManager: requestDelete");
    }
    return success;
}
The final request function calls the AssetPackManager_showCellularDataConfirmation function to present a user interface for the user to give or deny consent to download a large asset pack over a mobile data connection in the absence of a connected wi-fi network. Add the following code:
void GameAssetManagerInternals::RequestMobileDataDownloads() {
    LOGD("GameAssetManager: RequestMobileDataDownloads");
    AssetPackErrorCode assetPackErrorCode = AssetPackManager_showCellularDataConfirmation(
            mNativeActivity);
    SetAssetPackErrorStatus(assetPackErrorCode, NULL,
                            "GameAssetManager: RequestCellularDownload");
    if (assetPackErrorCode == ASSET_PACK_NO_ERROR) {
        mRequestingMobileDownload = true;
    }
}
Adding the update functions
We will be adding two update functions. The first, UpdateAssetPackBecameAvailable, is called in response to a status that an external asset pack has become available. This function will be called when an asset pack has completed downloading and transferring. It will also be called at startup for previously downloaded external asset packs which are already available on the device.
Unlike internal assets or install-time asset packs, fast-follow and on-demand asset packs exist outside of the application package. The Asset Pack Manager AssetPackManager_getAssetPackLocation function is used to retrieve the root directory containing the files of a specified asset pack. UpdateAssetPackBecameAvailable does this retrieval and stores the result. While this directory location is stored internally during the application session, it is not cached or saved. The presence of an external asset path on a device, or the directory path to an external asset pack are not guaranteed between application sessions. Therefore, status and location should be queried from the Asset Pack Manager every time the application starts. Add the following code:
void GameAssetManagerInternals::UpdateAssetPackBecameAvailable(AssetPackInfo *assetPackInfo) {
    LOGD("GameAssetManager: ProcessAssetPackBecameAvailable : %s",
            assetPackInfo->mDefinition->mPackName);
    if (assetPackInfo->mAssetPackStatus != GameAssetManager::GAMEASSET_READY) {
        assetPackInfo->mAssetPackStatus = GameAssetManager::GAMEASSET_READY;
        assetPackInfo->mAssetPackCompletion = 1.0f;

        // Get the path of the directory containing the asset files for
        // this asset pack
        AssetPackLocation *assetPackLocation = NULL;
        AssetPackErrorCode assetPackErrorCode = AssetPackManager_getAssetPackLocation(
                assetPackInfo->mDefinition->mPackName, &assetPackLocation);

        if (assetPackErrorCode == ASSET_PACK_NO_ERROR) {
            AssetPackStorageMethod storageMethod = AssetPackLocation_getStorageMethod(assetPackLocation);
            if (storageMethod == ASSET_PACK_STORAGE_FILES) {
                const char* assetPackPath = AssetPackLocation_getAssetsPath(assetPackLocation);
                if (assetPackPath != NULL) {
                    // Make a copy of the path, and add a path delimiter to the end
                    // if it isn't already present
                    size_t pathLength = strlen(assetPackPath);
                    bool needPathDelimiter = (assetPackPath[pathLength] != '/');
                    if (needPathDelimiter) {
                        ++pathLength;
                    }
                    char *pathCopy = new char[pathLength + 1];
                    pathCopy[pathLength] = '\0';
                    strncpy(pathCopy, assetPackPath, pathLength);
                    if (needPathDelimiter) {
                        pathCopy[pathLength - 1] = '/';
                    }
                    assetPackInfo->mAssetPackBasePath = pathCopy;
                }
            }
            AssetPackLocation_destroy(assetPackLocation);
        } else {
            SetAssetPackErrorStatus(assetPackErrorCode, assetPackInfo,
                                    "GameAssetManager: getAssetPackLocation");
        }
    }
}
The second update function, UpdateAssetPackFromDownloadState, processes the result of calls to AssetPackManager_getDownloadState. In the constructor we added calls to AssetPackManager_requestInfo. We use AssetPackManager_getDownloadState to retrieve the results of those requests for each asset pack. We also call AssetPackManager_getDownloadState to monitor state changes and progress information in response to requested Asset Pack Manager actions such as downloading an asset pack. Add the following code:
void GameAssetManagerInternals::UpdateAssetPackFromDownloadState(AssetPackInfo *assetPackInfo,
                                                                 AssetPackDownloadState *downloadState) {
    AssetPackDownloadStatus downloadStatus = AssetPackDownloadState_getStatus(
            downloadState);

    switch (downloadStatus) {
        case ASSET_PACK_UNKNOWN:
            break;
        case ASSET_PACK_DOWNLOAD_PENDING:
            ChangeAssetPackStatus(assetPackInfo, GameAssetManager::GAMEASSET_DOWNLOADING);
            assetPackInfo->mAssetPackCompletion = 0.0f;
            break;
        case ASSET_PACK_DOWNLOADING: {
                ChangeAssetPackStatus(assetPackInfo, GameAssetManager::GAMEASSET_DOWNLOADING);
                uint64_t dlBytes = AssetPackDownloadState_getBytesDownloaded(downloadState);
                uint64_t totalBytes = AssetPackDownloadState_getTotalBytesToDownload(downloadState);
                double dlPercent = ((double) dlBytes) / ((double) totalBytes);
                assetPackInfo->mAssetPackCompletion = (float) dlPercent;
            }
            break;
        case ASSET_PACK_TRANSFERRING:
            break;
        case ASSET_PACK_DOWNLOAD_COMPLETED:
            UpdateAssetPackBecameAvailable(assetPackInfo);
            break;
        case ASSET_PACK_DOWNLOAD_FAILED:
            ChangeAssetPackStatus(assetPackInfo, GameAssetManager::GAMEASSET_ERROR);
            break;
        case ASSET_PACK_DOWNLOAD_CANCELED:
            ChangeAssetPackStatus(assetPackInfo, GameAssetManager::GAMEASSET_NEEDS_DOWNLOAD);
            assetPackInfo->mAssetPackCompletion = 0.0f;
            break;
        case ASSET_PACK_WAITING_FOR_WIFI:
            ChangeAssetPackStatus(assetPackInfo, GameAssetManager::GAMEASSET_NEEDS_MOBILE_AUTH);
            break;
        case ASSET_PACK_NOT_INSTALLED: {
                ChangeAssetPackStatus(assetPackInfo, GameAssetManager::GAMEASSET_NEEDS_DOWNLOAD);
                uint64_t totalBytes = AssetPackDownloadState_getTotalBytesToDownload(downloadState);
                if (totalBytes > 0) {
                    assetPackInfo->mAssetPackDownloadSize = totalBytes;
                }
            }
            break;
        case ASSET_PACK_INFO_PENDING:
            break;
        case ASSET_PACK_INFO_FAILED:
            ChangeAssetPackStatus(assetPackInfo, GameAssetManager::GAMEASSET_ERROR);
            break;
        case ASSET_PACK_REMOVAL_PENDING:
            ChangeAssetPackStatus(assetPackInfo, GameAssetManager::GAMEASSET_PENDING_ACTION);
            break;
        case ASSET_PACK_REMOVAL_FAILED:
            ChangeAssetPackStatus(assetPackInfo, GameAssetManager::GAMEASSET_READY);
            assetPackInfo->mAssetPackCompletion = 1.0f;
            break;
        default: break;
    }
}
Our final update function checks for the completion of the mobile data permission request. If permission is granted, the downloads will start automatically, so this function is primarily to check for an error state as a result of the permission request. Add the following code:
void GameAssetManagerInternals::UpdateMobileDataRequestStatus() {
    if (mRequestingMobileDownload) {
        ShowCellularDataConfirmationStatus cellularStatus;
        AssetPackErrorCode assetPackErrorCode =
                AssetPackManager_getShowCellularDataConfirmationStatus(&cellularStatus);
        SetAssetPackErrorStatus(assetPackErrorCode, NULL,
                                "GameAssetManager: UpdateCellularRequestStatus");
        if (assetPackErrorCode == ASSET_PACK_NO_ERROR) {
            if (cellularStatus == ASSET_PACK_CONFIRM_USER_APPROVED) {
                mRequestingMobileDownload = false;
                LOGD("GameAssetManager: User approved mobile data download");
            } else if (cellularStatus == ASSET_PACK_CONFIRM_USER_CANCELED) {
                mRequestingMobileDownload = false;
                LOGD("GameAssetManager: User declined mobile data download");
            }
        }
    }
}
Adding the error utility function
Asset Pack Manager functions return success or failure results in the form of the AssetPackErrorCode enum. The enum return value of ASSET_PACK_NO_ERROR indicates success. All other values are errors. We will add a utility function to generate descriptive strings from the individual error codes. For errors involving a specific asset pack, it is passed to the utility function which sets that asset pack to an error status. The demo UI will report this error status and display the generated error message. Add the following code:
void GameAssetManagerInternals::SetAssetPackErrorStatus(const AssetPackErrorCode assetPackErrorCode,
                                                        AssetPackInfo *assetPackInfo,
                                                        const char *message) {
    switch (assetPackErrorCode) {
        case ASSET_PACK_NO_ERROR:
            // No error, so return immediately.
            return;
        case ASSET_PACK_APP_UNAVAILABLE:
            mAssetPackErrorMessage = "ASSET_PACK_APP_UNAVAILABLE"; break;
        case ASSET_PACK_UNAVAILABLE:
            mAssetPackErrorMessage = "ASSET_PACK_UNAVAILABLE"; break;
        case ASSET_PACK_INVALID_REQUEST:
            mAssetPackErrorMessage = "ASSET_PACK_INVALID_REQUEST"; break;
        case ASSET_PACK_DOWNLOAD_NOT_FOUND:
            mAssetPackErrorMessage = "ASSET_PACK_DOWNLOAD_NOT_FOUND"; break;
        case ASSET_PACK_API_NOT_AVAILABLE:
            mAssetPackErrorMessage = "ASSET_PACK_API_NOT_AVAILABLE"; break;
        case ASSET_PACK_NETWORK_ERROR:
            mAssetPackErrorMessage = "ASSET_PACK_NETWORK_ERROR"; break;
        case ASSET_PACK_ACCESS_DENIED:
            mAssetPackErrorMessage = "ASSET_PACK_ACCESS_DENIED"; break;
        case ASSET_PACK_INSUFFICIENT_STORAGE:
            mAssetPackErrorMessage = "ASSET_PACK_INSUFFICIENT_STORAGE"; break;
        case ASSET_PACK_PLAY_STORE_NOT_FOUND:
            mAssetPackErrorMessage = "ASSET_PACK_PLAY_STORE_NOT_FOUND"; break;
        case ASSET_PACK_NETWORK_UNRESTRICTED:
            mAssetPackErrorMessage = "ASSET_PACK_NETWORK_UNRESTRICTED"; break;
        case ASSET_PACK_INTERNAL_ERROR:
            mAssetPackErrorMessage = "ASSET_PACK_INTERNAL_ERROR"; break;
        case ASSET_PACK_INITIALIZATION_NEEDED:
            mAssetPackErrorMessage = "ASSET_PACK_INITIALIZATION_NEEDED"; break;
        case ASSET_PACK_INITIALIZATION_FAILED:
            mAssetPackErrorMessage = "ASSET_PACK_INITIALIZATION_FAILED"; break;

        default:    mAssetPackErrorMessage = "Unknown error code";
            break;
    }

    if (assetPackInfo == NULL) {
    LOGE("%s failed with error code %d : %s", message,
        static_cast<int>(assetPackErrorCode), mAssetPackErrorMessage);
    } else {
        assetPackInfo->mAssetPackStatus = GameAssetManager::GAMEASSET_ERROR;
        LOGE("%s failed on asset pack %s with error code %d : %s",
            message, assetPackInfo->mDefinition->mPackName,
            static_cast<int>(assetPackErrorCode),
            mAssetPackErrorMessage);
    }
}
Calling the new functions
Our changes have been additions to the internal GameAssetManagerInternals implementation class. Now we will update the GameAssetManager class to utilize the new code.
Updating GetGameAssetErrorMessage
Locate the GameAssetManager::GetGameAssetErrorMessage function. Replace the return "GENERIC ASSET ERROR MESSAGE" line with the following line:
return mInternals->GetAssetPackErrorMessage();
Updating UpdateGameAssetManager
Locate the GameAssetManager::UpdateGameAssetManager function. We will be updating it to do a couple things. First, it will call the UpdateMobileDataRequestStatus implementation class function to update status based on the results of any pending mobile data authorization requests. Second, it checks the status of all the asset packs. If an asset pack is in a status where it is pending a state update from the Asset Pack Manager, or is in the process of an operation such as downloading, AssetPackManager_getDownloadState is called and the resulting asset pack state passed to the UpdateAssetPackFromDownloadState implementation class function. Add the following code:
   // Update the status outcome of any mobile data requests
    mInternals->UpdateMobileDataRequestStatus();

    // Update status of asset packs if necessary
    for (int i = 0; i < mInternals->GetAssetPackCount(); ++i ) {
        AssetPackInfo *assetPackInfo = mInternals->GetAssetPack(i);
        if (assetPackInfo != NULL) {
            // If we are in an internal status where we want to query the asset pack
            // download state and update status accordingly, do so
            if (assetPackInfo->mAssetPackStatus == GameAssetManager::GAMEASSET_WAITING_FOR_STATUS ||
                assetPackInfo->mAssetPackStatus == GameAssetManager::GAMEASSET_DOWNLOADING ||
                assetPackInfo->mAssetPackStatus == GameAssetManager::GAMEASSET_PENDING_ACTION ||
                assetPackInfo->mAssetPackStatus == GameAssetManager::GAMEASSET_NEEDS_MOBILE_AUTH ) {
                    const char *assetPackName = assetPackInfo->mDefinition->mPackName;
                    AssetPackDownloadState *downloadState = NULL;
                    AssetPackErrorCode assetPackErrorCode = AssetPackManager_getDownloadState(
                            assetPackName, &downloadState);

                    if (assetPackErrorCode == ASSET_PACK_NO_ERROR) {
                        // Use the returned download state to update our asset pack info
                        mInternals->UpdateAssetPackFromDownloadState(assetPackInfo, downloadState);
                    } else {
                        // If an error is reported, mark the asset pack as being in error and
                        // bail on the update process
                        mInternals->SetAssetPackErrorStatus(assetPackErrorCode, assetPackInfo,
                                                            "GameAssetManager: getDownloadState");
                        return;
                    }

                    AssetPackDownloadState_destroy(downloadState);

            }
        }
    }
Updating RequestMobileDataDownloads
Locate the RequestMobileDataDownloads declaration and add the following line to the empty body:
mInternals->RequestMobileDataDownloads();
Updating RequestDownload
Locate the RequestDownload declaration and replace the existing line with the following code:
    bool downloadStarted = false;
    LOGD("GameAssetManager :: UI called RequestDownload %s", assetPackName);
    if (mInternals->GetAssetPackManagerInitialized()) {
        downloadStarted = mInternals->RequestAssetPackDownload(assetPackName);
    }

    return downloadStarted;
Updating RequestDownloadCancellation
Locate the RequestDownloadCancellation declaration and add the following line to the empty body:
mInternals->RequestAssetPackCancelDownload(assetPackName);
Updating RequestRemoval
Locate the RequestRemoval declaration and replace the existing line with the following line:
return mInternals->RequestAssetPackRemoval(assetPackName);
6. Testing asset packs locally
Play Asset Delivery supports local testing on a device without having to upload a build to Google Play. There are a few important differences and limitations to be aware of when local testing:
- Fast-follow asset pack types behave as on-demand asset pack types, they won't be automatically fetched when the game is locally installed on device.
- The asset packs are fetched from external storage instead of from the Google Play servers, so you cannot test how your code behaves in the case of network errors.
- Local testing does not cover the wait-for-Wi-Fi/cellular authorization scenario.
- Updates are not supported. Before installing a new version of your build, manually uninstall the previous version.
Building the app bundle
Play Asset Delivery requires building the application as an Android App Bundle versus directly creating an APK. In Android Studio, select Build -> Build Bundle(s) / APK(s) -> Build Bundle(s). You should end up with an app-debug.aab file located in the start/app/build/generated/outputs/bundle/debug directory.
Generating local testing APKs with –local testing
In Android Studio, select the Terminal tab located at the bottom of the window.

At the command prompt enter the following command (customize the version number of the bundletool-all.jar if it does not match the version you installed):
java -jar bundletool-all-1.0.0.jar build-apks --bundle=app/build/outputs/bundle/debug/app-debug.aab --output=nativegamepad.apks --local-testing
Sideloading the APKs with bundletool
Make sure you have a device connected and available in Android Studio. At the command prompt enter the following command (customize the version number of the bundletool-all.jar if it does not match the version you installed):
java -jar bundletool-all-1.0.0.jar install-apks --apks=nativegamepad.apks
Running the local build
After sideloading the example, and launching the app you should see the following: 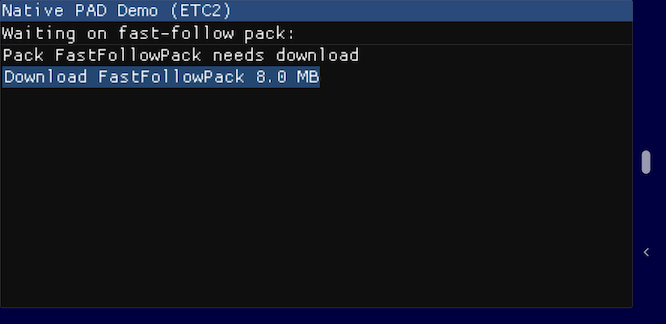
Since we are locally testing, the fast-follow pack is treated as an on-demand pack and needs a download request to be installed and made available. The demo UI doesn't automatically make this request, instead prompting with the Download FastFollowPack (Size in MB) button. If you select this button, the fast-follow pack will be downloaded and the UI screen will shift to match what would appear when running a build downloaded over Google Play: with internal and fast-follow packs available and the on-demand pack needing to be downloaded.
Generally, fast-follow packs will have completed installation before application launch. However, this is not guaranteed and your application should handle this scenario. The demo UI will display download progress of the fast-follow pack if it is still in the progress of downloading when the application is run. This behavior is specific to builds installed from Google Play and will not occur on local test builds.
7. Creating a build for Google Play
In order to upload a build of the example project to Google Play, we will need to change its package name to a unique identifier, and create a keystore to generate a signed release build.
Updating the package name
First, choose Build -> Clean Project in Android Studio.
Then, in the project pane, navigate to the app AndroidManifest.xml file in start -> start -> app -> src -> main and open it in the Android Studio editor.
Find the package="com.google.sample.nativepaddemo" entry, change the package name to something unique, and save the file.
Next, select the app build.gradle file just below the AndroidManifest.xml file and open it in the Android Studio editor. Find the line containing applicationId 'com.google.sample.nativepaddemo and change the package name to the same name you used in the AndroidManifest.xml file.
Create and setup a keystore for the game
Android requires that all apps are digitally signed with a certificate before they are installed on a device or updated.
We'll create a "Keystore" for the example project in this codelab. If you're publishing an update to an existing game, reuse the same Keystore as you did for releasing previous versions of the app.
Create a keystore and build a release app bundle
You can create a Keystore with Android Studio, follow the steps at that link to create a keystore and use it to generate a signed release build of the game. Choose the Android App Bundle option when prompted to select an Android App Bundle or APK. At the end of the process you will have an .aab file that is suitable for uploading to the Google Play Console.
8. Testing a Google Play build
Testing with internal app sharing
Internal app sharing can be used to easily install builds uploaded to Google Play. To test the example app using internal app sharing, do the following:
- Build the app as a release, signed Android App Bundle
- Follow the Play Console instructions on how to share your app internally.
- On the test device, click the internal app-sharing link for the version of the app you just uploaded.
- Install the app from the Google Play Store page you see after clicking the link.
If you install the app on a device that supports ASTC textures, the TCFT feature will install the ASTC texture files instead of the ETC2 texture files. The app displays the active texture format at the top of the UI; look for Native PAD Demo (ETC2)or Native Pad Demo (ASTC).
9. Confirming large downloads over mobile data (optional)
If a device is connected to the Internet via wi-fi, asset packs of any size can be downloaded without user confirmation. If wi-fi is not available, downloading an asset pack larger than 150MB in size requires explicit user consent to download using a mobile data connection. The Asset Pack Manager includes functions to ask for this consent and report the results. While the code we added handles this scenario, the current on-demand asset pack is well under the size limit. To validate this behavior, we need to increase the size of the on-demand asset pack and submit a new build to Google Play.
Padding the on-demand asset pack size
To increase the size of the on-demand asset pack above 150MB, we will simply make copies of an existing data file and rename it. A "padding" file of random binary data is included in the final project. Navigate to the final/OnDemandPack/src/main/assets directory. Copy the ondemand1_data.bin file to the start/OnDemandPack/src/main/assets directory. In the new location, duplicate and rename it with sequentially increasing numbers until the directory contains ondemand1_data.bin through ondemand10_data.bin.
Incrementing the version, rebuilding and resubmitting
Before making a new build, be sure to increment the versionCode field in the app's build.gradle file. After updating the app version, make a new Android App Bundle and upload it to Google Play.
Confirming mobile data access
When you run the new version of the app on a device with a mobile data connection, but no active wi-fi connection, instead of Download the demo UI will prompt Request Mobile Download of the on-demand asset pack. Selecting it will bring up the Asset Pack Manager consent UI, if the user consents the on-demand asset pack will download over the mobile data connection.
10. Congratulations
Congratulations, you've successfully integrated Play Asset Delivery into a native game and dynamically downloaded assets from Google Play. You are now ready to take advantage of the convenience and flexibility of delivering on-demand content directly from Google Play.
