
1. 前言
简介
在本课程的这一阶段,您已经熟悉掌握如何使用 Compose 构建应用,并已初步了解如何使用 XML、View、View 绑定和 Fragment 构建应用。使用 View 构建应用后,您可能会感受到使用声明式界面(例如 Compose)构建应用的便捷性。不过,在某些情况下,最好是使用 View,而不是 Compose。在此 Codelab 中,您将学习如何使用 View Interops 将 View 组件添加到现代 Compose 应用中。
在编写此 Codelab 时,Compose 中尚未提供您要创建的界面组件。这是掌握如何使用 View Interop 的绝佳机会!
前提条件:
- 已完成“Android 之 Compose 开发基础”课程的 Codelab 实操“使用 View 构建 Android 应用”及之前内容。
所需条件
- 一台连接到互联网并安装了 Android Studio 的电脑
- 一台设备或模拟器
- Juice Tracker 应用的起始代码
构建内容
在此 Codelab 中,您需要将 Spinner、RatingBar 和 AdView 这三个 View 集成到 Compose 界面中,以便完成 Juice Tracker 应用界面。如需构建这些组件,您需要使用 View Interoperability(简称“View Interop”)。借助 View Interop,您实际上可以将 View 封装到可组合函数中,从而将其添加到应用中。
代码演示
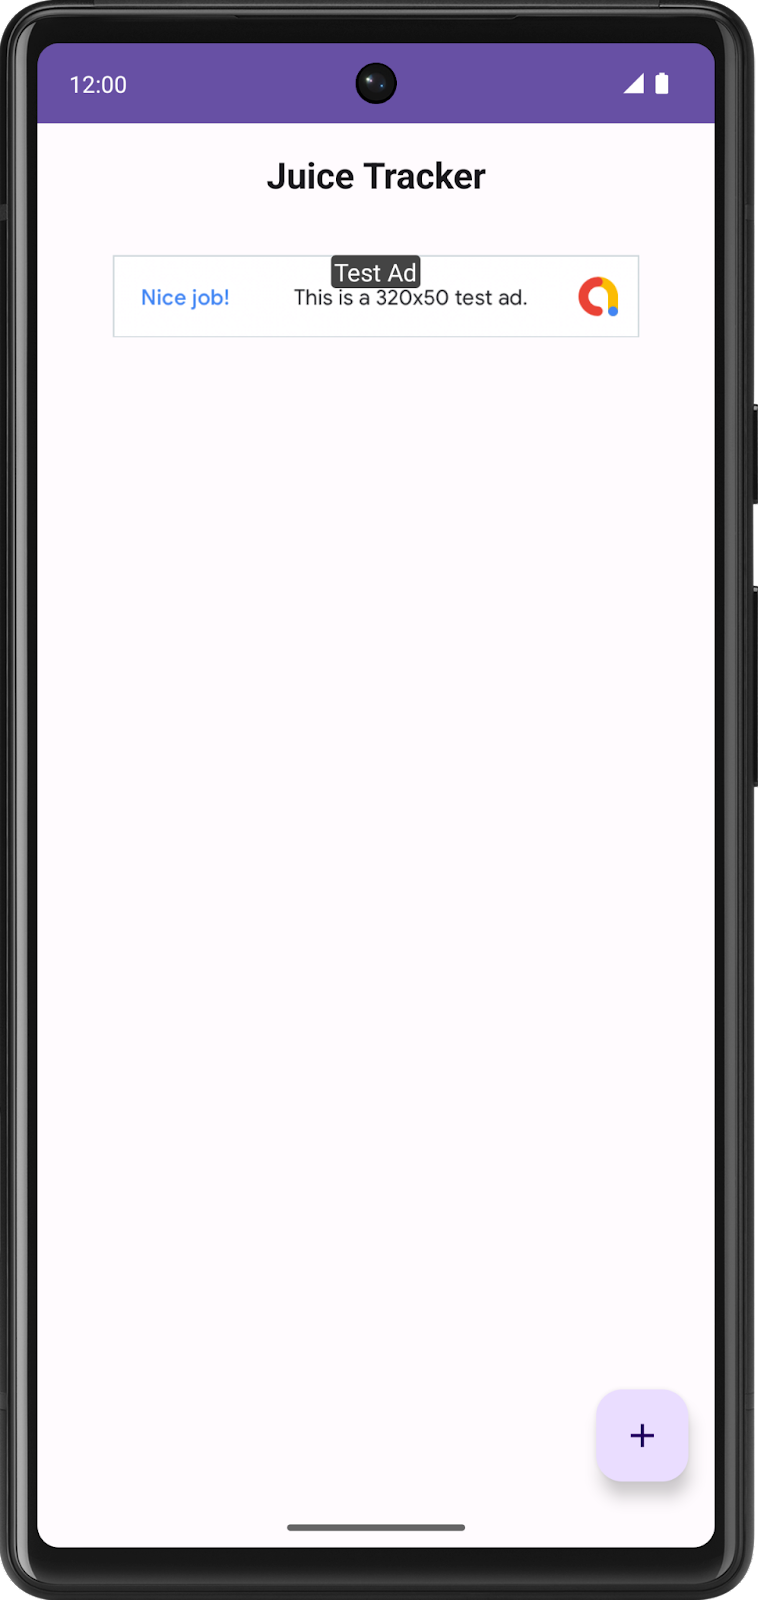
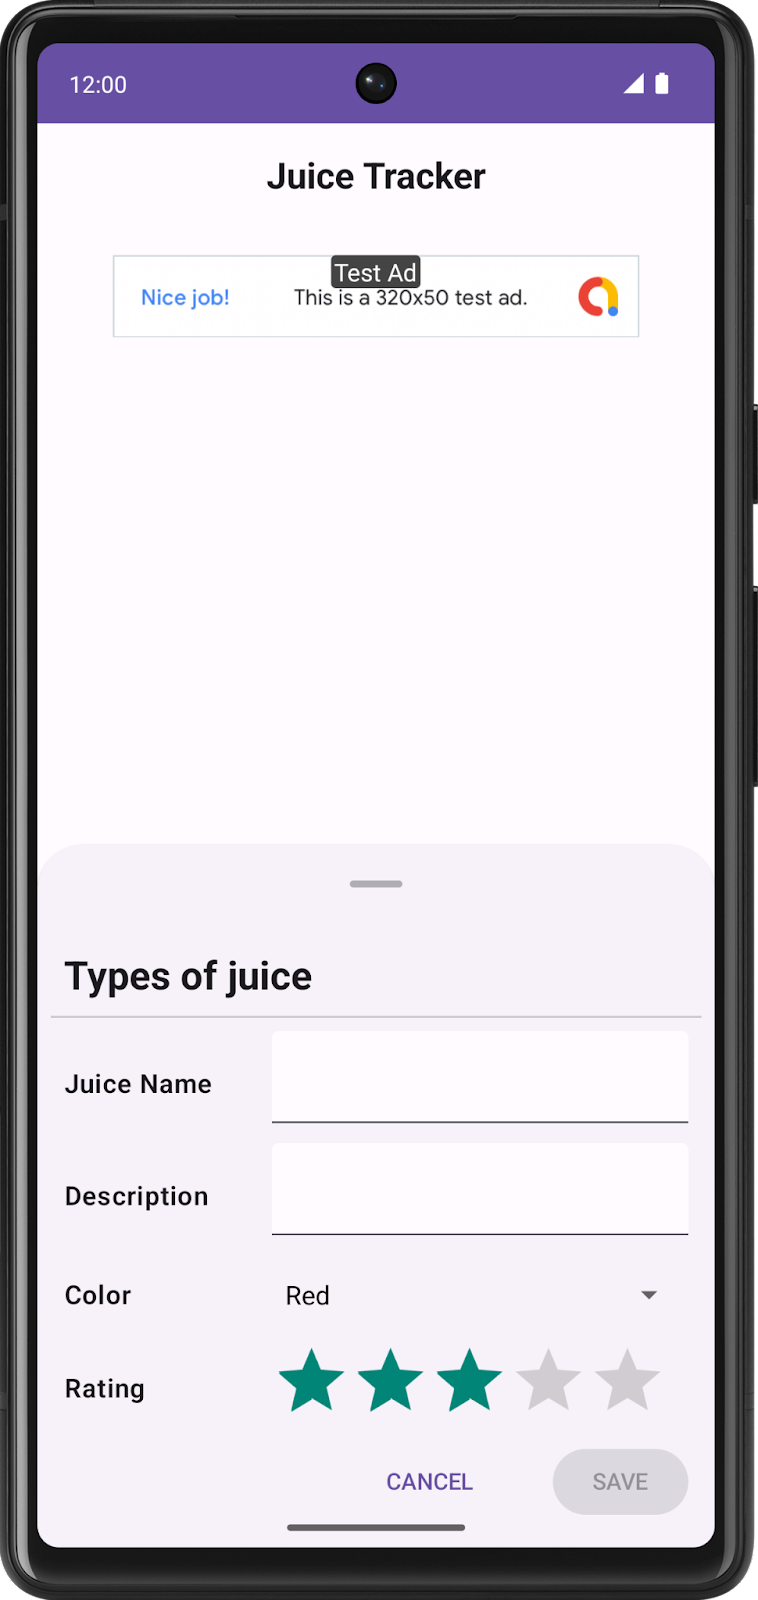
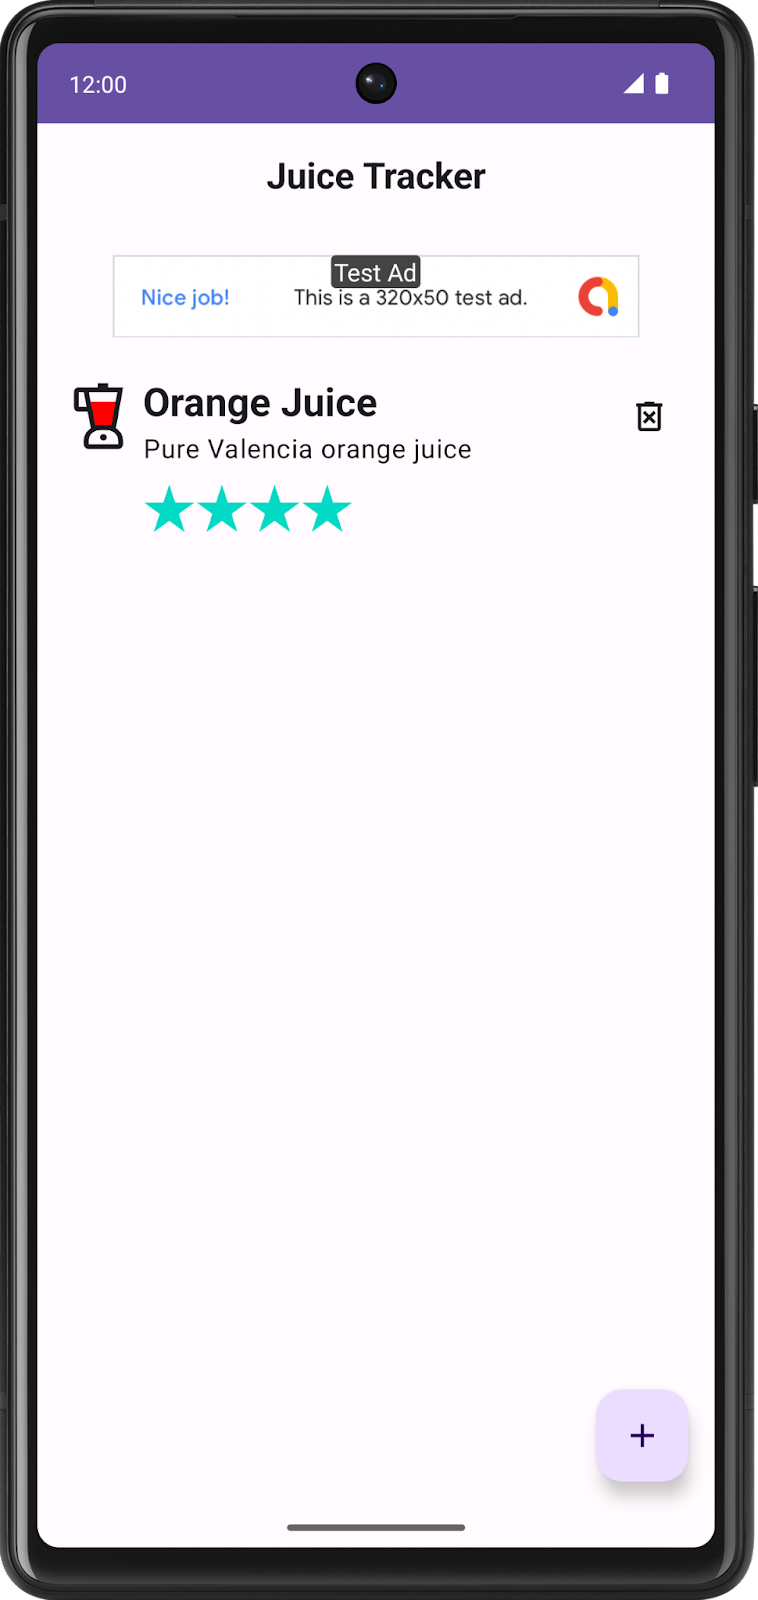
在此 Codelab 实操中,您将使用与 Codelab 实操“使用 View 构建 Android 应用” 和 Codelab 实操“将 Compose 添加到基于 View 的应用”中相同的 JuiceTracker 应用。与此版本的不同之处在于,提供的起始代码完全采用 Compose。目前,此应用缺少条目对话框工作表中的颜色和评分输入,以及列表界面顶部的广告横幅。
bottomsheet 目录包含与条目对话框相关的所有界面组件。在创建颜色和评分输入后,此软件包应包含颜色和评分输入的界面组件。
homescreen 包含主屏幕托管的界面组件,其中包括 JuiceTracker 列表。在创建广告横幅后,此软件包最终应包含广告横幅。
主要界面组件(例如底部动作条和果汁列表)托管在 JuiceTrackerApp.kt 文件中。
2. 获取起始代码
首先,请下载起始代码:
或者,您也可以克隆 GitHub 代码库:
$ git clone https://github.com/google-developer-training/basic-android-kotlin-compose-training-juice-tracker.git
$ cd basic-android-kotlin-compose-training-juice-tracker
$ git checkout compose-starter
- 在 Android Studio 中,打开
basic-android-kotlin-compose-training-juice-tracker文件夹。 - 在 Android Studio 中,打开 Juice Tracker 应用代码。
3. Gradle 配置
将 Play 服务广告依赖项添加到应用 build.gradle.kts 文件中。
app/build.gradle.kts
android {
   ...
   dependencies {
      ...
      implementation("com.google.android.gms:play-services-ads:22.2.0")
   }
}
4. 设置
将以下值添加到 Android 清单中的 activity 标记上方,以启用广告横幅进行测试:
AndroidManifest.xml
...
<meta-data
   android:name="com.google.android.gms.ads.APPLICATION_ID"
   android:value="ca-app-pub-3940256099942544~3347511713" />

...
5. 完成条目对话框
在本部分中,您将创建颜色旋转图标和评分栏,从而完成条目对话框。颜色旋转图标是可让您选择颜色的组件,而评分栏可让您为果汁选择评分。请参阅以下设计:
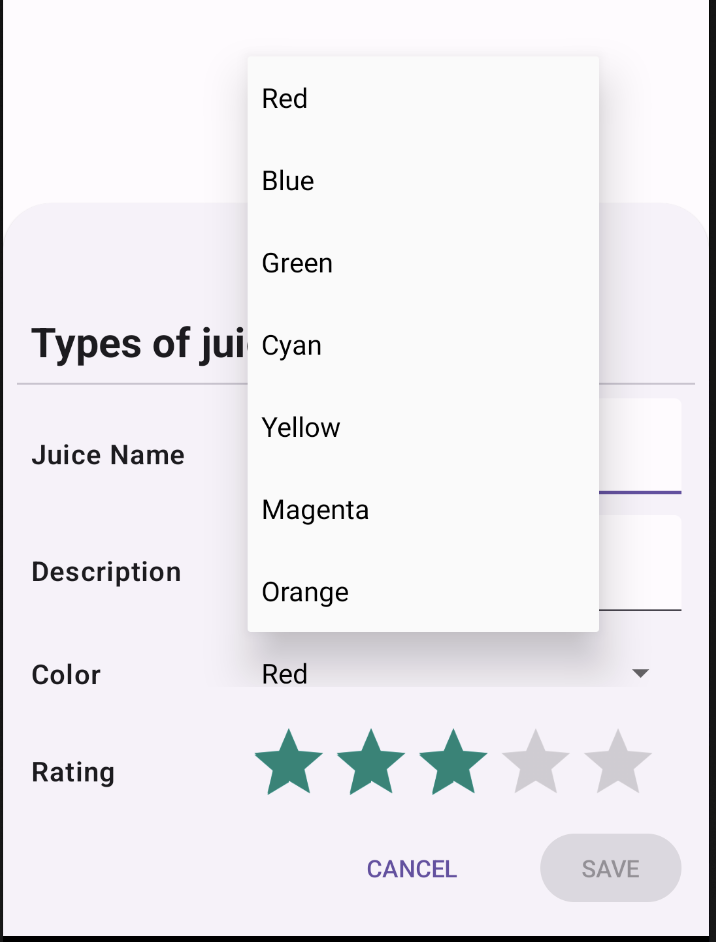

创建颜色旋转图标
如需在 Compose 中实现旋转图标,必须使用 Spinner 类。Spinner 是 View 组件,而不是可组合函数,因此必须通过互操作实现。
- 在
bottomsheet目录中,新建一个名为ColorSpinnerRow.kt的文件。 - 在文件中新建一个名为
SpinnerAdapter的类。 - 在
SpinnerAdapter的构造函数中,定义一个名为onColorChange的回调函数,该函数接受Int参数。SpinnerAdapter会处理Spinner的回调函数。
bottomsheet/ColorSpinnerRow.kt
class SpinnerAdapter(val onColorChange: (Int) -> Unit){
}
- 实现
AdapterView.OnItemSelectedListener接口。
通过实现此接口,您可以定义旋转图标的点击行为。稍后,您将在可组合函数中设置此适配器。
bottomsheet/ColorSpinnerRow.kt
class SpinnerAdapter(val onColorChange: (Int) -> Unit): AdapterView.OnItemSelectedListener {
}
- 实现
AdapterView.OnItemSelectedListener成员函数:onItemSelected()和onNothingSelected()。
bottomsheet/ColorSpinnerRow.kt
class SpinnerAdapter(val onColorChange: (Int) -> Unit): AdapterView.OnItemSelectedListener {
   override fun onItemSelected(parent: AdapterView<*>?, view: View?, position: Int, id: Long) {
        TODO("Not yet implemented")
    }

    override fun onNothingSelected(parent: AdapterView<*>?) {
        TODO("Not yet implemented")
    }
}
- 修改
onItemSelected()函数以调用onColorChange()回调函数,以便在您选择某个颜色后,应用会更新界面中的选定值。
bottomsheet/ColorSpinnerRow.kt
class SpinnerAdapter(val onColorChange: (Int) -> Unit): AdapterView.OnItemSelectedListener {
   override fun onItemSelected(parent: AdapterView<*>?, view: View?, position: Int, id: Long) {
        onColorChange(position)
    }

    override fun onNothingSelected(parent: AdapterView<*>?) {
        TODO("Not yet implemented")
    }
}
- 修改
onNothingSelected()函数以将颜色设置为0,以便在您未选择任何颜色时,使用第一个颜色(红色)作为默认颜色。
bottomsheet/ColorSpinnerRow.kt
class SpinnerAdapter(val onColorChange: (Int) -> Unit): AdapterView.OnItemSelectedListener {
   override fun onItemSelected(parent: AdapterView<*>?, view: View?, position: Int, id: Long) {
        onColorChange(position)
    }

    override fun onNothingSelected(parent: AdapterView<*>?) {
        onColorChange(0)
    }
}
之前已经构建了用于通过回调函数定义旋转图标行为的 SpinnerAdapter。现在,您需要构建旋转图标的内容并为其填充数据。
- 在
ColorSpinnerRow.kt文件内(但SpinnerAdapter类之外),新建一个名为ColorSpinnerRow的可组合函数。 - 在
ColorSpinnerRow()的方法签名中,添加旋转图标位置的Int参数、接受Int参数的回调函数以及修饰符。
bottomsheet/ColorSpinnerRow.kt
...
@Composable
fun ColorSpinnerRow(
    colorSpinnerPosition: Int,
    onColorChange: (Int) -> Unit,
    modifier: Modifier = Modifier
) {
}
- 在此函数内,使用
JuiceColor枚举创建果汁颜色字符串资源的数组。此数组将用作填充旋转图标的内容。
bottomsheet/ColorSpinnerRow.kt
...
@Composable
fun ColorSpinnerRow(
    colorSpinnerPosition: Int,
    onColorChange: (Int) -> Unit,
    modifier: Modifier = Modifier
) {
   val juiceColorArray =
        JuiceColor.values().map { juiceColor -> stringResource(juiceColor.label) }

}
- 添加
InputRow()可组合函数并传递输入标签的颜色字符串资源和修饰符,以定义用于显示Spinner的输入行。
bottomsheet/ColorSpinnerRow.kt
...
@Composable
fun ColorSpinnerRow(
    colorSpinnerPosition: Int,
    onColorChange: (Int) -> Unit,
    modifier: Modifier = Modifier
) {
   val juiceColorArray =
        JuiceColor.values().map { juiceColor -> stringResource(juiceColor.label) }
   InputRow(inputLabel = stringResource(R.string.color), modifier = modifier) {
   }
}
接下来,您将创建 Spinner!由于 Spinner 属于 View 类,因此必须使用 Compose 的 View Interoperability API 将其封装到可组合函数中。这可通过 AndroidView 可组合函数实现。
- 如需在 Compose 中使用
Spinner,请在InputRowlambda 主体中创建一个AndroidView()可组合函数。AndroidView()可组合函数会在可组合函数中创建 View 元素或层次结构。
bottomsheet/ColorSpinnerRow.kt
...
@Composable
fun ColorSpinnerRow(
    colorSpinnerPosition: Int,
    onColorChange: (Int) -> Unit,
    modifier: Modifier = Modifier
) {
   val juiceColorArray =
        JuiceColor.values().map { juiceColor -> stringResource(juiceColor.label) }
   InputRow(inputLabel = stringResource(R.string.color), modifier = modifier) {
      AndroidView()
   }
}
AndroidView 可组合函数接受三个参数:
factorylambda,这是一个用于创建 View 的函数。update回调,该回调将在factory中创建的 View 进行膨胀时调用。- 可组合函数
modifier。
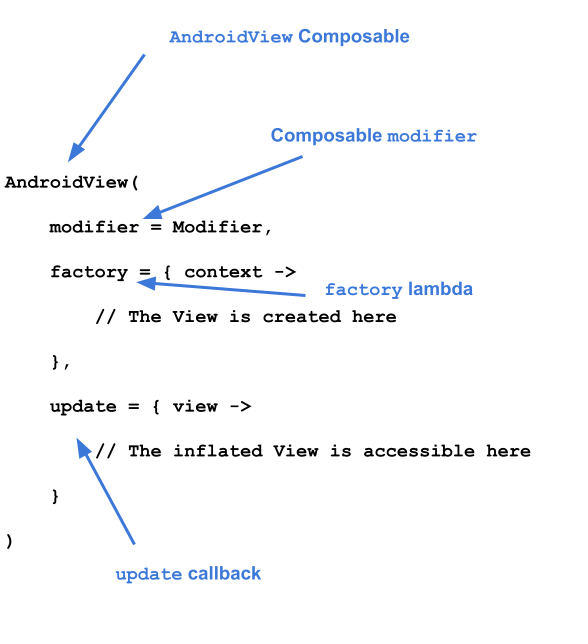
- 如需实现
AndroidView,请先传递修饰符并填充屏幕的最大宽度。 - 为
factory参数传递 lambda。 factorylambda 接受Context作为参数。创建一个Spinner类并传递上下文。
bottomsheet/ColorSpinnerRow.kt
...
@Composable
fun ColorSpinnerRow(
    colorSpinnerPosition: Int,
    onColorChange: (Int) -> Unit,
    modifier: Modifier = Modifier
) {
   ...
   InputRow(...) {
      AndroidView(
         modifier = Modifier.fillMaxWidth(),
         factory = { context ->
            Spinner(context)
         }
      )
   }
}
就像 RecyclerView.Adapter 为 RecyclerView 提供数据一样,ArrayAdapter 也为 Spinner 提供数据。Spinner 需要用适配器来存储颜色数组。
- 使用
ArrayAdapter设置适配器。ArrayAdapter需要上下文、XML 布局和数组。为布局传递simple_spinner_dropdown_item;此布局作为 Android 的默认布局。
bottomsheet/ColorSpinnerRow.kt
...
@Composable
fun ColorSpinnerRow(
colorSpinnerPosition: Int,
onColorChange: (Int) -> Unit,
modifier: Modifier = Modifier
) {
...
InputRow(...) {
AndroidView(
modifier = Modifier.fillMaxWidth(),
factory = { context ->
Spinner(context).apply {
adapter =
ArrayAdapter(
context,
android.R.layout.simple_spinner_dropdown_item,
juiceColorArray
)
}
}
)
}
}
factory 回调会在内部创建一个 View 实例并返回该实例。update 是一个回调,它接受的参数类型与 factory 回调返回的参数类型相同。此参数是由 factory 膨胀而来的 View 实例。在本例中,由于在工厂中创建了 Spinner,因此可以在 update lambda 主体中访问此 Spinner 的实例。
- 添加传递
spinner的update回调。使用update中提供的回调来调用setSelection()方法。
bottomsheet/ColorSpinnerRow.kt
...
@Composable
fun ColorSpinnerRow(
    colorSpinnerPosition: Int,
    onColorChange: (Int) -> Unit,
    modifier: Modifier = Modifier
) {
   ...
   InputRow(...) {
      //...
         },
         update = { spinner ->
             spinner.setSelection(colorSpinnerPosition)
             spinner.onItemSelectedListener = SpinnerAdapter(onColorChange)
         }
      )
   }
}
- 使用您之前创建的
SpinnerAdapter在update中设置onItemSelectedListener()回调。
bottomsheet/ColorSpinnerRow.kt
...
@Composable
fun ColorSpinnerRow(
    colorSpinnerPosition: Int,
    onColorChange: (Int) -> Unit,
    modifier: Modifier = Modifier
) {
   ...
   InputRow(...) {
      AndroidView(
         // ...
         },
         update = { spinner ->
             spinner.setSelection(colorSpinnerPosition)
             spinner.onItemSelectedListener = SpinnerAdapter(onColorChange)
         }
      )
   }
}
现在,颜色旋转图标组件的代码已完成。
- 添加以下实用函数以获取
JuiceColor的枚举索引。您将在下一步中使用此索引。
private fun findColorIndex(color: String): Int {
   val juiceColor = JuiceColor.valueOf(color)
   return JuiceColor.values().indexOf(juiceColor)
}
- 在
EntryBottomSheet.kt文件的SheetForm可组合函数中实现ColorSpinnerRow。将颜色旋转图标放在“Description”文本之后、按钮上方的位置。
bottomsheet/EntryBottomSheet.kt
...
@Composable
fun SheetForm(
   juice: Juice,
   onUpdateJuice: (Juice) -> Unit,
   onCancel: () -> Unit,
   onSubmit: () -> Unit,
   modifier: Modifier = Modifier,
) {
   ...
   TextInputRow(
            inputLabel = stringResource(R.string.juice_description),
            fieldValue = juice.description,
            onValueChange = { description -> onUpdateJuice(juice.copy(description = description)) },
            modifier = Modifier.fillMaxWidth()
        )
        ColorSpinnerRow(
            colorSpinnerPosition = findColorIndex(juice.color),
            onColorChange = { color ->
                onUpdateJuice(juice.copy(color = JuiceColor.values()[color].name))
            }
        )
   ButtonRow(
            modifier = Modifier
                .align(Alignment.End)
                .padding(bottom = dimensionResource(R.dimen.padding_medium)),
            onCancel = onCancel,
            onSubmit = onSubmit,
            submitButtonEnabled = juice.name.isNotEmpty()
        )
    }
}
创建评分输入
- 在
bottomsheet目录中,新建一个名为RatingInputRow.kt的文件。 - 在
RatingInputRow.kt文件中,新建一个名为RatingInputRow()的可组合函数。 - 在方法签名中,传递评分的
Int、用于处理选择更改的包含Int参数的回调以及修饰符。
bottomsheet/RatingInputRow.kt
@Composable
fun RatingInputRow(rating:Int, onRatingChange: (Int) -> Unit, modifier: Modifier = Modifier){
}
- 与
ColorSpinnerRow一样,向包含AndroidView的可组合函数添加InputRow,如以下示例代码所示。
bottomsheet/RatingInputRow.kt
@Composable
fun RatingInputRow(rating:Int, onRatingChange: (Int) -> Unit, modifier: Modifier = Modifier){
    InputRow(inputLabel = stringResource(R.string.rating), modifier = modifier) {
        AndroidView(
            factory = {},
            update = {}
        )
    }
}
- 在
factorylambda 主体中,创建RatingBar类的实例,用于提供此设计所需的评分栏的类型。将stepSize设置为1f,将评分强制设置为整数。
bottomsheet/RatingInputRow.kt
@Composable
fun RatingInputRow(rating:Int, onRatingChange: (Int) -> Unit, modifier: Modifier = Modifier){
    InputRow(inputLabel = stringResource(R.string.rating), modifier = modifier) {
        AndroidView(
            factory = { context ->
                RatingBar(context).apply {
                    stepSize = 1f
                }
            },
            update = {}
        )
    }
}
当 View 进行膨胀时,系统会设置评分。回想一下,factory 会将 RatingBar 的实例返回到更新回调。
- 使用传递给可组合函数的评分,在
updatelambda 主体中为RatingBar实例设置评分。 - 设置新的评分后,使用
RatingBar回调调用onRatingChange()回调函数,以在界面中更新评分。
bottomsheet/RatingInputRow.kt
@Composable
fun RatingInputRow(rating:Int, onRatingChange: (Int) -> Unit, modifier: Modifier = Modifier){
    InputRow(inputLabel = stringResource(R.string.rating), modifier = modifier) {
        AndroidView(
            factory = { context ->
                RatingBar(context).apply {
                    stepSize = 1f
                }
            },
            update = { ratingBar ->
                ratingBar.rating = rating.toFloat()
                ratingBar.setOnRatingBarChangeListener { _, _, _ ->
                    onRatingChange(ratingBar.rating.toInt())
                }
            }
        )
    }
}
现在,评分输入可组合函数已完成。
- 在
EntryBottomSheet中使用RatingInputRow()可组合函数。将其放置在颜色旋转图标之后、按钮上方的位置。
bottomsheet/EntryBottomSheet.kt
@Composable
fun SheetForm(
    juice: Juice,
    onUpdateJuice: (Juice) -> Unit,
    onCancel: () -> Unit,
    onSubmit: () -> Unit,
    modifier: Modifier = Modifier,
) {
    Column(
        modifier = modifier,
        verticalArrangement = Arrangement.spacedBy(4.dp)
    ) {
        ...
        ColorSpinnerRow(
            colorSpinnerPosition = findColorIndex(juice.color),
            onColorChange = { color ->
                onUpdateJuice(juice.copy(color = JuiceColor.values()[color].name))
            }
        )
        RatingInputRow(
            rating = juice.rating,
            onRatingChange = { rating -> onUpdateJuice(juice.copy(rating = rating)) }
        )
        ButtonRow(
            modifier = Modifier.align(Alignment.CenterHorizontally),
            onCancel = onCancel,
            onSubmit = onSubmit,
            submitButtonEnabled = juice.name.isNotEmpty()
        )
    }
}
创建广告横幅
- 在
homescreen软件包中,新建一个名为AdBanner.kt的文件。 - 在
AdBanner.kt文件中,新建一个名为AdBanner()的可组合函数。
与您之前构建的可组合函数不同,AdBanner 不需要输入。因此,您无需将其封装在 InputRow 可组合函数中。不过,它需要 AndroidView。
- 尝试使用
AdView类自行构建横幅广告。请务必将广告尺寸设置为AdSize.BANNER并将广告单元 ID 设置为"ca-app-pub-3940256099942544/6300978111"。 - 当
AdView膨胀后,使用AdRequest Builder加载广告。
homescreen/AdBanner.kt
@Composable
fun AdBanner(modifier: Modifier = Modifier) {
    AndroidView(
        modifier = modifier,
        factory = { context ->
            AdView(context).apply {
                setAdSize(AdSize.BANNER)
                // Use test ad unit ID
                adUnitId = "ca-app-pub-3940256099942544/6300978111"
            }
        },
        update = { adView ->
            adView.loadAd(AdRequest.Builder().build())
        }
    )
}
- 将
AdBanner放在JuiceTrackerApp中的JuiceTrackerList之前。第 83 行声明了JuiceTrackerList。
ui/JuiceTrackerApp.kt
...
AdBanner(
   Modifier
       .fillMaxWidth()
       .padding(
           top = dimensionResource(R.dimen.padding_medium),
           bottom = dimensionResource(R.dimen.padding_small)
       )
)

JuiceTrackerList(
    juices = trackerState,
    onDelete = { juice -> juiceTrackerViewModel.deleteJuice(juice) },
    onUpdate = { juice ->
        juiceTrackerViewModel.updateCurrentJuice(juice)
        scope.launch {
            bottomSheetScaffoldState.bottomSheetState.expand()
        }
     },
)
6. 获取解决方案代码
如需下载完成后的 Codelab 代码,您可以使用以下 Git 命令:
$ git clone https://github.com/google-developer-training/basic-android-kotlin-compose-training-juice-tracker.git
$ cd basic-android-kotlin-compose-training-juice-tracker
$ git checkout compose-with-views
或者,您也可以下载 ZIP 文件形式的代码库,将其解压缩并在 Android Studio 中打开。
如果您想查看解决方案代码,请前往 GitHub 查看。
7. 了解更多内容
8. 大功告成!
本课程到此结束,但这您的 Android 应用开发之旅才刚刚开始!
在本课程中,您学习了如何使用 Jetpack Compose 构建新应用。Jetpack Compose 是用于构建原生 Android 应用的现代界面工具包。在本课程中,您构建了包含列表、单个或多个界面的应用,并在这些元素之间导航。您学习了如何构建交互式应用、如何让应用响应用户输入以及如何更新界面。您应用了 Material Design,并使用了颜色、形状和排版来为您的应用设置主题。此外,您还使用了 Jetpack 和其他第三方库来安排任务、从远程服务器检索数据、在本地保留数据等。
通过学习本课程,您不仅充分了解了如何使用 Jetpack Compose 构建精美的自适应应用,还掌握了打造高效、可维护且富有视觉吸引力的 Android 应用所需的知识和技能。这些基础知识将帮助您继续学习和培养 Modern Android Development 和 Compose 的相关技能。
感谢大家参与并完成本课程!我们鼓励大家通过更多资源进一步学习并拓展相关技能,例如:Android 开发者文档、“面向 Android 开发者的 Jetpack Compose”课程、现代 Android 应用架构、Android 开发者博客、其他 Codelab 和示例项目。
最后,别忘了在社交媒体上分享您构建的内容,并使用 #AndroidBasics 标签,以便我们和 Android 开发者社区的其他成员也能及时关注您的学习历程!
祝编程顺利!