
1. Before you begin
Up until this point, the apps you've worked on consisted of a single screen. However, a lot of the apps you use probably have multiple screens that you can navigate through. For example, the Settings app has many pages of content spread across different screens.
|
|
|
In modern Android development, multiscreen apps are created using the Jetpack Navigation component. The Navigation Compose component allows you to easily build multi screen apps in Compose using a declarative approach, just like building user interfaces. This codelab introduces the essentials of the Navigation Compose component, how to make the AppBar responsive, and how to send data from your app to another app using intents—all while demonstrating best practices in an increasingly complex app.
Prerequisites
- Familiarity with the Kotlin language, including function types, lambdas, and scope functions
- Familiarity with basic
RowandColumnlayouts in Compose
What you'll learn
- Create a
NavHostcomposable to define routes and screens in your app. - Navigate between screens using a
NavHostController. - Manipulate the back stack to navigate to previous screens.
- Use intents to share data with another app.
- Customize the AppBar, including the title and back button.
What you'll build
- You'll implement navigation in a multiscreen app.
What you'll need
- The latest version of Android Studio
- An internet connection to download the starter code
2. Download starter code
To get started, download the starter code:
Alternatively, you can clone the GitHub repository for the code:
$ git clone https://github.com/google-developer-training/basic-android-kotlin-compose-training-cupcake.git
$ cd basic-android-kotlin-compose-training-cupcake
$ git checkout starter
If you want to see the starter code for this codelab, view it on GitHub.
3. App walkthrough
The Cupcake app is a bit different than the apps you've worked with so far. Instead of all the content displaying on a single screen, the app has four separate screens, and the user can navigate through each screen while ordering cupcakes. If you run the app, you won't see anything and you won't be able to navigate between these screens since the navigation component is not added to the app code yet. However, you can still check the composable previews for each screen and match them with the final app screens below.
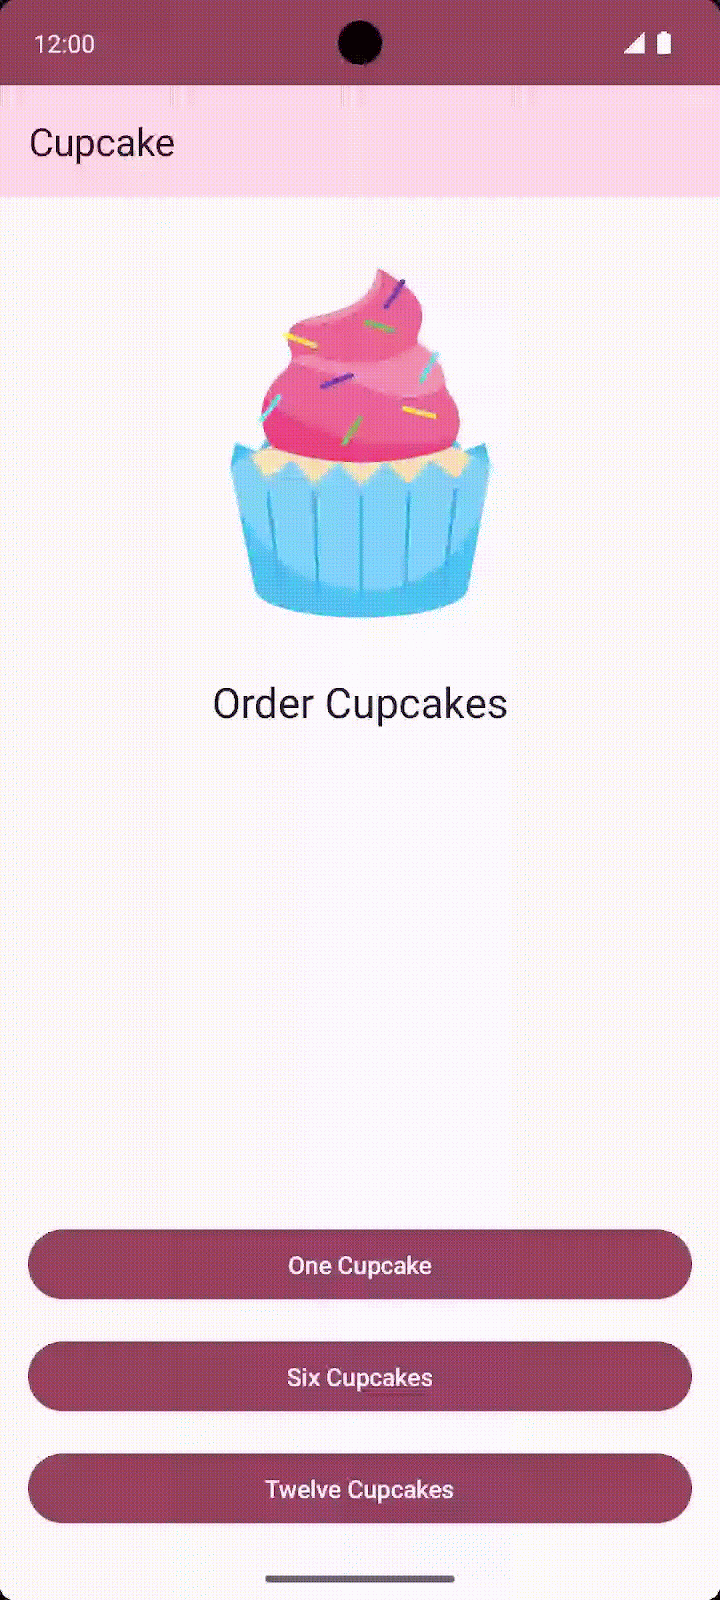
Start order screen
The first screen presents the user with three buttons that correspond to the quantity of cupcakes to order.
|
|
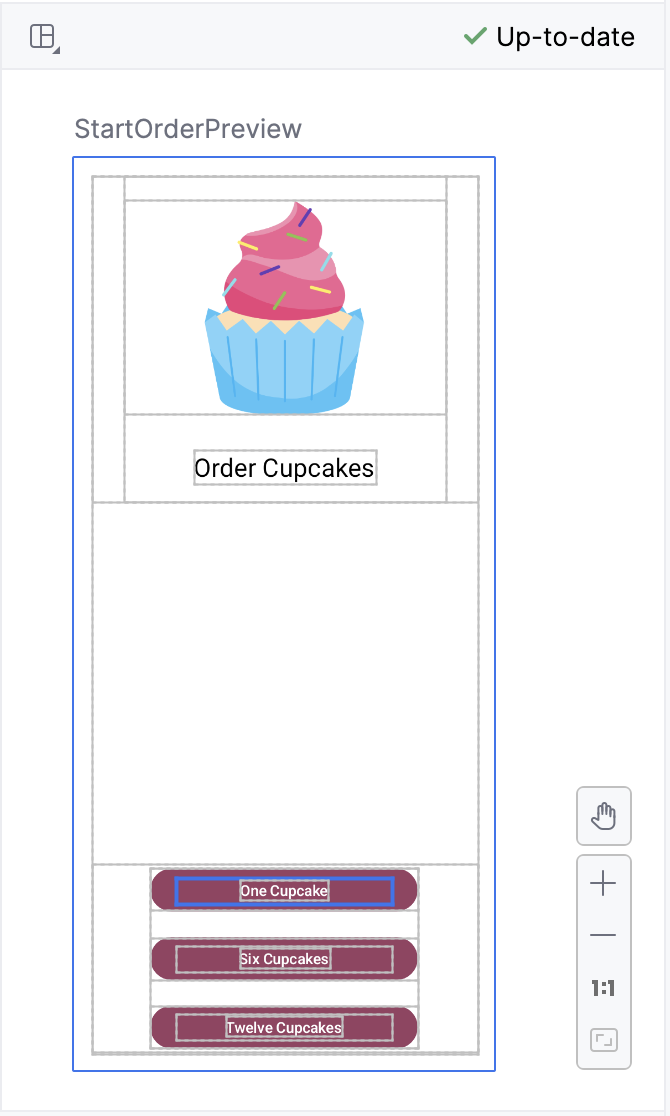
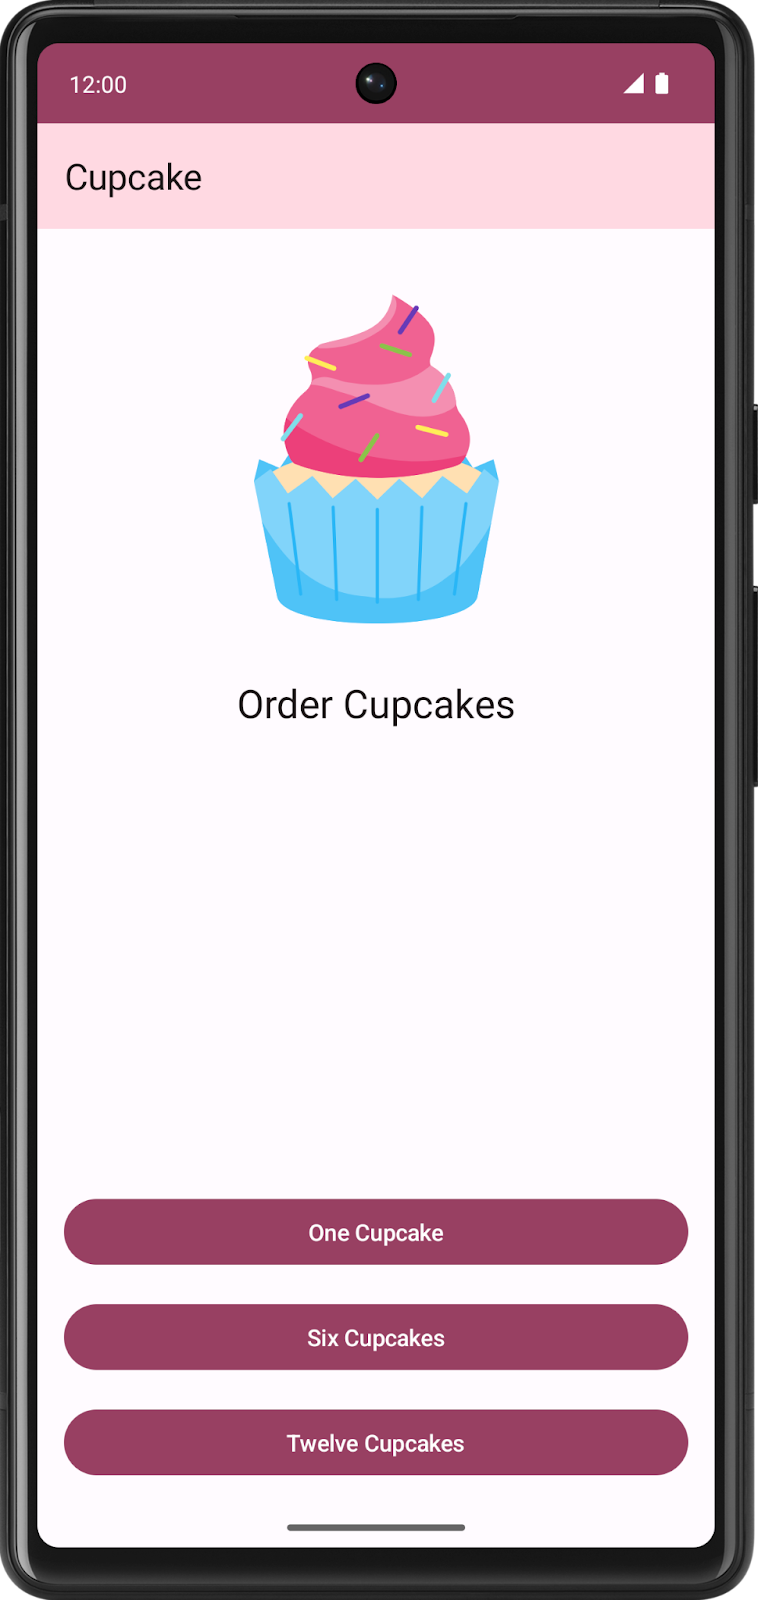
In code, this is represented by the StartOrderScreen composable in StartOrderScreen.kt.
The screen consists of a single column, with an image and text, along with three custom buttons to order different quantities of cupcakes. The custom buttons are implemented by the SelectQuantityButton composable, which is also in StartOrderScreen.kt.
Choose flavor screen
After selecting the quantity, the app prompts the user to select a cupcake flavor. The app uses what's known as radio buttons to display different options. Users can select one flavor out of a choice of possible flavors.
|
|
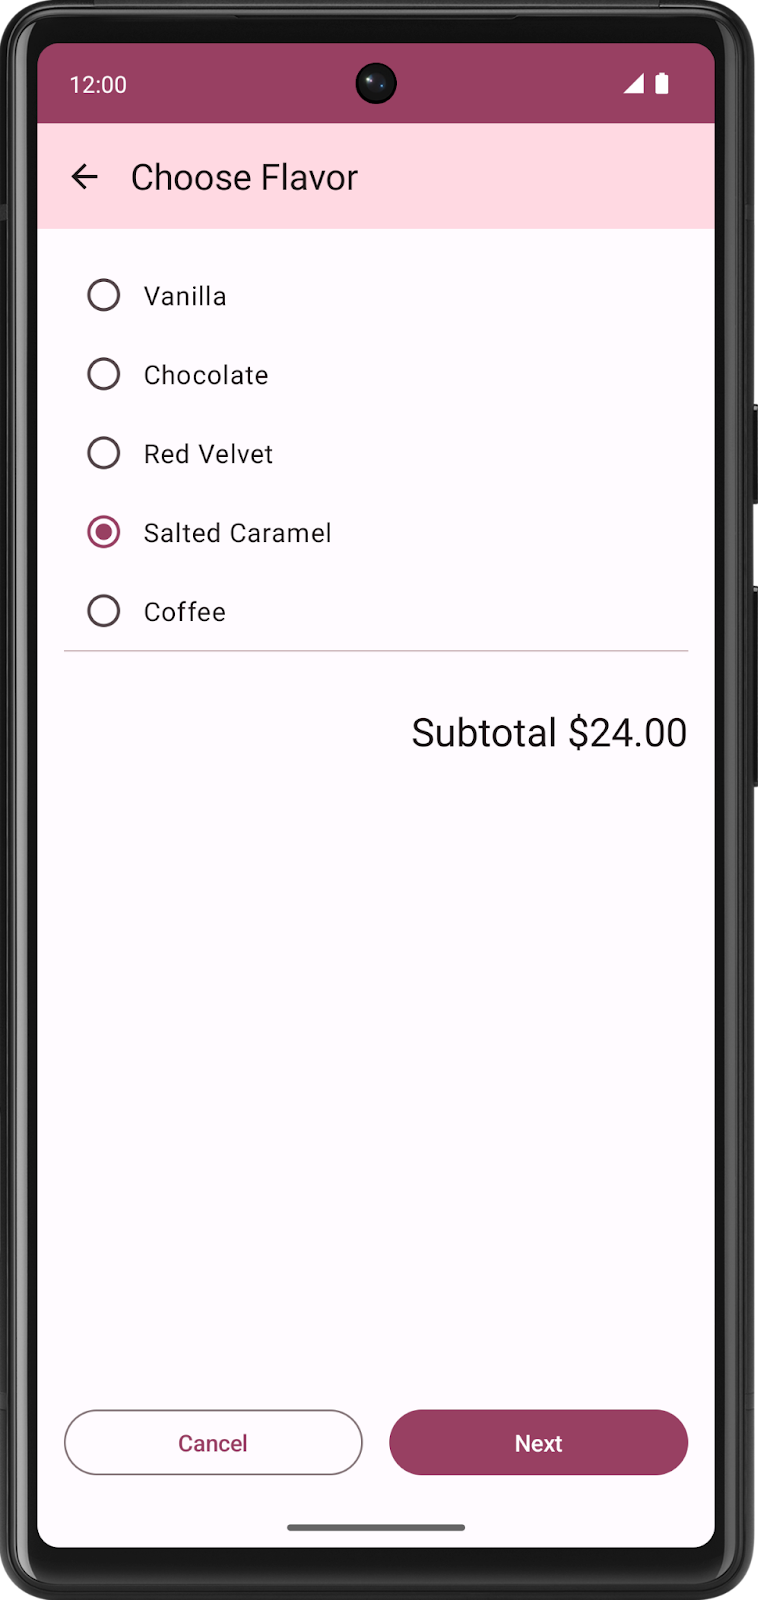
The list of possible flavors is stored as a list of string resource IDs in data.DataSource.kt.
Choose pickup date screen
After choosing a flavor, the app presents users with another series of radio buttons to select a pickup date. Pickup options come from a list returned by the pickupOptions() function in OrderViewModel.
|
|
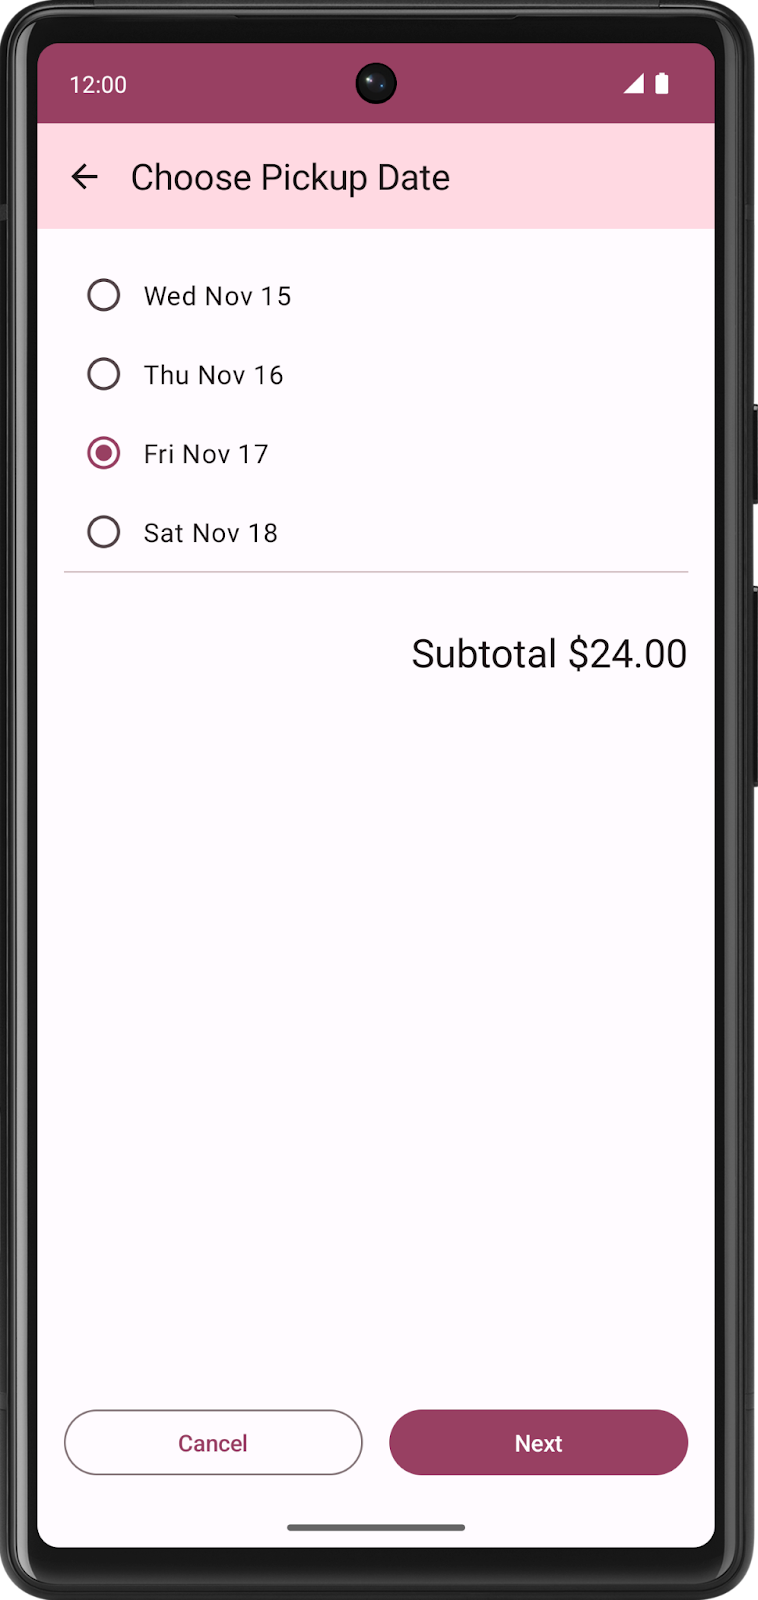
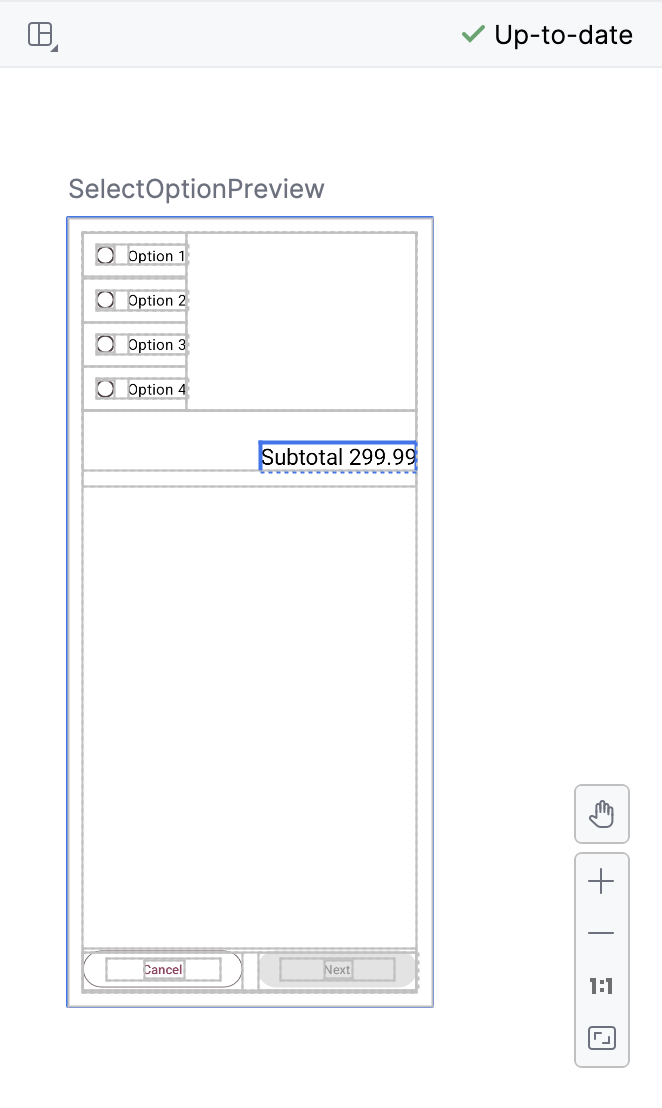
Both the Choose Flavor screen and Choose Pickup Date screen are represented by the same composable, SelectOptionScreen in SelectOptionScreen.kt. Why use the same composable? The layout of these screens is exactly the same! The only difference is the data, but you can use the same composable to display both the flavor and pickup date screens.
Order Summary screen
After selecting the pickup date, the app displays the Order Summary screen where the user can review and complete the order.
|
|
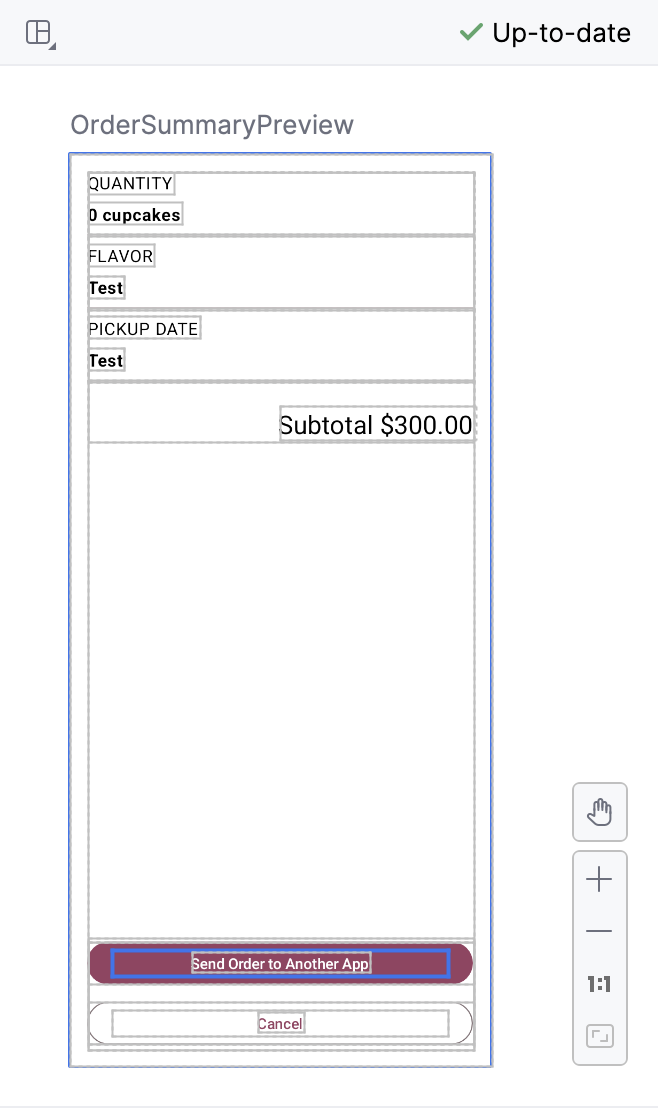
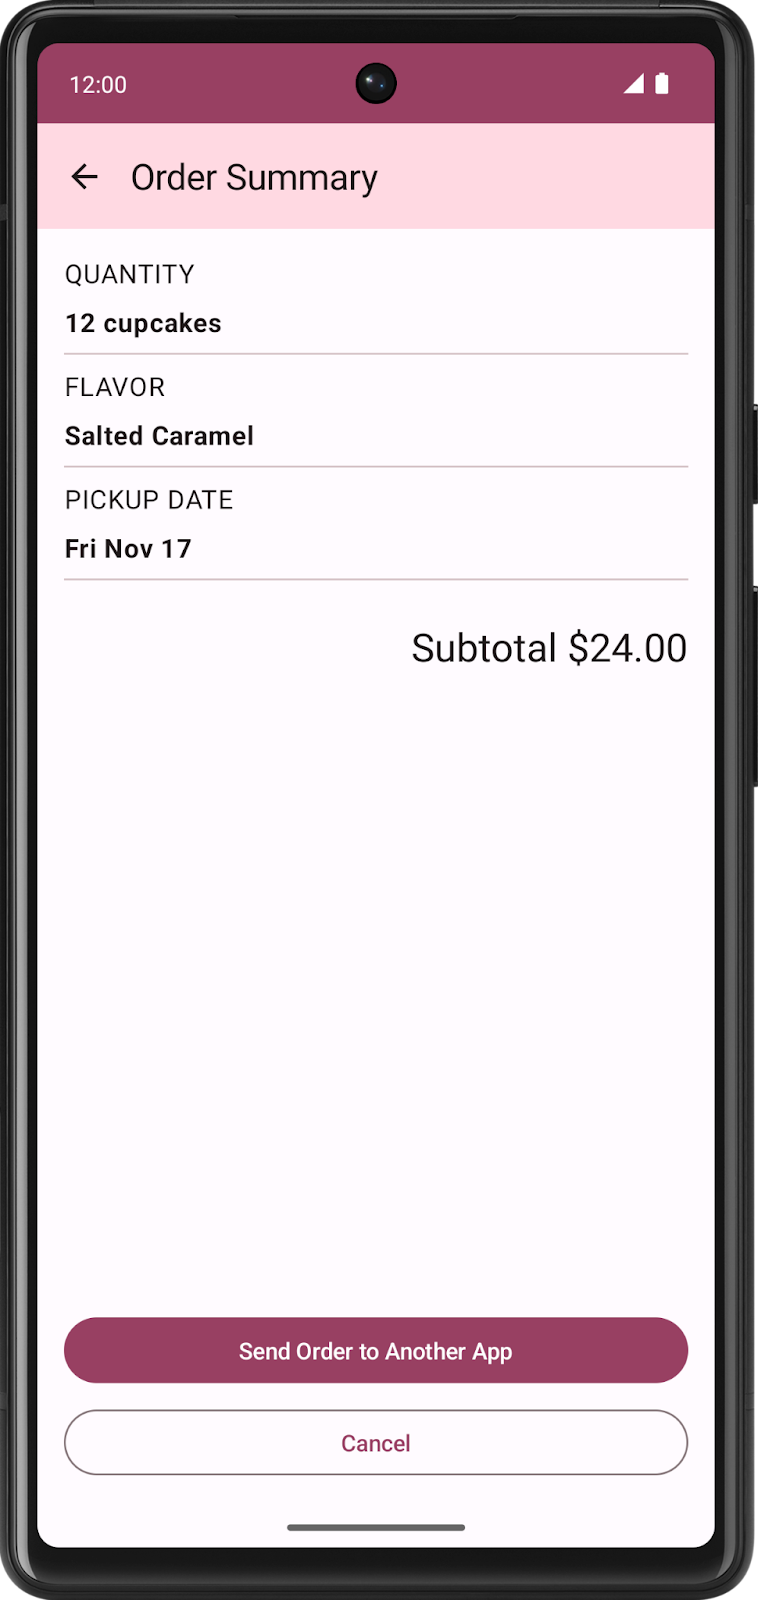
This screen is implemented by the OrderSummaryScreen composable in SummaryScreen.kt.
The layout consists of a Column containing all the information about their order, a Text composable for the subtotal, and buttons to either send the order to another app or cancel the order and return to the first screen.
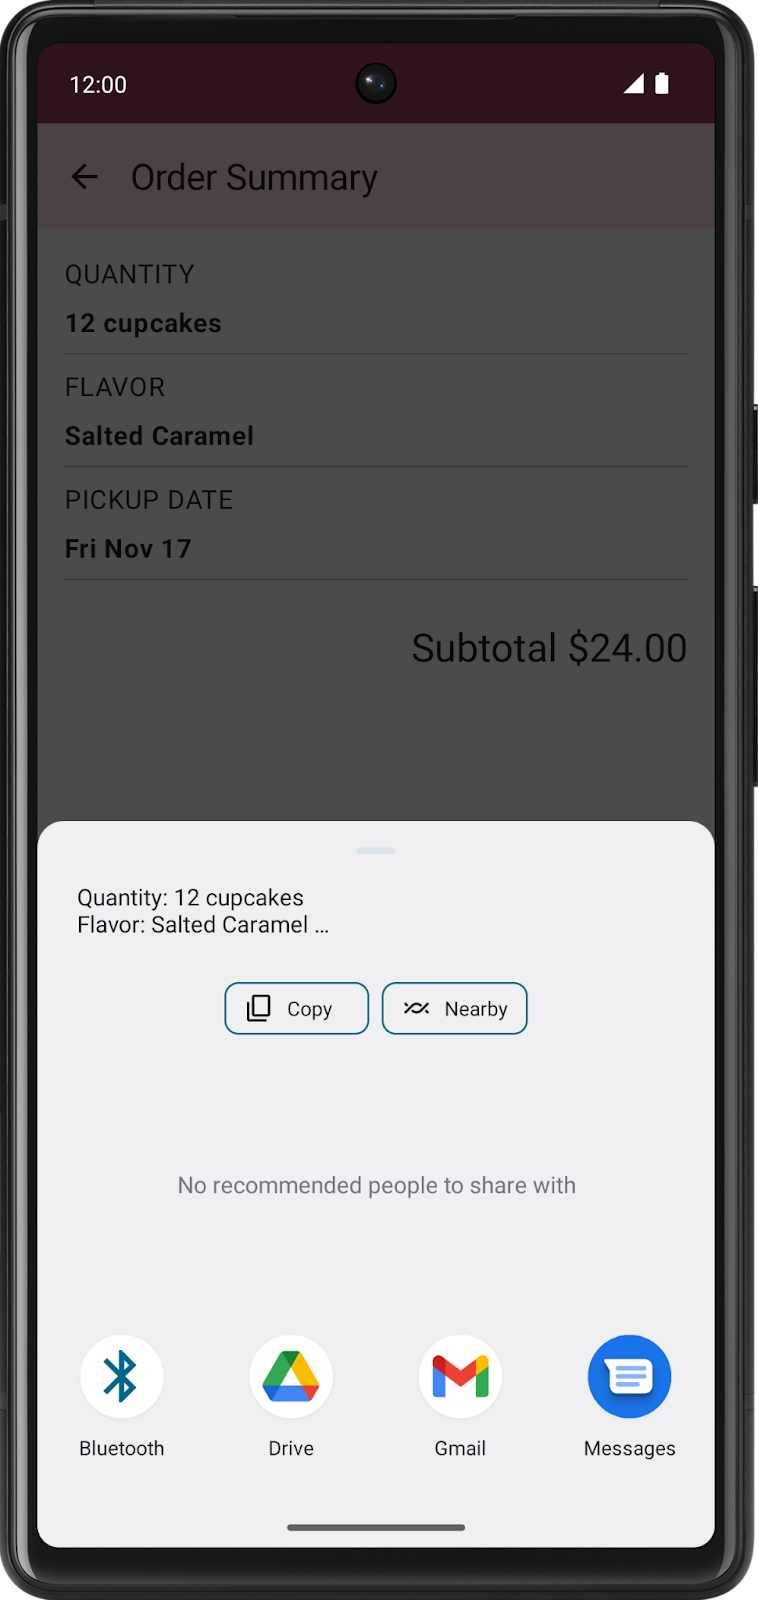
If users choose to send the order to another app, the Cupcake app displays an Android ShareSheet that shows different sharing options.
The current state of the app is stored in data.OrderUiState.kt. The OrderUiState data class contains properties to store the user's selections from each screen.
The screens of the app will be presented in the CupcakeApp composable. However, in the starter project, the app simply shows the first screen. It's not currently possible to navigate through all the screens of the app, but don't worry, that's what you're here for! You'll learn how to define navigation routes, set up a NavHost composable to navigate between screens—also known as destinations—perform intents to integrate with system UI components like the share screen, and make the AppBar respond to navigation changes.
Reusable composables
Where appropriate, the sample apps in this course are designed to implement best practices. The Cupcake app is no exception. In the ui.components package, you'll see a file named CommonUi.kt that contains a FormattedPriceLabel composable. Multiple screens in the app use this composable to format the order price consistently. Rather than duplicate the same Text composable with the same formatting and modifiers, you can define FormattedPriceLabel once and then reuse it as many times as needed for other screens.
The flavor and pickup date screens use the SelectOptionScreen composable, which is also reusable. This composable takes a parameter named options of the type List<String> that represents the options to display. The options appear in a Row, consisting of a RadioButton composable and a Text composable containing each string. A Column surrounds the entire layout and also contains a Text composable to show the formatted price, a Cancel button, and a Next button.
4. Define routes and create a NavHostController
Parts of the Navigation Component
The Navigation component has three main parts:
- NavController: Responsible for navigating between destinations—that is, the screens in your app.
- NavGraph: Maps composable destinations to navigate to.
- NavHost: Composable acting as a container for displaying the current destination of the NavGraph.
In this codelab, you'll focus on the NavController and the NavHost. Within the NavHost, you'll define the destinations for the Cupcake app's NavGraph.
Define routes for destinations in your app
One of the fundamental concepts of navigation in a Compose app is the route. A route is a string that corresponds to a destination. This idea is similar to the concept of a URL. Just as a different URL maps to a different page on a website, a route is a string that maps to a destination and serves as its unique identifier. A destination is typically a single Composable or group of Composables corresponding to what the user sees. The Cupcake app needs destinations for the start order screen, the flavor screen, the pickup date screen, and the order summary screen.
There are a finite number of screens in an app, so there are also a finite number of routes. You can define an app's routes using an enum class. Enum classes in Kotlin have a name property that returns a string with the property name.
You'll start by defining the four routes of the Cupcake app.
Start: Select the quantity of cupcakes from one of three buttons.Flavor: Select the flavor from a list of choices.Pickup: Select the pickup date from a list of choices.Summary: Review the selections and either send or cancel the order.
Add an enum class to define the routes.
- In
CupcakeScreen.kt, above theCupcakeAppBarcomposable, add an enum class namedCupcakeScreen.
enum class CupcakeScreen() {

}
- Add four cases to the enum class:
Start,Flavor,Pickup, andSummary.
enum class CupcakeScreen() {
    Start,
    Flavor,
    Pickup,
    Summary
}
Add a NavHost to your app
A NavHost is a Composable that displays other composable destinations, based on a given route. For example, if the route is Flavor, then the NavHost would show the screen to choose the cupcake flavor. If the route is Summary, then the app displays the summary screen.
The syntax for NavHost is just like any other Composable.

There are two notable parameters.
navController: An instance of theNavHostControllerclass. You can use this object to navigate between screens, for example, by calling thenavigate()method to navigate to another destination. You can obtain theNavHostControllerby callingrememberNavController()from a composable function.startDestination: A string route defining the destination shown by default when the app first displays theNavHost. In the case of the Cupcake app, this should be theStartroute.
Like other composables, NavHost also takes a modifier parameter.
You'll add a NavHost to the CupcakeApp composable in CupcakeScreen.kt. First, you need a reference to the navigation controller. You can use the navigation controller in both the NavHost you're adding now and the AppBar you'll add in a later step. Therefore, you should declare the variable in the CupcakeApp() composable.
- Open
CupcakeScreen.kt. - Within the
Scaffold, below theuiStatevariable, add aNavHostcomposable.
import androidx.navigation.compose.NavHost

Scaffold(
    ...
) { innerPadding ->
    val uiState by viewModel.uiState.collectAsState()

    NavHost()
}
- Pass in the
navControllervariable for thenavControllerparameter andCupcakeScreen.Start.namefor thestartDestinationparameter. Pass the modifier that was passed intoCupcakeApp()for the modifier parameter. Pass in an empty trailing lambda for the final parameter.
import androidx.compose.foundation.layout.padding

NavHost(
    navController = navController,
    startDestination = CupcakeScreen.Start.name,
    modifier = Modifier.padding(innerPadding)
) {

}
Handle routes in your NavHost
Like other composables, NavHost takes a function type for its content.
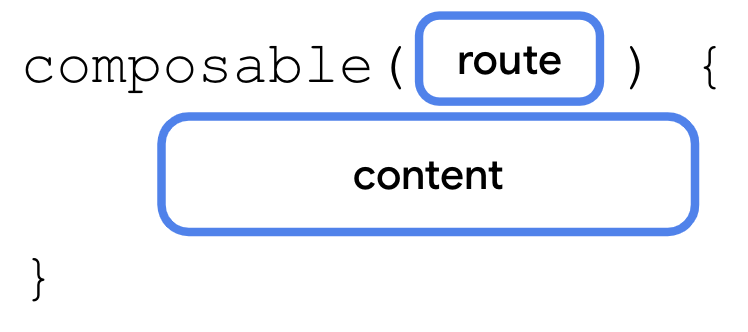
Within the content function of a NavHost, you call the composable() function. The composable() function has two required parameters.
route: A string corresponding to the name of a route. This can be any unique string. You'll use the name property of theCupcakeScreenenum's constants.content: Here you can call a composable that you want to display for the given route.
You'll call the composable() function once for each of the four routes.
- Call the
composable()function, passing inCupcakeScreen.Start.namefor theroute.
import androidx.navigation.compose.composable

NavHost(
    navController = navController,
    startDestination = CupcakeScreen.Start.name,
    modifier = Modifier.padding(innerPadding)
) {
    composable(route = CupcakeScreen.Start.name) {

    }
}
- Within the trailing lambda, call the
StartOrderScreencomposable, passing inquantityOptionsfor thequantityOptionsproperty. For themodifierpass inModifier.fillMaxSize().padding(dimensionResource(R.dimen.padding_medium))
import androidx.compose.foundation.layout.fillMaxSize
import androidx.compose.ui.res.dimensionResource
import com.example.cupcake.ui.StartOrderScreen
import com.example.cupcake.data.DataSource

NavHost(
    navController = navController,
    startDestination = CupcakeScreen.Start.name,
    modifier = Modifier.padding(innerPadding)
) {
    composable(route = CupcakeScreen.Start.name) {
        StartOrderScreen(
            quantityOptions = DataSource.quantityOptions,
            modifier = Modifier
                .fillMaxSize()
                .padding(dimensionResource(R.dimen.padding_medium))
        )
    }
}
- Below the first call to
composable(), callcomposable()again, passing inCupcakeScreen.Flavor.namefor theroute.
composable(route = CupcakeScreen.Flavor.name) {

}
- Within the trailing lambda, get a reference to
LocalContext.currentand store it in a variable namedcontext.Contextis an abstract class whose implementation is provided by the Android system. It allows access to application-specific resources and classes, as well as up-calls for application-level operations such as launching activities, etc. You can use this variable to get the strings from the list of resource IDs in the view model to display the list of flavors.
import androidx.compose.ui.platform.LocalContext

composable(route = CupcakeScreen.Flavor.name) {
    val context = LocalContext.current
}
- Call the
SelectOptionScreencomposable.
composable(route = CupcakeScreen.Flavor.name) {
    val context = LocalContext.current
    SelectOptionScreen(

    )
}
- The flavor screen needs to display and update the subtotal when the user selects a flavor. Pass in
uiState.pricefor thesubtotalparameter.
composable(route = CupcakeScreen.Flavor.name) {
    val context = LocalContext.current
    SelectOptionScreen(
        subtotal = uiState.price
    )
}
- The flavor screen gets the list of flavors from the app's string resources. Transform the list of resource IDs into a list of strings using the
map()function and callingcontext.resources.getString(id)for each flavor.
import com.example.cupcake.ui.SelectOptionScreen

composable(route = CupcakeScreen.Flavor.name) {
    val context = LocalContext.current
    SelectOptionScreen(
        subtotal = uiState.price,
        options = DataSource.flavors.map { id -> context.resources.getString(id) }
    )
}
- For the
onSelectionChangedparameter, pass in a lambda expression that callssetFlavor()on the view model, passing init(the argument passed intoonSelectionChanged()). For themodifierparameter, pass inModifier.fillMaxHeight().
import androidx.compose.foundation.layout.fillMaxHeight
import com.example.cupcake.data.DataSource.flavors

composable(route = CupcakeScreen.Flavor.name) {
    val context = LocalContext.current
    SelectOptionScreen(
        subtotal = uiState.price,
        options = DataSource.flavors.map { id -> context.resources.getString(id) },
        onSelectionChanged = { viewModel.setFlavor(it) },
        modifier = Modifier.fillMaxHeight()
    )
}
The pickup date screen. is similar to the flavor screen. The only difference is the data passed into the SelectOptionScreen composable.
- Call the
composable()function again, passing inCupcakeScreen.Pickup.namefor therouteparameter.
composable(route = CupcakeScreen.Pickup.name) {

}
- In the trailing lambda, call the
SelectOptionScreencomposable and pass inuiState.pricefor thesubtotal, as before. Pass inuiState.pickupOptionsfor theoptionsparameter and a lambda expression that callssetDate()on theviewModelfor theonSelectionChangedparameter. For themodifierparameter, pass inModifier.fillMaxHeight().
SelectOptionScreen(
    subtotal = uiState.price,
    options = uiState.pickupOptions,
    onSelectionChanged = { viewModel.setDate(it) },
    modifier = Modifier.fillMaxHeight()
)
- Call
composable()one more time, passing inCupcakeScreen.Summary.namefor theroute.
composable(route = CupcakeScreen.Summary.name) {

}
- In the trailing lambda, call the
OrderSummaryScreen()composable, passing in theuiStatevariable for theorderUiStateparameter. For themodifierparameter, pass inModifier.fillMaxHeight().
import com.example.cupcake.ui.OrderSummaryScreen

composable(route = CupcakeScreen.Summary.name) {
    OrderSummaryScreen(
        orderUiState = uiState,
        modifier = Modifier.fillMaxHeight()
    )
}
That's it for setting up the NavHost. In the next section, you'll make your app change routes and navigate between screens when the user taps each of the buttons.
5. Navigate between routes
Now that you've defined your routes and mapped them to composables in a NavHost, it's time to navigate between screens. The NavHostController—the navController property from calling rememberNavController()—is responsible for navigating between routes. Notice, however, that this property is defined in the CupcakeApp composable. You need a way to access it from the different screens in your app.
Easy, right? Just pass the navController as a parameter to each of the composables.
While this approach works, it's not an ideal way to architect your app. A benefit of using a NavHost to handle your app's navigation is that navigation logic is kept separate from individual UI. This option avoids some of the major drawbacks of passing the navController as a parameter.
- Navigation logic is kept in one place, which can make your code easier to maintain and prevent bugs by not accidentally giving individual screens free reign of navigation in your app.
- In apps that need to work on different form factors (like portrait mode phone, foldable phone, or large screen tablet), a button may or may not trigger navigation, depending on the app's layout. Individual screens should be self-contained and don't need to be aware of other screens in the app.
Instead, our approach is to pass a function type into each composable for what should happen when a user clicks the button. That way, the composable and any of its child composables decide when to call the function. However, navigation logic isn't exposed to the individual screens in your app. All the navigation behavior is handled in the NavHost.
Add button handlers to StartOrderScreen
You'll start by adding a function type parameter that is called when one of the quantity buttons is pressed on the first screen. This function is passed into the StartOrderScreen composable and is responsible for updating the viewmodel and navigating to the next screen.
- Open
StartOrderScreen.kt. - Below the
quantityOptionsparameter, and before the modifier parameter, add a parameter namedonNextButtonClickedof type() -> Unit.
@Composable
fun StartOrderScreen(
    quantityOptions: List<Pair<Int, Int>>,
    onNextButtonClicked: () -> Unit,
    modifier: Modifier = Modifier
){
    ...
}
- Now that the
StartOrderScreencomposable expects a value foronNextButtonClicked, find theStartOrderPreviewand pass an empty lambda body to theonNextButtonClickedparameter.
@Preview
@Composable
fun StartOrderPreview() {
    CupcakeTheme {
        StartOrderScreen(
            quantityOptions = DataSource.quantityOptions,
            onNextButtonClicked = {},
            modifier = Modifier
                .fillMaxSize()
                .padding(dimensionResource(R.dimen.padding_medium))
        )
    }
}
Each button corresponds to a different quantity of cupcakes. You'll need this information so that the function passed in for onNextButtonClicked can update the viewmodel accordingly.
- Modify the
onNextButtonClickedparameter's type to take anIntparameter.
onNextButtonClicked: (Int) -> Unit,
To get the Int to pass in when calling onNextButtonClicked(), take a look at the type of quantityOptions parameter.
The type is List<Pair<Int, Int>> or a list of Pair<Int, Int>. The Pair type may be unfamiliar to you, but it's just as the name suggests, a pair of values. Pair takes two generic type parameters. In this case, they're both of type Int.

Each item in a pair is accessed by either the first property or second property. In the case of the StartOrderScreen composable's quantityOptions parameter, the first Int is a resource ID for the string to display on each button. The second Int is the actual quantity of cupcakes.
We'll pass the second property of the selected pair when calling the onNextButtonClicked() function.
- Find the empty lambda expression for the
onClickparameter of theSelectQuantityButton.
quantityOptions.forEach { item ->
    SelectQuantityButton(
        labelResourceId = item.first,
        onClick = {}
    )
}
- Within the lambda expression, call
onNextButtonClicked, passing initem.second—the number of cupcakes.
quantityOptions.forEach { item ->
    SelectQuantityButton(
        labelResourceId = item.first,
        onClick = { onNextButtonClicked(item.second) }
    )
}
Add button handlers to SelectOptionScreen
- Below the
onSelectionChangedparameter of theSelectOptionScreencomposable inSelectOptionScreen.kt, add a parameter namedonCancelButtonClickedof type() -> Unitwith a default value of{}.
@Composable
fun SelectOptionScreen(
    subtotal: String,
    options: List<String>,
    onSelectionChanged: (String) -> Unit = {},
    onCancelButtonClicked: () -> Unit = {},
    modifier: Modifier = Modifier
)
- Below the
onCancelButtonClickedparameter, add another parameter of type() -> UnitnamedonNextButtonClickedwith a default value of{}.
@Composable
fun SelectOptionScreen(
    subtotal: String,
    options: List<String>,
    onSelectionChanged: (String) -> Unit = {},
    onCancelButtonClicked: () -> Unit = {},
    onNextButtonClicked: () -> Unit = {},
    modifier: Modifier = Modifier
)
- Pass in
onCancelButtonClickedfor the cancel button'sonClickparameter.
OutlinedButton(
    modifier = Modifier.weight(1f),
    onClick = onCancelButtonClicked
) {
    Text(stringResource(R.string.cancel))
}
- Pass in
onNextButtonClickedfor the next button'sonClickparameter.
Button(
    modifier = Modifier.weight(1f),
    enabled = selectedValue.isNotEmpty(),
    onClick = onNextButtonClicked
) {
    Text(stringResource(R.string.next))
}
Add button handlers to SummaryScreen
Finally, add button handler functions for the Cancel and Send buttons on the summary screen.
- In the
OrderSummaryScreencomposable inSummaryScreen.kt, add a parameter namedonCancelButtonClickedof type() -> Unit.
@Composable
fun OrderSummaryScreen(
    orderUiState: OrderUiState,
    onCancelButtonClicked: () -> Unit,
    modifier: Modifier = Modifier
){
    ...
}
- Add another parameter of type
(String, String) -> Unitand name this oneonSendButtonClicked.
@Composable
fun OrderSummaryScreen(
    orderUiState: OrderUiState,
    onCancelButtonClicked: () -> Unit,
    onSendButtonClicked: (String, String) -> Unit,
    modifier: Modifier = Modifier
){
    ...
}
- The
OrderSummaryScreencomposable now expects values foronSendButtonClickedandonCancelButtonClicked. Find theOrderSummaryPreview, pass an empty lambda body with twoStringparameters toonSendButtonClickedand an empty lambda body to theonCancelButtonClickedparameters.
@Preview
@Composable
fun OrderSummaryPreview() {
   CupcakeTheme {
       OrderSummaryScreen(
           orderUiState = OrderUiState(0, "Test", "Test", "$300.00"),
           onSendButtonClicked = { subject: String, summary: String -> },
           onCancelButtonClicked = {},
           modifier = Modifier.fillMaxHeight()
       )
   }
}
- Pass
onSendButtonClickedfor theonClickparameter of the Send button. Pass innewOrderandorderSummary, the two variables defined earlier inOrderSummaryScreen. These strings consist of the actual data that the user can share with another app.
Button(
    modifier = Modifier.fillMaxWidth(),
    onClick = { onSendButtonClicked(newOrder, orderSummary) }
) {
    Text(stringResource(R.string.send))
}
- Pass
onCancelButtonClickedfor theonClickparameter of the Cancel button.
OutlinedButton(
    modifier = Modifier.fillMaxWidth(),
    onClick = onCancelButtonClicked
) {
    Text(stringResource(R.string.cancel))
}
Navigate to another route
To navigate to another route, simply call the navigate() method on your instance of NavHostController.

The navigate method takes a single parameter: a String corresponding to a route defined in your NavHost. If the route matches one of the calls to composable() in the NavHost, the app then navigates to that screen.
You'll pass in functions that call navigate() when the user presses buttons on the Start, Flavor, and Pickup screens.
- In
CupcakeScreen.kt, find the call tocomposable()for the start screen. For theonNextButtonClickedparameter, pass in a lambda expression.
StartOrderScreen(
    quantityOptions = DataSource.quantityOptions,
    onNextButtonClicked = {
    }
)
Remember the Int property passed into this function for the number of cupcakes? Before navigating to the next screen, you should update the view model so that the app displays the correct subtotal.
- Call
setQuantityon theviewModel, passing init.
onNextButtonClicked = {
    viewModel.setQuantity(it)
}
- Call
navigate()on thenavController, passing inCupcakeScreen.Flavor.namefor theroute.
onNextButtonClicked = {
    viewModel.setQuantity(it)
    navController.navigate(CupcakeScreen.Flavor.name)
}
- For the
onNextButtonClickedparameter on the flavor screen, simply pass in a lambda that callsnavigate(), passing inCupcakeScreen.Pickup.namefor theroute.
composable(route = CupcakeScreen.Flavor.name) {
    val context = LocalContext.current
    SelectOptionScreen(
        subtotal = uiState.price,
        onNextButtonClicked = { navController.navigate(CupcakeScreen.Pickup.name) },
        options = DataSource.flavors.map { id -> context.resources.getString(id) },
        onSelectionChanged = { viewModel.setFlavor(it) },
        modifier = Modifier.fillMaxHeight()
    )
}
- Pass in an empty lambda for
onCancelButtonClicked, which you implement next.
SelectOptionScreen(
    subtotal = uiState.price,
    onNextButtonClicked = { navController.navigate(CupcakeScreen.Pickup.name) },
    onCancelButtonClicked = {},
    options = DataSource.flavors.map { id -> context.resources.getString(id) },
    onSelectionChanged = { viewModel.setFlavor(it) },
    modifier = Modifier.fillMaxHeight()
)
- For the
onNextButtonClickedparameter on the pickup screen, pass in a lambda that callsnavigate(), passing inCupcakeScreen.Summary.namefor theroute.
composable(route = CupcakeScreen.Pickup.name) {
    SelectOptionScreen(
        subtotal = uiState.price,
        onNextButtonClicked = { navController.navigate(CupcakeScreen.Summary.name) },
        options = uiState.pickupOptions,
        onSelectionChanged = { viewModel.setDate(it) },
        modifier = Modifier.fillMaxHeight()
    )
}
- Again, pass in an empty lambda for
onCancelButtonClicked().
SelectOptionScreen(
    subtotal = uiState.price,
    onNextButtonClicked = { navController.navigate(CupcakeScreen.Summary.name) },
    onCancelButtonClicked = {},
    options = uiState.pickupOptions,
    onSelectionChanged = { viewModel.setDate(it) },
    modifier = Modifier.fillMaxHeight()
)
- For the
OrderSummaryScreen, pass in empty lambdas foronCancelButtonClickedandonSendButtonClicked. Add parameters for thesubjectandsummarythat are passed intoonSendButtonClicked, which you will implement soon.
composable(route = CupcakeScreen.Summary.name) {
    OrderSummaryScreen(
        orderUiState = uiState,
        onCancelButtonClicked = {},
        onSendButtonClicked = { subject: String, summary: String ->

        },
        modifier = Modifier.fillMaxHeight()
    )
}
You should now be able to navigate through each screen of your app. Notice that by calling navigate(), not only does the screen change, but it's actually placed on top of the back stack. Also, when you press the system back button, you can navigate back to the previous screen.
The app stacks each screen on top of the previous one, and the back button (  ) can remove them. The history of screens from the
 startDestination at the bottom to the topmost screen that was just shown is known as the back stack.
Pop to the start screen
Unlike the system back button, the Cancel button doesn't go back to the previous screen. Instead, it should pop—remove—all screens from the back stack and return to the starting screen.
You can do this by calling the popBackStack() method.

The popBackStack() method has two required parameters.
route: The string representing the route of the destination you want to navigate back to.inclusive: A Boolean value that, if true, also pops (removes) the specified route. If false,popBackStack()will remove all destinations on top of—but not including—the start destination, leaving it as the topmost screen visible to the user.
When users press the Cancel button on any of the screens, the app resets the state in the view model and calls popBackStack(). You'll first implement a method to do this and then pass it in for the appropriate parameter on all three screens with Cancel buttons.
- After the
CupcakeApp()function, define a private function calledcancelOrderAndNavigateToStart().
private fun cancelOrderAndNavigateToStart() {
}
- Add two parameters:
viewModelof typeOrderViewModel, andnavControllerof typeNavHostController.
private fun cancelOrderAndNavigateToStart(
    viewModel: OrderViewModel,
    navController: NavHostController
) {
}
- In the function body, call
resetOrder()on theviewModel.
private fun cancelOrderAndNavigateToStart(
    viewModel: OrderViewModel,
    navController: NavHostController
) {
    viewModel.resetOrder()
}
- Call
popBackStack()on thenavController, passing inCupcakeScreen.Start.namefor theroute, andfalseforinclusive.
private fun cancelOrderAndNavigateToStart(
    viewModel: OrderViewModel,
    navController: NavHostController
) {
    viewModel.resetOrder()
    navController.popBackStack(CupcakeScreen.Start.name, inclusive = false)
}
- In the
CupcakeApp()composable, passcancelOrderAndNavigateToStartin for theonCancelButtonClickedparameters of the twoSelectOptionScreencomposables and theOrderSummaryScreencomposable.
composable(route = CupcakeScreen.Start.name) {
    StartOrderScreen(
        quantityOptions = DataSource.quantityOptions,
        onNextButtonClicked = {
            viewModel.setQuantity(it)
            navController.navigate(CupcakeScreen.Flavor.name)
        },
        modifier = Modifier
            .fillMaxSize()
            .padding(dimensionResource(R.dimen.padding_medium))
    )
}
composable(route = CupcakeScreen.Flavor.name) {
    val context = LocalContext.current
    SelectOptionScreen(
        subtotal = uiState.price,
        onNextButtonClicked = { navController.navigate(CupcakeScreen.Pickup.name) },
        onCancelButtonClicked = {
            cancelOrderAndNavigateToStart(viewModel, navController)
        },
        options = DataSource.flavors.map { id -> context.resources.getString(id) },
        onSelectionChanged = { viewModel.setFlavor(it) },
        modifier = Modifier.fillMaxHeight()
    )
}
composable(route = CupcakeScreen.Pickup.name) {
    SelectOptionScreen(
        subtotal = uiState.price,
        onNextButtonClicked = { navController.navigate(CupcakeScreen.Summary.name) },
        onCancelButtonClicked = {
            cancelOrderAndNavigateToStart(viewModel, navController)
        },
        options = uiState.pickupOptions,
        onSelectionChanged = { viewModel.setDate(it) },
        modifier = Modifier.fillMaxHeight()
    )
}
composable(route = CupcakeScreen.Summary.name) {
    OrderSummaryScreen(
        orderUiState = uiState,
        onCancelButtonClicked = {
            cancelOrderAndNavigateToStart(viewModel, navController)
        },
        onSendButtonClicked = { subject: String, summary: String ->

        },
        modifier = Modifier.fillMaxHeight()
   )
}
- Run your app and test that pressing the Cancel button on any of the screens navigates the user back to the first screen.
6. Navigate to another app
So far, you've learned how to navigate to a different screen in your app and how to navigate back to the home screen. There's just one other step to implement navigation in the Cupcake app. On the order summary screen, the user can send their order to another app. This selection brings up a ShareSheet—a user interface component that covers the bottom part of the screen—that shows sharing options.
This piece of UI isn't part of the Cupcake app. In fact, it's provided by the Android operating system. System UI, such as the sharing screen, isn't called by your navController. Instead, you use something called an Intent.
An intent is a request for the system to perform some action, commonly presenting a new activity. There are many different intents, and you're encouraged to refer to the documentation for a comprehensive list. However, we are interested in the one called ACTION_SEND. You can supply this intent with some data, such as a string, and present appropriate sharing actions for that data.
The basic process for setting up an intent is as follows:
- Create an intent object and specify the intent, such as
ACTION_SEND. - Specify the type of additional data being sent with the intent. For a simple piece of text, you can use
"text/plain", though other types, such as"image/*"or"video/*", are available. - Pass any additional data to the intent, such as the text or image to share, by calling the
putExtra()method. This intent will take two extras:EXTRA_SUBJECTandEXTRA_TEXT. - Call the
startActivity()method of context, passing in an activity created from the intent.
We'll walk you through how to create the share action intent, but the process is the same for other types of intents. For future projects, you're encouraged to refer to the documentation as needed for the specific type of data and necessary extras.
Complete the following steps to create an intent to send the cupcake order to another app:
- In CupcakeScreen.kt, below the
CupcakeAppcomposable, create a private function namedshareOrder().
private fun shareOrder()
- Add a parameter named
contextof typeContext.
import android.content.Context

private fun shareOrder(context: Context) {
}
- Add two
Stringparameters:subjectandsummary. These strings will be shown on the sharing action sheet.
private fun shareOrder(context: Context, subject: String, summary: String) {
}
- Within the function's body, create an Intent named
intent, and passIntent.ACTION_SENDas an argument.
import android.content.Intent

val intent = Intent(Intent.ACTION_SEND)
Since you only need to configure this Intent object once, you can make the next few lines of code more concise using the apply() function, which you learned about in an earlier codelab.
- Call
apply()on the newly created Intent and pass in a lambda expression.
val intent = Intent(Intent.ACTION_SEND).apply {

}
- In the lambda body, set the type to
"text/plain". Because you're doing this in a function passed intoapply(), you don't need to refer to the object's identifier,intent.
val intent = Intent(Intent.ACTION_SEND).apply {
    type = "text/plain"
}
- Call
putExtra(), passing in subject forEXTRA_SUBJECT.
val intent = Intent(Intent.ACTION_SEND).apply {
    type = "text/plain"
    putExtra(Intent.EXTRA_SUBJECT, subject)
}
- Call
putExtra(), passing in summary forEXTRA_TEXT.
val intent = Intent(Intent.ACTION_SEND).apply {
    type = "text/plain"
    putExtra(Intent.EXTRA_SUBJECT, subject)
    putExtra(Intent.EXTRA_TEXT, summary)
}
- Call
startActivity()method of context.
context.startActivity(

)
- Within the lambda passed into
startActivity(), create an activity from the Intent by calling the class methodcreateChooser(). Pass intent for the first argument and thenew_cupcake_orderstring resource.
context.startActivity(
    Intent.createChooser(
        intent,
        context.getString(R.string.new_cupcake_order)
    )
)
- In the
CupcakeAppcomposable, in the call tocomposable()for theCucpakeScreen.Summary.name, get a reference to the context object so that you can pass it to theshareOrder()function.
composable(route = CupcakeScreen.Summary.name) {
    val context = LocalContext.current

    ...
}
- In the lambda body of
onSendButtonClicked(), callshareOrder(), passing in thecontext,subject, andsummaryas arguments.
onSendButtonClicked = { subject: String, summary: String ->
    shareOrder(context, subject = subject, summary = summary)
}
- Run your app and navigate through the screens.
When you click Send Order to Another App, you should see sharing actions such as Messaging and Bluetooth on the bottom sheet, along with the subject and summary you provided as extras.
7. Make the app bar respond to navigation
Even though your app functions and can navigate to and from every screen, there's still something missing from the screenshots at the start of this codelab. The app bar does not automatically respond to navigation. The title doesn't update when the app navigates to a new route nor does it display the Up button before the title when appropriate.
The starter code includes a composable to manage the AppBar named CupcakeAppBar. Now that you have implemented navigation in the app, you can use the information from the back stack to display the correct title and show the Up button if appropriate. The CupcakeAppBar composable should be aware of the current screen so that the title updates appropriately.
- In the
CupcakeScreenenum in CupcakeScreen.kt add a parameter of typeIntnamedtitleusing the@StringResannotation.
import androidx.annotation.StringRes

enum class CupcakeScreen(@StringRes val title: Int) {
    Start,
    Flavor,
    Pickup,
    Summary
}
- Add a resource value for each enum case, corresponding to the title text for each screen. Use
app_namefor theStartscreen,choose_flavorfor theFlavorscreen,choose_pickup_datefor thePickupscreen, andorder_summaryfor theSummaryscreen.
enum class CupcakeScreen(@StringRes val title: Int) {
    Start(title = R.string.app_name),
    Flavor(title = R.string.choose_flavor),
    Pickup(title = R.string.choose_pickup_date),
    Summary(title = R.string.order_summary)
}
- Add a parameter named
currentScreenof typeCupcakeScreento theCupcakeAppBarcomposable.
fun CupcakeAppBar(
    currentScreen: CupcakeScreen,
    canNavigateBack: Boolean,
    navigateUp: () -> Unit = {},
    modifier: Modifier = Modifier
)
- Inside
CupcakeAppBar, replace the hard coded app name with the current screen's title by passing incurrentScreen.titleto the call tostringResource()for the title parameter ofTopAppBar.
TopAppBar(
    title = { Text(stringResource(currentScreen.title)) },
    modifier = modifier,
    navigationIcon = {
        if (canNavigateBack) {
            IconButton(onClick = navigateUp) {
                Icon(
                    imageVector = Icons.Filled.ArrowBack,
                    contentDescription = stringResource(R.string.back_button)
                )
            }
        }
    }
)
The Up button should only show if there's a composable on the back stack. If the app has no screens on the back stack—StartOrderScreen is shown—then the Up button should not show. To check this, you need a reference to the back stack.
- In the
CupcakeAppcomposable, below thenavControllervariable, create a variable namedbackStackEntryand call thecurrentBackStackEntryAsState()method ofnavControllerusing thebydelegate.
import androidx.navigation.compose.currentBackStackEntryAsState

@Composable
fun CupcakeApp(
    viewModel: OrderViewModel = viewModel(),
    navController: NavHostController = rememberNavController()
){

    val backStackEntry by navController.currentBackStackEntryAsState()

    ...
}
- Convert the current screen's title to a value of
CupcakeScreen. Below thebackStackEntryvariable, create a variable usingvalnamedcurrentScreenequal to the result of calling thevalueOf()class function ofCupcakeScreen, and pass in the route of the destination ofbackStackEntry. Use the elvis operator to provide a default value ofCupcakeScreen.Start.name.
val currentScreen = CupcakeScreen.valueOf(
    backStackEntry?.destination?.route ?: CupcakeScreen.Start.name
)
- Pass the value of
currentScreenvariable into the parameter of the same name of theCupcakeAppBarcomposable.
CupcakeAppBar(
    currentScreen = currentScreen,
    canNavigateBack = false,
    navigateUp = {}
)
As long as there's a screen behind the current screen on the back stack, the Up button should show. You can use a boolean expression to identify if the Up button should appear:
- For the
canNavigateBackparameter, pass in a boolean expression checking if thepreviousBackStackEntryproperty ofnavControlleris not equal to null.
canNavigateBack = navController.previousBackStackEntry != null,
- To actually navigate back to the previous screen, call the
navigateUp()method ofnavController.
navigateUp = { navController.navigateUp() }
- Run your app.
Notice that the AppBar title now updates to reflect the current screen. When you navigate to a screen other than StartOrderScreen, the Up button should appear and take you back to the previous screen.
8. Get the solution code
To download the code for the finished codelab, you can use these git commands:
$ git clone https://github.com/google-developer-training/basic-android-kotlin-compose-training-cupcake.git
$ cd basic-android-kotlin-compose-training-cupcake
$ git checkout navigation
Alternatively, you can download the repository as a zip file, unzip it, and open it in Android Studio.
If you want to see the solution code for this codelab, view it on GitHub.
9. Summary
Congratulations! You've just made the leap from simple single screen applications to a complex multi-screen app using the Jetpack Navigation component to move through multiple screens. You defined routes, handled them in a NavHost, and used function type parameters to separate the navigation logic from individual screens. You also learned how to send data to another app using intents as well as customize the app bar in response to navigation. In the upcoming units, you'll continue using these skills as you work on several other multi-screen apps of growing complexity.