
1. 事前準備
本實作程式碼研究室會說明開發雙螢幕和摺疊式裝置的基本知識。當您完成課程後,應用程式就能支援 Pixel Fold、Microsoft Surface Duo、Samsung Galaxy Z Fold 5 等摺疊式裝置。
必要條件
如要完成本程式碼研究室,您需符合以下條件:
- 具備建立 Android 應用程式的經驗
- 具備活動、片段、檢視繫結和 xml-layouts 的經驗
要執行的步驟:
建立簡易應用程式,以執行以下動作:
- 顯示裝置功能
- 偵測應用程式是在摺疊式或雙螢幕裝置上執行
- 決定裝置狀態
- 使用 Jetpack WindowManager,藉此支援新的板型規格裝置。
軟硬體需求
- Android Studio Arctic Fox 或更高版本
- 摺疊式裝置或模擬器
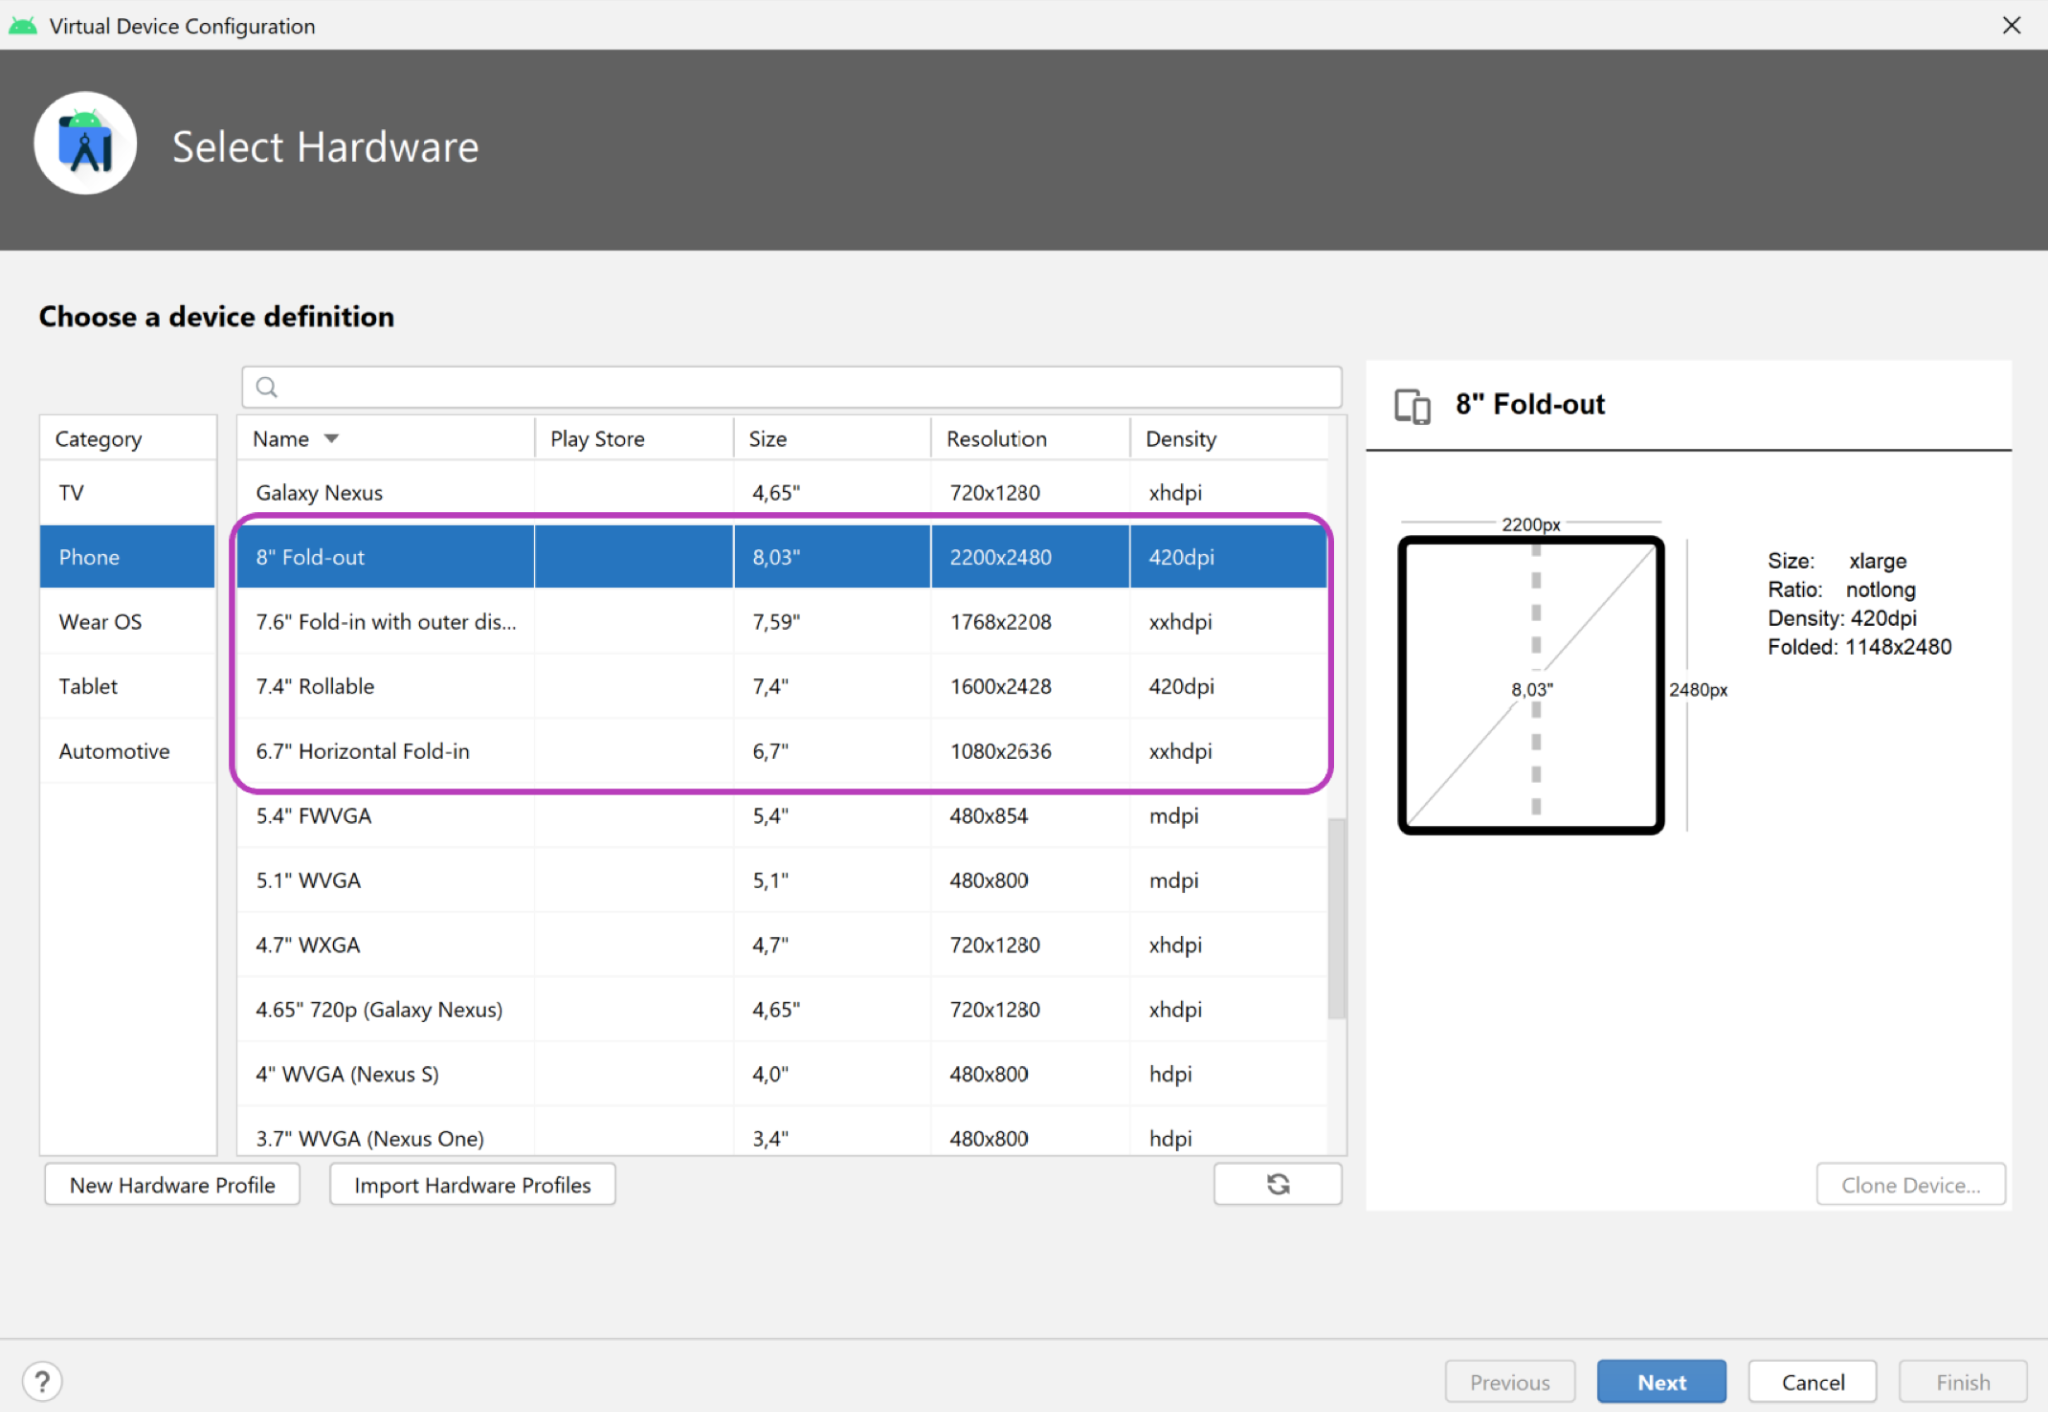
Android Emulator v30.0.6+ 包含虛擬轉軸角度感應器和 3D 檢視畫面的摺疊式裝置支援。您可以使用下圖中的幾種摺疊式裝置模擬器:
- 如要使用雙螢幕模擬器,請下載適用於您平台 (Windows、MacOS 或 GNU/Linux) 的 Microsoft Surface Duo 模擬器。
2. 單螢幕裝置與摺疊式裝置
與先前的行動裝置相比,摺疊式裝置能夠為使用者提供更大的螢幕畫面,以及更多樣化的使用者介面。這類裝置在折疊後通常會比一般尺寸的平板電腦還要小,因此更加方便攜帶,且功能更多樣化。
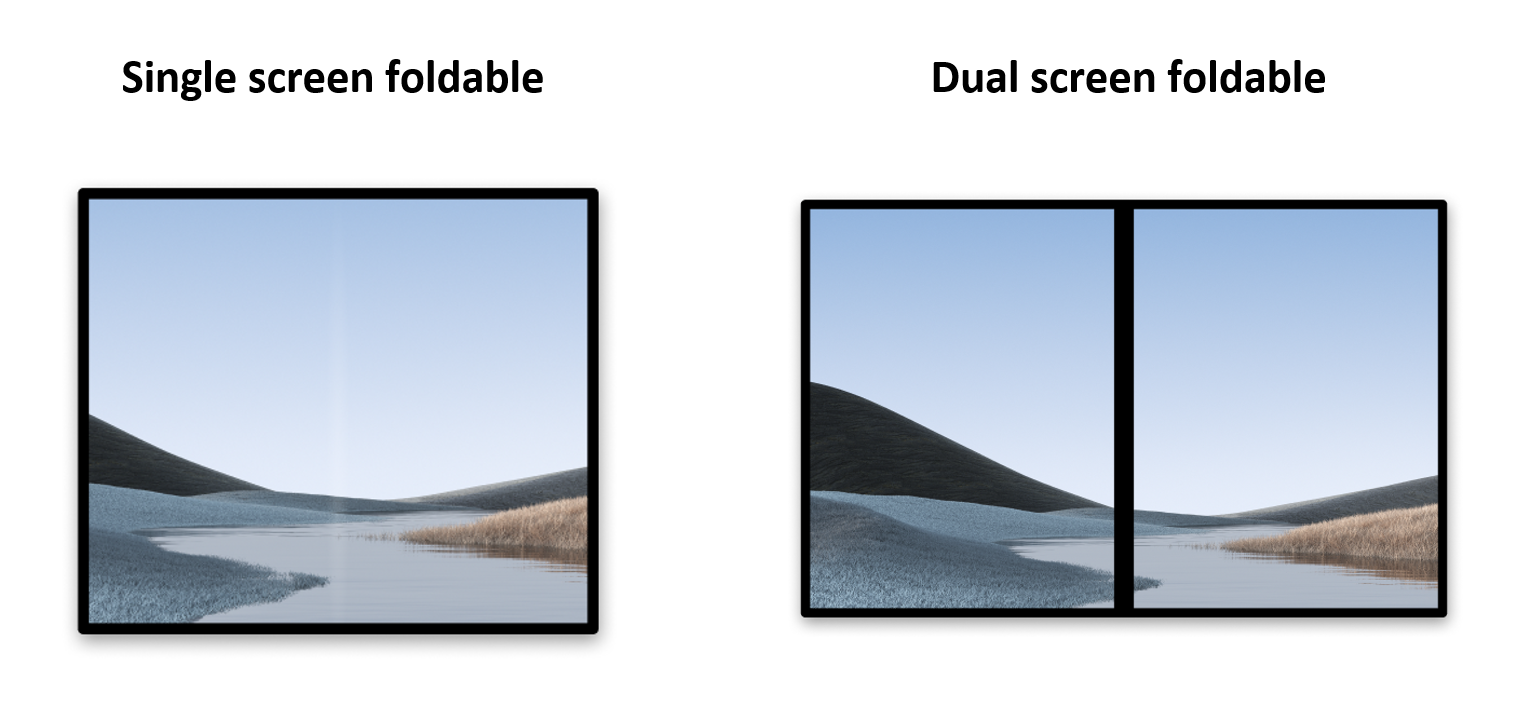
撰寫本文時,摺疊式裝置有以下兩種:
- 單螢幕摺疊式裝置:包含一個可折疊的螢幕。使用者可以透過
multi-window模式,在一個螢幕上同時執行多個應用程式。 - 雙螢幕摺疊式裝置:有兩個螢幕,由轉軸接合在一起。這類裝置也可以摺疊,但有兩個不同的邏輯顯示區域。
如同平板電腦及其他單螢幕行動裝置一般,摺疊式裝置也可以:
- 在其中一個顯示區域中執行一個應用程式。
- 並排執行兩個應用程式,不同的顯示區域分別執行一個應用程式 (使用
multi-window模式)。
與單螢幕裝置不同的是,摺疊式裝置也支援不同的形態。型態可用來以不同方式顯示內容。
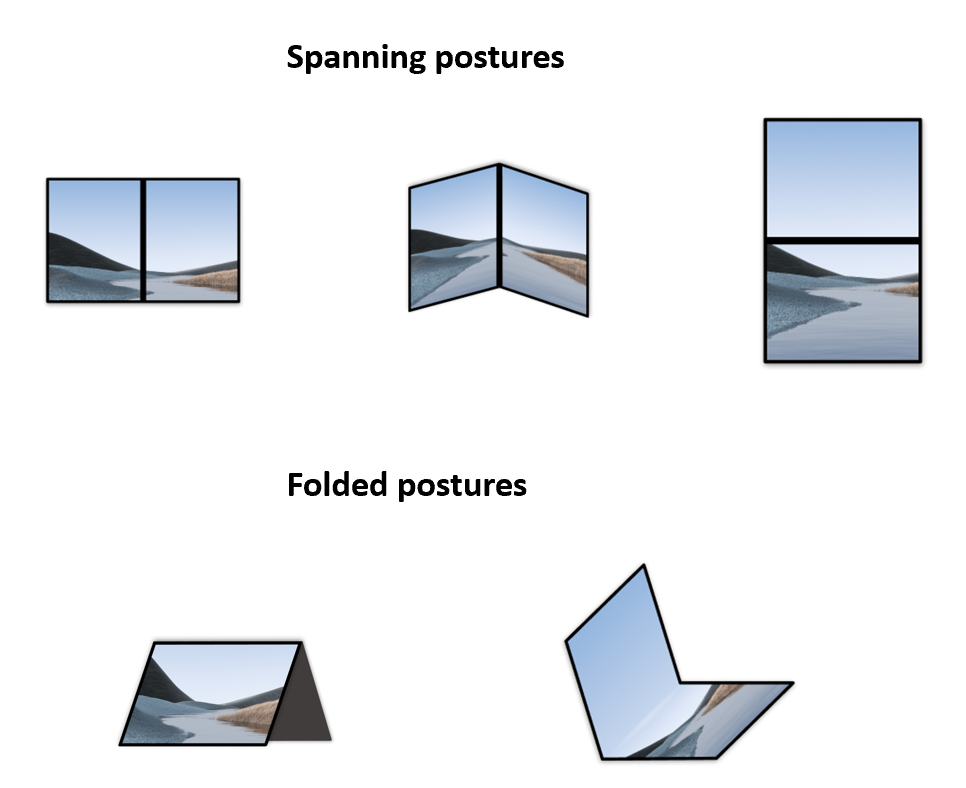
當應用程式橫跨 (顯示於) 整個顯示區域時 (在雙螢幕摺疊式裝置上使用所有顯示區域),摺疊式裝置可以提供不同的橫跨型態。
摺疊式裝置也可以提供折疊的型態,例如桌面模式可讓您在平放的螢幕與向您傾斜的螢幕之間進行邏輯分割;而帳篷模式呈現內容的方式就像是搭配立架小工具使用裝置一般。
3. Jetpack WindowManager
Jetpack WindowManager 程式庫可協助應用程式開發人員支援新的裝置板型規格,並在舊版和新版平台上,為多種 WindowManager 功能提供一般 API 介面。
主要功能與特色
Jetpack WindowManager 1.5.1 版本包含 FoldingFeature 類別,用於說明彈性顯示畫面中的折疊方式,或是兩個實體顯示面板之間的轉軸。其 API 可讓您存取與裝置相關的重要資訊:
state():透過已定義的型態清單 (FLAT和HALF_OPENED) 提供裝置目前的型態isSeparating():計算是否應將FoldingFeature想成是將視窗分割成多個實際區域,使用者看起來會是分隔的邏輯區塊occlusionType():計算遮蔽模式,以判斷FoldingFeature是否會遮蔽部分視窗。orientation():如果FoldingFeature寬度大於高度,會傳回FoldingFeature.Orientation.HORIZONTAL;否則會傳回FoldingFeature.Orientation.VERTICAL。bounds():提供Rect執行個體,其中包含裝置功能的邊界,例如實轉軸的邊界。
只要使用 WindowInfoTracker 介面,就能存取 windowLayoutInfo(),以收集 WindowLayoutInfo 的 Flow,其中包含所有可用的 DisplayFeature。
4. 設定
建立新專案並選取「Empty Activity」範本:
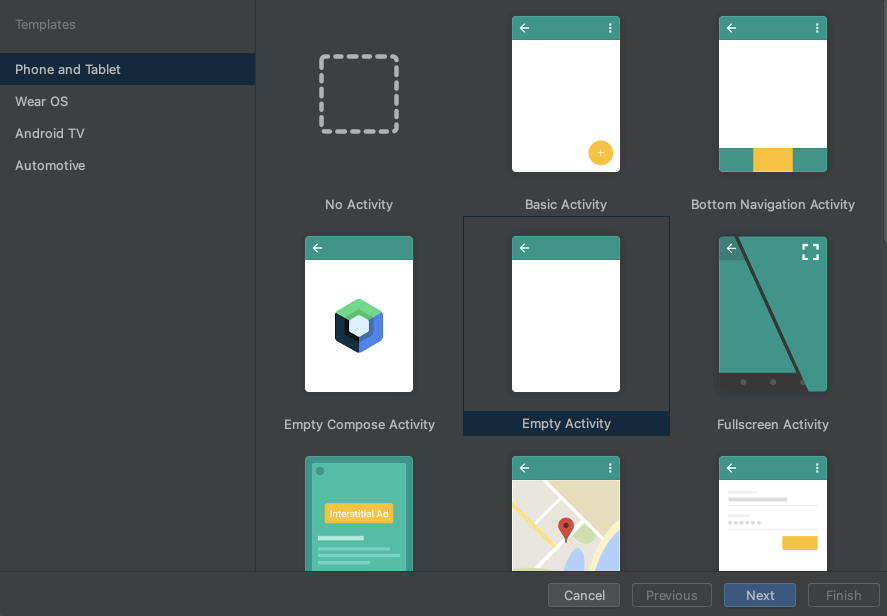
請保留所有參數做為預設值。
宣告依附元件
如要使用 Jetpack WindowManager,請在應用程式或模組的 build.gradle 檔案中新增依附元件:
app/build.gradle
dependencies {
    ext.windowmanager_version = "1.5.1"

    implementation "androidx.window:window:$windowmanager_version"
    androidTestImplementation "androidx.window:window-testing:$windowmanager_version"

    // Needed to use lifecycleScope to collect the WindowLayoutInfo flow
    implementation "androidx.lifecycle:lifecycle-runtime-ktx:2.6.2"
}
使用 WindowManager
您可以透過 WindowManager 的 WindowInfoTracker 介面存取視窗功能。
開啟 MainActivity.kt 來源檔案並呼叫 WindowInfoTracker.getOrCreate(this@MainActivity),即可初始化與目前活動相關聯的 WindowInfoTracker 例項:
MainActivity.kt
import androidx.window.layout.WindowInfoTracker

private lateinit var windowInfoTracker: WindowInfoTracker

override fun onCreate(savedInstanceState: Bundle?) {
        super.onCreate(savedInstanceState)

        windowInfoTracker = WindowInfoTracker.getOrCreate(this@MainActivity)
}
有了 WindowInfoTracker 例項,您就可以取得裝置目前視窗狀態的資訊。
5. 設定應用程式 UI
我們可以透過 Jetpack WindowManager 取得關於視窗指標、版面配置和顯示設定的資訊。請在主要活動的版面配置中,分別針對每個部分使用 TextView 來顯示這類資訊。
建立 ConstraintLayout,其中包含三個 TextView (置於畫面中央)。
開啟 activity_main.xml 檔案並貼上下列內容:
activity_main.xml
<?xml version="1.0" encoding="utf-8"?>
<androidx.constraintlayout.widget.ConstraintLayout xmlns:android="http://schemas.android.com/apk/res/android"
   xmlns:app="http://schemas.android.com/apk/res-auto"
   xmlns:tools="http://schemas.android.com/tools"
   android:id="@+id/constraint_layout"
   android:layout_width="match_parent"
   android:layout_height="match_parent"
   tools:context=".MainActivity">

    <TextView
        android:id="@+id/window_metrics"
        android:layout_width="wrap_content"
        android:layout_height="wrap_content"
        android:padding="20dp"
        tools:text="Window metrics"
        android:textSize="20sp"
        app:layout_constraintBottom_toTopOf="@+id/layout_change"
        app:layout_constraintStart_toStartOf="parent"
        app:layout_constraintTop_toTopOf="parent"
        app:layout_constraintVertical_chainStyle="packed" />

    <TextView
        android:id="@+id/layout_change"
        android:layout_width="wrap_content"
        android:layout_height="wrap_content"
        android:padding="20dp"
        tools:text="Layout change"
        android:textSize="20sp"
        app:layout_constrainedWidth="true"
        app:layout_constraintBottom_toTopOf="@+id/configuration_changed"
        app:layout_constraintStart_toStartOf="parent"
        app:layout_constraintTop_toBottomOf="@+id/window_metrics" />

    <TextView
        android:id="@+id/configuration_changed"
        android:layout_width="wrap_content"
        android:layout_height="wrap_content"
        android:padding="20dp"
        tools:text="Using one logic/physical display - unspanned"
        android:textSize="20sp"
        app:layout_constraintBottom_toBottomOf="parent"
        app:layout_constraintStart_toStartOf="parent"
        app:layout_constraintTop_toBottomOf="@+id/layout_change" />

</androidx.constraintlayout.widget.ConstraintLayout>
我們現在要使用查看繫結,在程式碼中連結這些 UI 元素。因此,我們需要在應用程式的 build.gradle 檔案中開始啟用這項功能:
app/build.gradle
android {
   // Other configurations

   buildFeatures {
      viewBinding true
   }
}
按照 Android Studio 的建議同步處理 Gradle 專案,並利用以下程式碼在 MainActivity.kt 中採用查看繫結:
MainActivity.kt
class MainActivity : AppCompatActivity() {
    private lateinit var windowInfoTracker: WindowInfoTracker
    private lateinit var binding: ActivityMainBinding

    override fun onCreate(savedInstanceState: Bundle?) {
        super.onCreate(savedInstanceState)
        binding = ActivityMainBinding.inflate(layoutInflater)
        setContentView(binding.root)

        windowInfoTracker = WindowInfoTracker.getOrCreate(this@MainActivity)
    }
}
6. 以視覺化的方式呈現 WindowMetrics 資訊
在 MainActivity 的 onCreate 方法中呼叫函式,即可取得及顯示 WindowMetrics 資訊。請在 onCreate 方法中新增 obtainWindowMetrics() 呼叫:
MainActivity.kt
override fun onCreate(savedInstanceState: Bundle?) {
   super.onCreate(savedInstanceState)
   binding = ActivityMainBinding.inflate(layoutInflater)
   setContentView(binding.root)

   windowInfoTracker = WindowInfoTracker.getOrCreate(this@MainActivity)

   obtainWindowMetrics()
}
實作 obtainWindowMetrics 方法:
MainActivity.kt
import androidx.window.layout.WindowMetricsCalculator

private fun obtainWindowMetrics() {
   val wmc = WindowMetricsCalculator.getOrCreate()
   val currentWM = wmc.computeCurrentWindowMetrics(this).bounds.flattenToString()
   val maximumWM = wmc.computeMaximumWindowMetrics(this).bounds.flattenToString()
   binding.windowMetrics.text =
       "CurrentWindowMetrics: ${currentWM}\nMaximumWindowMetrics: ${maximumWM}"
}
呼叫 WindowMetricsCalculator 的伴生函式 getOrCreate(),以取得該類別的例項。
使用這個 WindowMetricsCalculator 例項,將資訊設為 windowMetrics TextView。我們會使用 computeCurrentWindowMetrics.bounds 和 computeMaximumWindowMetrics.bounds 函式傳回的值。
這些值可提供實用資訊,說明視窗占用的區域指標。
執行應用程式。在雙螢幕模擬器中 (如下圖所示),您會收到 CurrentWindowMetrics,與模擬器所模擬的裝置尺寸相符。當應用程式以單螢幕模式執行時,您也可以查看相關指標:

當應用程式跨螢幕顯示時,視窗指標會像下圖那樣變化,因此可反映該應用程式所用的較大視窗區域:
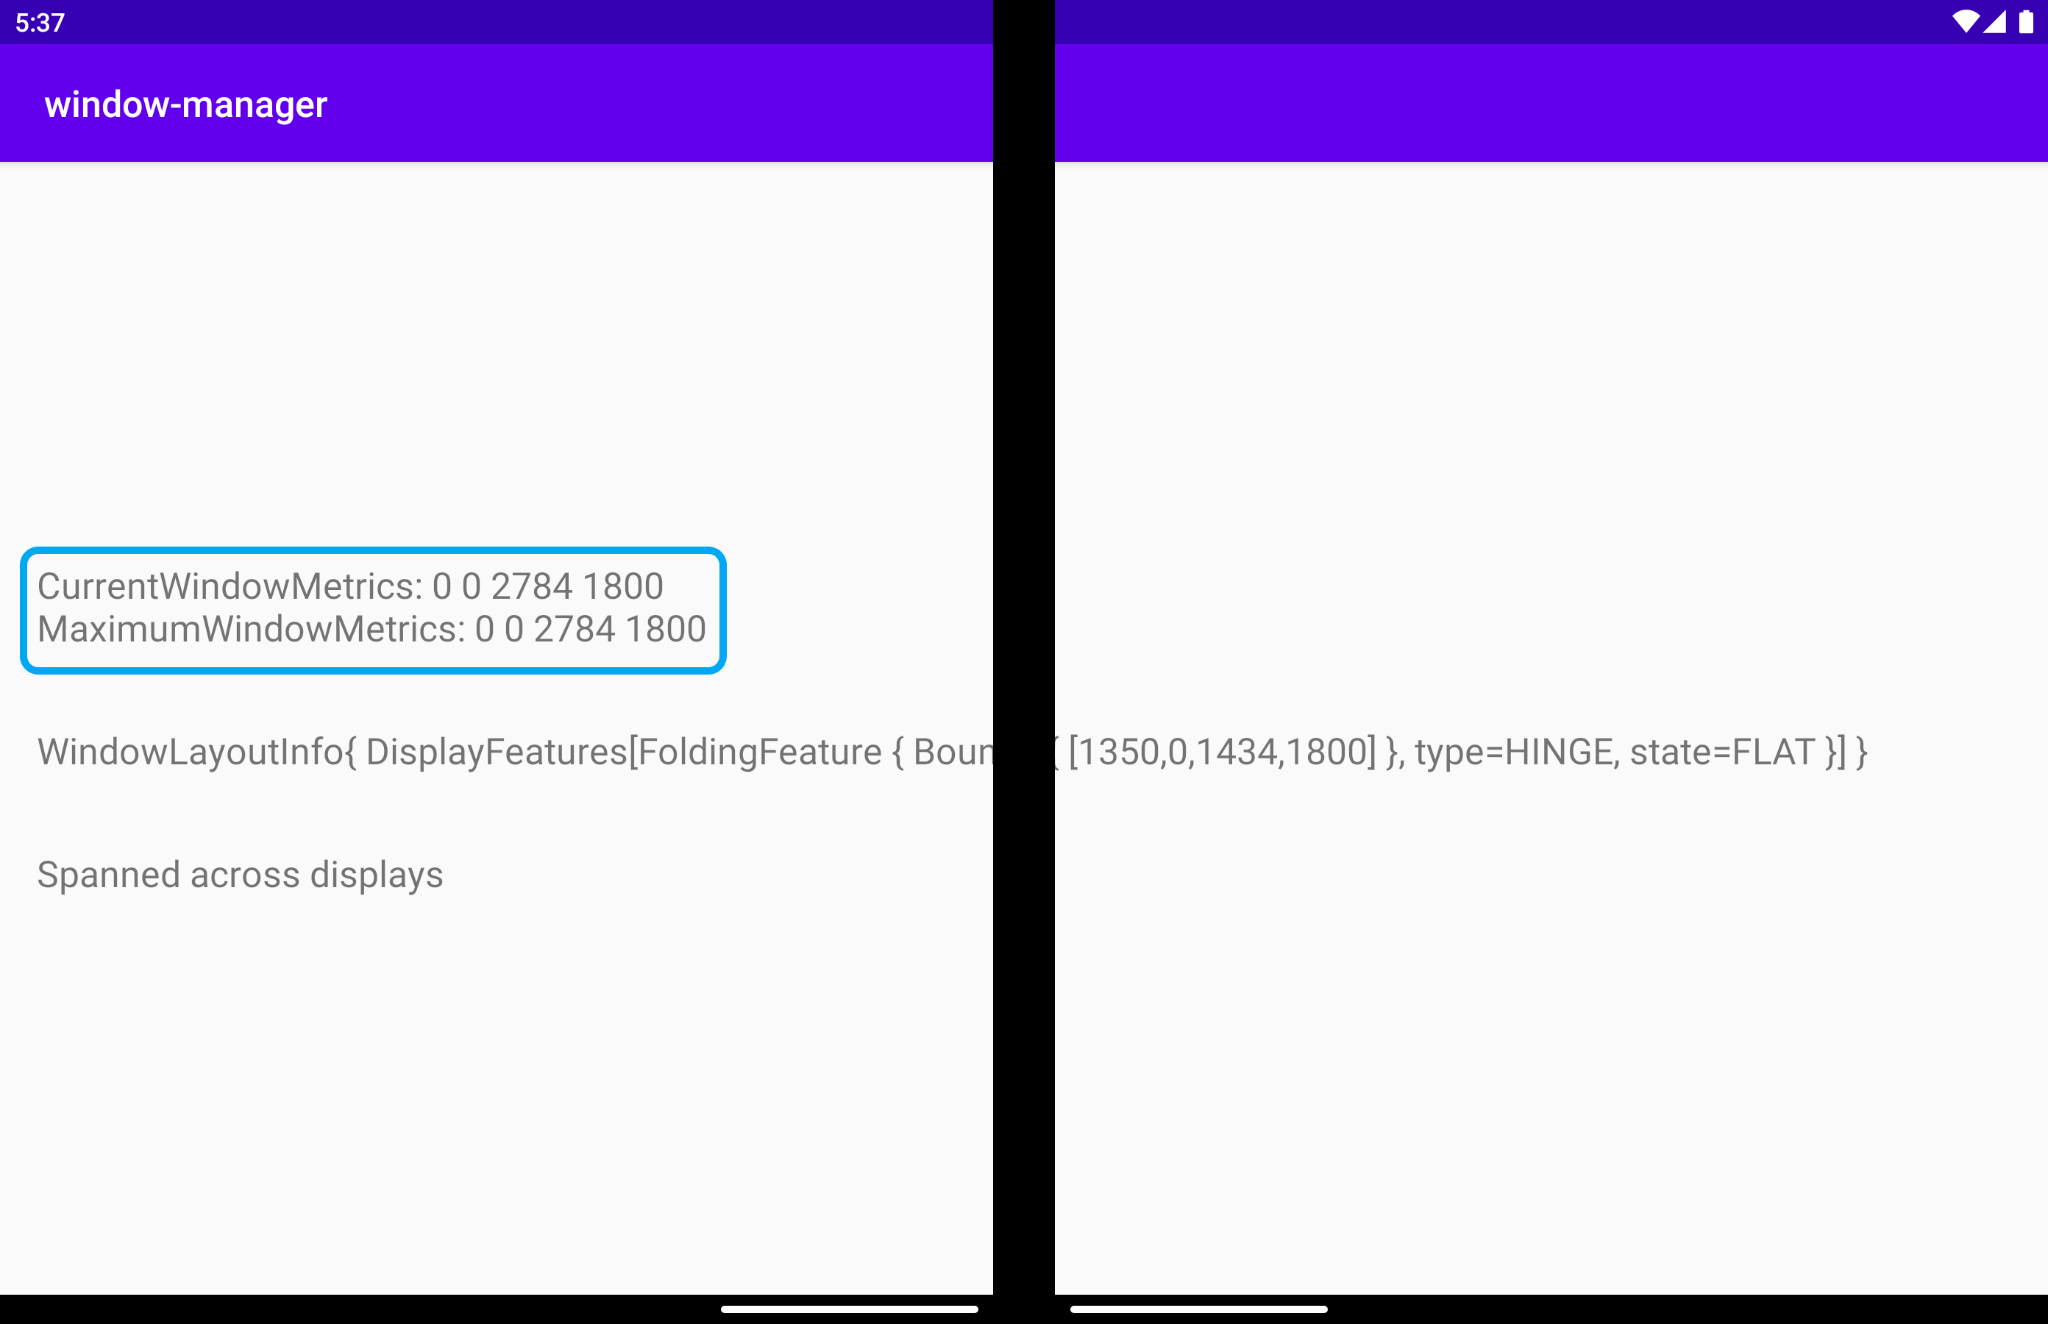
由於應用程式會持續執行,並且會在單螢幕和雙螢幕上占據完整顯示區域,因此目前視窗指標和最大視窗指標會具有相同的值。
在採用水平摺疊的摺疊式裝置模擬器中,如果應用程式橫跨整個實體螢幕,其值會與應用程式採用多視窗模式執行時不同:
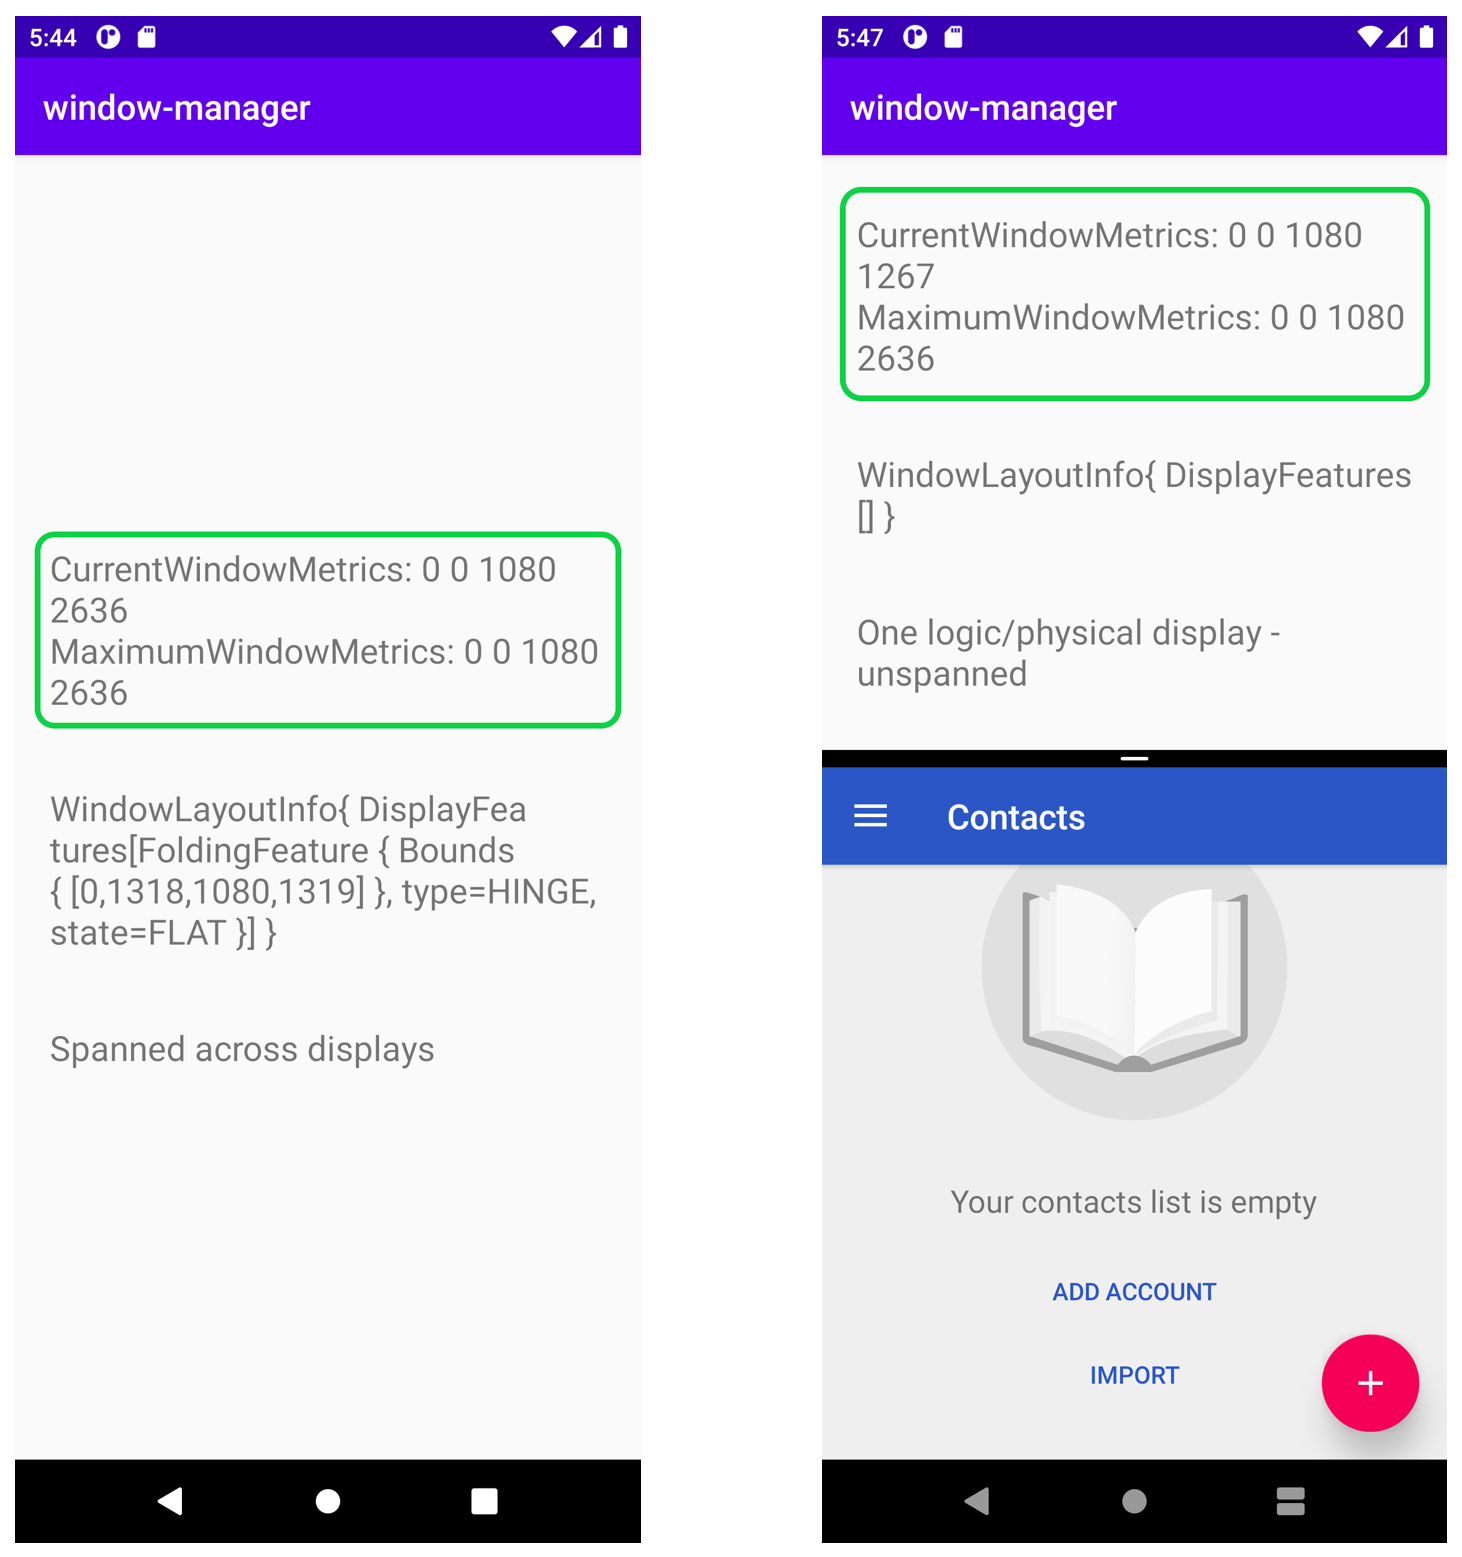
如左圖所示,由於執行中的應用程式占滿整個顯示區域,這是目前且最大的區域,因此這兩個指標的值會一樣。
但在右側圖片中,當應用程式是以多視窗模式執行時,您可以看到,目前指標會顯示在分割畫面模式的特定區域 (頂端) 所執行的應用程式區域尺寸,您也可以看到最高指標會顯示裝置的最大顯示區域。
WindowMetricsCalculator 提供的指標非常實用,可用於判斷應用程式正在使用或可以使用的視窗區域。
7. 以視覺化的方式呈現 FoldingFeature 資訊
您現在可以註冊,接收視窗版面配置的變更項目,以及模擬器或裝置的 DisplayFeatures 特性和邊界。
為了收集 WindowInfoTracker#windowLayoutInfo() 的資訊,請使用針對各個 Lifecycle 物件所定義的 lifecycleScope。當生命週期遭刪除時,系統會取消在這個範圍內啟動的任何協同程式。您可以透過 lifecycle.coroutineScope 或 lifecycleOwner.lifecycleScope 屬性,存取生命週期的協同程式範圍。
在 MainActivity 的 onCreate 方法中呼叫函式,即可取得及顯示 WindowInfoTracker 資訊。首先,請在 onCreate 方法中新增 onWindowLayoutInfoChange() 呼叫:
MainActivity.kt
override fun onCreate(savedInstanceState: Bundle?) {
   super.onCreate(savedInstanceState)
   binding = ActivityMainBinding.inflate(layoutInflater)
   setContentView(binding.root)

   windowInfoTracker = WindowInfoTracker.getOrCreate(this@MainActivity)

   obtainWindowMetrics()
   onWindowLayoutInfoChange()
}
每當有新的版面配置設定變更時,只要實作該函式即可取得資訊。
定義函式簽章和架構。
MainActivity.kt
private fun onWindowLayoutInfoChange() {
}
我們可以透過函式收到的參數 (WindowInfoTracker),取得其 WindowLayoutInfo 資料。WindowLayoutInfo 包含視窗內的 DisplayFeature 清單。舉例來說,轉軸或螢幕畫面折疊可以跨越整個視窗,因此建議您將視覺內容和互動元素分為兩個群組 (例如清單詳細資料或檢視畫面控制項)。
系統只會回報目前視窗範圍內顯示的功能。如果螢幕上的視窗經過移動或調整大小,這些功能的位置和大小可能也會隨之改變。
透過 lifecycle-runtime-ktx 依附元件中定義的 lifecycleScope,您可以取得 WindowLayoutInfo 的 flow,其中包含所有顯示功能的清單。接著請新增 onWindowLayoutInfoChange 的主體:
MainActivity.kt
import androidx.lifecycle.Lifecycle
import androidx.lifecycle.lifecycleScope
import androidx.lifecycle.repeatOnLifecycle
import kotlinx.coroutines.Dispatchers
import kotlinx.coroutines.flow.collect
import kotlinx.coroutines.launch

private fun onWindowLayoutInfoChange() {
    lifecycleScope.launch(Dispatchers.Main) {
        lifecycle.repeatOnLifecycle(Lifecycle.State.STARTED) {
            windowInfoTracker.windowLayoutInfo(this@MainActivity)
                .collect { value ->
                    updateUI(value)
                }
        }
    }
}
系統會從 collect 呼叫 updateUI 函式。您只要實作這個函式,即可顯示並輸出從 WindowLayoutInfo 的 flow 接收的資訊。請檢查 WindowLayoutInfo 資料是否具備顯示功能。如果是的話,顯示功能會以某種方式與應用程式的 UI 互動。如果 WindowLayoutInfo 資料沒有任何顯示功能,應用程式就會在單螢幕裝置 (模式) 或多視窗模式中執行。
MainActivity.kt
import androidx.window.layout.WindowLayoutInfo

private fun updateUI(newLayoutInfo: WindowLayoutInfo) {
    binding.layoutChange.text = newLayoutInfo.toString()
    if (newLayoutInfo.displayFeatures.isNotEmpty()) {
        binding.configurationChanged.text = "Spanned across displays"
    } else {
        binding.configurationChanged.text = "One logic/physical display - unspanned"
    }
}
執行應用程式。在雙螢幕模擬器中,您會得到以下結果:
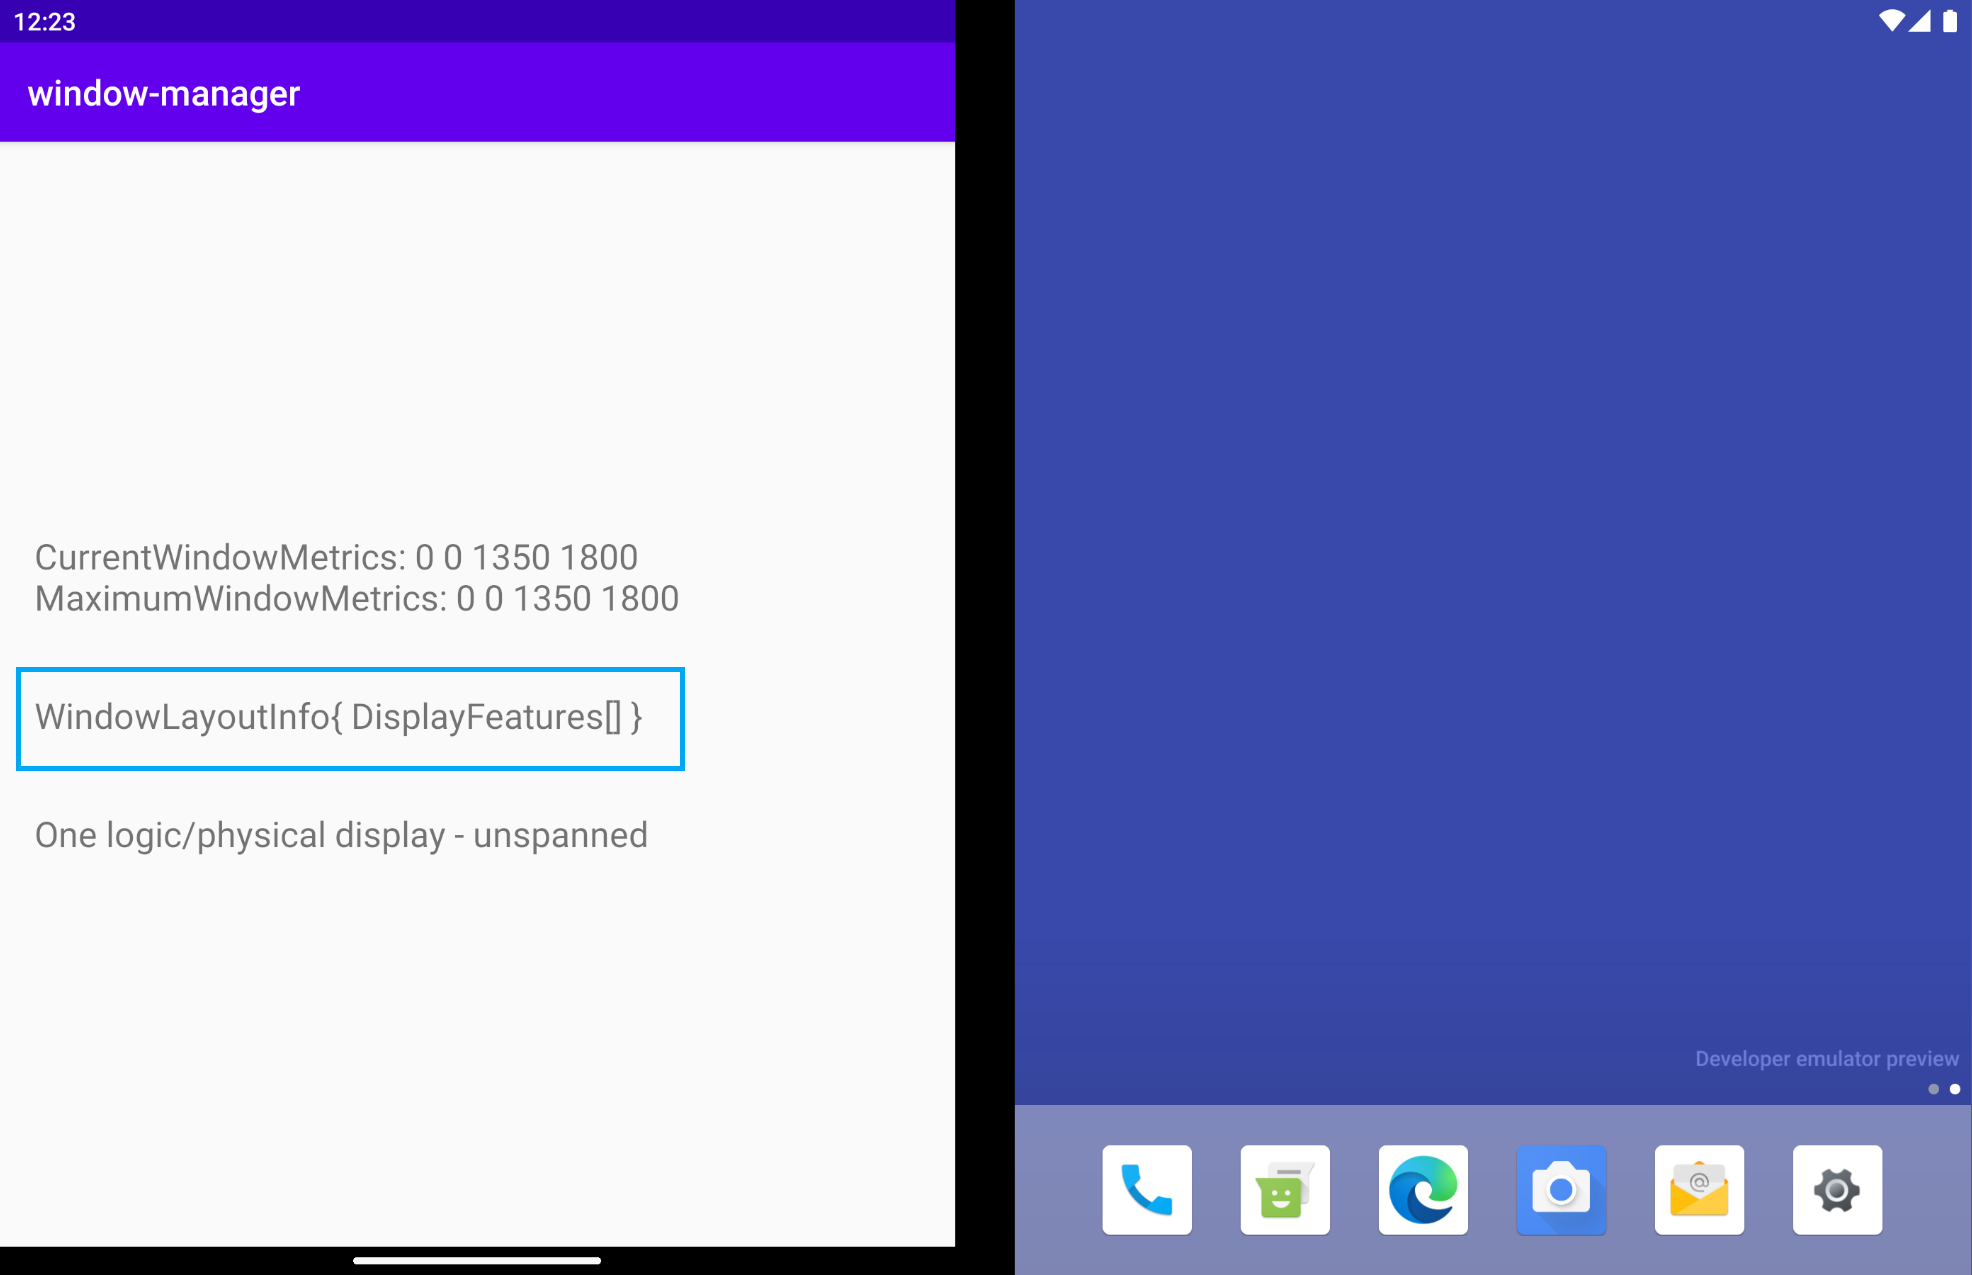
WindowLayoutInfo 是空的,List<DisplayFeature> 沒有任何內容。然而,如果您的模擬器中間有轉軸,為什麼您無法從 WindowManager 取得資訊呢?
只有在應用程式橫跨多個螢幕 (不論是否為實體螢幕) 時,WindowManager 才會透過 WindowInfoTracker 提供 WindowLayoutInfo 資料,包含裝置功能類型、裝置功能邊界和裝置型態。在上圖中,應用程式在單螢幕模式中執行,因此 WindowLayoutInfo 是空的。
有了這項資訊,您就可以知道應用程式正在哪一個模式中執行 (單螢幕模式或跨螢幕),因此可以在 UI/使用者體驗中做出相應調整,並根據這些特定設定提供更好的使用者體驗。
在沒有實體雙螢幕的裝置上 (通常不會有實體轉軸),應用程式可以透過多視窗模式並排執行。當應用程式在這些裝置上以多視窗模式執行時,其執行方式與先前範例中在單螢幕上執行時一樣。當應用程式以占據所有邏輯顯示螢幕的方式執行時,行為會和橫跨多個螢幕時一樣,如下圖所示:
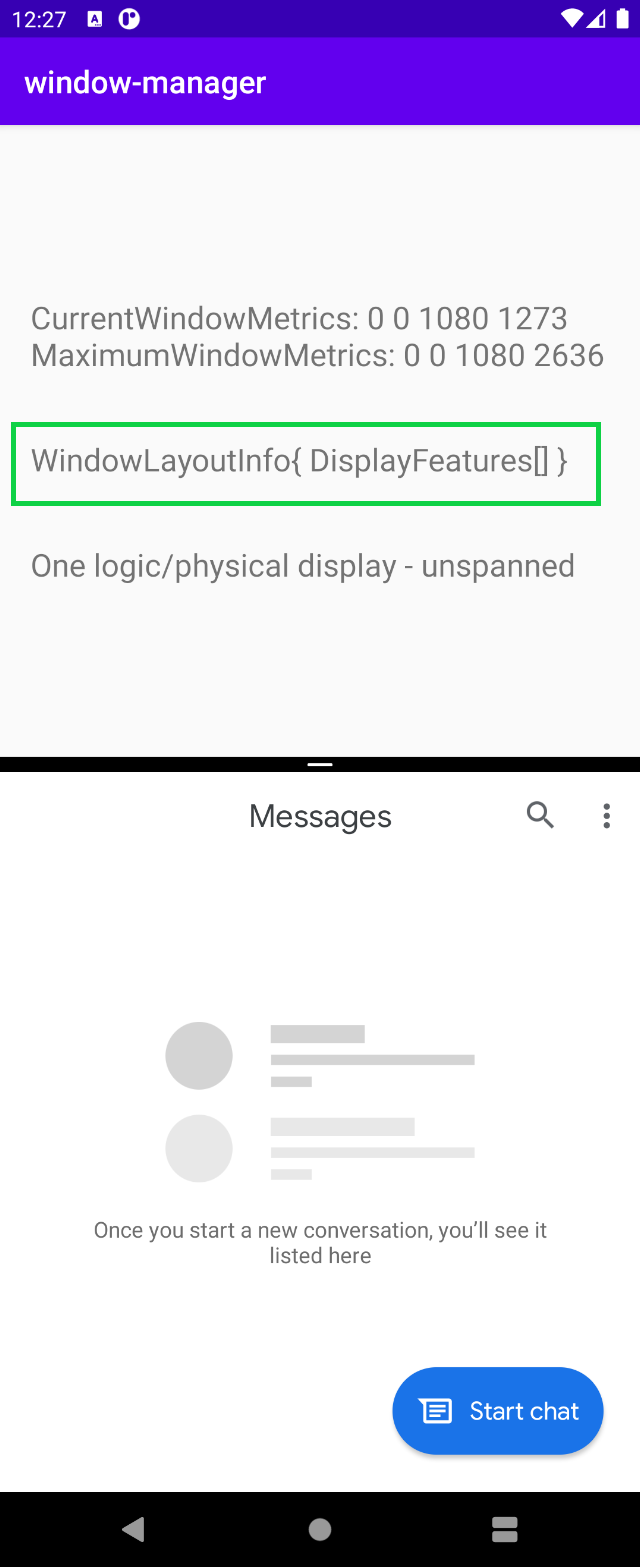
應用程式在多視窗模式中執行時,WindowManager 會提供空白的 List<LayoutInfo>。
簡言之,只有在應用程式以占據所有邏輯顯示螢幕的方式執行、與裝置功能 (摺疊或轉軸) 互動時,時,您才能獲得 WindowLayoutInfo 資料。在其他情況下,系統不會提供任何資訊。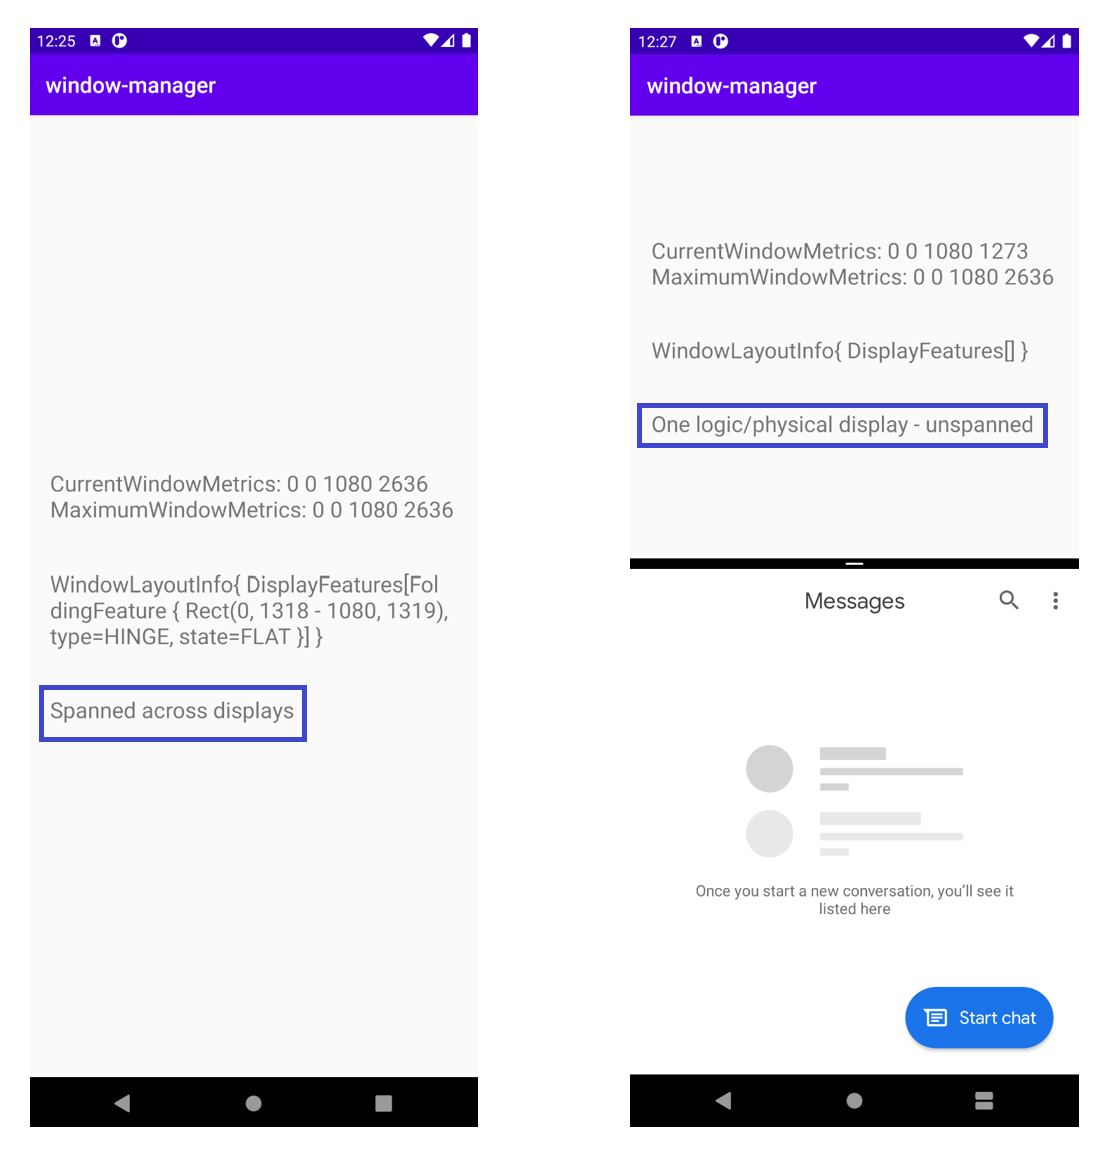
如果讓應用程式橫跨多個螢幕顯示,會發生什麼事?在雙螢幕模擬器中,WindowLayoutInfo 會包含 FoldingFeature 物件,用於提供以下資料:裝置功能 (HINGE)、該功能的邊界 (Rect (0, 0 - 1434, 1800)),以及裝置的型態/狀態 (FLAT)。
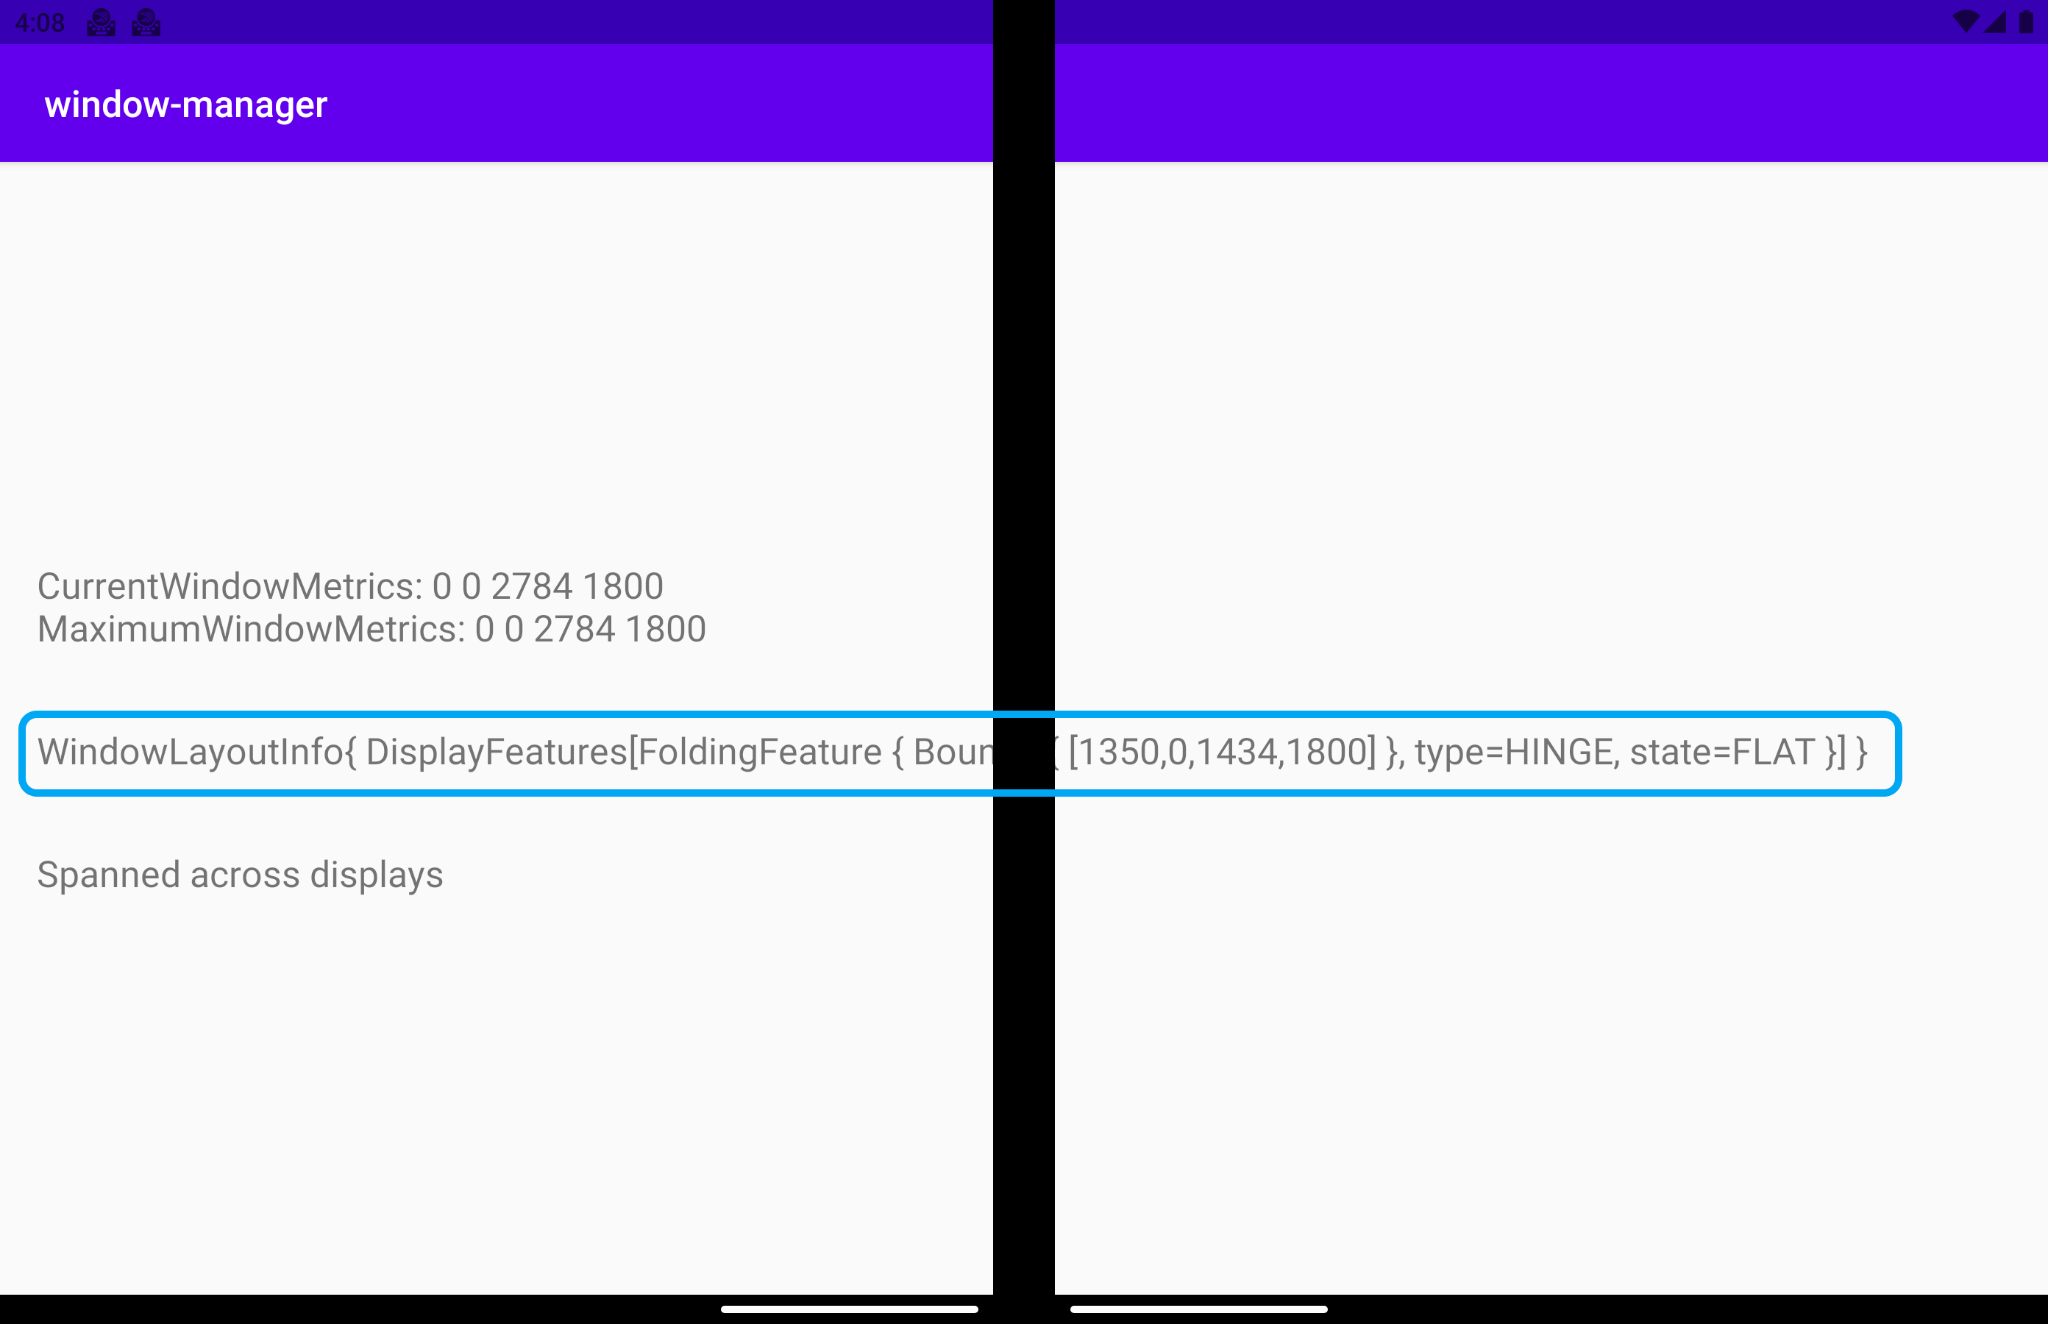
以下說明每個欄位代表的意義:
type = TYPE_HINGE:這個雙螢幕模擬器會模仿有實體轉軸的真實 Surface Duo 裝置,這也是 WindowManager 回報的內容。Bounds[0, 0 - 1434, 1800]:代表在視窗座標空間內,功能在應用程式視窗中的邊界矩形。如果您參閱 Surface Duo 裝置的尺寸規格,就會發現轉軸的位置與這些邊界 (左側、頂端、右側、底部) 回報的位置完全相同。State:有兩種不同的值可代表裝置型態 (狀態)。HALF_OPENED:摺疊式裝置的轉軸位於開啟和關閉狀態的中間位置,而且彈性螢幕的各個部分之間或實體螢幕面板之間,會有一個彎曲的角度。FLAT:摺疊式裝置完全打開,使用者看到的螢幕空間是平的。
根據預設,模擬器開啟的高度為 180 度,因此 WindowsManager 傳回的型態為 FLAT。
如果使用虛擬感應器選項將模擬器的型態變更為半開啟的型態,WindowManager 會通知您新的位置:HALF_OPENED。
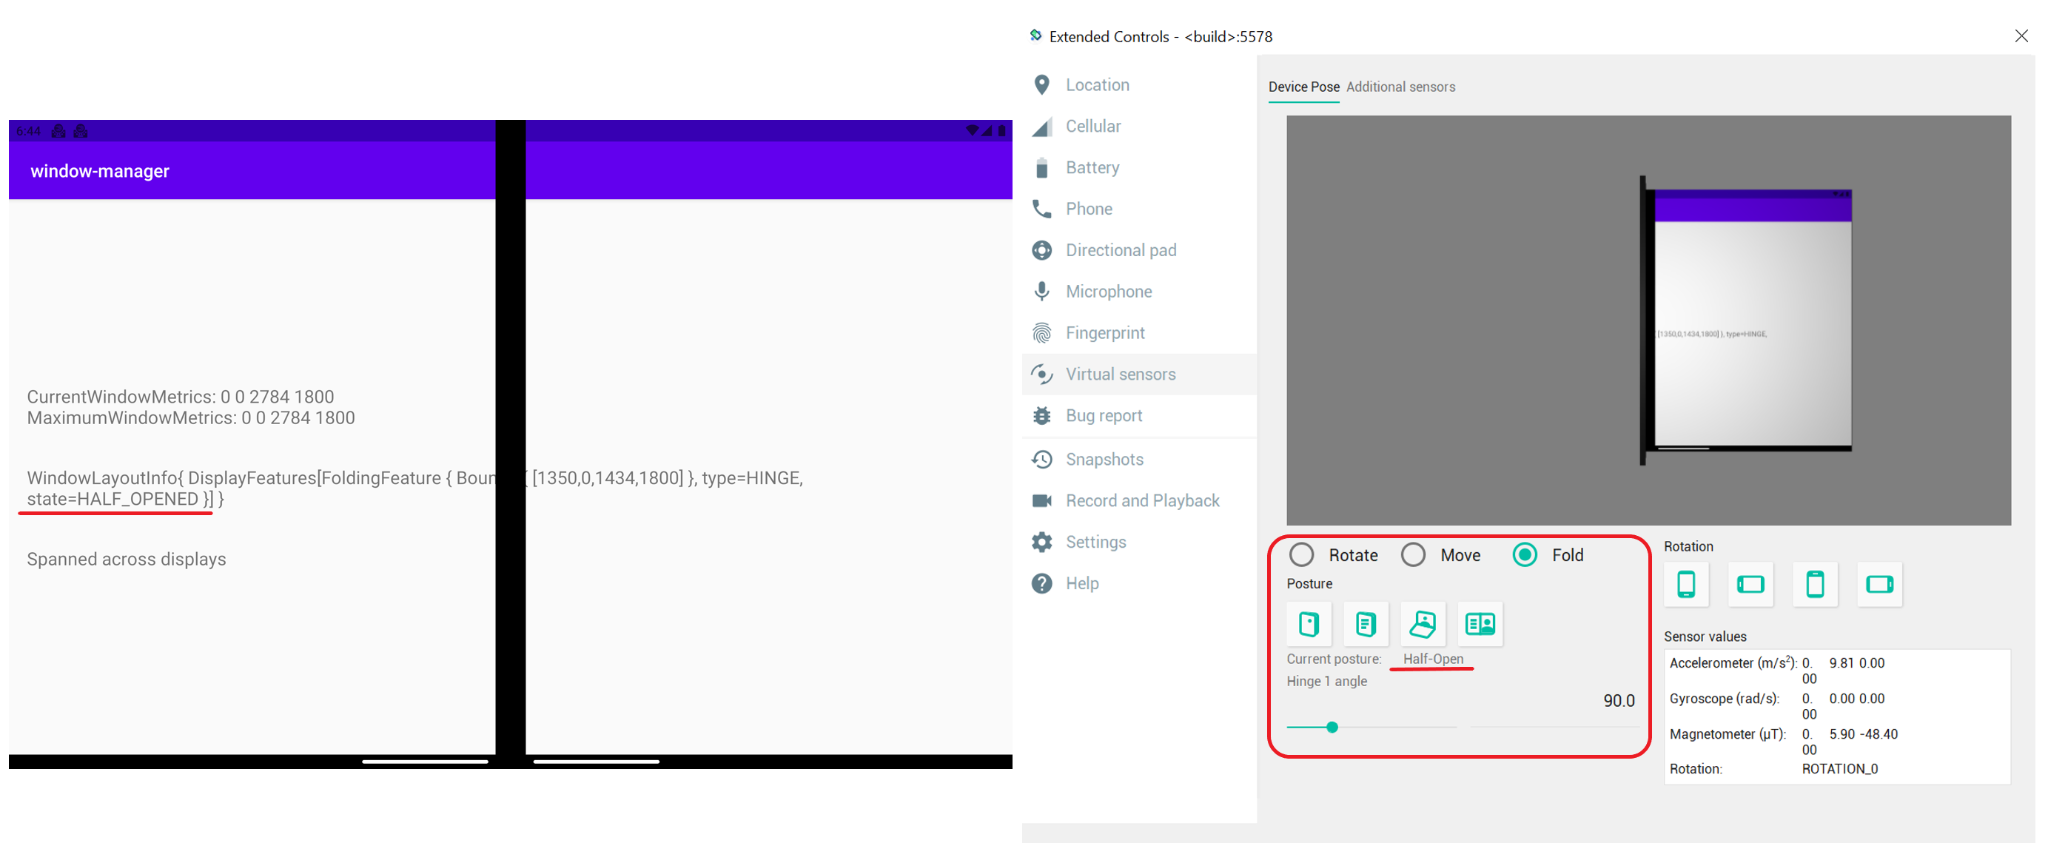
使用 WindowManager 調整 UI/使用者體驗
如圖中的視窗版面配置資訊所示,顯示功能會切割顯示的資訊,下圖中也是一樣的情況:

這並非最佳的使用者體驗。您可以使用 WindowManager 提供的資訊來調整 UI/使用者體驗。
如先前所述,應用程式橫跨不同的顯示區域時,應用程式也會與裝置功能互動,所以 WindowManager 會提供視窗版面配置資訊,做為顯示狀態和顯示邊界。因此,當應用程式橫跨不同的顯示區域時,您需要使用該資訊並調整使用者介面/使用者體驗。
您要做的就是在應用程式橫跨不同的顯示區域時,調整執行階段目前的 UI/使用者體驗,以免重要資訊遭到截斷,或被顯示功能隱藏。您將建立可反映裝置顯示功能的檢視畫面,這個檢視畫面會用來當做參考資訊,從而限制遭到切除或隱藏的 TextView,以免再遺漏任何資訊。
為了方便學習,您需要為這個新的檢視畫面上色,這樣就能清楚看到該畫面與實際裝置的顯示功能位於相同指定位置,也具有相同的尺寸。
在 activity_main.xml 中新增要用來當做裝置功能參考資料的新檢視畫面:
activity_main.xml
<!-- It's not important where this view is placed by default, it will be positioned dynamically at runtime -->
<View
    android:id="@+id/folding_feature"
    android:layout_width="0dp"
    android:layout_height="0dp"
    android:background="@android:color/holo_red_dark"
    android:visibility="gone"
    tools:ignore="MissingConstraints" />
在 MainActivity.kt 中,前往您用來顯示特定 WindowLayoutInfo 資訊的 updateUI() 函式,並在出現顯示功能的 if-else 案例中,新增函式呼叫:
MainActivity.kt
private fun updateUI(newLayoutInfo: WindowLayoutInfo) {
   binding.layoutChange.text = newLayoutInfo.toString()
   if (newLayoutInfo.displayFeatures.isNotEmpty()) {
       binding.configurationChanged.text = "Spanned across displays"
       alignViewToFoldingFeatureBounds(newLayoutInfo)
   } else {
       binding.configurationChanged.text = "One logic/physical display - unspanned"
   }
}
您已將接收的 alignViewToFoldingFeatureBounds 函式新增為 WindowLayoutInfo 參數。
建立該函式。在函式中建立 ConstraintSet,以便為檢視畫面套用新的限制。然後,使用 WindowLayoutInfo 取得顯示功能邊界。由於 WindowLayoutInfo 傳回的 DisplayFeature 清單僅是一個介面,因此請將其投放到 FoldingFeature,以便存取所有資訊:
MainActivity.kt
import androidx.constraintlayout.widget.ConstraintSet
import androidx.window.layout.FoldingFeature

private fun alignViewToFoldingFeatureBounds(newLayoutInfo: WindowLayoutInfo) {
   val constraintLayout = binding.constraintLayout
   val set = ConstraintSet()
   set.clone(constraintLayout)

   // Get and translate the feature bounds to the View's coordinate space and current
   // position in the window.
   val foldingFeature = newLayoutInfo.displayFeatures[0] as FoldingFeature
   val bounds = getFeatureBoundsInWindow(foldingFeature, binding.root)


   // Rest of the code to be added in the following steps
}
定義 getFeatureBoundsInWindow() 函式,將功能邊界轉譯成檢視畫面的座標空間,以及視窗中的目前位置。
MainActivity.kt
import android.graphics.Rect
import android.view.View
import androidx.window.layout.DisplayFeature

/**
 * Get the bounds of the display feature translated to the View's coordinate space and current
 * position in the window. This will also include view padding in the calculations.
 */
private fun getFeatureBoundsInWindow(
    displayFeature: DisplayFeature,
    view: View,
    includePadding: Boolean = true
): Rect? {
    // Adjust the location of the view in the window to be in the same coordinate space as the feature.
    val viewLocationInWindow = IntArray(2)
    view.getLocationInWindow(viewLocationInWindow)

    // Intersect the feature rectangle in window with view rectangle to clip the bounds.
    val viewRect = Rect(
        viewLocationInWindow[0], viewLocationInWindow[1],
        viewLocationInWindow[0] + view.width, viewLocationInWindow[1] + view.height
    )

    // Include padding if needed
    if (includePadding) {
        viewRect.left += view.paddingLeft
        viewRect.top += view.paddingTop
        viewRect.right -= view.paddingRight
        viewRect.bottom -= view.paddingBottom
    }

    val featureRectInView = Rect(displayFeature.bounds)
    val intersects = featureRectInView.intersect(viewRect)

    // Checks to see if the display feature overlaps with our view at all
    if ((featureRectInView.width() == 0 && featureRectInView.height() == 0) ||
        !intersects
    ) {
        return null
    }

    // Offset the feature coordinates to view coordinate space start point
    featureRectInView.offset(-viewLocationInWindow[0], -viewLocationInWindow[1])

    return featureRectInView
}
有了顯示功能的邊界相關資訊,您就可以設定參考檢視畫面的正確高度,並據此移動。
alignViewToFoldingFeatureBounds 的完整程式碼會是:
MainActivity.kt - alignViewToFoldingFeatureBounds
private fun alignViewToFoldingFeatureBounds(newLayoutInfo: WindowLayoutInfo) {
    val constraintLayout = binding.constraintLayout
    val set = ConstraintSet()
    set.clone(constraintLayout)

    // Get and Translate the feature bounds to the View's coordinate space and current
    // position in the window.
    val foldingFeature = newLayoutInfo.displayFeatures[0] as FoldingFeature
    val bounds = getFeatureBoundsInWindow(foldingFeature, binding.root)

    bounds?.let { rect ->
        // Some devices have a 0px width folding feature. We set a minimum of 1px so we
        // can show the view that mirrors the folding feature in the UI and use it as reference.
        val horizontalFoldingFeatureHeight = (rect.bottom - rect.top).coerceAtLeast(1)
        val verticalFoldingFeatureWidth = (rect.right - rect.left).coerceAtLeast(1)

        // Sets the view to match the height and width of the folding feature
        set.constrainHeight(
            R.id.folding_feature,
            horizontalFoldingFeatureHeight
        )
        set.constrainWidth(
            R.id.folding_feature,
            verticalFoldingFeatureWidth
        )

        set.connect(
            R.id.folding_feature, ConstraintSet.START,
            ConstraintSet.PARENT_ID, ConstraintSet.START, 0
        )
        set.connect(
            R.id.folding_feature, ConstraintSet.TOP,
            ConstraintSet.PARENT_ID, ConstraintSet.TOP, 0
        )

        if (foldingFeature.orientation == FoldingFeature.Orientation.VERTICAL) {
            set.setMargin(R.id.folding_feature, ConstraintSet.START, rect.left)
            set.connect(
                R.id.layout_change, ConstraintSet.END,
                R.id.folding_feature, ConstraintSet.START, 0
            )
        } else {
            // FoldingFeature is Horizontal
            set.setMargin(
                R.id.folding_feature, ConstraintSet.TOP,
                rect.top
            )
            set.connect(
                R.id.layout_change, ConstraintSet.TOP,
                R.id.folding_feature, ConstraintSet.BOTTOM, 0
            )
        }

        // Set the view to visible and apply constraints
        set.setVisibility(R.id.folding_feature, View.VISIBLE)
        set.applyTo(constraintLayout)
    }
}
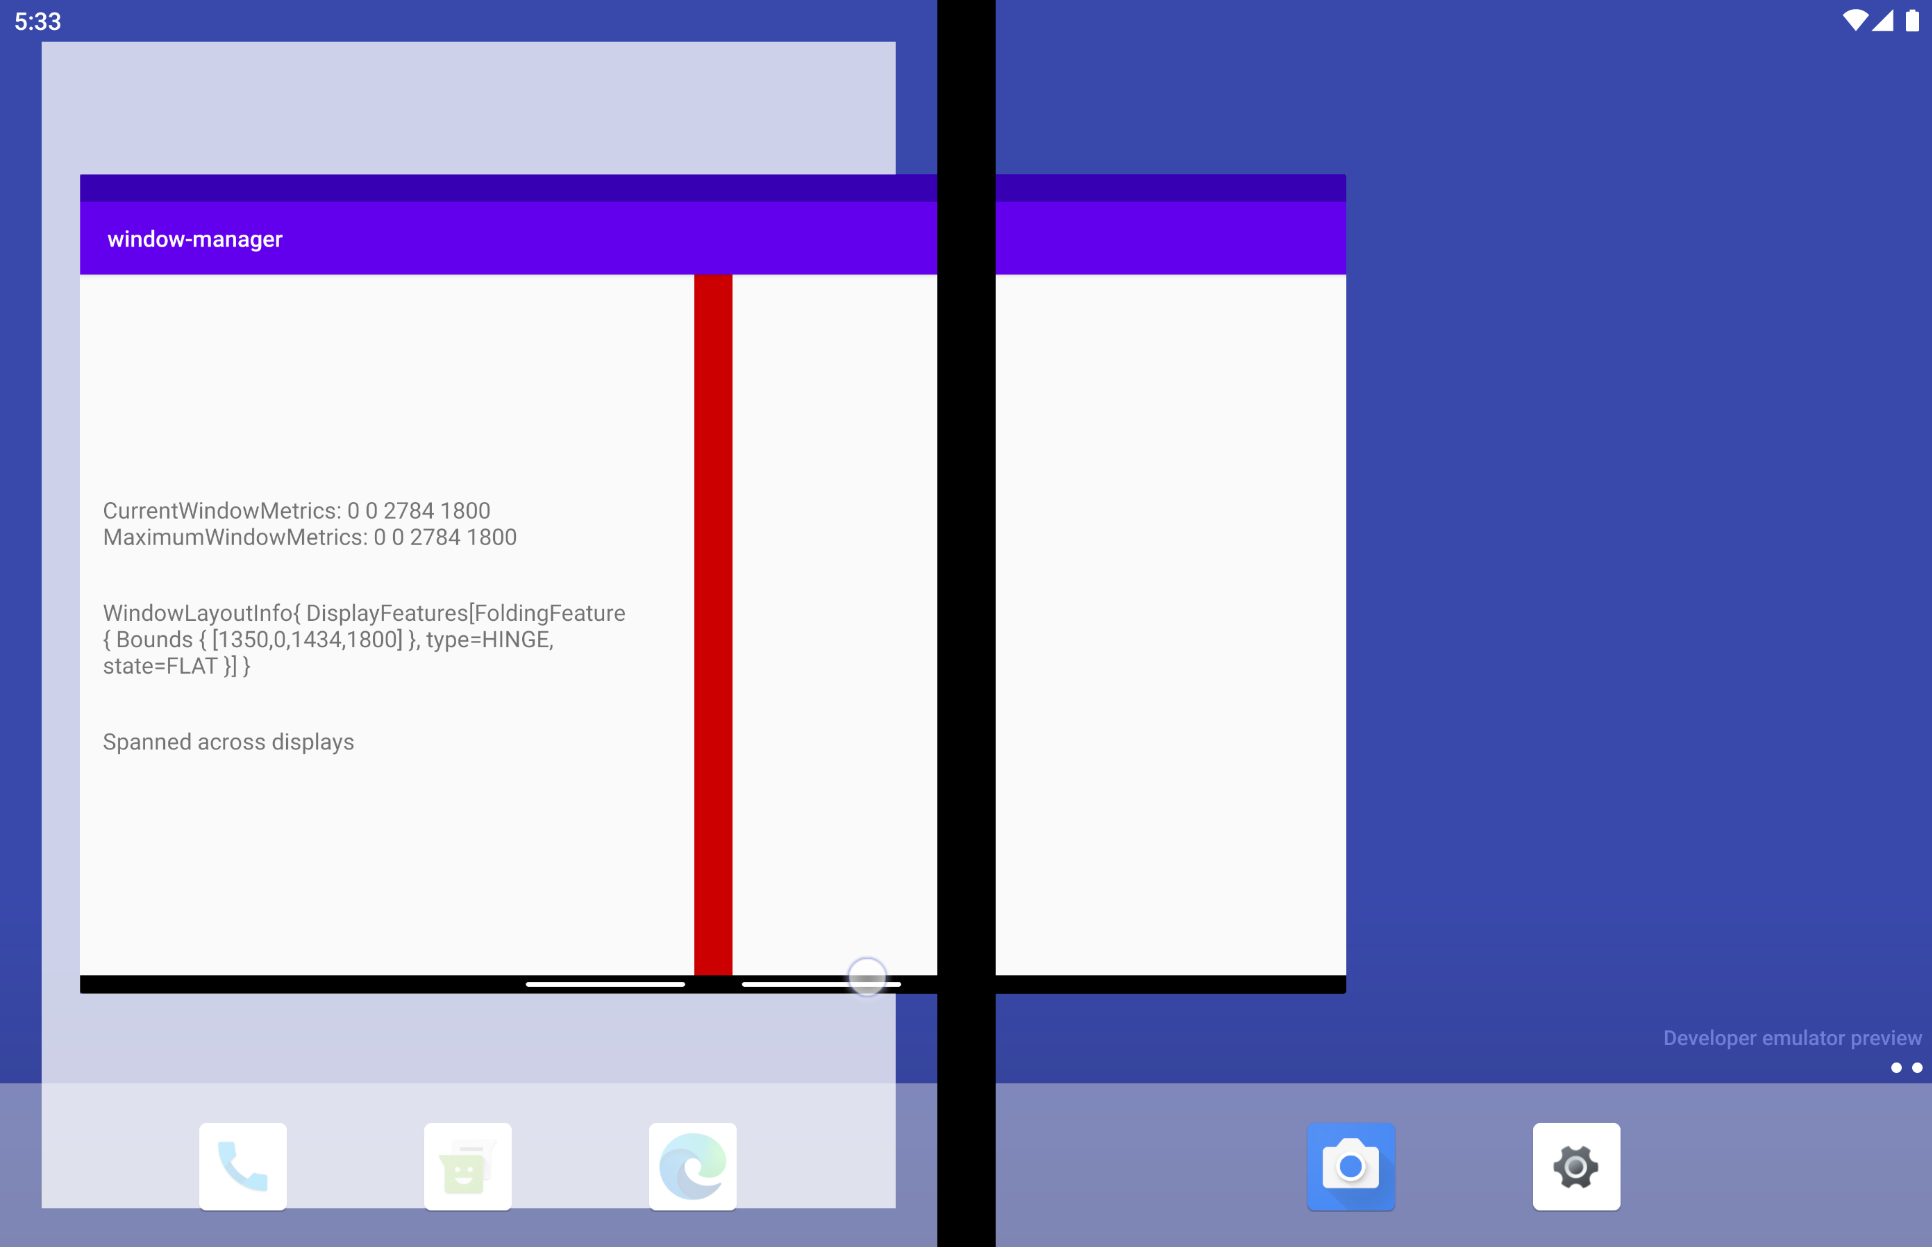
現在,與裝置顯示功能有所衝突的 TextView 會考量功能所在的位置,因此絕不會切除或隱藏相關內容:
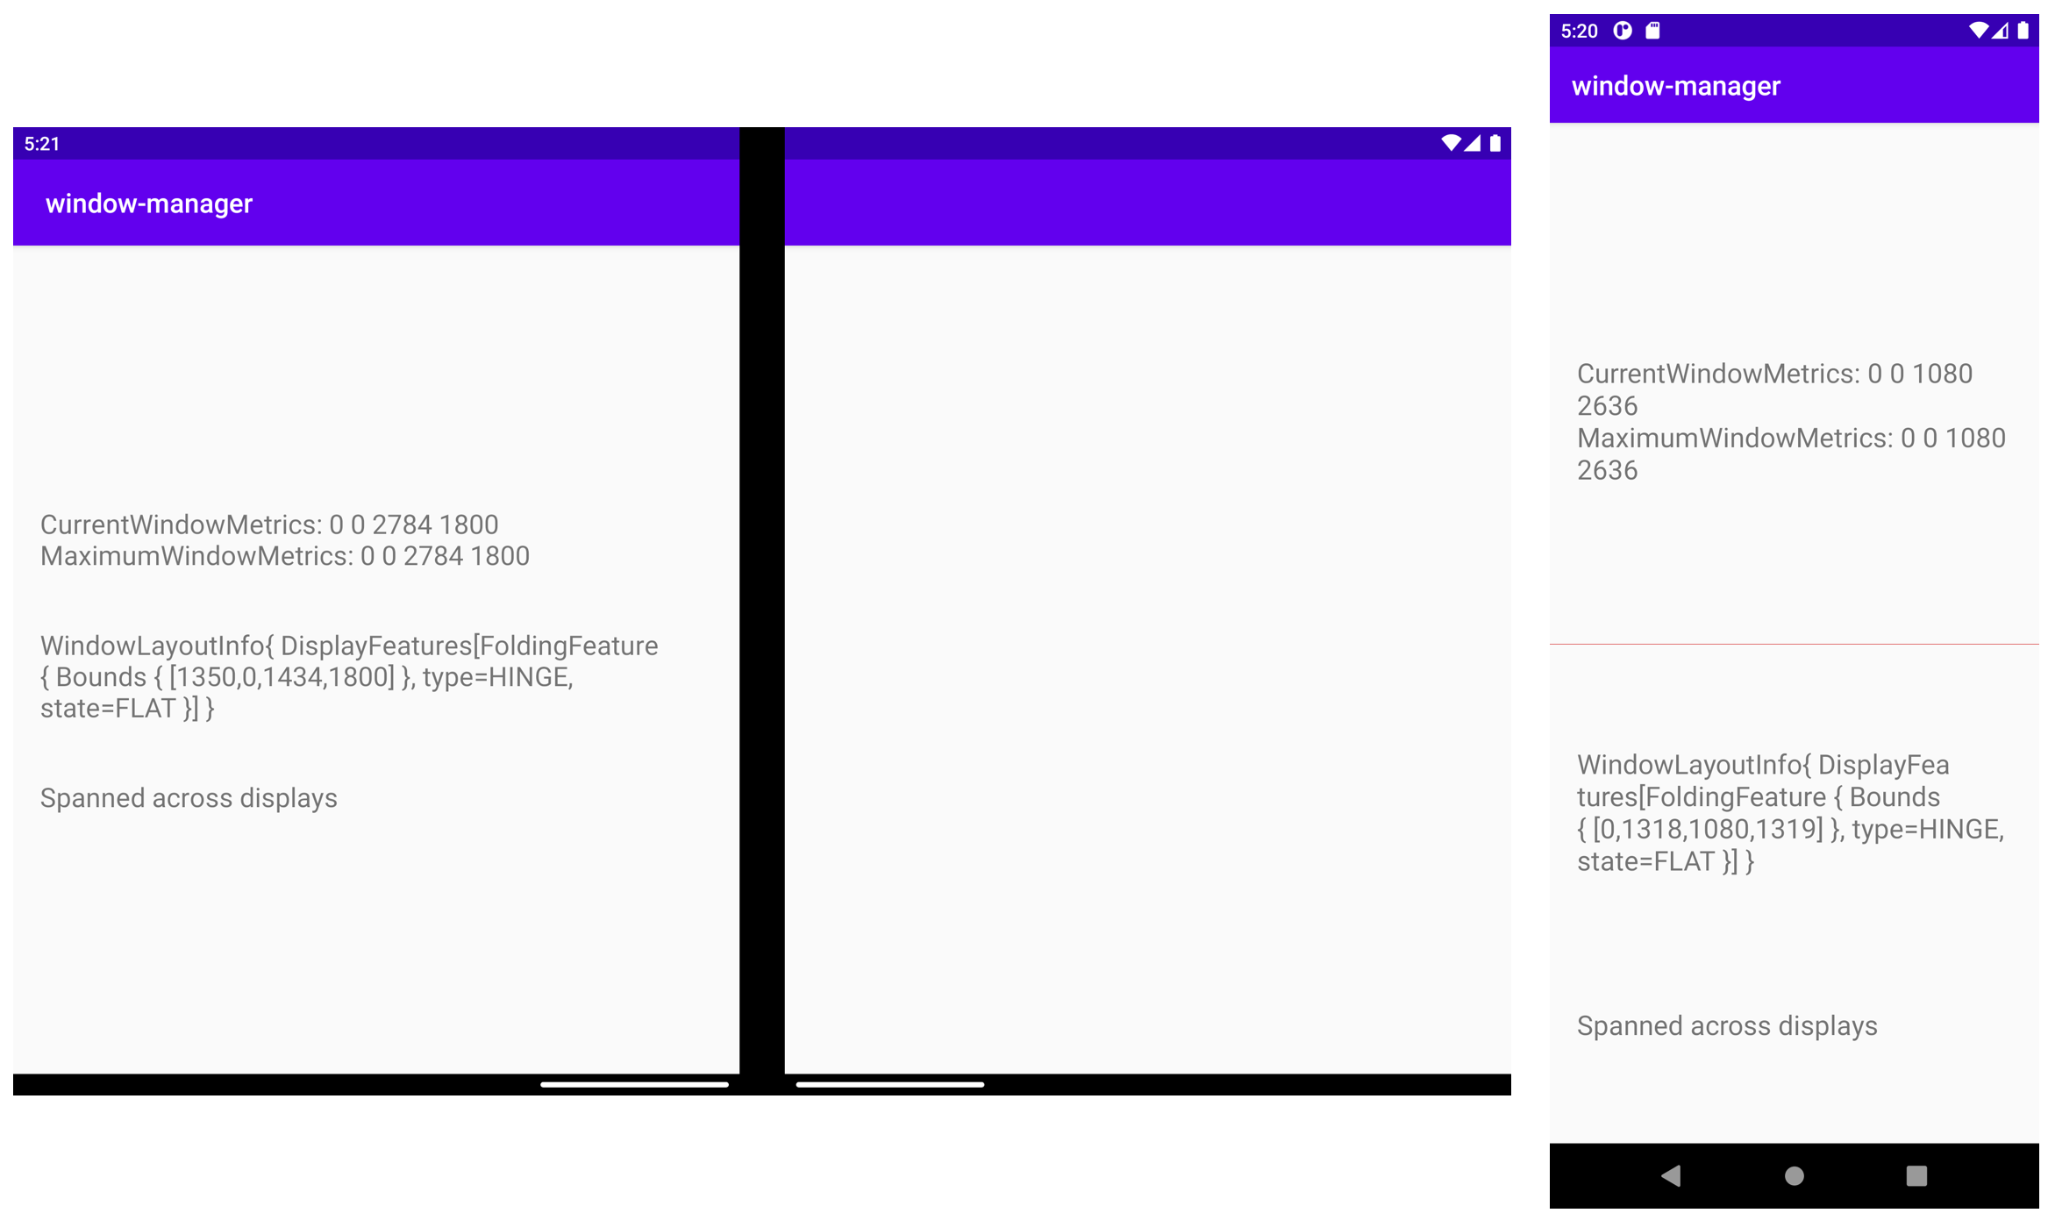
在雙螢幕模擬器中 (如上方左圖所示),您可以看到 TextView 如何橫跨多個螢幕顯示內容,先前被轉軸切斷的內容已正常顯示,因此也就不會遺漏任何資訊。
在摺疊式裝置模擬器 (如上方右圖所示) 中,您會看到淡紅色線條代表摺疊顯示功能所在的位置,而 TextView 現已置於此功能下方。因此,當裝置折疊時 (例如筆電型態的 90 度折疊),沒有任何資訊會受到此功能影響。
如果您疑惑為何在雙螢幕模擬器中沒看到顯示功能 (因為這是轉軸型裝置),實際上是轉軸隱藏了呈現功能的檢視畫面。不過,如果將應用程式從橫跨顯示改為非橫跨顯示,您會在功能所在位置看到高度和寬度都正確的檢視畫面。
8. 其他 Jetpack WindowManager 構件
除了主要構件,WindowManager 還提供其他實用構件,有助您以不同方式與元件互動,同時將您目前建構應用程式所用的環境納入考量。
Java 構件
如果您使用的是 Java 程式設計語言而非 Kotlin,或者透過回呼來監聽事件更適合您的架構,WindowManager 的 Java 構件可能就會派上用場,因為它提供了適用於 Java 的 API,可讓您透過回呼來註冊及取消註冊事件監聽器。
RxJava 構件
如果您已使用 RxJava (2 或 3 版),則可使用特定構件,無論您使用的是 Observables 或 Flowables,這些特定構件都有助於維持程式碼的一致性。
9. 使用 Jetpack WindowManager 進行測試
測試模擬器或裝置上的可折疊型態非常實用,有助於測試 UI 元素在 FoldingFeature 周圍的配置方式。
WindowManger 隨附實用的檢測設備測試構件,可用於這項測試。
一起來看看我們如何運用這項功能。
我們搭配主要的 WindowManager 依附元件,在應用程式 build.gradle 檔案中新增了測試構件:androidx.window:window-testing
window-testing 構件隨附了全新實用的 TestRule (名為 WindowLayoutInfoPublisherRule),有助您使用一串 WindowLayoutInfo 值進行測試。WindowLayoutInfoPublisherRule 可讓您根據需求,透過不同的 WindowLayoutInfo 值推送。
為方便使用,並以此為基礎建立可透過這項新構件測試 UI 的範例,請更新由 Android Studio 範本所建立的測試類別,將 ExampleInstrumentedTest 類別中的所有程式碼替換為下列內容:
ExampleInstrumentedTest.kt
import androidx.test.ext.junit.rules.ActivityScenarioRule
import androidx.test.ext.junit.runners.AndroidJUnit4
import androidx.window.testing.layout.WindowLayoutInfoPublisherRule
import org.junit.Rule
import org.junit.rules.RuleChain
import org.junit.rules.TestRule
import org.junit.runner.RunWith

@RunWith(AndroidJUnit4::class)
class MainActivityTest {
    private val activityRule = ActivityScenarioRule(MainActivity::class.java)
    private val publisherRule = WindowLayoutInfoPublisherRule()

    @get:Rule
    val testRule: TestRule

    init {
        testRule = RuleChain.outerRule(publisherRule).around(activityRule)
    }
}
上述規則已與 ActvityScenarioRule 鏈結在一起。
為了模擬 FoldingFeature,新構件隨附幾項非常實用的功能。以下,我們將採用最容易使用的功能來提供一些預設值。
在 MainActivity 中,TextView 會與摺疊功能的左側對齊。請建立測試,確保實作方式正確無誤。
建立名為 testText_is_left_of_Vertical_FoldingFeature 的測試:
ExampleInstrumentedTest.kt
import androidx.window.layout.FoldingFeature.Orientation.Companion.VERTICAL
import androidx.window.layout.FoldingFeature.State.Companion.FLAT
import androidx.window.testing.layout.FoldingFeature
import androidx.window.testing.layout.TestWindowLayoutInfo
import org.junit.Test

@Test
fun testText_is_left_of_Vertical_FoldingFeature() {
   activityRule.scenario.onActivity { activity ->
       val hinge = FoldingFeature(
           activity = activity,
           state = FLAT,
           orientation = VERTICAL,
           size = 2
       )

       val expected = TestWindowLayoutInfo(listOf(hinge))
       publisherRule.overrideWindowLayoutInfo(expected)
   }

   // Add Assertion with EspressoMatcher here

}
測試的 FoldingFeature 具有 FLAT 狀態,且螢幕方向為 VERTICAL。我們定義了特定大小,因為我們希望模擬的 FoldingFeature 顯示在測試的 UI 中,以便查看其在裝置上的位置。
我們會使用之前執行個體化的 WindowLayoutInfoPublishRule 來發布虛假的 FoldingFeaure,以便取得採用實際 WindowLayoutInfo 資料的結果:
最後一個步驟是測試使用者介面元素的位置適當對齊,以避免 FoldingFeature。方法很簡單,只要使用 EspressoMatchers,在剛剛建立的測試結尾加入宣告即可:
ExampleInstrumentedTest.kt
import androidx.test.espresso.assertion.PositionAssertions
import androidx.test.espresso.matcher.ViewMatchers.withId

onView(withId(R.id.layout_change)).check(
    PositionAssertions.isCompletelyLeftOf(withId(R.id.folding_feature))
)
完整的測試如下:
ExampleInstrumentedTest.kt
@Test
fun testText_is_left_of_Vertical_FoldingFeature() {
    activityRule.scenario.onActivity { activity ->
        val hinge = FoldingFeature(
            activity = activity,
            state = FoldingFeature.State.FLAT,
            orientation = FoldingFeature.Orientation.VERTICAL,
            size = 2
        )
        val expected = TestWindowLayoutInfo(listOf(hinge))
        publisherRule.overrideWindowLayoutInfo(expected)
    }
    onView(withId(R.id.layout_change)).check(
        PositionAssertions.isCompletelyLeftOf(withId(R.id.folding_feature))
    )
}
val horizontal_hinge = FoldingFeature(
   activity = activity,
   state = FLAT,
   orientation = HORIZONTAL,
   size = 2
)
您現在可以在裝置或模擬器上執行測試,檢查應用程式是否可正常運作。請注意,您不需要摺疊式裝置或模擬器即可執行這項測試。
10. 恭喜!
隨著摺疊式裝置問世,Jetpack WindowManager 可協助開發人員做好準備,因應這類採用全新板型規格的裝置。
WindowManager 提供的資訊十分實用,可讓開發人員根據摺疊式裝置調整應用程式,提升使用者體驗。
以下重點摘錄這個程式碼研究室介紹的內容:
- 什麼是摺疊式裝置?
- 不同摺疊式裝置的差異
- 摺疊式裝置、單螢幕裝置和平板電腦之間的差異
- Jetpack WindowManager API
- 使用 Jetpack WindowManager,並根據新的裝置版型規格調整我們的應用程式
- 使用 Jetpack WindowManager 進行測試