
1. 始める前に
Android Studio をパソコンにインストールしていない場合は、インストールします。Android Studio の実行に必要なシステム要件(ダウンロード ページの下部に記載されています)をパソコンが満たしていることを確認します。設定の手順について詳しくは、Codelab の「Android Studio のダウンロードとインストール」をご覧ください。
この Codelab では、Android Studio に用意されているプロジェクト テンプレートを使用して、初めての Android アプリを作成します。Kotlin と Jetpack Compose を使用して、アプリをカスタマイズします。なお、Android Studio は更新されて UI が変更されることがあるため、ご使用の Android Studio がこの Codelab のスクリーンショットと多少異なっていても問題ありません。
前提条件
- Kotlin の基礎知識があること
必要なもの
- Android Studio の最新バージョン
学習内容
- Android Studio で Android アプリを作成する方法
- Android Studio のプレビュー ツールでアプリを実行する方法
- Kotlin でテキストを更新する方法
- Jetpack Compose でユーザー インターフェース(UI)を更新する方法
- Jetpack Compose のプレビューでアプリのプレビューを表示する方法
作成するアプリの概要
- 自己紹介をカスタマイズできるアプリ
この Codelab が完了すると、アプリは次のようになります(ただし、ご自身の名前でカスタマイズします)。
必要なもの
- Android Studio がインストールされているパソコン。
2. テンプレートを使用してプロジェクトを作成する
この Codelab では、Android Studio に用意されている Empty Activity プロジェクト テンプレートを使用して Android アプリを作成します。
Android Studio でプロジェクトを作成するには:
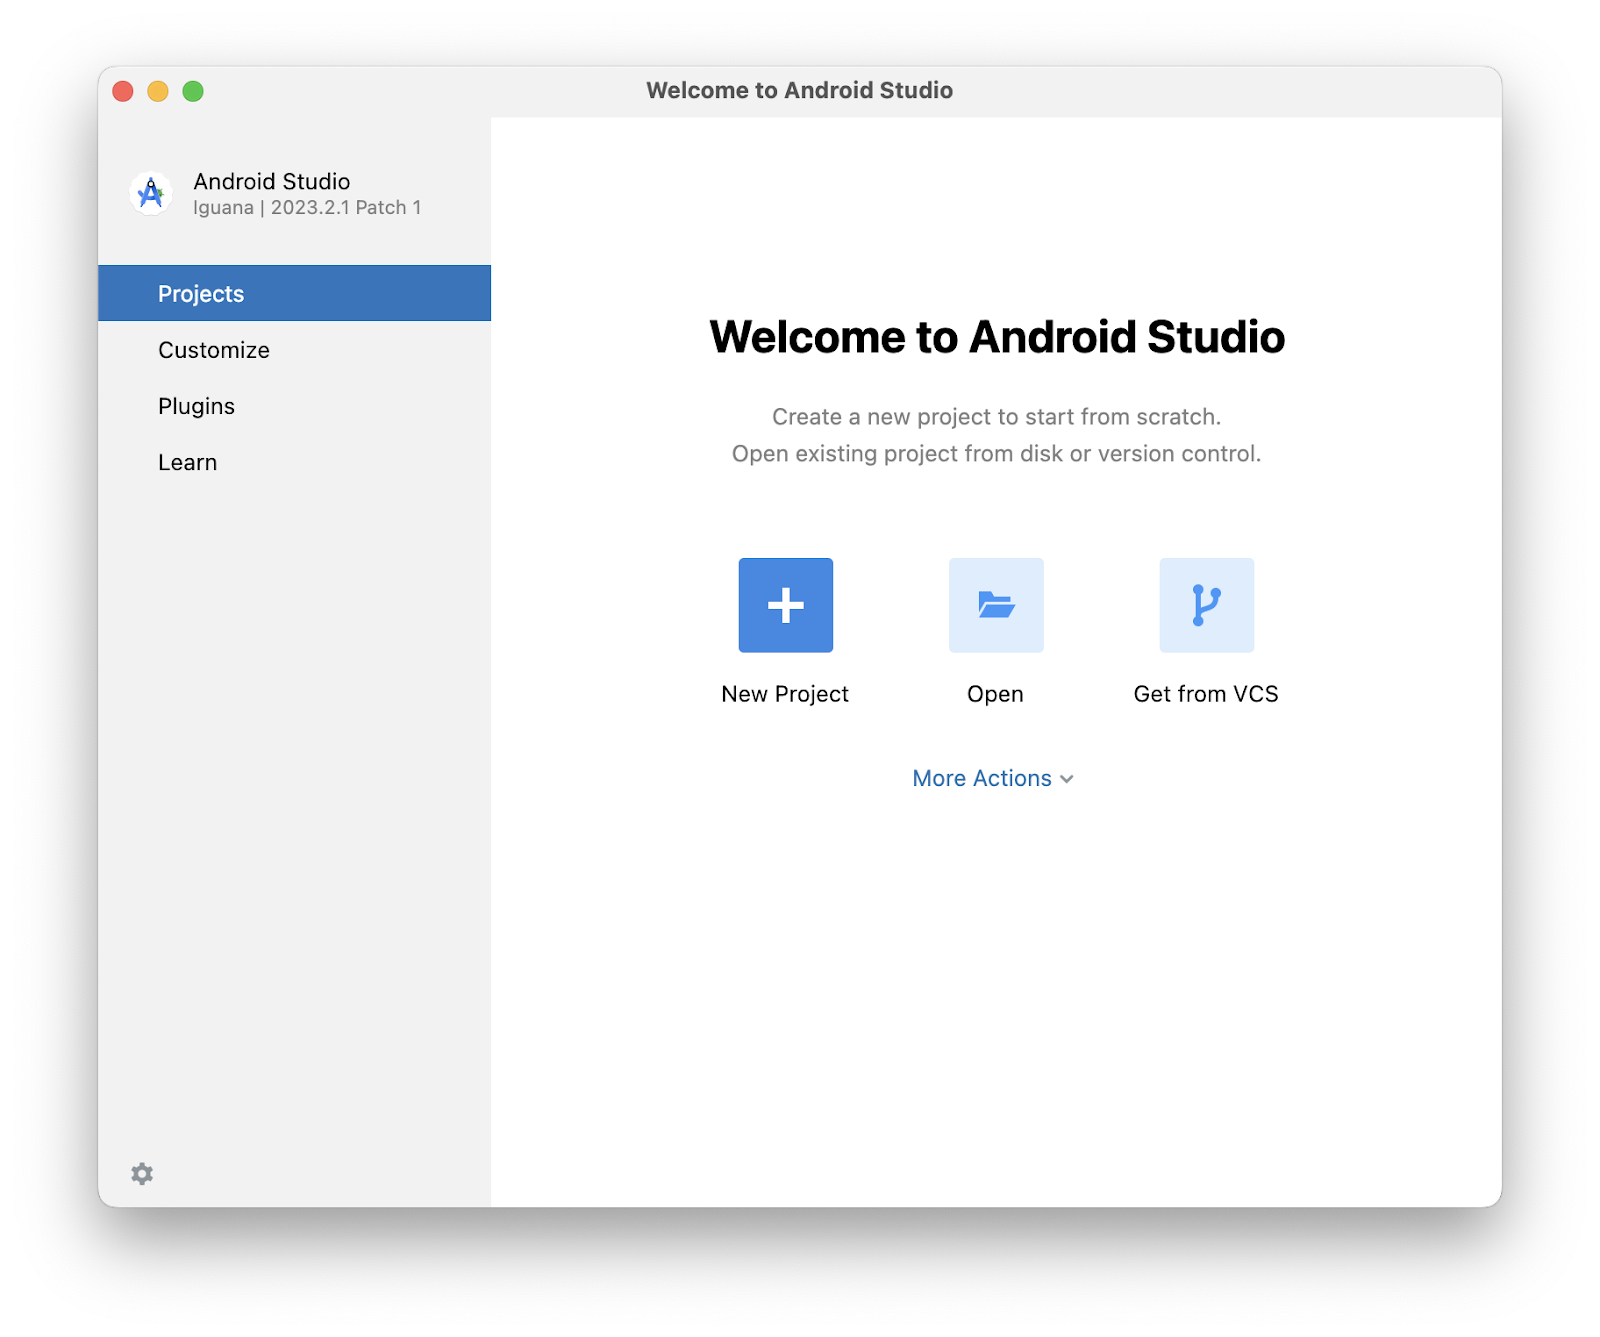
- Android Studio のアイコンをダブルクリックして Android Studio を起動します。

- [Welcome to Android Studio] ダイアログで、[New Project] をクリックします。
[New Project] ウィンドウが開き、Android Studio に用意されているテンプレートのリストが表示されます。
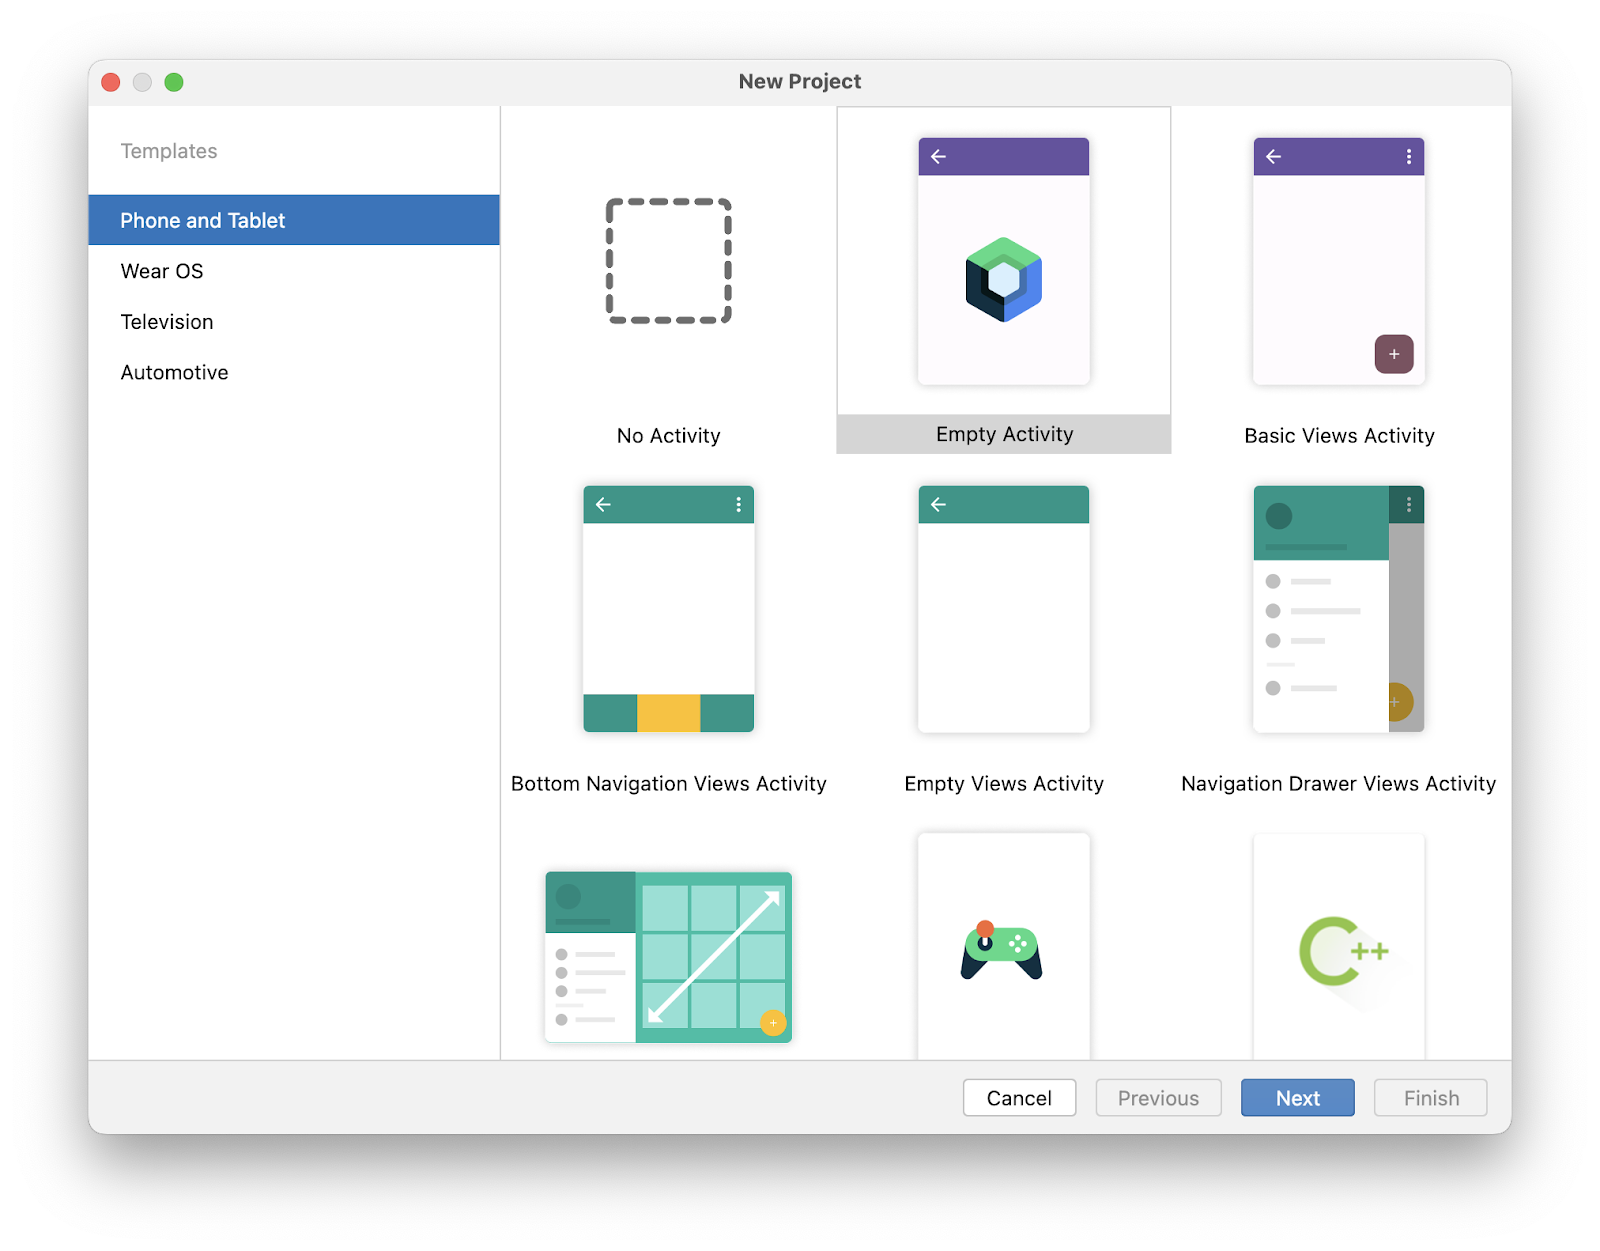
Android Studio のプロジェクト テンプレートは、ある種のアプリのブループリントを提供する Android プロジェクトです。テンプレートにより、プロジェクトの構造と、Android Studio でプロジェクトをビルドするために必要なファイルを作成します。選択したテンプレートによってスターター コードが提供されるため、作業を迅速に進めることができます。
- [Phone and Tablet] タブが選択されていることを確認します。
- [Empty Activity] テンプレートをクリックし、プロジェクトのテンプレートとして選択します。Empty Activity テンプレートは、Compose アプリの構築に使用できるシンプルなプロジェクトを作成するためのテンプレートです。単一の画面に「
"HelloAndroid!"」というテキストが表示されます。 - [Next] をクリックします。[New Project] ダイアログが開き、プロジェクトを設定するためのフィールドが表示されます。
- プロジェクトを次のように設定します。
[Name] フィールドは、プロジェクトの名前を入力するために使用します。この Codelab では「Greeting Card」と入力します。
[Package name] フィールドはそのままにしておきます。ファイル構造の中でどのようにファイルが整理されるかを示しています。この場合、パッケージ名は com.example.greetingcard です。
[Save location] フィールドはそのままにしておきます。プロジェクトに関連するすべてのファイルが保存される場所が表示されます。ファイルを見つけられるように、パソコンのどこに保存されるかをメモしておきます。
[Minimum SDK] フィールドのメニューから [API 24: Android 7.0 (Nougat)] を選択します。Minimum SDK は、アプリを実行できる Android の最小バージョンを示します。
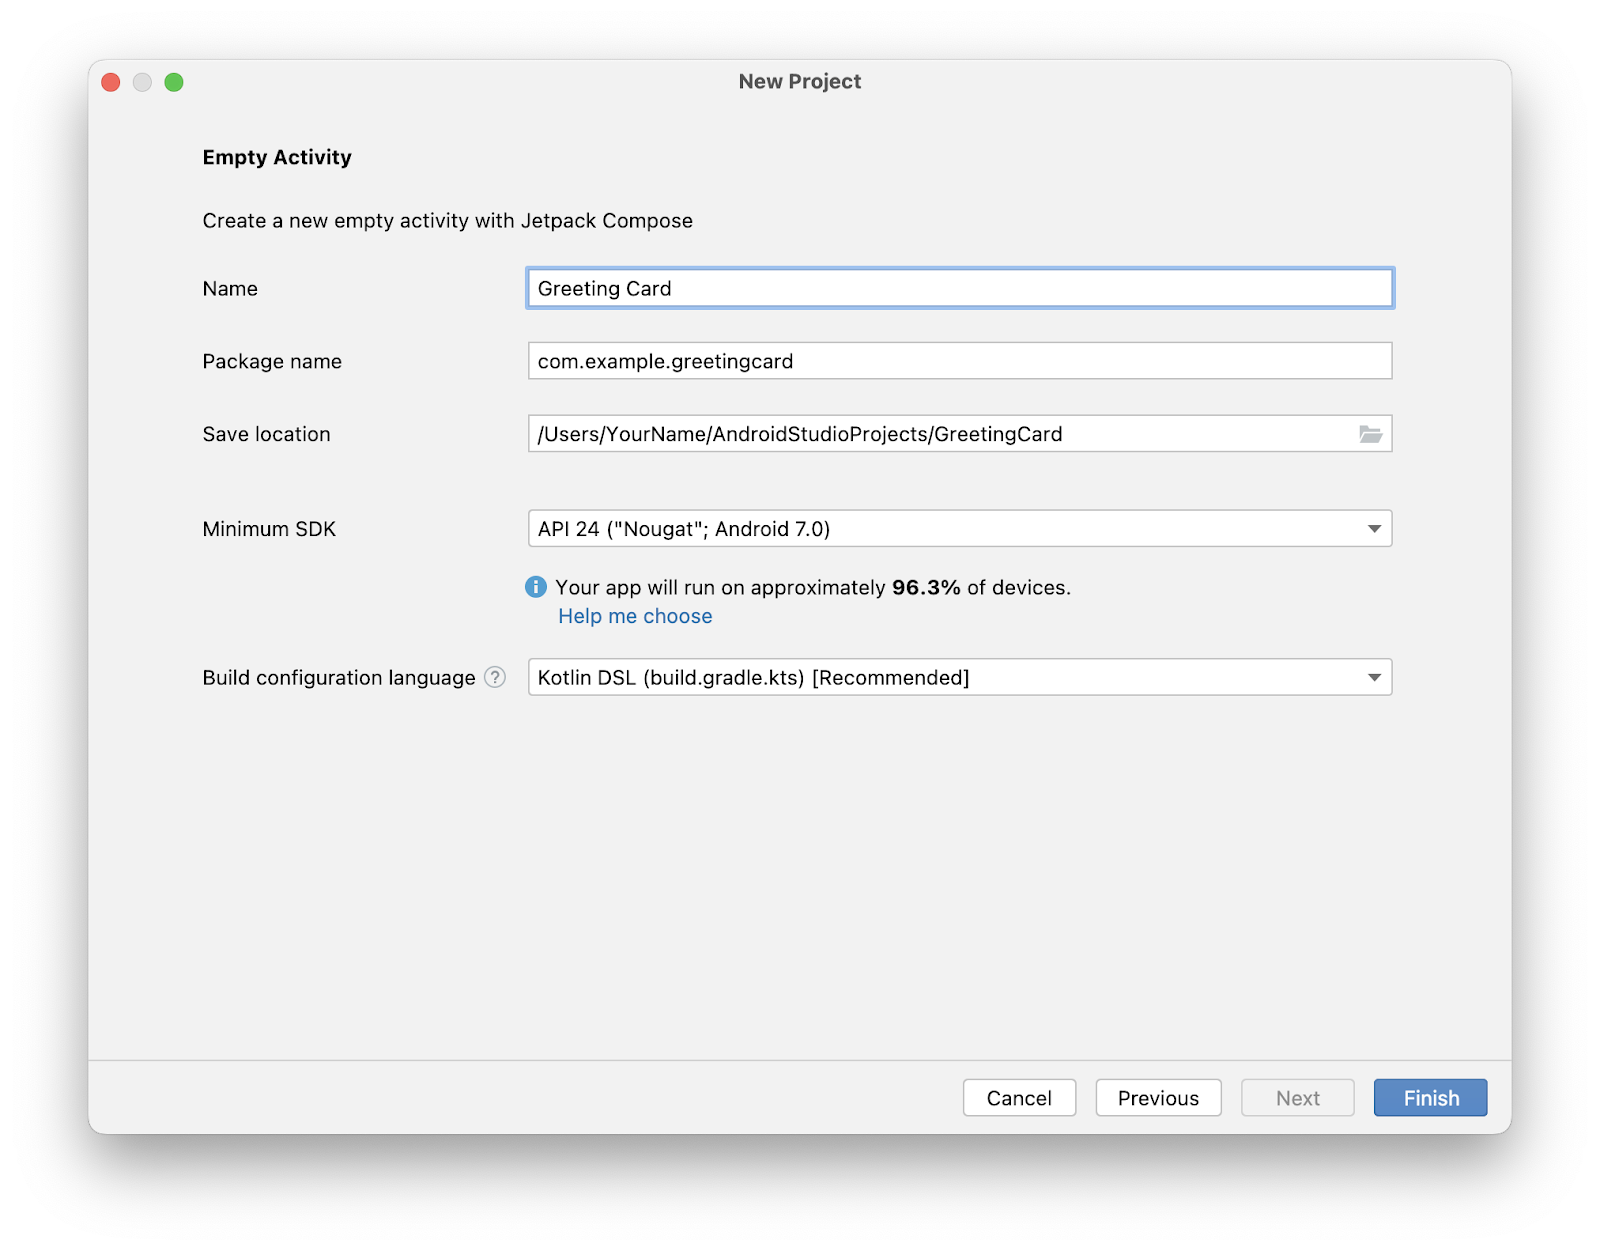
- [Finish] をクリックします。この処理には時間がかかることがあります。しばらくお待ちください。Android Studio のセットアップ中、Android Studio でプロジェクトがセットアップ中であることを示す進行状況バーとメッセージが表示されます。たとえば、次のようになります。

プロジェクトのセットアップが作成されると、次のようなメッセージが表示されます。

- [What's New] ペインには Android Studio の新機能に関する最新情報が記載されています。いったん閉じます。

- Android Studio の右上にある [Split] をクリックすると、コードとデザインの両方を表示できます。コードのみを表示するには [Code] をクリックし、デザインのみを表示するには [Design] をクリックします。
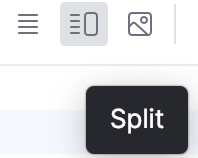
[Split] をクリックすると、次の 3 つのエリアが表示されます。

- [Project] ビュー(1)には、プロジェクトのファイルとフォルダが表示されます。
- [Code] ビュー(2)では、コードを編集します。
- [Design] ビュー(3)では、アプリの外観をプレビューします。
[Design] ビューには、空白のペインに次のテキストが表示されることがあります。

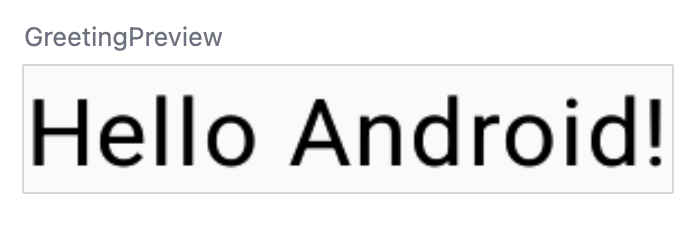
- [Build & Refresh] をクリックします。ビルドに時間がかかる場合がありますが、完了すると、プレビューに「Hello Android!」というテキスト ボックスが表示されます。Empty Compose アクティビティには、このアプリを作成するために必要なコードがすべて含まれています。
3. プロジェクト ファイルを探す
このセクションではファイル構造について理解を深めることで、引き続き Android Studio について説明します。
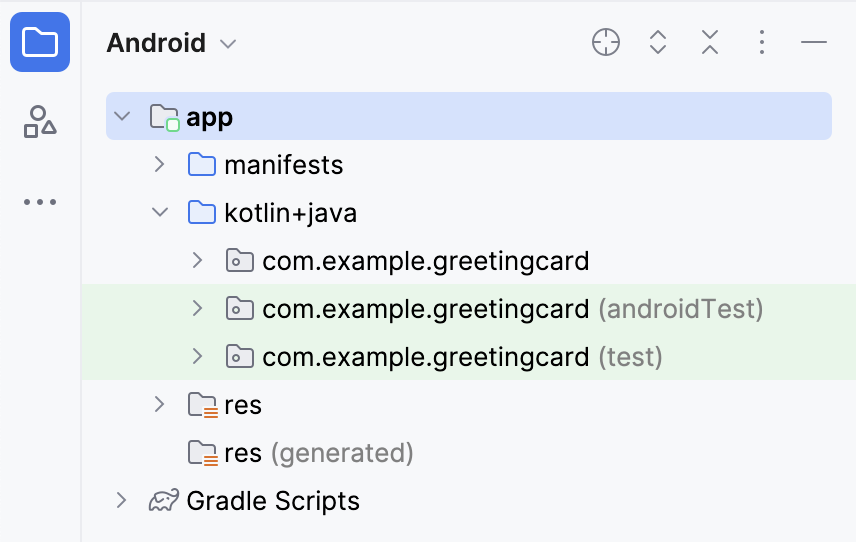
- Android Studio で [Project] タブを確認します。[Project] タブには、プロジェクトのファイルとフォルダが表示されます。プロジェクトをセットアップしたとき、パッケージ名は com.example.greetingcard でした。パッケージは、この [Project] タブで確認できます。パッケージとは基本的に、コードが配置されているフォルダのことです。Android Studio は、パッケージのセットで構成されたディレクトリ構造でプロジェクトを整理します。
- 必要に応じて、[Android] タブのプルダウン メニューから [Android] を選択します。
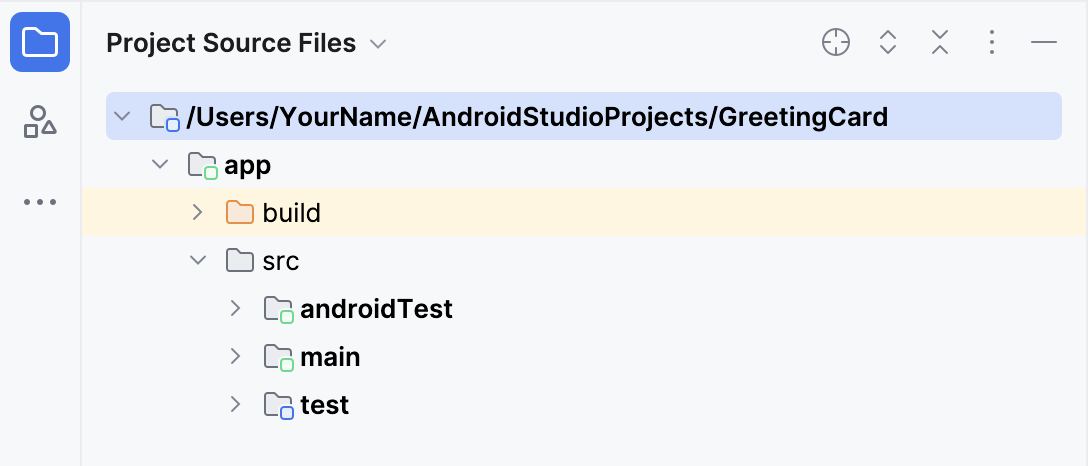
これが、使用するファイルの標準的なビューと構成です。アプリで作業するファイルに簡単にアクセスできるため、プロジェクトのコードを記述する場合に便利です。ただし、Finder や Windows のエクスプローラーなどのファイル ブラウザでファイルを確認すると、ファイル階層はまったく異なる構成になっています。
- プルダウン メニューから [Project Source Files] を選択します。これで、ファイル ブラウザと同じようにファイルを閲覧できるようになりました。
- もう一度 [Android] を選択し、さきほどのビューに戻ります。このコースでは Android ビューを使用します。ファイル構造がおかしい場合は、Android ビューになっていることを確認してください。
4. テキストを更新する
Android Studio について理解したところで、グリーティング カードを作成してみましょう。
MainActivity.kt ファイルの [Code] ビューを確認します。このコードには自動生成された関数があります(具体的には onCreate() 関数や setContent() 関数)。
class MainActivity : ComponentActivity() {
    override fun onCreate(savedInstanceState: Bundle?) {
        super.onCreate(savedInstanceState)
        setContent {
            GreetingCardTheme {
                // A surface container using the 'background' color from the theme
                Surface(
                    modifier = Modifier.fillMaxSize(),
                    color = MaterialTheme.colorScheme.background
                ) {
                    Greeting("Android")
                }
            }
        }
    }
}
onCreate() 関数は、この Android アプリのエントリ ポイントであり、他の関数を呼び出してユーザー インターフェースを構築します。Kotlin プログラムでは、main() 関数が実行のエントリ ポイントや開始点です。Android アプリでは、onCreate() 関数がその役割を担います。
onCreate() 関数内の setContent() 関数は、コンポーズ可能な関数を介してレイアウトを定義するために使用されます。@Composable アノテーションが付いた関数はすべて、setContent() 関数や他のコンポーズ可能な関数から呼び出すことができます。アノテーションは、Jetpack Compose がこの関数を使用して UI を生成することを Kotlin コンパイラに伝えます。
次に、Greeting() 関数を見てみましょう。Greeting() 関数はコンポーズ可能な関数です。この関数の上に @Composable アノテーションが付加されている点に留意してください。コンポーズ可能な関数は、入力を受け取り、画面に表示される内容を生成します。
@Composable
fun Greeting(name: String, modifier: Modifier = Modifier) {
    Text(
        text = "Hello $name!",
        modifier = modifier
    )
}
関数については以前に学習しました(復習が必要な場合は「Kotlin で関数を作成して使用する」の codelab をご覧ください)。ただし、コンポーズ可能な関数には異なる点がいくつかあります。
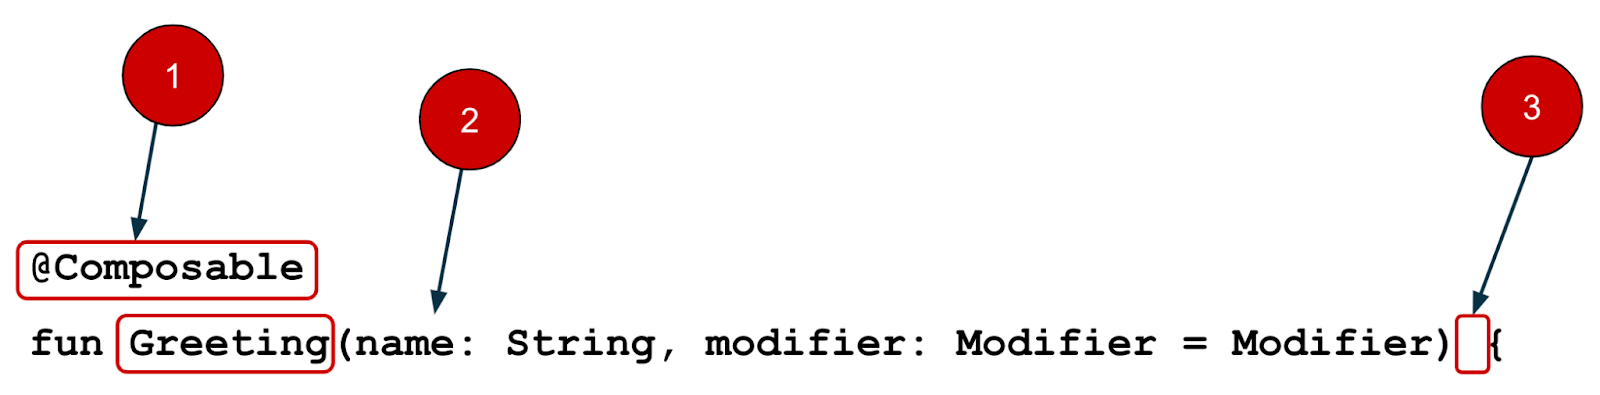
- 関数の前に
@Composableアノテーションを追加します。
- 関数の前に
@Composable関数名は大文字で始めます。
@Composable関数は何も返しません。
@Composable
fun Greeting(name: String, modifier: Modifier = Modifier) {
    Text(
        text = "Hello $name!",
        modifier = modifier
    )
}
現時点では、Greeting() 関数は名前を受け取り、その人物に Hello を表示します。
- 「Hello」と挨拶するのではなく自己紹介するように
Greeting()関数を更新します。
@Composable
fun Greeting(name: String, modifier: Modifier = Modifier) {
    Text(
        text = "Hi, my name is $name!",
        modifier = modifier
    )
}
- Android は自動的にプレビューを更新します。

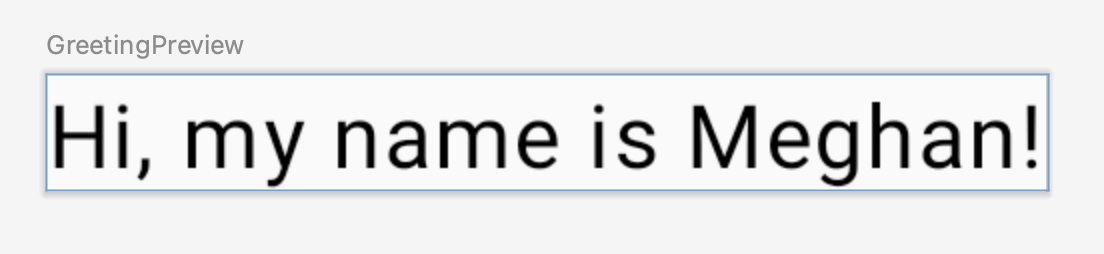
これで、テキストは変更されましたが、Android として自己紹介しています。これはおそらくご自身の名前ではないでしょう。今度は、ご自身の名前で自己紹介するようにカスタマイズしてみましょう。
GreetingPreview() 関数は、アプリ全体をビルドせずにコンポーザブルの外観を確認できる便利な機能です。コンポーザブルのプレビューを有効にするためには、@Composable と @Preview のアノテーションを追加します。@Preview アノテーションは、コンポーザブルをこのファイルのデザインビュー内で表示するように Android Studio に伝えます。
ご覧のとおり、@Preview アノテーションは showBackground というパラメータを受け取ります。showBackground を true に設定すると、コンポーザブルのプレビューに背景が追加されます。
Android Studio は、デフォルトではエディタにライトモードを使用するため、showBackground = true と showBackground = false の違いがわかりにくい場合があります。違いの見た目の例は次のとおりです。true に設定した場合の画像は背景が白くなっています。
|
|
 showBackground = true
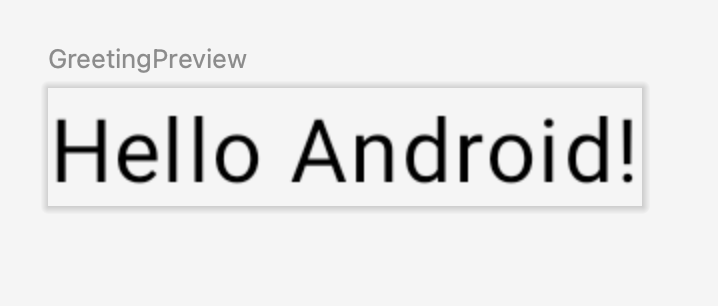 showBackground = false
- ご自身の名前を使用して
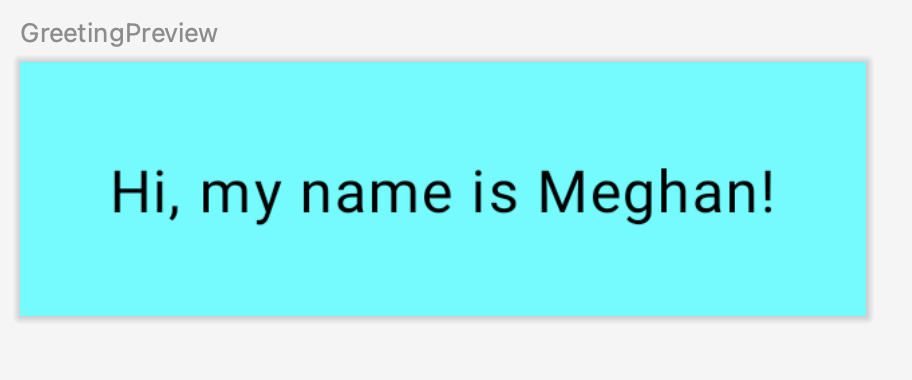
GreetingPreview()関数を更新します。次に再ビルドし、カスタマイズしたグリーティング カードを見てみましょう。
@Preview(showBackground = true)
@Composable
fun GreetingPreview() {
    GreetingCardTheme {
        Greeting("Meghan")
    }
}
5. 背景色を変更する
これで自己紹介のテキストが完成しました。しかし、これだけではあまりおもしろくありません。このセクションでは、背景色を変更する方法について説明します。
自己紹介のテキストに別の背景色を設定するには、テキストを Surface で囲む必要があります。Surface は、外観(背景色や枠線など)を変更できる UI のセクションを表すコンテナです。
- テキストを
Surfaceで囲むには、テキストの行をハイライト表示し、Windows の場合はAlt+Enterキー、Mac の場合はOption+Enterキーを押して、[Surround with widget] を選択します。
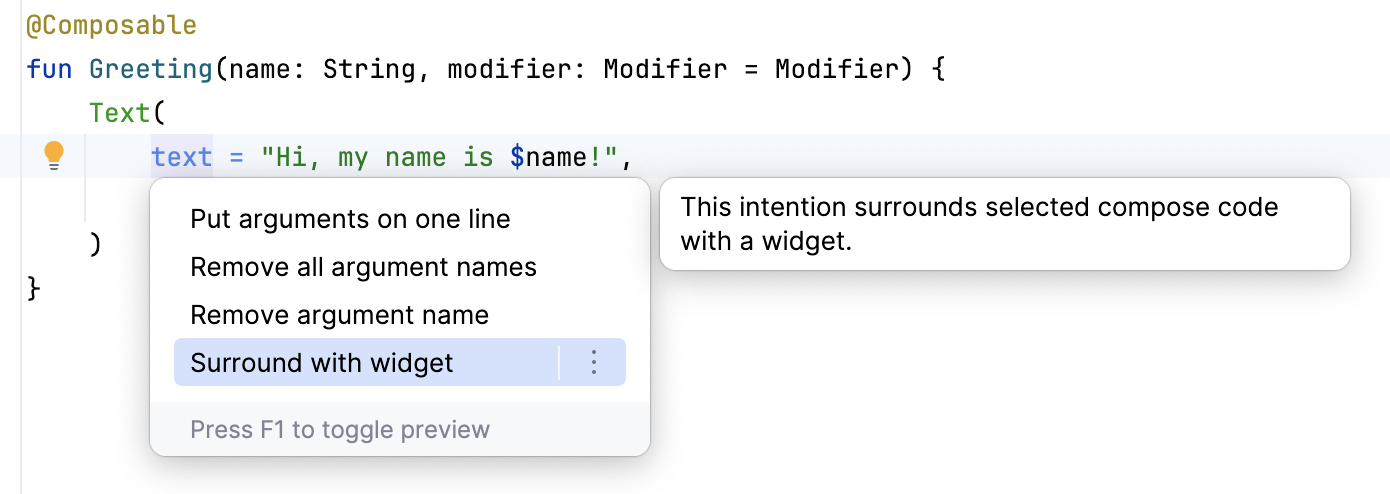
- [Surround with Container] を選択します。
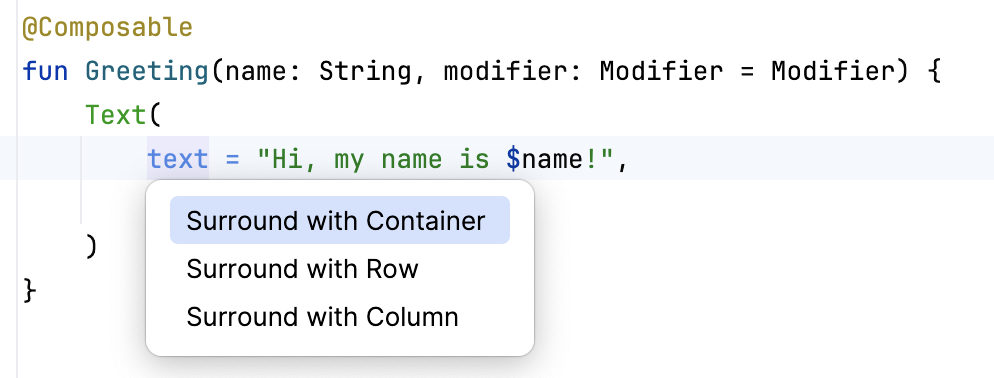
デフォルトで提供されるコンテナは Box ですが、別のコンテナタイプに変更することもできます。Box レイアウトについては、後ほど説明します。
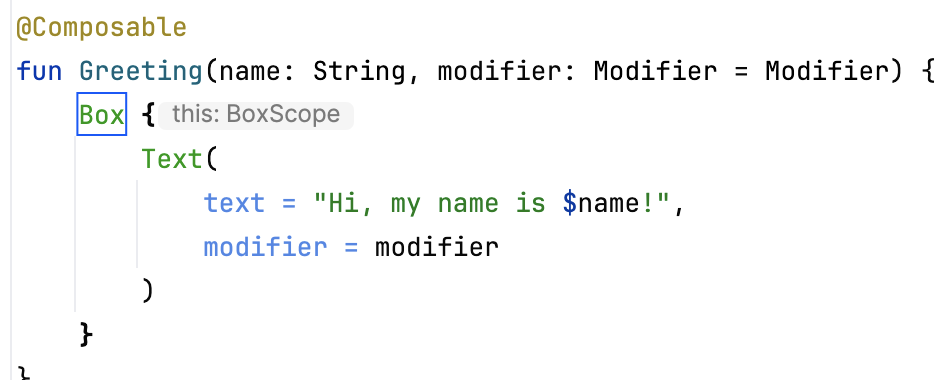
Boxを削除し、代わりに「Surface()」と入力します。
@Composable
fun Greeting(name: String, modifier: Modifier = Modifier) {
    Surface() {
        Text(
            text = "Hi, my name is $name!",
            modifier = modifier
        )
    }
}
Surfaceコンテナにcolorパラメータを追加するには、Colorに設定します。
@Composable
fun Greeting(name: String, modifier: Modifier = Modifier) {
    Surface(color = Color) {
        Text(
            text = "Hi, my name is $name!",
            modifier = modifier
        )
    }
}
- 「
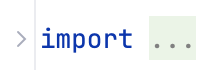
Color」と入力すると赤色で表示されます。これは、Android Studio ではこの問題を解決できないことを意味します。この問題を解決するには、[import] と表示されているファイルの先頭までスクロールして、3 つの点のボタンを押します。
- このステートメントをインポート リストの一番下に追加します。
import androidx.compose.ui.graphics.Color
インポートの全一覧は次のように表示されます。
import android.os.Bundle
import androidx.activity.ComponentActivity
import androidx.activity.compose.setContent
import androidx.compose.foundation.layout.Box
import androidx.compose.foundation.layout.fillMaxSize
import androidx.compose.material3.MaterialTheme
import androidx.compose.material3.Surface
import androidx.compose.material3.Text
import androidx.compose.runtime.Composable
import androidx.compose.ui.Modifier
import androidx.compose.ui.tooling.preview.Preview
import com.example.greetingcard.ui.theme.GreetingCardTheme
import androidx.compose.ui.graphics.Color
- コードでは、インポートをアルファベット順で保持し、不要なインポートを削除することをおすすめします。そのためには、上部のツールバーで [Help] を押し、「Optimize Imports」と入力して、[Optimize Imports] をクリックします。
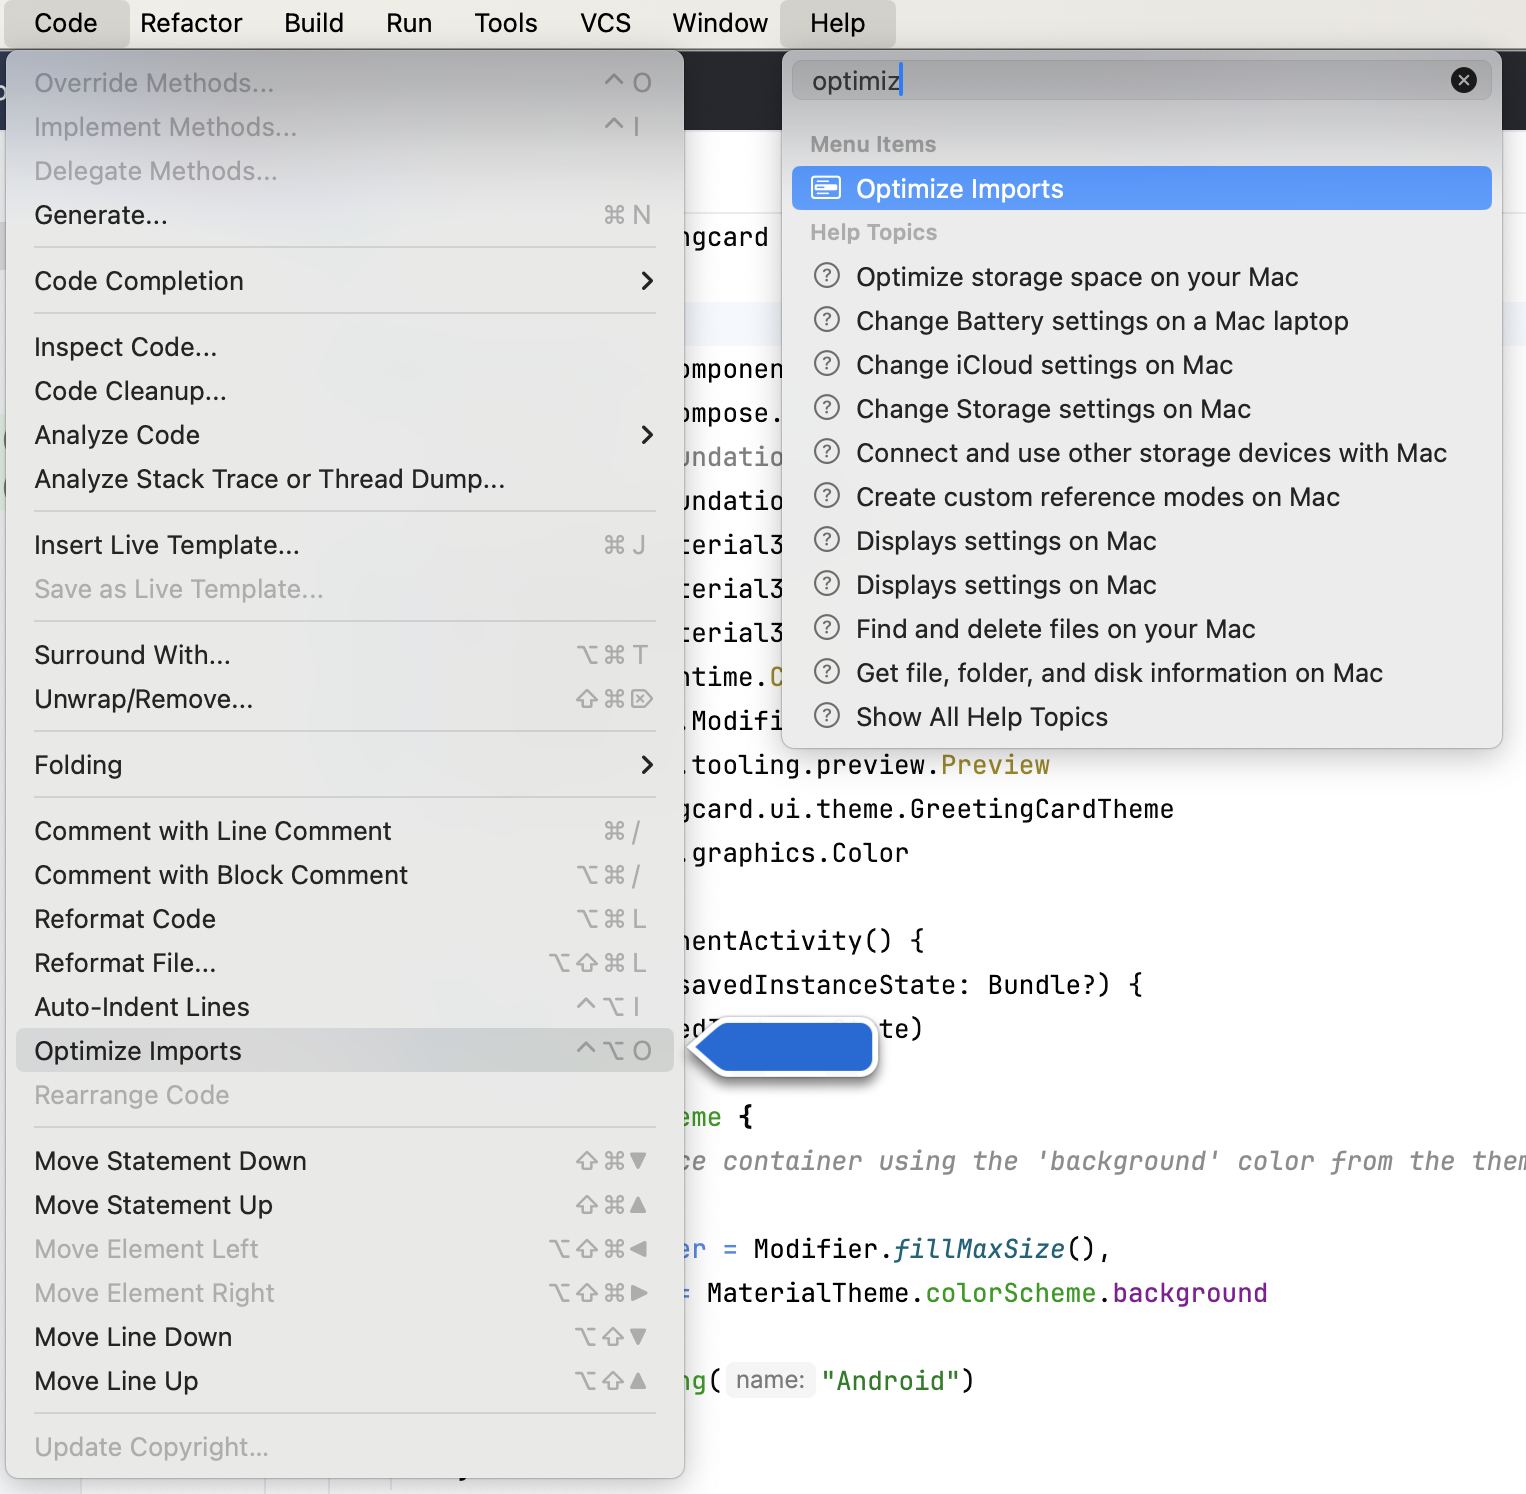
[Code] > [Optimize Imports] をクリックすることで、メニューから直接 [Optimize Imports] を開けます。場所がわからない場合は、ヘルプの検索オプションを使用してメニュー項目を見つけられます。
この時点でインポートの全一覧は次のように表示されます。
import android.os.Bundle
import androidx.activity.ComponentActivity
import androidx.activity.compose.setContent
import androidx.compose.foundation.layout.fillMaxSize
import androidx.compose.material3.MaterialTheme
import androidx.compose.material3.Surface
import androidx.compose.material3.Text
import androidx.compose.runtime.Composable
import androidx.compose.ui.Modifier
import androidx.compose.ui.graphics.Color
import androidx.compose.ui.tooling.preview.Preview
import com.example.greetingcard.ui.theme.GreetingCardTheme
- サーフェスの括弧内で入力した色は、赤色から赤色の下線に変更されています。これを修正するため、後ろにピリオドを追加します。ポップアップが開き、さまざまな色のオプションが表示されます。
これも Android Studio の便利な機能です。インテリジェントで、役に立つことがあります。この場合は色を指定しようとしているため、さまざまな色が提案されます。
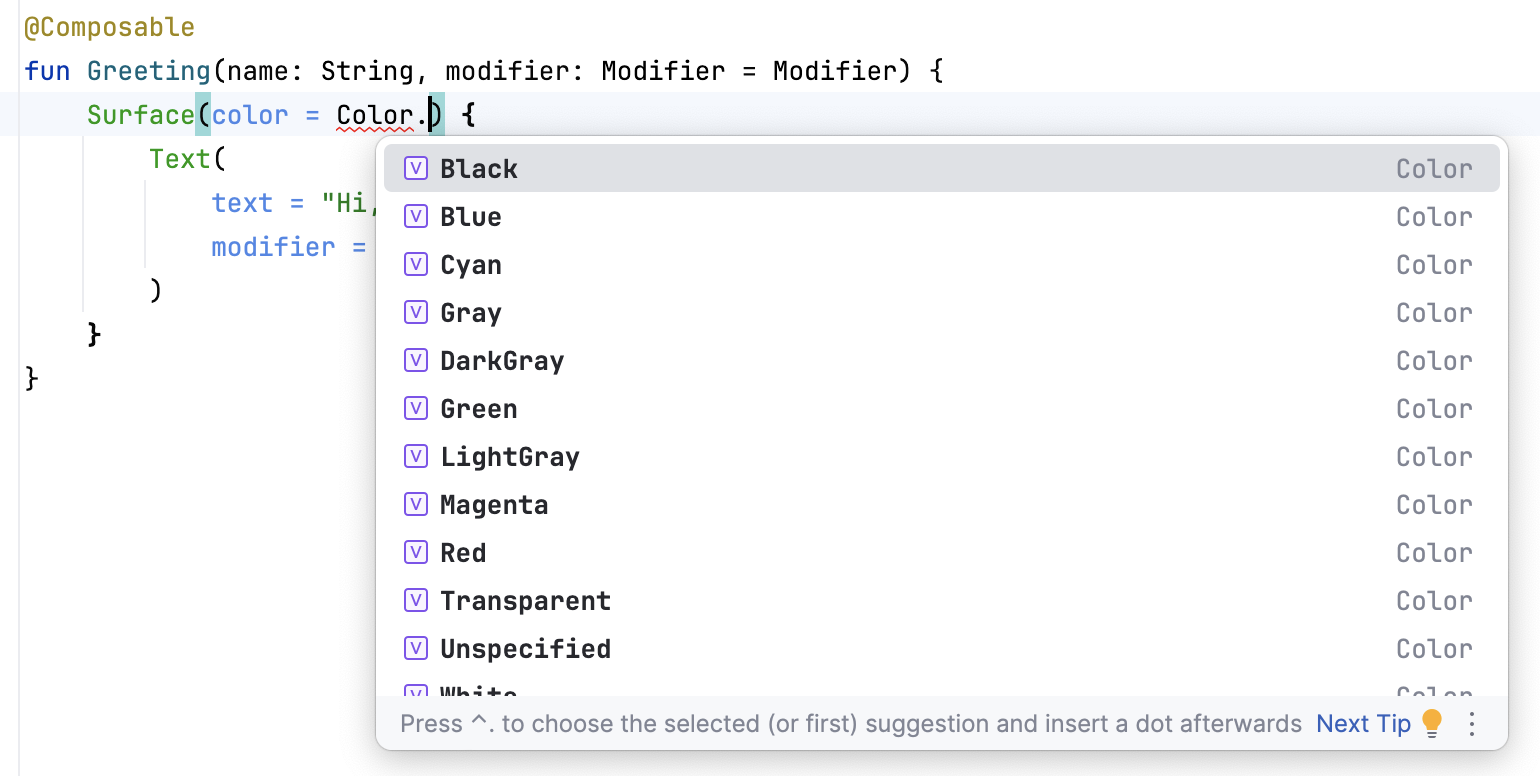
- サーフェスの色を選択します。この Codelab ではシアンを使用しますが、好きな色を選択できます。
@Composable
fun Greeting(name: String, modifier: Modifier = Modifier) {
   Surface(color = Color.Cyan) {
       Text(
           text = "Hi, my name is $name!",
           modifier = modifier
       )
   }
}
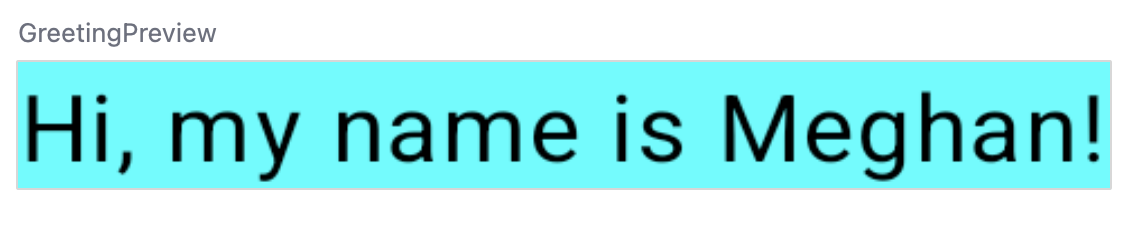
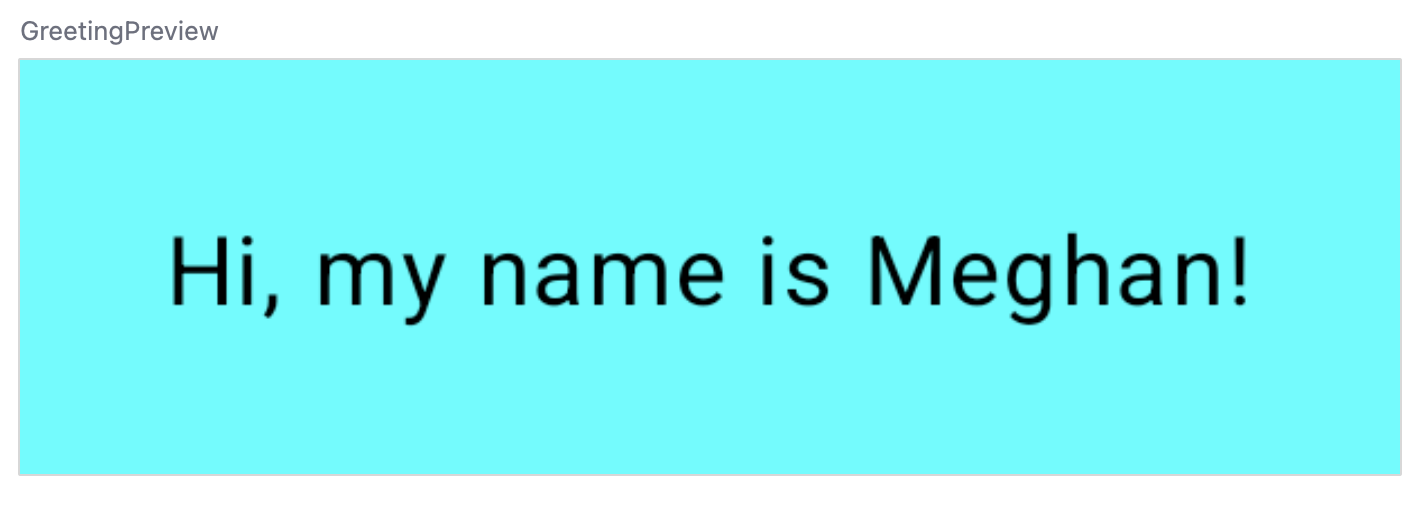
- 更新されたプレビューをご確認ください。
6. パディングを追加する
これでテキストに背景色が設定されました。今度はテキストの周囲に余白(パディング)を追加してみましょう。
Modifier は、コンポーザブルを拡張または装飾するために使用します。使用できる修飾子の一つに、padding 修飾子があります。これは要素の周囲に余白を設けます(この場合はテキストの周囲に余白を追加します)。そのためには Modifier.padding() 関数を使用します。
コンポーザブルはすべて、タイプ Modifier のオプション パラメータを持つ必要があります。これは最初のオプション パラメータです。
modifierにサイズ24.dpのパディングを追加します。
@Composable
fun Greeting(name: String, modifier: Modifier = Modifier) {
    Surface(color = Color.Cyan) {
        Text(
            text = "Hi, my name is $name!",
            modifier = modifier.padding(24.dp)
        )
    }
}
- これらのインポートを import ステートメント セクションに追加します。
[Optimize Imports] を使用して、新しいインポートをアルファベット順に並べ替えてください。
import androidx.compose.ui.unit.dp
import androidx.compose.foundation.layout.padding
おつかれさまでした。Compose で初めての Android アプリを作成しました。これはかなり大きな成果です。時間をかけてさまざまな色やテキストを試し、カスタマイズしてみましょう。
7. 解答コードを確認する
レビュー用コード スニペット
package com.example.greetingcard

import android.os.Bundle
import androidx.activity.ComponentActivity
import androidx.activity.compose.setContent
import androidx.compose.foundation.layout.fillMaxSize
import androidx.compose.foundation.layout.padding
import androidx.compose.material3.MaterialTheme
import androidx.compose.material3.Surface
import androidx.compose.material3.Text
import androidx.compose.runtime.Composable
import androidx.compose.ui.Modifier
import androidx.compose.ui.graphics.Color
import androidx.compose.ui.tooling.preview.Preview
import androidx.compose.ui.unit.dp
import com.example.greetingcard.ui.theme.GreetingCardTheme

class MainActivity : ComponentActivity() {
    override fun onCreate(savedInstanceState: Bundle?) {
        super.onCreate(savedInstanceState)
        setContent {
            GreetingCardTheme {
                // A surface container using the 'background' color from the theme
                Surface(
                    modifier = Modifier.fillMaxSize(),
                    color = MaterialTheme.colorScheme.background
                ) {
                    Greeting("Android")
                }
            }
        }
    }
}

@Composable
fun Greeting(name: String, modifier: Modifier = Modifier) {
    Surface(color = Color.Cyan) {
        Text(
            text = "Hi, my name is $name!",
            modifier = modifier.padding(24.dp)
        )
    }
}

@Preview(showBackground = true)
@Composable
fun GreetingPreview() {
    GreetingCardTheme {
        Greeting("Meghan")
    }
}
8. まとめ
これで、Android Studio について学び、Compose で初めての Android アプリを作成できました。
この Codelab は、「Compose を用いた Android アプリ開発の基礎」コースの一部です。エミュレータまたは実機でアプリを実行する方法については、このパスウェイの次の Codelab をご覧ください。
概要
- 新しいプロジェクトを作成するには、Android Studio を開き、[New Project] > [Empty Activity] > [Next] をクリックし、プロジェクトの名前を入力して設定を行います。
- アプリの外観を確認するには、[Preview] ペインを使用します。
- コンポーズ可能な関数は、通常の関数と似てはいますが少し異なります。関数名は大文字で始め、関数の前に
@Composableアノテーションを追加します。@Composable関数は何も返しません。 Modifierは、コンポーザブルを拡張または装飾するために使用します。