
1. 事前準備
即使沒有網際網路連線,也能使用行動裝置合作完成群組專案,或是分享影片、串流播放內容、玩多人遊戲,這不是很棒嗎?您當然可以實現這些願望。在本程式碼研究室中,您將瞭解如何達成上述目標。
為簡單起見,我們會建構一款不透過網際網路進行的「剪刀石頭布」多人遊戲。本程式碼研究室將說明如何使用 Google Play 服務提供的 Nearby Connections API,讓使用者能夠在實體鄰近範圍內相互通訊。使用者彼此之間的距離必須在約 100 公尺的範圍內。即使沒有網際網路連線,使用者可以分享的資料類型或數量仍無任何上限。使用者可以串流播放影片、收發語音訊息、傳送簡訊等等。
必要條件
- 具備 Kotlin 和 Android 開發作業的基本知識
- 如何在 Android Studio 上建立及執行應用程式
- 兩部以上 Android 裝置,用於執行及測試程式碼
- 搭載 Android API 級別 16 以上版本
- 已安裝 Google Play 服務
- 最新版 Android Studio
課程內容
- 如何將 Google Play 服務 Nearby Connections 程式庫新增至應用程式
- 如何廣播連線意願與鄰近裝置通訊
- 如何探索有連線意願的鄰近裝置
- 如何與連線裝置通訊
- 隱私權與資料保護的最佳做法
建構項目
本程式碼研究室將說明如何建構含單一活動的應用程式,讓使用者能夠找到玩「剪刀石頭布」遊戲的對手。這個應用程式包含下列 UI 元素:
- 用來尋找對手的按鈕
- 遊戲控制器有三個按鈕,可讓使用者選擇石頭、布、剪刀 (ROCK、PAPER 或 SCISSORS)
- 用於顯示分數的多個
TextView TextView用於顯示狀態
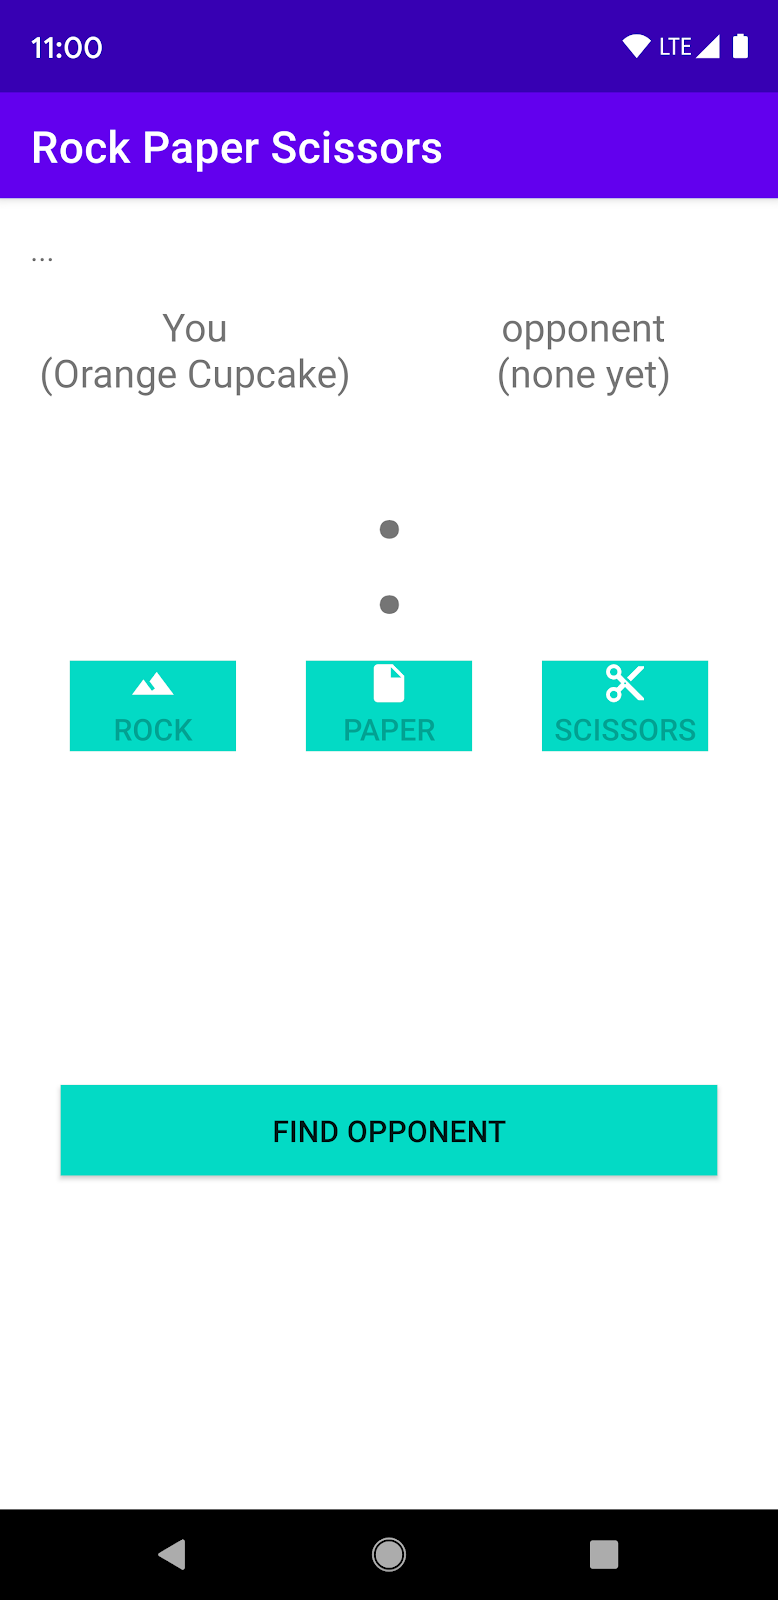
圖 1
2. 建立 Android Studio 專案
- 建立新的 Android Studio 專案。
- 選擇「Empty Activity」。
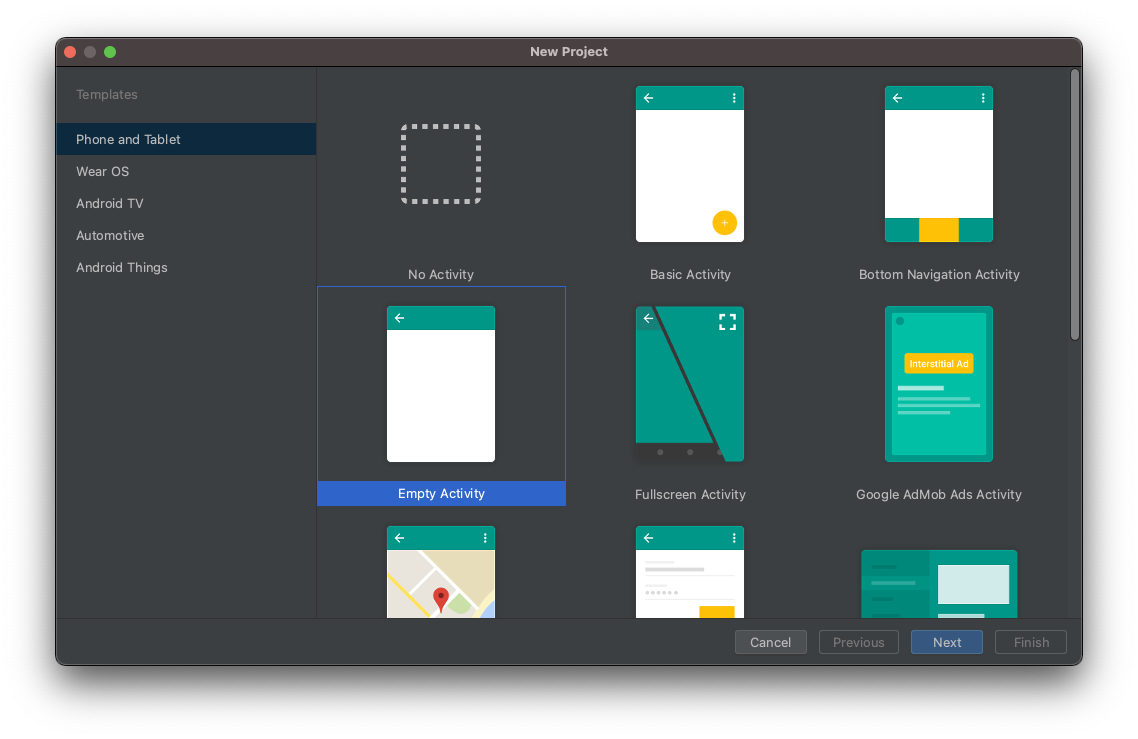
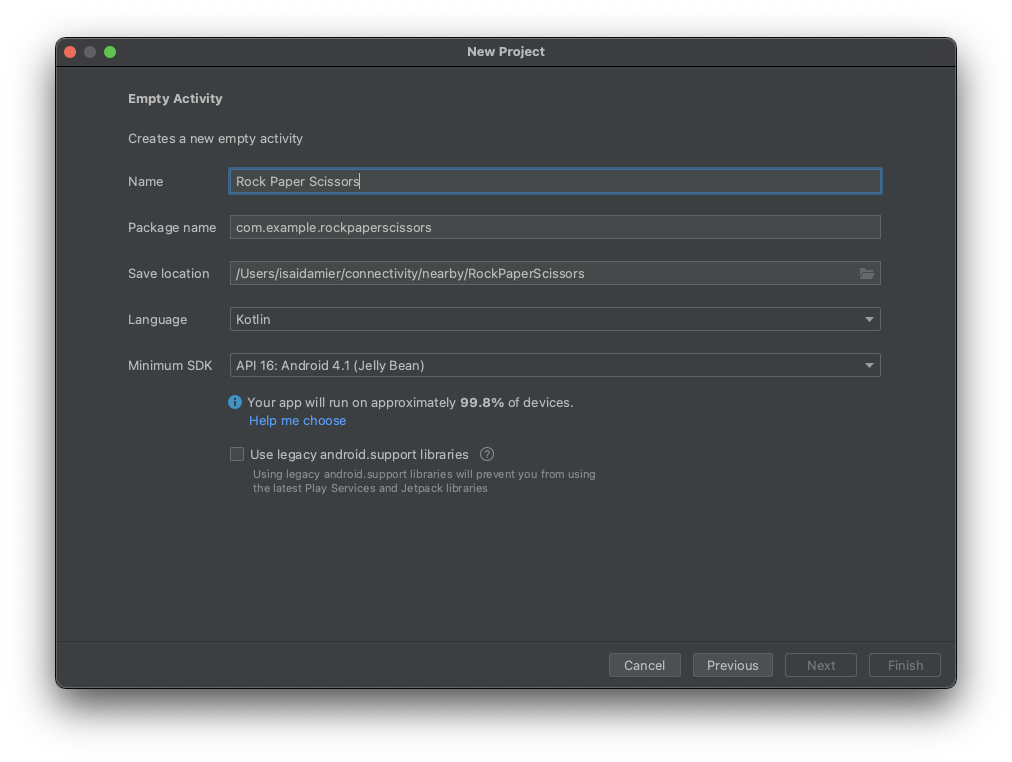
- 將專案命名為「Rock Paper Scissors」,並將語言設為 Kotlin。
3. 設定程式碼
- 將最新版本的 Nearby 依附元件加入應用程式層級的
build.gradle檔案。這可讓應用程式使用 Nearby Connections API,廣播連線、探索鄰近裝置及進行通訊的意願。
implementation 'com.google.android.gms:play-services-nearby:LATEST_VERSION'
- 在
android區塊中將「viewBinding」viewBinding建構選項設為true即可啟用「檢視繫結」,這樣便無須使用findViewById來與 View 互動。
android {
   ...
   buildFeatures {
       viewBinding true
   }
}
- 按一下「Sync Now」或綠色鐵鎚按鈕,讓 Android Studio 套用這些 Gradle 變更。

- 我們會使用向量可繪項目做為石頭、布和剪刀的圖片。將下列三個 XML 檔案加入
res/drawable目錄。
res/drawables/rock.xml
<vector xmlns:android="http://schemas.android.com/apk/res/android"
   android:height="24dp"
   android:tintMode="multiply"
   android:viewportHeight="48.0"
   android:viewportWidth="48.0"
   android:width="24dp">
 <path
     android:fillColor="#ffffff"
     android:pathData="M28,12l-7.5,10 5.7,7.6L23,32c-3.38,-4.5 -9,-12 -9,-12L2,36h44L28,12z"/>
</vector>
res/drawables/paper.xml
<vector xmlns:android="http://schemas.android.com/apk/res/android"
   android:height="24dp"
   android:tintMode="multiply"
   android:viewportHeight="48.0"
   android:viewportWidth="48.0"
   android:width="24dp">
 <path
     android:fillColor="#ffffff"
     android:pathData="M28,4L12,4C9.79,4 8.02,5.79 8.02,8L8,40c0,2.21 1.77,4 3.98,4L36,44c2.21,0 4,-1.79 4,-4L40,16L28,4zM26,18L26,7l11,11L26,18z"/>
</vector>
res/drawables/scissors.xml
<vector xmlns:android="http://schemas.android.com/apk/res/android"
   android:width="24dp"
   android:height="24dp"
   android:tintMode="multiply"
   android:viewportWidth="48.0"
   android:viewportHeight="48.0">
   <path
       android:fillColor="#ffffff"
       android:pathData="M19.28,15.28c0.45,-1 0.72,-2.11 0.72,-3.28 0,-4.42 -3.58,-8 -8,-8s-8,3.58 -8,8 3.58,8 8,8c1.17,0 2.28,-0.27 3.28,-0.72L20,24l-4.72,4.72c-1,-0.45 -2.11,-0.72 -3.28,-0.72 -4.42,0 -8,3.58 -8,8s3.58,8 8,8 8,-3.58 8,-8c0,-1.17 -0.27,-2.28 -0.72,-3.28L24,28l14,14h6v-2L19.28,15.28zM12,16c-2.21,0 -4,-1.79 -4,-4s1.79,-4 4,-4 4,1.79 4,4 -1.79,4 -4,4zM12,40c-2.21,0 -4,-1.79 -4,-4s1.79,-4 4,-4 4,1.79 4,4 -1.79,4 -4,4zM24,25c-0.55,0 -1,-0.45 -1,-1s0.45,-1 1,-1 1,0.45 1,1 -0.45,1 -1,1zM38,6L26,18l4,4L44,8L44,6z" />
</vector>
- 為遊戲畫面新增遊戲控制器 (也就是遊戲按鈕),以及分數和狀態
TextView。將activity_main.xml檔案中的程式碼替換成以下程式碼:
<?xml version="1.0" encoding="utf-8"?>
<androidx.constraintlayout.widget.ConstraintLayout
   xmlns:android="http://schemas.android.com/apk/res/android"
   xmlns:app="http://schemas.android.com/apk/res-auto"
   xmlns:tools="http://schemas.android.com/tools"
   android:layout_width="match_parent"
   android:layout_height="match_parent"
   tools:context=".MainActivity">

   <TextView
       android:id="@+id/status"
       android:layout_width="match_parent"
       android:layout_height="wrap_content"
       android:padding="16dp"
       android:text="searching..."
       app:layout_constraintBottom_toTopOf="@+id/myName"
       app:layout_constraintEnd_toEndOf="parent"
       app:layout_constraintStart_toStartOf="parent"
       app:layout_constraintTop_toTopOf="parent"
       />

   <TextView
       android:id="@+id/myName"
       android:layout_width="0dp"
       android:layout_height="wrap_content"
       android:layout_gravity="center"
       android:text="You (codeName)"
       android:textAlignment="center"
       android:textAppearance="?android:textAppearanceMedium"
       app:layout_constraintEnd_toStartOf="@+id/opponentName"
       app:layout_constraintStart_toStartOf="parent"
       app:layout_constraintTop_toBottomOf="@+id/status"
       />

   <TextView
       android:id="@+id/opponentName"
       android:layout_width="0dp"
       android:layout_height="wrap_content"
       android:layout_gravity="center"
       android:text="Opponent (codeName)"
       android:textAlignment="center"
       android:textAppearance="?android:textAppearanceMedium"
       app:layout_constraintEnd_toEndOf="parent"
       app:layout_constraintStart_toEndOf="@+id/myName"
       app:layout_constraintTop_toBottomOf="@+id/status"
       />

   <TextView
       android:id="@+id/score"
       android:layout_width="match_parent"
       android:layout_height="wrap_content"
       android:layout_gravity="center"
       android:layout_margin="16dp"
       android:text=":"
       android:textAlignment="center"
       android:textSize="80sp"
       app:layout_constraintEnd_toEndOf="parent"
       app:layout_constraintStart_toStartOf="parent"
       app:layout_constraintTop_toBottomOf="@+id/myName"
       />

   <androidx.appcompat.widget.AppCompatButton
       android:id="@+id/rock"
       android:layout_width="wrap_content"
       android:layout_height="wrap_content"
       android:drawableTop="@drawable/rock"
       android:text="Rock"
       app:layout_constraintEnd_toStartOf="@+id/paper"
       app:layout_constraintHorizontal_chainStyle="spread"
       app:layout_constraintStart_toStartOf="parent"
       app:layout_constraintTop_toBottomOf="@+id/score"
       />

   <androidx.appcompat.widget.AppCompatButton
       android:id="@+id/paper"
       android:layout_width="wrap_content"
       android:layout_height="wrap_content"
       android:drawableTop="@drawable/paper"
       android:text="Paper"
       app:layout_constraintEnd_toStartOf="@+id/scissors"
       app:layout_constraintStart_toEndOf="@+id/rock"
       app:layout_constraintTop_toBottomOf="@+id/score"
       />

   <androidx.appcompat.widget.AppCompatButton
       android:id="@+id/scissors"
       android:layout_width="wrap_content"
       android:layout_height="wrap_content"
       android:drawableTop="@drawable/scissors"
       android:text="Scissors"
       app:layout_constraintEnd_toEndOf="parent"
       app:layout_constraintStart_toEndOf="@+id/paper"
       app:layout_constraintTop_toBottomOf="@+id/score"
       />

   <androidx.appcompat.widget.AppCompatButton
       android:id="@+id/disconnect"
       android:layout_width="match_parent"
       android:layout_height="wrap_content"
       android:layout_margin="32dp"
       android:text="disconnect"
       app:layout_constraintBottom_toBottomOf="parent"
       app:layout_constraintEnd_toEndOf="parent"
       app:layout_constraintStart_toStartOf="parent"
       app:layout_constraintTop_toBottomOf="@+id/paper"
       />

   <androidx.appcompat.widget.AppCompatButton
       android:id="@+id/findOpponent"
       android:layout_width="match_parent"
       android:layout_height="wrap_content"
       android:layout_margin="32dp"
       android:text="find opponent"
       app:layout_constraintBottom_toBottomOf="parent"
       app:layout_constraintEnd_toEndOf="parent"
       app:layout_constraintStart_toStartOf="parent"
       app:layout_constraintTop_toBottomOf="@+id/paper"
       />

</androidx.constraintlayout.widget.ConstraintLayout>
您的版面配置現在看起來應會如以上「圖 1」所示。
注意:在您的專案中,請將 16dp 等值變更為 @dimen/activity_vertical_margin 這類資源。
4. 將 Nearby Connections 新增至應用程式
準備 manifest.xml 檔案
在資訊清單檔案中加入下列權限。由於 ACCESS_FINE_LOCATION 是危險權限,應用程式會加入程式碼,觸發系統代表應用程式,提示使用者授予或拒絕存取權。Wi-Fi 權限適用於點對點連線,而非網際網路連線。
<!-- Required for Nearby Connections →

<!--    Because ACCESS_FINE_LOCATION is a dangerous permission, the app will have to-->
<!--    request it at runtime, and the user will be prompted to grant or deny access.-->

<uses-permission android:name="android.permission.BLUETOOTH"/>
<uses-permission android:name="android.permission.BLUETOOTH_ADMIN"/>
<uses-permission android:name="android.permission.ACCESS_WIFI_STATE"/>
<uses-permission android:name="android.permission.CHANGE_WIFI_STATE"/>
<uses-permission android:name="android.permission.ACCESS_FINE_LOCATION"/>
選擇策略
使用 Nearby Connections API 時,您必須選擇 Strategy 來決定應用程式與其他鄰近裝置連線的方式。請選擇 P2P_CLUSTER、P2P_STAR 或 P2P_POINT_TO_POINT。
我們選擇 P2P_STAR 的用意,是希望能夠查看玩家在遊戲中嘗試挑戰的大量傳入要求,且一次只能對另一位玩家進行遊戲。
您選擇的 Strategy 必須同時用於應用程式的廣播和探索功能。下圖顯示各項 Strategy 的運作方式。
裝置可以要求 N 個傳出連線 | 裝置可以接收 M 個傳入連線 | |||
| N = 多個 | M = 多個 | 連線頻寬較低 | |
| N = 1 | M = 多個 | 連線頻寬較高 | |
| N = 1 | M = 1 | 可達最高處理量 | |
在 MainActivity 中定義變數
- 在主要活動 (
MainActivity.kt) 的onCreate()函式上方,貼上此程式碼片段來定義下列變數。這些變數會定義遊戲專屬邏輯和執行階段權限。
/**
* Enum class for defining the winning rules for Rock-Paper-Scissors. Each player will make a
* choice, then the beats function in this class will be used to determine whom to reward the
* point to.
*/
private enum class GameChoice {
   ROCK, PAPER, SCISSORS;

   fun beats(other: GameChoice): Boolean =
       (this == ROCK && other == SCISSORS)
               || (this == SCISSORS && other == PAPER)
               || (this == PAPER && other == ROCK)
}

/**
* Instead of having each player enter a name, in this sample we will conveniently generate
* random human readable names for players.
*/
internal object CodenameGenerator {
   private val COLORS = arrayOf(
       "Red", "Orange", "Yellow", "Green", "Blue", "Indigo", "Violet", "Purple", "Lavender"
   )
   private val TREATS = arrayOf(
       "Cupcake", "Donut", "Eclair", "Froyo", "Gingerbread", "Honeycomb",
       "Ice Cream Sandwich", "Jellybean", "Kit Kat", "Lollipop", "Marshmallow", "Nougat",
       "Oreo", "Pie"
   )
   private val generator = Random()

   /** Generate a random Android agent codename  */
   fun generate(): String {
       val color = COLORS[generator.nextInt(COLORS.size)]
       val treat = TREATS[generator.nextInt(TREATS.size)]
       return "$color $treat"
   }
}

/**
* Strategy for telling the Nearby Connections API how we want to discover and connect to
* other nearby devices. A star shaped strategy means we want to discover multiple devices but
* only connect to and communicate with one at a time.
*/
private val STRATEGY = Strategy.P2P_STAR

/**
* Our handle to the [Nearby Connections API][ConnectionsClient].
*/
private lateinit var connectionsClient: ConnectionsClient


/**
* The request code for verifying our call to [requestPermissions]. Recall that calling
* [requestPermissions] leads to a callback to [onRequestPermissionsResult]
*/
private val REQUEST_CODE_REQUIRED_PERMISSIONS = 1

/*
The following variables are convenient ways of tracking the data of the opponent that we
choose to play against.
*/
private var opponentName: String? = null
private var opponentEndpointId: String? = null
private var opponentScore = 0
private var opponentChoice: GameChoice? = null

/*
The following variables are for tracking our own data
*/
private var myCodeName: String = CodenameGenerator.generate()
private var myScore = 0
private var myChoice: GameChoice? = null

/**
* This is for wiring and interacting with the UI views.
*/
private lateinit var binding: ActivityMainBinding
- 變更
onCreate()函式,將ViewBinding物件傳入setContentView()。這樣做可以顯示activity_main.xml版面配置檔案的內容。同時初始化connectionsClient,讓應用程式能使用 API 通訊。
override fun onCreate(savedInstanceState: Bundle?) {
   super.onCreate(savedInstanceState)
   binding = ActivityMainBinding.inflate(layoutInflater)
   setContentView(binding.root)
   connectionsClient = Nearby.getConnectionsClient(this)
}
驗證必要權限
按照規則,您會在 AndroidManifest.xml 檔案中宣告危險權限,但必須在執行階段提出要求。至於其他必要權限,您仍應在執行階段進行驗證,確保結果符合預期。若使用者拒絕授予任何權限,則會顯示浮動式訊息,通知對方必須授予這些權限才能繼續運作,因為範例應用程式需要這些權限才能使用。
- 在
onCreate()函式下方加入下列程式碼片段,驗證是否具備相關權限:
@CallSuper
override fun onStart() {
   super.onStart()
   if (checkSelfPermission(Manifest.permission.ACCESS_FINE_LOCATION) != PackageManager.PERMISSION_GRANTED) {
       requestPermissions(
           arrayOf(Manifest.permission.ACCESS_FINE_LOCATION),
           REQUEST_CODE_REQUIRED_PERMISSIONS
       )
   }
}

@CallSuper
override fun onRequestPermissionsResult(
   requestCode: Int,
   permissions: Array<out String>,
   grantResults: IntArray
) {
   super.onRequestPermissionsResult(requestCode, permissions, grantResults)
   val errMsg = "Cannot start without required permissions"
   if (requestCode == REQUEST_CODE_REQUIRED_PERMISSIONS) {
       grantResults.forEach {
           if (it == PackageManager.PERMISSION_DENIED) {
               Toast.makeText(this, errMsg, Toast.LENGTH_LONG).show()
               finish()
               return
           }
       }
       recreate()
   }
}
在此階段,我們已完成下列工作的程式碼編寫作業:
- 建立版面配置檔案
- 在資訊清單中宣告必要權限
- 在執行階段驗證必要的危險權限
反向逐步操作說明
現在我們已處理初步工作,可以開始編寫 Nearby Connections 程式碼,與鄰近使用者連線通訊。一般來說,應用程式必須允許供其他裝置尋找,且必須掃描其他裝置,才能順利與附近的裝置進行通訊。
換句話說,在「剪刀石頭布」遊戲中,您和對手必須先找到對方,才能開始玩遊戲。
您可以透過「廣播」程序來讓裝置可供偵測。同樣地,您也可以透過「探索」程序尋找鄰近的對手。
為了瞭解相關程序,建議您以反向順序處理程式碼。為此,我們接著會採取下列行動:
- 我們會假設已連線,並撰寫用來收發訊息的程式碼。就當前目標而言,這表示撰寫會實際遊玩「剪刀石頭布」遊戲的程式碼。
- 我們會撰寫程式碼,以與鄰近裝置廣播通訊。
- 我們會撰寫用於探索鄰近裝置的程式碼。
傳送和接收資料
您可以使用 connectionsClient.sendPayload() 方法,以 Payload 形式傳送資料,並使用 PayloadCallback 物件接收酬載。Payload 可以是任何內容,包括影片、相片、串流或任何其他種類的資料,也沒有數據用量上限。
- 在我們的遊戲中,酬載是石頭、布或剪刀的選項。當使用者點選其中一個控制器按鈕時,應用程式即會將其選擇傳送至對手的應用程式做為酬載。如要記錄使用者的動作,請將下列程式碼片段新增至
onRequestPermissionsResult()函式下方。
/** Sends the user's selection of rock, paper, or scissors to the opponent. */
private fun sendGameChoice(choice: GameChoice) {
   myChoice = choice
   connectionsClient.sendPayload(
       opponentEndpointId!!,
       Payload.fromBytes(choice.name.toByteArray(UTF_8))
   )
   binding.status.text = "You chose ${choice.name}"
   // For fair play, we will disable the game controller so that users don't change their
   // choice in the middle of a game.
   setGameControllerEnabled(false)
}

/**
* Enables/Disables the rock, paper and scissors buttons. Disabling the game controller
* prevents users from changing their minds after making a choice.
*/
private fun setGameControllerEnabled(state: Boolean) {
   binding.apply {
       rock.isEnabled = state
       paper.isEnabled = state
       scissors.isEnabled = state
   }
}
- 裝置會透過
PayloadCallback物件接收酬載,這個物件提供兩個方法。onPayloadReceived()方法會在接收訊息時通知應用程式,onPayloadTransferUpdate()方法會追蹤傳入與傳出訊息的狀態。
為了方便起見,我們會讀取來自 onPayloadReceived() 的傳入訊息做為對手動作,並使用 onPayloadTransferUpdate() 方法追蹤和確認兩名玩家皆展開行動的時間。請在 onCreate() 方法上方加入以下程式碼片段。
/** callback for receiving payloads */
private val payloadCallback: PayloadCallback = object : PayloadCallback() {
   override fun onPayloadReceived(endpointId: String, payload: Payload) {
       payload.asBytes()?.let {
           opponentChoice = GameChoice.valueOf(String(it, UTF_8))
       }
   }

   override fun onPayloadTransferUpdate(endpointId: String, update: PayloadTransferUpdate) {
       // Determines the winner and updates game state/UI after both players have chosen.
       // Feel free to refactor and extract this code into a different method
       if (update.status == PayloadTransferUpdate.Status.SUCCESS
           && myChoice != null && opponentChoice != null) {
           val mc = myChoice!!
           val oc = opponentChoice!!
           when {
               mc.beats(oc) -> { // Win!
                   binding.status.text = "${mc.name} beats ${oc.name}"
                   myScore++
               }
               mc == oc -> { // Tie
                   binding.status.text = "You both chose ${mc.name}"
               }
               else -> { // Loss
                   binding.status.text = "${mc.name} loses to ${oc.name}"
                   opponentScore++
               }
           }
           binding.score.text = "$myScore : $opponentScore"
           myChoice = null
           opponentChoice = null
           setGameControllerEnabled(true)
       }
   }
}
廣告
您廣播自己的存在狀態或意願,希望鄰近玩家偵測到您並要求與您連線。因此,Nearby Connections API 的 startAdvertising() 方法需要回呼物件。如果有人偵測到您的廣播並想要進行連線,此回呼 ConnectionLifecycleCallback 就會通知您。回呼物件有三種方法:
onConnectionInitiated()方法會告知您,有人偵測到您的廣播並想要進行連線。因此,您可以選擇接受與connectionsClient.acceptConnection()的連線。- 有人偵測到您的廣播時,會向您傳送連線要求。您和傳送者皆必須接受連線要求,才能實際連線。
onConnectionResult()方法可讓您得知是否已建立連線。 onDisconnected()函式會告知您,連線已失效。發生這種情況的原因可能在於您或對手決定結束連線。
如何廣播:
- 針對我們的應用程式,會在收到
onConnectionInitiated()回呼時接受連線。接著在onConnectionResult()中若已建立連線,即會停止廣播和探索,這是因為只需要與一位對手連線即可進行遊戲。最後,我們會於onConnectionResult()重設遊戲。
將下列程式碼片段貼至 onCreate() 方法之前。
// Callbacks for connections to other devices
private val connectionLifecycleCallback = object : ConnectionLifecycleCallback() {
   override fun onConnectionInitiated(endpointId: String, info: ConnectionInfo) {
       // Accepting a connection means you want to receive messages. Hence, the API expects
       // that you attach a PayloadCall to the acceptance
       connectionsClient.acceptConnection(endpointId, payloadCallback)
       opponentName = "Opponent\n(${info.endpointName})"
   }

   override fun onConnectionResult(endpointId: String, result: ConnectionResolution) {
       if (result.status.isSuccess) {
           connectionsClient.stopAdvertising()
           connectionsClient.stopDiscovery()
           opponentEndpointId = endpointId
           binding.opponentName.text = opponentName
           binding.status.text = "Connected"
           setGameControllerEnabled(true) // we can start playing
       }
   }

   override fun onDisconnected(endpointId: String) {
       resetGame()
   }
}
- 由於
resetGame()非常方便於在任何時候發出呼叫,因此我們將其做為專屬副程式來使用。在MainActivity類別底部新增程式碼。
/** Wipes all game state and updates the UI accordingly. */
private fun resetGame() {
   // reset data
   opponentEndpointId = null
   opponentName = null
   opponentChoice = null
   opponentScore = 0
   myChoice = null
   myScore = 0
   // reset state of views
   binding.disconnect.visibility = View.GONE
   binding.findOpponent.visibility = View.VISIBLE
   setGameControllerEnabled(false)
   binding.opponentName.text="opponent\n(none yet)"
   binding.status.text ="..."
   binding.score.text = ":"
}
- 下列程式碼片段是實際的廣播呼叫,告知 Nearby Connections API 您想要進入廣播模式。將其新增至
onCreate()方法下方。
private fun startAdvertising() {
   val options = AdvertisingOptions.Builder().setStrategy(STRATEGY).build()
   // Note: Advertising may fail. To keep this demo simple, we don't handle failures.
   connectionsClient.startAdvertising(
       myCodeName,
       packageName,
       connectionLifecycleCallback,
       options
   )
}
探索
探索功能與廣播相得益彰。這兩種呼叫非常類似,但使用的回呼不同。startDiscovery() 呼叫的回呼為 EndpointDiscoveryCallback 物件。此物件有兩個回呼方法:onEndpointFound() 供每次偵測到廣播時呼叫,onEndpointLost() 則供無法再偵測到廣播時呼叫。
- 我們的應用程式將與偵測到的第一個廣播者連線。也就是說,我們會在
onEndpointFound()方法中發出連線要求,而不會使用onEndpointLost()方法採取任何行動。將回呼新增至onCreate()方法之前。
// Callbacks for finding other devices
private val endpointDiscoveryCallback = object : EndpointDiscoveryCallback() {
   override fun onEndpointFound(endpointId: String, info: DiscoveredEndpointInfo) {
       connectionsClient.requestConnection(myCodeName, endpointId, connectionLifecycleCallback)
   }

   override fun onEndpointLost(endpointId: String) {
   }
}
- 此外並新增程式碼片段,以實際告知 Nearby Connections API 您要進入探索模式。將程式碼片段新增至
MainActivity類別底部。
private fun startDiscovery(){
   val options = DiscoveryOptions.Builder().setStrategy(STRATEGY).build()
   connectionsClient.startDiscovery(packageName,endpointDiscoveryCallback,options)
}
- 目前,我們已完成了 Nearby Connections 部分的工作!我們可針對附近的裝置廣播、探索和進行通訊。但目前還無法玩這個遊戲,我們必須完成 UI 檢視區塊的接線作業:
- 當使用者按一下「FIND OPPONENT」按鈕時,應用程式應同時呼叫
startAdvertising()和startDiscovery()。透過這種方式,您可以探索他人,同時也供他人探索。 - 當使用者按一下「ROCK」、「PAPER」或「SCISSORS」當中的其中一個控制器按鈕時,應用程式需呼叫
sendGameChoice()才能向對手傳送資料。 - 當使用者按一下「DISCONNECT」按鈕時,應用程式應重設遊戲。
更新 onCreate() 方法以反映這些互動。
override fun onCreate(savedInstanceState: Bundle?) {
   super.onCreate(savedInstanceState)
   binding = ActivityMainBinding.inflate(layoutInflater)
   setContentView(binding.root)
   connectionsClient = Nearby.getConnectionsClient(this)

   binding.myName.text = "You\n($myCodeName)"
   binding.findOpponent.setOnClickListener {
       startAdvertising()
       startDiscovery()
       binding.status.text = "Searching for opponents..."
       // "find opponents" is the opposite of "disconnect" so they don't both need to be
       // visible at the same time
       binding.findOpponent.visibility = View.GONE
       binding.disconnect.visibility = View.VISIBLE
   }
   // wire the controller buttons
   binding.apply {
       rock.setOnClickListener { sendGameChoice(GameChoice.ROCK) }
       paper.setOnClickListener { sendGameChoice(GameChoice.PAPER) }
       scissors.setOnClickListener { sendGameChoice(GameChoice.SCISSORS) }
   }
   binding.disconnect.setOnClickListener {
       opponentEndpointId?.let { connectionsClient.disconnectFromEndpoint(it) }
       resetGame()
   }

   resetGame() // we are about to start a new game
}
清理
若您不再需要,應停止使用 Nearby API。對於這個範例遊戲,我們會在 onStop() 活動生命週期函式中釋放所有資產。
@CallSuper
override fun onStop(){
   connectionsClient.apply {
       stopAdvertising()
       stopDiscovery()
       stopAllEndpoints()
   }
   resetGame()
   super.onStop()
}
5. 執行應用程式
在兩部裝置上執行應用程式,享受遊戲樂趣!
6. 隱私權最佳做法
我們的「剪刀石頭布」遊戲不會分享任何私密資料,連產品代號也是隨機產生。因此,我們可以自動在 onConnectionInitiated(String, ConnectionInfo) 內接受連線。
ConnectionInfo 物件提供每個連線的專屬權杖,供應用程式透過 getAuthenticationDigits() 存取。您可以向所有使用者顯示權杖,以進行視覺驗證。或者,您可以在其中一部裝置上加密原始權杖,以酬載的形式傳送到另一部裝置上解密,再開始分享私密資料。如要進一步瞭解 Android 加密機制,請參閱這篇網誌文章:《改善應用程式的加密編譯機制,包括訊息驗證及使用者線上狀態》。
7. 恭喜
恭喜!現在您已瞭解如何透過 Nearby Connections API 與使用者連線,而無需透過網際網路連線,
簡單來說,如要使用 Nearby Connections API,您必須為 play-services-nearby 新增依附元件。您還必須在 AndroidManifest.xml 檔案中要求權限,並在執行階段檢查這些權限。您亦已瞭解如何執行下列作業:
- 廣播您與鄰近使用者連線的意願資訊
- 探索想要連線的鄰近使用者
- 接受連線
- 傳送訊息
- 接收訊息
- 保護使用者隱私權
後續步驟
參閱我們的網誌系列文章和範例