
1. Before You Begin
Wouldn't it be nice if you could use your mobile device to collaborate on group projects or share videos, stream content, play a multiplayer game – even without access to the internet? You actually can. And in this codelab, you will learn how to do just that.
To keep things simple, we are going to build a multiplayer Rock-Paper-Scissors game that works without the internet. This codelab teaches you how to use the Nearby Connections API, part of the Google Play services, to enable users to communicate with each other based on physical proximity. Users must be within about 100 meters of each other. There is no limit to the type or amount of data users can share – even without an internet connection. Users can stream videos, send and receive voice messages, send text messages, and more.
Prerequisites
- Basic knowledge of Kotlin and Android development
- How to create and run apps on Android Studio
- Two or more Android devices, for running and testing the code
- running Android API level 16 or higher
- with Google Play services installed
- The latest version of Android Studio.
What you'll learn
- How to add the Google Play services Nearby Connections library to your app
- How to advertise your interest to communicate with nearby devices
- How to discover nearby devices of interest
- How to communicate with connected devices
- Best practices for privacy and data protection
What you'll build
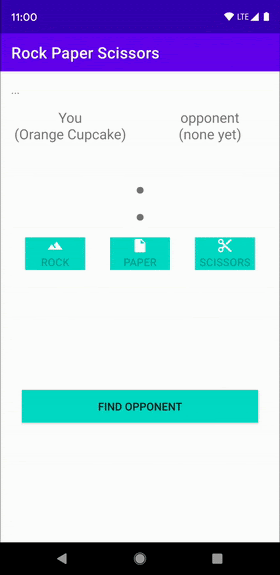
This codelab shows you how to build a single Activity app that allows a user to find opponents and play Rock-Paper-Scissors. The app has the following UI elements:
- A button for finding opponents
- A game controller with three buttons that allow users to choose ROCK, PAPER, or SCISSORS to play
TextViews for displaying scores- A
TextViewfor showing status
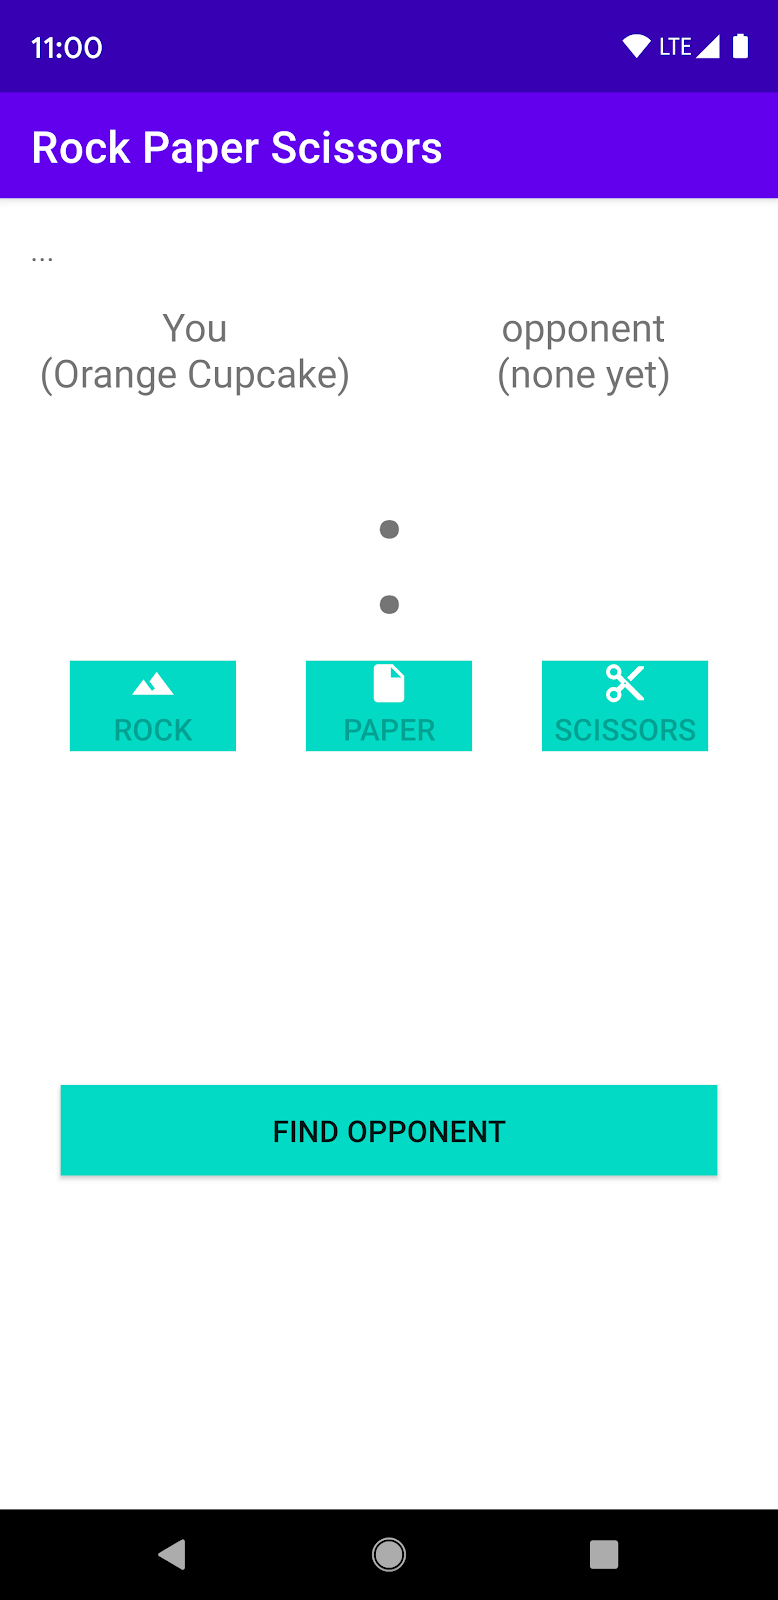
Figure 1
2. Create an Android Studio project
- Start a new Android Studio project.
- Choose Empty Activity.
- Name the project Rock Paper Scissors, and set the language to Kotlin.
3. Set up code
- Add the latest version of the Nearby dependency into your app-level
build.gradlefile. This allows your app to use the Nearby Connections API to advertise interest in connecting, discovering nearby devices, and communicating.
implementation 'com.google.android.gms:play-services-nearby:LATEST_VERSION'
- Set the viewBinding build option to
truein theandroidblock to enable View Binding, so that you don't have to usefindViewByIdto interact with Views.
android {
   ...
   buildFeatures {
       viewBinding true
   }
}
- Click Sync Now or the green hammer button so that Android Studio takes these Gradle changes into account.

- We are using vector drawables for our rock, paper, and scissors images. Add the following three XML files to your
res/drawabledirectory.
res/drawables/rock.xml
<vector xmlns:android="http://schemas.android.com/apk/res/android"
   android:height="24dp"
   android:tintMode="multiply"
   android:viewportHeight="48.0"
   android:viewportWidth="48.0"
   android:width="24dp">
 <path
     android:fillColor="#ffffff"
     android:pathData="M28,12l-7.5,10 5.7,7.6L23,32c-3.38,-4.5 -9,-12 -9,-12L2,36h44L28,12z"/>
</vector>
res/drawables/paper.xml
<vector xmlns:android="http://schemas.android.com/apk/res/android"
   android:height="24dp"
   android:tintMode="multiply"
   android:viewportHeight="48.0"
   android:viewportWidth="48.0"
   android:width="24dp">
 <path
     android:fillColor="#ffffff"
     android:pathData="M28,4L12,4C9.79,4 8.02,5.79 8.02,8L8,40c0,2.21 1.77,4 3.98,4L36,44c2.21,0 4,-1.79 4,-4L40,16L28,4zM26,18L26,7l11,11L26,18z"/>
</vector>
res/drawables/scissors.xml
<vector xmlns:android="http://schemas.android.com/apk/res/android"
   android:width="24dp"
   android:height="24dp"
   android:tintMode="multiply"
   android:viewportWidth="48.0"
   android:viewportHeight="48.0">
   <path
       android:fillColor="#ffffff"
       android:pathData="M19.28,15.28c0.45,-1 0.72,-2.11 0.72,-3.28 0,-4.42 -3.58,-8 -8,-8s-8,3.58 -8,8 3.58,8 8,8c1.17,0 2.28,-0.27 3.28,-0.72L20,24l-4.72,4.72c-1,-0.45 -2.11,-0.72 -3.28,-0.72 -4.42,0 -8,3.58 -8,8s3.58,8 8,8 8,-3.58 8,-8c0,-1.17 -0.27,-2.28 -0.72,-3.28L24,28l14,14h6v-2L19.28,15.28zM12,16c-2.21,0 -4,-1.79 -4,-4s1.79,-4 4,-4 4,1.79 4,4 -1.79,4 -4,4zM12,40c-2.21,0 -4,-1.79 -4,-4s1.79,-4 4,-4 4,1.79 4,4 -1.79,4 -4,4zM24,25c-0.55,0 -1,-0.45 -1,-1s0.45,-1 1,-1 1,0.45 1,1 -0.45,1 -1,1zM38,6L26,18l4,4L44,8L44,6z" />
</vector>
- Add the game controller (in other words, playing buttons), score and status
TextViews for the game screen. In theactivity_main.xmlfile, replace the code with the following:
<?xml version="1.0" encoding="utf-8"?>
<androidx.constraintlayout.widget.ConstraintLayout
   xmlns:android="http://schemas.android.com/apk/res/android"
   xmlns:app="http://schemas.android.com/apk/res-auto"
   xmlns:tools="http://schemas.android.com/tools"
   android:layout_width="match_parent"
   android:layout_height="match_parent"
   tools:context=".MainActivity">

   <TextView
       android:id="@+id/status"
       android:layout_width="match_parent"
       android:layout_height="wrap_content"
       android:padding="16dp"
       android:text="searching..."
       app:layout_constraintBottom_toTopOf="@+id/myName"
       app:layout_constraintEnd_toEndOf="parent"
       app:layout_constraintStart_toStartOf="parent"
       app:layout_constraintTop_toTopOf="parent"
       />

   <TextView
       android:id="@+id/myName"
       android:layout_width="0dp"
       android:layout_height="wrap_content"
       android:layout_gravity="center"
       android:text="You (codeName)"
       android:textAlignment="center"
       android:textAppearance="?android:textAppearanceMedium"
       app:layout_constraintEnd_toStartOf="@+id/opponentName"
       app:layout_constraintStart_toStartOf="parent"
       app:layout_constraintTop_toBottomOf="@+id/status"
       />

   <TextView
       android:id="@+id/opponentName"
       android:layout_width="0dp"
       android:layout_height="wrap_content"
       android:layout_gravity="center"
       android:text="Opponent (codeName)"
       android:textAlignment="center"
       android:textAppearance="?android:textAppearanceMedium"
       app:layout_constraintEnd_toEndOf="parent"
       app:layout_constraintStart_toEndOf="@+id/myName"
       app:layout_constraintTop_toBottomOf="@+id/status"
       />

   <TextView
       android:id="@+id/score"
       android:layout_width="match_parent"
       android:layout_height="wrap_content"
       android:layout_gravity="center"
       android:layout_margin="16dp"
       android:text=":"
       android:textAlignment="center"
       android:textSize="80sp"
       app:layout_constraintEnd_toEndOf="parent"
       app:layout_constraintStart_toStartOf="parent"
       app:layout_constraintTop_toBottomOf="@+id/myName"
       />

   <androidx.appcompat.widget.AppCompatButton
       android:id="@+id/rock"
       android:layout_width="wrap_content"
       android:layout_height="wrap_content"
       android:drawableTop="@drawable/rock"
       android:text="Rock"
       app:layout_constraintEnd_toStartOf="@+id/paper"
       app:layout_constraintHorizontal_chainStyle="spread"
       app:layout_constraintStart_toStartOf="parent"
       app:layout_constraintTop_toBottomOf="@+id/score"
       />

   <androidx.appcompat.widget.AppCompatButton
       android:id="@+id/paper"
       android:layout_width="wrap_content"
       android:layout_height="wrap_content"
       android:drawableTop="@drawable/paper"
       android:text="Paper"
       app:layout_constraintEnd_toStartOf="@+id/scissors"
       app:layout_constraintStart_toEndOf="@+id/rock"
       app:layout_constraintTop_toBottomOf="@+id/score"
       />

   <androidx.appcompat.widget.AppCompatButton
       android:id="@+id/scissors"
       android:layout_width="wrap_content"
       android:layout_height="wrap_content"
       android:drawableTop="@drawable/scissors"
       android:text="Scissors"
       app:layout_constraintEnd_toEndOf="parent"
       app:layout_constraintStart_toEndOf="@+id/paper"
       app:layout_constraintTop_toBottomOf="@+id/score"
       />

   <androidx.appcompat.widget.AppCompatButton
       android:id="@+id/disconnect"
       android:layout_width="match_parent"
       android:layout_height="wrap_content"
       android:layout_margin="32dp"
       android:text="disconnect"
       app:layout_constraintBottom_toBottomOf="parent"
       app:layout_constraintEnd_toEndOf="parent"
       app:layout_constraintStart_toStartOf="parent"
       app:layout_constraintTop_toBottomOf="@+id/paper"
       />

   <androidx.appcompat.widget.AppCompatButton
       android:id="@+id/findOpponent"
       android:layout_width="match_parent"
       android:layout_height="wrap_content"
       android:layout_margin="32dp"
       android:text="find opponent"
       app:layout_constraintBottom_toBottomOf="parent"
       app:layout_constraintEnd_toEndOf="parent"
       app:layout_constraintStart_toStartOf="parent"
       app:layout_constraintTop_toBottomOf="@+id/paper"
       />

</androidx.constraintlayout.widget.ConstraintLayout>
Your layout should now look as in Figure 1 above.
Note: In your own project, change values such as 16dp to resources such as @dimen/activity_vertical_margin.
4. Add Nearby Connections to your app
Prepare your manifest.xml file
Add the following permissions to the manifest file. Because the ACCESS_FINE_LOCATION is a dangerous permission, your app will include code that will trigger the system to prompt users on your app's behalf to grant or deny access. The Wi-Fi permissions apply to peer-to-peer connections, not internet connections.
<!-- Required for Nearby Connections →

<!--    Because ACCESS_FINE_LOCATION is a dangerous permission, the app will have to-->
<!--    request it at runtime, and the user will be prompted to grant or deny access.-->

<uses-permission android:name="android.permission.BLUETOOTH"/>
<uses-permission android:name="android.permission.BLUETOOTH_ADMIN"/>
<uses-permission android:name="android.permission.ACCESS_WIFI_STATE"/>
<uses-permission android:name="android.permission.CHANGE_WIFI_STATE"/>
<uses-permission android:name="android.permission.ACCESS_FINE_LOCATION"/>
Choosing a Strategy
The Nearby Connections API requires that you choose a Strategy that determines how your app connects with other nearby devices. Choose P2P_CLUSTER, P2P_STAR, or P2P_POINT_TO_POINT.
For our purposes, we'll choose P2P_STAR because we want to be able to see a lot of incoming requests from players who want to challenge us but only play against one other person at a time.
The Strategy you choose must be used for both advertising and discovery in your app. The figure below shows how each Strategy works.
Devices can request N outgoing connections | Devices can receive M incoming connections | |||
| N = many | M = many | results in lower bandwidth connections | |
| N = 1 | M = many | results in higher bandwidth connections | |
| N = 1 | M = 1 | highest possible throughput | |
Define variables in MainActivity
- Inside the main activity (
MainActivity.kt), above theonCreate()function, define the following variables by pasting this code snippet. These variables define game specific logic and the runtime permissions.
/**
* Enum class for defining the winning rules for Rock-Paper-Scissors. Each player will make a
* choice, then the beats function in this class will be used to determine whom to reward the
* point to.
*/
private enum class GameChoice {
   ROCK, PAPER, SCISSORS;

   fun beats(other: GameChoice): Boolean =
       (this == ROCK && other == SCISSORS)
               || (this == SCISSORS && other == PAPER)
               || (this == PAPER && other == ROCK)
}

/**
* Instead of having each player enter a name, in this sample we will conveniently generate
* random human readable names for players.
*/
internal object CodenameGenerator {
   private val COLORS = arrayOf(
       "Red", "Orange", "Yellow", "Green", "Blue", "Indigo", "Violet", "Purple", "Lavender"
   )
   private val TREATS = arrayOf(
       "Cupcake", "Donut", "Eclair", "Froyo", "Gingerbread", "Honeycomb",
       "Ice Cream Sandwich", "Jellybean", "Kit Kat", "Lollipop", "Marshmallow", "Nougat",
       "Oreo", "Pie"
   )
   private val generator = Random()

   /** Generate a random Android agent codename  */
   fun generate(): String {
       val color = COLORS[generator.nextInt(COLORS.size)]
       val treat = TREATS[generator.nextInt(TREATS.size)]
       return "$color $treat"
   }
}

/**
* Strategy for telling the Nearby Connections API how we want to discover and connect to
* other nearby devices. A star shaped strategy means we want to discover multiple devices but
* only connect to and communicate with one at a time.
*/
private val STRATEGY = Strategy.P2P_STAR

/**
* Our handle to the [Nearby Connections API][ConnectionsClient].
*/
private lateinit var connectionsClient: ConnectionsClient


/**
* The request code for verifying our call to [requestPermissions]. Recall that calling
* [requestPermissions] leads to a callback to [onRequestPermissionsResult]
*/
private val REQUEST_CODE_REQUIRED_PERMISSIONS = 1

/*
The following variables are convenient ways of tracking the data of the opponent that we
choose to play against.
*/
private var opponentName: String? = null
private var opponentEndpointId: String? = null
private var opponentScore = 0
private var opponentChoice: GameChoice? = null

/*
The following variables are for tracking our own data
*/
private var myCodeName: String = CodenameGenerator.generate()
private var myScore = 0
private var myChoice: GameChoice? = null

/**
* This is for wiring and interacting with the UI views.
*/
private lateinit var binding: ActivityMainBinding
- Change your
onCreate()function to pass in theViewBindingobject tosetContentView(). This displays the contents of theactivity_main.xmllayout file. Also, initialize theconnectionsClientso your app can communicate with the API.
override fun onCreate(savedInstanceState: Bundle?) {
   super.onCreate(savedInstanceState)
   binding = ActivityMainBinding.inflate(layoutInflater)
   setContentView(binding.root)
   connectionsClient = Nearby.getConnectionsClient(this)
}
Verify required permissions
As a rule, dangerous permissions are declared in the AndroidManifest.xml file but must be requested at runtime. For other necessary permissions, you should still verify them at runtime to ensure the outcome is as you would expect. And if the user denies any of them, show a toast informing them that they cannot proceed without granting these permissions since our sample app is not usable without them.
- Below the
onCreate()function, add the following code snippet to verify that we have the permissions:
@CallSuper
override fun onStart() {
   super.onStart()
   if (checkSelfPermission(Manifest.permission.ACCESS_FINE_LOCATION) != PackageManager.PERMISSION_GRANTED) {
       requestPermissions(
           arrayOf(Manifest.permission.ACCESS_FINE_LOCATION),
           REQUEST_CODE_REQUIRED_PERMISSIONS
       )
   }
}

@CallSuper
override fun onRequestPermissionsResult(
   requestCode: Int,
   permissions: Array<out String>,
   grantResults: IntArray
) {
   super.onRequestPermissionsResult(requestCode, permissions, grantResults)
   val errMsg = "Cannot start without required permissions"
   if (requestCode == REQUEST_CODE_REQUIRED_PERMISSIONS) {
       grantResults.forEach {
           if (it == PackageManager.PERMISSION_DENIED) {
               Toast.makeText(this, errMsg, Toast.LENGTH_LONG).show()
               finish()
               return
           }
       }
       recreate()
   }
}
At this point, we have written code to accomplish the following tasks:
- Created our layout file
- Declared the necessary permissions in our manifest
- Verified the required dangerous permissions at runtime
Walkthrough in reverse
Now that we have dealt with the preliminaries, we are ready to start writing the Nearby Connections code to connect with nearby users and communicate. Usually, before you can actually start communicating with nearby devices, your app must allow other devices to find it and it must scan for other devices.
In other words, in the context of our Rock-Paper-Scissors game, you and your opponents must find each other before you can start playing the game.
You can make your device discoverable through a process called advertising. Similarly, you can discover nearby opponents through a process called discovery.
For the sake of understanding the process, it's best to tackle the code in reverse order. To that end, we will proceed as follows:
- We will pretend we are already connected and write the code for sending and receiving messages. For our present purpose, this means writing the code for actually playing the Rock-Paper-Scissors game.
- We will write the code for advertising our interest in connecting with nearby devices.
- We will write the code for discovering nearby devices.
Sending and receiving data
You use the connectionsClient.sendPayload() method to send data as Payload, and the PayloadCallback object to receive the payloads. A Payload can be anything: videos, photos, streams, or any other kind of data. And there is no data limit.
- In our game, the payload is a choice of rock, paper, or scissors. When a user clicks one of the controller buttons, the app sends their choice to the opponent's app as a payload. To record the user's move, add the following code snippet below the
onRequestPermissionsResult()function.
/** Sends the user's selection of rock, paper, or scissors to the opponent. */
private fun sendGameChoice(choice: GameChoice) {
   myChoice = choice
   connectionsClient.sendPayload(
       opponentEndpointId!!,
       Payload.fromBytes(choice.name.toByteArray(UTF_8))
   )
   binding.status.text = "You chose ${choice.name}"
   // For fair play, we will disable the game controller so that users don't change their
   // choice in the middle of a game.
   setGameControllerEnabled(false)
}

/**
* Enables/Disables the rock, paper and scissors buttons. Disabling the game controller
* prevents users from changing their minds after making a choice.
*/
private fun setGameControllerEnabled(state: Boolean) {
   binding.apply {
       rock.isEnabled = state
       paper.isEnabled = state
       scissors.isEnabled = state
   }
}
- A device receives payloads through the
PayloadCallbackobject, which has two methods. TheonPayloadReceived()method tells your app when it's receiving a message, and theonPayloadTransferUpdate()method tracks the status of both incoming and outgoing messages.
For our purposes, we will read the incoming message from onPayloadReceived() as our opponent's move, and use the onPayloadTransferUpdate() method to track and confirm when both players have made their moves. Add this code snippet above the onCreate() method.
/** callback for receiving payloads */
private val payloadCallback: PayloadCallback = object : PayloadCallback() {
   override fun onPayloadReceived(endpointId: String, payload: Payload) {
       payload.asBytes()?.let {
           opponentChoice = GameChoice.valueOf(String(it, UTF_8))
       }
   }

   override fun onPayloadTransferUpdate(endpointId: String, update: PayloadTransferUpdate) {
       // Determines the winner and updates game state/UI after both players have chosen.
       // Feel free to refactor and extract this code into a different method
       if (update.status == PayloadTransferUpdate.Status.SUCCESS
           && myChoice != null && opponentChoice != null) {
           val mc = myChoice!!
           val oc = opponentChoice!!
           when {
               mc.beats(oc) -> { // Win!
                   binding.status.text = "${mc.name} beats ${oc.name}"
                   myScore++
               }
               mc == oc -> { // Tie
                   binding.status.text = "You both chose ${mc.name}"
               }
               else -> { // Loss
                   binding.status.text = "${mc.name} loses to ${oc.name}"
                   opponentScore++
               }
           }
           binding.score.text = "$myScore : $opponentScore"
           myChoice = null
           opponentChoice = null
           setGameControllerEnabled(true)
       }
   }
}
Advertisement
You advertise your presence or interest in hope that someone nearby will notice you and ask to connect with you. As such, the startAdvertising() method of the Nearby Connections API requires a callback object. That callback, ConnectionLifecycleCallback, informs you when someone who has noticed your advertisement wants to connect. The callback object has three methods:
- The
onConnectionInitiated()method tells you that someone has noticed your advertisement and wants to connect. As a result you can choose to accept the connection withconnectionsClient.acceptConnection(). - When someone notices your advertisement, they send you a connection request. Both you and the sender must accept the connection request in order to actually connect. The
onConnectionResult()method lets you know whether the connection was established. - The
onDisconnected()function tells you that the connection is no longer active. This can happen, for example, if either you or the opponent decides to end the connection.
To advertise:
- For our app, we will accept the connection when we get the
onConnectionInitiated()call back. Then insideonConnectionResult(), if the connection was established, we will stop advertising and discovering since we only needed to connect with one opponent to play the game. And finally, inonConnectionResult(), we will reset the game.
Paste the following code snippet before your onCreate() method.
// Callbacks for connections to other devices
private val connectionLifecycleCallback = object : ConnectionLifecycleCallback() {
   override fun onConnectionInitiated(endpointId: String, info: ConnectionInfo) {
       // Accepting a connection means you want to receive messages. Hence, the API expects
       // that you attach a PayloadCall to the acceptance
       connectionsClient.acceptConnection(endpointId, payloadCallback)
       opponentName = "Opponent\n(${info.endpointName})"
   }

   override fun onConnectionResult(endpointId: String, result: ConnectionResolution) {
       if (result.status.isSuccess) {
           connectionsClient.stopAdvertising()
           connectionsClient.stopDiscovery()
           opponentEndpointId = endpointId
           binding.opponentName.text = opponentName
           binding.status.text = "Connected"
           setGameControllerEnabled(true) // we can start playing
       }
   }

   override fun onDisconnected(endpointId: String) {
       resetGame()
   }
}
- Because
resetGame()is so convenient to call at diverse junctures, we make it into its own subroutine. Add the code at the bottom of theMainActivityclass.
/** Wipes all game state and updates the UI accordingly. */
private fun resetGame() {
   // reset data
   opponentEndpointId = null
   opponentName = null
   opponentChoice = null
   opponentScore = 0
   myChoice = null
   myScore = 0
   // reset state of views
   binding.disconnect.visibility = View.GONE
   binding.findOpponent.visibility = View.VISIBLE
   setGameControllerEnabled(false)
   binding.opponentName.text="opponent\n(none yet)"
   binding.status.text ="..."
   binding.score.text = ":"
}
- The following snippet is the actual advertisement call, in which you tell the Nearby Connections API that you want to enter advertising mode. Add it below your
onCreate()method.
private fun startAdvertising() {
   val options = AdvertisingOptions.Builder().setStrategy(STRATEGY).build()
   // Note: Advertising may fail. To keep this demo simple, we don't handle failures.
   connectionsClient.startAdvertising(
       myCodeName,
       packageName,
       connectionLifecycleCallback,
       options
   )
}
Discovery
The complement of advertising is discovery. The two calls are very similar, except they use different callbacks. The callback for the startDiscovery() call is an EndpointDiscoveryCallback object. This object has two callback methods: onEndpointFound() is called every time an advertisement is detected; onEndpointLost() is called every time an advertisement is no longer available.
- Our app will connect with the first advertiser we detect. This means that we will make a connection request inside the
onEndpointFound()method, and do nothing with theonEndpointLost()method. Add the callback before youronCreate()method.
// Callbacks for finding other devices
private val endpointDiscoveryCallback = object : EndpointDiscoveryCallback() {
   override fun onEndpointFound(endpointId: String, info: DiscoveredEndpointInfo) {
       connectionsClient.requestConnection(myCodeName, endpointId, connectionLifecycleCallback)
   }

   override fun onEndpointLost(endpointId: String) {
   }
}
- Also add the snippet for actually telling the Nearby Connections API you want to enter discovery mode. Add it at the bottom of your
MainActivityclass.
private fun startDiscovery(){
   val options = DiscoveryOptions.Builder().setStrategy(STRATEGY).build()
   connectionsClient.startDiscovery(packageName,endpointDiscoveryCallback,options)
}
- At this point, the Nearby Connections portion of our work is done! We can advertise, discover, and communicate with nearby devices. But we can't quite play the game yet. We have to finish wiring the UI views:
- When the user clicks the FIND OPPONENT button, the app should call both
startAdvertising()andstartDiscovery(). This way, you are both discovering and being discovered. - When the user clicks one of the controller buttons of ROCK, PAPER, or SCISSORS, the app needs to call
sendGameChoice()to transmit that data to the opponent. - When either user clicks the DISCONNECT button, the app should reset the game.
Update your onCreate() method to reflect these interactions.
override fun onCreate(savedInstanceState: Bundle?) {
   super.onCreate(savedInstanceState)
   binding = ActivityMainBinding.inflate(layoutInflater)
   setContentView(binding.root)
   connectionsClient = Nearby.getConnectionsClient(this)

   binding.myName.text = "You\n($myCodeName)"
   binding.findOpponent.setOnClickListener {
       startAdvertising()
       startDiscovery()
       binding.status.text = "Searching for opponents..."
       // "find opponents" is the opposite of "disconnect" so they don't both need to be
       // visible at the same time
       binding.findOpponent.visibility = View.GONE
       binding.disconnect.visibility = View.VISIBLE
   }
   // wire the controller buttons
   binding.apply {
       rock.setOnClickListener { sendGameChoice(GameChoice.ROCK) }
       paper.setOnClickListener { sendGameChoice(GameChoice.PAPER) }
       scissors.setOnClickListener { sendGameChoice(GameChoice.SCISSORS) }
   }
   binding.disconnect.setOnClickListener {
       opponentEndpointId?.let { connectionsClient.disconnectFromEndpoint(it) }
       resetGame()
   }

   resetGame() // we are about to start a new game
}
Clean up
You should stop using the Nearby API when no longer necessary. For our sample game, we release all assets inside the onStop() activity lifecycle function.
@CallSuper
override fun onStop(){
   connectionsClient.apply {
       stopAdvertising()
       stopDiscovery()
       stopAllEndpoints()
   }
   resetGame()
   super.onStop()
}
5. Run the app
Run the app on two devices and enjoy the game!
6. Best practice for privacy
Our Rock-Paper-Scissors game doesn't share any sensitive data. Even the code names are randomly generated. That is why we automatically accept the connection inside onConnectionInitiated(String, ConnectionInfo).
The ConnectionInfo object contains a unique token per connection, which your app can access through getAuthenticationDigits(). You can display the tokens to both users for visual verification. As an alternative, you can encrypt the raw token on one device and send it as a payload to be decrypted on the other device before you start sharing sensitive data. For more on Android encryption, check out this blog post called " Improve your app's cryptography, from message authentication to user presence."
7. Congratulations
Congratulations! Now you know how to connect your users without an internet connection through the Nearby Connections API.
In summary, to use the Nearby Connections API, you need to add dependency for play-services-nearby. You also need to ask for permissions in the AndroidManifest.xml file and check those permissions at runtime. You have also learned how to do the following:
- Advertise your interest in connecting with nearby users
- Discover nearby users who wish to connect
- Accept connections
- Send messages
- Receive messages
- Safeguard user privacy
What's Next?
Check out our blog series and sample