1. Introduction
In this codelab you will learn advanced concepts related to State and Side Effects APIs in Jetpack Compose. You'll see how to create a state holder for stateful composables whose logic isn't trivial, how to create coroutines and call suspend functions from Compose code, and how to trigger side effects to accomplish different use cases.
For more support as you're walking through this codelab, check out the following code-along:
What you'll learn
- How to observe streams of data from Compose code to update the UI.
- How to create a state holder for stateful composables.
- Side effect APIs such as
LaunchedEffect,rememberUpdatedState,DisposableEffect,produceState, andderivedStateOf. - How to create coroutines and call suspend functions in composables using the
rememberCoroutineScopeAPI.
What you'll need
- Latest Android Studio
- Experience with Kotlin syntax, including lambdas.
- Basic experience with Compose. Consider taking the Jetpack Compose basics codelab before this codelab.
- Basic state concepts in Compose such as Unidirectional Data Flow (UDF), ViewModels, state hoisting, stateless/stateful composables, Slot APIs, and the
rememberandmutableStateOfstate APIs. To obtain this knowledge, consider reading the State and Jetpack Compose documentation or completing the Using State in Jetpack Compose codelab. - Basic knowledge of Kotlin coroutines.
- Basic understanding of the lifecycle of composables.
What you'll build
In this codelab, you'll start from an unfinished application, the Crane material study app, and add features to improve the app.

2. Getting set up
Get the code
The code for this codelab can be found in the android-compose-codelabs Github repository. To clone it, run:
$ git clone https://github.com/android/codelab-android-compose
Alternatively, you can download the repository as a zip file:
Check out the sample app
The code you just downloaded contains code for all Compose codelabs available. To complete this codelab, open the AdvancedStateAndSideEffectsCodelab project inside Android Studio.
We recommend that you start with the code in the main branch and follow the codelab step-by-step at your own pace.
During the codelab, you'll be presented with snippets of code that you'll need to add to the project. In some places, you'll also need to remove code that is explicitly mentioned in comments on the code snippets.
Getting familiar with the code and running the sample app
Take a moment to explore the project structure and run the app.
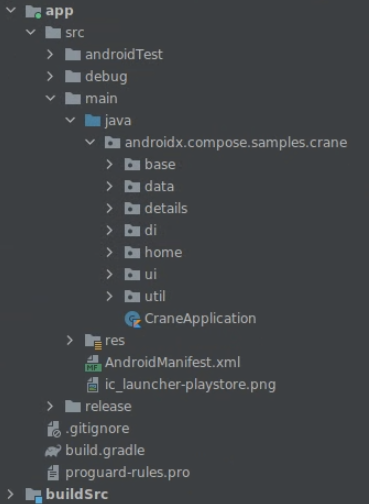
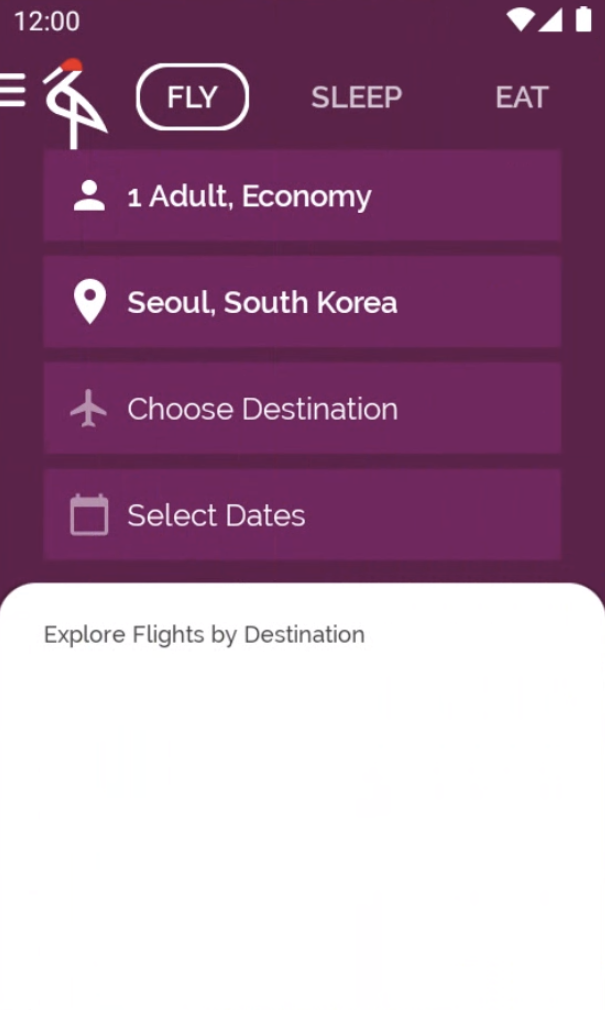
When you run the app from the main branch, you'll see that some functionality such as the drawer, or loading flight destinations doesn't work! That's what you'll be doing in the next steps of the codelab.

UI tests
The app is covered with very basic UI tests available in the androidTest folder. They should pass for both the main and end branches at all times.
[Optional] Displaying the map on the details screen
Displaying the map of the city on the details screen is not necessary at all to follow along. However, if you want to see it, you need to get a personal API key as the Maps documentation says. Include that key in the local.properties file as follows:
// local.properties file
google.maps.key={insert_your_api_key_here}
Solution to the codelab
To get the end branch using git, use this command:
$ git clone -b end https://github.com/android/codelab-android-compose
Alternatively, you can download the solution code from here:
Frequently asked questions
3. UI state production pipeline
As you might've noticed when running the app from the main branch, the list of flight destinations is empty!
To fix this, you have to complete two steps:
- Add the logic in the
ViewModelto produce the UI state. In your case, this is the list of suggested destinations. - Consume the UI state from the UI, which will display the UI on the screen.
In this section, you'll complete the first step.
A good architecture for an application is organized in layers to obey basic good system design practices, like separation of concerns and testability.
UI State production refers to the process in which the app accesses the data layer, applies business rules if needed, and exposes UI state to be consumed from the UI.
The data layer in this application is already implemented. Now, you'll produce the state (the list of suggested destinations) so that the UI can consume it.
There are a few APIs that can be used to produce UI state. The alternatives are summarized in the Output types in state production pipelines documentation. In general, it is a good practice to use Kotlin's StateFlow to produce UI state.
To produce the UI state, follow these steps:
- Open
home/MainViewModel.kt. - Define a private
_suggestedDestinationsvariable of typeMutableStateFlowto represent the list of suggested destinations, and set an empty list as the start value.
private val _suggestedDestinations = MutableStateFlow<List<ExploreModel>>(emptyList())
- Define a second immutable variable
suggestedDestinationsof typeStateFlow. This is the public read-only variable that can be consumed from the UI. Exposing a read-only variable while using the mutable variable internally is a good practice. By doing this, you ensure the UI state cannot be modified unless it is through theViewModel, which makes it the single source of truth. The extension functionasStateFlowconverts the flow from mutable to immutable.
private val _suggestedDestinations = MutableStateFlow<List<ExploreModel>>(emptyList())

val suggestedDestinations: StateFlow<List<ExploreModel>> = _suggestedDestinations.asStateFlow()
- In the
ViewModel's init block, add a call fromdestinationsRepositoryto get the destinations from the data layer.
private val _suggestedDestinations = MutableStateFlow<List<ExploreModel>>(emptyList())

val suggestedDestinations: StateFlow<List<ExploreModel>> = _suggestedDestinations.asStateFlow()

init {
    _suggestedDestinations.value = destinationsRepository.destinations
}
- Finally, uncomment the usages of the internal variable
_suggestedDestinationsyou find in this class, so it can be updated properly with events coming from the UI.
That's it– the first step is done! Now, the ViewModel is able to produce UI state. In the next step, you will consume this state from the UI.
4. Consuming a Flow safely from the ViewModel
The list of flight destinations is still empty. In the previous step, you produced the UI state in the MainViewModel. Now, you'll consume the UI state exposed by MainViewModel to display in the UI.
Open the home/CraneHome.kt file and look at the CraneHomeContent composable.
There's a TODO comment above the definition of suggestedDestinations which is assigned to a remembered empty list. This is what's showing on the screen: an empty list! In this step, you'll fix that and show the suggested destinations that the MainViewModel exposes.
Open home/MainViewModel.kt and take a look at the suggestedDestinations StateFlow that is initialized to destinationsRepository.destinations, and gets updated when the updatePeople or toDestinationChanged functions get called.
You want your UI in the CraneHomeContent composable to update whenever there's a new item emitted into the suggestedDestinations stream of data. You can use the collectAsStateWithLifecycle() function. collectAsStateWithLifecycle() collects values from the StateFlow and represents the latest value via Compose's State API in a lifecycle-aware manner. This will make the Compose code that reads that state value recompose on new emissions.
To start using the collectAsStateWithLifecycle API, first add the following dependency in app/build.gradle. The variable lifecycle_version is defined already in the project with the appropriate version.
dependencies {
    implementation "androidx.lifecycle:lifecycle-runtime-compose:$lifecycle_version"
}
Go back to the CraneHomeContent composable and replace the line that assigns suggestedDestinations with a call to collectAsStateWithLifecycle on the ViewModel's suggestedDestinations property:
import androidx.lifecycle.compose.collectAsStateWithLifecycle

@Composable
fun CraneHomeContent(
    onExploreItemClicked: OnExploreItemClicked,
    openDrawer: () -> Unit,
    modifier: Modifier = Modifier,
    viewModel: MainViewModel = viewModel(),
) {
    val suggestedDestinations by viewModel.suggestedDestinations.collectAsStateWithLifecycle()
    // ...
}
If you run the app, you'll see that the list of destinations are populated, and that they change whenever you tap the number of people traveling.

5. LaunchedEffect and rememberUpdatedState
In the project, there's a home/LandingScreen.kt file that's not used at the moment. You want to add a landing screen to the app, which potentially could be used to load all the data needed in the background.
The landing screen will occupy the whole screen and show the app's logo in the middle of the screen. Ideally, you'd show the screen and—after all the data's been loaded—you'd notify the caller that the landing screen can be dismissed using the onTimeout callback.
Kotlin coroutines are the recommended way to perform asynchronous operations in Android. An app would usually use coroutines to load things in the background when it starts. Jetpack Compose offers APIs that make using coroutines safe within the UI layer. As this app doesn't communicate with a backend, you'll use the coroutines' delay function to simulate loading things in the background.
A side-effect in Compose is a change to the state of the app that happens outside the scope of a composable function. Changing the state to show/hide the landing screen will happen in the onTimeout callback and since before calling onTimeout you need to load things using coroutines, the state change needs to happen in the context of a coroutine!
To call suspend functions safely from inside a composable, use the LaunchedEffect API, which triggers a coroutine-scoped side-effect in Compose.
When LaunchedEffect enters the Composition, it launches a coroutine with the block of code passed as a parameter. The coroutine will be canceled if LaunchedEffect leaves the composition.
Although the next code is not correct, let's see how to use this API and discuss why the following code is wrong. You'll call the LandingScreen composable later in this step.
// home/LandingScreen.kt file

import androidx.compose.runtime.LaunchedEffect
import kotlinx.coroutines.delay

@Composable
fun LandingScreen(onTimeout: () -> Unit, modifier: Modifier = Modifier) {
    Box(modifier = modifier.fillMaxSize(), contentAlignment = Alignment.Center) {
        // Start a side effect to load things in the background
        // and call onTimeout() when finished.
        // Passing onTimeout as a parameter to LaunchedEffect
        // is wrong! Don't do this. We'll improve this code in a sec.
        LaunchedEffect(onTimeout) {
            delay(SplashWaitTime) // Simulates loading things
            onTimeout()
        }
        Image(painterResource(id = R.drawable.ic_crane_drawer), contentDescription = null)
    }
}
Some side-effect APIs like LaunchedEffect take a variable number of keys as a parameter that are used to restart the effect whenever one of those keys changes. Have you spotted the error? We wouldn't want to restart the LaunchedEffect if callers to this composable function pass a different onTimeout lambda value. That'd make the delay start again and you wouldn't be meeting the requirements.
Let's fix this. To trigger the side-effect only once during the lifecycle of this composable, use a constant as a key, for example LaunchedEffect(Unit) { ... }. However, now there's a different issue.
If onTimeout changes while the side-effect is in progress, there's no guarantee that the last onTimeout is called when the effect finishes. To guarantee that the last onTimeout is called, remember onTimeout using the rememberUpdatedState API. This API captures and updates the newest value:
// home/LandingScreen.kt file

import androidx.compose.runtime.getValue
import androidx.compose.runtime.rememberUpdatedState
import kotlinx.coroutines.delay

@Composable
fun LandingScreen(onTimeout: () -> Unit, modifier: Modifier = Modifier) {
    Box(modifier = modifier.fillMaxSize(), contentAlignment = Alignment.Center) {
        // This will always refer to the latest onTimeout function that
        // LandingScreen was recomposed with
        val currentOnTimeout by rememberUpdatedState(onTimeout)

        // Create an effect that matches the lifecycle of LandingScreen.
        // If LandingScreen recomposes or onTimeout changes,
        // the delay shouldn't start again.
        LaunchedEffect(Unit) {
            delay(SplashWaitTime)
            currentOnTimeout()
        }

        Image(painterResource(id = R.drawable.ic_crane_drawer), contentDescription = null)
    }
}
You should use rememberUpdatedState when a long-lived lambda or object expression references parameters or values computed during composition, which might be common when working with LaunchedEffect.
Showing the landing screen
Now, you need to show the landing screen when the app is opened. Open the home/MainActivity.kt file and check out the MainScreen composable that's first called.
In the MainScreen composable, you can simply add an internal state that tracks whether the landing should be shown or not:
// home/MainActivity.kt file

import androidx.compose.runtime.getValue
import androidx.compose.runtime.mutableStateOf
import androidx.compose.runtime.remember
import androidx.compose.runtime.setValue

@Composable
private fun MainScreen(onExploreItemClicked: OnExploreItemClicked) {
    Surface(color = MaterialTheme.colors.primary) {
        var showLandingScreen by remember { mutableStateOf(true) }
        if (showLandingScreen) {
            LandingScreen(onTimeout = { showLandingScreen = false })
        } else {
            CraneHome(onExploreItemClicked = onExploreItemClicked)
        }
    }
}
If you run the app now, you should see the LandingScreen appearing and disappearing after 2 seconds.

6. rememberCoroutineScope
In this step, you'll make the navigation drawer work. Currently, nothing happens if you try to tap the hamburger menu.
Open the home/CraneHome.kt file and check out the CraneHome composable to see where you need to open the navigation drawer: in the openDrawer callback!
In CraneHome, you have a scaffoldState that contains a DrawerState. DrawerState has methods to open and close the navigation drawer programmatically. However, if you attempt to write scaffoldState.drawerState.open() in the openDrawer callback, you'll get an error! That's because the open function is a suspend function. We're in the realm of coroutines again.
Apart from APIs to make calling coroutines safe from the UI layer, some Compose APIs are suspend functions. One example of this is the API to open the navigation drawer. Suspend functions, in addition to being able to run asynchronous code, also help represent concepts that happen over time. As opening the drawer requires some time, movement, and potential animations, that's perfectly reflected with the suspend function, which will suspend the execution of the coroutine where it's been called until it finishes and resumes execution.
scaffoldState.drawerState.open() must be called within a coroutine. What can you do? openDrawer is a simple callback function, therefore:
- You cannot simply call suspend functions in it because
openDraweris not executed in the context of a coroutine. - You cannot use
LaunchedEffectas before because we cannot call composables inopenDrawer. We're not in the Composition.
You want to launch a coroutine; which scope should we use? Ideally, you'd want a CoroutineScope that follows the lifecycle of its call-site. Using the rememberCoroutineScope API returns a CoroutineScope bound to the point in the Composition where you call it. The scope will be automatically canceled once it leaves the Composition. With that scope, you can start coroutines when you're not in the Composition, for example, in the openDrawer callback.
// home/CraneHome.kt file

import androidx.compose.runtime.rememberCoroutineScope
import kotlinx.coroutines.launch

@Composable
fun CraneHome(
    onExploreItemClicked: OnExploreItemClicked,
    modifier: Modifier = Modifier,
) {
    val scaffoldState = rememberScaffoldState()
    Scaffold(
        scaffoldState = scaffoldState,
        modifier = Modifier.statusBarsPadding(),
        drawerContent = {
            CraneDrawer()
        }
    ) {
        val scope = rememberCoroutineScope()
        CraneHomeContent(
            modifier = modifier,
            onExploreItemClicked = onExploreItemClicked,
            openDrawer = {
                scope.launch {
                    scaffoldState.drawerState.open()
                }
            }
        )
    }
}
If you run the app, you'll see that the navigation drawer opens when you tap the hamburger menu icon.

LaunchedEffect vs rememberCoroutineScope
Using LaunchedEffect in this case wasn't possible because you needed to trigger the call to create a coroutine in a regular callback that was outside of the Composition.
Looking back at the landing screen step that used LaunchedEffect, could you use rememberCoroutineScope and call scope.launch { delay(); onTimeout(); } instead of using LaunchedEffect?
You could've done that, and it would've seemed to work, but it wouldn't be correct. As explained in the Thinking in Compose documentation, composables can be called by Compose at any moment. LaunchedEffect guarantees that the side-effect will be executed when the call to that composable makes it into the Composition. If you use rememberCoroutineScope and scope.launch in the body of the LandingScreen, the coroutine will be executed every time LandingScreen is called by Compose regardless of whether that call makes it into the Composition or not. Therefore, you'll waste resources and you won't be executing this side-effect in a controlled environment.
7. Creating a state holder
Have you noticed that if you tap Choose Destination you can edit the field and filter cities based on your search input? You also probably noticed that whenever you modify Choose Destination, the text style changes.
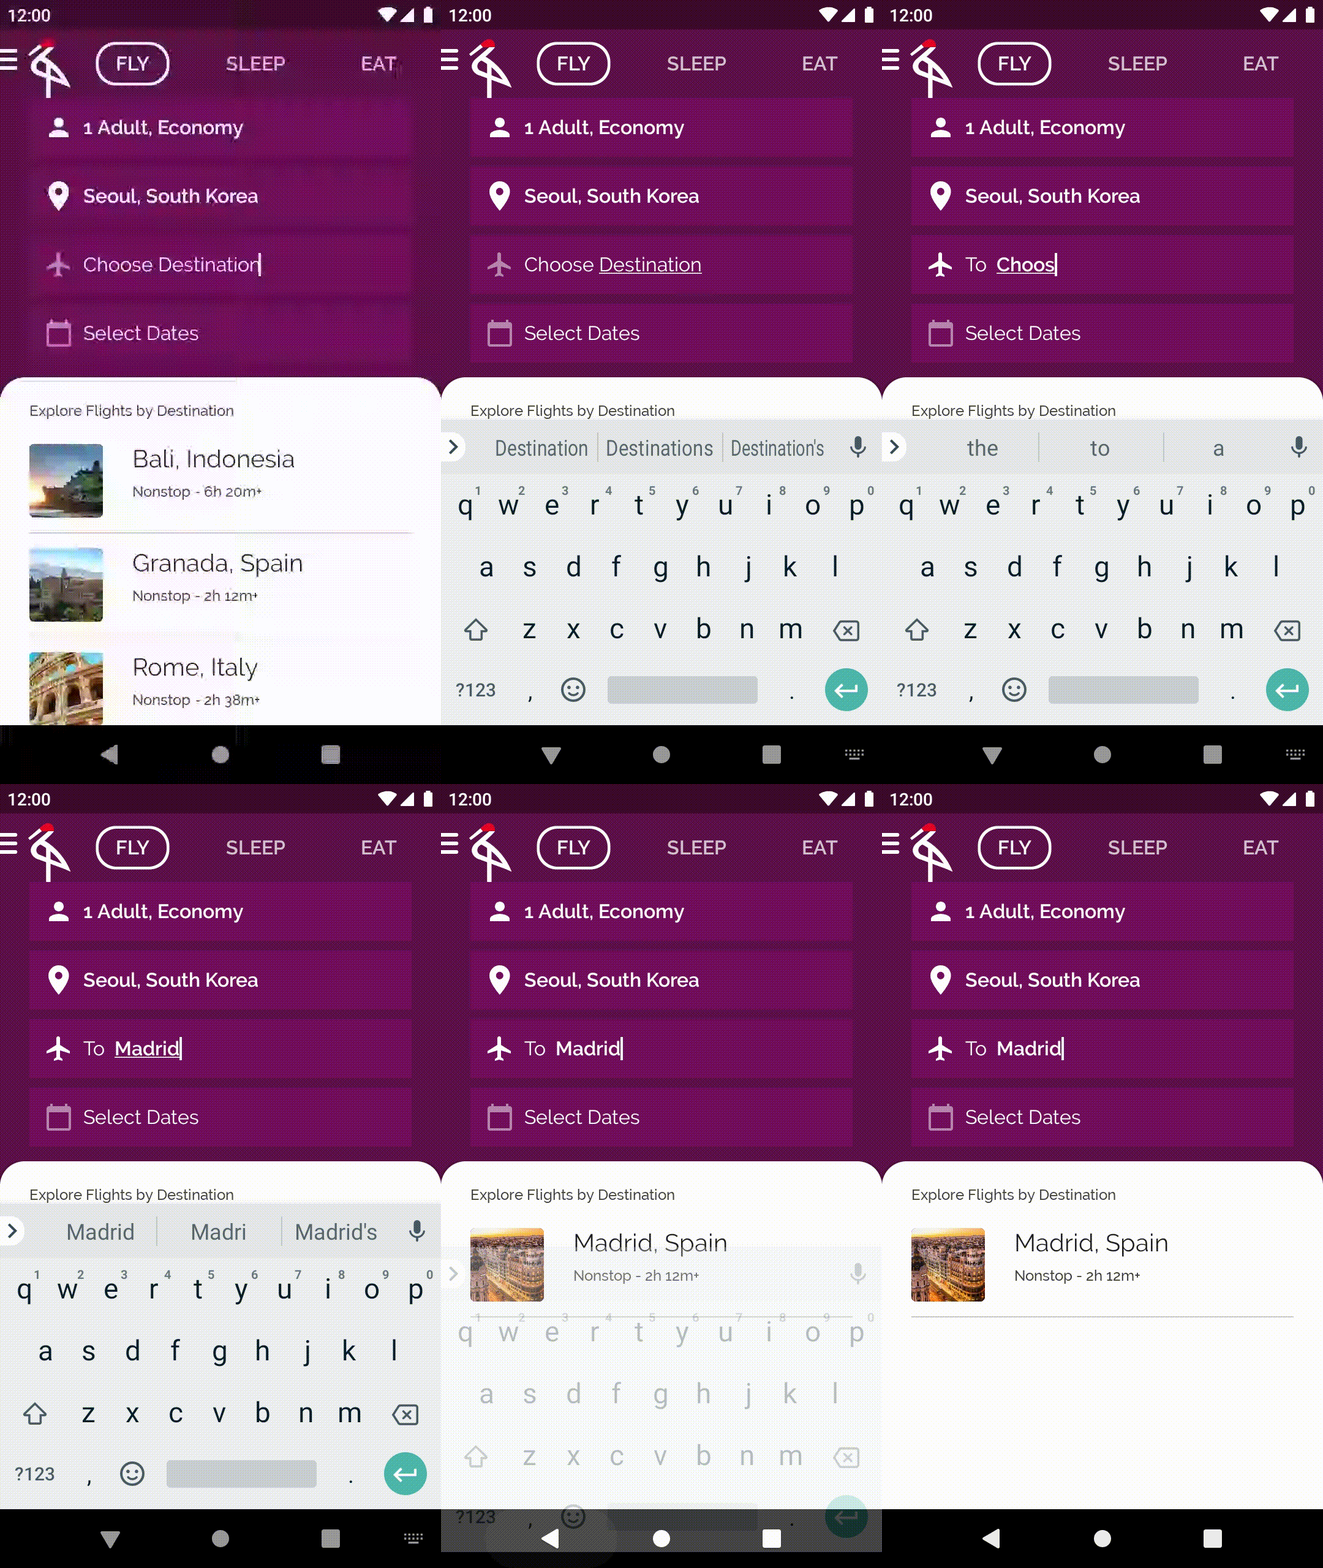
Open the base/EditableUserInput.kt file. The CraneEditableUserInput stateful composable takes some parameters such as the hint and a caption which corresponds to the optional text next to the icon. For example, the caption To appears when you search for a destination.
// base/EditableUserInput.kt file - code in the main branch

@Composable
fun CraneEditableUserInput(
    hint: String,
    caption: String? = null,
    @DrawableRes vectorImageId: Int? = null,
    onInputChanged: (String) -> Unit
) {
    // TODO Codelab: Encapsulate this state in a state holder
    var textState by remember { mutableStateOf(hint) }
    val isHint = { textState == hint }

    ...
}
Why?
The logic to update the textState and determine whether what's been displayed corresponds to the hint or not is all in the body of the CraneEditableUserInput composable. This brings some downsides with it:
- The value of the
TextFieldis not hoisted and therefore cannot be controlled from outside, making testing harder. - The logic of this composable could become more complex and the internal state could be out of sync more easily.
By creating a state holder responsible for the internal state of this composable, you can centralize all state changes in one place. With this, it's more difficult for the state to be out of sync, and the related logic is all grouped together in a single class. Furthermore, this state can be easily hoisted up and can be consumed from callers of this composable.
In this case, hoisting the state is a good idea since this is a low-level UI component that might be reused in other parts of the app. Therefore, the more flexible and controllable it is, the better.
Creating the state holder
As CraneEditableUserInput is a reusable component, create a regular class as state holder named EditableUserInputState in the same file that looks like the following:
// base/EditableUserInput.kt file

import androidx.compose.runtime.getValue
import androidx.compose.runtime.mutableStateOf
import androidx.compose.runtime.setValue

class EditableUserInputState(private val hint: String, initialText: String) {

    var text by mutableStateOf(initialText)
       private set

    fun updateText(newText: String) {
       text = newText
    }

    val isHint: Boolean
        get() = text == hint
}
The class should have the following traits:
textis a mutable state of typeString, just as you have inCraneEditableUserInput. It's important to usemutableStateOfso that Compose tracks changes to the value and recomposes when changes happen.textis avar, with a privatesetso it can't be directly mutated from outside the class. Instead of making this variable public, you can expose an eventupdateTextto modify it, which makes the class the single source of truth.- The class takes an
initialTextas a dependency that is used to initializetext. - The logic to know if the
textis the hint or not is in theisHintproperty that performs the check on-demand.
If the logic gets more complex in the future, you only need to make changes to one class: EditableUserInputState.
Remembering the state holder
State holders always need to be remembered in order to keep them in the Composition and not create a new one every time. It's a good practice to create a method in the same file that does this to remove boilerplate and avoid any mistakes that might occur. In the base/EditableUserInput.kt file, add this code:
// base/EditableUserInput.kt file

@Composable
fun rememberEditableUserInputState(hint: String): EditableUserInputState =
    remember(hint) {
        EditableUserInputState(hint, hint)
    }
If you only remember this state, it won't survive activity recreations. To achieve that, you can use the rememberSaveable API instead which behaves similarly to remember, but the stored value also survives activity and process recreation. Internally, it uses the saved instance state mechanism.
rememberSaveable does all this with no extra work for objects that can be stored inside a Bundle. That's not the case for the EditableUserInputState class that you created in your project. Therefore, you need to tell rememberSaveable how to save and restore an instance of this class using a Saver.
Creating a custom saver
A Saver describes how an object can be converted into something which is Saveable. Implementations of a Saver need to override two functions:
saveto convert the original value to a saveable one.restoreto convert the restored value to an instance of the original class.
For this case, instead of creating a custom implementation of Saver for the EditableUserInputState class, you can use some of the existing Compose APIs such as listSaver or mapSaver (that stores the values to save in a List or Map) to reduce the amount of code that you need to write.
It's a good practice to place Saver definitions close to the class they work with. Because it needs to be statically accessed, add the Saver for EditableUserInputState in a companion object. In the base/EditableUserInput.kt file, add the implementation of the Saver:
// base/EditableUserInput.kt file

import androidx.compose.runtime.saveable.Saver
import androidx.compose.runtime.saveable.listSaver

class EditableUserInputState(private val hint: String, initialText: String) {
    var text by mutableStateOf(initialText)

    val isHint: Boolean
        get() = text == hint

    companion object {
        val Saver: Saver<EditableUserInputState, *> = listSaver(
            save = { listOf(it.hint, it.text) },
            restore = {
                EditableUserInputState(
                    hint = it[0],
                    initialText = it[1],
                )
            }
        )
    }
}
In this case, you use a listSaver as an implementation detail to store and restore an instance of EditableUserInputState in the saver.
Now, you can use this saver in rememberSaveable (instead of remember) in the rememberEditableUserInputState method you created before:
// base/EditableUserInput.kt file
import androidx.compose.runtime.saveable.rememberSaveable

@Composable
fun rememberEditableUserInputState(hint: String): EditableUserInputState =
    rememberSaveable(hint, saver = EditableUserInputState.Saver) {
        EditableUserInputState(hint, hint)
    }
With this, the EditableUserInput remembered state will survive process and activity recreations.
Using the state holder
You're going to use EditableUserInputState instead of text and isHint, but you don't want to just use it as an internal state in CraneEditableUserInput as there's no way for the caller composable to control the state. Instead, you want to hoist EditableUserInputState so that callers can control the state of CraneEditableUserInput. If you hoist the state, then the composable can be used in previews and be tested more easily since you're able to modify its state from the caller.
To do this, you need to change the parameters of the composable function and give it a default value in case it is needed. Because you might want to allow CraneEditableUserInput with empty hints, add a default argument:
@Composable
fun CraneEditableUserInput(
    state: EditableUserInputState = rememberEditableUserInputState(""),
    caption: String? = null,
    @DrawableRes vectorImageId: Int? = null
) { /* ... */ }
You've probably noticed that the onInputChanged parameter is not there anymore! Since the state can be hoisted, if callers want to know if the input changed, they can control the state and pass that state into this function.
Next, you need to tweak the function body to use the hoisted state instead of the internal state that was used before. After the refactoring, the function should look like this:
@Composable
fun CraneEditableUserInput(
    state: EditableUserInputState = rememberEditableUserInputState(""),
    caption: String? = null,
    @DrawableRes vectorImageId: Int? = null
) {
    CraneBaseUserInput(
        caption = caption,
        tintIcon = { !state.isHint },
        showCaption = { !state.isHint },
        vectorImageId = vectorImageId
    ) {
        BasicTextField(
            value = state.text,
            onValueChange = { state.updateText(it) },
            textStyle = if (state.isHint) {
                captionTextStyle.copy(color = LocalContentColor.current)
            } else {
                MaterialTheme.typography.body1.copy(color = LocalContentColor.current)
            },
            cursorBrush = SolidColor(LocalContentColor.current)
        )
    }
}
State holder callers
Since you changed the API of CraneEditableUserInput, you need to check in all places where it's called to make sure you pass in the appropriate parameters.
The only place in the project that you call this API is in the home/SearchUserInput.kt file. Open it and go to the ToDestinationUserInput composable function; you should see a build error there. As the hint is now part of the state holder, and you want a custom hint for this instance of CraneEditableUserInput in the Composition, you need to remember the state at the ToDestinationUserInput level and pass it into CraneEditableUserInput:
// home/SearchUserInput.kt file

import androidx.compose.samples.crane.base.rememberEditableUserInputState

@Composable
fun ToDestinationUserInput(onToDestinationChanged: (String) -> Unit) {
    val editableUserInputState = rememberEditableUserInputState(hint = "Choose Destination")
    CraneEditableUserInput(
        state = editableUserInputState,
        caption = "To",
        vectorImageId = R.drawable.ic_plane
    )
}
snapshotFlow
The code above is missing functionality to notify ToDestinationUserInput's caller when the input changes. Due to how the app is structured, you don't want to hoist the EditableUserInputState any higher up in the hierarchy. You wouldn't want to couple the other composables such as FlySearchContent with this state. How can you call the onToDestinationChanged lambda from ToDestinationUserInput and still keep this composable reusable?
You can trigger a side-effect using LaunchedEffect every time the input changes and call the onToDestinationChanged lambda:
// home/SearchUserInput.kt file

import androidx.compose.runtime.LaunchedEffect
import androidx.compose.runtime.rememberUpdatedState
import androidx.compose.runtime.snapshotFlow
import kotlinx.coroutines.flow.collect
import kotlinx.coroutines.flow.filter

@Composable
fun ToDestinationUserInput(onToDestinationChanged: (String) -> Unit) {
    val editableUserInputState = rememberEditableUserInputState(hint = "Choose Destination")
    CraneEditableUserInput(
        state = editableUserInputState,
        caption = "To",
        vectorImageId = R.drawable.ic_plane
    )

    val currentOnDestinationChanged by rememberUpdatedState(onToDestinationChanged)
    LaunchedEffect(editableUserInputState) {
        snapshotFlow { editableUserInputState.text }
            .filter { !editableUserInputState.isHint }
            .collect {
                currentOnDestinationChanged(editableUserInputState.text)
            }
    }
}
You've already used LaunchedEffect and rememberUpdatedState before, but the code above also uses a new API! The snapshotFlow API converts Compose State<T> objects into a Flow. When the state read inside snapshotFlow mutates, the Flow will emit the new value to the collector. In this case, you convert the state into a flow to use the power of flow operators. With that, you filter when the text is not the hint, and collect the emitted items to notify the parent that the current destination changed.
There are no visual changes in this step of the codelab, but you've improved the quality of this part of the code. If you run the app now, you should see everything is working as it did previously.
8. DisposableEffect
When you tap on a destination, the details screen opens and you can see where the city is on the map. That code is in the details/DetailsActivity.kt file. In the CityMapView composable, you're calling the rememberMapViewWithLifecycle function. If you open this function, which is in the details/MapViewUtils.kt file, you'll see that it's not connected to any lifecycle! It just remembers a MapView and calls onCreate on it:
// details/MapViewUtils.kt file - code in the main branch

@Composable
fun rememberMapViewWithLifecycle(): MapView {
    val context = LocalContext.current
    // TODO Codelab: DisposableEffect step. Make MapView follow the lifecycle
    return remember {
        MapView(context).apply {
            id = R.id.map
            onCreate(Bundle())
        }
    }
}
Even though the app runs fine, this is a problem because the MapView is not following the correct lifecycle. Therefore, it won't know when the app is moved to the background, when the View should be paused, etc. Let's fix this!
As the MapView is a View and not a composable, you want it to follow the lifecycle of the Activity where it's used as well as the lifecycle of the Composition. That means you need to create a LifecycleEventObserver to listen for lifecycle events and call the right methods on the MapView. Then, you need to add this observer to the current activity's lifecycle.
Start by creating a function that returns a LifecycleEventObserver that calls the corresponding methods in a MapView given a certain event:
// details/MapViewUtils.kt file

import androidx.lifecycle.Lifecycle
import androidx.lifecycle.LifecycleEventObserver

private fun getMapLifecycleObserver(mapView: MapView): LifecycleEventObserver =
    LifecycleEventObserver { _, event ->
        when (event) {
            Lifecycle.Event.ON_CREATE -> mapView.onCreate(Bundle())
            Lifecycle.Event.ON_START -> mapView.onStart()
            Lifecycle.Event.ON_RESUME -> mapView.onResume()
            Lifecycle.Event.ON_PAUSE -> mapView.onPause()
            Lifecycle.Event.ON_STOP -> mapView.onStop()
            Lifecycle.Event.ON_DESTROY -> mapView.onDestroy()
            else -> throw IllegalStateException()
        }
    }
Now, you need to add this observer to the current lifecycle, which you can get using the current LifecycleOwner with the LocalLifecycleOwner composition local. However, it's not enough to add the observer; you also need to be able to remove it! You need a side effect that tells you when the effect is leaving the Composition so that you can perform some cleanup code. The side-effect API you're looking for is DisposableEffect.
DisposableEffect is meant for side effects that need to be cleaned up after the keys change or the composable leaves the Composition. The final rememberMapViewWithLifecycle code does exactly that. Implement the following lines in your project:
// details/MapViewUtils.kt file

import androidx.compose.runtime.DisposableEffect
import androidx.compose.ui.platform.LocalLifecycleOwner

@Composable
fun rememberMapViewWithLifecycle(): MapView {
    val context = LocalContext.current
    val mapView = remember {
        MapView(context).apply {
            id = R.id.map
        }
    }

    val lifecycle = LocalLifecycleOwner.current.lifecycle
    DisposableEffect(key1 = lifecycle, key2 = mapView) {
        // Make MapView follow the current lifecycle
        val lifecycleObserver = getMapLifecycleObserver(mapView)
        lifecycle.addObserver(lifecycleObserver)
        onDispose {
            lifecycle.removeObserver(lifecycleObserver)
        }
    }

    return mapView
}
The observer is added to the current lifecycle, and it'll be removed whenever the current lifecycle changes or this composable leaves the Composition. With the keys in DisposableEffect, if either the lifecycle or the mapView change, the observer will be removed and added again to the right lifecycle.
With the changes you've just made, the MapView will always follow the lifecycle of the current LifecycleOwner and its behavior would be just as if it was used in the View world.
Feel free to run the app and open the details screen to make sure that the MapView still renders properly. There are no visual changes in this step.
9. produceState
In this section, you'll improve how the details screen starts. The DetailsScreen composable in the details/DetailsActivity.kt file gets the cityDetails synchronously from the ViewModel and calls DetailsContent if the result is successful.
However, cityDetails could evolve to be more costly to load on the UI thread and it could use coroutines to move the loading of the data to a different thread. You'll improve this code to add a loading screen and display the DetailsContent when the data is ready.
One way to model the state of the screen is with the following class that covers all possibilities: data to display on the screen, and the loading and error signals. Add the DetailsUiState class to the DetailsActivity.kt file:
// details/DetailsActivity.kt file

data class DetailsUiState(
    val cityDetails: ExploreModel? = null,
    val isLoading: Boolean = false,
    val throwError: Boolean = false
)
You could map what the screen needs to display and the UiState in the ViewModel layer by using a stream of data, a StateFlow of type DetailsUiState, that the ViewModel updates when the information is ready and that Compose collects with the collectAsStateWithLifecycle() API that you already know about.
However, for the sake of this exercise, you're going to implement an alternative. If you wanted to move the uiState mapping logic to the Compose world, you could use the produceState API.
produceState allows you to convert non-Compose state into Compose State. It launches a coroutine scoped to the Composition that can push values into the returned State using the value property. As with LaunchedEffect, produceState also takes keys to cancel and restart the computation.
For your use case, you can use produceState to emit uiState updates with an initial value of DetailsUiState(isLoading = true) as follows:
// details/DetailsActivity.kt file

import androidx.compose.runtime.produceState

@Composable
fun DetailsScreen(
    onErrorLoading: () -> Unit,
    modifier: Modifier = Modifier,
    viewModel: DetailsViewModel = viewModel()
) {

    val uiState by produceState(initialValue = DetailsUiState(isLoading = true)) {
        // In a coroutine, this can call suspend functions or move
        // the computation to different Dispatchers
        val cityDetailsResult = viewModel.cityDetails
        value = if (cityDetailsResult is Result.Success<ExploreModel>) {
            DetailsUiState(cityDetailsResult.data)
        } else {
            DetailsUiState(throwError = true)
        }
    }

    // TODO: ...
}
Next, depending on the uiState, you show the data, show the loading screen, or report the error. Here's the complete code for the DetailsScreen composable:
// details/DetailsActivity.kt file

import androidx.compose.foundation.layout.Box
import androidx.compose.material.CircularProgressIndicator

@Composable
fun DetailsScreen(
    onErrorLoading: () -> Unit,
    modifier: Modifier = Modifier,
    viewModel: DetailsViewModel = viewModel()
) {
    val uiState by produceState(initialValue = DetailsUiState(isLoading = true)) {
        val cityDetailsResult = viewModel.cityDetails
        value = if (cityDetailsResult is Result.Success<ExploreModel>) {
            DetailsUiState(cityDetailsResult.data)
        } else {
            DetailsUiState(throwError = true)
        }
    }

    when {
        uiState.cityDetails != null -> {
            DetailsContent(uiState.cityDetails!!, modifier.fillMaxSize())
        }
        uiState.isLoading -> {
            Box(modifier.fillMaxSize()) {
                CircularProgressIndicator(
                    color = MaterialTheme.colors.onSurface,
                    modifier = Modifier.align(Alignment.Center)
                )
            }
        }
        else -> { onErrorLoading() }
    }
}
If you run the app, you'll see how the loading spinner appears before showing the city details.

10. derivedStateOf
The last improvement you're going to make to Crane is showing a button to Scroll to top whenever you scroll in the flight destinations list after you pass the first element of the screen. Tapping the button takes you to the first element on the list.

Open the base/ExploreSection.kt file that contains this code. The ExploreSection composable corresponds to what you see in the backdrop of the scaffold.
To calculate whether the user has passed the first item, use LazyColumn's LazyListState and check if listState.firstVisibleItemIndex > 0.
A naive implementation would look like the following:
// DO NOT DO THIS - It's executed on every recomposition
val showButton = listState.firstVisibleItemIndex > 0
This solution is not as efficient as it could be, because the composable function reading showButton recomposes as often as firstVisibleItemIndex changes - which happens frequently when scrolling. Instead, you want the function to recompose only when the condition changes between true and false.
There's an API that allows you to do this: the derivedStateOf API.
listState is an observable Compose State. Your calculation, showButton, also needs to be a Compose State since you want the UI to recompose when its value changes, and show or hide the button.
Use derivedStateOf when you want a Compose State that's derived from another State. The derivedStateOf calculation block is executed every time the internal state changes, but the composable function only recomposes when the result of the calculation is different from the last one. This minimizes the amount of times functions reading showButton recompose.
Using the derivedStateOf API in this case is a better and more efficient alternative. You'll also wrap the call with the remember API, so the calculated value survives recomposition.
// Show the button if the first visible item is past
// the first item. We use a remembered derived state to
// minimize unnecessary recompositions
val showButton by remember {
    derivedStateOf {
        listState.firstVisibleItemIndex > 0
    }
}
The new code for the ExploreSection composable should be familiar to you already. You're using a Box to place the Button that is shown conditionally on top of ExploreList. And you use rememberCoroutineScope to call the listState.scrollToItem suspend function inside the Button's onClick callback.
// base/ExploreSection.kt file

import androidx.compose.material.FloatingActionButton
import androidx.compose.runtime.derivedStateOf
import androidx.compose.runtime.getValue
import androidx.compose.runtime.remember
import androidx.compose.runtime.rememberCoroutineScope
import androidx.compose.foundation.layout.navigationBarsPadding
import kotlinx.coroutines.launch

@Composable
fun ExploreSection(
    modifier: Modifier = Modifier,
    title: String,
    exploreList: List<ExploreModel>,
    onItemClicked: OnExploreItemClicked
) {
    Surface(modifier = modifier.fillMaxSize(), color = Color.White, shape = BottomSheetShape) {
        Column(modifier = Modifier.padding(start = 24.dp, top = 20.dp, end = 24.dp)) {
            Text(
                text = title,
                style = MaterialTheme.typography.caption.copy(color = crane_caption)
            )
            Spacer(Modifier.height(8.dp))
            Box(Modifier.weight(1f)) {
                val listState = rememberLazyListState()
                ExploreList(exploreList, onItemClicked, listState = listState)

                // Show the button if the first visible item is past
                // the first item. We use a remembered derived state to
                // minimize unnecessary compositions
                val showButton by remember {
                    derivedStateOf {
                        listState.firstVisibleItemIndex > 0
                    }
                }
                if (showButton) {
                    val coroutineScope = rememberCoroutineScope()
                    FloatingActionButton(
                        backgroundColor = MaterialTheme.colors.primary,
                        modifier = Modifier
                            .align(Alignment.BottomEnd)
                            .navigationBarsPadding()
                            .padding(bottom = 8.dp),
                        onClick = {
                            coroutineScope.launch {
                                listState.scrollToItem(0)
                            }
                        }
                    ) {
                        Text("Up!")
                    }
                }
            }
        }
    }
}
If you run the app, you'll see the button appearing at the bottom once you scroll and pass the first element of the screen.
11. Congratulations!
Congratulations, you've successfully completed this codelab and learned advanced concepts of state and side-effect APIs in a Jetpack Compose app!
You learned about how to create state holders, side effect APIs such as LaunchedEffect, rememberUpdatedState, DisposableEffect, produceState, and derivedStateOf, and how to use coroutines in Jetpack Compose.
What's next?
Check out the other codelabs on the Compose pathway, and other code samples, including Crane.
Documentation
For more information and guidance about these topics, check out the following documentation:
