
1. 事前準備
本程式碼研究室提供實用操作說明,讓您瞭解實作檢視區塊拖曳功能的基礎知識。您將瞭解如何在應用程式內和不同應用程式間拖曳檢視區塊,以及如何在應用程式內及不同應用程式間實作拖曳互動程序。您可以在本程式碼研究室的引導下,使用 DropHelper 啟用拖曳功能、使用 ShadowBuilder 自訂拖曳期間的視覺回饋、新增跨應用程式拖曳的權限,以及實作通用的內容接收器。
必要條件
如要完成本程式碼研究室,您需符合以下條件:
- 具備建構 Android 應用程式的經驗
- 具備活動、片段、檢視繫結和 xml-layout 的使用經驗
課程步驟
建立簡易應用程式,執行以下動作:
- 使用
DragStartHelper和DropHelper實作拖曳功能 - 變更 ShadowBuilder
- 新增跨應用程式拖曳的權限
- 實作通用的多媒體內容接收器。
軟硬體需求
- Android Studio Jellyfish 以上版本
- Android 裝置或模擬器
2. 拖曳事件
拖曳程序可視為 4 階段事件,分別為以下階段:
- 啟動:系統為因應使用者的拖曳手勢而啟動拖曳作業。
- 繼續:使用者繼續拖曳,進入目標檢視區塊時,dragshadow 建構工具就會啟動。
- 完成:使用者在放置目標區域的放置目標定界框內放開拖曳的項目。
- 結束:系統傳送信號以結束拖曳作業。
系統會透過 DragEvent 物件傳送拖曳事件。DragEvent 物件可包含下列資料:
ActionType:拖曳事件的生命週期事件所對應的事件動作值,例如ACTION_DRAG_STARTED,ACTION_DROP等。ClipData:要拖曳的資料,封裝在ClipData物件中。ClipDescription:ClipData物件相關中繼資訊。Result:拖曳作業的結果。X:被拖曳物件目前位置的 x 座標。Y:被拖曳物件目前位置的 y 座標。
3. 設定
建立新專案並選取「Empty Views Activity」範本:
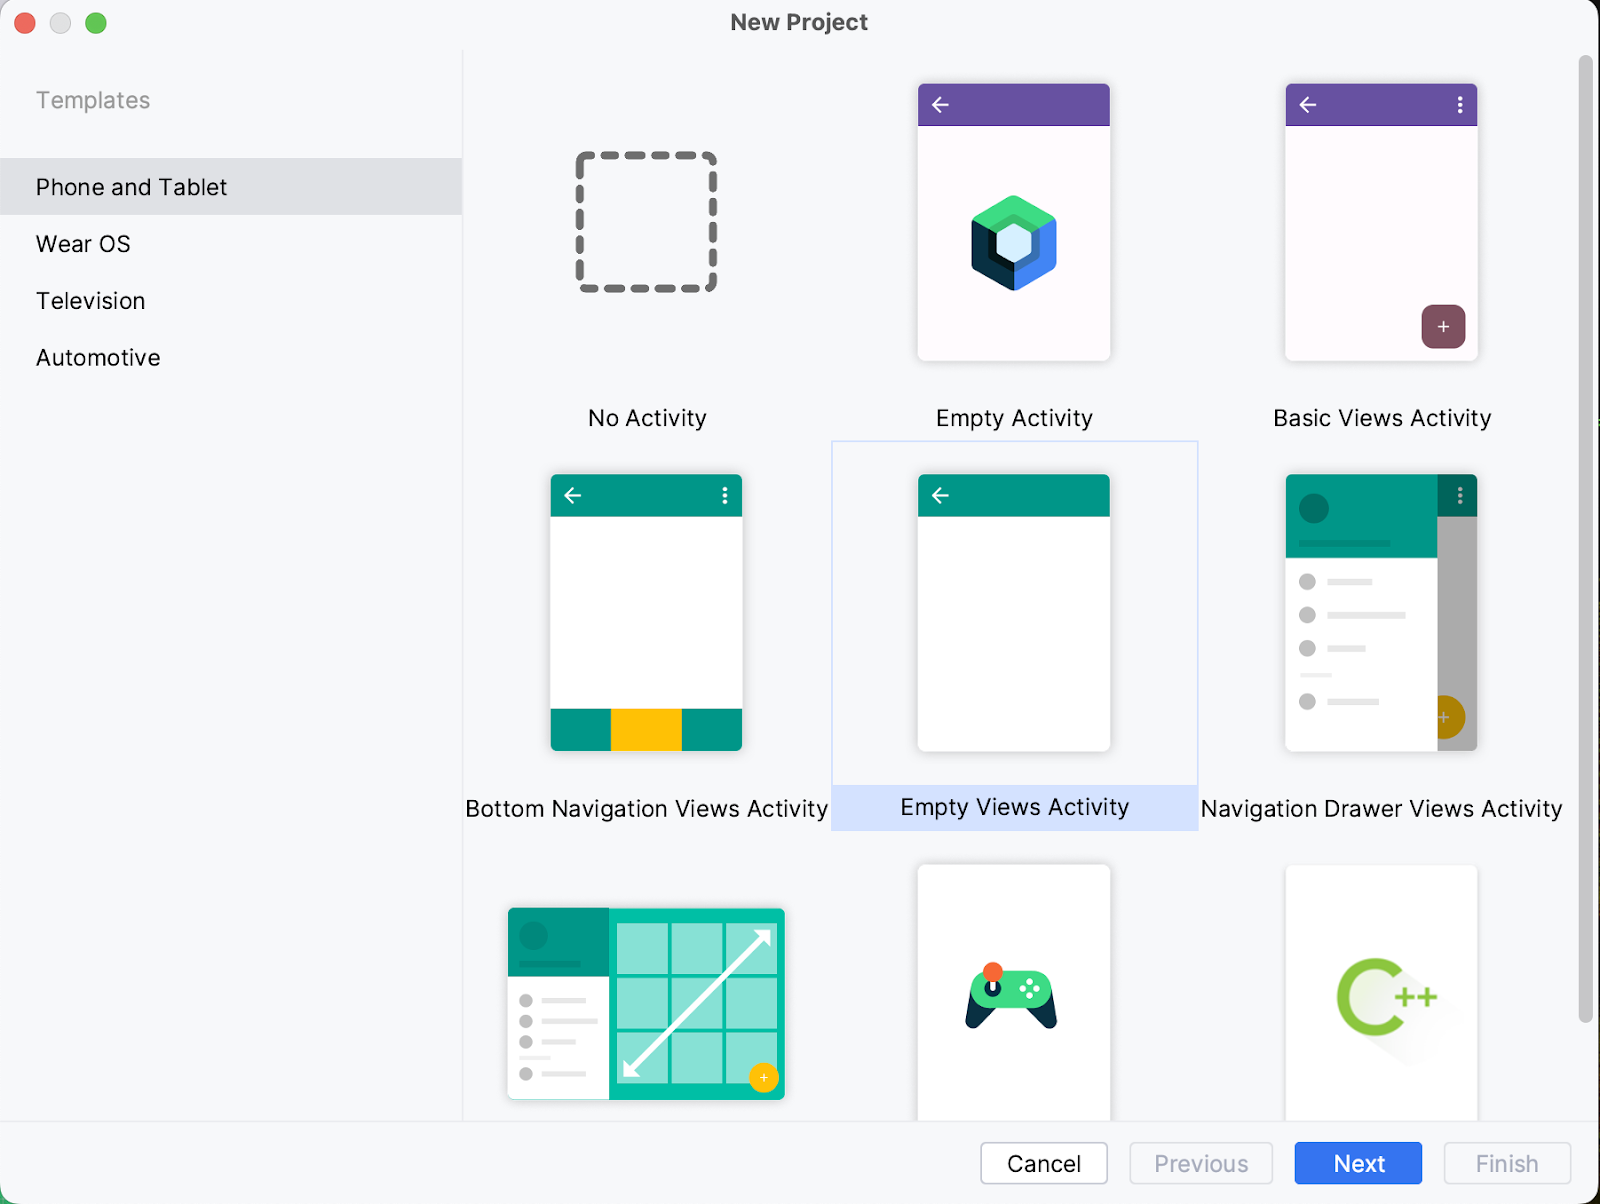
請保留所有參數的預設值。讓專案同步處理及建立索引。系統會一併建立 MainActivity.kt 與檢視區塊的 activity_main.xml。
4. 使用檢視區塊實作拖曳功能
在 string.xml 中新增一些字串值:
<resources>
    <string name="app_name">DragAndDropCodelab</string>
    <string name="drag_image">Drag Image</string>
    <string name="drop_image">drop image</string>
 </resources>
開啟 activity_main.xml 來源檔案並修改版面配置,加入兩個 ImageViews,一個做為拖曳來源,另一個則做為放置目標。
<?xml version="1.0" encoding="utf-8"?>
<androidx.constraintlayout.widget.ConstraintLayout xmlns:android="http://schemas.android.com/apk/res/android"
    xmlns:app="http://schemas.android.com/apk/res-auto"
    xmlns:tools="http://schemas.android.com/tools"
    android:layout_width="match_parent"
    android:layout_height="match_parent"
    tools:context=".MainActivity">

    <TextView
        android:id="@+id/tv_greeting"
        android:layout_width="wrap_content"
        android:layout_height="wrap_content"
        app:layout_constraintBottom_toTopOf="@id/iv_source"
        app:layout_constraintLeft_toLeftOf="parent"
        app:layout_constraintRight_toRightOf="parent"
        app:layout_constraintTop_toTopOf="parent" />

    <ImageView
        android:id="@+id/iv_source"
        android:layout_width="match_parent"
        android:layout_height="wrap_content"
        android:contentDescription="@string/drag_image"
        app:layout_constraintBottom_toTopOf="@id/iv_target"
        app:layout_constraintLeft_toLeftOf="parent"
        app:layout_constraintRight_toRightOf="parent"
        app:layout_constraintTop_toBottomOf="@id/tv_greeting" />

    <ImageView
        android:id="@+id/iv_target"
        android:layout_width="match_parent"
        android:layout_height="wrap_content"
        android:contentDescription="@string/drop_image"
        app:layout_constraintBottom_toBottomOf="parent"
        app:layout_constraintLeft_toLeftOf="parent"
        app:layout_constraintRight_toRightOf="parent"
        app:layout_constraintTop_toBottomOf="@id/iv_source" />
</androidx.constraintlayout.widget.ConstraintLayout>
在 build.gradle.kts 中啟用檢視繫結:
buildFeatures{
   viewBinding = true
}
在 build.gradle.kts 中,新增 Glide 的依附元件:
dependencies {
    implementation("com.github.bumptech.glide:glide:4.16.0")
    annotationProcessor("com.github.bumptech.glide:compiler:4.16.0")

    //other dependencies
}
在 string.xml 中新增圖片網址和問候語:
<string name="greeting">Drag and Drop</string>
<string name="target_url">https://services.google.com/fh/files/misc/qq2.jpeg</string>
<string name="source_url">https://services.google.com/fh/files/misc/qq10.jpeg</string>
在 MainActivity.kt 中,初始化檢視區塊。
class MainActivity : AppCompatActivity() {
   val binding by lazy(LazyThreadSafetyMode.NONE) {
       ActivityMainBinding.inflate(layoutInflater)
   }

   override fun onCreate(savedInstanceState: Bundle?) {
       super.onCreate(savedInstanceState)
       setContentView(binding.root)
       binding.tvGreeting.text = getString(R.string.greeting)
       Glide.with(this).asBitmap()
           .load(getString(R.string.source_url))
           .into(binding.ivSource)
       Glide.with(this).asBitmap()
           .load(getString(R.string.target_url))
           .into(binding.ivTarget)
   }
}
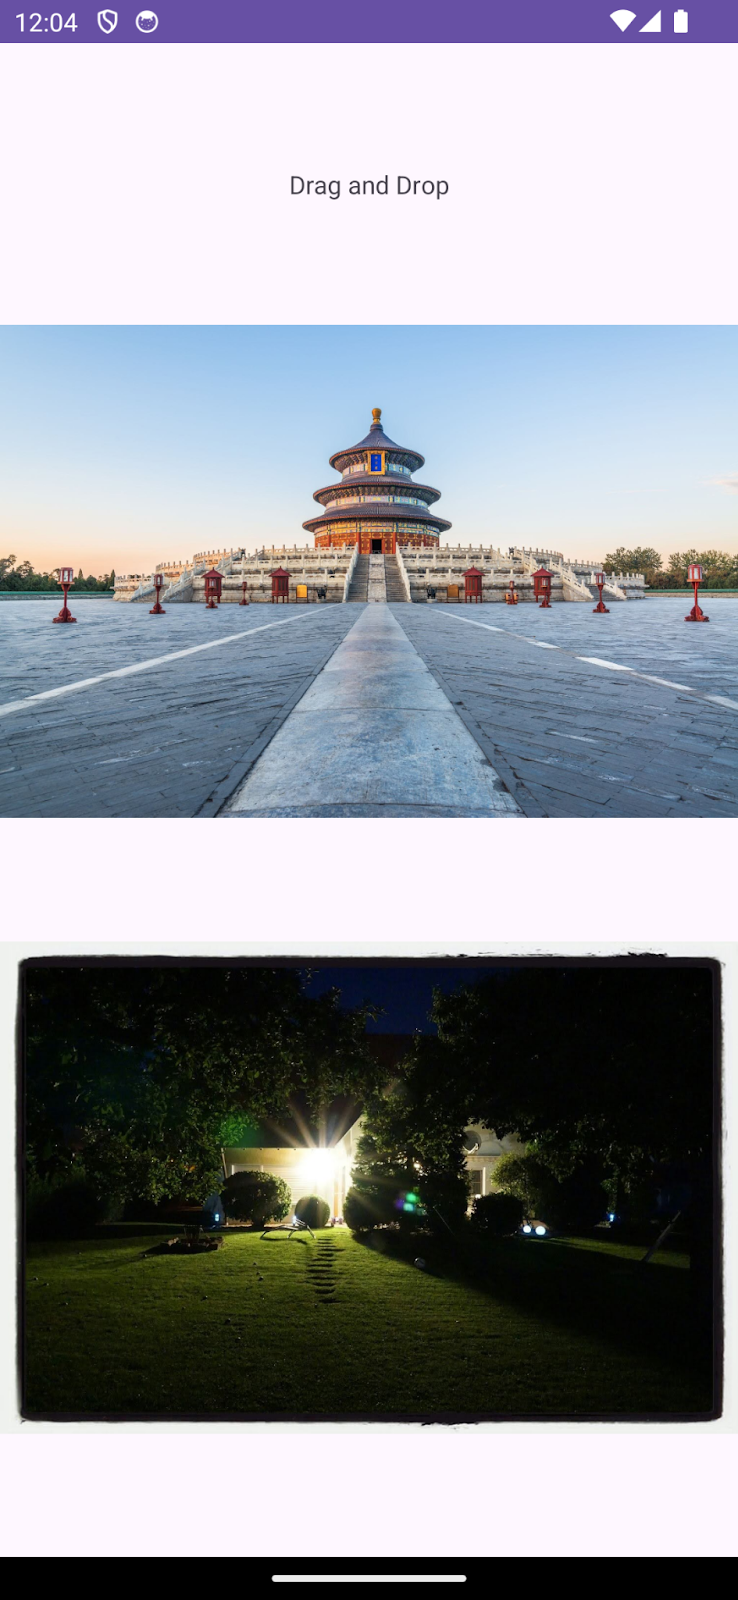
在此狀態下,應用程式應會顯示問候語,以及兩張直向排列的圖片。
5. 設定可拖曳的檢視區塊
如要將特定檢視區塊設為可拖曳,該檢視區塊必須針對拖曳手勢實作 startDragAndDrop() 方法。
讓我們為 onLongClickListener 實作回呼,當使用者在檢視區塊上啟動拖曳動作時,就會觸發回呼。
draggableView.setOnLongClickListener{ v ->
   //drag logic here
   true
}
即使檢視區塊並非可長按點擊,這個回呼也會將其設為可長按點擊。回呼會傳回布林值,True 表示回呼已取用該拖曳動作。
準備 ClipData:要拖曳的資料
讓我們定義要放置的資料。資料可以是簡單的文字或影片等任何類型。這項資料會封裝在 ClipData 物件中。ClipData 物件會持有一或多個複雜的 ClipItem。
ClipDescription 中定義的 MIME 類型各不相同。
我們要拖曳來源檢視區塊的圖片網址。ClipData 包含 3 個主要元件:
- 標籤:向使用者顯示的簡單文字,指出要拖曳的項目
- MIME 類型:要拖曳項目的 MimeType
- ClipItem:要拖曳的項目,封裝在
ClipData.Item物件中
讓我們建立 ClipData。
val label = "Dragged Image Url"
val clipItem = ClipData.Item(v.tag as? CharSequence)
val mimeTypes = arrayOf(ClipDescription.MIMETYPE_TEXT_PLAIN)
val draggedData = ClipData(
   label, mimeTypes, clipItem
)
啟動拖曳作業
我們已經準備好要拖曳的資料,可以啟動拖曳作業,方法是使用 startDragAndDrop。
startDragAndDrop 方法採用下列 4 個引數:
- data:以
ClipData.形式拖曳的資料。 - shadowBuilder:可為檢視區塊建構陰影的 DragShadowBuilder。
- myLocalState:包含拖曳作業相關本機資料的物件。將拖曳事件分派至同一個活動中的檢視區塊時,可透過 DragEvent.getLocalState() 取得這個物件。
- Flag:控制拖曳作業的旗標。
呼叫此函式後,系統會根據 View.DragShadowBuilder 類別繪製拖曳陰影。產生拖曳陰影後,系統會將事件傳送至已實作 OnDragListener 介面的可見檢視區塊,開始進行拖曳作業。
v.startDragAndDrop(
   draggedData,
   View.DragShadowBuilder(v),
   null,
   0
)
如此一來,我們設定了檢視區塊的拖曳作業,以及要拖曳的資料。最終實作內容如下所示。
fun setupDrag(draggableView: View) {
   draggableView.setOnLongClickListener { v ->
       val label = "Dragged Image Url"
       val clipItem = ClipData.Item(v.tag as? CharSequence)
       val mimeTypes = arrayOf(ClipDescription.MIMETYPE_TEXT_PLAIN)
       val draggedData = ClipData(
           label, mimeTypes, clipItem
       )
       v.startDragAndDrop(
           draggedData,
           View.DragShadowBuilder(v),
           null,
           0
       )
   }
}
在此階段,您應該可以長按檢視區塊加以拖曳。
接下來繼續設定放置的檢視區塊。
6. 設定 DropTarget 的檢視區塊
檢視區塊已實作 OnDragListener 介面,因此可以做為放置的目標。
讓我們將第二個圖片檢視區塊設定為放置目標。
private fun setupDrop(dropTarget: View) {
   dropTarget.setOnDragListener { v, event ->
       // handle drag events here
       true
   }
}
我們要覆寫 OnDragListener 介面的 onDrag 方法。onDrag 方法採用 2 個引數。
- 接收拖曳事件的 View
- 拖曳事件的 Event 物件
如果拖曳事件處理成功,這個方法會傳回 true,否則會傳回 false。
DragEvent
這代表系統在拖曳作業不同階段傳輸的資料套件。這個資料套件會封裝與作業本身和涉及資料有關的重要資訊。
DragEvent 會根據拖曳作業階段採用不同的拖曳動作:
ACTION_DRAG_STARTED:表示拖曳作業已開始。ACTION _DRAG_LOCATION:表示使用者已在進入的狀態下放開拖曳項目,也就是在目標放置區域的邊界外。ACTION_DRAG_ENTERED:表示拖曳的檢視區塊位於目標放置檢視區塊的邊界內。ACTION_DROP:表示使用者已在目標放置區域中放開拖曳項目。ACTION_DRAG_ENDED:表示拖曳作業已完成。ACTION_DRAG_EXITED:表示拖曳作業已結束。
驗證 DragEvent
如果符合 ACTION_DRAG_STARTED 事件中的所有限制條件,您可以選擇繼續執行拖曳作業。舉例來說,在本範例中,我們可以檢查傳入的資料類型是否正確。
DragEvent.ACTION_DRAG_STARTED -> {
   Log.d(TAG, "ON DRAG STARTED")
   if (event.clipDescription.hasMimeType(ClipDescription.MIMETYPE_TEXT_PLAIN)) {
       (v as? ImageView)?.alpha = 0.5F
       v.invalidate()
       true
   } else {
       false
   }
}
在本範例中,我們檢查了事件中的 ClipDescription 是否屬於可接受的 MIME 類型。如果是,我們會提供視覺信號來表示這種情況並傳回 true,表明系統正在處理拖曳的資料。否則會傳回 false,表示放置目標檢視區塊已捨棄拖曳動作。
處理放置的資料
在 ACTION_DROP 事件中,可以選擇如何處理放置的資料。在本範例中,我們會以文字形式擷取已新增至 ClipData 的網址。將此圖片從網址放到目標圖片檢視區塊:
DragEvent.ACTION_DROP -> {
   Log.d(TAG, "On DROP")
   val item: ClipData.Item = event.clipData.getItemAt(0)
   val dragData = item.text
   Glide.with(this).load(item.text).into(v as ImageView)
   (v as? ImageView)?.alpha = 1.0F
   true
}
除了放置作業的處理方式,我們還可以設定使用者將檢視區塊拖曳至目標放置檢視區塊的定界框內時,以及將檢視區塊拖曳出目標區域時,分別要執行的動作。
新增拖曳項目進入目標區域時的視覺提示:
DragEvent.ACTION_DRAG_ENTERED -> {
   Log.d(TAG, "ON DRAG ENTERED")
   (v as? ImageView)?.alpha = 0.3F
   v.invalidate()
   true
}
此外,針對使用者將檢視區塊拖曳至目標放置檢視區塊定界框外的情況,加入更多視覺提示。
DragEvent.ACTION_DRAG_EXITED -> {
   Log.d(TAG, "ON DRAG EXISTED")
   (v as? ImageView)?.alpha = 0.5F
   v.invalidate()
   true
}
新增更多視覺提示,表示拖曳作業已結束:
DragEvent.ACTION_DRAG_ENDED -> {
   Log.d(TAG, "ON DRAG ENDED")
   (v as? ImageView)?.alpha = 1.0F
   true
}
在此階段,您應該可以將圖片拖曳至目標圖片檢視區塊,放置圖片後,目標 ImageView 就會反映變更。

7. 在多視窗模式下拖曳
項目可以從某個應用程式拖曳至另一個指定應用程式,應用程式會透過多視窗模式分享畫面。啟用跨應用程式拖曳功能的實作方式與上述相同,差別只在於必須新增拖曳期間的旗標,以及放置期間的權限。
設定拖曳期間的旗標
如先前所述,startDragAndDrop 有一個用於指定旗標的引數,用來控制拖曳作業。
v.startDragAndDrop(
   draggedData,
   View.DragShadowBuilder(v),
   null,
   View.DRAG_FLAG_GLOBAL or View.DRAG_FLAG_GLOBAL_URI_READ
)
View.DRAG_FLAG_GLOBAL 表示拖曳項目可以跨越視窗邊界,View.DRAG_FLAG_GLOBAL_URI_READ 則表示拖曳接收端可以讀取內容 URI。
如要讓放置目標讀取來自其他應用程式的拖曳資料,放置目標檢視區塊必須宣告讀取權限。
val dropPermission = requestDragAndDropPermissions(event)
此外,還要在拖曳的資料處理完成後撤銷權限。
dropPermission.release()
拖曳項目的最終處理方式如下所示:
DragEvent.ACTION_DROP -> {
   Log.d(TAG, "On DROP")
   val dropPermission = requestDragAndDropPermissions(event)
   val item: ClipData.Item = event.clipData.getItemAt(0)
   val dragData = item.text
   Glide.with(this).load(item.text).into(v as ImageView)
   (v as? ImageView)?.alpha = 1.0F
   dropPermission.release()
   true
}
在此階段,您應該可以將該圖片拖曳至另一個應用程式,從另一個應用程式拖曳過來的資料也能正確處理。
8. 拖曳程式庫
Jetpack 提供 DragAndDrop 程式庫,可簡化拖曳作業的實作方式。
在 build.gradle.kts 中新增依附元件,即可使用 DragAndDrop 程式庫:
implementation("androidx.draganddrop:draganddrop:1.0.0")
在本練習中,請建立名為 DndHelperActivity.kt 的獨立 Activity,包含 2 個直向排列的 ImageView,其中一個做為拖曳來源,另一個則做為放置目標。
修改 strings.xml 以新增字串資源。
<string name="greeting_1">DragStartHelper and DropHelper</string>
<string name="target_url_1">https://services.google.com/fh/files/misc/qq9.jpeg</string>
<string name="source_url_1">https://services.google.com/fh/files/misc/qq8.jpeg</string>
更新 activity_dnd_helper.xml,加入 ImageView:
<?xml version="1.0" encoding="utf-8"?>
<androidx.constraintlayout.widget.ConstraintLayout xmlns:android="http://schemas.android.com/apk/res/android"
   xmlns:app="http://schemas.android.com/apk/res-auto"
   xmlns:tools="http://schemas.android.com/tools"
   android:layout_width="match_parent"
   android:layout_height="match_parent"
   android:padding="24dp"
   tools:context=".DnDHelperActivity">

   <TextView
       android:id="@+id/tv_greeting"
       android:layout_width="wrap_content"
       android:layout_height="wrap_content"
       app:layout_constraintBottom_toTopOf="@id/iv_source"
       app:layout_constraintLeft_toLeftOf="parent"
       app:layout_constraintRight_toRightOf="parent"
       app:layout_constraintTop_toTopOf="parent" />

   <ImageView
       android:id="@+id/iv_source"
       android:layout_width="match_parent"
       android:layout_height="wrap_content"
       android:contentDescription="@string/drag_image"
       app:layout_constraintBottom_toTopOf="@id/iv_target"
       app:layout_constraintLeft_toLeftOf="parent"
       app:layout_constraintRight_toRightOf="parent"
       app:layout_constraintTop_toBottomOf="@id/tv_greeting" />

   <ImageView
       android:id="@+id/iv_target"
       android:layout_width="match_parent"
       android:layout_height="wrap_content"
       android:contentDescription="@string/drop_image"
       app:layout_constraintBottom_toBottomOf="parent"
       app:layout_constraintLeft_toLeftOf="parent"
       app:layout_constraintRight_toRightOf="parent"
       app:layout_constraintTop_toBottomOf="@id/iv_source" />
</androidx.constraintlayout.widget.ConstraintLayout>
最後,在 DnDHelperActivity.kt 中初始化檢視區塊:
class DnDHelperActivity : AppCompatActivity() {
   private val binding by lazy(LazyThreadSafetyMode.NONE) {
       ActivityMainBinding.inflate(layoutInflater)
   }

   override fun onCreate(savedInstanceState: Bundle?) {
       super.onCreate(savedInstanceState)
       setContentView(binding.root)
       binding.tvGreeting.text = getString(R.string.greeting)
       Glide.with(this).asBitmap()
           .load(getString(R.string.source_url_1))
           .into(binding.ivSource)
       Glide.with(this).asBitmap()
           .load(getString(R.string.target_url_1))
           .into(binding.ivTarget)
       binding.ivSource.tag = getString(R.string.source_url_1)
   }
}
請務必更新 AndroidManifest.xml,將 DndHelperActivity 設為啟動器活動:
<activity
   android:name=".DnDHelperActivity"
   android:exported="true">
   <intent-filter>
       <action android:name="android.intent.action.MAIN" />
       <category android:name="android.intent.category.LAUNCHER" />
   </intent-filter>
</activity>
DragStartHelper
我們先前已實作 onLongClickListener 並呼叫 startDragAndDrop,將檢視區塊設為可拖曳。DragStartHelper 提供公用程式方法,可簡化實作程序。
DragStartHelper(draggableView)
{ view: View, _: DragStartHelper ->
   // prepare clipData

   // startDrag and Drop
}.attach()
DragStartHelper 會將要拖曳的檢視區塊當做引數使用。我們在此實作了 OnDragStartListener 方法,將在其中準備 clipdata 並啟動拖曳作業。
最終實作內容如下所示。
DragStartHelper(draggableView)
{ view: View, _: DragStartHelper ->
   val item = ClipData.Item(view.tag as? CharSequence)
   val dragData = ClipData(
       view.tag as? CharSequence,
       arrayOf(ClipDescription.MIMETYPE_TEXT_PLAIN),
       item
   )
   view.startDragAndDrop(
       dragData,
       View.DragShadowBuilder(view),
       null,
       0
   )
}.attach()
DropHelper
DropHelper 提供名為 configureView 的公用程式方法,可簡化目標放置檢視區塊的設定程序。
configureView 採用下列 4 個引數:
- Activity:目前的活動
- dropTarget:正在設定的檢視區塊
- mimeTypes:要放置的資料項目所屬 mimeType
OnReceiveContentListener:處理放置資料的介面
自訂放置目標的醒目顯示。
DropHelper.configureView(
   This, // Current Activity
   dropTarget,
   arrayOf("text/*"),
   DropHelper.Options.Builder().build()
) {
   // handle the dropped data
}
OnRecieveContentListener 會接收放置的內容,並採用兩個參數:
- View:要放置內容的位置
- Payload:要放置的實際內容
private fun setupDrop(dropTarget: View) {
   DropHelper.configureView(
       this,
       dropTarget,
       arrayOf("text/*"),
   ) { _, payload: ContentInfoCompat ->
       // TODO: step through clips if one cannot be loaded
       val item = payload.clip.getItemAt(0)
       val dragData = item.text
       Glide.with(this)
           .load(dragData)
           .centerCrop().into(dropTarget as ImageView)
       // Consume payload by only returning remaining items
       val (_, remaining) = payload.partition { it == item }
       remaining
   }
}
在此階段,您應該可以使用 DragStartHelper 和 DropHelper 拖曳資料。
設定放置區域的醒目顯示
如您所見,拖曳項目進入放置區域時,放置區域會醒目顯示。我們可以利用 DropHelper.Options,自訂在拖曳項目進入檢視區塊邊界時,醒目顯示放置區域的方式。
DropHelper.Options 可用來設定放置目標區域的醒目顯示顏色,以及醒目顯示的圓角半徑。
DropHelper.Options.Builder()
   .setHighlightColor(getColor(R.color.green))
   .setHighlightCornerRadiusPx(16)
   .build()
這些選項應以引數形式,透過 DropHelper 傳遞至 configureView 方法。
private fun setupDrop(dropTarget: View) {
   DropHelper.configureView(
       this,
       dropTarget,
       arrayOf("text/*"),
       DropHelper.Options.Builder()
           .setHighlightColor(getColor(R.color.green))
           .setHighlightCornerRadiusPx(16)
           .build(),
   ) { _, payload: ContentInfoCompat ->
       // TODO: step through clips if one cannot be loaded
       val item = payload.clip.getItemAt(0)
       val dragData = item.text
       Glide.with(this)
           .load(dragData)
           .centerCrop().into(dropTarget as ImageView)
       // Consume payload by only returning remaining items
       val (_, remaining) = payload.partition { it == item }
       remaining
   }
}
您應該可以在拖曳時,看到醒目顯示顏色和圓角半徑。

9. 接收多媒體內容
OnReceiveContentListener 是統合式 API,可接收文字、HTML、圖片、影片等多媒體內容,並透過鍵盤、拖曳動作或剪貼簿將內容插入至檢視區塊中。維護每項輸入機制的回呼可能並不容易。OnReceiveContentListener 的作用是,使用單一 API 接收文字、標記、音訊、影片、圖片及其他內容。OnReceiveContentListener API 會建立用於實作的單一 API 來整合這些不同的程式碼路徑,這樣您就可以專心處理應用程式專屬邏輯,讓平台處理其他工作:
在本練習中,請建立名為 ReceiveRichContentActivity.kt 的獨立 Activity,包含 2 個直向排列的 ImageView,其中一個做為拖曳來源,另一個則做為放置目標。
修改 strings.xml 以新增字串資源。
<string name="greeting_2">Rich Content Receiver</string>
<string name="target_url_2">https://services.google.com/fh/files/misc/qq1.jpeg</string>
<string name="source_url_2">https://services.google.com/fh/files/misc/qq3.jpeg</string>
更新 activity_receive_rich_content.xml,加入 ImageView:
<?xml version="1.0" encoding="utf-8"?>
<androidx.constraintlayout.widget.ConstraintLayout xmlns:android="http://schemas.android.com/apk/res/android"
   xmlns:app="http://schemas.android.com/apk/res-auto"
   xmlns:tools="http://schemas.android.com/tools"
   android:layout_width="match_parent"
   android:layout_height="match_parent"
   tools:context=".ReceiveRichContentActivity">

   <TextView
       android:id="@+id/tv_greeting"
       android:layout_width="wrap_content"
       android:layout_height="wrap_content"
       app:layout_constraintBottom_toTopOf="@id/iv_source"
       app:layout_constraintLeft_toLeftOf="parent"
       app:layout_constraintRight_toRightOf="parent"
       app:layout_constraintTop_toTopOf="parent" />

   <ImageView
       android:id="@+id/iv_source"
       android:layout_width="320dp"
       android:layout_height="wrap_content"
       android:contentDescription="@string/drag_image"
       app:layout_constraintBottom_toTopOf="@id/iv_target"
       app:layout_constraintLeft_toLeftOf="parent"
       app:layout_constraintRight_toRightOf="parent"
       app:layout_constraintTop_toBottomOf="@id/tv_greeting" />

   <ImageView
       android:id="@+id/iv_target"
       android:layout_width="320dp"
       android:layout_height="wrap_content"
       android:contentDescription="@string/drop_image"
       app:layout_constraintBottom_toBottomOf="parent"
       app:layout_constraintLeft_toLeftOf="parent"
       app:layout_constraintRight_toRightOf="parent"
       app:layout_constraintTop_toBottomOf="@id/iv_source" />
</androidx.constraintlayout.widget.ConstraintLayout>
最後,在 ReceiveRichContentActivity.kt 中初始化檢視區塊:
class ReceiveRichContentActivity : AppCompatActivity() {
   private val binding by lazy(LazyThreadSafetyMode.NONE) {
       ActivityReceiveRichContentBinding.inflate(layoutInflater)
   }
   override fun onCreate(savedInstanceState: Bundle?) {
       super.onCreate(savedInstanceState)
       setContentView(binding.root)
       binding.tvGreeting.text = getString(R.string.greeting_2)
       Glide.with(this).asBitmap()
           .load(getString(R.string.source_url_2))
           .into(binding.ivSource)
       Glide.with(this).asBitmap()
           .load(getString(R.string.target_url_2))
           .into(binding.ivTarget)
       binding.ivSource.tag = getString(R.string.source_url_2)
   }
}
請務必更新 AndroidManifest.xml,將 DndHelperActivity 設為啟動器活動:
<activity
   android:name=".ReceiveRichContentActivity"
   android:exported="true">
   <intent-filter>
       <action android:name="android.intent.action.MAIN" />
       <category android:name="android.intent.category.LAUNCHER" />
   </intent-filter>
</activity>
首先,建立實作 OnReceiveContentListener. 的回呼:
val listener = OnReceiveContentListener { view, payload ->
   val (textContent, remaining) =
       payload.partition { item: ClipData.Item -> item.text != null }
   if (textContent != null) {
       val clip = textContent.clip
       for (i in 0 until clip.itemCount) {
           val currentText = clip.getItemAt(i).text
           Glide.with(this)
               .load(currentText)
               .centerCrop().into(view as ImageView)
       }
   }
   remaining
}
我們在此實作了 OnRecieveContentListener 介面。onRecieveContent 方法採用下列 2 個引數:
- 目前正在接收資料的 View
- 來自鍵盤、拖曳動作或剪貼簿的資料 Payload (格式為
ContentInfoCompat)
這個方法會傳回未處理的酬載。
我們在此使用 Partition 方法將酬載區隔為文字內容和其他內容,並依據需求處理文字資料,傳回剩餘的酬載。
接著,處理要使用拖曳資料執行的動作。
val listener = OnReceiveContentListener { view, payload ->
   val (textContent, remaining) =
       payload.partition { item: ClipData.Item -> item.text != null }
   if (textContent != null) {
       val clip = textContent.clip
       for (i in 0 until clip.itemCount) {
           val currentText = clip.getItemAt(i).text
           Glide.with(this)
               .load(currentText)
               .centerCrop().into(view as ImageView)
       }
   }
   remaining
}
現在事件監聽器已準備就緒,請將這個事件監聽器新增至目標檢視區塊。
ViewCompat.setOnReceiveContentListener(
   binding.ivTarget,
   arrayOf("text/*"),
   listener
)
在此階段,您應該可以將圖片拖曳並放置到目標區域。放置後,拖曳的圖片應會取代放置目標檢視區塊中的原始圖片。
10. 恭喜!
您現在已熟悉如何為 Android 應用程式實作拖曳功能。透過本程式碼研究室的引導,您已瞭解如何在 Android 應用程式內和不同應用程式間建立互動式拖曳互動程序,進而提升使用者體驗及強化功能。學習重點包括:
- 拖曳功能的基礎知識:瞭解拖曳事件的 4 個階段 (啟動、繼續、完成、結束) 以及 DragEvent 物件中的重要資料。
- 啟用拖曳功能:處理 DragEvent,將檢視區塊設為可拖曳,並處理目標檢視區塊中的放置項目。
- 在多視窗模式下拖曳:設定適當的旗標和權限,啟用跨應用程式拖曳功能。
- 使用 DragAndDrop 程式庫:使用 Jetpack 程式庫簡化拖曳實作方式。
- 接收多媒體內容:使用整合式 API 處理透過各種方式輸入的多種內容類型 (文字、圖片、影片等)。