
1. Before you begin
In the apps that you use on your phone, notice that some parts of the app stay the same, while other parts change (or are variable).
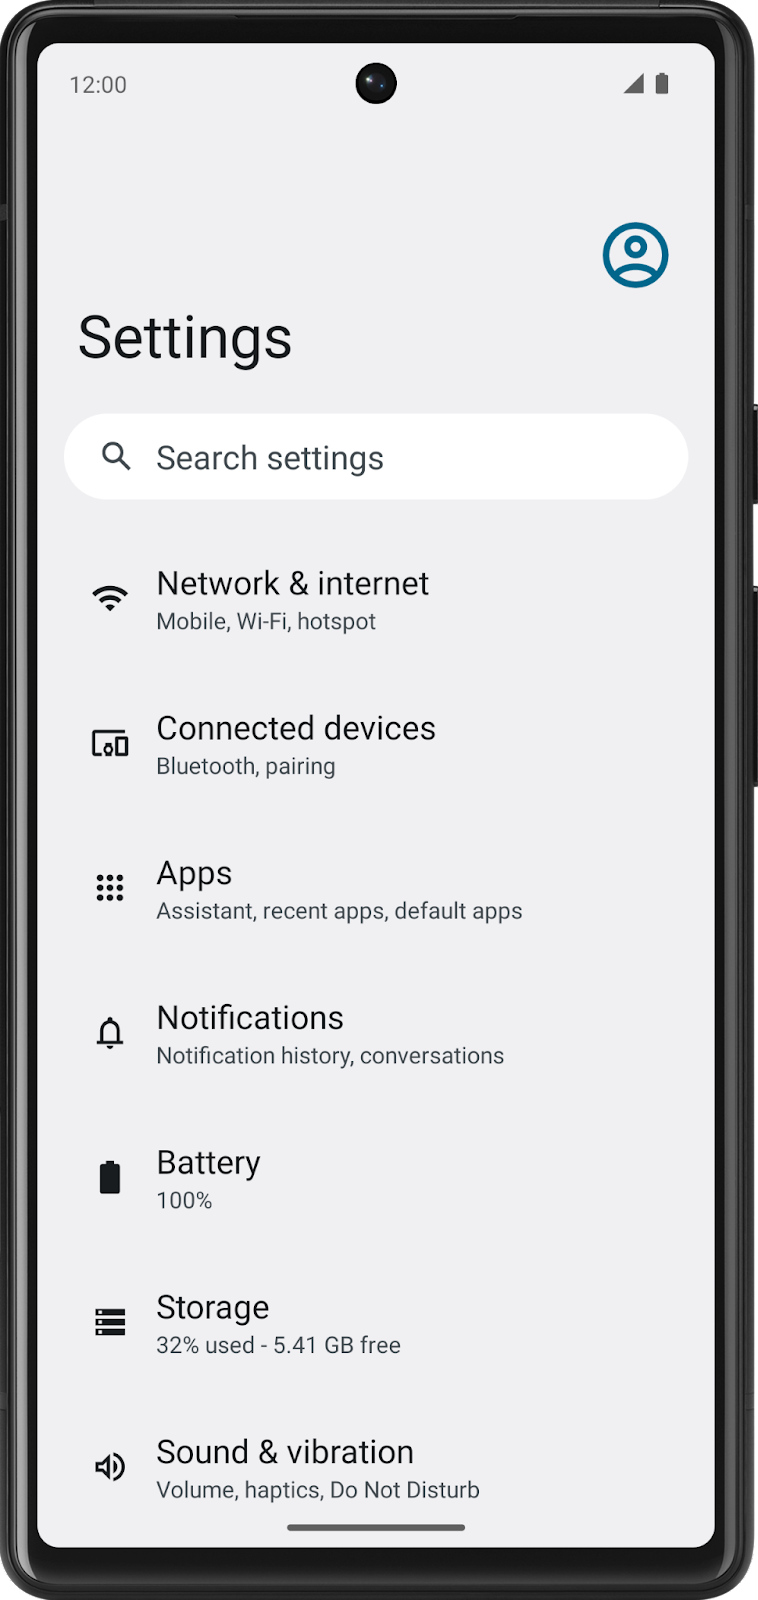
For example, the names of the categories within the Settings app stay the same – Network & internet, Connected devices, Apps, and more.
On the other hand, if you look at a news app, the articles will change often. The article name, source, time posted, and images change.
How do you write your code so that content changes over time? You can't rewrite the code in your app every time there are new articles to post, which happens every day, every hour, and every minute!
In this codelab, you learn how to write code that uses variables so that certain parts of your program can change without having to write a whole new set of instructions. You will use the Kotlin Playground as you did in the previous codelab.
What you'll build
- Short programs in Kotlin that use variables.
What you'll learn
- How to define a variable and update its value.
- How to select an appropriate data type for a variable from the basic data types in Kotlin.
- How to add comments to your code.
What you'll need
- A computer with internet access and a web browser.
2. Variables and data types
In computer programming, there's the concept of a variable, which is a container for a single piece of data. You can envision it as a box that contains a value. The box has a label, which is the name of the variable. By referring to the box by its name, you have access to the value it holds.

Why store the value in a box and reference the box by its name when you can simply use the value directly? The problem is that when your code uses values directly in all the instructions, your program will only work for that specific case.
Here's an analogy that can make it easier to understand why variables are useful. The following is a letter for someone you recently met.
Dear Lauren,
It was great meeting you today at the office. I look forward to seeing you on Friday.
Have a nice day!
This letter is great, but it only works for your specific situation with Lauren. What if you find yourself writing the same letter many times but with slight variations for different people? It would be more efficient to create a single letter template, leaving blanks for the parts that can change.
Dear ____ ,
It was great meeting you today at _____. I look forward to seeing you on ____ .
Have a nice day!
You can also specify the type of information that goes in each blank space. This ensures that the letter template will be used as you expected.
Dear { name } ,
It was great meeting you today at { location } . I look forward to seeing you on { date } .
Have a nice day!
Conceptually, building an app is similar. You have placeholders for some data, while other parts of the app stay the same.

In the above illustration of a news app, the "Welcome" text, the "Latest news for you" heading, and the "View more articles" button text always stay the same. Conversely, the name of the user and the contents of each article will change, so that would be a great opportunity to use variables to hold each piece of information.

You don't want to write the code (or instructions) in your news app to only work for a user named Alex, or for a news article that always has the same title and publication date. Instead, you want a more flexible app, so you should write your code by referencing variable names like name, article1Name, article1Date, and so on. Then your code becomes general enough to work for many different use cases where the user's name could be different and the article details could be different.
Example app with variables
Let's look at an app example to see where it may use variables.

In a maps app, you may find a details screen for each location, such as a restaurant or business. The above screenshot from the Google Maps app shows the details for Google's company headquarters, which is called the Googleplex. Which pieces of data do you think are stored as variables in the app?
- Name of the location
- Star rating of the location
- Number of reviews of the location
- Whether the user saved (or bookmarked) this location
- Address of the location
Change the data that's stored in these variables and you have a maps app that's flexible enough to display the details of other locations too.
Data types
When you decide what aspects of your app can be variable, it's important to specify what type of data can be stored in those variables. In Kotlin, there are some common basic data types. The table below shows a different data type in each row. For each data type, there's a description of what kind of data it can hold and example values.
Kotlin data type | What kind of data it can contain | Example literal values |
| Text |
|
| Integer number |
|
| Decimal number |
|
| Decimal number (that is less precise than a |
|
|
|
|
Now that you are aware of some common Kotlin data types, which data type would be appropriate for each of the variables identified in the location detail page you saw earlier?
- Name of the location is text, so it can be stored in a variable whose data type is
String. - Star rating of the location is a decimal number (such as 4.2 stars), so it can be stored as a
Double. - Number of reviews of the location is a whole number, so it should be stored as an
Int. - Whether the user saved this location only has two possible values (saved or not saved), so it's stored as a
Boolean, wheretrueandfalsecan represent each of those states. - Address of the location is text, so it should be a
String.
Practice on two more scenarios below. Identify the use of variables and their data types in the following apps.
- In an app for watching videos, such as the YouTube app, there's a video details screen. Where are variables likely used? What's the data type of those variables?

There isn't a single correct answer, but in a video-watching app, variables can be used for the following pieces of data:
- Name of the video (
String) - Name of the channel (
String) - Number of views on the video (
Int) - Number of likes on the video (
Int) - Number of comments on the video (
Int)
- In an app like Messages, the screen lists the most recent text messages received. Where are variables likely used? What's the data type of those variables?
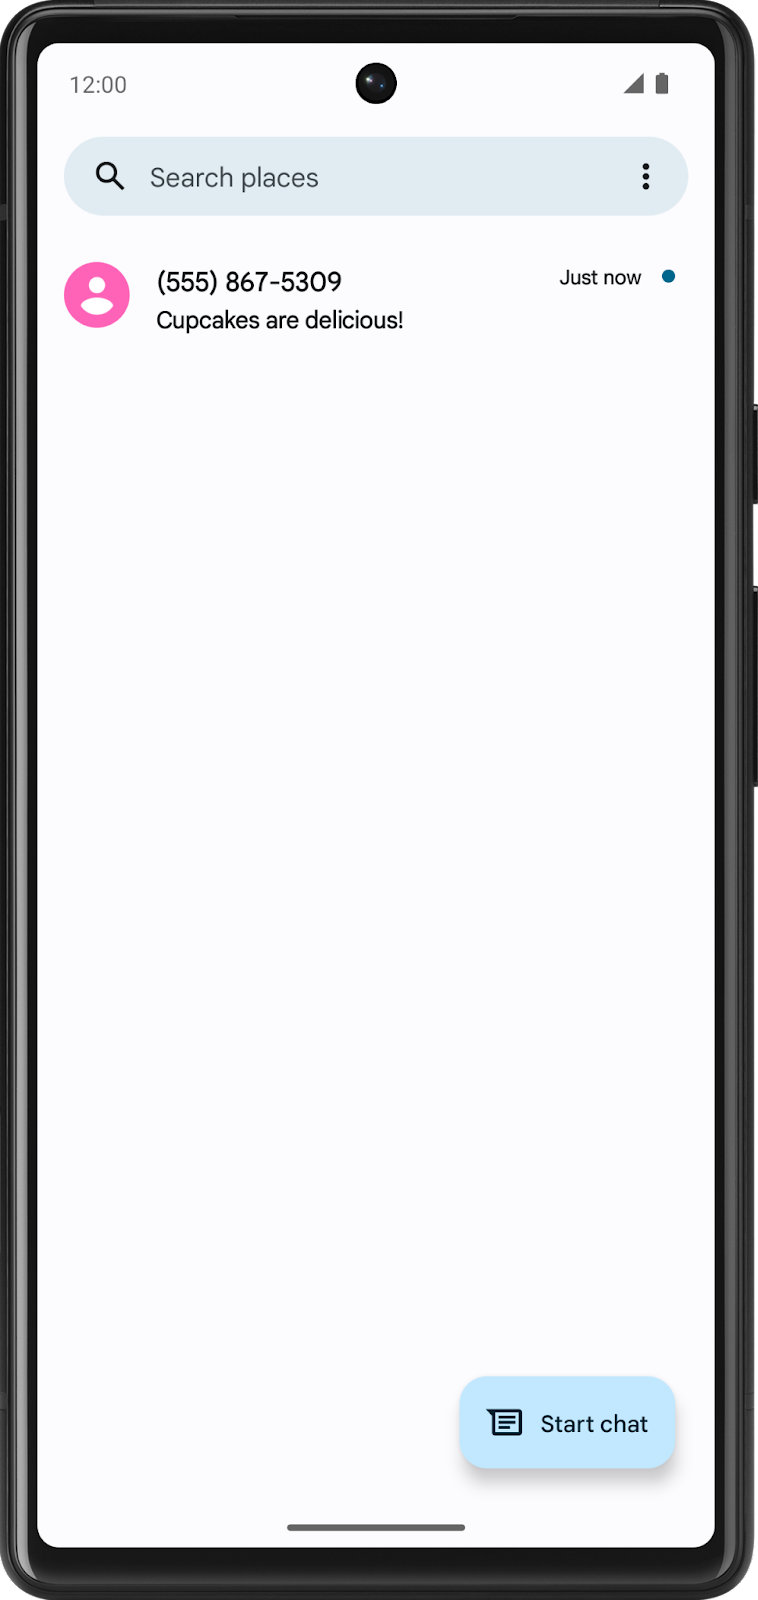
Again, there isn't a single correct answer. In an text messaging app, variables can be used for the following pieces of data:
- Phone number of the sender (
String) - Timestamp of the message (
String) - Preview of the message contents (
String) - Whether the text message is unread (
Boolean)
Try it
- Open your favorite app on your phone.
- Identify where you think variables are used in the app on that particular screen.
- Guess what data type those variables are.
- Share your answers on social media with a screenshot of the app, an explanation of where you think variables are used, and the hashtag #AndroidBasics.
Great work in this codelab so far! Move onto the next section to learn more about how variables and data types are used in your code.
3. Define and use variables
Define versus use a variable
You must define a variable first in your code before you can use the variable. This is similar to what you learned in the last codelab about defining functions before calling them.
When you define a variable, you assign a name to uniquely identify it. You also decide what type of data it can hold by specifying the data type. Lastly, you can provide an initial value that will be stored in the variable, but this is optional.
Once you define a variable, you can use that variable in your program. To use a variable, type out the variable name in your code, which tells the Kotlin compiler that you want to use the variable's value at that point in the code.
For example, define a variable for the number of unread messages in a user's inbox. The variable can have the name count. Store a value such as the number 2 inside the variable, representing 2 unread messages in the user's inbox. (You can pick a different number to store in the variable, but for the purpose of this example, use the number 2.)

Every time your code needs to access the number of unread messages, type count in your code. When executing your instructions, the Kotlin compiler sees the variable name in your code and uses the variable value in its place.
Technically, there are more specific vocabulary words to describe this process:
An expression is a small unit of code that evaluates to a value. An expression can be made up of variables, function calls, and more. In the following case, the expression is made up of one variable: the count variable. This expression evaluates to 2.

Evaluate means determining the value of an expression. In this case, the expression evaluates to 2. The compiler evaluates expressions in the code and uses those values when executing the instructions in the program.

To observe this behavior in the Kotlin Playground, run the program in the next section.
Example
- Open the Kotlin Playground in a web browser.
- Replace the existing code in the Kotlin Playground with the following program.
This program creates a variable called count with an initial value of 2 and uses it by printing out the value of the count variable to the output. Don't worry if you don't understand all aspects of the code syntax yet. It will be explained in more detail in upcoming sections.
fun main() {
    val count: Int = 2
    println(count)
}
- Run the program and the output should be:
2
Variable declaration
In the program you ran, the second line of code says:
val count: Int = 2
This statement creates an integer variable called count that holds the number 2.
It can take a while to become familiar with reading the syntax (or format) for declaring a variable in Kotlin. The following diagram shows where each detail about the variable should be located, as well as the location of spaces and symbols.

In the context of the count variable example, you can see that the variable declaration starts with the word val. The name of the variable is count. The data type is Int, and the initial value is 2.

Each part of the variable declaration is explained in more detail below.
Keyword to define new variable
To define a new variable, start with the Kotlin keyword val (which stands for value). Then the Kotlin compiler knows that a variable declaration is in this statement.
Variable name
Just like you name a function, you also name a variable. In the variable declaration, the variable name follows the val keyword.

You can choose any variable name you want, but as a best practice, avoid using Kotlin keywords as a variable name.
It's best to choose a name that describes the data that the variable holds so that your code is easier to read.
Variable names should follow the camel case convention, as you learned with function names. The first word of the variable name is all lower case. If there are multiple words in the name, there are no spaces between words, and all other words should begin with a capital letter.
Example variable names:
numberOfEmailscityNamebookPublicationDate
For the code example shown earlier, count is the name of the variable.
val count: Int = 2
Variable data type
After the variable name, you add a colon, a space, and then the data type of the variable. As mentioned earlier, String, Int, Double, Float, and Boolean are some of the basic Kotlin data types. You'll learn more data types later in this course. Remember to spell data types exactly as shown and begin each with a capital letter.

For the count variable example, Int is the data type of the variable.
val count: Int = 2
Assignment operator
In the variable declaration, the equal sign symbol (=) follows the data type. The equal sign symbol is called the assignment operator. The assignment operator assigns a value to the variable. In other words, the value on the right-hand side of the equal sign gets stored in the variable on the left-hand side of the equal sign.

Variable initial value
The variable value is the actual data that's stored in the variable.

For the count variable example, the number 2 is the initial value of the variable.
val count: Int = 2
You may also hear the phrase: "the count variable is initialized to 2." This means that 2 is the first value stored in the variable when the variable is declared.
The initial value will be different depending on the data type declared for the variable.
Refer to the following table which you may recognize from earlier in the codelab. The third column shows example values that can be stored in a variable of each corresponding type. These values are called literals because they are fixed or constant values (the value is constantly the same). As an example, the integer 32 is always going to have the value of 32. In contrast, a variable is not a literal because its value can change. You may hear these literal values referred to based on their type: string literal, integer literal, boolean literal, etc.
Kotlin data type | What kind of data it can contain | Example literal values |
| Text |
|
| Integer number |
|
| Decimal number |
|
| Decimal number (that is less precise than a |
|
|
|
|
It's important to provide an appropriate and valid value according to the data type of the variable. For instance, you can't store a string literal like "Hello" inside a variable of type Int because the Kotlin compiler will give you an error.
Use a variable
The following is the original program you ran in the Kotlin Playground. So far you learned that the second line of code creates a new integer variable called count with a value of 2.
fun main() {
    val count: Int = 2
    println(count)
}
Now look at the third line of code. You are printing the count variable to the output:
println(count)
Notice there are no quotation marks around the word count. It is a variable name, not a string literal. (You would find quotation marks around the word if it was a string literal.) When you run the program, the Kotlin compiler evaluates the expression inside the parentheses, which is count, for the println() instruction. Since the expression evaluates to 2, then the println() method is called with 2 as the input: println(2).
Hence the output of the program is:
2
The number by itself in the output is not very useful. It would be more helpful to have a more detailed message printed in the output to explain what the 2 represents.
String template
A more helpful message to display in the output is:
You have 2 unread messages.
Follow these steps so that the program outputs a more helpful message.
- Update your program in the Kotlin Playground with the following code. For the
println()call, pass in a string literal that contains thecountvariable name. Remember to surround the text with quotation marks. Note that this will not give you the results you expect. You'll fix the issue in a later step.
fun main() {
    val count: Int = 2
    println("You have count unread messages.")
}
- Run the program and the output should display:
You have count unread messages.
That sentence doesn't make sense! You want the value of the count variable to be displayed in the message, not the variable name.
- To fix the output, you need a string template. This is a string template because it contains a template expression, which is a dollar sign (
$) followed by a variable name. A template expression is evaluated, and its value gets substituted into the string.

Add a dollar sign $ before the count variable. In this case, the template expression $count evaluates to 2, and the 2 gets substituted into the string where the expression was located.
fun main() {
    val count: Int = 2
    println("You have $count unread messages.")
}
- When you run the program, the output matches the desired goal:
You have 2 unread messages.
That sentence makes much more sense to the user!
- Now change the initial value of the
countvariable to a different integer literal. For example, you could choose the number10. Leave the rest of the code in the program unchanged.
fun main() {
    val count: Int = 10
    println("You have $count unread messages.")
}
- Run the program. Notice that the output changes accordingly and you didn't even need to change the
println()statement in your program.
You have 10 unread messages.
You can see how useful a string template can be. You only wrote the string template once in your code ("You have $count unread messages."). If you change the initial value of the count variable, the println() statement still works. Your code is more flexible now!
To further emphasize this point, compare the following two programs. The first program uses a string literal, with the exact number of unread messages directly in the string. This program only works when your user has 10 unread messages.
fun main() {
    println("You have 10 unread messages.")
}
By using a variable and a string template in the second program, your code can adapt to more scenarios. This second program is more flexible!
fun main() {
    val count: Int = 10
    println("You have $count unread messages.")
}
Type inference
Here's a tip that allows you to write less code when declaring variables.
Type inference is when the Kotlin compiler can infer (or determine) what data type a variable should be, without the type being explicitly written in the code. That means you can omit the data type in a variable declaration, if you provide an initial value for the variable. The Kotlin compiler looks at the data type of the initial value, and assumes that you want the variable to hold data of that type.
The following syntax is for a variable declaration that uses type inference:

Returning to the count example, the program initially contained this line of code:
val count: Int = 2
However, this line of code can also be written as follows. Notice that the colon symbol (:) and Int data type are omitted. The updated syntax has fewer words to type, and it achieves the same outcome of creating an Int variable called count with a value of 2.
val count = 2
The Kotlin compiler knows that you want to store 2 (a whole number integer) into the variable count, so it can infer that the count variable is of type Int. Convenient, right? This is one example of how writing Kotlin code is more concise!
Even though this example only discusses a variable of type Int, the concept of type inference applies to all data types in Kotlin.
Basic math operations with integers
What is the difference between an Int variable with value 2 and a String variable with value "2"? When they both get printed to the output, they look the same.
The advantage to storing integers as an Int (as opposed to a String) is that you can perform math operations with Int variables, such as addition, subtraction, division, and multiplication (see other operators). For example, two integer variables can be added together to get their sum. There are certainly cases where it's reasonable to have integers stored as Strings, but the purpose of this section is to show you what you can do with Int variables.
- Return to the Kotlin Playground and remove all the code in the code editor.
- Create a new program where you define an integer variable for the number of unread emails in an inbox, and initialize it to a value such as
5. You can pick a different number if you'd like. Define a second integer variable for the number of read emails in an inbox. Initialize it to a value such as100. You can pick a different number if you'd like. Then print out the total number of messages in the inbox by adding the two integer numbers together.
fun main() {
    val unreadCount = 5
    val readCount = 100
    println("You have ${unreadCount + readCount} total messages in your inbox.")
}
- Run the program and it should display the total number of messages in the inbox:
You have 105 total messages in your inbox.
For a string template, you learned that you can put the $ symbol before a single variable name. However, if you have a more complex expression, you must enclose the expression in curly braces with the $ symbol before the curly braces: ${unreadCount + readCount}. The expression within the curly braces, unreadCount + readCount, evaluates to 105. Then the value 105 is substituted within the string literal.

- To explore this topic further, create variables with different names and different initial values, and use template expressions to print messages to the output.
For example, modify your program to print this out:
100 photos
10 photos deleted
90 photos left
Here's one way that you can write your program, though there are other correct ways to write it too!
fun main() {
    val numberOfPhotos = 100
    val photosDeleted = 10
    println("$numberOfPhotos photos")
    println("$photosDeleted photos deleted")
    println("${numberOfPhotos - photosDeleted} photos left")
}
4. Update variables
When an app is running, the value of a variable may need to be updated. For example, in a shopping app, as the user adds items to the shopping cart, the cart total increases.
Let's simplify the shopping use case into a simple program. The logic is written out below with human language, not in Kotlin. This is called pseudocode because it describes the key points of how the code will be written, but it doesn't contain all the details of the code.
In the main function of a program:
- Create an integer
cartTotalvariable that starts at the value0. - The user adds a sweater that costs $20 to their shopping cart.
- Update the
cartTotalvariable to20, which is the current cost of the items in their shopping cart. - Print the total cost of the items in their cart, which is the
cartTotalvariable, to the output.
To further simplify the code, you don't need to write the code for when the user adds items to the shopping cart. (You haven't learned about how a program can respond to user input yet. That will come in a later unit.) Hence, focus on the parts where you create, update, and print out the cartTotal variable.
- Replace the existing code in the Kotlin Playground with the below program. In line 2 of the program, you initialize the
cartTotalvariable to the value0. Since you provide an initial value, there's no need to specify theIntdata type due to type inference. In line 3 of the program, you attempt to update thecartTotalvariable to20with the assignment operator (=). In line 4 of the program, you print out thecartTotalvariable using a string template.
fun main() {
    val cartTotal = 0
    cartTotal = 20
    println("Total: $cartTotal")
}
- Run the program, and you will get a compile error.
- Notice the error says that the
valcan't be reassigned. The error is on the third line of the program, which tries to change the value of thecartTotalvariable to20.ThevalcartTotalcan't be reassigned to another value (20) after it's been assigned an initial value (0).
Val cannot be reassigned
If you need to update the value of a variable, declare the variable with the Kotlin keyword var, instead of val.
valkeyword - Use when you expect the variable value will not change.varkeyword - Use when you expect the variable value can change.
With val, the variable is read-only, which means you can only read, or access, the value of the variable. Once the value is set, you cannot edit or modify its value. With var, the variable is mutable, which means the value can be changed or modified. The value can be mutated.
To remember the difference, think of val as a fixed value and var as variable. In Kotlin, it's recommended to use the val keyword over the var keyword when possible.
- Update the variable declaration for
cartTotalon line 2 of the program to usevarinstead ofval. This is how the code should look:
fun main() {
    var cartTotal = 0
    cartTotal = 20
    println("Total: $cartTotal")
}
- Notice the syntax of the code on line 3 of the program which updates the variable.
cartTotal = 20
Use the assignment operator (=) to assign a new value (20) to the existing variable (cartTotal). You don't need to use the var keyword again because the variable is already defined.

Using the box analogy, picture the value 20 being stored in the box labeled cartTotal.

Here's a diagram for the general syntax for updating a variable, which has already been declared on an earlier line of code. Start the statement with the name of the variable you want to update. Add a space, the equal sign, followed by another space. Then write out the updated value for the variable.

- Run your program and the code should successfully compile. It should print this output :
Total: 20
- To see how the variable value changes while the program is running, print the
cartTotalvariable to the output after the variable is initially declared. See the code changes below. Line 3 has a newprintln()statement. There's also a blank line added on line 4 of the code. Blank lines do not have any impact on how the compiler understands the code. Add a blank line where it would make it easier to read your code by separating out related blocks of code.
fun main() {
    var cartTotal = 0
    println("Total: $cartTotal")

    cartTotal = 20
    println("Total: $cartTotal")
}
- Run the program again and the output should be:
Total: 0
Total: 20
You can see that initially the shopping cart total is 0. Then it updates to 20. You successfully updated a variable! This was possible because you changed cartTotal from a read-only variable (with val) to a mutable variable (with var).
Remember that you should only use var to declare a variable if you expect the value to change. Otherwise you should default to using val to declare a variable. This practice makes your code safer. Using val ensures that variables won't get updated in your program if you don't expect them to. Once a val is assigned a value, it always stays that value.
Increment and decrement operators
Now you know that a variable must be declared as a var in order to update its value. Apply this knowledge to the email message example below that should look familiar.
- Replace the code in the Kotlin Playground with this program:
fun main() {
    val count: Int = 10
    println("You have $count unread messages.")
}
- Run the program. It should print out:
You have 10 unread messages.
- Replace the
valkeyword with thevarkeyword to make thecountvariable a mutable variable. There should be no change in the output when you run the program.
fun main() {
    var count: Int = 10
    println("You have $count unread messages.")
}
- However, now you can update the
countto a different value. For example, when one new email arrives in the user's inbox, you can increasecountby 1. (You don't need to write the code for the arrival of an email. Getting data from the internet is a more advanced topic for a much later unit.) For now, focus on thecountvariable increasing by1with this line of code:
count = count + 1
The expression to the right of the equal sign is count + 1 and evaluates to 11. That is because the current value of count is 10 (which is on line 2 of the program) and 10 + 1 equals 11. Then with the assignment operator, the value 11 gets assigned or stored in the count variable.

Add this line of code to your program at the bottom of the main() function. Your code should look like the following:
fun main() {
    var count = 10
    println("You have $count unread messages.")
    count = count + 1
}
If you run the program now, the output is the same as before because you haven't added any code to use the count variable after you updated it.
- Add another print statement that prints out the number of unread messages after the variable has been updated.
fun main() {
    var count = 10
    println("You have $count unread messages.")
    count = count + 1
    println("You have $count unread messages.")
}
- Run the program. The second message should display the updated
countof11messages.
You have 10 unread messages.
You have 11 unread messages.
- For shorthand, if you want to increase a variable by
1, you can use the increment operator (++) which is made up of two plus symbols. By using these symbols directly after a variable name, you tell the compiler that you want to add 1 to the current value of the variable, and then store the new value in the variable. The following two lines of code are equivalent, but using the++increment operator involves less typing.
count = count + 1
count++
Make this modification to your code and then run your program. There should be no spaces between the variable name and the increment operator.
fun main() {
    var count = 10
    println("You have $count unread messages.")
    count++
    println("You have $count unread messages.")
}
- Run the program. The output is the same, but now you learned about a new operator!
You have 10 unread messages.
You have 11 unread messages.
- Now modify line 4 of your program to use the decrement operator (
--) after thecountvariable name. The decrement operator is made up of two minus symbols. By placing the decrement operator after the variable name, you tell the compiler that you want to decrease the value of the variable by1and store the new value into the variable.
fun main() {
    var count = 10
    println("You have $count unread messages.")
    count--
    println("You have $count unread messages.")
}
- Run the program. It should print this output:
You have 10 unread messages.
You have 9 unread messages.
In this section, you learned how to update a mutable variable using the increment operator (++) and the decrement operator (--). More specifically, count++ is the same as count = count + 1 and count-- is the same as count = count - 1.
5. Explore other data types
Earlier in the codelab, you were introduced to some common basic data types: String, Int, Double, and Boolean. You just used the Int data type, now you will explore other data types.
Kotlin data type | What kind of data it can contain |
| Text |
| Integer number |
| Decimal number |
|
|
Try these programs in the Kotlin Playground to see what the output is.
Double
When you need a variable with a decimal value, use a Double variable. To learn about its valid range, refer to this table and look at the decimal digits it can store for example.
Imagine you're navigating to a destination, and your trip is split into three separate parts because you need to make stops along the way. This program displays the total distance left to reach your destination.
- Enter this code in the Kotlin Playground. Can you understand what is happening on each line of code?
fun main() {
    val trip1: Double = 3.20
    val trip2: Double = 4.10
    val trip3: Double = 1.72
    val totalTripLength: Double = 0.0
    println("$totalTripLength miles left to destination")
}
Three variables called trip1, trip2, and trip3 are declared to represent the distance of each part of the trip. All of them are Double variables because they store decimal values. Use val to declare each variable because their values do not change over the course of the program. The program also creates a fourth variable called totalTripLength which is currently initialized to 0.0. The last line of the program prints a message with the value of the totalTripLength variable.
- Fix the code so that the
totalTripLengthvariable is the sum of all three trip lengths.
val totalTripLength: Double = trip1 + trip2 + trip3
The expression on the right of the equal sign evaluates to 9.02 because 3.20 + 4.10 + 1.72 equals 9.02. The value of 9.02 gets stored into the totalTripLength variable.

Your whole program should look like the below code:
fun main() {
    val trip1: Double = 3.20
    val trip2: Double = 4.10
    val trip3: Double = 1.72
    val totalTripLength: Double = trip1 + trip2 + trip3
    println("$totalTripLength miles left to destination")
}
- Run the program. It should print this out:
9.02 miles left to destination
- Update your code to remove the unnecessary
Doubledata type from the variable declarations because of type inference. The Kotlin compiler can infer that these variables areDoubledata types based on the decimal numbers provided as initial values.
fun main() {
    val trip1 = 3.20
    val trip2 = 4.10
    val trip3 = 1.72
    val totalTripLength = trip1 + trip2 + trip3
    println("$totalTripLength miles left to destination")
}
- Run your code again to ensure that your code still compiles. The output should be the same, but now your code is simpler!
String
When you need a variable that can store text, use a String variable. Remember to use quotation marks around String literal values, such as "Hello Kotlin", whereas the Int and Double literal values do not have quotes around them.
- Copy and paste this program into the Kotlin Playground.
fun main() {
    val nextMeeting = "Next meeting:"
    val date = "January 1"
    val reminder = nextMeeting + date
    println(reminder)
}
Notice that there are two String variables declared, a nextMeeting variable and a date variable. Then a third String variable called reminder is declared, which is set equal to the nextMeeting variable plus the date variable.
With the + symbol, you can add two strings together, which is called concatenation. The two strings are combined together, one after the other. The result of the expression, nextMeeting + date is "Next meeting:January 1" as shown in the diagram below.

The value "Next meeting:January 1" is then stored into the reminder variable using the assignment operator on line 4 of the program.
- Run your program. It should print this out:
Next meeting:January 1
When you concatenate two strings together, there are no extra spaces added between the strings. If you want a space after the colon in the resulting string, you need to add the space to one string or the other.
- Update your
nextMeetingvariable to have an extra space at the end of the string before the closing quotation mark. (Alternatively, you could have added an extra space to the beginning of thedatevariable). Your program should look like the following:
fun main() {
    val nextMeeting = "Next meeting: "
    val date = "January 1"
    val reminder = nextMeeting + date
    println(reminder)
}
- Run your program again and now there should be a space after the colon in the output message.
Next meeting: January 1
- Modify the code so that you concatenate - or add - another piece of text to the expression that gets stored in the
remindervariable.
Use the + symbol to add the string literal " at work" to the end of the reminder string.
- Run the program.
It should print this output:
Next meeting: January 1 at work
The code below shows you one way that you could implement the behavior.
fun main() {
    val nextMeeting = "Next meeting: "
    val date = "January 1"
    val reminder = nextMeeting + date + " at work"
    println(reminder)
}
Notice that there are no quotation marks around nextMeeting and date because they are names of existing string variables (where their respective values are text with quotes around them). Conversely, the literal " at work" is not previously defined in any variable, so use quotations around this text in order for the compiler to know that this is a string that should be concatenated onto the other strings.
Technically, you can achieve the same output by declaring a single String variable with the full text instead of using separate variables. However, the purpose of this exercise is to demonstrate how you can declare and manipulate String variables, especially how to concatenate separate strings.
- When reading code that contains strings, you may come across escape sequences. Escape sequences are characters that are preceded with a backslash symbol (
\), which is also called an escaping backslash.
An example is seeing \" within a string literal like in the below example. Copy and paste this code into the Kotlin Playground.
fun main() {
    println("Say \"hello\"")
}
You learned earlier to use double quotation marks around a string literal. But what if you want to use the " symbol in your string? Then you need to add the backslash symbol before the double quotation mark as \" within your string. Remember that there should still be double quotation marks around the whole string.
- Run the program to see the output. It should show:
Say "hello"
In the output, there are quotation marks displayed around hello because we added \" before and after hello in the println() statement.
For other escape sequences supported in Kotlin, refer to the documentation page on escape sequences. For example, if you want a new line in your string, use the \ symbol before the character n as in \n.
Now you've learned about concatenating strings and also escape sequences within strings. Move onto the last data type that this codelab covers.
Boolean
The Boolean data type is useful when your variable only has two possible values represented by true or false.
An example is a variable that represents whether a device's airplane mode is on or off, or whether an app's notifications are enabled or disabled.
- Enter this code in the Kotlin Playground. In line 2 of this program, you declare a
Booleanvariable callednotificationsEnabledand initialize it totrue. Technically, you can omit: Booleanin the declaration, so you can remove it if you'd like. In line 3 of the program, you print out the value of thenotificationsEnabledvariable.
fun main() {
    val notificationsEnabled: Boolean = true
    println(notificationsEnabled)
}
Run the program, and it should print this out:
true
- Change the initial value of the
Booleanto false on line 2 of the program.
fun main() {
    val notificationsEnabled: Boolean = false
    println(notificationsEnabled)
}
Run the program, and it should print this out:
false
- Other data types can be concatenated to
Strings. For example, you can concatenateBooleanstoStrings. Use the+symbol to concatenate (or append) the value of thenotificationsEnabledboolean variable onto the end of the"Are notifications enabled? "string.
fun main() {
    val notificationsEnabled: Boolean = false
    println("Are notifications enabled? " + notificationsEnabled)
}
Run the program to see the result of the concatenation. The program should print this output:
Are notifications enabled? false
You can see that it's possible to set the Boolean variable to a true or false value. Boolean variables enable you to code more interesting scenarios in which you execute some set of instructions when a Boolean variable has a true value. Or if the Boolean has a false value, you skip those instructions. You learn more about Booleans in a future codelab.
6. Coding conventions
In the previous codelab, you were introduced to the Kotlin style guide for writing Android code in a consistent way as recommended by Google and followed by other professional developers.
Here are a couple of other formatting and coding conventions for you to follow based on the new topics you learned:
- Variable names should be in camel case and start with a lowercase letter.
- In a variable declaration, there should be a space after a colon when you specify the data type.

- There should be a space before and after an operator like the assignment (
=), addition (+), subtraction (-), multiplication (*), division (/) operators and more.


- As you write more complex programs, there is a recommended limit of 100 characters per line. That ensures that you can read all the code in a program easily on your computer screen, without needing to scroll horizontally when reading code.
7. Commenting in your code
When coding, another good practice to follow is to add comments that describe what the code is intended to do. Comments can help people who read your code follow it more easily. Two forward slash symbols, or //, indicate that the text after it on the rest of the line is considered a comment, so it isn't interpreted as code. It's common practice to add a space after the two forward slash symbols.
// This is a comment.
A comment can also start in the middle of a line of code. In this example, height = 1 is a normal coding statement. // Assume the height is 1 to start with is interpreted as a comment and not considered part of the code.
height = 1 // Assume the height is 1 to start with
If you want to describe the code in more detail with a long comment that exceeds 100 characters on a line, use a multi-line comment. Start the multi-line comment with a forward slash (/) and an asterisk symbol (*) as /*. Add an asterisk at the beginning of each new line of the comment. Then finally end the comment with an asterisk and forward slash symbol */.
/*
 * This is a very long comment that can
 * take up multiple lines.
 */
This program contains single-line and multi-line comments that describe what's happening:
/*
 * This program displays the number of messages
 * in the user's inbox.
 */
fun main() {
    // Create a variable for the number of unread messages.
    var count = 10
    println("You have $count unread messages.")

    // Decrease the number of messages by 1.
    count--
    println("You have $count unread messages.")
}
As mentioned earlier, you can add blank empty lines to your code to group related statements together and make the code easier to read.
- Add some comments to an earlier code snippet that you used.
- Run the program to ensure that the behavior didn't change because comments shouldn't affect the output.
8. Conclusion
Excellent work! You learned about variables in Kotlin, why variables are useful in programming, and how to create, update, and use them. You experimented with different basic data types in Kotlin, including the Int, Double, String, and Boolean data types. You also learned about the difference between the val and var keywords.
All of these concepts are critical building blocks on your journey to become a developer.
See you in the next codelab!
Summary
- A variable is a container for a single piece of data.
- You must declare a variable first before you use it.
- Use the
valkeyword to define a variable that is read-only where the value cannot change once it's been assigned. - Use the
varkeyword to define a variable that is mutable or changeable. - In Kotlin, it's preferred to use
valovervarwhen possible. - To declare a variable, start with the
valorvarkeyword. Then specify the variable name, data type, and initial value. For example:val count: Int = 2. - With type inference, omit the data type in the variable declaration if an initial value is provided.
- Some common basic Kotlin data types include:
Int,String,Boolean,Float, andDouble. - Use the assignment operator (
=) to assign a value to a variable either during declaration of the variable or updating the variable. - You can only update a variable that has been declared as a mutable variable (with
var). - Use the increment operator (
++) or decrement operator (--) to increase or decrease the value of an integer variable by 1, respectively. - Use the
+symbol to concatenate strings together. You can also concatenate variables of other data types likeIntandBooleantoStrings.