
1. Before you begin
This codelab teaches you about state, and how it can be used and manipulated by Jetpack Compose.
At its core, state in an app is any value that can change over time. This definition is very broad and includes everything from a database to a variable in your app. You learn more about databases in a later unit, but for now all you need to know is that a database is an organized collection of structured information, such as the files on your computer.
All Android apps display state to the user. A few examples of state in Android apps include:
- A message that shows when a network connection can't be established.
- Forms, such as registration forms. The state can be filled and submitted.
- Tappable controls, such as buttons. The state could be not tapped, being tapped (display animation), or tapped (an
onClickaction).
In this codelab, you explore how to use and think about state when you use Compose. To do this, you build a tip calculator app called Tip Time with these built-in Compose UI elements:
- A
TextFieldcomposable to enter and edit text. - A
Textcomposable to display text. - A
Spacercomposable to display empty space between UI elements.
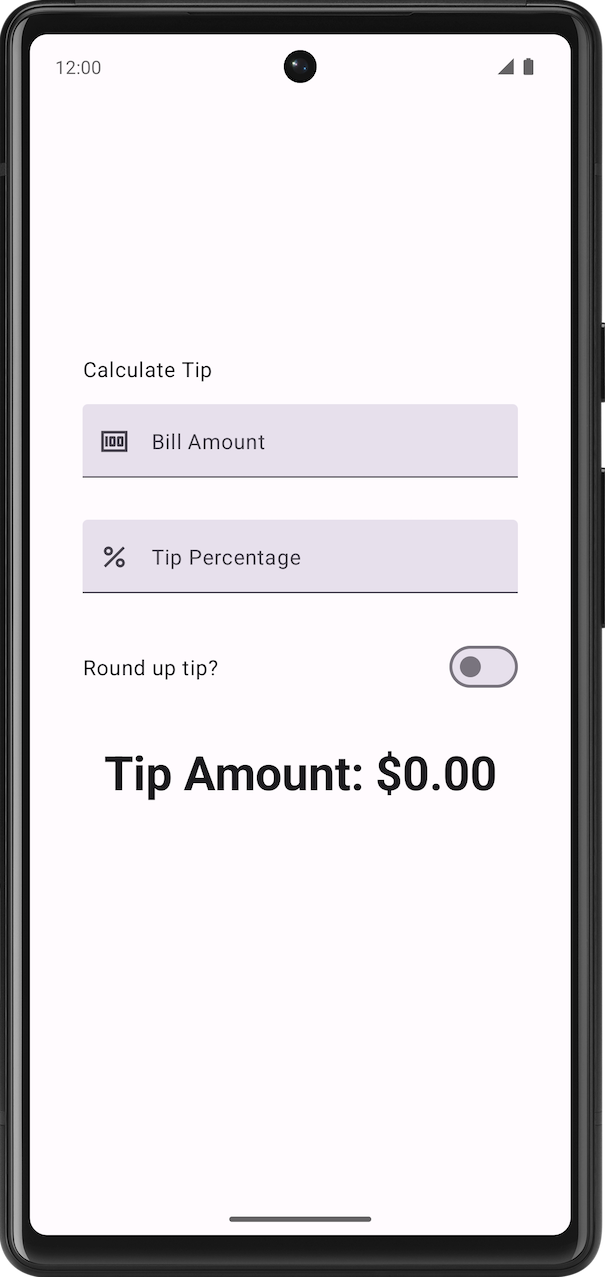
At the end of this codelab, you'll have built an interactive tip calculator that automatically calculates the tip amount when you enter the service amount. This image shows what the final app looks like:
Prerequisites
- Basic understanding of Compose, such as the
@Composableannotation. - Basic familiarity with Compose layouts, such as the
RowandColumnlayout composables. - Basic familiarity with modifiers, such as the
Modifier.padding()function. - Familiarity with the
Textcomposable.
What you'll learn
- How to think about state in a UI.
- How Compose uses state to display data.
- How to add a text box to your app.
- How to hoist a state.
What you'll build
- A tip-calculator app called Tip Time that calculates a tip amount based on the service amount.
What you'll need
- A computer with internet access and a web browser
- Knowledge of Kotlin
- The latest version of Android Studio
2. Get started
- Check Google's online tip calculator. Please note that this is just an example and this is not the Android app you will be creating in this course.


- Enter different values in the Bill and Tip % boxes. The tip and total values change.

Notice that the moment you enter the values, the Tip and the Total update. By the end of the following codelab you will be developing a similar tip calculator app in Android.
In this pathway, you'll build a simple tip calculator Android app.
Developers will often work in this way—get a simple version of the app ready and working (even if it doesn't look very good), and then add more features and make it more visually appealing later.
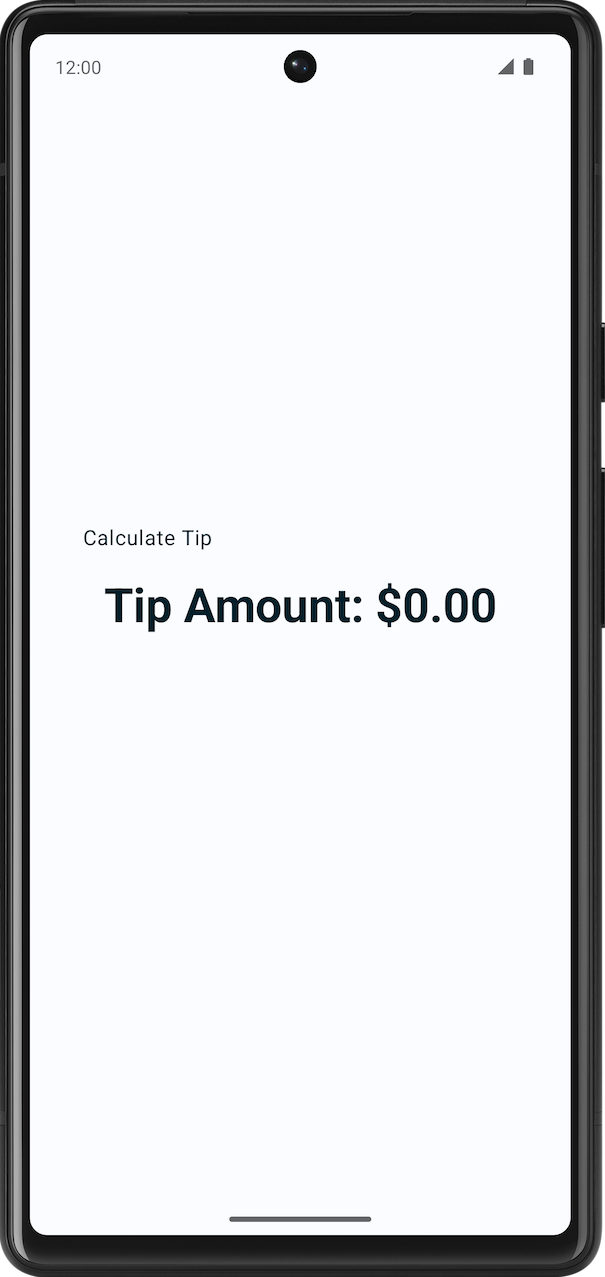
By the end of this codelab, your tip calculator app will look like these screenshots. When the user enters a bill amount, your app will display a suggested tip amount. The tip percentage is hardcoded to 15% for now. In the next codelab, you will continue to work on your app and add more features like setting a custom tip percentage.
|
|
3. Get Starter Code
Starter code is a pre-written code that can be used as a starting point for a new project. It can also help you to focus on new concepts taught in this codelab.
Get started with the starter code by downloading it here:
Alternatively, you can clone the GitHub repository for the code:
$ git clone https://github.com/google-developer-training/basic-android-kotlin-compose-training-tip-calculator.git
$ cd basic-android-kotlin-compose-training-tip-calculator
$ git checkout starter
You can browse the starter code in the TipTime GitHub repository.
Starter app overview
To familiarize yourself with the starter code, complete the following steps:
- Open the project with starter code in Android Studio.
- Run the app on an Android device or emulator.
- You will notice two text components; one is for a label and the other is for displaying tip amount.
Starter code walk through
The starter code has the text composables. In this pathway, you will add a text field to take users input. Here is a brief walkthrough of some files to get you started.
res > values > strings.xml
<resources>
   <string name="app_name">Tip Time</string>
   <string name="calculate_tip">Calculate Tip</string>
   <string name="bill_amount">Bill Amount</string>
   <string name="tip_amount">Tip Amount: %s</string>
</resources>
This is the string.xml file in the resources with all the strings you will be using in this app.
MainActivity
This file contains mostly template generated code and following functions.
- The
TipTimeLayout()function contains aColumnelement with two text composables that you see in the screenshots. This also hasspacercomposable to add space for aesthetic reasons. - The
calculateTip()function that accepts the bill amount and calculates a 15% tip amount. ThetipPercentparameter is set to a15.0default argument value. This sets the default tip value to 15% for now. In the next codelab, you get the tip amount from the user.
@Composable
fun TipTimeLayout() {
    Column(
        modifier = Modifier
            .statusBarsPadding()
            .padding(horizontal = 40.dp)
            .verticalScroll(rememberScrollState())
            .safeDrawingPadding(),
        horizontalAlignment = Alignment.CenterHorizontally,
        verticalArrangement = Arrangement.Center
    ) {
        Text(
            text = stringResource(R.string.calculate_tip),
            modifier = Modifier
                .padding(bottom = 16.dp, top = 40.dp)
                .align(alignment = Alignment.Start)
        )
        Text(
            text = stringResource(R.string.tip_amount, "$0.00"),
            style = MaterialTheme.typography.displaySmall
        )
        Spacer(modifier = Modifier.height(150.dp))
    }
}
private fun calculateTip(amount: Double, tipPercent: Double = 15.0): String {
   val tip = tipPercent / 100 * amount
   return NumberFormat.getCurrencyInstance().format(tip)
}
In the onCreate() function's Surface() block, the TipTimeLayout() function is being called. This displays the app's layout in the device or the emulator.
override fun onCreate(savedInstanceState: Bundle?) {
   //...
   setContent {
       TipTimeTheme {
           Surface(
           //...
           ) {
               TipTimeLayout()
           }
       }
   }
}
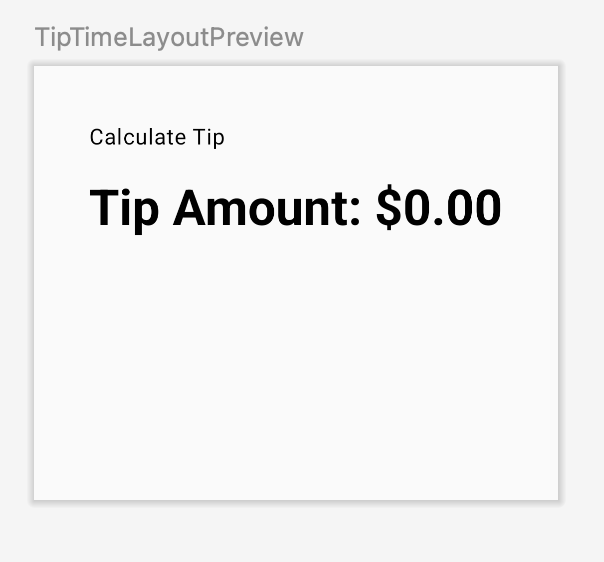
The TipTimeLayoutPreview() function's TipTimeTheme block, the TipTimeLayout() function is being called. This displays the app's layout in the Design and in the Split pane.
@Preview(showBackground = true)
@Composable
fun TipTimeLayoutPreview() {
   TipTimeTheme {
       TipTimeLayout()
   }
}
Take input from the user
In this section, you add the UI element that lets the user enter the bill amount in the app. You can see what it looks like in this image:

Your app uses a custom style and theme.
Styles and themes are a collection of attributes that specifies the appearance for a single UI element. A style can specify attributes such as font color, font size, background color, and much more which can be applied for the entire app. Later codelabs will cover how to implement these in your app. For now, this has already been done for you to make your app more beautiful.
To get a better understanding, here is a side-by-side comparison of the solution version of the app with and without a custom theme.
|
|
 Without a custom theme.
 With a custom theme.
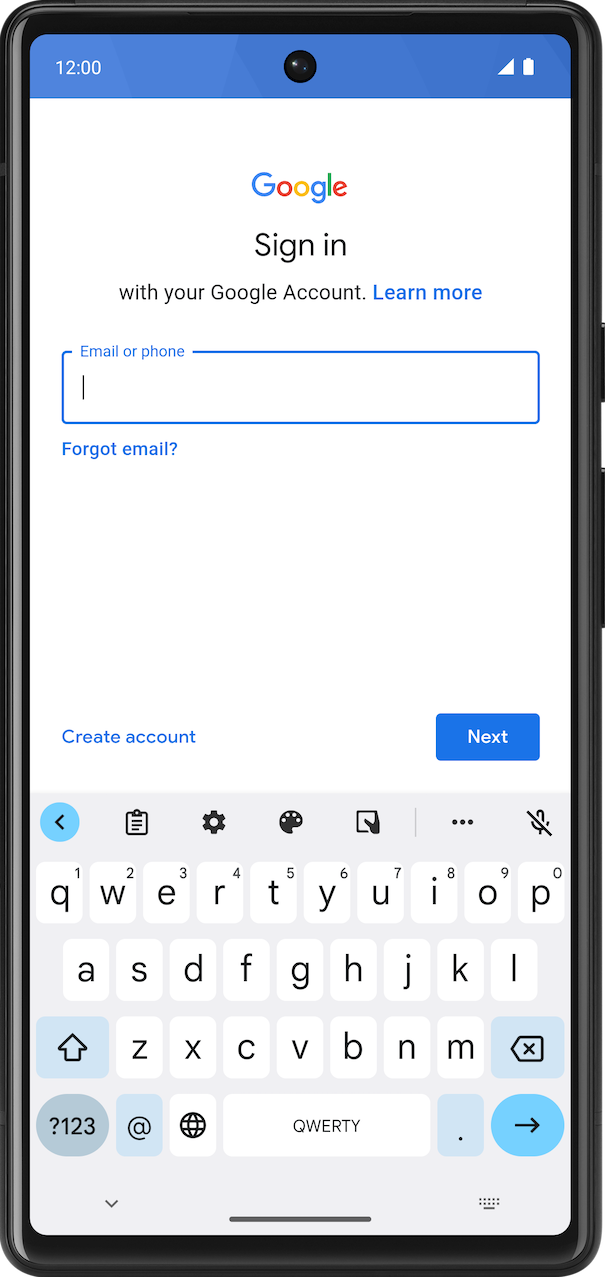
The TextField composable function lets the user enter text in an app. For example, notice the text box on the login screen of the Gmail app in this image:
Add the TextField composable to the app:
- In the
MainActivity.ktfile, add anEditNumberField()composable function, that takes aModifierparameter. - In the body of the
EditNumberField()function belowTipTimeLayout(), add aTextFieldthat accepts avaluenamed parameter set to an empty string and anonValueChangenamed parameter set to an empty lambda expression:
@Composable
fun EditNumberField(modifier: Modifier = Modifier) {
   TextField(
      value = "",
      onValueChange = {},
      modifier = modifier
   )
}
- Notice the parameters that you passed:
- The
valueparameter is a text box that displays the string value you pass here. - The
onValueChangeparameter is the lambda callback that's triggered when the user enters text in the text box.
- Import this function:
import androidx.compose.material3.TextField
- In the
TipTimeLayout()composable, on the line after the first text composable function, call theEditNumberField()function, passing the following modifier.
import androidx.compose.foundation.layout.fillMaxWidth

@Composable
fun TipTimeLayout() {
   Column(
        modifier = Modifier
            .statusBarsPadding()
            .padding(horizontal = 40.dp)
            .verticalScroll(rememberScrollState())
            .safeDrawingPadding(),
        horizontalAlignment = Alignment.CenterHorizontally,
        verticalArrangement = Arrangement.Center
   ) {
       Text(
           ...
       )
       EditNumberField(modifier = Modifier.padding(bottom = 32.dp).fillMaxWidth())
       Text(
           ...
       )
       ...
   }
}
This displays the text box on the screen.
- In the Design pane, you should see the
Calculate Tiptext, an empty text box and theTip Amounttext composable.

4. Use state in Compose
State in an app is any value that can change over time. In this app, the state is the bill amount.
Add a variable to store state:
- At the beginning of the
EditNumberField()function, use thevalkeyword to add anamountInputvariable set it to"0"value:
val amountInput = "0"
This is the state of the app for the bill amount.
- Set the
valuenamed parameter to anamountInputvalue:
TextField(
   value = amountInput,
   onValueChange = {},
)
- Check the preview. The text box displays the value set to the state variable as you can see in this image:

- Run the app in the emulator, try to enter a different value. The hardcoded state remains unchanged because the
TextFieldcomposable doesn't update itself. It updates when itsvalueparameter changes, which is set to theamountInputproperty.
The amountInput variable represents the state of the text box. Having a hardcoded state isn't useful because it can't be modified and it doesn't reflect user input. You need to update the state of the app when the user updates the bill amount.
5. The Composition
The composables in your app describe a UI that shows a column with some text, a spacer, and a text box. The text shows a Calculate Tip text, and the text box shows a 0 value or whatever the default value is.
Compose is a declarative UI framework, meaning that you declare how the UI should look in your code. If you wanted your text box to show a 100 value initially, you'd set the initial value in the code for the composables to a 100 value.
What happens if you want your UI to change while the app is running or as the user interacts with the app? For example, what if you wanted to update the amountInput variable with the value entered by the user and display it in the text box? That's when you rely on a process called recomposition to update the Composition of the app.
The Composition is a description of the UI built by Compose when it executes composables. Compose apps call composable functions to transform data into UI. If a state change happens, Compose re-executes the affected composable functions with the new state, which creates an updated UI—this is called recomposition. Compose schedules a recomposition for you.
When Compose runs your composables for the first time during initial composition, it keeps track of the composables that you call to describe your UI in a Composition. Recomposition is when Compose re-executes the composables that may have changed in response to data changes and then updates the Composition to reflect any changes.
The Composition can only be produced by an initial composition and updated by recomposition. The only way to modify the Composition is through recomposition. To do this, Compose needs to know what state to track so that it can schedule the recomposition when it receives an update. In your case, it's the amountInput variable, so whenever its value changes, Compose schedules a recomposition.
You use the State and MutableState types in Compose to make state in your app observable, or tracked, by Compose. The State type is immutable, so you can only read the value in it, while the MutableState type is mutable. You can use the mutableStateOf() function to create an observable MutableState. It receives an initial value as a parameter that is wrapped in a State object, which then makes its value observable.
The value returned by the mutableStateOf() function:
- Holds state, which is the bill amount.
- Is mutable, so the value can be changed.
- Is observable, so Compose observes any changes to the value and triggers a recomposition to update the UI.
Add a cost-of-service state:
- In the
EditNumberField()function, change thevalkeyword before theamountInputstate variable to thevarkeyword:
var amountInput = "0"
This makes amountInput mutable.
- Use the
MutableState<String>type instead of the hardcodedStringvariable so that Compose knows to track theamountInputstate and then pass in a"0"string, which is the initial default value for theamountInputstate variable:
import androidx.compose.runtime.MutableState
import androidx.compose.runtime.mutableStateOf

var amountInput: MutableState<String> = mutableStateOf("0")
The amountInput initialization can also be written like this with type inference:
var amountInput = mutableStateOf("0")
The mutableStateOf() function receives an initial "0" value as an argument, which then makes amountInput observable. This results in this compilation warning in Android Studio, but you fix it soon:
Creating a state object during composition without using remember.
- In the
TextFieldcomposable function, use theamountInput.valueproperty:
TextField(
   value = amountInput.value,
   onValueChange = {},
   modifier = modifier
)
Compose keeps track of each composable that reads state value properties and triggers a recomposition when its value changes.
The onValueChange callback is triggered when the text box's input changes. In the lambda expression, the it variable contains the new value.
- In the
onValueChangenamed parameter's lambda expression, set theamountInput.valueproperty to theitvariable:
@Composable
fun EditNumberField(modifier: Modifier = Modifier) {
   var amountInput = mutableStateOf("0")
   TextField(
       value = amountInput.value,
       onValueChange = { amountInput.value = it },
       modifier = modifier
   )
}
You are updating the state of the TextField (that is the amountInput variable), when the TextField notifies you that there is a change in the text through onValueChange callback function.
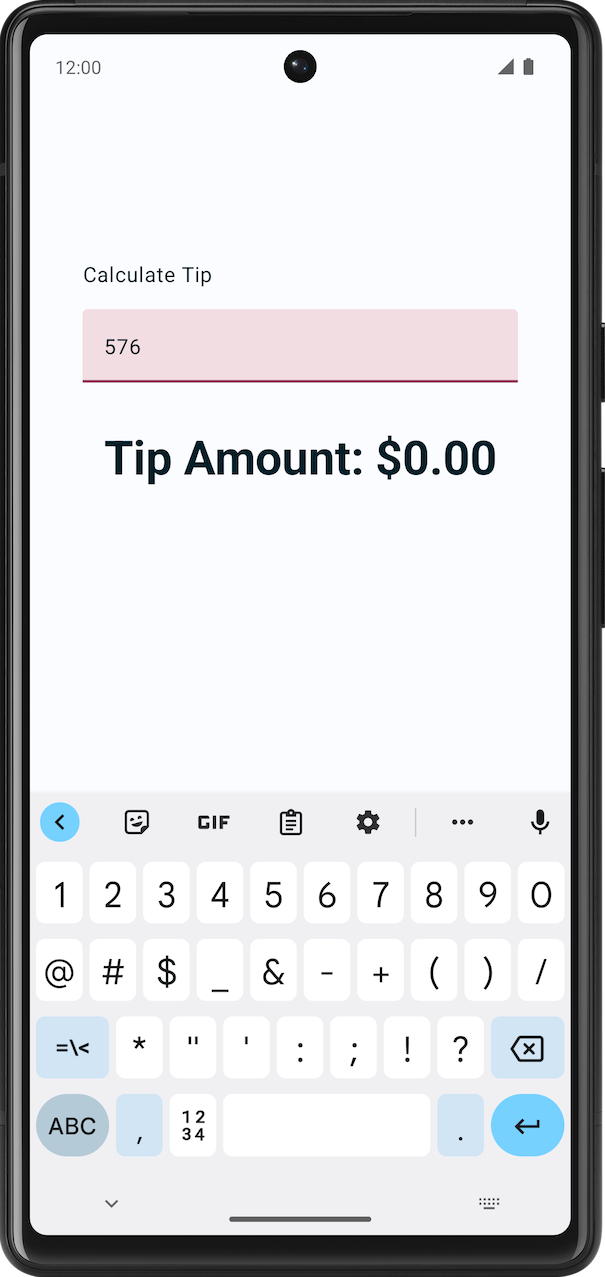
- Run the app and enter text in the text box. The text box still shows a
0value as you can see in this image:
When the user enters text in the text box, the onValueChange callback is called and the amountInput variable is updated with the new value. The amountInput state is tracked by Compose, so the moment that its value changes, recomposition is scheduled and the EditNumberField() composable function is executed again. In that composable function, the amountInput variable is reset to its initial 0 value. Thus, the text box shows a 0 value.
With the code you added, state changes cause recompositions to be scheduled.
However, you need a way to preserve the value of the amountInput variable across recompositions so that it's not reset to a 0 value each time that the EditNumberField() function recomposes. You resolve this issue in the next section.
6. Use remember function to save state
Composable methods can be called many times because of recomposition. The composable resets its state during recomposition if it's not saved.
Composable functions can store an object across recompositions with the remember. A value computed by the remember function is stored in the Composition during initial composition and the stored value is returned during recomposition. Usually remember and mutableStateOf functions are used together in composable functions to have the state and its updates be reflected properly in the UI.
Use the remember function in EditNumberField() function:
- In the
EditNumberField()function, initialize theamountInputvariable with thebyrememberKotlin property delegate, by surrounding the call tomutableStateOf()function withremember. - In the
mutableStateOf()function, pass in an empty string instead of a static"0"string:
var amountInput by remember { mutableStateOf("") }
Now the empty string is the initial default value for the amountInput variable. by is a Kotlin property delegation. The default getter and setter functions for the amountInput property are delegated to the remember class's getter and setter functions, respectively.
- Import these functions:
import androidx.compose.runtime.remember
import androidx.compose.runtime.getValue
import androidx.compose.runtime.setValue
Adding the delegate's getter and setter imports lets you read and set amountInput without referring to the MutableState's value property.
Updated EditNumberField() function should look like this:
@Composable
fun EditNumberField(modifier: Modifier = Modifier) {
   var amountInput by remember { mutableStateOf("") }
   TextField(
       value = amountInput,
       onValueChange = { amountInput = it },
       modifier = modifier
   )
}
- Run the app and enter some text in the text box. You should see the text you typed now.
7. State and recomposition in action
In this section, you set a breakpoint and debug the EditNumberField() composable function to see how initial composition and recomposition work.
Set a breakpoint and debug the app on an emulator or a device:
- In the
EditNumberField()function next to theonValueChangenamed parameter, set a line breakpoint. - In the navigation menu, click Debug ‘app'. The app launches on the emulator or device. Your app's execution pauses for the first time when the
TextFieldelement is created.

- In the Debug pane, click
 Resume Program. The text box is created.
 - On the emulator or device, enter a letter in the text box. Your app's execution pauses again when it reaches the breakpoint that you set.
When you enter the text, the onValueChange callback is called. Inside the lambda it has the new value you typed in the keypad.
Once the value of "it" is assigned to amountInput then Compose triggers the recomposition with the new data as the observable value has changed.

- In the Debug pane, click Resume Program. The text entered in the emulator or on the device displays next to the line with the breakpoint as seen in this image:
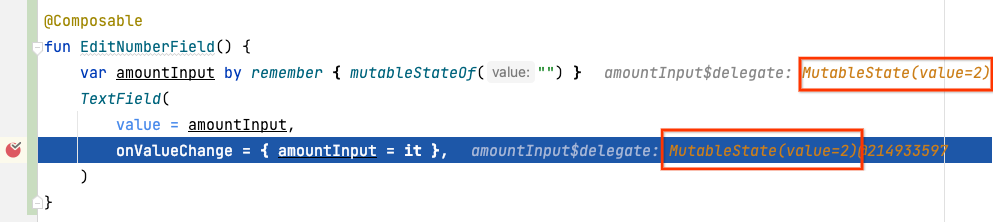
This is the state of the text field.
- Click Resume Program. The value entered is displayed on the emulator or device.
8. Modify the appearance
In the previous section, you got the text field to work. In this section, you enhance the UI.
Add a label to the text box
Every text box should have a label that lets users know what information they can enter. In the first part of the following example image, the label text is in the middle of a text field and aligned with the input line. In the second part of the following example image, the label is moved higher in the text box when the user clicks in the text box to enter text. To learn more about text-field anatomy, see Anatomy.

Modify the EditNumberField() function to add a label to the text field:
- In the
EditNumberField()function'sTextField()composable function , add alabelnamed parameter set to an empty lambda expression:
TextField(
//...
   label = { }
)
- In the lambda expression, call the
Text()function that accepts astringResource(R.string.bill_amount):
label = { Text(stringResource(R.string.bill_amount)) },
- In the
TextField()composable function, addsingleLinenamed parameter set to atruevalue:
TextField(
  // ...
   singleLine = true,
)
This condenses the text box to a single, horizontally scrollable line from multiple lines.
- Add the
keyboardOptionsparameter set to aKeyboardOptions():
import androidx.compose.foundation.text.KeyboardOptions

TextField(
  // ...
   keyboardOptions = KeyboardOptions(),
)
Android provides an option to configure the keyboard displayed on the screen to enter digits, email addresses, URLs, and passwords, to name a few. To learn more about other keyboard types, see KeyboardType.
- Set the keyboard type to number keyboard to input digits. Pass the
KeyboardOptionsfunction akeyboardTypenamed parameter set to aKeyboardType.Number:
import androidx.compose.ui.text.input.KeyboardType

TextField(
  // ...
   keyboardOptions = KeyboardOptions(keyboardType = KeyboardType.Number),
)
The completed EditNumberField() function should look like this code snippet:
@Composable
fun EditNumberField(modifier: Modifier = Modifier) {
    var amountInput by remember { mutableStateOf("") }
    TextField(
        value = amountInput,
        onValueChange = { amountInput = it },
        singleLine = true,
        label = { Text(stringResource(R.string.bill_amount)) },
        keyboardOptions = KeyboardOptions(keyboardType = KeyboardType.Number),
        modifier = modifier
    )
}
- Run the app.
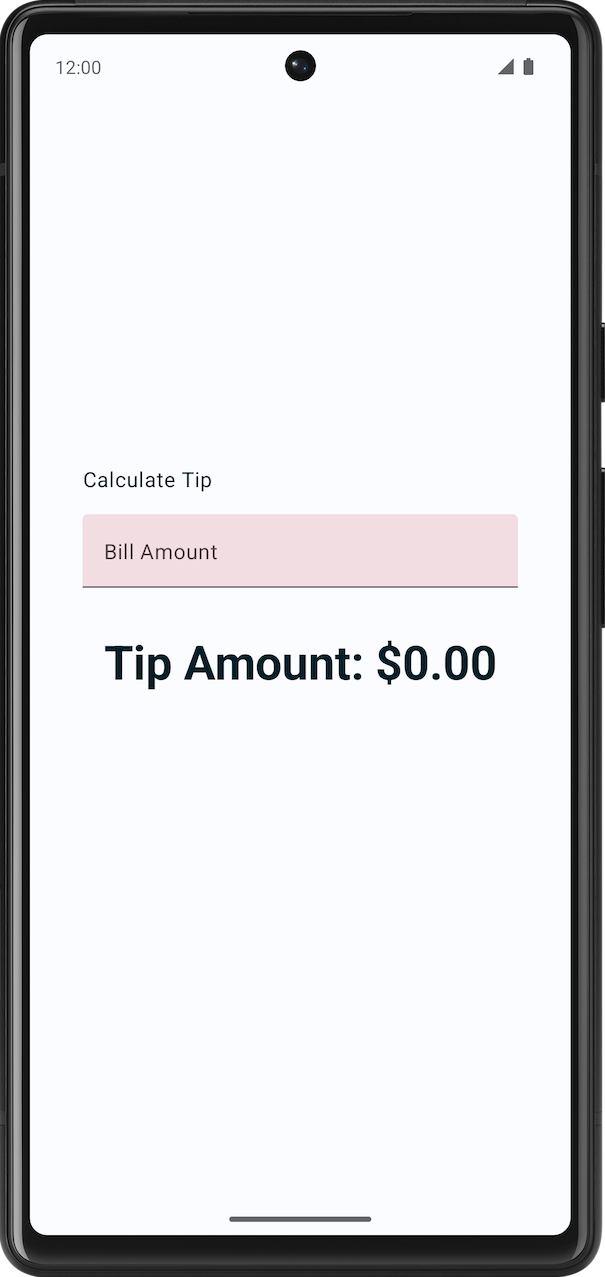
You can see the changes to the keypad in this screenshot:

9. Display the tip amount
In this section, you implement the main functionality of the app, which is the ability to calculate and display the tip amount.
In the MainActivity.kt file, a private calculateTip() function is given to you as part of the starter code. You will use this function to calculate the tip amount:
private fun calculateTip(amount: Double, tipPercent: Double = 15.0): String {
    val tip = tipPercent / 100 * amount
    return NumberFormat.getCurrencyInstance().format(tip)
}
In the above method you are using NumberFormat to display the format of the tip as currency.
Now your app can calculate the tip, but you still need to format and display it with the class.
Use the calculateTip() function
The text entered by the user in the text field composable is returned to the onValueChange callback function as a String even though the user entered a number. To fix this, you need to convert the amountInput value, which contains the amount entered by the user.
- In
EditNumberField()composable function, create a new variable calledamountafter theamountInputdefinition. Call thetoDoubleOrNullfunction on theamountInputvariable, to convert theStringto aDouble:
val amount = amountInput.toDoubleOrNull()
The toDoubleOrNull() function is a predefined Kotlin function that parses a string as a Double number and returns the result or null if the string isn't a valid representation of a number.
- At the end of the statement, add an
?:Elvis operator that returns a0.0value whenamountInputis null:
val amount = amountInput.toDoubleOrNull() ?: 0.0
- After the
amountvariable, create anothervalvariable calledtip. Initialize it with thecalculateTip(), passing theamountparameter.
val tip = calculateTip(amount)
The EditNumberField() function should look like this code snippet:
@Composable
fun EditNumberField(modifier: Modifier = Modifier) {
   var amountInput by remember { mutableStateOf("") }

   val amount = amountInput.toDoubleOrNull() ?: 0.0
   val tip = calculateTip(amount)

   TextField(
       value = amountInput,
       onValueChange = { amountInput = it },
       label = { Text(stringResource(R.string.bill_amount)) },
       modifier = Modifier.fillMaxWidth(),
       singleLine = true,
       keyboardOptions = KeyboardOptions(keyboardType = KeyboardType.Number)
   )
}
Show the calculated tip amount
You have written the function to calculate the tip amount, the next step is to display the calculated tip amount:
- In the
TipTimeLayout()function at the end of theColumn()block, notice the text composable that displays$0.00. You will update this value to the calculated tip amount.
@Composable
fun TipTimeLayout() {
    Column(
        modifier = Modifier
            .statusBarsPadding()
            .padding(horizontal = 40.dp)
            .verticalScroll(rememberScrollState())
            .safeDrawingPadding(),
        horizontalAlignment = Alignment.CenterHorizontally,
        verticalArrangement = Arrangement.Center
    ) {
        // ...
        Text(
            text = stringResource(R.string.tip_amount, "$0.00"),
            style = MaterialTheme.typography.displaySmall
        )
        // ...
    }
}
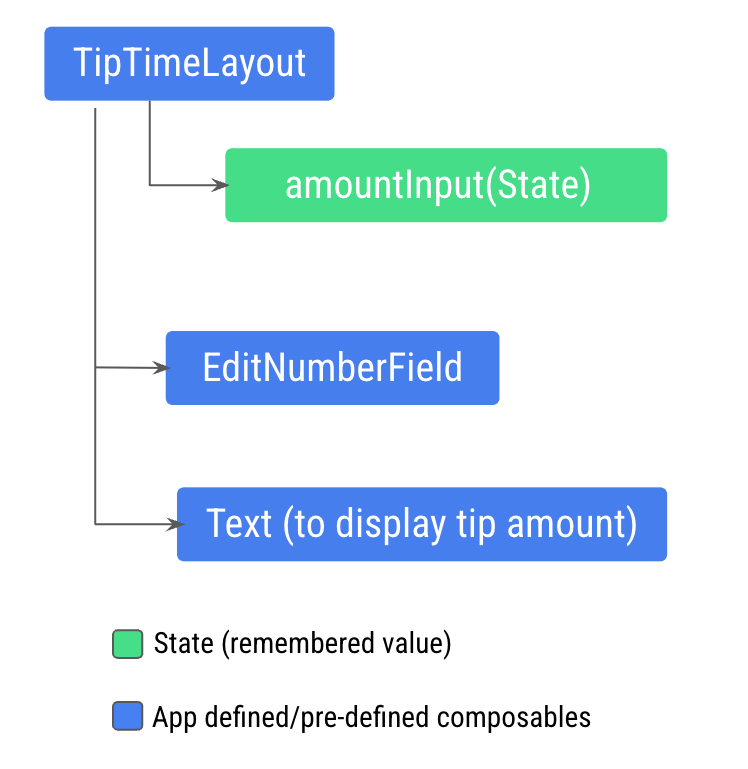
You need to access the amountInput variable in the TipTimeLayout() function to calculate and display the tip amount, but the amountInput variable is the state of the text field defined in the EditNumberField() composable function, so you can't call it from the TipTimeLayout() function yet. This image illustrates the structure of the code:

This structure won't let you display the tip amount in the new Text composable because the Text composable needs to access the amount variable calculated from the amountInput variable. You need to expose the amount variable to the TipTimeLayout() function. This image illustrates the desired code structure, which makes the EditNumberField() composable stateless:
This pattern is called state hoisting. In the next section, you hoist, or lift, the state from a composable to make it stateless.
10. State hoisting
In this section, you learn how to decide where to define your state in a way that you can reuse and share your composables.
In a composable function, you can define variables that hold state to display in the UI. For example, you defined the amountInput variable as state in the EditNumberField() composable.
When your app becomes more complex and other composables need access to the state within the EditNumberField() composable, you need to consider hoisting, or extracting, the state out of the EditNumberField() composable function.
Understand stateful versus stateless composables
You should hoist the state when you need to:
- Share the state with multiple composable functions.
- Create a stateless composable that can be reused in your app.
When you extract state from a composable function, the resulting composable function is called stateless. That is, composable functions can be made stateless by extracting state from them.
A stateless composable is a composable that doesn't have a state, meaning it doesn't hold, define, or modify a new state. On the other hand, a stateful composable is a composable that owns a piece of state that can change over time.
State hoisting is a pattern of moving state to its caller to make a component stateless.
When applied to composables, this often means introducing two parameters to the composable:
- A
value: Tparameter, which is the current value to display. - An
onValueChange: (T) -> Unit– callback lambda, which is triggered when the value changes so that the state can be updated elsewhere, such as when a user enters some text in the text box.
Hoist the state in EditNumberField() function:
- Update the
EditNumberField()function definition, to hoist the state by adding thevalueandonValueChangeparameters:
@Composable
fun EditNumberField(
   value: String,
   onValueChange: (String) -> Unit,
   modifier: Modifier = Modifier
) {
//...
The value parameter is of String type, and the onValueChange parameter is of (String) -> Unit type, so it's a function that takes a String value as input and has no return value. The onValueChange parameter is used as the onValueChange callback passed into the TextField composable.
- In the
EditNumberField()function, update theTextField()composable function to use the passed in parameters:
TextField(
   value = value,
   onValueChange = onValueChange,
   // Rest of the code
)
- Hoist the state, move the remembered state from the
EditNumberField()function to theTipTimeLayout()function:
@Composable
fun TipTimeLayout() {
   var amountInput by remember { mutableStateOf("") }

   val amount = amountInput.toDoubleOrNull() ?: 0.0
   val tip = calculateTip(amount)

   Column(
       //...
   ) {
       //...
   }
}
- You hoisted the state to
TipTimeLayout(), now pass it toEditNumberField(). In theTipTimeLayout()function, update theEditNumberField()function call to use the hoisted state:
EditNumberField(
   value = amountInput,
   onValueChange = { amountInput = it },
   modifier = Modifier
       .padding(bottom = 32.dp)
       .fillMaxWidth()
)
This makes EditNumberField stateless. You hoisted the UI state to its ancestor, TipTimeLayout(). The TipTimeLayout() is the state(amountInput) owner now.
Positional formatting
Positional formatting is used to display dynamic content in strings. For example, imagine that you want the Tip amount text box to display an xx.xx value that could be any amount calculated and formatted in your function. To accomplish this in the strings.xml file, you need to define the string resource with a placeholder argument, like this code snippet:
// No need to copy.

// In the res/values/strings.xml file
<string name="tip_amount">Tip Amount: %s</string>
In the compose code, you can have multiple, and any type of, placeholder arguments. A string placeholder is %s.
Notice the text composable in TipTimeLayout(), you pass in the formatted tip as an argument to the stringResource() function.
// No need to copy
Text(
   text = stringResource(R.string.tip_amount, "$0.00"),
   style = MaterialTheme.typography.displaySmall
)
- In the function,
TipTimeLayout(), use thetipproperty to display the tip amount. Update theTextcomposable'stextparameter to use thetipvariable as a parameter.
Text(
     text = stringResource(R.string.tip_amount, tip),
     // ...
The completed TipTimeLayout() and EditNumberField() functions should look like this code snippet:
@Composable
fun TipTimeLayout() {
   var amountInput by remember { mutableStateOf("") }
   val amount = amountInput.toDoubleOrNull() ?: 0.0
   val tip = calculateTip(amount)

   Column(
       modifier = Modifier
            .statusBarsPadding()
            .padding(horizontal = 40.dp)
            .verticalScroll(rememberScrollState())
            .safeDrawingPadding(),
       horizontalAlignment = Alignment.CenterHorizontally,
       verticalArrangement = Arrangement.Center
   ) {
       Text(
           text = stringResource(R.string.calculate_tip),
           modifier = Modifier
               .padding(bottom = 16.dp, top = 40.dp)
               .align(alignment = Alignment.Start)
       )
       EditNumberField(
           value = amountInput,
           onValueChange = { amountInput = it },
           modifier = Modifier
               .padding(bottom = 32.dp)
               .fillMaxWidth()
       )
       Text(
           text = stringResource(R.string.tip_amount, tip),
           style = MaterialTheme.typography.displaySmall
       )
       Spacer(modifier = Modifier.height(150.dp))
   }
}

@Composable
fun EditNumberField(
   value: String,
   onValueChange: (String) -> Unit,
   modifier: Modifier = Modifier
) {
   TextField(
       value = value,
       onValueChange = onValueChange,
       singleLine = true,
       label = { Text(stringResource(R.string.bill_amount)) },
       keyboardOptions = KeyboardOptions(keyboardType = KeyboardType.Number),
       modifier = modifier
   )
}
To summarize, you hoisted the amountInput state from the EditNumberField() into the TipTimeLayout() composable. For the text box to work as before, you have to pass in two arguments to the EditNumberField() composable function: the amountInput value and the lambda callback that updates the amountInput value from the user's input. These changes let you calculate the tip from the amountInput property in the TipTimeLayout() to display it to the user.
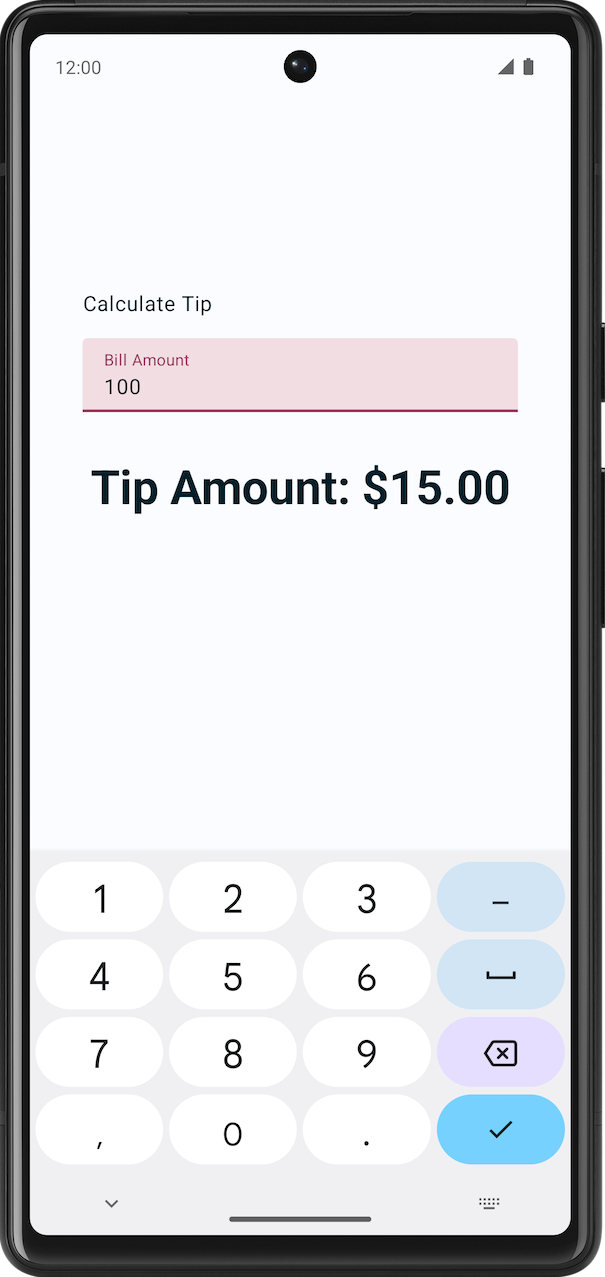
- Run the app on the emulator or device and then enter a value in the bill amount text box. The tip amount of 15 percent of the bill amount is displayed as you can see in this image:

11. Get the solution code
To download the code for the finished codelab, you can use these git commands:
$ git clone https://github.com/google-developer-training/basic-android-kotlin-compose-training-tip-calculator.git
$ cd basic-android-kotlin-compose-training-tip-calculator
$ git checkout state
Alternatively you can download the repository as a zip file, unzip it, and open it in Android Studio.
If you want to see the solution code, view it on GitHub.
12. Conclusion
Congratulations! You completed this codelab and learned how to use state in a Compose app!
Summary
- State in an app is any value that can change over time.
- The Composition is a description of the UI built by Compose when it executes composables. Compose apps call composable functions to transform data into UI.
- Initial composition is a creation of the UI by Compose when it executes composable functions the first time.
- Recomposition is the process of running the same composables again to update the tree when their data changes.
- State hoisting is a pattern of moving state to its caller to make a component stateless.