
1. Before you begin
You learned in the previous codelabs how to use a Room persistence library, an abstraction layer on top of a SQLite database, to store the app data. In this codelab, you'll add more features to the Inventory app and learn how to read, display, update, and delete data from the SQLite database using Room. You will use a LazyColumn to display the data from the database and automatically update the data when the underlying data in the database changes.
Prerequisites
- Ability to create and interact with the SQLite database using the Room library.
- Ability to create an entity, DAO, and database classes.
- Ability to use a data access object (DAO) to map Kotlin functions to SQL queries.
- Ability to display list items in a
LazyColumn. - Completion of the previous codelab in this unit, Persist data with Room.
What you'll learn
- How to read and display entities from a SQLite database.
- How to update and delete entities from a SQLite database using the Room library.
What you'll build
- An Inventory app that displays a list of inventory items and can update, edit, and delete items from the app database using Room.
What you'll need
- A computer with Android Studio
2. Starter app overview
This codelab uses the Inventory app solution code from the previous codelab, Persist data with Room as the starter code. The starter app already saves data with the Room persistence library. The user can use the Add Item screen to add data to the app database.
|
|
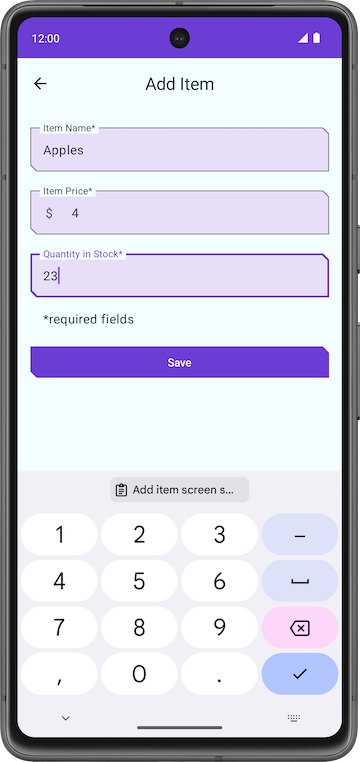
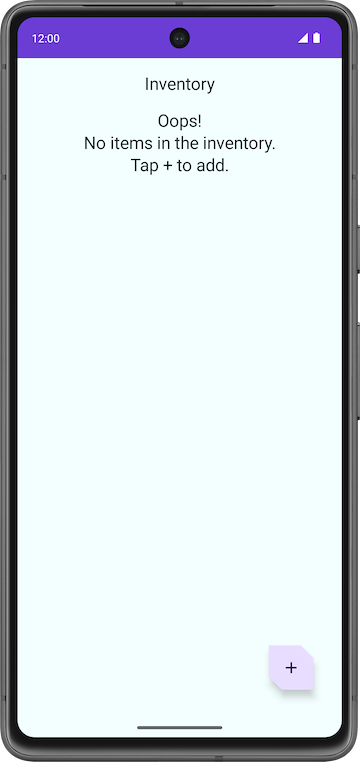
In this codelab, you extend the app to read and display the data, and update and delete entities on the database using a Room library.
Download the starter code for this codelab
To get started, download the starter code:
$ git clone https://github.com/google-developer-training/basic-android-kotlin-compose-training-inventory-app.git
$ cd basic-android-kotlin-compose-training-inventory-app
$ git checkout room
Alternatively, you can download the repository as a zip file, unzip it, and open it in Android Studio.
If you want to see the starter code for this codelab, view it on GitHub.
3. Update UI state
In this task, you add a LazyColumn to the app to display the data stored in the database.
HomeScreen composable function walkthrough
- Open the
ui/home/HomeScreen.ktfile and look at theHomeScreen()composable.
@Composable
fun HomeScreen(
    navigateToItemEntry: () -> Unit,
    navigateToItemUpdate: (Int) -> Unit,
    modifier: Modifier = Modifier,
) {
    val scrollBehavior = TopAppBarDefaults.enterAlwaysScrollBehavior()

    Scaffold(
        topBar = {
            // Top app with app title
        },
        floatingActionButton = {
            FloatingActionButton(
                // onClick details
            ) {
                Icon(
                    // Icon details
                )
            }
        },
    ) { innerPadding ->

       // Display List header and List of Items
        HomeBody(
            itemList = listOf(),  // Empty list is being passed in for itemList
            onItemClick = navigateToItemUpdate,
            modifier = modifier.padding(innerPadding)
                              .fillMaxSize()
        )
    }
This composable function displays the following items:
- The top app bar with the app title
- The floating action button (FAB) for the addition of new items to inventory

- The
HomeBody()composable function
The HomeBody()composable function displays inventory items based on the passed in list. As part of the starter code implementation, an empty list (listOf()) is passed to the HomeBody()composable function. To pass the inventory list to this composable, you must retrieve the inventory data from the repository and pass it into the HomeViewModel.
Emit UI state in the HomeViewModel
When you added methods to ItemDao to get items- getItem() and getAllItems()- you specified a Flow as the return type. Recall that a Flow represents a generic stream of data. By returning a Flow, you only need to explicitly call the methods from the DAO once for a given lifecycle. Room handles updates to the underlying data in an asynchronous manner.
Getting data from a flow is called collecting from a flow. When collecting from a flow in your UI layer, there are a few things to consider.
- Lifecycle events like configuration changes, for example rotating the device, causes the activity to be recreated. This causes recomposition and collecting from your
Flowall over again. - You want the values to be cached as state so that existing data isn't lost between lifecycle events.
- Flows should be canceled if there's no observers left, such as after a composable's lifecycle ends.
The recommended way to expose a Flow from a ViewModel is with a StateFlow. Using a StateFlow allows the data to be saved and observed, regardless of the UI lifecycle. To convert a Flow to a StateFlow, you use the stateIn operator.
The stateIn operator has three parameters which are explained below:
scope- TheviewModelScopedefines the lifecycle of theStateFlow. When theviewModelScopeis canceled, theStateFlowis also canceled.started- The pipeline should only be active when the UI is visible. TheSharingStarted.WhileSubscribed()is used to accomplish this. To configure a delay (in milliseconds) between the disappearance of the last subscriber and the stopping of the sharing coroutine, pass in theTIMEOUT_MILLISto theSharingStarted.WhileSubscribed()method.initialValue- Set the initial value of the state flow toHomeUiState().
Once you've converted your Flow into a StateFlow, you can collect it using the collectAsState() method, converting its data into State of the same type.
In this step, you'll retrieve all items in the Room database as a StateFlow observable API for UI state. When the Room Inventory data changes, the UI updates automatically.
- Open the
ui/home/HomeViewModel.ktfile, which contains aTIMEOUT_MILLISconstant and aHomeUiStatedata class with a list of items as a constructor parameter.
// No need to copy over, this code is part of starter code

class HomeViewModel : ViewModel() {

    companion object {
        private const val TIMEOUT_MILLIS = 5_000L
    }
}

data class HomeUiState(val itemList: List<Item> = listOf())
- Inside the
HomeViewModelclass, declare avalcalledhomeUiStateof the typeStateFlow<HomeUiState>. You will resolve the initialization error shortly.
val homeUiState: StateFlow<HomeUiState>
- Call
getAllItemsStream()onitemsRepositoryand assign it tohomeUiStateyou just declared.
val homeUiState: StateFlow<HomeUiState> =
    itemsRepository.getAllItemsStream()
You now get an error - Unresolved reference: itemsRepository. To resolve the Unresolved reference error, you need to pass in the ItemsRepository object to the HomeViewModel.
- Add a constructor parameter of the type
ItemsRepositoryto theHomeViewModelclass.
import com.example.inventory.data.ItemsRepository

class HomeViewModel(itemsRepository: ItemsRepository): ViewModel() {
- In the
ui/AppViewModelProvider.ktfile, in theHomeViewModelinitializer, pass theItemsRepositoryobject as shown.
initializer {
    HomeViewModel(inventoryApplication().container.itemsRepository)
}
- Go back to the
HomeViewModel.ktfile. Notice the type mismatch error. To resolve this, add a transformation map as shown below.
val homeUiState: StateFlow<HomeUiState> =
    itemsRepository.getAllItemsStream().map { HomeUiState(it) }
Android Studio still shows you a type mismatch error. This error is because homeUiState is of the type StateFlow and getAllItemsStream() returns a Flow.
- Use the
stateInoperator to convert theFlowinto aStateFlow. TheStateFlowis the observable API for UI state, which enables the UI to update itself.
import androidx.lifecycle.viewModelScope
import kotlinx.coroutines.flow.SharingStarted
import kotlinx.coroutines.flow.map
import kotlinx.coroutines.flow.stateIn

val homeUiState: StateFlow<HomeUiState> =
    itemsRepository.getAllItemsStream().map { HomeUiState(it) }
        .stateIn(
            scope = viewModelScope,
            started = SharingStarted.WhileSubscribed(TIMEOUT_MILLIS),
            initialValue = HomeUiState()
        )
- Build the app to make sure there are no errors in the code. There will not be any visual changes.
4. Display the Inventory data
In this task, you collect and update the UI state in the HomeScreen.
- In the
HomeScreen.ktfile, in theHomeScreencomposable function, add a new function parameter of the typeHomeViewModeland initialize it.
import androidx.lifecycle.viewmodel.compose.viewModel
import com.example.inventory.ui.AppViewModelProvider


@Composable
fun HomeScreen(
    navigateToItemEntry: () -> Unit,
    navigateToItemUpdate: (Int) -> Unit,
    modifier: Modifier = Modifier,
    viewModel: HomeViewModel = viewModel(factory = AppViewModelProvider.Factory)
)
- In the
HomeScreencomposable function, add avalcalledhomeUiStateto collect the UI state from theHomeViewModel. You usecollectAsState(), which collects values from thisStateFlowand represents its latest value viaState.
import androidx.compose.runtime.collectAsState
import androidx.compose.runtime.getValue

val homeUiState by viewModel.homeUiState.collectAsState()
- Update the
HomeBody()function call and pass inhomeUiState.itemListto theitemListparameter.
HomeBody(
    itemList = homeUiState.itemList,
    onItemClick = navigateToItemUpdate,
    modifier = modifier.padding(innerPadding)
)
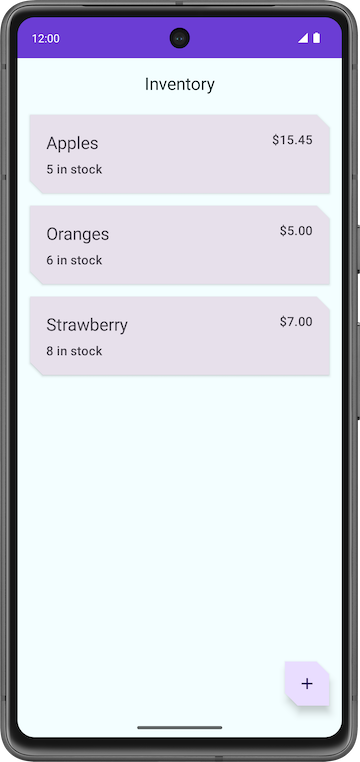
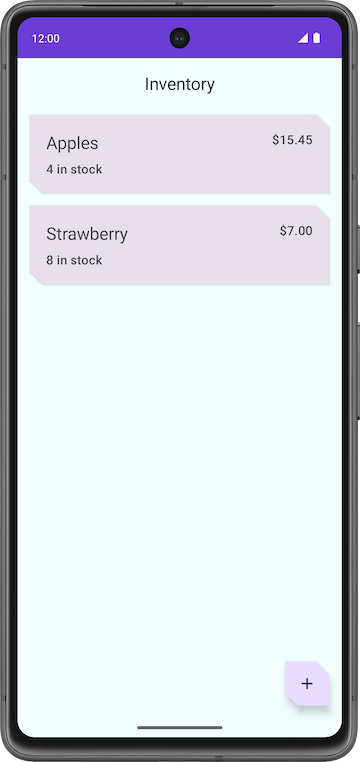
- Run the app. Notice that the inventory list displays if you saved items in your app database. If the list is empty, add some inventory items to the app database.
5. Test your database
Previous codelabs discuss the importance of testing your code. In this task, you add some unit tests to test your DAO queries, and then you add more tests as you progress through the codelab.
The recommended approach for testing your database implementation is writing a JUnit test that runs on an Android device. Because these tests don't require creating an activity, they are faster to execute than your UI tests.
- In the
build.gradle.kts (Module :app)file, notice the following dependencies for Espresso and JUnit.
// Testing
androidTestImplementation("androidx.test.espresso:espresso-core:3.5.1")
androidTestImplementation("androidx.test.ext:junit:1.1.5")
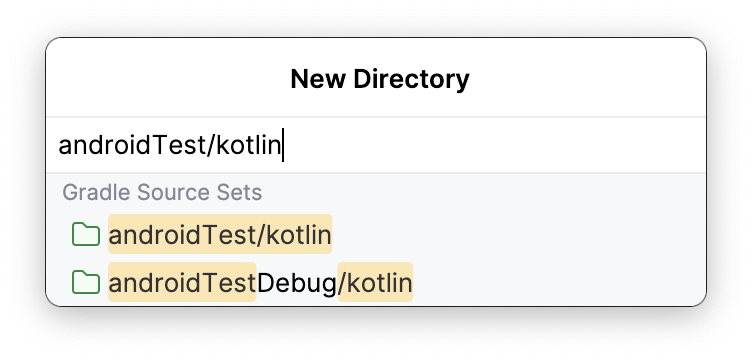
- Switch to Project view and right-click on src > New > Directory to create a test source set for your tests.
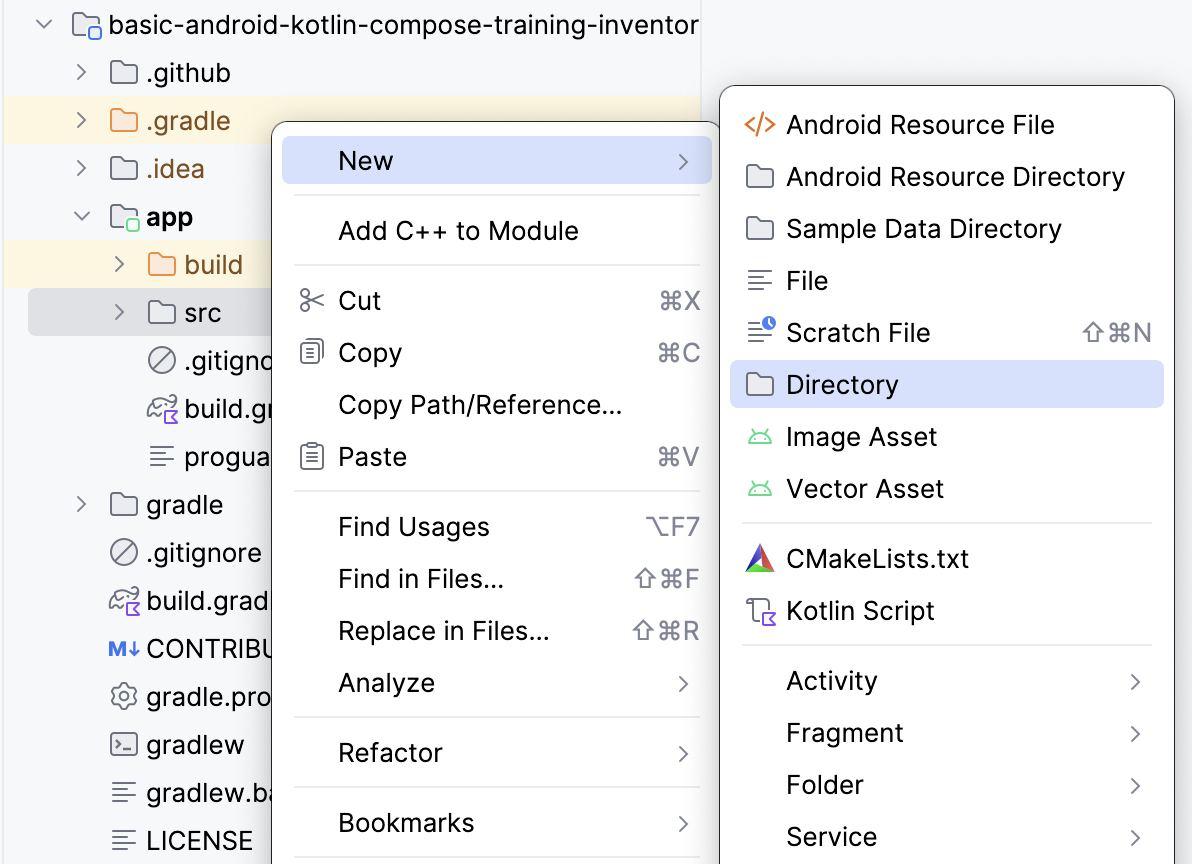
- Select androidTest/kotlin from the New Directory popup.
- Create a Kotlin class called
ItemDaoTest.kt. - Annotate the
ItemDaoTestclass with@RunWith(AndroidJUnit4::class). Your class now looks something like the following example code:
package com.example.inventory

import androidx.test.ext.junit.runners.AndroidJUnit4
import org.junit.runner.RunWith

@RunWith(AndroidJUnit4::class)
class ItemDaoTest {
}
- Inside the class, add private
varvariables of the typeItemDaoandInventoryDatabase.
import com.example.inventory.data.InventoryDatabase
import com.example.inventory.data.ItemDao

private lateinit var itemDao: ItemDao
private lateinit var inventoryDatabase: InventoryDatabase
- Add a function to create the database and annotate it with
@Beforeso that it can run before every test. - Inside the method, initialize
itemDao.
import android.content.Context
import androidx.room.Room
import androidx.test.core.app.ApplicationProvider
import org.junit.Before

@Before
fun createDb() {
    val context: Context = ApplicationProvider.getApplicationContext()
    // Using an in-memory database because the information stored here disappears when the
    // process is killed.
    inventoryDatabase = Room.inMemoryDatabaseBuilder(context, InventoryDatabase::class.java)
        // Allowing main thread queries, just for testing.
        .allowMainThreadQueries()
        .build()
    itemDao = inventoryDatabase.itemDao()
}
In this function, you use an in-memory database and do not persist it on the disk. To do so, you use the inMemoryDatabaseBuilder() function. You do this because the information need not be persisted, but rather, needs to be deleted when the process is killed.You are running the DAO queries in the main thread with .allowMainThreadQueries(), just for testing.
- Add another function to close the database. Annotate it with
@Afterto close the database and run after every test.
import org.junit.After
import java.io.IOException

@After
@Throws(IOException::class)
fun closeDb() {
    inventoryDatabase.close()
}
- Declare items in the class
ItemDaoTestfor the database to use, as shown in the following code example:
import com.example.inventory.data.Item

private var item1 = Item(1, "Apples", 10.0, 20)
private var item2 = Item(2, "Bananas", 15.0, 97)
- Add utility functions to add one item, and then two items, to the database. Later, you use these functions in your test. Mark them as
suspendso they can run in a coroutine.
private suspend fun addOneItemToDb() {
    itemDao.insert(item1)
}

private suspend fun addTwoItemsToDb() {
    itemDao.insert(item1)
    itemDao.insert(item2)
}
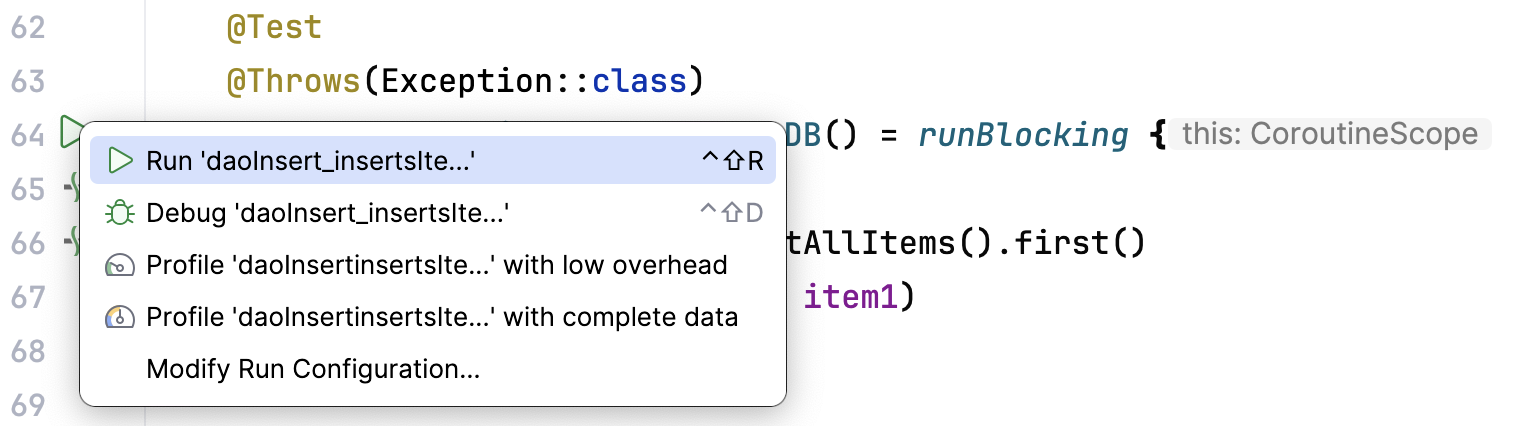
- Write a test for inserting a single item into the database,
insert(). Name the testdaoInsert_insertsItemIntoDBand annotate it with@Test.
import kotlinx.coroutines.flow.first
import kotlinx.coroutines.runBlocking
import org.junit.Assert.assertEquals
import org.junit.Test


@Test
@Throws(Exception::class)
fun daoInsert_insertsItemIntoDB() = runBlocking {
    addOneItemToDb()
    val allItems = itemDao.getAllItems().first()
    assertEquals(allItems[0], item1)
}
In this test, you use the utility function addOneItemToDb()to add one item to the database. Then, you read the first item in the database. With assertEquals(), you compare the expected value with the actual value. You run the test in a new coroutine with runBlocking{}. This setup is the reason you mark the utility functions as suspend.
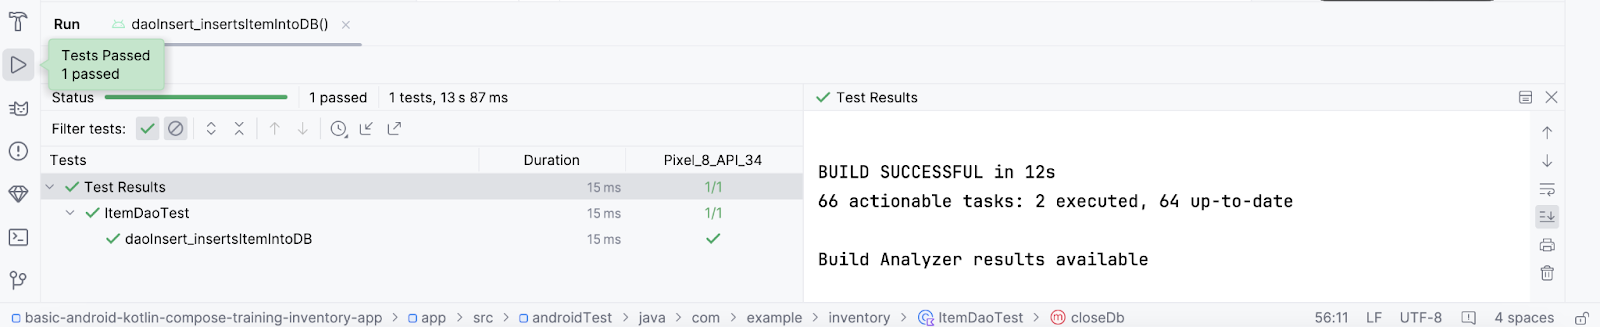
- Run the test and make sure it passes.
- Write another test for
getAllItems()from the database. Name the testdaoGetAllItems_returnsAllItemsFromDB.
@Test
@Throws(Exception::class)
fun daoGetAllItems_returnsAllItemsFromDB() = runBlocking {
    addTwoItemsToDb()
    val allItems = itemDao.getAllItems().first()
    assertEquals(allItems[0], item1)
    assertEquals(allItems[1], item2)
}
In the above test, you add two items to the database inside a coroutine. Then you read the two items and compare them with the expected values.
6. Display item details
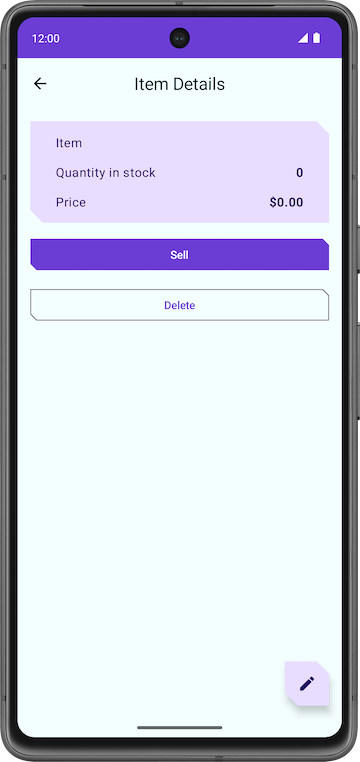
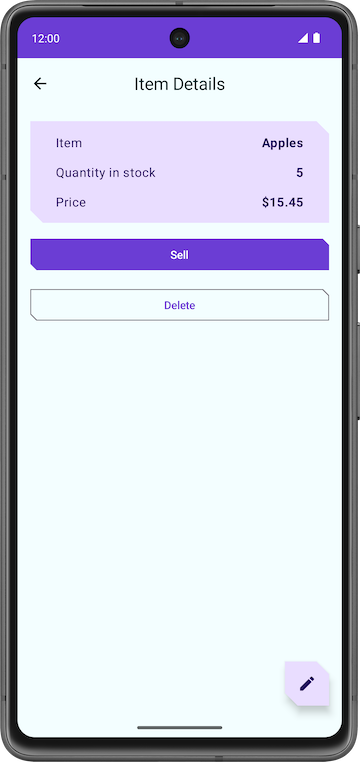
In this task, you read and display the entity details on the Item Details screen. You use the item UI state, such as name, price, and quantity from the inventory app database and display them on the Item Details screen with the ItemDetailsScreen composable. The ItemDetailsScreen composable function is prewritten for you and contains three Text composables that display the item details.
ui/item/ItemDetailsScreen.kt
This screen is part of the starter code and displays the details of the items, which you see in a later codelab. You do not work on this screen in this codelab. The ItemDetailsViewModel.kt is the corresponding ViewModel for this screen.
- In the
HomeScreencomposable function, notice theHomeBody()function call.navigateToItemUpdateis being passed to theonItemClickparameter, which gets called when you click on any item in your list.
// No need to copy over
HomeBody(
    itemList = homeUiState.itemList,
    onItemClick = navigateToItemUpdate,
    modifier = modifier
        .padding(innerPadding)
        .fillMaxSize()
)
- Open
ui/navigation/InventoryNavGraph.ktand notice thenavigateToItemUpdateparameter in theHomeScreencomposable. This parameter specifies the destination for navigation as the item details screen.
// No need to copy over
HomeScreen(
    navigateToItemEntry = { navController.navigate(ItemEntryDestination.route) },
    navigateToItemUpdate = {
        navController.navigate("${ItemDetailsDestination.route}/${it}")
   }
This part of the onItemClick functionality is already implemented for you. When you click the list item, the app navigates to the item details screen.
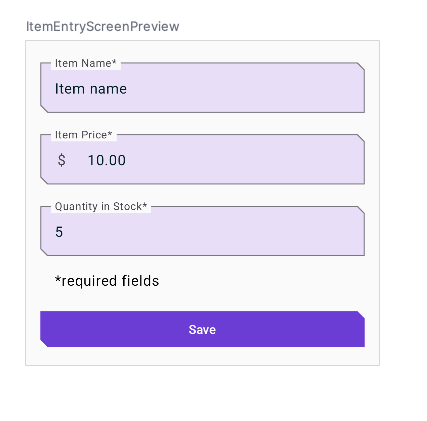
- Click any item in the inventory list to see the item details screen with empty fields.
To fill the text fields with item details, you need to collect the UI state in ItemDetailsScreen().
- In
UI/Item/ItemDetailsScreen.kt, add a new parameter to theItemDetailsScreencomposable of the typeItemDetailsViewModeland use the factory method to initialize it.
import androidx.lifecycle.viewmodel.compose.viewModel
import com.example.inventory.ui.AppViewModelProvider

@Composable
fun ItemDetailsScreen(
    navigateToEditItem: (Int) -> Unit,
    navigateBack: () -> Unit,
    modifier: Modifier = Modifier,
    viewModel: ItemDetailsViewModel = viewModel(factory = AppViewModelProvider.Factory)
)
- Inside the
ItemDetailsScreen()composable, create avalcalleduiStateto collect the UI state. UsecollectAsState()to collectuiStateStateFlowand represent its latest value viaState. Android Studio displays an unresolved reference error.
import androidx.compose.runtime.collectAsState

val uiState = viewModel.uiState.collectAsState()
- To resolve the error, create a
valcalleduiStateof the typeStateFlow<ItemDetailsUiState>in theItemDetailsViewModelclass. - Retrieve the data from the item repository and map it to
ItemDetailsUiStateusing the extension functiontoItemDetails(). The extension functionItem.toItemDetails()is already written for you as part of the starter code.
import androidx.lifecycle.viewModelScope
import kotlinx.coroutines.flow.SharingStarted
import kotlinx.coroutines.flow.StateFlow
import kotlinx.coroutines.flow.filterNotNull
import kotlinx.coroutines.flow.map
import kotlinx.coroutines.flow.stateIn

val uiState: StateFlow<ItemDetailsUiState> =
         itemsRepository.getItemStream(itemId)
             .filterNotNull()
             .map {
                 ItemDetailsUiState(itemDetails = it.toItemDetails())
             }.stateIn(
                 scope = viewModelScope,
                 started = SharingStarted.WhileSubscribed(TIMEOUT_MILLIS),
                 initialValue = ItemDetailsUiState()
             )
- Pass
ItemsRepositoryinto theItemDetailsViewModelto resolve theUnresolved reference: itemsRepositoryerror.
class ItemDetailsViewModel(
    savedStateHandle: SavedStateHandle,
    private val itemsRepository: ItemsRepository
    ) : ViewModel() {
- In
ui/AppViewModelProvider.kt, update the initializer forItemDetailsViewModelas shown in the following code snippet:
initializer {
    ItemDetailsViewModel(
        this.createSavedStateHandle(),
        inventoryApplication().container.itemsRepository
    )
}
- Go back to the
ItemDetailsScreen.ktand notice the error in theItemDetailsScreen()composable is resolved. - In the
ItemDetailsScreen()composable, update theItemDetailsBody()function call and pass inuiState.valuetoitemUiStateargument.
ItemDetailsBody(
    itemUiState = uiState.value,
    onSellItem = {  },
    onDelete = { },
    modifier = modifier.padding(innerPadding)
)
- Observe the implementations of
ItemDetailsBody()andItemInputForm(). You are passing the current selecteditemfromItemDetailsBody()toItemDetails().
// No need to copy over

@Composable
private fun ItemDetailsBody(
    itemUiState: ItemUiState,
    onSellItem: () -> Unit,
    onDelete: () -> Unit,
    modifier: Modifier = Modifier
) {
    Column(
       //...
    ) {
        var deleteConfirmationRequired by rememberSaveable { mutableStateOf(false) }
        ItemDetails(
             item = itemDetailsUiState.itemDetails.toItem(), modifier = Modifier.fillMaxWidth()
         )

      //...
    }
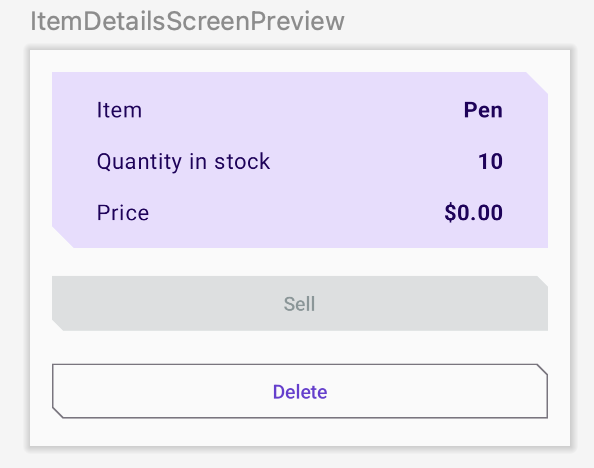
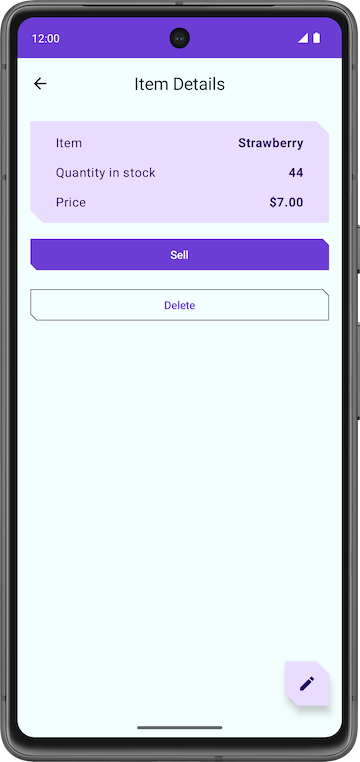
- Run the app. When you click any list element on the Inventory screen, the Item Details screen displays.
- Notice that the screen is not blank anymore. It displays the entity details retrieved from the inventory database.

- Tap the Sell button. Nothing happens!
In the next section, you implement the functionality of the Sell button.
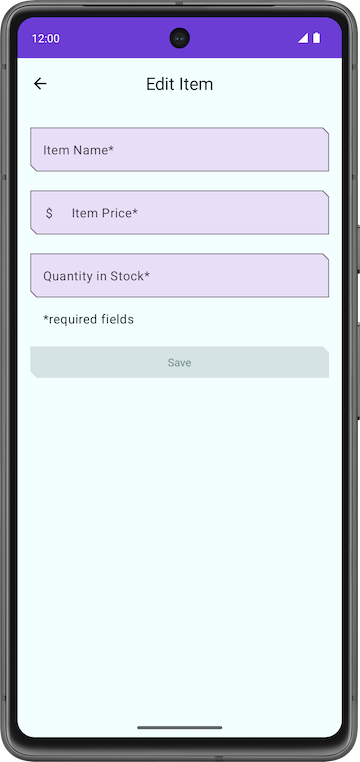
7. Implement Item details screen
ui/item/ItemEditScreen.kt
The Item edit screen is already provided to you as part of the starter code.
This layout contains text field composables to edit the details of any new inventory item.
The code for this app still isn't fully functional. For example, in the Item Details screen, when you tap the Sell button, the Quantity in Stock does not decrease. When you tap the Delete button, the app does prompt you with a confirmation dialog. However, when you select the Yes button, the app does not actually delete the item.
Lastly, the FAB button  opens an empty Edit Item screen.
In this section, you implement the functionalities of Sell, Delete and the FAB buttons.
8. Implement sell item
In this section, you extend the features of the app to implement the sell functionality. This update involves the following tasks:
- Add a test for the DAO function to update an entity.
- Add a function in the
ItemDetailsViewModelto reduce the quantity and update the entity in the app database. - Disable the Sell button if the quantity is zero.
- In
ItemDaoTest.kt, add a function calleddaoUpdateItems_updatesItemsInDB()with no parameters. Annotate with@Testand@Throws(Exception::class).
@Test
@Throws(Exception::class)
fun daoUpdateItems_updatesItemsInDB()
- Define the function and create a
runBlockingblock. CalladdTwoItemsToDb()inside it.
fun daoUpdateItems_updatesItemsInDB() = runBlocking {
    addTwoItemsToDb()
}
- Update the two entities with different values, calling
itemDao.update.
itemDao.update(Item(1, "Apples", 15.0, 25))
itemDao.update(Item(2, "Bananas", 5.0, 50))
- Retrieve the entities with
itemDao.getAllItems(). Compare them to the updated entity and assert.
val allItems = itemDao.getAllItems().first()
assertEquals(allItems[0], Item(1, "Apples", 15.0, 25))
assertEquals(allItems[1], Item(2, "Bananas", 5.0, 50))
- Make sure the completed function looks like the following:
@Test
@Throws(Exception::class)
fun daoUpdateItems_updatesItemsInDB() = runBlocking {
    addTwoItemsToDb()
    itemDao.update(Item(1, "Apples", 15.0, 25))
    itemDao.update(Item(2, "Bananas", 5.0, 50))

    val allItems = itemDao.getAllItems().first()
    assertEquals(allItems[0], Item(1, "Apples", 15.0, 25))
    assertEquals(allItems[1], Item(2, "Bananas", 5.0, 50))
}
- Run the test and make sure it passes.
Add a function in the ViewModel
- In
ItemDetailsViewModel.kt, inside theItemDetailsViewModelclass, add a function calledreduceQuantityByOne()with no parameters.
fun reduceQuantityByOne() {
}
- Inside the function, start a coroutine with
viewModelScope.launch{}.
import kotlinx.coroutines.launch
import androidx.lifecycle.viewModelScope


viewModelScope.launch {
}
- Inside the
launchblock, create avalcalledcurrentItemand set it touiState.value.toItem().
val currentItem = uiState.value.toItem()
The uiState.value is of the type ItemUiState. You convert it to the Item entity type with the extension function toItem().
- Add an
ifstatement to check if thequalityis greater than0. - Call
updateItem()onitemsRepositoryand pass in the updatedcurrentItem. Usecopy()to update thequantityvalue so that the function looks like the following:
fun reduceQuantityByOne() {
    viewModelScope.launch {
        val currentItem = uiState.value.itemDetails.toItem()
        if (currentItem.quantity > 0) {
    itemsRepository.updateItem(currentItem.copy(quantity = currentItem.quantity - 1))
       }
    }
}
- Go back to
ItemDetailsScreen.kt. - In the
ItemDetailsScreencomposable, go to theItemDetailsBody()function call. - In the
onSellItemlambda, callviewModel.reduceQuantityByOne().
ItemDetailsBody(
    itemUiState = uiState.value,
    onSellItem = { viewModel.reduceQuantityByOne() },
    onDelete = { },
    modifier = modifier.padding(innerPadding)
)
- Run the app.
- On the Inventory screen, click a list element. When the Item Details screen displays, tap the Sell and notice that the quantity value decreases by one.
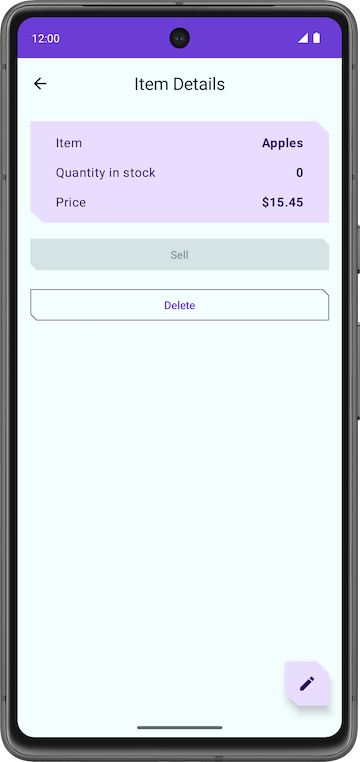
- In the Item Details screen, continuously tap the Sell button until the quantity is zero.
After the quantity reaches zero, tap Sell again. There is no visual change because the function reduceQuantityByOne() checks if the quantity is greater than zero before updating the quantity.

To give users better feedback, you might want to disable the Sell button when there is no item to sell.
- In the
ItemDetailsViewModelclass, setoutOfStockvalue based on theit.quantityin themaptransformation.
val uiState: StateFlow<ItemDetailsUiState> =
    itemsRepository.getItemStream(itemId)
        .filterNotNull()
        .map {
            ItemDetailsUiState(outOfStock = it.quantity <= 0, itemDetails = it.toItemDetails())
        }.stateIn(
            //...
        )
- Run your app. Notice that the app disables the Sell button when the quantity in stock is zero.
Congratulations on implementing the Sell item feature in your app!
Delete item entity
As with the previous task, you must extend the features of your app further by implementing delete functionality This feature is much easier to implement than the sell feature. The process involves the following tasks:
- Add a test for the delete DAO query.
- Add a function in the
ItemDetailsViewModelclass to delete an entity from the database. - Update the
ItemDetailsBodycomposable.
Add DAO test
- In
ItemDaoTest.kt, add a test calleddaoDeleteItems_deletesAllItemsFromDB().
@Test
@Throws(Exception::class)
fun daoDeleteItems_deletesAllItemsFromDB()
- Launch a coroutine with
runBlocking {}.
fun daoDeleteItems_deletesAllItemsFromDB() = runBlocking {
}
- Add two items to the database and call
itemDao.delete()on those two items to delete them from the database.
addTwoItemsToDb()
itemDao.delete(item1)
itemDao.delete(item2)
- Retrieve the entities from the database and check that the list is empty. The completed test should look like the following:
import org.junit.Assert.assertTrue

@Test
@Throws(Exception::class)
fun daoDeleteItems_deletesAllItemsFromDB() = runBlocking {
    addTwoItemsToDb()
    itemDao.delete(item1)
    itemDao.delete(item2)
    val allItems = itemDao.getAllItems().first()
    assertTrue(allItems.isEmpty())
}
Add delete function in the ItemDetailsViewModel
- In
ItemDetailsViewModel, add a new function calleddeleteItem()that takes no parameters and returns nothing. - Inside the
deleteItem()function, add anitemsRepository.deleteItem()function call and pass inuiState.value.toItem().
suspend fun deleteItem() {
    itemsRepository.deleteItem(uiState.value.itemDetails.toItem())
}
In this function, you convert the uiState from itemDetails type to Item entity type using the toItem() extension function.
- In the
ui/item/ItemDetailsScreencomposable, add avalcalledcoroutineScopeand set it torememberCoroutineScope(). This approach returns a coroutine scope bound to the composition where it's called (ItemDetailsScreencomposable).
import androidx.compose.runtime.rememberCoroutineScope


val coroutineScope = rememberCoroutineScope()
- Scroll to the
ItemDetailsBody()function. - Launch a coroutine with
coroutineScopeinside theonDeletelambda. - Inside the
launchblock, call thedeleteItem()method onviewModel.
import kotlinx.coroutines.launch

ItemDetailsBody(
    itemUiState = uiState.value,
    onSellItem = { viewModel.reduceQuantityByOne() },
    onDelete = {
        coroutineScope.launch {
           viewModel.deleteItem()
    }
    modifier = modifier.padding(innerPadding)
)
- After deleting the item, navigate back to the inventory screen.
- Call
navigateBack()after thedeleteItem()function call.
onDelete = {
    coroutineScope.launch {
        viewModel.deleteItem()
        navigateBack()
    }
- Still within the
ItemDetailsScreen.ktfile, scroll to theItemDetailsBody()function.
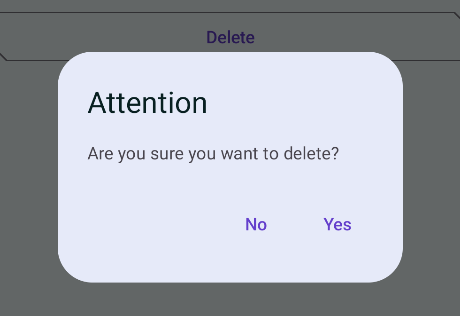
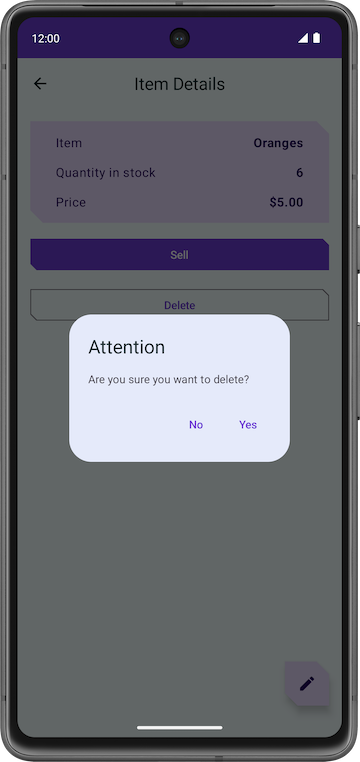
This function is part of the starter code. This composable displays an alert dialog to get the user's confirmation before deleting the item and calls the deleteItem() function when you tap Yes.
// No need to copy over

@Composable
private fun ItemDetailsBody(
    itemUiState: ItemUiState,
    onSellItem: () -> Unit,
    onDelete: () -> Unit,
    modifier: Modifier = Modifier
) {
    Column(
        /*...*/
    ) {
        //...

        if (deleteConfirmationRequired) {
            DeleteConfirmationDialog(
                onDeleteConfirm = {
                    deleteConfirmationRequired = false
                    onDelete()
                },
                //...
            )
        }
    }
}
When you tap No, the app closes the alert dialog. The showConfirmationDialog()function displays the following alert:
- Run the app.
- Select a list element on the Inventory screen.
- In the Item Details screen, tap Delete.
- Tap Yes in the alert dialog, and the app navigates back to the Inventory screen.
- Confirm that the entity you deleted is no longer in the app database.
Congratulations on implementing the delete feature!
|
|
Edit item entity
Similar to the previous sections, in this section, you add another feature enhancement to the app that edits an item entity.
Here is a quick run through of the steps to edit an entity in the app database:
- Add a test to the test get item DAO query.
- Populate the text fields and the Edit Item screen with the entity details.
- Update the entity in the database using Room.
Add DAO test
- In
ItemDaoTest.kt, add a test calleddaoGetItem_returnsItemFromDB().
@Test
@Throws(Exception::class)
fun daoGetItem_returnsItemFromDB()
- Define the function. Inside the coroutine, add one item to the database.
@Test
@Throws(Exception::class)
fun daoGetItem_returnsItemFromDB() = runBlocking {
    addOneItemToDb()
}
- Retrieve the entity from the database using the
itemDao.getItem()function and set it to avalnameditem.
val item = itemDao.getItem(1)
- Compare the actual value with the retrieved value and assert using
assertEquals(). Your completed test looks like the following:
@Test
@Throws(Exception::class)
fun daoGetItem_returnsItemFromDB() = runBlocking {
    addOneItemToDb()
    val item = itemDao.getItem(1)
    assertEquals(item.first(), item1)
}
- Run the test and ensure it passes.
Populate text fields
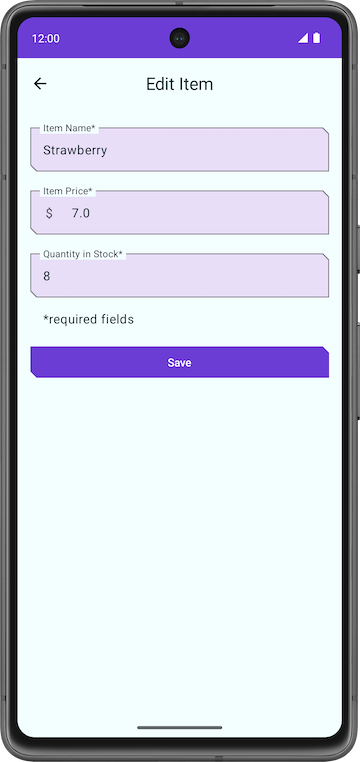
If you run the app, go to the Item Details screen, and then click the FAB, you can see that the title of the screen now is Edit Item. However, all the text fields are empty. In this step, you populate the text fields in the Edit Item screen with the entity details.
|
|
- In
ItemDetailsScreen.kt, scroll to theItemDetailsScreencomposable. - In
FloatingActionButton(), change theonClickargument to includeuiState.value.itemDetails.id, which is theidof the selected entity. You use thisidto retrieve the entity details.
FloatingActionButton(
    onClick = { navigateToEditItem(uiState.value.itemDetails.id) },
    modifier = /*...*/
)
- In the
ItemEditViewModelclass, add aninitblock.
init {

}
- Inside the
initblock, launch a coroutine withviewModelScope.launch.
import kotlinx.coroutines.launch

viewModelScope.launch { }
- Inside the
launchblock, retrieve the entity details withitemsRepository.getItemStream(itemId).
import androidx.lifecycle.viewModelScope
import kotlinx.coroutines.flow.filterNotNull
import kotlinx.coroutines.flow.first


init {
    viewModelScope.launch {
        itemUiState = itemsRepository.getItemStream(itemId)
            .filterNotNull()
            .first()
            .toItemUiState(true)
    }
}
In this launch block, you add a filter to return a flow that only contains values that are not null. With toItemUiState(), you convert the item entity to ItemUiState. You pass the actionEnabled value as true to enable the Save button.
To resolve the Unresolved reference: itemsRepository error, you need to pass in the ItemsRepository as a dependency to the view model.
- Add a constructor parameter to the
ItemEditViewModelclass.
class ItemEditViewModel(
    savedStateHandle: SavedStateHandle,
    private val itemsRepository: ItemsRepository
)
- In the
AppViewModelProvider.ktfile, in theItemEditViewModelinitializer, add theItemsRepositoryobject as an argument.
initializer {
    ItemEditViewModel(
        this.createSavedStateHandle(),
        inventoryApplication().container.itemsRepository
    )
}
- Run the app.
- Go to Item Details and tap
 FAB.
FAB. - Notice that the fields populate with the item details.
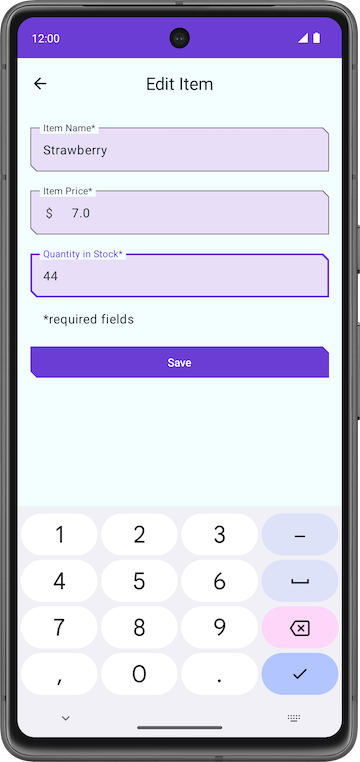
- Edit the stock quantity, or any other field, and tap Save.
Nothing happens! This is because you are not updating the entity in the app database. You fix this in the next section.
|
|
Update the entity using Room
In this final task, you add the final pieces of the code to implement the update functionality. You define the necessary functions in the ViewModel and use them in the ItemEditScreen.
It's coding time again!
- In
ItemEditViewModelclass, add a function calledupdateUiState()that takes anItemUiStateobject and returns nothing. This function updates theitemUiStatewith new values that the user enters.
fun updateUiState(itemDetails: ItemDetails) {
    itemUiState =
        ItemUiState(itemDetails = itemDetails, isEntryValid = validateInput(itemDetails))
}
In this function, you assign the passed in itemDetails to the itemUiState and update the isEntryValid value. The app enables the Save button if itemDetails is true. You set this value to true only if the input that the user enters is valid.
- Go to the
ItemEditScreen.ktfile. - In the
ItemEditScreencomposable, scroll down to theItemEntryBody()function call. - Set the
onItemValueChangeargument value to the new functionupdateUiState.
ItemEntryBody(
    itemUiState = viewModel.itemUiState,
    onItemValueChange = viewModel::updateUiState,
    onSaveClick = { },
    modifier = modifier.padding(innerPadding)
)
- Run the app.
- Go to the Edit Item screen.
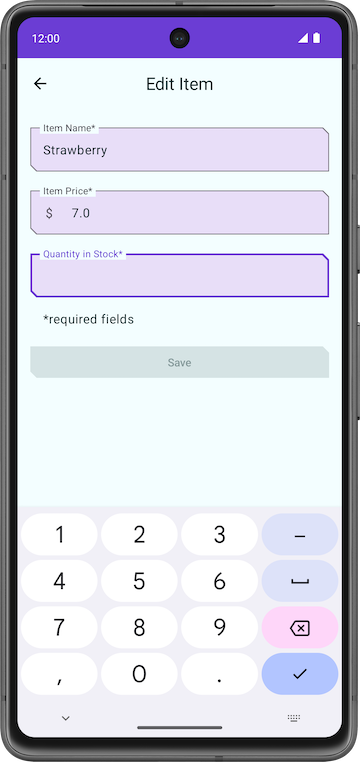
- Make one of the entity values empty so that it is invalid. Notice how the Save button disables automatically.
|
|
|

- Go back to the
ItemEditViewModelclass and add asuspendfunction calledupdateItem()that takes nothing. You use this function to save the updated entity to the Room database.
suspend fun updateItem() {
}
- Inside the
getUpdatedItemEntry()function, add anifcondition to validate the user input by using the functionvalidateInput(). - Make a call to the
updateItem()function on theitemsRepository, passing in theitemUiState.itemDetails.toItem(). Entities that can be added to the Room database need to be of the typeItem. The completed function looks like the following:
suspend fun updateItem() {
    if (validateInput(itemUiState.itemDetails)) {
        itemsRepository.updateItem(itemUiState.itemDetails.toItem())
    }
}
- Go back to the
ItemEditScreencomposable.You need a coroutine scope to call theupdateItem()function. Create a val calledcoroutineScopeand set it torememberCoroutineScope().
import androidx.compose.runtime.rememberCoroutineScope

val coroutineScope = rememberCoroutineScope()
- In the
ItemEntryBody()function call, update theonSaveClickfunction argument to start a coroutine in thecoroutineScope. - Inside the
launchblock, callupdateItem()on theviewModeland navigate back.
import kotlinx.coroutines.launch

onSaveClick = {
    coroutineScope.launch {
        viewModel.updateItem()
        navigateBack()
    }
},
The completed ItemEntryBody() function call looks like the following:
ItemEntryBody(
    itemUiState = viewModel.itemUiState,
    onItemValueChange = viewModel::updateUiState,
    onSaveClick = {
        coroutineScope.launch {
            viewModel.updateItem()
            navigateBack()
        }
    },
    modifier = modifier.padding(innerPadding)
)
- Run the app and try editing inventory items. You are now able to edit any item in the Inventory app database.
|
|
Congratulations on creating your first app that uses Room to manage the database!
9. Solution code
The solution code for this codelab is in the GitHub repo and the branch shown below:
10. Learn more
Android Developer Documentation
- Debug your database with the Database Inspector
- Save data in a local database using Room
- Test and debug your database | Android Developers
Kotlin references