1. Before you begin
Most production-quality apps have data that the app needs to persist. For example, the app might store a playlist of songs, items on a to-do list, records of expenses and income, a catalog of constellations, or a history of personal data. For such use cases, you use a database to store this persistent data.
Room is a persistence library that's part of Android Jetpack. Room is an abstraction layer on top of a SQLite database. SQLite uses a specialized language (SQL) to perform database operations. Instead of using SQLite directly, Room simplifies the chores of database setup, configuration, and interactions with the app. Room also provides compile-time checks of SQLite statements.
An abstraction layer is a set of functions that hide the underlying implementation/complexity. It provides an interface to an existing set of functionality, like SQLite in this case.
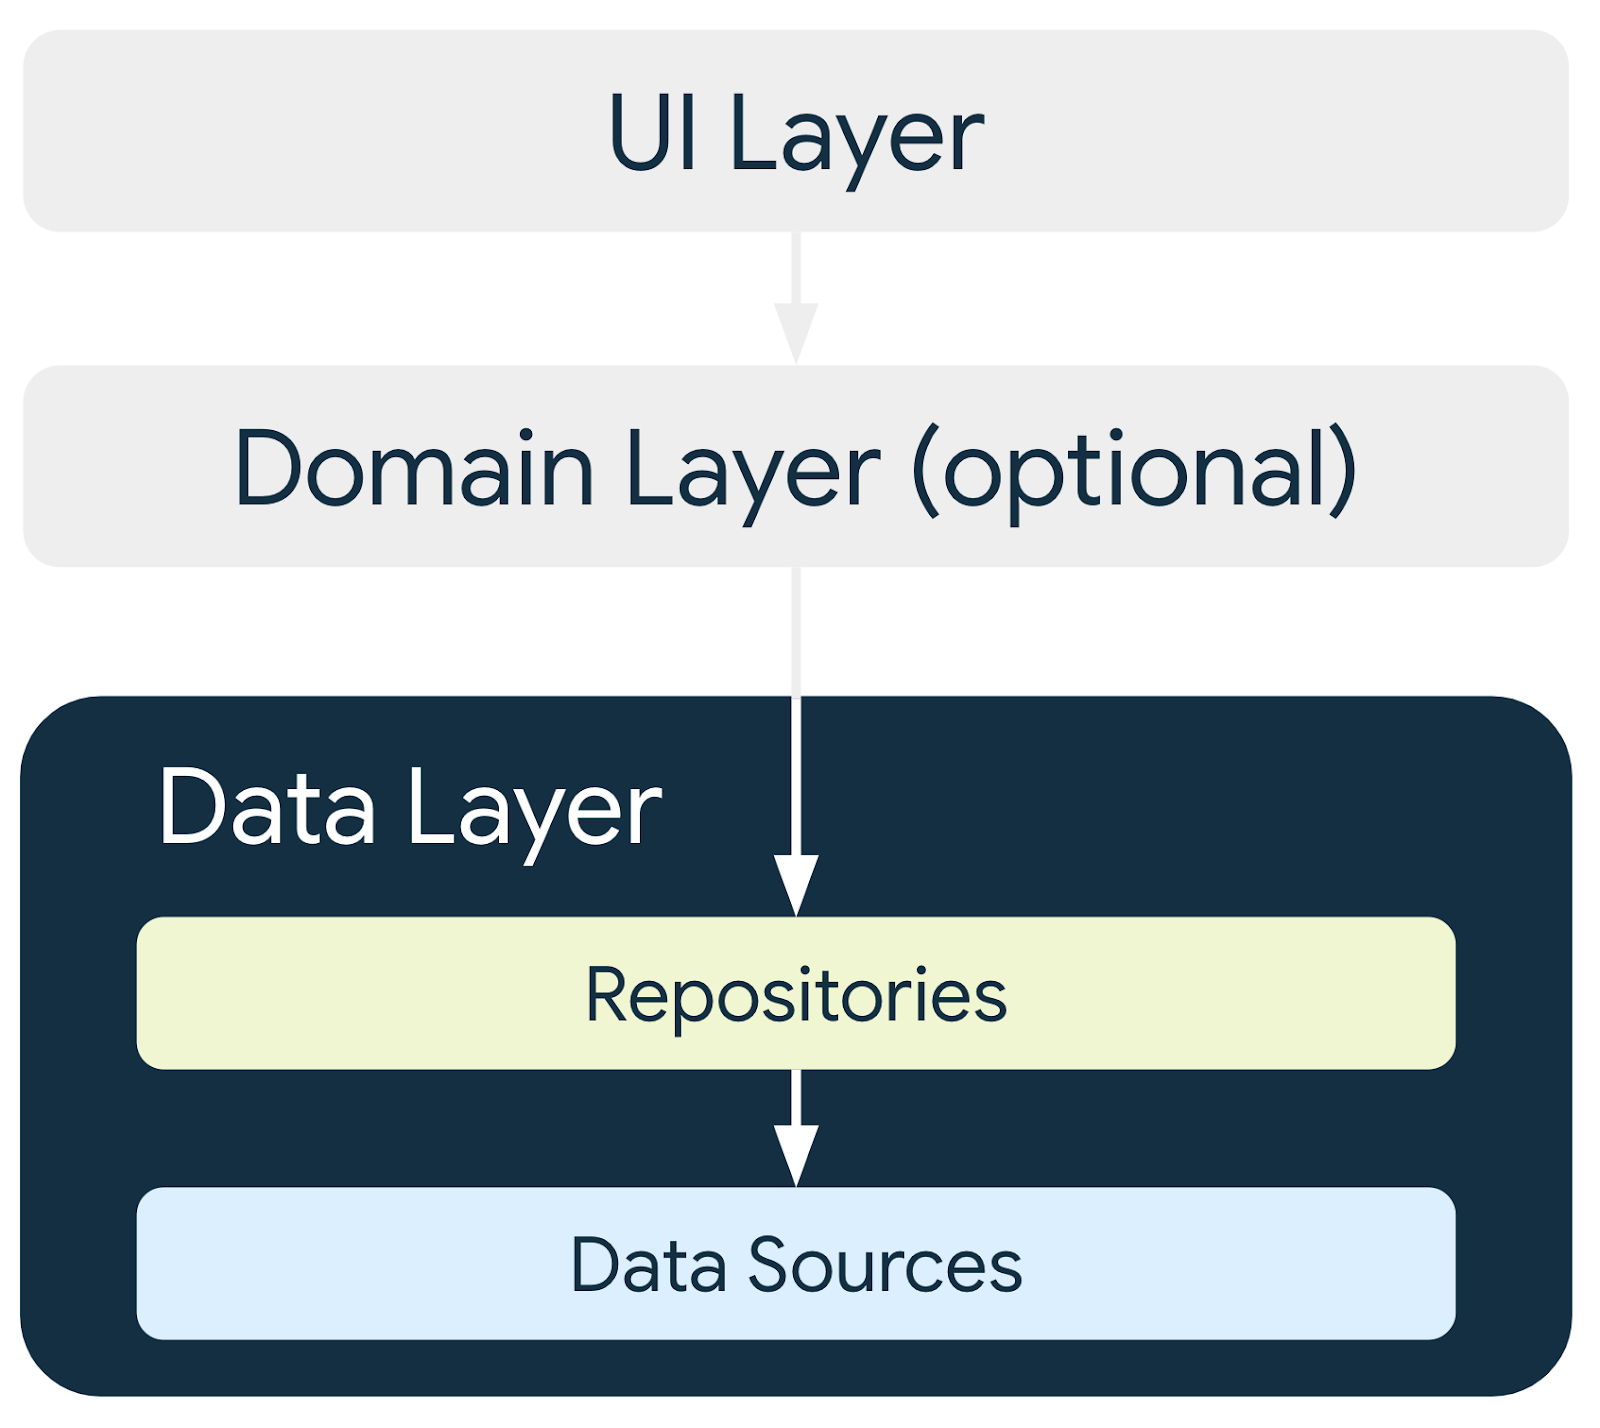
The image below shows how Room, as a data source, fits in with the overall architecture recommended in this course. Room is a Data Source.
Prerequisites
- Ability to build a basic user interface (UI) for an Android app using Jetpack Compose.
- Ability to use composables like
Text,Icon,IconButton, andLazyColumn. - Ability to use the
NavHostcomposable to define routes and screens in your app. - Ability to navigate between screens using a
NavHostController. - Familiarity with the Android architecture component
ViewModel. Ability to useViewModelProvider.Factoryto instantiate the ViewModels. - Familiarity with concurrency fundamentals.
- Ability to use coroutines for long-running tasks.
- Basic knowledge of SQLite databases and the SQL language.
What you'll learn
- How to create and interact with the SQLite database using the Room library.
- How to create an entity, a data access object (DAO), and database classes.
- How to use a DAO to map Kotlin functions to SQL queries.
What you'll build
- You'll build an Inventory app that saves inventory items into the SQLite database.
What you need
- Starter code for the Inventory app
- A computer with Android Studio
- Device or an emulator with API level 26 or higher
2. App overview
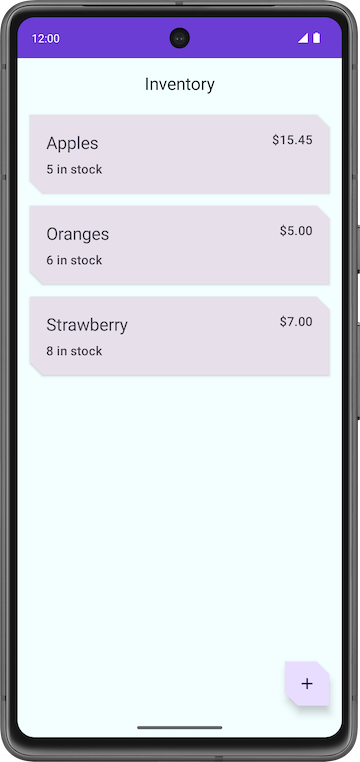
In this codelab, you work with a starter code of the Inventory app and add the database layer to it using the Room library. The final version of the app displays a list of items from the inventory database. The user has options to add a new item, update an existing item, and delete an item from the inventory database. For this codelab, you save the item data to the Room database. You complete the rest of the app's functionality in the next codelab.
|
|
|
3. Starter app overview
Download the starter code for this codelab
To get started, download the starter code:
Alternatively, you can clone the GitHub repository for the code:
$ git clone https://github.com/google-developer-training/basic-android-kotlin-compose-training-inventory-app.git
$ cd basic-android-kotlin-compose-training-inventory-app
$ git checkout starter
You can browse the code in the Inventory app GitHub repository.
Starter code overview
- Open the project with the starter code in Android Studio.
- Run the app on an Android device or an emulator. Make sure the emulator or connected device runs with an API level 26 or higher. Database Inspector works on emulators/devices that run API level 26 and higher.
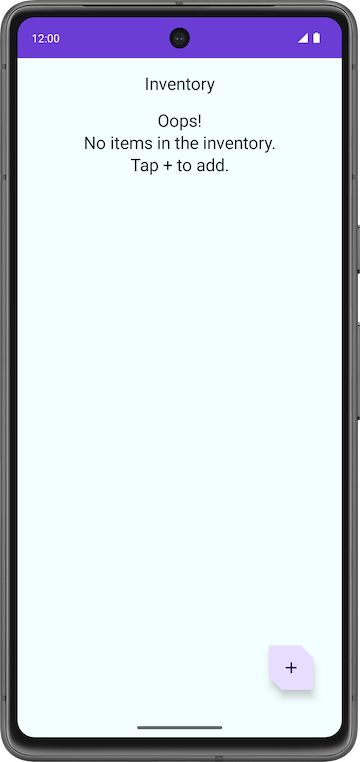
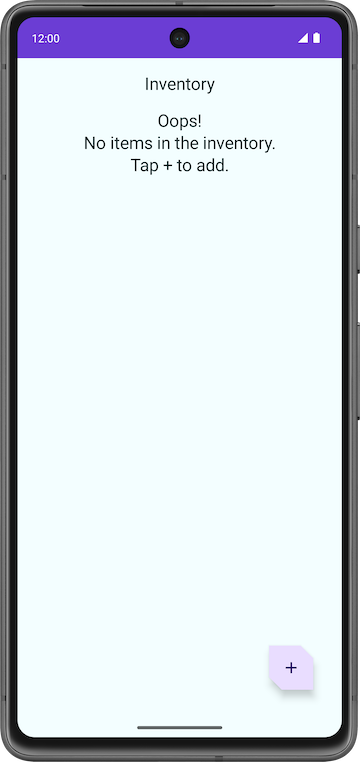
- Notice that the app shows no inventory data.
- Tap the floating action button (FAB), which lets you add new items to the database.
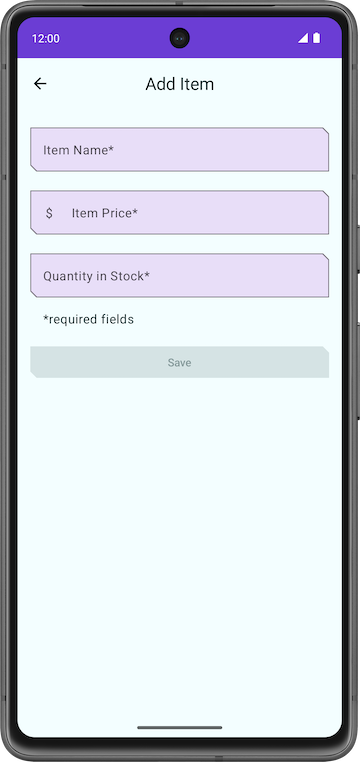
The app navigates to a new screen where you can enter details for the new item.
|
|
Problems with the starter code
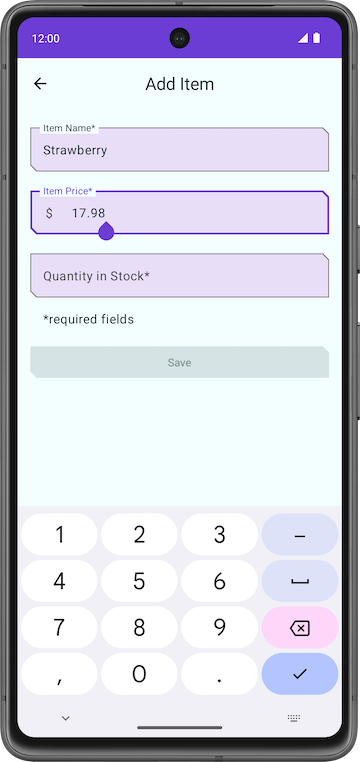
- In the Add Item screen, enter an item's details like name, price, and quantity of the Item.
- Tap Save. The Add Item screen is not closed, but you can navigate back using the back key. The save functionality is not implemented, so the item details are not saved.
Notice that the app is incomplete and the Save button functionality is not implemented.
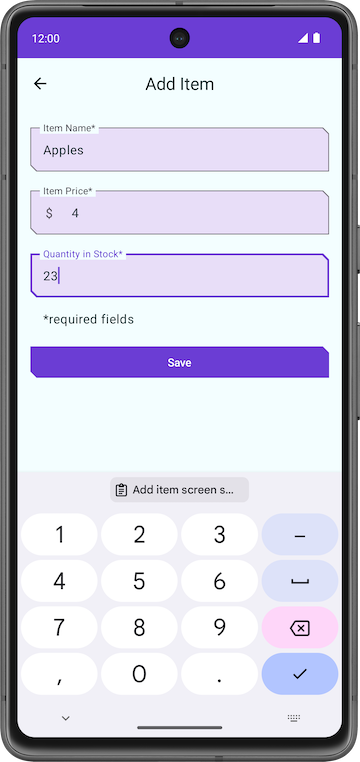
In this codelab, you add the code that uses Room to save the inventory details in the SQLite database. You use the Room persistence library to interact with the SQLite database.
Code walkthrough
The starter code you downloaded has pre-designed screen layouts for you. In this pathway, you focus on implementing the database logic. The following section is a brief walkthrough of some of the files to get you started.
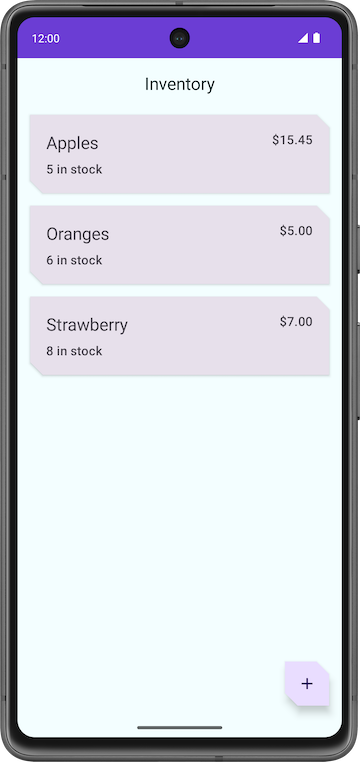
ui/home/HomeScreen.kt
This file is the home screen, or the first screen in the app, which contains the composables to display the inventory list. It has a FAB  to add new items to the list. You display the items in the list later in the pathway.
ui/item/ItemEntryScreen.kt
This screen is similar to ItemEditScreen.kt. They both have text fields for the item details. This screen is displayed when the FAB is tapped in the home screen. The ItemEntryViewModel.kt is the corresponding ViewModel for this screen.

ui/navigation/InventoryNavGraph.kt
This file is the navigation graph for the entire application.
4. Main components of Room
Kotlin provides an easy way to work with data through data classes. While it is easy to work with in-memory data using data classes, when it comes to persisting data, you need to convert this data into a format compatible with database storage. To do so, you need tables to store the data and queries to access and modify the data.
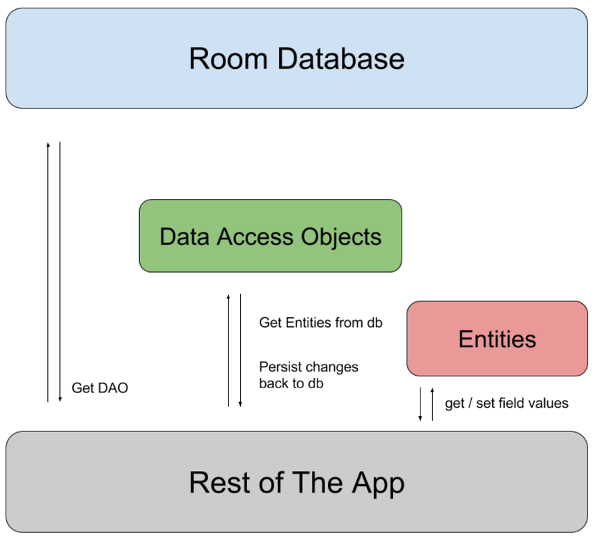
The following three components of Room make these workflows seamless.
- Room entities represent tables in your app's database. You use them to update the data stored in rows in tables and to create new rows for insertion.
- Room DAOs provide methods that your app uses to retrieve, update, insert, and delete data in the database.
- Room Database class is the database class that provides your app with instances of the DAOs associated with that database.
You implement and learn more about these components later in the codelab. The following diagram demonstrates how the components of Room work together to interact with the database.
Add Room dependencies
In this task, you add the required Room component libraries to your Gradle files.
- Open the module-level gradle file
build.gradle.kts (Module: InventoryApp.app). - In the
dependenciesblock, add the dependencies for the Room library shown in the following code.
//Room
implementation("androidx.room:room-runtime:${rootProject.extra["room_version"]}")
ksp("androidx.room:room-compiler:${rootProject.extra["room_version"]}")
implementation("androidx.room:room-ktx:${rootProject.extra["room_version"]}")
KSP is a powerful and yet simple API for parsing Kotlin annotations.
5. Create an item Entity
An Entity class defines a table, and each instance of this class represents a row in the database table. The entity class has mappings to tell Room how it intends to present and interact with the information in the database. In your app, the entity holds information about inventory items, such as item name, item price, and quantity of items available.
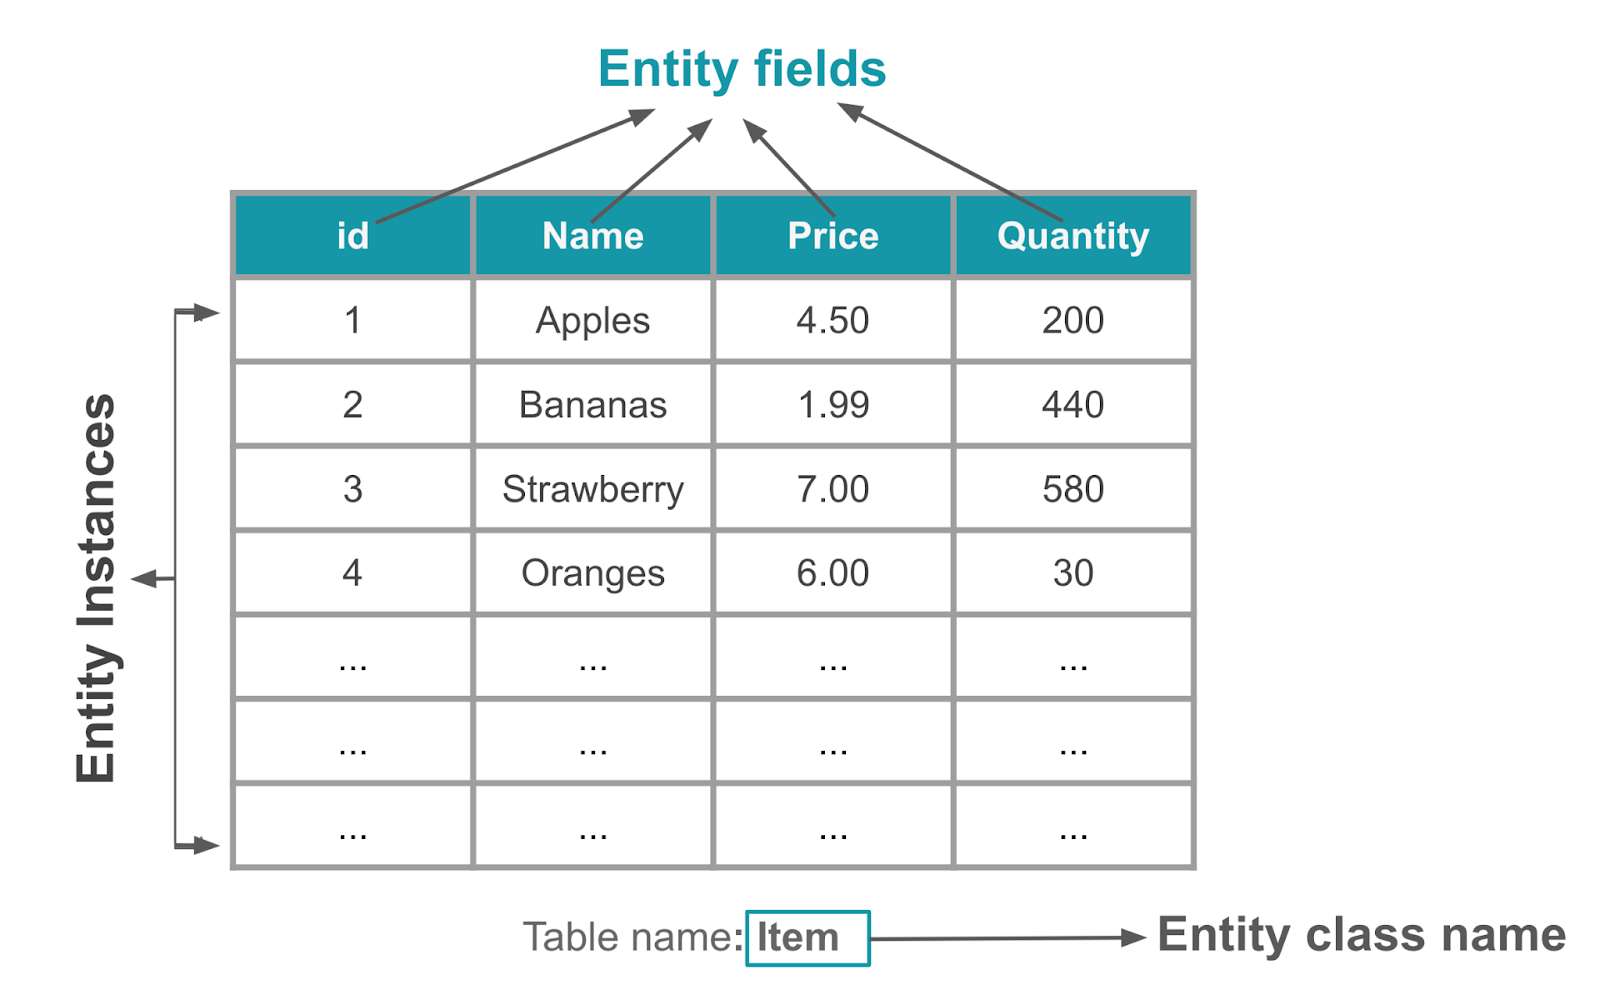
The @Entity annotation marks a class as a database Entity class. For each Entity class, the app creates a database table to hold the items. Each field of the Entity is represented as a column in the database, unless denoted otherwise (see Entity docs for details). Every entity instance stored in the database must have a primary key. The primary key is used to uniquely identify every record/entry in your database tables. After the app assigns a primary key, it cannot be modified; it represents the entity object as long as it exists in the database.
In this task, you create an Entity class and define fields to store the following inventory information for each item: an Int to store the primary key, a String to store the item name, a double to store the item price, and an Int to store the quantity in stock.
- Open the starter code in the Android Studio.
- Open the
datapackage under thecom.example.inventorybase package. - Inside the
datapackage, open theItemKotlin class, which represents a database entity in your app.
// No need to copy over, this is part of the starter code
class Item(
    val id: Int,
    val name: String,
    val price: Double,
    val quantity: Int
)
Data classes
Data classes are primarily used to hold data in Kotlin. They are defined with the keyword data. Kotlin data class objects have some extra benefits. For example, the compiler automatically generates utilities to compare, print, and copy such as toString(), copy(), and equals().
Example:
// Example data class with 2 properties.
data class User(val firstName: String, val lastName: String){
}
To ensure consistency and meaningful behavior of the generated code, data classes must fulfill the following requirements:
- The primary constructor must have at least one parameter.
- All primary constructor parameters must be
valorvar. - Data classes cannot be
abstract,open, orsealed.
To learn more about Data classes, check out the Data classes documentation.
- Prefix the definition of the
Itemclass with thedatakeyword to convert it to a data class.
data class Item(
    val id: Int,
    val name: String,
    val price: Double,
    val quantity: Int
)
- Above the
Itemclass declaration, annotate the data class with@Entity. Use thetableNameargument to set theitemsas the SQLite table name.
import androidx.room.Entity

@Entity(tableName = "items")
data class Item(
   ...
)
- Annotate the
idproperty with@PrimaryKeyto make theidthe primary key. A primary key is an ID to uniquely identify every record/entry in yourItemtable
import androidx.room.PrimaryKey

@Entity(tableName = "items")
data class Item(
    @PrimaryKey
    val id: Int,
    ...
)
- Assign the
ida default value of0, which is necessary for theidto auto generateidvalues. - Add the
autoGenerateparameter to the@PrimaryKeyannotation to specify whether the primary key column should be auto-generated. IfautoGenerateis set totrue, Room will automatically generate a unique value for the primary key column when a new entity instance is inserted into the database. This ensures that each entity instance has a unique identifier, without having to manually assign values to the primary key column
data class Item(
    @PrimaryKey(autoGenerate = true)
    val id: Int = 0,
    // ...
)
Great! Now that you have created an Entity class, you can create a Data Access Object (DAO) to access the database.
6. Create the item DAO
The Data Access Object (DAO) is a pattern you can use to separate the persistence layer from the rest of the application by providing an abstract interface. This isolation follows the single-responsibility principle, which you have seen in previous codelabs.
The functionality of the DAO is to hide all the complexities involved in performing database operations in the underlying persistence layer, separate from the rest of the application. This lets you change the data layer independently of the code that uses the data.

In this task, you define a DAO for Room. DAOs are the main components of Room that are responsible for defining the interface that accesses the database.
The DAO you create is a custom interface that provides convenience methods for querying/retrieving, inserting, deleting, and updating the database. Room generates an implementation of this class at compile time.
The Room library provides convenience annotations, such as @Insert, @Delete, and @Update, for defining methods that perform simple inserts, deletes, and updates without requiring you to write a SQL statement.
If you need to define more complex operations for insert, delete, update, or if you need to query the data in the database, use a @Query annotation instead.
As an added bonus, as you write your queries in Android Studio, the compiler checks your SQL queries for syntax errors.
For the Inventory app, you need the ability to do the following:
- Insert or add a new item.
- Update an existing item to update the name, price, and quantity.
- Get a specific item based on its primary key,
id. - Get all items so you can display them.
- Delete an entry in the database.
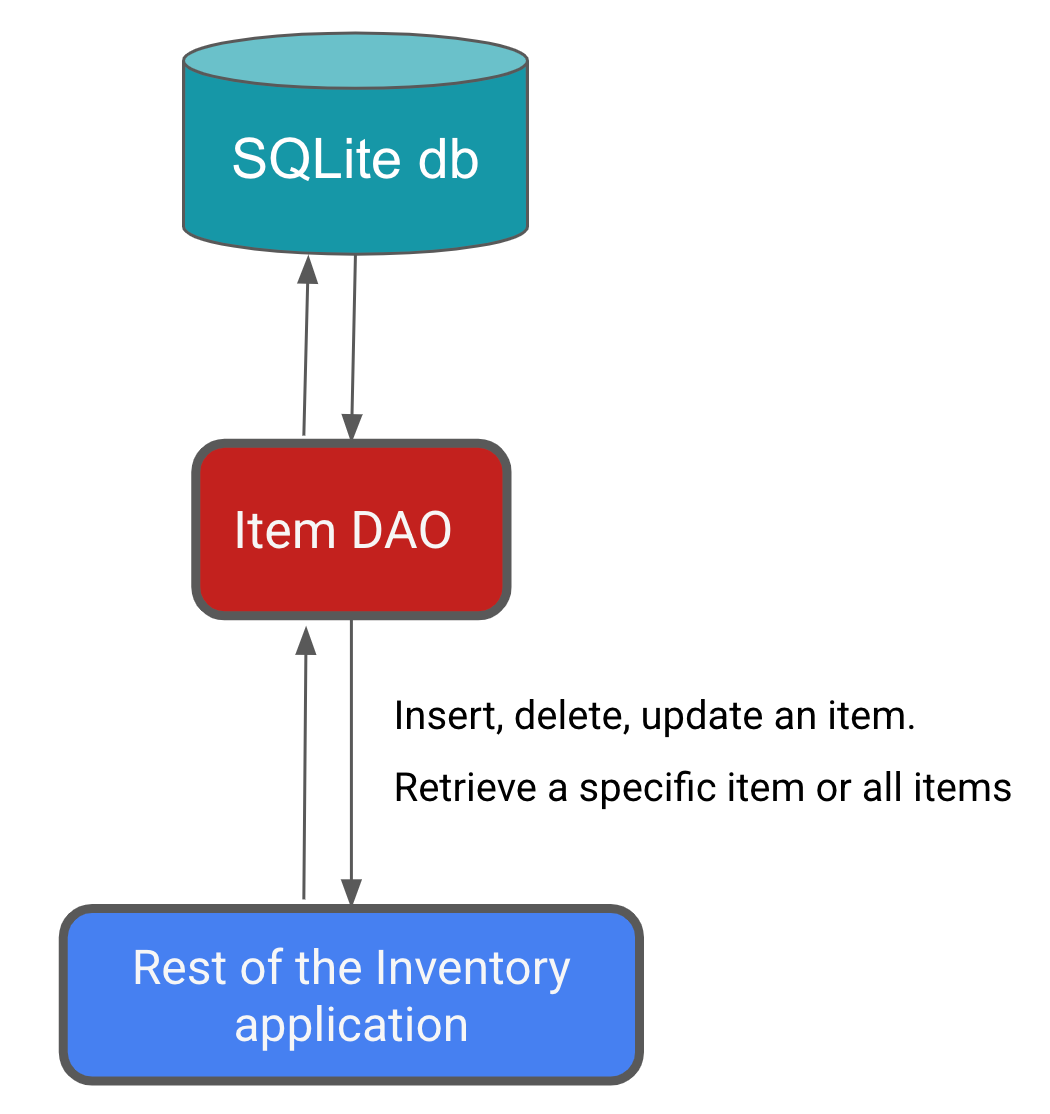
Complete the following steps to implement the item DAO in your app:
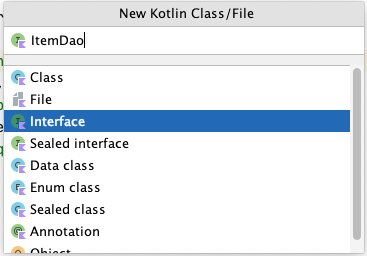
- In the
datapackage, create the Kotlin interfaceItemDao.kt.
- Annotate the
ItemDaointerface with@Dao.
import androidx.room.Dao

@Dao
interface ItemDao {
}
- Inside the body of the interface, add an
@Insertannotation. - Below the
@Insert, add aninsert()function that takes an instance of theEntityclassitemas its argument. - Mark the function with the
suspendkeyword to let it run on a separate thread.
The database operations can take a long time to execute, so they need to run on a separate thread. Room doesn't allow database access on the main thread.
import androidx.room.Insert

@Insert
suspend fun insert(item: Item)
When inserting items into the database, conflicts can happen. For example, multiple places in the code tries to update the entity with different, conflicting, values such as the same primary key. An entity is a row in DB. In the Inventory app, we only insert the entity from one place that is the Add Item screen so we are not expecting any conflicts and can set the conflict strategy to Ignore.
- Add an argument
onConflictand assign it a value ofOnConflictStrategy.IGNORE.
The argument onConflict tells the Room what to do in case of a conflict. The OnConflictStrategy.IGNORE strategy ignores a new item.
To know more about the available conflict strategies, check out the OnConflictStrategy documentation.
import androidx.room.OnConflictStrategy

@Insert(onConflict = OnConflictStrategy.IGNORE)
suspend fun insert(item: Item)
Now Room generates all the necessary code to insert the item into the database. When you call any of the DAO functions that are marked with Room annotations, Room executes the corresponding SQL query on the database. For example, when you call the above method, insert() from your Kotlin code, Room executes a SQL query to insert the entity into the database.
- Add a new function with
@Updateannotation that takes anItemas parameter.
The entity that's updated has the same primary key as the entity that's passed in. You can update some or all of the entity's other properties.
- Similar to the
insert()method, mark this function with thesuspendkeyword.
import androidx.room.Update

@Update
suspend fun update(item: Item)
Add another function with the @Delete annotation to delete item(s), and make it a suspending function.
import androidx.room.Delete

@Delete
suspend fun delete(item: Item)
There is no convenience annotation for the remaining functionality, so you have to use the @Query annotation and supply SQLite queries.
- Write a SQLite query to retrieve a particular item from the item table based on the given
id. The following code provides a sample query that selects all columns from theitems, where theidmatches a specific value andidis a unique identifier.
Example:
// Example, no need to copy over
SELECT * from items WHERE id = 1
- Add a
@Queryannotation. - Use the SQLite query from the previous step as a string parameter to the
@Queryannotation. - Add a
Stringparameter to the@Querythat is a SQLite query to retrieve an item from the item table.
The query now says to select all columns from the items, where the id matches the :id argument. Notice the :id uses the colon notation in the query to reference arguments in the function.
@Query("SELECT * from items WHERE id = :id")
- After the
@Queryannotation, add agetItem()function that takes anIntargument and returns aFlow<Item>.
import androidx.room.Query
import kotlinx.coroutines.flow.Flow

@Query("SELECT * from items WHERE id = :id")
fun getItem(id: Int): Flow<Item>
It is recommended to use Flow in the persistence layer. With Flow as the return type, you receive notification whenever the data in the database changes. The Room keeps this Flow updated for you, which means you only need to explicitly get the data once. This setup is helpful to update the inventory list, which you implement in the next codelab. Because of the Flow return type, Room also runs the query on the background thread. You don't need to explicitly make it a suspend function and call it inside a coroutine scope.
- Add a
@Querywith agetAllItems()function. - Have the SQLite query return all columns from the
itemtable, ordered in ascending order. - Have
getAllItems()return a list ofItementities asFlow.Roomkeeps thisFlowupdated for you, which means you only need to explicitly get the data once.
@Query("SELECT * from items ORDER BY name ASC")
fun getAllItems(): Flow<List<Item>>
Completed ItemDao:
import androidx.room.Dao
import androidx.room.Delete
import androidx.room.Insert
import androidx.room.OnConflictStrategy
import androidx.room.Query
import androidx.room.Update
import kotlinx.coroutines.flow.Flow

@Dao
interface ItemDao {
    @Insert(onConflict = OnConflictStrategy.IGNORE)
    suspend fun insert(item: Item)

    @Update
    suspend fun update(item: Item)

    @Delete
    suspend fun delete(item: Item)

    @Query("SELECT * from items WHERE id = :id")
    fun getItem(id: Int): Flow<Item>

    @Query("SELECT * from items ORDER BY name ASC")
    fun getAllItems(): Flow<List<Item>>
}
- Though you won't see any visible changes, build your app to make sure it has no errors.
7. Create a Database instance
In this task, you create a RoomDatabase that uses your Entity and DAO from the previous tasks. The database class defines the list of entities and DAOs.
The Database class provides your app with instances of the DAOs you define. In turn, the app can use the DAOs to retrieve data from the database as instances of the associated data entity objects. The app can also use the defined data entities to update rows from the corresponding tables or to create new rows for insertion.
You need to create an abstract RoomDatabase class and annotate it with @Database. This class has one method that returns the existing instance of the RoomDatabase if the database doesn't exist.
Here's the general process for getting the RoomDatabase instance:
- Create a
public abstractclass that extendsRoomDatabase. The new abstract class you define acts as a database holder. The class you define is abstract becauseRoomcreates the implementation for you. - Annotate the class with
@Database. In the arguments, list the entities for the database and set the version number. - Define an abstract method or property that returns an
ItemDaoinstance, and theRoomgenerates the implementation for you. - You only need one instance of the
RoomDatabasefor the whole app, so make theRoomDatabasea singleton. - Use
Room'sRoom.databaseBuilderto create your (item_database) database only if it doesn't exist. Otherwise, return the existing database.
Create the Database
- In the
datapackage, create a Kotlin classInventoryDatabase.kt. - In the
InventoryDatabase.ktfile, makeInventoryDatabaseclass anabstractclass that extendsRoomDatabase. - Annotate the class with
@Database. Disregard the missing parameters error, which you fix in the next step.
import androidx.room.Database
import androidx.room.RoomDatabase

@Database
abstract class InventoryDatabase : RoomDatabase() {}
The @Database annotation requires several arguments so that Room can build the database.
- Specify the
Itemas the only class with the list ofentities. - Set the
versionas1. Whenever you change the schema of the database table, you have to increase the version number. - Set
exportSchematofalseso as not to keep schema version history backups.
@Database(entities = [Item::class], version = 1, exportSchema = false)
- Inside the body of the class, declare an abstract function that returns the
ItemDaoso that the database knows about the DAO.
abstract fun itemDao(): ItemDao
- Below the abstract function, define a
companion object, which allows access to the methods to create or get the database and uses the class name as the qualifier.
companion object {}
- Inside the
companionobject, declare a private nullable variableInstancefor the database and initialize it tonull.
The Instance variable keeps a reference to the database, when one has been created. This helps maintain a single instance of the database opened at a given time, which is an expensive resource to create and maintain.
- Annotate
Instancewith@Volatile.
The value of a volatile variable is never cached, and all reads and writes are to and from the main memory. These features help ensure the value of Instance is always up to date and is the same for all execution threads. It means that changes made by one thread to Instance are immediately visible to all other threads.
@Volatile
private var Instance: InventoryDatabase? = null
- Below
Instance, while still inside thecompanionobject, define agetDatabase()method with aContextparameter that the database builder needs. - Return a type
InventoryDatabase. An error message appears becausegetDatabase()isn't returning anything yet.
import android.content.Context

fun getDatabase(context: Context): InventoryDatabase {}
Multiple threads can potentially ask for a database instance at the same time, which results in two databases instead of one. This issue is known as a race condition. Wrapping the code to get the database inside a synchronized block means that only one thread of execution at a time can enter this block of code, which makes sure the database only gets initialized once. Use synchronized{} block to avoid the race condition.
- Inside
getDatabase(), return theInstancevariable—or, ifInstanceis null, initialize it inside asynchronized{}block. Use the elvis operator(?:) to do this. - Pass in
this, the companion object. You fix the error in later steps.
return Instance ?: synchronized(this) { }
- Inside the synchronized block, use the database builder to get the database. Continue to ignore the errors, which you fix in the next steps.
import androidx.room.Room

Room.databaseBuilder()
- Inside the
synchronizedblock, use the database builder to get a database. Pass in the application context, the database class, and a name for the database-item_databaseto theRoom.databaseBuilder().
Room.databaseBuilder(context, InventoryDatabase::class.java, "item_database")
Android Studio generates a Type Mismatch error. To remove this error, you have to add a build() in the following steps.
- Add the required migration strategy to the builder. Use
.fallbackToDestructiveMigration().
.fallbackToDestructiveMigration()
- To create the database instance, call
.build(). This call removes the Android Studio errors.
.build()
- After
build(), add analsoblock and assignInstance = itto keep a reference to the recently created db instance.
.also { Instance = it }
- At the end of the
synchronizedblock, returninstance. Your final code looks like the following code:
import android.content.Context
import androidx.room.Database
import androidx.room.Room
import androidx.room.RoomDatabase

/**
* Database class with a singleton Instance object.
*/
@Database(entities = [Item::class], version = 1, exportSchema = false)
abstract class InventoryDatabase : RoomDatabase() {

    abstract fun itemDao(): ItemDao

    companion object {
        @Volatile
        private var Instance: InventoryDatabase? = null

        fun getDatabase(context: Context): InventoryDatabase {
            // if the Instance is not null, return it, otherwise create a new database instance.
            return Instance ?: synchronized(this) {
                Room.databaseBuilder(context, InventoryDatabase::class.java, "item_database")
                    .build()
                    .also { Instance = it }
            }
        }
    }
}
- Build your code to make sure there are no errors.
8. Implement the Repository
In this task, you implement the ItemsRepository interface and OfflineItemsRepository class to provide get, insert, delete, and update entities from the database.
- Open the
ItemsRepository.ktfile under thedatapackage. - Add the following functions to the interface, which map to the DAO implementation.
import kotlinx.coroutines.flow.Flow

/**
* Repository that provides insert, update, delete, and retrieve of [Item] from a given data source.
*/
interface ItemsRepository {
    /**
     * Retrieve all the items from the the given data source.
     */
    fun getAllItemsStream(): Flow<List<Item>>

    /**
     * Retrieve an item from the given data source that matches with the [id].
     */
    fun getItemStream(id: Int): Flow<Item?>

    /**
     * Insert item in the data source
     */
    suspend fun insertItem(item: Item)

    /**
     * Delete item from the data source
     */
    suspend fun deleteItem(item: Item)

    /**
     * Update item in the data source
     */
    suspend fun updateItem(item: Item)
}
- Open the
OfflineItemsRepository.ktfile under thedatapackage. - Pass in a constructor parameter of the type
ItemDao.
class OfflineItemsRepository(private val itemDao: ItemDao) : ItemsRepository
- In the
OfflineItemsRepositoryclass, override the functions defined in theItemsRepositoryinterface and call the corresponding functions from theItemDao.
import kotlinx.coroutines.flow.Flow

class OfflineItemsRepository(private val itemDao: ItemDao) : ItemsRepository {
    override fun getAllItemsStream(): Flow<List<Item>> = itemDao.getAllItems()

    override fun getItemStream(id: Int): Flow<Item?> = itemDao.getItem(id)

    override suspend fun insertItem(item: Item) = itemDao.insert(item)

    override suspend fun deleteItem(item: Item) = itemDao.delete(item)

    override suspend fun updateItem(item: Item) = itemDao.update(item)
}
Implement AppContainer class
In this task, you instantiate the database and pass in the DAO instance to the OfflineItemsRepository class.
- Open the
AppContainer.ktfile under thedatapackage. - Pass in the
ItemDao()instance to theOfflineItemsRepositoryconstructor. - Instantiate the database instance by calling
getDatabase()on theInventoryDatabaseclass passing in the context and call.itemDao()to create the instance ofDao.
override val itemsRepository: ItemsRepository by lazy {
    OfflineItemsRepository(InventoryDatabase.getDatabase(context).itemDao())
}
You now have all the building blocks to work with your Room. This code compiles and runs, but you have no way to tell if it actually works. So, this moment is a good time to test your database. To complete the test, you need the ViewModel to talk to the database.
9. Add the save functionality
You have thus far created a database, and the UI classes were part of the starter code. To save the app's transient data and to also access the database, you need to update the ViewModels. Your ViewModels interact with the database via the DAO and provide data to the UI. All database operations need to be run away from the main UI thread; you do so with coroutines and viewModelScope.
UI state class walkthrough
Open the ui/item/ItemEntryViewModel.kt file. The ItemUiState data class represents the UI state of an Item. The ItemDetails data class represents a single item.
The starter code provides you with three extension functions:
- The
ItemDetails.toItem()extension function converts theItemUiStateUI state object to theItementity type. - The
Item.toItemUiState()extension function converts theItemRoom entity object to theItemUiStateUI state type. - The
Item.toItemDetails()extension function converts theItemRoom entity object to theItemDetails.
// No need to copy, this is part of starter code
/**
* Represents Ui State for an Item.
*/
data class ItemUiState(
    val itemDetails: ItemDetails = ItemDetails(),
    val isEntryValid: Boolean = false
)

data class ItemDetails(
    val id: Int = 0,
    val name: String = "",
    val price: String = "",
    val quantity: String = "",
)

/**
* Extension function to convert [ItemDetails] to [Item]. If the value of [ItemDetails.price] is
* not a valid [Double], then the price will be set to 0.0. Similarly if the value of
* [ItemDetails.quantity] is not a valid [Int], then the quantity will be set to 0
*/
fun ItemDetails.toItem(): Item = Item(
    id = id,
    name = name,
    price = price.toDoubleOrNull() ?: 0.0,
    quantity = quantity.toIntOrNull() ?: 0
)

fun Item.formatedPrice(): String {
    return NumberFormat.getCurrencyInstance().format(price)
}

/**
* Extension function to convert [Item] to [ItemUiState]
*/
fun Item.toItemUiState(isEntryValid: Boolean = false): ItemUiState = ItemUiState(
    itemDetails = this.toItemDetails(),
    isEntryValid = isEntryValid
)

/**
* Extension function to convert [Item] to [ItemDetails]
*/
fun Item.toItemDetails(): ItemDetails = ItemDetails(
    id = id,
    name = name,
    price = price.toString(),
    quantity = quantity.toString()
)
You use the above class in the view models to read and update the UI.
Update ItemEntry ViewModel
In this task, you pass in the repository to the ItemEntryViewModel.kt file. You also save the item details entered in the Add Item screen into the database.
- Notice the
validateInput()private function in theItemEntryViewModelclass.
// No need to copy over, this is part of starter code
private fun validateInput(uiState: ItemDetails = itemUiState.itemDetails): Boolean {
    return with(uiState) {
        name.isNotBlank() && price.isNotBlank() && quantity.isNotBlank()
    }
}
The above function checks if the name, price, and quantity are empty. You use this function to verify user input before adding or updating the entity in the database.
- Open the
ItemEntryViewModelclass and add aprivatedefault constructor parameter of the typeItemsRepository.
import com.example.inventory.data.ItemsRepository

class ItemEntryViewModel(private val itemsRepository: ItemsRepository) : ViewModel() {
}
- Update the
initializerfor the item entry view model in theui/AppViewModelProvider.ktand pass in the repository instance as a parameter.
object AppViewModelProvider {
    val Factory = viewModelFactory {
        // Other Initializers
        // Initializer for ItemEntryViewModel
        initializer {
            ItemEntryViewModel(inventoryApplication().container.itemsRepository)
        }
        //...
    }
}
- Go to the
ItemEntryViewModel.ktfile and at the end of theItemEntryViewModelclass and add a suspend function calledsaveItem()to insert an item into the Room database. This function adds the data to the database in a non-blocking way.
suspend fun saveItem() {
}
- Inside the function, check if
itemUiStateis valid and convert it toItemtype so Room can understand the data. - Call
insertItem()onitemsRepositoryand pass in the data. The UI calls this function to add Item details to the database.
suspend fun saveItem() {
    if (validateInput()) {
        itemsRepository.insertItem(itemUiState.itemDetails.toItem())
    }
}
You have now added all the required functions to add entities to the database. In the next task, you update the UI to use the above functions.
ItemEntryBody() composable walkthrough
- In the
ui/item/ItemEntryScreen.ktfile, theItemEntryBody()composable is partially implemented for you as part of the stater code. Look at theItemEntryBody()composable in theItemEntryScreen()function call.
// No need to copy over, part of the starter code
ItemEntryBody(
    itemUiState = viewModel.itemUiState,
    onItemValueChange = viewModel::updateUiState,
    onSaveClick = { },
    modifier = Modifier
        .padding(innerPadding)
        .verticalScroll(rememberScrollState())
        .fillMaxWidth()
)
- Note that the UI state and the
updateUiStatelambda are being passed as function parameters. Look at the function definition to see how the UI state is being updated.
// No need to copy over, part of the starter code
@Composable
fun ItemEntryBody(
    itemUiState: ItemUiState,
    onItemValueChange: (ItemUiState) -> Unit,
    onSaveClick: () -> Unit,
    modifier: Modifier = Modifier
) {
    Column(
        // ...
    ) {
        ItemInputForm(
             itemDetails = itemUiState.itemDetails,
             onValueChange = onItemValueChange,
             modifier = Modifier.fillMaxWidth()
         )
        Button(
             onClick = onSaveClick,
             enabled = itemUiState.isEntryValid,
             shape = MaterialTheme.shapes.small,
             modifier = Modifier.fillMaxWidth()
         ) {
             Text(text = stringResource(R.string.save_action))
         }
    }
}
You are displaying ItemInputForm and a Save button in this composable. In the ItemInputForm() composable, you are displaying three text fields. The Save is only enabled if text is entered in the text fields. The isEntryValid value is true if the text in all the text fields is valid (not empty).
|
|
- Take a look at the
ItemInputForm()composable function implementation and notice theonValueChangefunction parameter. You are updating theitemDetailsvalue with the value entered by the user in the text fields. By the time the Save button is enabled,itemUiState.itemDetailshas the values that need to be saved.
// No need to copy over, part of the starter code
@Composable
fun ItemEntryBody(
    //...
) {
    Column(
        // ...
    ) {
        ItemInputForm(
             itemDetails = itemUiState.itemDetails,
             //...
         )
        //...
    }
}
// No need to copy over, part of the starter code
@Composable
fun ItemInputForm(
    itemDetails: ItemDetails,
    modifier: Modifier = Modifier,
    onValueChange: (ItemUiState) -> Unit = {},
    enabled: Boolean = true
) {
    Column(modifier = modifier.fillMaxWidth(), verticalArrangement = Arrangement.spacedBy(16.dp)) {
        OutlinedTextField(
            value = itemUiState.name,
            onValueChange = { onValueChange(itemDetails.copy(name = it)) },
            //...
        )
        OutlinedTextField(
            value = itemUiState.price,
            onValueChange = { onValueChange(itemDetails.copy(price = it)) },
            //...
        )
        OutlinedTextField(
            value = itemUiState.quantity,
            onValueChange = { onValueChange(itemDetails.copy(quantity = it)) },
            //...
        )
    }
}
Add click listener to the Save button
To tie everything together, add a click handler to the Save button. Inside the click handler, you launch a coroutine and call saveItem() to save the data in the Room database.
- In the
ItemEntryScreen.kt, inside theItemEntryScreencomposable function, create avalnamedcoroutineScopewith therememberCoroutineScope()composable function.
import androidx.compose.runtime.rememberCoroutineScope

val coroutineScope = rememberCoroutineScope()
- Update the
ItemEntryBody()function call and launch a coroutine insideonSaveClicklambda.
ItemEntryBody(
   // ...
    onSaveClick = {
        coroutineScope.launch {
        }
    },
    modifier = modifier.padding(innerPadding)
)
- Look at the
saveItem()function implementation in theItemEntryViewModel.ktfile to check ifitemUiStateis valid, convertingitemUiStatetoItemtype, and inserting it in the database usingitemsRepository.insertItem().
// No need to copy over, you have already implemented this as part of the Room implementation

suspend fun saveItem() {
    if (validateInput()) {
        itemsRepository.insertItem(itemUiState.itemDetails.toItem())
    }
}
- In the
ItemEntryScreen.kt, inside theItemEntryScreencomposable function, inside the coroutine, callviewModel.saveItem()to save the item in the database.
ItemEntryBody(
    // ...
    onSaveClick = {
        coroutineScope.launch {
            viewModel.saveItem()
        }
    },
    //...
)
Notice that you did not use viewModelScope.launch() for saveItem() in the ItemEntryViewModel.kt file, but it is necessary for ItemEntryBody() when you call a repository method. You can only call suspend functions from a coroutine or another suspend function. The function viewModel.saveItem() is a suspend function.
- Build and run your app.
- Tap the + FAB.
- In the Add Item screen, add the item details and tap Save. Notice that tapping the Save button does not close the Add Item screen.
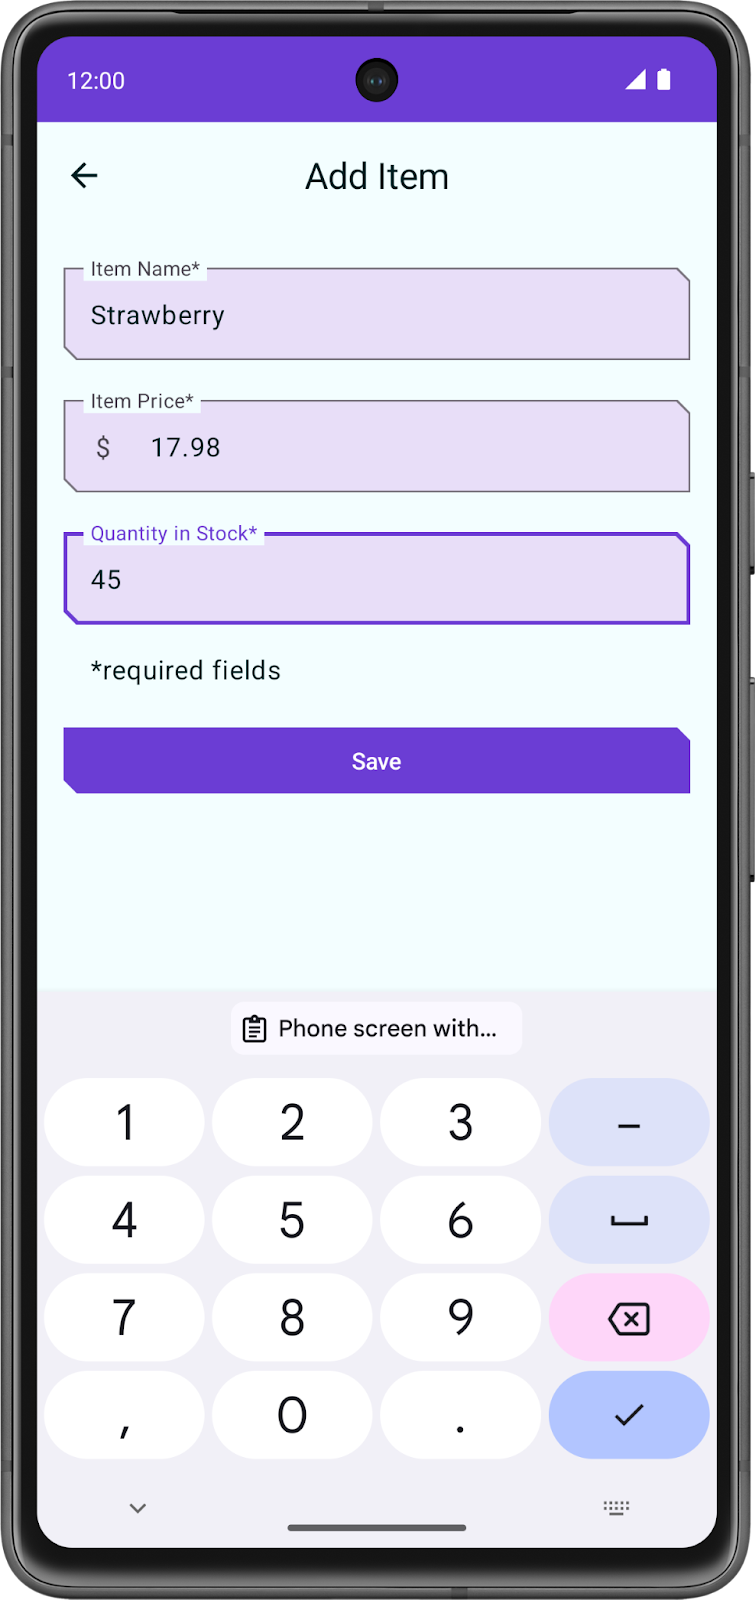
- In the
onSaveClicklambda, add a call tonavigateBack()after the call toviewModel.saveItem()to navigate back to the previous screen. YourItemEntryBody()function looks like the following code:
ItemEntryBody(
    itemUiState = viewModel.itemUiState,
    onItemValueChange = viewModel::updateUiState,
    onSaveClick = {
        coroutineScope.launch {
            viewModel.saveItem()
            navigateBack()
        }
    },
    modifier = modifier.padding(innerPadding)
)
- Run the app again and perform the same steps to enter and save the data. Notice that this time, the app navigates back to the Inventory screen.
This action saves the data, but you cannot see the inventory data in the app. In the next task, you use the Database Inspector to view the data you saved.
10. View the database content using Database Inspector
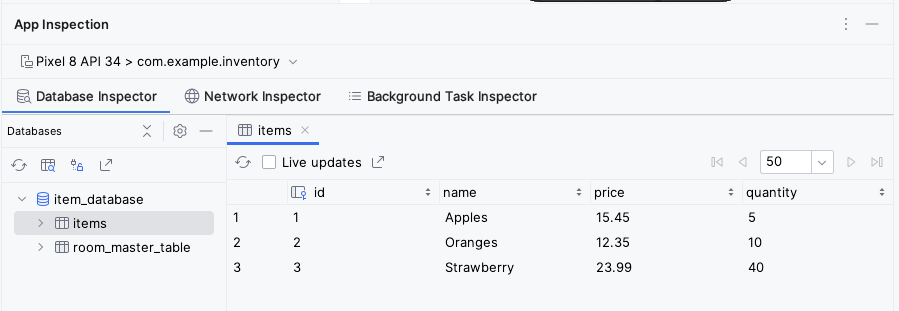
The Database Inspector lets you inspect, query, and modify your app's databases while your app runs. This feature is especially useful for database debugging. The Database Inspector works with plain SQLite and with libraries built on top of SQLite, such as Room. Database Inspector works best on emulators/devices running API level 26.
- Run your app on an emulator or connected device running API level 26 or higher, if you have not done so already.
- In Android Studio, select View > Tool Windows > App Inspection from the menu bar.
- Select the Database Inspector tab.
- In the Database Inspector pane, select the
com.example.inventoryfrom the dropdown menu if it is not already selected. The item_database in the Inventory app appears in the Databases pane.

- Expand the node for the item_database in the Databases pane and select Item to inspect. If your Databases pane is empty, use your emulator to add some items to the database using the Add Item screen.
- Check the Live updates checkbox in the Database Inspector to automatically update the data it presents as you interact with your running app in the emulator or device.
Congratulations! You created an app that can persist data using Room. In the next codelab, you will add a lazyColumn to your app to display the items on the database, and add new features to the app, like the ability to delete and update the entities. See you there!
11. Get the solution code
The solution code for this codelab is in the GitHub repo. To download the code for the finished codelab, use the following git commands:
$ git clone https://github.com/google-developer-training/basic-android-kotlin-compose-training-inventory-app.git
$ cd basic-android-kotlin-compose-training-inventory-app
$ git checkout room
Alternatively, you can download the repository as a zip file, unzip it, and open it in Android Studio.
If you want to see the solution code for this codelab, view it on GitHub.
12. Summary
- Define your tables as data classes annotated with
@Entity. Define properties annotated with@ColumnInfoas columns in the tables. - Define a data access object (DAO) as an interface annotated with
@Dao. The DAO maps Kotlin functions to database queries. - Use annotations to define
@Insert,@Delete, and@Updatefunctions. - Use the
@Queryannotation with an SQLite query string as a parameter for any other queries. - Use Database Inspector to view the data saved in the Android SQLite database.
13. Learn more
Android Developer Documentation
- Save data in a local database using Room
- androidx.room
- Debug your database with the Database Inspector
Blog posts
Videos
Other documentation and articles

