1. Before you begin
In this unit, you learned:
- How to build an app with multiple screens
- How to build an adaptive layout so that your app works well across a range of screen sizes
- The importance of app architecture
- How to ensure your app adheres to the activity lifecycle without wasting unnecessary resources
- How to preserve user state across device configuration changes
That was a lot to learn!
Following the codelab steps helped you learn these new concepts to a certain degree, but you will gain a deeper level of understanding by applying your knowledge and skills to a new app.
You will use your knowledge when you run into new situations, bugs, or times when you need to design a solution yourself. You can always refer back to previous apps and codelabs to quickly remind yourself what you learned and put that into action.
You will learn more if you try to tackle these problems on your own, which will more closely resemble what the "real world" is like as a developer. It's a skill in itself to know how to break down a problem, troubleshoot it, and search for resources to find a solution. For that reason, you're encouraged to work on these projects at the end of each unit. With this motivation and context in mind, check out the following prompt for the Unit 4 project.
Prerequisites
- Ability to create and run a project in Android Studio
- Familiar with the basics of the Kotlin programming language
- Familiar with how to create UI layouts in Compose, and how to make them adaptive to different screen sizes
- Ability to add and implement the Jetpack Navigation component with Compose
- Ability to implement an app with the recommended app architecture using ViewModels, UiState, and Jetpack Navigation
What you'll build
- An Android app that displays recommendations for things to do and places to visit within the city you live in
What you'll need
- A computer with Android Studio installed
2. Overview
Congratulations on reaching the end of Unit 4!
To help reinforce what you learned in this unit, you will build an app that contains lists of recommendations for different activities and places to visit within a city of your choice.
This app should:
- Contain multiple screens; for example, each screen can display a different category of recommendations.
- Use the Jetpack Navigation component to enable users to navigate through your app.
- Maintain a clear distinction between the UI layer and the data layer.
- Use a ViewModel and make updates to the UI from the view model using the unidirectional data flow (UDF) pattern.
- Use adaptive layouts that account for all different screen sizes.
- Follow Material Design guidelines for adaptive design and navigation.
3. Gather the content for the app
Gather the content for your app and write it down on a piece of paper or type it into a document. It's easier to organize the app content before you start coding your app.
Decide which city or region you want to use for the app. We suggest you use your favorite city or the city you live in. You can also choose a wider region that includes multiple cities, if you prefer.
Choose an app name based on the city you selected. Even though this project is called the My City app, you are encouraged to customize the app name to be specific to your city.
Create lists for different categories of recommendations for your city. For example, you can create a list of recommended:
- Coffee shops
- Restaurants
- Kid-friendly places
- Parks
- Shopping centers
Your app should contain several lists of recommendations from different categories. Try to create at least 3 to 5 recommendations for each category so the screen doesn't look too empty.
If you want to add photos to your app, collect the photos at this stage.
4. Sketch the app screens
On a piece of paper, sketch out what the different screens of the app will look like. You can draw arrows between the screens and add buttons to the layout to show how the user navigates from one screen to another.
This sketch does not need to be very detailed or polished. The main purpose is to develop an idea for the destinations on the navigation graph and the overall layout of the app. These drawings can help you with the next step.
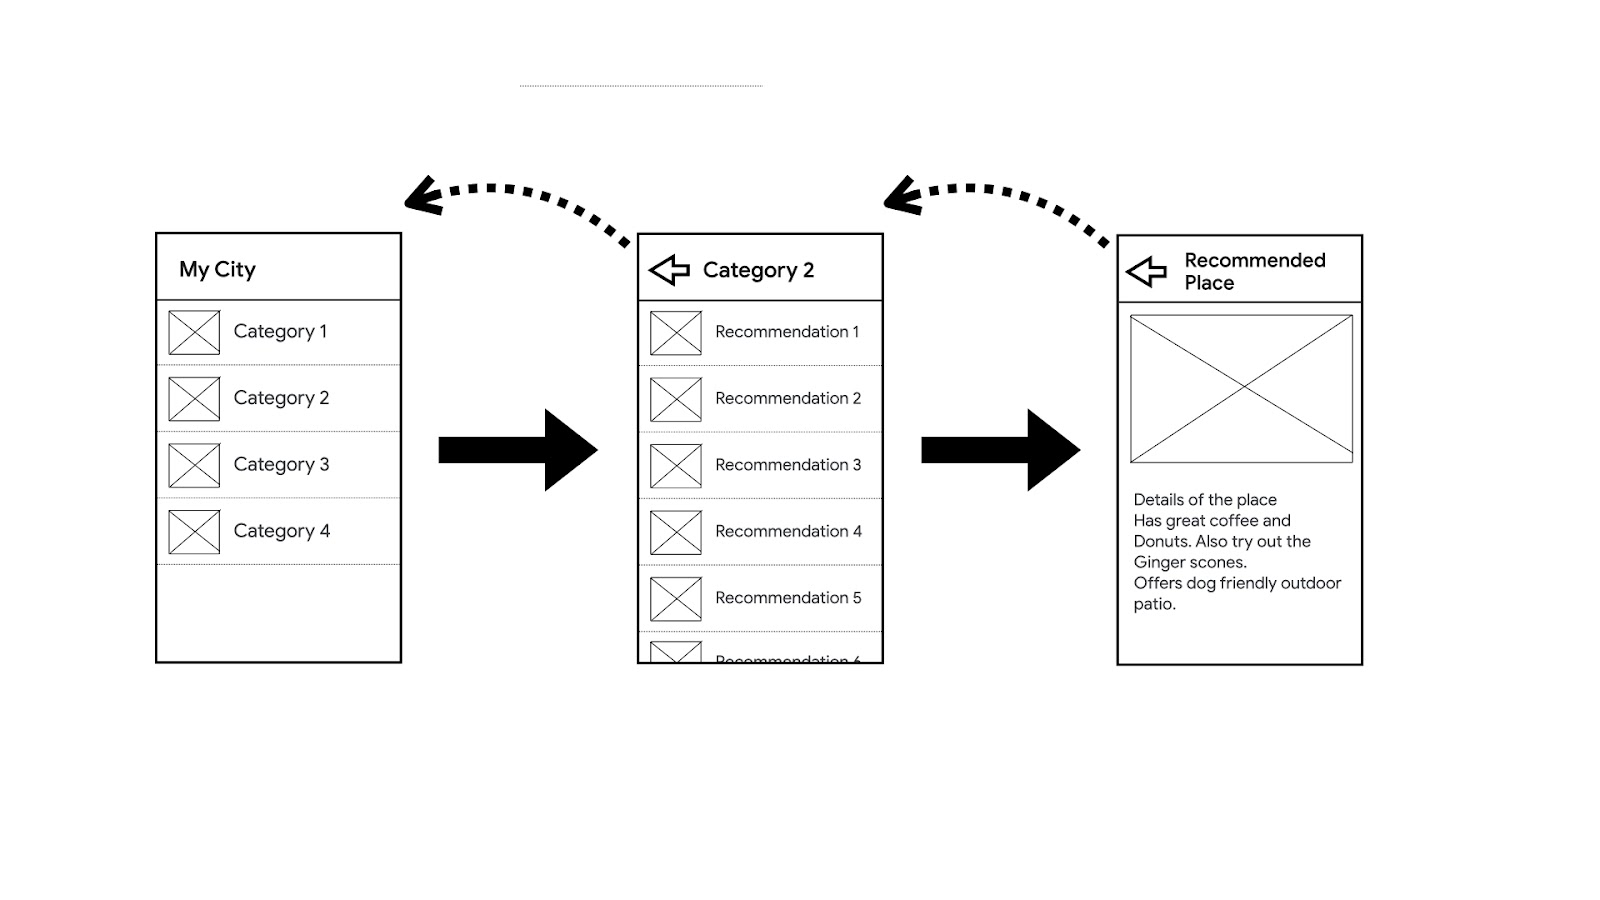
If you need help sketching out the app and navigation flow, view the following example:

Can you use this example to sketch the app and navigation flow for larger screens? If you need more help, feel free to check the codelab where you built the Reply app.
5. Plan the steps
Write out the general steps for how to build the app that you sketched.
For example:
- Create the data class for a recommended place.
- Create the screen layout for the recommended coffee shops.
- Create the navigation graph for all screens.
These notes can help you determine the part of the app you want to tackle first.
To become even more organized, you can also number the steps in the order you plan to complete them. If one step requires you to complete another step first, then you need to sequence the steps appropriately.
6. Implement the app
Now that you have a high-level plan for the app, you can start coding the app!
Create the project and complete each task one-by-one. Be patient with yourself if a task takes a long time. It is normal to have a steep learning curve for building an app of this complexity.
Tips:
- Review previous codelabs and the GitHub code repos for reference.
- Look at other Compose sample apps or the Now in Android app. Note that these apps are larger and more complex than the apps you have built so far.
- If you encounter a bug in the app and can't figure out how to fix it, consider using the Android Studio debugging tools.
7. Get feedback from a user (Optional)
This section is recommended as a good learning experience. When you have a working version of your app, show it to a potential user and get feedback from them.
If you own an Android device, install the app on the device. Alternatively, you can use an emulator, but keep in mind that the user may not be familiar with what an emulator is and how it relates to a real device.
Try not to give the user any guidance or instructions. Instead, focus on observing the user and asking questions to understand how users might use the app for the first time. Pay attention to how they interact with the app and whether navigating through the app seems intuitive or confusing to them. Can they use the app as you expected, or are they having issues figuring out how to use the app?
Make sure they navigate through every screen and interact with each part of the app. You can ask them other questions, including the following examples:
- What is your first impression of this app?
- What do you like about this app?
- Do you have any suggestions for how I can improve this app??
Consider whether you want to incorporate the user's suggestions into your app to create a better experience for your users.
8. Test the app with Resizable Emulator
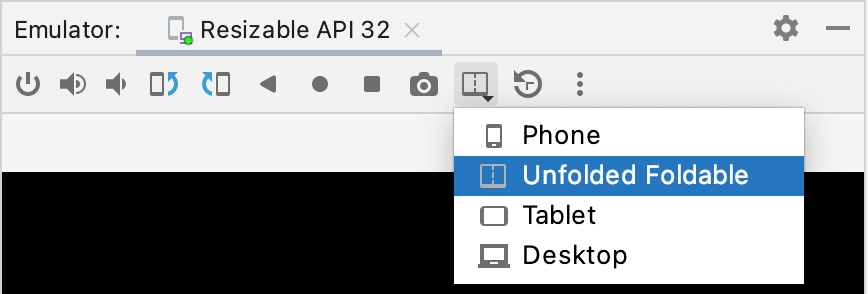
It is a good idea to test what you built on a Resizable Emulator to see if the app works as expected on different screen sizes. Make sure to change the emulator size and try out the different device options as shown in the following image.

9. Good luck!
Good luck creating your app! When you complete the app, share it on social media using the hashtag #AndroidBasics. We're excited to see how your app turns out and to hear about your recommendations!
