
1. 事前準備
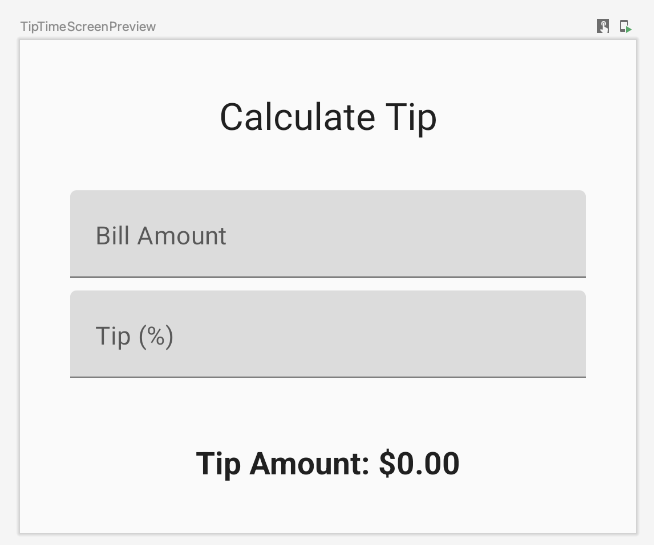
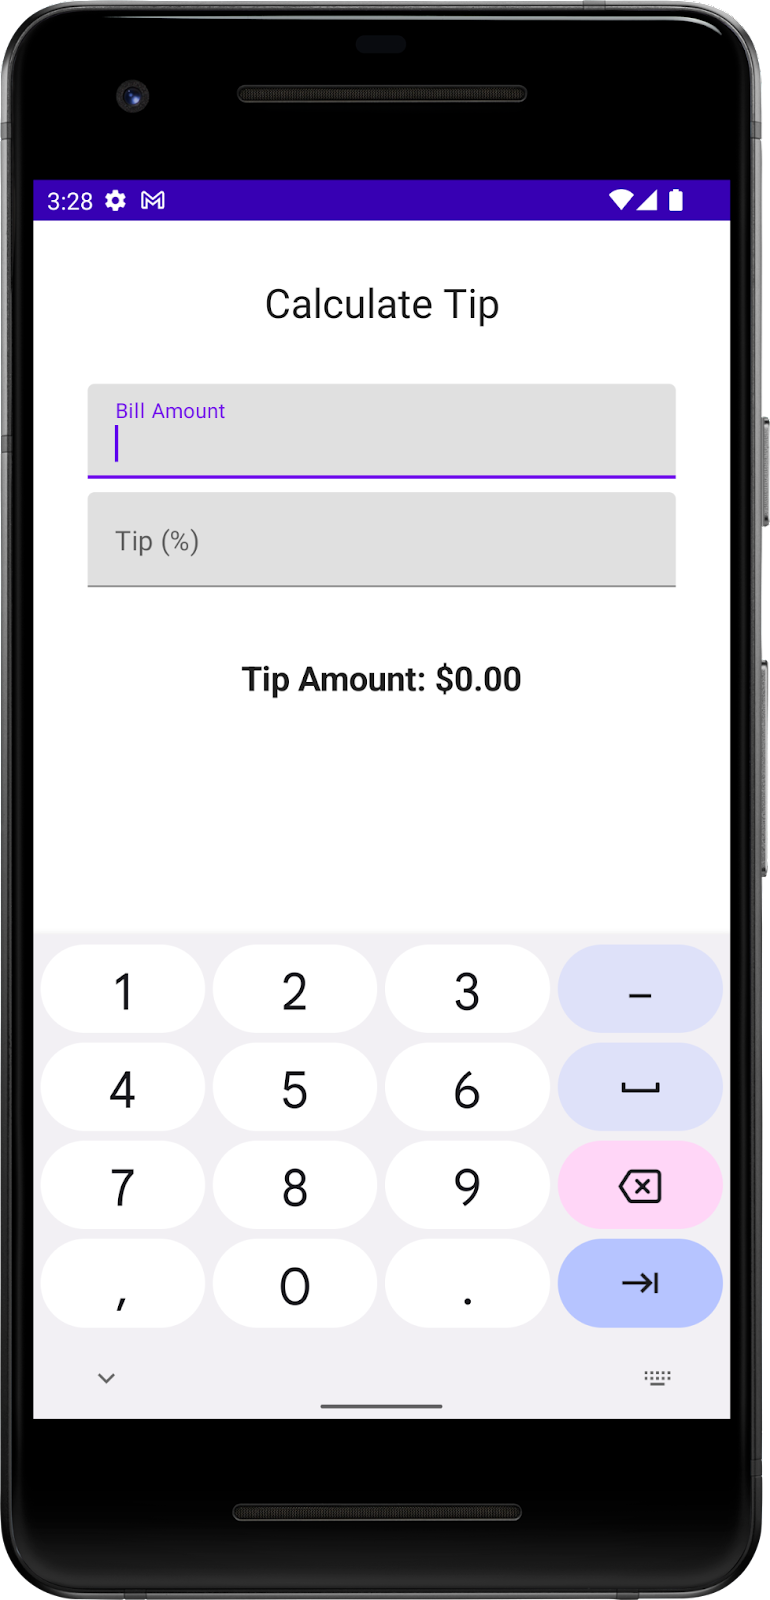
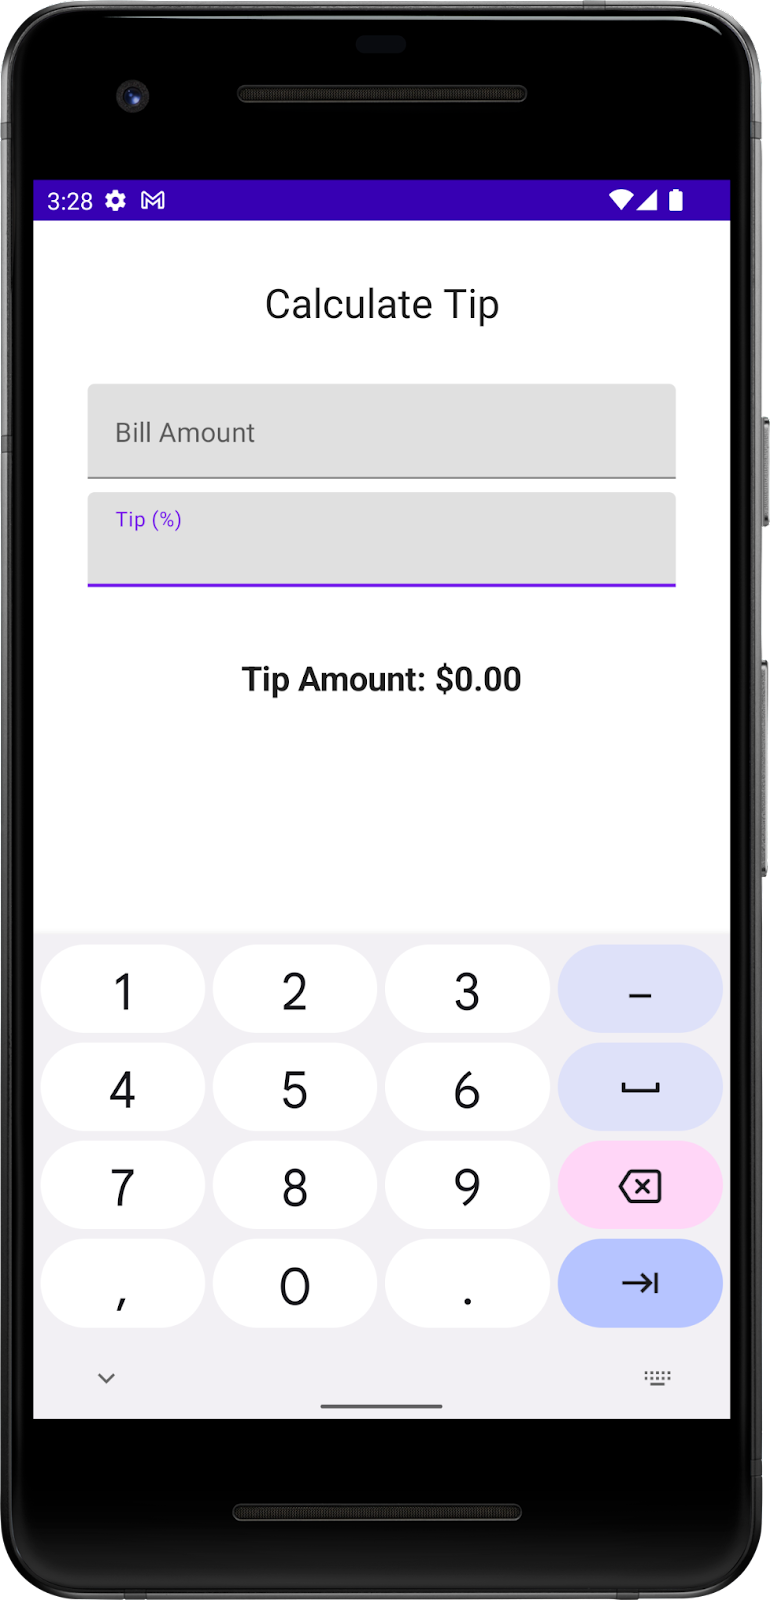
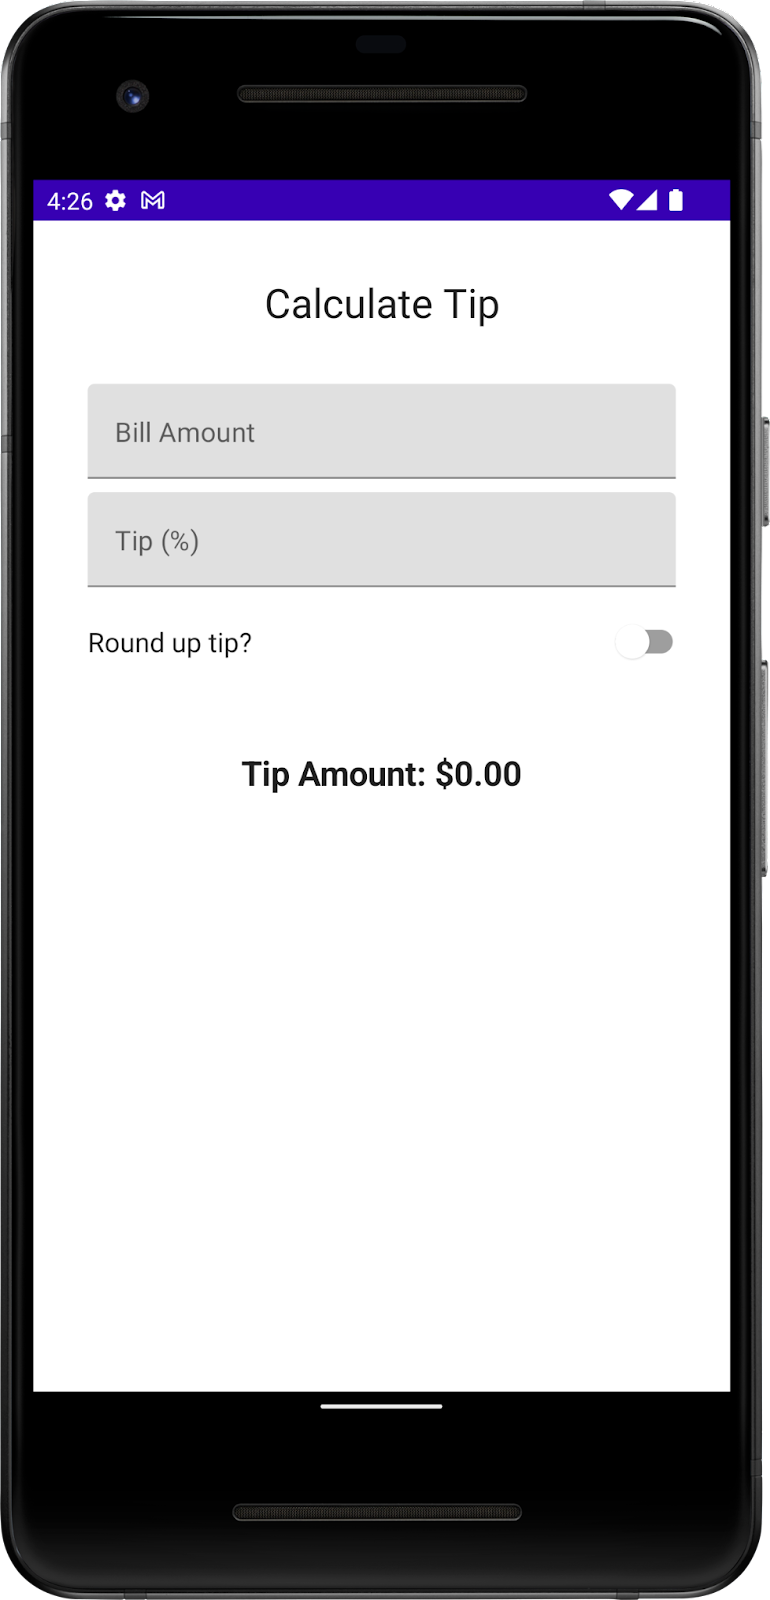
在本程式碼研究室中,您將使用「Compose 中的狀態簡介」程式碼研究室的解決方案程式碼,建構互動式小費計算機。使用者輸入帳單金額和小費百分比後,可以用來自動計算小費並無條件進位。最終版應用程式如下圖所示:

必要條件
- 完成「使用 Jetpack Compose 中的狀態」程式碼研究室
- 可在應用程式中新增
Text和TextField可組合函式 - 具備
remember函式、狀態、狀態提升的相關知識,並瞭解有狀態與無狀態可組合函式之間的差異
課程內容
- 在虛擬鍵盤上新增動作按鈕的方法。
- 鍵盤動作的設定方法。
Switch可組合函式的定義和使用方法。- 版面配置檢查器的簡介。
建構項目
- Tip Time 應用程式,可根據使用者輸入的服務費用和小費百分比計算小費金額。
軟硬體需求
- Android Studio
- 「使用 Jetpack Compose 中的狀態」程式碼研究室的解決方案程式碼
2. 範例應用程式總覽
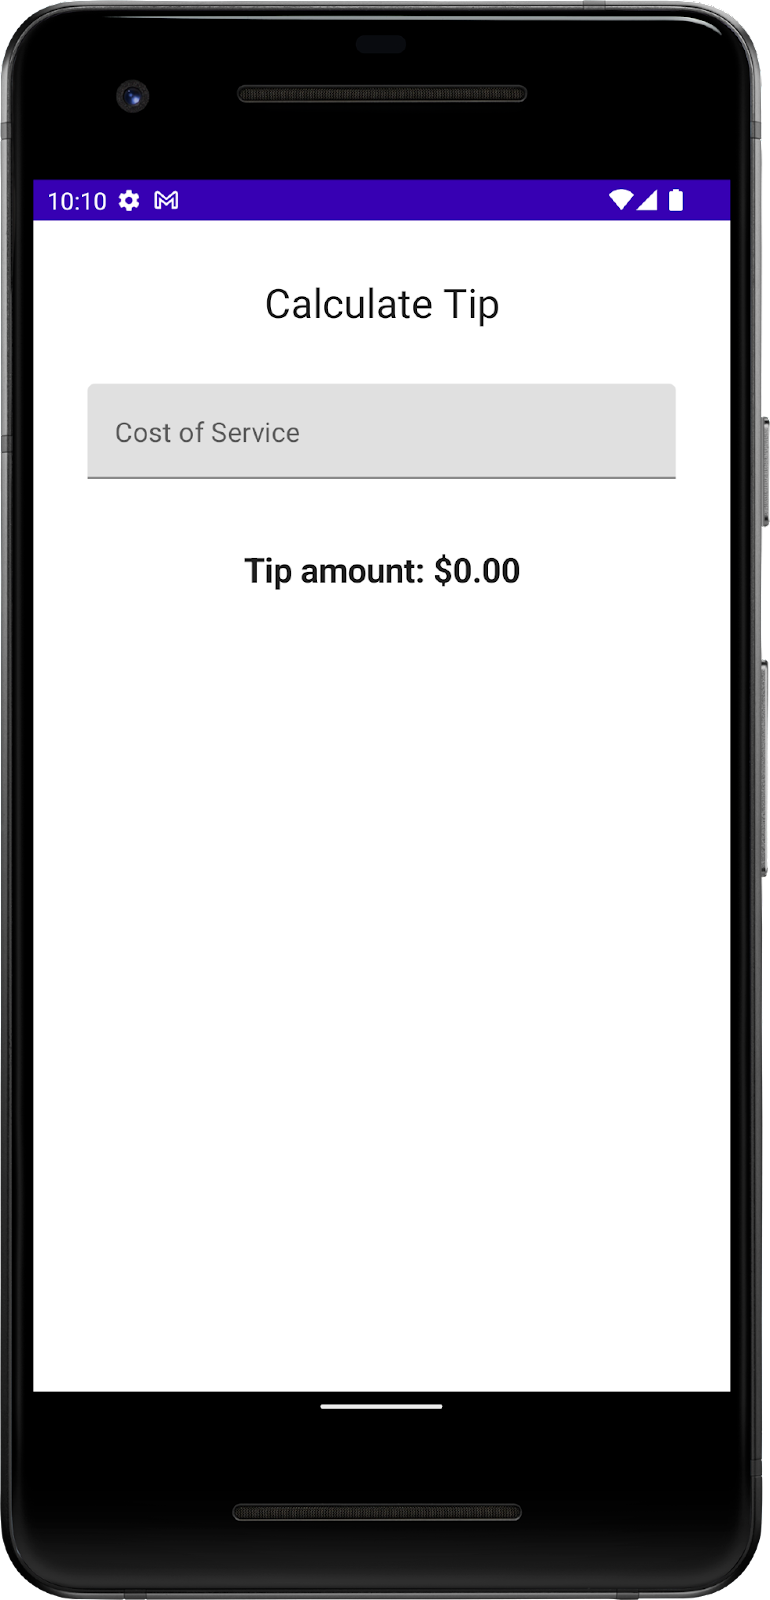
本程式碼研究室會從上一個程式碼研究室提供的 Tip Time 應用程式開始談起,該應用程式提供了根據固定費率計算小費金額的使用者介面。使用者可以在「Cost of Service」文字方塊中輸入服務費用。接著應用程式會計算小費金額並顯示在 Text 可組合函式中。
|
|
取得範例程式碼
如要開始使用,請先下載範例程式碼:
或者,您也可以複製 GitHub 存放區的程式碼:
$ git clone https://github.com/google-developer-training/basic-android-kotlin-compose-training-tip-calculator.git
$ cd basic-android-kotlin-compose-training-tip-calculator
$ git checkout state
您可以瀏覽 Tip Calculator GitHub 存放區中的程式碼。
執行 Tip Time 應用程式
- 在 Android Studio 中開啟 Tip Time 專案,並在模擬器或裝置上執行應用程式。
- 輸入服務費用。應用程式會自動計算並顯示小費金額。
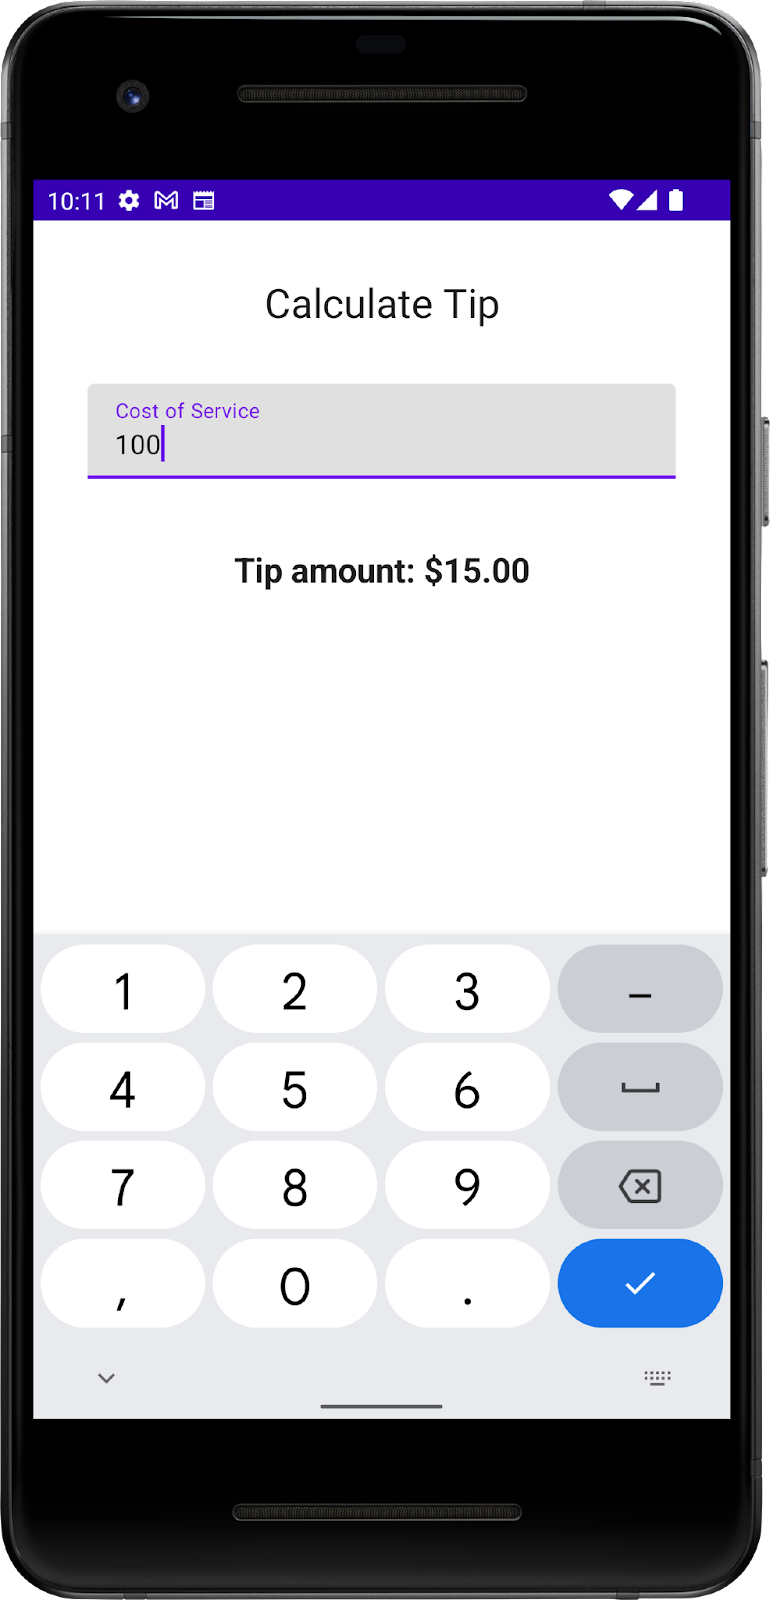
在目前的實作項目中,小費百分比是以硬式編碼的方式設為 15%。在本程式碼研究室中,您將透過文字欄位來擴充這項功能,讓應用程式依據自訂小費百分比計算並將小費金額無條件進位。
新增必要的字串資源
- 在「Project」分頁中,依序點選「res」>「values」>「strings.xml」。
- 在
strings.xml檔案的<resources>標記之間,新增以下字串資源:
<string name="how_was_the_service">Tip (%)</string>
<string name="round_up_tip">Round up tip?</string>
strings.xml 檔案應該如以下程式碼片段所示,其中包含先前程式碼研究室中的字串:
strings.xml
<resources>
   <string name="app_name">TipTime</string>
   <string name="calculate_tip">Calculate Tip</string>
   <string name="cost_of_service">Cost of Service</string>
   <string name="how_was_the_service">Tip (%)</string>
   <string name="round_up_tip">Round up tip?</string>
   <string name="tip_amount">Tip Amount: %s</string>
</resources>
- 將
Cost Of Service字串變更為Bill Amount字串。在部分國家/地區中,「服務費」指的是「小費」,因此這項變更可避免混淆。 - 在
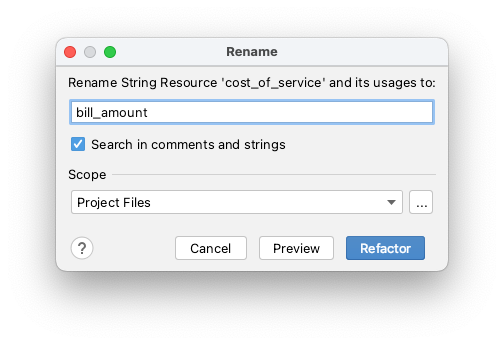
Cost of Service字串中,在屬性的namecost_of_service上按一下滑鼠右鍵,然後依序選取「Refactor」>「Rename」。系統會隨即開啟「Rename」對話方塊。

- 在「Rename」對話方塊中,將
cost_of _service替換為bill_amount,然後按一下「Refactor」。這個步驟會更新專案中出現的所有cost_of_service字串資源,因此您無需手動變更 Compose 程式碼。
- 在
strings.xml檔案中,將字串值從Cost of Service變更為Bill Amount:
<string name="bill_amount">Bill Amount</string>
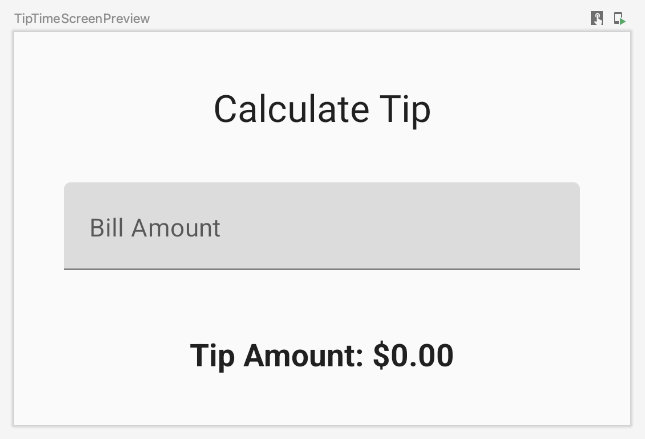
- 前往
MainActivity.kt檔案,然後執行應用程式。文字方塊中的標籤已更新,如下圖所示:

3. 新增小費百分比文字欄位
顧客可能會想按照服務品質和其他各種原因來增加或減少小費。為滿足這項需求,應用程式應讓使用者計算自訂的小費。您將在本節中新增可讓使用者輸入自訂小費百分比的文字欄位,如下圖所示:

應用程式已有「Bill Amount」文字欄位可組合函式,也就是無狀態的 EditNumberField() 可組合函式。在先前的程式碼研究室中,您已將 amountInput 狀態從 EditNumberField() 可組合函式提升為 TipTimeScreen() 函式,讓 EditNumberField() 成為無狀態的可組合函式。
如要新增文字欄位,可以重複使用相同的 EditNumberField() 可組合函式,但搭配不同的標籤。如要進行這項變更,您需將標籤做為參數傳遞,而不是在 EditNumberField() 可組合函式中對標籤進行硬式編碼。
將 EditNumberField() 可組合函式設為可重複使用:
- 在
EditNumberField()可組合函式參數的MainActivity.kt檔案中,新增Int類型的label字串資源:
@Composable
fun EditNumberField(
   label: Int,
   value: String,
   onValueChange: (String) -> Unit
)
- 將
Modifier類型的modifier引數新增至EditNumberField()可組合函式:
@Composable
fun EditNumberField(
   label: Int,
   value: String,
   onValueChange: (String) -> Unit,
   modifier: Modifier = Modifier
)
- 在函式主體中,以
label參數取代硬式編碼的字串資源 ID:
@Composable
fun EditNumberField(
   //...
) {
   TextField(
       //...
       label = { Text(stringResource(label)) },
       //...
   )
}
- 如要表示
label參數預計會做為字串資源參照,請使用@StringRes註解為函式參數加上註解:
@Composable
fun EditNumberField(
   @StringRes label: Int,
   value: String,
   onValueChange: (String) -> Unit,
   modifier: Modifier = Modifier
)
- 匯入下列內容:
import androidx.annotation.StringRes
- 在
EditNumberField()函式的TextField可組合函式中,將label參數傳遞給stringResource()函式。
@Composable
fun EditNumberField(
   @StringRes label: Int,
   value: String,
   onValueChange: (String) -> Unit,
   modifier: Modifier = Modifier
) {
   TextField(
       //...
       label = { Text(stringResource(label)) },
       //...
   )
}
- 在
TipTimeScreen()函式的EditNumberField()函式呼叫中,將label參數設為R.string.bill_amount字串資源:
EditNumberField(
   label = R.string.bill_amount,
   value = amountInput,
   onValueChange = { amountInput = it }
)
- 在「Design」窗格中,按一下
 「Build & Refresh」。該應用程式的 UI 應如下圖所示:
- 在
TipTimeScreen()函式的EditNumberField()函式呼叫後方,新增另一個用於自訂小費百分比的文字欄位。接著使用以下參數呼叫EditNumberField()可組合函式:
EditNumberField(
   label = R.string.how_was_the_service,
   value = "",
   onValueChange = { }
)
這個步驟會新增另一個用於自訂小費百分比的文字方塊。
- 在「Design」窗格中,按一下「 Build & Refresh」。應用程式預覽畫面現在會顯示「Tip (%)」文字欄位,如下圖所示:
- 在
TipTimeScreen()函式頂端,為新增的文字欄位狀態變數加上名為tipInput的var屬性。接著,使用mutableStateOf("")來初始化變數,並將該呼叫放入remember函式中:
var tipInput by remember { mutableStateOf("") }
- 在新的
EditNumberField()函式呼叫中,將value具名參數設為tipInput變數,然後更新onValueChangelambda 運算式中的tipInput變數:
EditNumberField(
   label = R.string.how_was_the_service,
   value = tipInput,
   onValueChange = { tipInput = it }
)
- 在
TipTimeScreen()函式的tipInput變數定義後方,定義名為tipPercent的val變數,藉此將tipInput變數轉換為Double類型,接著使用 Elvis 運算子,並在運算結果的值為null時傳回0.0:
val tipPercent = tipInput.toDoubleOrNull() ?: 0.0
- 在
TipTimeScreen()函式中更新calculateTip()函式呼叫,傳入tipPercent變數做為第二個參數:
val tip = calculateTip(amount, tipPercent)
TipTimeScreen() 函式的程式碼現在應如下列程式碼片段所示:
@Composable
fun TipTimeScreen() {
   var amountInput by remember { mutableStateOf("") }
   var tipInput by remember { mutableStateOf("") }

   val tipPercent = tipInput.toDoubleOrNull() ?: 0.0
   val amount = amountInput.toDoubleOrNull() ?: 0.0
   val tip = calculateTip(amount, tipPercent)

   Column(
       modifier = Modifier.padding(32.dp),
       verticalArrangement = Arrangement.spacedBy(8.dp)
   ) {
       Text(
           text = stringResource(R.string.calculate_tip),
           fontSize = 24.sp,
           modifier = Modifier.align(Alignment.CenterHorizontally)
       )
       Spacer(Modifier.height(16.dp))
       EditNumberField(
           label = R.string.bill_amount,
           value = amountInput,
           onValueChange = { amountInput = it }
       )
       EditNumberField(
           label = R.string.how_was_the_service,
           value = tipInput,
           onValueChange = { tipInput = it }
       )
       Spacer(Modifier.height(24.dp))
       Text(
           text = stringResource(R.string.tip_amount, tip),
           modifier = Modifier.align(Alignment.CenterHorizontally),
           fontSize = 20.sp,
           fontWeight = FontWeight.Bold
       )
   }
}
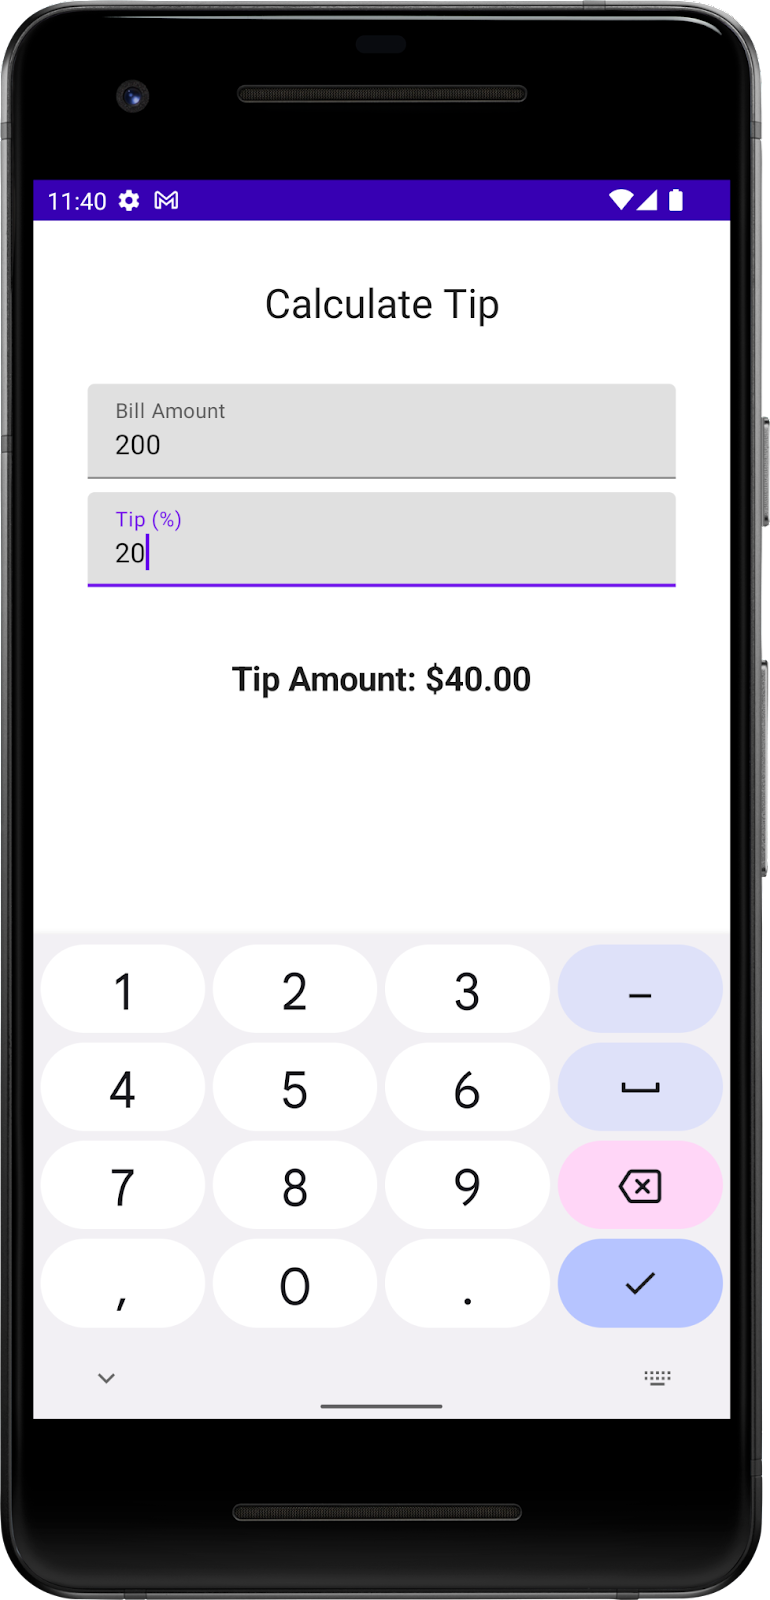
- 在模擬器或裝置上執行應用程式,然後輸入帳單金額和小費百分比。應用程式是否正確計算小費金額?
4. 設定動作按鈕
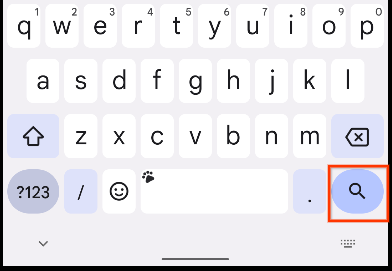
在先前的程式碼研究室中,您已瞭解如何使用 KeyboardOptions 類別設定鍵盤類型。在本節中,您將瞭解如何使用相同的 KeyboardOptions 設定鍵盤動作按鈕。鍵盤動作按鈕是指鍵盤末端的按鈕,您可以在下表中看到一些範例:
屬性 | 鍵盤上的動作按鈕 |
|
|
|
|
|
|
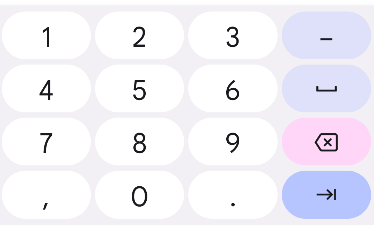
在這項工作中,您會為文字方塊設定兩個不同的動作按鈕:
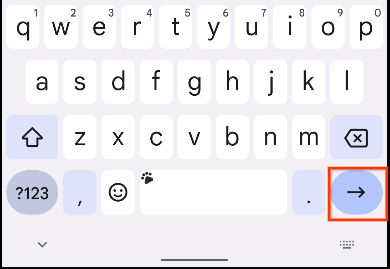
- 「Bill Amount」文字方塊的「Next」動作按鈕,表示使用者已輸入完畢並想移到下一個文字方塊。
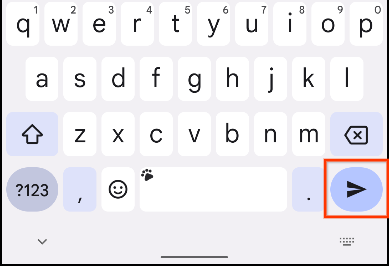
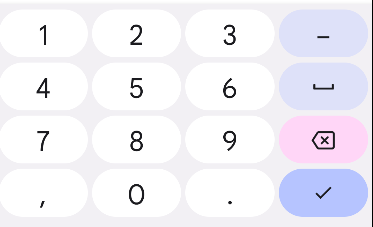
- 「Tip %」文字方塊的「Done」動作按鈕,表示使用者已完成輸入。
您可以在下方圖片中查看含有這些動作按鈕的鍵盤範例:
|
|
新增鍵盤選項:
- 在
EditNumberField()函式的TextField()函式呼叫中,將設為ImeAction.Next值的imeAction具名引數傳遞給KeyboardOptions建構函式。接著透過KeyboardOptions.Default.copy函式來使用其他預設選項,例如大寫和自動更正功能。
@Composable
fun EditNumberField(
   //...
) {
   TextField(
       //...
       keyboardOptions = KeyboardOptions.Default.copy(
           keyboardType = KeyboardType.Number,
           imeAction = ImeAction.Next
       )
   )
}
- 在模擬器或裝置上執行應用程式。鍵盤現在會顯示「Next」動作按鈕,如下圖所示:
|
|
不過,您的目標是為文字欄位提供兩個不同的動作按鈕。我們稍後就會修正這個問題。
- 檢查
EditNumberField()函式。TextField()函式中的keyboardOptions參數是採用硬式編碼。如要為文字欄位建立不同的動作按鈕,您必須傳入KeyboardOptions物件做為引數 (將在下一個步驟進行)。
// No need to copy, just examine the code.
fun EditNumberField(
   @StringRes label: Int,
   value: String,
   onValueChange: (String) -> Unit
) {
   TextField(
       //...
       keyboardOptions = KeyboardOptions.Default.copy(
          keyboardType = KeyboardType.Number,
          imeAction = ImeAction.Next
       )
   )
}
- 在
EditNumberField()函式定義中新增KeyboardOptions類型的keyboardOptions參數。接著在函式主體中,將該函式指派給TextField()函式的keyboardOptions具名參數:
@Composable
fun EditNumberField(
   @StringRes label: Int,
   keyboardOptions: KeyboardOptions,
   value: String,
   onValueChange: (String) -> Unit
){
   TextField(
       //...
       keyboardOptions = keyboardOptions
   )
}
- 在
TipTimeScreen()函式中更新第一個EditNumberField()函式呼叫,並為「Bill Amount」文字欄位傳入keyboardOptions具名參數。
EditNumberField(
   label = R.string.bill_amount,
   keyboardOptions = KeyboardOptions(
       keyboardType = KeyboardType.Number,
       imeAction = ImeAction.Next
   ),
   value = amountInput,
   onValueChange = { amountInput = it }
)
- 在第二個
EditNumberField()函式呼叫中,將「Tip %」文字欄位的imeAction變更為ImeAction.Done。函式應如以下程式碼片段所示:
EditNumberField(
   label = R.string.how_was_the_service,
   keyboardOptions = KeyboardOptions(
       keyboardType = KeyboardType.Number,
       imeAction = ImeAction.Done
   ),
   value = tipInput,
   onValueChange = { tipInput = it }
)
- 執行應用程式。畫面會隨即顯示「Next」和「Done」動作按鈕,如下圖所示:
|
|


- 輸入帳單金額並點選「Next」動作按鈕,然後輸入小費百分比並點選「Done」動作按鈕。由於您尚未對按鈕加入任何功能,因此系統目前沒有任何回應。您將在下一節實作這些功能。
5. 設定鍵盤動作
在本節中,您將使用 KeyboardActions 類別實作鍵盤功能,藉此將焦點移到下一個文字欄位並關閉鍵盤。這項功能不僅能改善使用者體驗,還可讓開發人員為因應使用者在螢幕鍵盤上選擇輸入法編輯器 (IME) 的動作,指定要觸發的動作。當使用者點選「Next」或「Done」動作按鈕時,就是 IME 動作的一個例子。
您將實作以下項目:
- 針對「Next」動作:將焦點移到下一個文字欄位 (「Tip %」文字方塊)。
- 針對「Done」動作:關閉虛擬鍵盤。
- 在
EditNumberField()函式中新增名為focusManager的val變數,並為該變數指派LocalFocusManager.current屬性值:
val focusManager = LocalFocusManager.current
LocalFocusManager 介面的用途是控管 Compose 中的焦點。使用這個變數即可將焦點移至或移出文字方塊。
- 匯入
import androidx.compose.ui.platform.LocalFocusManager。 - 在
EditNumberField()函式簽名中,新增另一個KeyboardActions類型的keyboardActions參數:
@Composable
fun EditNumberField(
   @StringRes label: Int,
   keyboardOptions: KeyboardOptions,
   keyboardActions: KeyboardActions,
   value: String,
   onValueChange: (String) -> Unit
) {
   //...
}
- 在
EditNumberField()函式主體中更新TextField()函式呼叫,並將keyboardActions參數設為傳入的keyboardActions參數。
@Composable
fun EditNumberField(
   //...
) {
   TextField(
       //...
       keyboardActions = keyboardActions
   )
}
現在,您可以為每個動作按鈕自訂帶有不同功能的文字欄位。
- 在
TipTimeScreen()函式呼叫中更新第一個EditNumberField()函式呼叫,以便納入keyboardActions具名參數做為新引數,然後為該參數指派KeyboardActions( onNext ={ })這個值:
// Bill amount text field
EditNumberField(
   //...
   keyboardActions = KeyboardActions(
       onNext = { }
   ),
   //...
)
當使用者按下鍵盤上的「Next」動作按鈕時,系統就會執行 onNext 具名參數的 lambda 運算式。
- 定義 lambda,要求
FocusManager將焦點向下移動至下一個可組合函式「Tip %」。接著在 lambda 運算式中,呼叫focusManager物件上的moveFocus()函式並傳入FocusDirection.Down引數:
// Bill amount text field
EditNumberField(
   label = R.string.bill_amount,
   keyboardOptions = KeyboardOptions(
       keyboardType = KeyboardType.Number,
       imeAction = ImeAction.Next
   ),
   keyboardActions = KeyboardActions(
       onNext = { focusManager.moveFocus(FocusDirection.Down) }
   ),
   value = amountInput,
   onValueChange = { amountInput = it }
)
moveFocus() 函式會將焦點移往指定方向,在本例中為向下移動至「Tip %」文字欄位。
- 匯入下列內容:
import androidx.compose.ui.focus.FocusDirection
- 對「Tip %」文字欄位實作類似的步驟。不同之處在於您需要定義
onDone具名參數,而非onNext。
// Tip% text field
EditNumberField(
   //...
   keyboardActions = KeyboardActions(
       onDone = { }
   ),
   //...
)
- 使用者輸入自訂小費後,鍵盤上的「Done」動作應清除焦點,進而關閉鍵盤。為此,請定義 lambda,要求
FocusManager清除焦點,方法是在 lambda 運算式中,呼叫focusManager物件上的clearFocus()函式:
EditNumberField(
   label = R.string.how_was_the_service,
   keyboardOptions = KeyboardOptions(
       keyboardType = KeyboardType.Number,
       imeAction = ImeAction.Done
   ),
   keyboardActions = KeyboardActions(
       onDone = { focusManager.clearFocus() }),
   value = tipInput,
   onValueChange = { tipInput = it }
)
clearFocus() 函式會將焦點從目前所在元件中清除。
- 執行應用程式。鍵盤動作現在會變更焦點所在的元件,如以下 GIF 所示:
6. 新增切換鈕
切換鈕可將單一項目設為開啟或關閉,使用者可以視需要選用其中一種狀態。切換按鈕包含指標和軌道,如下圖所示:
|
|
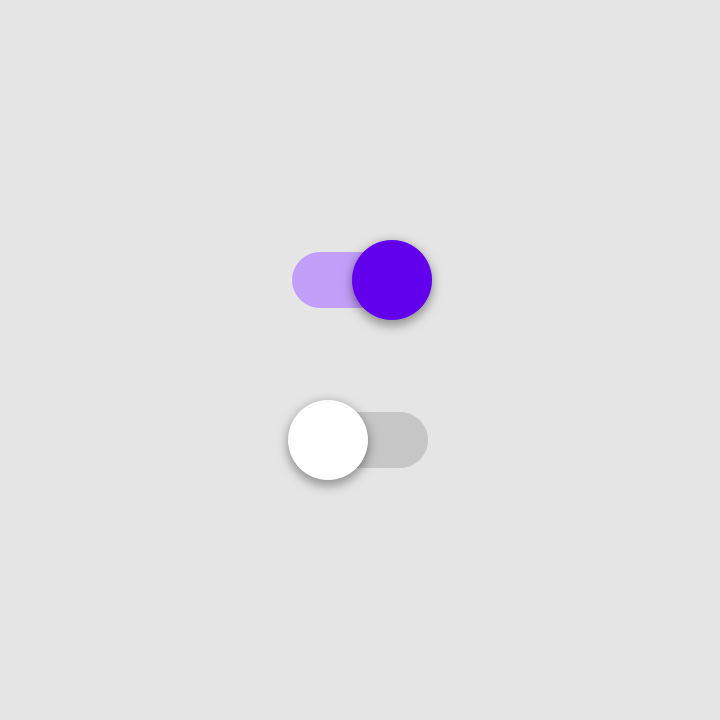
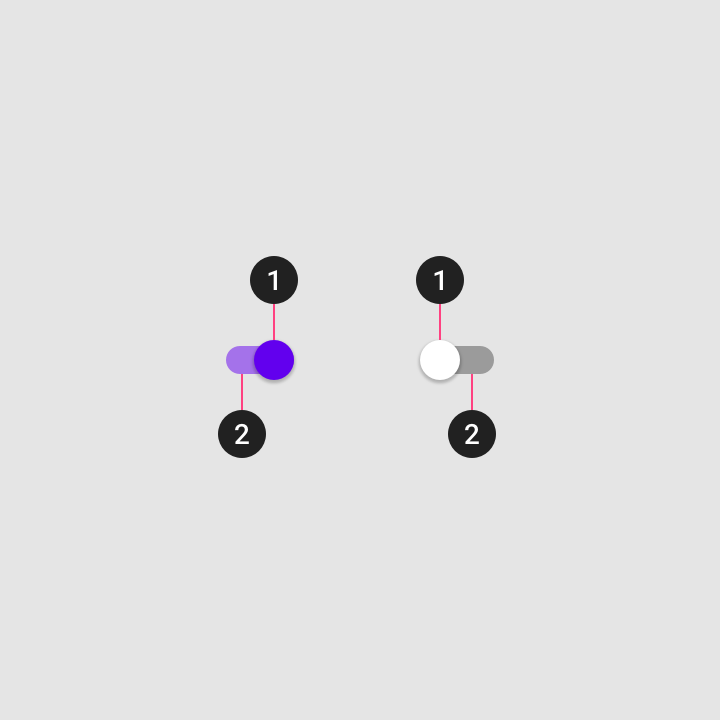 1. 指標
1. 指標切換鈕是一種選取控制項,可用來輸入決定或宣告偏好設定,如下圖中的設定內容:
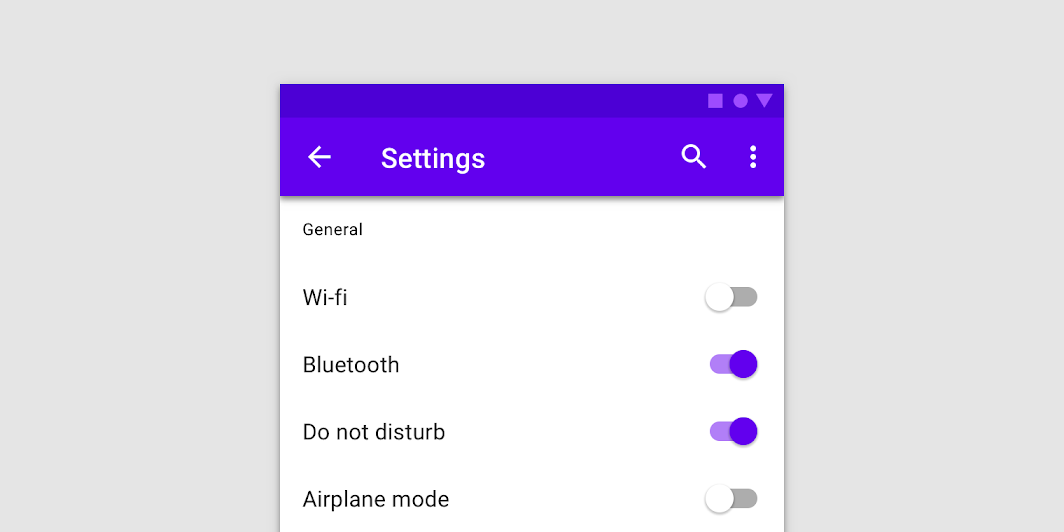
使用者可以來回拖曳「指標」選擇選項,或者輕觸切換按鈕進行切換。下方 GIF 中的切換鈕為另一個例子,其中的「Visual options」設定會切換為「Dark mode」:
如要進一步瞭解切換鈕,請參閱「切換鈕」說明文件。
您可以使用 Switch 可組合函式,讓使用者選擇是否要將小費無條件進位至最接近的整數,如下圖所示:

為 Text 和 Switch 可組合函式新增一列:
- 在
EditNumberField()函式後方新增RoundTheTipRow()可組合函式,然後傳入預設的Modifier做為類似EditNumberField()函式的引數:
@Composable
fun RoundTheTipRow(modifier: Modifier = Modifier) {
}
- 實作
RoundTheTipRow()函式,新增含有以下modifier的Row版面配置可組合函式,將子元素的寬度設為畫面最大寬度、置中對齊,並確保大小為48dp:
Row(
   modifier = Modifier
       .fillMaxWidth()
       .size(48.dp),
   verticalAlignment = Alignment.CenterVertically
) {
}
- 匯入下列內容:
import androidx.compose.foundation.layout.Row
import androidx.compose.foundation.layout.Size
- 在
Row版面配置可組合項的 lambda 區塊中,新增使用R.string.round_up_tip字串資源的Text可組合項,即可顯示Round up tip?字串:
Text(text = stringResource(R.string.round_up_tip))
- 在
Text可組合項後方新增Switch可組合項,並傳遞設為roundUp的checked具名參數以及設為onRoundUpChanged的onCheckedChange具名參數。
Switch(
    checked = roundUp,
    onCheckedChange = onRoundUpChanged,
)
下表包含上述參數的資訊,這些參數與您為 RoundTheTipRow() 函式定義的參數相同:
參數 | 說明 |
| 是否已勾選切換鈕。這是 |
| 使用者點選切換鈕時要呼叫的回呼。 |
- 匯入下列內容:
import androidx.compose.material.Switch
- 在
RoundTipRow()函式中新增Boolean類型的roundUp參數,以及可接受Boolean且不會傳回任何結果的onRoundUpChangedlambda 函式:
@Composable
fun RoundTheTipRow(
   roundUp: Boolean,
   onRoundUpChanged: (Boolean) -> Unit,
   modifier: Modifier = Modifier
)
這會提升切換鈕的狀態。
- 在
Switch可組合項中新增上述modifier,讓Switch可組合項對齊螢幕尾端:
       Switch(
           modifier = modifier
               .fillMaxWidth()
               .wrapContentWidth(Alignment.End),
           //...
       )
- 匯入下列內容:
import androidx.compose.foundation.layout.wrapContentWidth
- 在
TipTimeScreen()函式中,為Switch可組合函式的狀態新增 var 變數。接著建立名為roundUp的var變數、設為mutableStateOf(),並使用false做為預設引數。然後將呼叫放入remember { }中。
fun TipTimeScreen() {
   //...
   var roundUp by remember { mutableStateOf(false) }

   //...
   Column(
       ...
   ) {
     //...
  }
}
這是 Switch 可組合函式狀態的變數,預設狀態為 false。
- 在
TipTimeScreen()函式的Column區塊中,於「Tip %」文字欄位後方呼叫含有以下引數的RoundTheTipRow()函式:設為roundUp的roundUp具名參數,以及設為 lambda 回呼 (可更新roundUp值) 的onRoundUpChanged具名參數:
@Composable
fun TipTimeScreen() {
   //...

   Column(
       ...
   ) {
       Text(
           ...
       )
       Spacer(...)
       EditNumberField(
           ...
       )
       EditNumberField(
           ...
       )
       RoundTheTipRow(roundUp = roundUp, onRoundUpChanged = { roundUp = it })
       Spacer(...)
       Text(
           ...
       )
   }
}
這會顯示「Round up tip」列。
- 執行應用程式。應用程式會顯示下圖中的「Round up tip?」的切換按鈕,但其中的指標不太明顯:
|
|
 1. 指標
1. 指標為了改善指標的可見度,請在後續步驟中將指標變更為深灰色。
- 在
RoundTheTipRow()函式的Switch()可組合函式中,新增colors具名參數。 - 將
colors具名參數設為SwitchDefaults.colors()函式,並在該函式中加入設為Color.DarkGray引數的uncheckedThumbColor具名參數。
Switch(
   //...
   colors = SwitchDefaults.colors(
       uncheckedThumbColor = Color.DarkGray
   )
)
- 匯入下列內容:
import androidx.compose.material.SwitchDefaults
import androidx.compose.ui.graphics.Color
RoundTheTipRow() 可組合函式現在應如下列程式碼片段所示:
@Composable
fun RoundTheTipRow(roundUp: Boolean, onRoundUpChanged: (Boolean) -> Unit) {
   Row(
       modifier = Modifier
           .fillMaxWidth()
           .size(48.dp),
       verticalAlignment = Alignment.CenterVertically
   ) {
       Text(stringResource(R.string.round_up_tip))
       Switch(
           modifier = Modifier
               .fillMaxWidth()
               .wrapContentWidth(Alignment.End),
           checked = roundUp,
           onCheckedChange = onRoundUpChanged,
           colors = SwitchDefaults.colors(
               uncheckedThumbColor = Color.DarkGray
           )
       )
   }
}
- 執行應用程式。切換鈕的指標顏色現已變更,如下圖所示:
- 輸入帳單金額和小費百分比,然後選取「Round up tip?」切換按鈕。這時小費金額並不會無條件進位,如果有此需求,請繼續依下一節說明更新
calculateTip()函式。
更新 calculateTip() 函式將小費無條件進位
請修改 calculateTip() 函式以接受 Boolean 變數,將小費無條件進位至最接近的整數:
- 如要將小費無條件進位,
calculateTip()函式必須知道切換按鈕的狀態,這是一個Boolean值。請在calculateTip()函式中新增Boolean類型的roundUp參數:
private fun calculateTip(
   amount: Double,
   tipPercent: Double = 15.0,
   roundUp: Boolean
): String {
   //...
}
- 在
calculateTip()函式的return陳述式前方,新增if()條件來檢查roundUp值。如果roundUp為true,請定義tip變數並設為kotlin.math.ceil()函式,然後傳遞tip函式做為引數:
if (roundUp)
   tip = kotlin.math.ceil(tip)
完成的 calculateTip() 函式應如下列程式碼片段所示:
private fun calculateTip(amount: Double, tipPercent: Double = 15.0, roundUp: Boolean): String {
   var tip = tipPercent / 100 * amount
   if (roundUp)
       tip = kotlin.math.ceil(tip)
   return NumberFormat.getCurrencyInstance().format(tip)
}
- 在
TipTimeScreen()函式中更新calculateTip()函式呼叫,然後傳入roundUp參數:
val tip = calculateTip(amount, tipPercent, roundUp)
- 執行應用程式。應用程式現在可將小費金額無條件進位,如下圖所示:
|
|


7. 取得解決方案程式碼
完成程式碼研究室後,如要下載當中用到的程式碼,您可以使用以下 Git 指令:
$ git clone https://github.com/google-developer-training/basic-android-kotlin-compose-training-tip-calculator.git
您也可以將存放區下載為 ZIP 檔案、將其解壓縮,並在 Android Studio 中開啟。
如要查看解決方案程式碼,請前往 GitHub。
8. 結語
恭喜!您已在 Tip Time 應用程式中新增自訂小費功能。現在使用者可在應用程式中輸入自訂小費百分比,並將小費金額四捨五入。歡迎在社群媒體上分享您的作品,並加上 #AndroidBasics 主題標記!