
1. Introduction
Android Vendor Test Suite (VTS) consists of four products:
VTS
VTS itself means the compliance test suite of Android Vendor Interface (VINTF).
VINTF is a versioned, stable interface for Android vendor implementation. This concept is introduced from Android version 8.0 (Oreo) in order to improve the engineering productivity, launch velocity, security, and reliability of Android device ecosystem.
VTS has a set of test cases designed to test the following components directly under VINTF:
- Hardware Abstraction Layer (HAL) modules
- Vendor native libraries (e.g., Vendor NDK, shortly VNDK)
- OS (i.e., Linux kernel)
CTS-on-GSI
CTS-on-GSI stands for Compatibility Test Suite (CTS) on General System Image (GSI). It is specifically designed to test Android devices using GSI, i.e., the stock AOSP (Android Open Source Project) system image. Most of the CTS-on-GSI tests is a kind of SDK API tests and can indirectly test VINTF. It consists of a subset of CTS test cases and some new test cases specifically designed for VINTF.
VTS-*
VTS-* is for the quality assurance of Android platform software. VTS-* has optional functional tests and non-functional tests. The default test plan name of the functional VTS and VTS-* is vts and vts-star, respectively.
The non-functional tests include performance tests (e.g., vts-performance) and fuzz tests (e.g., vts-fuzz). VTS-* also includes test case development tools. Two example test development tools are a HAL API call trace recording tool and a native code coverage measurement tool.
Android Lab and VTI
Vendor Test Infrastructure (VTI) is a set of cloud-based infrastructures for Android device partners and Open Source Software (OSS) ecosystems. It allows partners to easily create a cloud-based continuous integration service for VTS tests. That is possible thanks to the Android Lab infrastructure that can be used to build and operate an Android test lab so as to streamline VTS, VTS-*, and CTS-on-GSI executions.
Related Codelabs
Are you interested in using and developing some VTS or CTS-on-GSI tests now? Then please click the next button.
2. Build and Run a VTS Test Plan
Establishing a test environment
Recommended system environment:
- 64-bit Debian Linux (testing branch)
- Java 8
- Python 2.7
- ADB 1.0.39 https://developer.android.com/studio/releases/platform-tools.html
To set up a testing environment:
- Install Python development kit:
$ sudo apt-get install python-dev
- Install Protocol Buffer tools (for Python):
$ sudo apt-get install python-protobuf
$ sudo apt-get install protobuf-compiler
- Install Python virtual environment-related tools:
$ sudo apt-get install python-virtualenv
$ sudo apt-get install python-pip
- (Optionally) Download Python packages from PyPI to a local directory:
# To permanently set $VTS_PYPI_PATH, please add the following line to ~/.bashrc
$ export VTS_PYPI_PATH=<your directory>
$ curl https://android.googlesource.com/platform/test/vts/+/master/script/pip_requirements.txt?format=TEXT | base64 -d > pip_requirements.txt
$ pip download -d $VTS_PYPI_PATH -r pip_requirements.txt --no-binary protobuf,grpcio,matplotlib,numpy,Pillow,scipy
- Connect your device to host:
- Connect an unlocked Android device to a host computer using a USB cable.
- On the Android device, go to Settings > About Phone then click Build number until developer mode is enabled.
- On the Android device, go to Settings > Developer options > Turn on USB debugging.
- On the host, run from command-line shell:
$ adb devices
- On the Android device, confirm the host is trusted.
- On the host, run from command-line shell:
$ adb shell
- If that works, you are ready.
Testing a patch
To test a patch:
- Build a VTS host-side package:
$ . build/envsetup.sh
$ lunch aosp_arm64-userdebug
$ make vts -j
- Run the default VTS tests:
$ vts-tradefed
> run vts     // here `vts` is the test plan name
VTS plans
Available VTS test plans include:
Command | Description |
| For default VTS tests |
| For default VTS-* tests (excluding tests in the default VTS plan). |
| For default VTS HAL (hardware abstraction layer) tests |
| For default VTS kernel tests |
| For default VTS VNDK (vendor native development kit) tests |
| For default CTS-on-GSI (general system image) tests. |
To view a list of all plans, refer to /test/vts/tools/vts-tradefed/res/config.md.
VTS TradeFed Console Options
Available VTS TradeFed console options include:
Command | Description |
| Runs one specific test module. |
| Runs one specific test case. Multiple test cases can be specified as a comma separated list (e.g. test_case1,test_case2,...). |
| Prints detailed console logs. Applied to both VTS Java and Python test frameworks. |
| Lists all invocation threads. |
| Lists previous results. |
| Runs a test plan on the primary ABI (e.g., ARM64) only. |
| Runs test only against one ABI (Application Binary Interface) bitness. This shortens test execution time. |
| Selects a device to use when multiple devices are connected. |
| Interrupts running command and outputs partial result. |
| Splits the vts plan into shards and runs them on multiple devices. –shards used only for VTS. |
| Splits the cts-on-gsi plan into shards and runs them on multiple devices. –shard-count used only for CTS-on-GSI. |
| Retries failed and not executed tests with previous configuration and command options. Used only for VTS. |
| Retries for CTS-on-GSI always use |
| Generates a report in which all tests pass without being executed. |
| Prints help page that lists other console options. |
| Prints common options for vts plan. |
| Prints all options for vts plan. |
For Windows Host
While building VTS on Windows is not supported, it is possible to run most of VTS tests on a Windows host machine with Python, Java, and ADB installed.
- Download links: Java http://www.oracle.com/technetwork/java/javase/downloads/index.html Python 2.7 https://www.python.org/downloads/windows/ ADB 1.0.39 https://developer.android.com/studio/releases/platform-tools.html Install the required Python packages by using
pip. - Build VTS on Linux:
$ . build/envsetup.sh
$ lunch aosp_arm64-userdebug
$ make vts -j
- Copy
out/host/linux-x86/vts/android-vts.zipto your Windows host and extract it. - (Optional) Download Python packages from PyPI to a local directory:
# Permanently set VTS_PYPI_PATH in Advanced System Settings.
$ set VTS_PYPI_PATH=<your directory>
# Copy https://android.googlesource.com/platform/test/vts/+/master/script/pip_requirements.txt to local pip_requirements.txt.
$ pip download -d %VTS_PYPI_PATH% -r pip_requirements.txt
- Add
adb.exetoPATH. Runvts-tradefed_win.bat
$ set ANDROID_BUILD_TOP=
$ vts-tradefed_win.bat
> run vts     // where vts is the test plan name
3. Build and Run a VTS Test (For Developers)
Build and run locally
For ARM devices, please run:
$ . build/envsetup.sh
$ lunch aosp_arm64
$ make vts -j && vts-tradefed run commandAndExit <test plan name>
$ make vts -j TARGET_PRODUCT=aosp_arm64 && vts-tradefed run commandAndExit <test plan name> --primary-abi-only -l INFO --module <test module name>
For x86 devices, please use aosp_x86_64 build target.
To run a test case
$ vts-tradefed run commandAndExit <test plan name> -m <test module> -t <test case>
An example:
$ vts-tradefed run commandAndExit vts -m VtsHalRadioV1_0Target -t RadioHidlTest.getAvailableNetworks
Download packages and run
If you have downloaded android-vts.zip from its official release page or an Android build system, please run:
$ unzip android-vts.zip
$ cd android-vts
$ export PATH=`pwd`/bin:$PATH
$ export ANDROID_BUILD_TOP=
$ cd tools
$ ./vts-tradefed
Build a native test binary and run directly (only for development)
For a cc_test test module, please run:
$ m <test module> && adb sync data && adb shell data/nativetest64/<test module>/<test module>
Use atest (alpha version)
Atest is a script that builds only required build targets. It can be used for certain VTS and CTS-on-GSI test modules today. The supported VTS test modules include most of the VTS HAL tests. Atest is supported from v9.0 (P).
$ atest <test module>
$ atest <test module> -- -t <test case>
$ atest VtsCodelabHelloWorldTest -- -t testEcho1
Here are some examples:
$ atest VtsCodelabHelloWorldTest
$ atest VtsCodelabHelloWorldTest -- -t testEcho1
$ atest VtsHalLightV2_0Target
$ atest VtsHalRadioV1_0Target -- -t RadioHidlTest.getAvailableNetworks
You can also run a test in the current working directory.
$ cd test/vts/testcases/codelab/hello_world/
$ atest ./
4. Prepare a device with GSI for CTS-on-GSI test plan
How to Flash a Device
It uses a <fish>-user build and a GSI-userdebug build. The flashing steps are:
Step 1. Flash a <fish>-user build.
$ fastboot update ${TARGET_PRODUCT}-img-$BUILD_ID.zip --skip-reboot
Step 2. Select a GSI build. The GSI artifact file name is aosp_<arch><build AB type>-img-<build ID>.zip where <arch> is either arm, arm64, x86, or x86_64 (e.g., aosp_arm64_ab-img-<build ID>.zip); <build AB type> is _a, _ab, or empty. Specifically, for P branch, please use:
aosp_arm64-userdebugfor newly launched devicesaosp_arm64_ab-userdebugfor upgrading A/B build devicesaosp_arm64_a-userdebugfor upgrading non-A/B build devicesaosp_x86_64_a-userdebugfor emulator (goldfish)
Then please unzip the GSI artifact file and use system.img in it.
Step 3. Flash a GSI
$ fastboot flash system system.img
If a device uses Android verified boot, please turn that off for testing by running:
$ fastboot flash vbmeta vbmeta.img
where the vbmeta.img can be download from an Android build system or built locally.
Build a GSI image locally
$ lunch aosp_<arch><build AB type>-userdebug  # e.g., aosp_arm64_ab-userdebug
$ make -j
Build vbmeta.img locally
$ make avbtool -j
$ avbtool make_vbmeta_image --flag 2 --output vbmeta.img
How to Run a CTS-on-GSI test
Since v8.1
Please use a VTS package and then unzip and run:
$ vts-tradefed
> run cts-on-gsi -m <test module> -t <test case>
Here -m and -t are optional.
For v8.0
Please use the CTS package that is downloadable from the CTS download page.
$ cts-tradefed
> run cts-reference-aosp -m <test module> -t <test case>
5. Write a VTS Test (Getting Started)
All VTS, VTS-*, and VTI code is kept in AOSP (Android Open Source Project). Let's download the AOSP source code based on this ' Downloading the Source' manual.
Write a Host-Side Python Test
We will extend the provided VTS HelloWorld Codelab test. Before actually extending that test, let's build and run that test.
$ make vts -j
$ vts-tradefed
> run vts-codelab -m VtsCodelabHelloWorldTest
If your VTS TradeFed console printed the following result (e.g., PASSED: 4), that means you can run VtsCodelabHelloWorldTest successfully on your device and thus are ready for this part of the codelab.
E/BuildInfo: Device build already contains a file for VIRTUALENVPATH in thread Invocation-<ID>
E/BuildInfo: Device build already contains a file for PYTHONPATH in thread Invocation-<ID>
I/VtsMultiDeviceTest: Setting test name as VtsCodelabHelloWorldTest
I/ConsoleReporter: [<ID>] Starting armeabi-v7a VtsCodelabHelloWorldTest with 2 tests
I/ConsoleReporter: [1/2 armeabi-v7a VtsCodelabHelloWorldTest <ID>] VtsCodelabHelloWorldTest#testEcho1 pass
I/ConsoleReporter: [2/2 armeabi-v7a VtsCodelabHelloWorldTest <ID>] VtsCodelabHelloWorldTest#testEcho2 pass
I/ConsoleReporter: [<ID>] armeabi-v7a VtsCodelabHelloWorldTest completed in 2s. 2 passed, 0 failed, 0 not executed
W/CompatibilityTest: Inaccurate runtime hint for armeabi-v7a VtsCodelabHelloWorldTest, expected 1m 0s was 19s
I/ResultReporter: Test Result: <omitted>/out/host/linux-x86/vts/android-vts/results/2017.04.21_11.27.07/test_result_failures.html
I/ResultReporter: Test Logs: <omitted>/out/host/linux-x86/vts/android-vts/logs/2017.04.21_11.27.07
I/ResultReporter: Invocation finished in 43s. PASSED: 4, FAILED: 0, MODULES: 2 of 2
It also shows where the test logs are kept (out/host/linux-x86/vts/android-vts/logs/2017.04.21_11.27.07) and the xml report is stored (out/host/linux-x86/vts/android-vts/results/2017.04.21_11.27.07).
You may use -l INFO option to have logs printed to console during test execution time.
The VtsCodelabHelloWorldTest code is stored in <your AOSP repo's local home dir> /test/vts/testcases/codelab/hello_world/. That directory has the following four files:
Android.mk: Build file to define a test build module.AndroidTest.xml: Test module configuration file.VtsCodelabHelloWorldTest.py: Test case Python file to define the actual test logic.__init__.py: An empty file required for Python package.
Let's look into each of the first three files.
Android.mk:
LOCAL_PATH := $(call my-dir)

include $(CLEAR_VARS)
LOCAL_MODULE := VtsCodelabHelloWorldTest
VTS_CONFIG_SRC_DIR := testcases/codelab/hello_world
include test/vts/tools/build/Android.host_config.mk
It tells that the test module's build module name is VtsCodelabHelloWorldTest, and its source code is kept in the testcases/codelab/hello_world directory. The last line is to use the predefined VTS build rule.
AndroidTest.xml:
<configuration description="Config for VTS CodeLab HelloWorld test case">
    <option name="config-descriptor:metadata" key="plan" value="vts-codelab" />
    <target_preparer class="com.android.compatibility.common.tradefed.targetprep.VtsFilePusher">
        <option name="push-group" value="HostDrivenTest.push" />
    </target_preparer>
    <test class="com.android.tradefed.testtype.VtsMultiDeviceTest">
        <option name="test-module-name" value="VtsCodelabHelloWorldTest"/>
        <option name="test-case-path" value="vts/testcases/codelab/hello_world/VtsCodelabHelloWorldTest" />
    </test>
</configuration>
This xml file tells VTS TradeFed how to prepare and run the VtsCodelabHelloWorldTest test. It uses a VTS TradeFed test preparer: VtsFilePusher, which pushes all the files needed for a host-driven test. The actual list is defined in HostDrivenTest.push file which includes VtsDriverHal.push and VtsDriverShell.push files. Those included files may include some other push files defined in the same directory.
The actual test execution is specified by the VtsMultiDeviceTest class where option test-module-name specifies the actual test module name, which we can use when we do > run vts -m <Test Module Name> from a VTS TradeFed console, and option test-case-path specifies the path of the actual test source file (excluding .py extension).
VtsCodelabHelloWorldTest.py:
import logging

from vts.runners.host import asserts
from vts.runners.host import base_test
from vts.runners.host import const
from vts.runners.host import test_runner


class VtsCodelabHelloWorldTest(base_test.BaseTestClass):
    """Two hello world test cases which use the shell driver."""

    def setUpClass(self):
        self.dut = self.android_devices[0]
        self.shell = self.dut.shell

    def testEcho1(self):
        """A simple testcase which sends a command."""
        results = self.shell.Execute(
            "echo hello_world")  # runs a shell command.
        logging.info(str(results[const.STDOUT]))  # prints the stdout
        asserts.assertEqual(results[const.STDOUT][0].strip(),
                            "hello_world")  # checks the stdout
        asserts.assertEqual(results[const.EXIT_CODE][0],
                            0)  # checks the exit code

    def testEcho2(self):
        """A simple testcase which sends two commands."""
        results = self.shell.Execute(["echo hello", "echo world"])
        logging.info(str(results[const.STDOUT]))
        asserts.assertEqual(len(results[const.STDOUT]),
                            2)  # check the number of processed commands
        asserts.assertEqual(results[const.STDOUT][0].strip(), "hello")
        asserts.assertEqual(results[const.STDOUT][1].strip(), "world")
        asserts.assertEqual(results[const.EXIT_CODE][0], 0)
        asserts.assertEqual(results[const.EXIT_CODE][1], 0)


if __name__ == "__main__":
    test_runner.main()
This file contains the actual test source code. It has the test class VtsCodelabHelloWorldTest which inherits from BaseTestClass class. This class can have four default methods: setUpClass which is called once at the beginning for setup, setUp which is called before running each test case, tearDown which is called after each test case, and tearDownClass which is called once at the end for cleanup. In this case, only setUpClass is defined (by overriding) and simply gets a DUT (Device Under Test) instance and a shell instance of the DUT.
A test case is a method with test as the prefix of its name (e.g., testEcho1 and testEcho2). testEcho1 test case invokes a remote shell instance (first line), sends ‘echo hello_world' shell command to a target device (second line), and verifies the results (fourth line to check the stdout of the echo command and fifth line to check the exit code of the same echo command). testEcho2 test case shows how to send multiple shell commands using one Python function call.
To extend this test module, let's add the following method to VtsCodelabHelloWorldTest class.
    def testListFiles(self):
        """A simple testcase which lists files."""
        results = self.dut.shell.Execute("ls /data/local/tmp")
        logging.info(results[const.STDOUT][0])
        asserts.assertEqual(results[const.EXIT_CODE][0], 0)
Then, run the following commands to test it:
$ make vts
$ vts-tradefed
> run vts-codelab -m VtsCodelabHelloWorldTest -t testListFiles -l INFO
You can check the test logs to see whether all files are correctly listed. That result can be validated by using adb shell ls /data/local/tmp command.
Because this test is written in Python and executed on the host, we call this a host-side Python test.
Host-side HAL test
To write a host-side HAL test with python, the first step is to call method InitHidlHal which will return the client handler of the targent HAL, for example:
self.dut.hal.InitHidlHal(
            target_type="thermal",
            target_basepaths=self.dut.libPaths,
            target_version=1.0,
            target_package="android.hardware.thermal",
            target_component_name="IThermal")
Where target_type is the name of handler we use to access the targeting HAL, target_package/target_version/target_component_name is the package name/version/interface name of the targeting HAL.
After that, we can use the handler to test APIs defined with the targeting, e.g.
status, cpuUsages = self.dut.hal.thermal.getCpuUsages()
Use Hidl native types in host-side HAL tests
VTS now supports 3 hidl native types in host-side HAL tests which are fmq, hidl_memory and hidl_handle, the following sections shows how we use each of the types in the test.
fmq
fmq (Fast Message Queue) is a data structure used to send/receive data between HAL client and HAL servers processes.
To create a fmq with host-side python script, call the InitFmq() method which returns a handler of the created queue, e.g.
self.writer = self.dut.resource.InitFmq(
            data_type="uint16_t",
            sync=True,
            queue_size=2048,
            blocking=False)
Where data_type means the type of data in the queue, such as uint16_t, uint32_t. sync is a bool indicating whether the queue is synchronized (i.e. only has one reader). Queue_size sets the maximum number of queue elements in the queue. Blocking indicates whether blocking should be enabled in the queue (e.g. read can wait if there is no data to read.).
Once the queue has been created, we can use the handler to perform operations like read/write data from/to fmq, e.g.
write_data = [1, 2, 3, 4]
asserts.assertTrue(self.writer.write(write_data, 4), "Write queue failed.")
Other operations supported for fmq includes:
- getQuantumCount(): returns the number of items that fit in the queue.
- getQuantumSize(): returns the size of item in the queue.
- availableToWrite(): returns the number of spaces available to write.
- availableToRead(): returns the number of items in the queue ready to be read.
- isValid(): checks if the queue is valid.
hidl_memory
hidl_memory is a data structure used by the HAL client and server processes to access shared memory
To create a hidl_memory with host-side python script, call the InitHidlMemory() method which returns a handler of the created memory object, e.g.
self.mem_obj = self.dut.resource.InitHidlMemory(mem_size=1024)
Where mem_size sets the size of the requested memory region.
Once the shared memory has been created, we can use the handler to perform operations like read/write data from/to the memory, e.g.
write_data = "abcdef"
# Write data into memory.
self.mem_obj.update()
self.mem_obj.updateBytes(write_data, len(write_data))
self.mem_obj.commit()

# Read data from memory.
self.mem_obj.read()
read_data = self.mem_obj.readBytes(len(write_data))
hidl_handle
hidl_handle is a data structure used by the HAL client and server processes to pass file descriptors so the client and server could communicate via files. Currently VTS only support hild_handle with a single basic file descriptor.
To create a hidl_handle with host-side python script, call the InitHidlHandleForSingleFile()method e.g.
self.writer = self.dut.resource.InitHidlHandleForSingleFile(
            file_path="/data/local/tmp/vts_codelab_tmp/test.txt",
            mode="w+")
Where file_path specifies path to the file and mode is the mode that the file is opened (e.g. r, w)
Once we created the handler, we can use is to perform operations like read/write data from/to the corresponding file, e.g.
write_data = "Hello World!"
asserts.assertEqual(len(write_data),
                self.writer.writeFile(write_data,len(write_data)))
Write a Target-Side C/C++ Binary Test
This part explains how to package a target-side binary or a shell script as a VTS test by using BinaryTest template. Let's assume your binary test module name is vts_sample_binary_test that would exit with 0 if that test passes. You can wrap the test easily with VTS BinaryTest template by specifying the test module path and type in AndroidTest.xml:
<test class="com.android.tradefed.testtype.VtsMultiDeviceTest">
    <option name="test-module-name" value="VtsSampleBinaryTest" />
    <option name="binary-test-source" value="DATA/nativetest/vts_sample_binary_test" />
</test>
The binary-test-source option specifies where the binary is packaged in VTS, and the BinaryTest template will push the test binary to a default location on device and deleting it after test finishes.
You can also specify a test tag, which is often used to distinguish 32bit tests and 64bit tests.
<test class="com.android.tradefed.testtype.VtsMultiDeviceTest">
    <option name="test-module-name" value="VtsSampleBinaryTest" />
    <option name="binary-test-source" value="_32bit::DATA/nativetest/vts_sample_binary_test" />
    <option name="binary-test-source" value="_64bit::DATA/nativetest64/vts_sample_binary_test" />
</test>
An example test is available at $ANDROID_BUILD_TOP /test/vts/testcases/codelab/target_binary/.
Using a script to auto-generate a new test project
A basic test project can be created using script located test/vts/script/create-test-project.py
To create a codelab like project, first load environment from repo root
$ . build/envsetup.sh
Then call the project creation script with required --name and --dir option
$ test/vts/script/create-test-project.py --name SampleTestModule --dir sample_test_module
A new test project will be created under test/vts/testcases/sample_test_module
Filtering test cases
Test case filter can be configured from AndroidTest.xml.
There are three options that can be used to configure test filter:
Option name | Value type | Description |
include-filter | strings | Test case include filter |
exclude-filter | strings | Test case exclude filterExample: |
exclude-over-include | boolean | Whether exclude filter has higher priority than include filter.Default: |
Filter priority
By default, include-filter has higher priority than exclude filter. This means if there is any items in include-filter, exclude-filter will just be ignored.
This is useful for users to select to run specific tests directly from command line even while the test has been excluded in configuration due to some error. See "Specify filters from run command" section below for details on how to use filter from run command.
However, if exclude-over-include option is set to true, tests excluded from exclude-filter will not run even when it is also specified in include-filter.
Multiple filters
include-filter and exclude-filter can be specified multiple times in AndroidTest.xml, and their values will be combined into a list. For example:
<test class="com.android.tradefed.testtype.VtsMultiDeviceTest">
    <option name="include-filter" value="test1" />
    <option name="include-filter" value="test2" />
</test>
Comma separation
The value can also be comma separated. For example:
<test class="com.android.tradefed.testtype.VtsMultiDeviceTest">
    <option name="include-filter" value="test1,test2" />
    <option name="include-filter" value="test3" />
</test>
This also means test name should not contain commas.
Regular expression
Regular expression can be used by wrapping test name with r(...). For example, the following configuration runs only all test whose name ends with 32bit:
<test class="com.android.tradefed.testtype.VtsMultiDeviceTest">
    <option name="include-filter" value="r(.*32bit)" />
</test>
The regular expression wrapping can be escaped with backslashes. For example, \r(test1) is an exact test name match.
Bitness expansion
By default, bitness postfix will be added to each non-regular expression filtering rule that doesn't have bitness postfix. For example, the following two configurations are equal:
Configuration 1:
<test class="com.android.tradefed.testtype.VtsMultiDeviceTest">
    <option name="include-filter" value="test1" />
</test>
Configuration 2:
<test class="com.android.tradefed.testtype.VtsMultiDeviceTest">
    <option name="include-filter" value="test1" />
    <option name="include-filter" value="test1_32bit" />
    <option name="include-filter" value="test1_64bit" />
</test>
If a filter is a regular expression, or already has 32bit or 64bit posix, it will not be automatically expanded.
Minus sign prefix in include-filter
A minus sign prefix in include filter adds a value to exclude filter. For example, the following two configurations have the same effect:
Configuration 1:
<test class="com.android.tradefed.testtype.VtsMultiDeviceTest">
    <option name="include-filter" value="-r(.*32bit)" />
</test>
Configuration 2:
<test class="com.android.tradefed.testtype.VtsMultiDeviceTest">
    <option name="exclude-filter" value="r(.*32bit)" />
</test>
Specify filters from run command
The include-filter can also be configured in test run command.
vts-tradefed run vts-star -m TestModule -t test1,r(test2.*),-r(.*64bit)
Since minus sign adds the item to exclude-filter, the above command has the same effect with the following configuration:
<test class="com.android.tradefed.testtype.VtsMultiDeviceTest">
    <option name="include-filter" value="test1" />
    <option name="include-filter" value="r(test2.*)" />
    <option name="exclude-filter" value="r(.*64bit)" />
</test>
6. Choose a Template and Write a Customized VTS Test
Using a VTS template, you can quickly develop a VTS test for a specific objective. This part of codelab explains a few commonly used templates.
Wrap a target side GTest binary with GtestBinaryTest template
If your test binary is a GTest ( Google Test), you may still use the BinaryTest template, which will treat the test module as a single test case in result reporting. You can specify the gtest binary test type so that individual test cases will be correctly parsed.
<test class="com.android.tradefed.testtype.VtsMultiDeviceTest">
    <option name="test-module-name" value="VtsSampleBinaryTest" />
    <option name="binary-test-source" value="_32bit::DATA/nativetest/vts_sample_binary_test" />
    <option name="binary-test-source" value="_64bit::DATA/nativetest64/vts_sample_binary_test" />
    <option name="binary-test-type" value="gtest" />
</test>
GtestBinaryTest template will first list all the available test cases, and then run them one by one through shell command with –gtest_filter flag. This means, each test case will be executed on its own Linux process, and global static variable across test cases should not be used.
Wrap a target side HIDL HAL test binary with HalHidlGtest template
From Android version 8.0 (O), Hardware Interface Definition Language (HIDL) is used to specify HAL interfaces. Using VTS, HIDL HAL testing can be done effectively because the VTS framework handles its non-conventional test steps transparently and provides various useful utils which a HIDL HAL test case can use.
A HIDL HAL target side test often needs setup steps such as disabling Java framework, setting SELinux mode, toggling between passthrough and binder mode, checking HAL service status, and so forth.
Let's assume your test AndroidTest.xml looks like:
<test class="com.android.tradefed.testtype.VtsMultiDeviceTest">
    <option name="test-module-name" value="VtsHalMyHidlTargetTest"/>
    <option name="binary-test-source" value="..." />
...
The following option is needed to use the HIDL HAL gtest template.
<option name="binary-test-type" value="hal_hidl_gtest" />
Use test template to write your target-side HIDL HAL test
VTS provides a number of test templates for HAL developers to write target-side HIDL HAL tests, these templates provide a way for developers to make use of VTS test framework features.
VtsHalHidlTargetTestBase
A HIDL GTest extending from VtsHalHidlTargetTestBase will allow VTS framework to toggle between passthrough and binder mode for performance comparison.
The VTS HIDL target templates are located in VtsHalHidlTargetTestBase module, and you may include it through your Android.bp file in the following way:
 cc_test {
    name: "VtsHalHidlSampleTest",
    defaults: ["hidl_defaults"],
    srcs: ["SampleTest.cpp"],
    shared_libs: [
        ...
    ],
    static_libs: ["VtsHalHidlTargetTestBase"],
}
And in SampleTest.cpp:
...
#include <VtsHalHidlTargetTestBase.h>
...

class SampleTest : public ::testing::VtsHalHidlTargetTestBase {
Interface int_ = ::testing::VtsHalHidlTargetTestBase::getService<IInterface>();

...
VtsHalHidlTargetCallbackBase
VtsHalHidlTargetCallbackBase is another template in that runner. It offers utility function such as WaitForCallback and NotifyFromCallback. A typical usage is as follows:
class CallbackArgs {
    ArgType1 arg1;
    ArgType2 arg2;
}

class MyCallback
    : public ::testing::VtsHalHidlTargetCallbackBase<>,
      public CallbackInterface {
 public:
  CallbackApi1(ArgType1 arg1) {
    CallbackArgs data;
    data.arg1 = arg1;
    NotifyFromCallback("CallbackApi1", data);
  }

  CallbackApi2(ArgType2 arg2) {
    CallbackArgs data;
    data.arg1 = arg1;
    NotifyFromCallback("CallbackApi2", data);
  }
}

Test(MyTest) {
  CallApi1();
  CallApi2();
  auto result = cb_.WaitForCallback("CallbackApi1");
  // cb_ as an instance of MyCallback, result is an instance of
  // ::testing::VtsHalHidlTargetCallbackBase::WaitForCallbackResult
  EXPECT_TRUE(result.no_timeout); // Check wait did not time out
  EXPECT_TRUE(result.args); // Check CallbackArgs is received (not
                               nullptr). This is optional.
  // Here check value of args using the pointer result.args;
  result = cb_.WaitForCallback("CallbackApi2");
  EXPECT_TRUE(result.no_timeout);
  // Here check value of args using the pointer result.args;

  // Additionally. a test can wait for one of multiple callbacks.
  // In this case, wait will return when any of the callbacks in the provided
  // name list is called.
  result = cb_.WaitForCallbackAny(<vector_of_string>)
  // When vector_of_string is not provided, all callback functions will
  // be monitored. The name of callback function that was invoked
  // is stored in result.name
VtsHalHidlTargetTestEnvBase
VtsHalHidlTargetTestEnvBase is a template for creating a gtest environment. It provides interface for developer to register the HAL service accessed by the test and the VTS test framework will use these info to support:
- HAL Service name aware testing: VTS framework will automatically identify all instances of the registered HAL service(s) and run the test against each of the instances.
- HAL testability checker: VTS framework will check the HAL service available on the target device and skip the test if the registered HAL service(s) is not available.
To use VtsHalHidlTargetTestEnvBase, first define a testEnvironment based on VtsHalHidlTargetTestEnvBase and register targeting HALs accessed by the test (android.hardware.Foo@1.0::IFoo in the example):
...
#include <android/hardware/foo/1.0/IFoo.h>
#include <VtsHalHidlTargetTestEnvBase.h>

class testEnvironment  : public::testing::VtsHalHidlTargetTestEnvBase {
      virtual void registerTestServices() override {
                  registerTestService<IFoo>();
      }
};
testEnvironment* env;
Next, register the test environment in your main() function and call initTest()to initialize the test environment:
...
int main(int argc, char** argv) {
        testEnv = new testEnvironment();
        ::testing::AddGlobalTestEnvironment(testEnv);
        ::testing::InitGoogleTest(&argc, argv);
        testEnv>init(argc, argv);
        return RUN_ALL_TESTS();
}
Now, wherever you need to call GetService()in your test to get a clint handler of the targeting HAL service, pass the service name retrieved by the test environment (i.e. the service name of the HAL instance identified by the VTS test framework) as the parameter, for example:
::testing::VtsHalHidlTargetTestBase::getService<IFoo>(testEnv->getServiceName<IFoo>());
The docstrings in source code under test/vts/runners/target/ contain more detailed explanation for each APIs.
Test template to write your host-side HIDL HAL test
VTS also provides a python test temple to help developers write host-side HIDL HAL tests. A test written based on hal_hidl_host_test template is automatically enabled to support the following VTS features:
- Service name aware testing.
- HAL testability checker.
- HAL API latency profiling if API profiling is enabled for the test.
- Native code coverage measurement if coverage instrument is enabled on target device.
To use hal_hidl_host_test template, you test will look like:
...
class ExampleTest(hal_hidl_host_test.HalHidlHostTest):
    TEST_HAL_SERVICES = {
        "android.hardware.foo@1.0::IFoo",
    }

    def setUpClass(self):
        super(ContexthubHidlTest, self).setUpClass()
        self.dut.hal.InitHidlHal(
            target_type="foo",
            target_basepaths=self.dut.libPaths,
            target_version=1.0,
            target_package="android.hardware.foo",
            target_component_name="IFoo",
            hw_binder_service_name=self.getHalServiceName(
                        "android.hardware.foo@1.0::IFoo"),
            bits=int(self.abi_bitness))

    def testCase1(self):
        ...
As shown in the example code, the first step we need is to define a test class based on hal_hidl_host_test.HalHidlHostTest. Then we need to explicitly claim the targeting HAL service(s) of the test as TEST_HAL_SERVICES. This step is similar to the HAL service registration in the target-side HIDL HAL test which will inform the VTS test framework of the HAL service(s) accessed by the test. Finally, when we call InitHidlHal to get the client handler of the targent HAL, we need to pass parameter hw_binder_service_name by calling the method getHalServiceName()provided by the template which will automatically identify the HAL service instance available on the target device and pass the corresponding service name.
Customize your test configuration (Optional)
AndroidTest.xml file
Pre-test file pushes from host to device can be configured for VtsFilePusher in AndroidTest.xml with the push-group option. Individual file push can be defined with push. Please refer to TradeFed for more detail.
Python module dependencies can be specified as dep-module option for VtsPythonVirtualenvPreparer in AndroidTest.xml. This will trigger the runner to install or update the modules using pip in the python virtual environment before running tests.
...
    <multi_target_preparer class="com.android.tradefed.targetprep.VtsPythonVirtualenvPreparer">
        <option name="dep-module" value="numpy" />
        <option name="dep-module" value="scipy" />
        <option name="dep-module" value="matplotlib" />
        <option name="dep-module" value="Pillow" />
    </multi_target_preparer>
...
VtsPythonVirtualenvPreparer will install a set of package including future, futures, enum, and protobuf by default. To add a dependency module, please add <option name="dep-module" value="<module name>" /> inside VtsPythonVirtualenvPreparer in ‘AndroidTest.xml'
Test case config
Optionally, a .runner_conf file can be used to pass variables in json format to test case.
To add a .runner_conf file, create a .runner_conf file under your project directory using project name:
$ vi test/vts/testcases/host/<your project directiry>/<your project name>.runner_conf
Then edit its contents to:
{
    <key_1>: <value_1>,
    <key_2>: <value_2>
}
And in your test case python class, you can get the json value by using self.getUserParams method.
For example:
    key1 = self.getUserParam("key_1")
    logging.info("%s: %s", "key_1", key1)
At last, add the following line to com.android.tradefed.testtype.VtsMultiDeviceTest class
in AndroidTest.xml:
<option name="test-config-path" value="vts/testcases/<your project directiry>/<your project name>.runner_conf" />
Your config file will overwrite fields in the following default json object defined at
test/vts/tools/vts-tradefed/res/default/DefaultTestCase.config if there's a conflict.
Binary Test Configurations
Binary tests, including gtests and hidl tests, have the following AndroidTest.xml configuration options
Option name | Value type | Description |
binary-test-source | strings | Binary test source paths relative to vts test-case directory on host. |
binary-test-working-directory | strings | Working directories (device-side path).Example: |
binary-test-envp | strings | Environment variables for binary.Example: |
binary-test-args | strings | Test arguments or flags.Example: |
binary-test-ld-library-path | strings |
|
binary-test-disable-framework | boolean | Run |
binary-test-stop-native-servers | boolean | Stop all properly configured native servers during the testing. Example: |
binary-test-type | string | Template type. Other template types extend from this template, but you don't have to specify this option for this template because you already specified |
For more information, please refer to this page in source.android.com
7. Write a VTS HAL Extension Test
SoC vendors and ODMs may define and implement HAL extensions for their products. VTS supports testing those HAL extensions. As long as the test cases follow the target/host-side templates, VTS can run them like the compliance tests in vts-hal plan.
The source code of the HAL can be placed in any project. The naming convention for HAL extension is vendor.<VENDOR_NAME>.<HAL_NAME>@<HAL_VERSION>; for VTS module, it is VtsHal<VENDOR_NAME><HAL_NAME><HAL_VERSION><Test_TYPE>. For example, vendor.example.light@2.0 and VtsHalExampleLightV2_0Target.
In this codelab, Let's assume the HAL extension is defined under vendor/qcom/light/2.0 as vendor.qcom.light@2.0
- Suppose we have already defined a test binary
VtsHalQcomLightV2_0TargetTestundervendor/qcom/light/2.0/vts/functionalused for our target side test, we need to first include the binary in VTS package by adding the binary to${ANDROID_BUILD_TOP}/test/vts/tools/build/tasks/list/vts_test_lib_hidl_package_list.mk - Create VTS configurations for the test case.
launch_hal_test.py located under ${ANDROID_BUILD_TOP}/test/vts-testcase/hal/script is a script to help developers generate the config files (Android.mk and AndroidTest.xml) for VTS HAL tests. An example usage of the script is:
$ cd ${ANDROID_BUILD_TOP}/test/vts-testcase/hal/script
$ ./launch_hal_test.py --test_type target --package_root vendor.qcom --path_root vendor/qcom/ --test_binary_file VtsHalQcomLightV2_0TargetTest.cpp vendor.qcom.light@2.0
The generated config file will be stored under the same directory that stores the .hal files (${ANDROID_BUILD_TOP}/vendor/qcom/light/2.0/ in this case). You can also customize the directory to store config files by passing option --test_config_dir to the script.
- If the service is not installed on the device, you can manually add it.
$ HAL_NAME=vendor.qcom.light@2.0
$ m ${HAL_NAME}-service -j
$ cd $ANDROID_PRODUCT_OUT
$ adb root
$ adb shell mkdir /data/tmp
$ adb push ./vendor/bin/hw/${HAL_NAME}-service /data/tmp/
$ adb push ./vendor/lib64/${HAL_NAME}.so /data/tmp/
$ adb shell LD_LIBRARY_PATH=/data/tmp/ /data/tmp/${HAL_NAME}-service
# Open another terminal, set HAL_NAME and confirm the service is running.
$ adb shell lshal | grep ${HAL_NAME}
- Build and run the VTS modules on the device with non-compliance configuration.
$ m vts -j
$ vts-tradefed
> run vts-staging-default -m VtsHalQcomLightV2_0Target
If the service has never run on the device since bootup, the result on console looks like PASSED: 0, FAILED: 0, MODULES: 2 of 2, which means the modules are skipped. If the service is running, you can see passing or failing results.
8. Write a HAL adapter test
The Hal adapter Test is designed to verify the backward compatibility of a system image with an older vendor image. The idea is to adapter a HAL service to a lower minor version (e.g. adapter android.hardware.vibrator@1.1 to android.hardware.vibrator@1.0) and verify the device functions as long as the system claims to be compatible with the lower version of the given HAL.
Configuration
To write a HAL adapter test, there is no need to write any test code as these tests are typically based on existing CTS tests which are already packaged with android-vts.zip. What we need to do is to create a right test configuration.
As usual, you need an Android.mk and an AndroidTest.xml to deploy the HAL adapter test as part of VTS.
Let's assume you want to create an adapter for HAL android.hardware.vibrator@1.1. In your AndroidTest.xml, first configure to push the adapter script as:
<target_preparer class="com.android.compatibility.common.tradefed.targetprep.VtsFilePusher">
    <option name="abort-on-push-failure" value="true"/>
    <option name="push" value="script/target/vts_adapter.sh->/data/local/tmp/vts_adapter.sh"/>
</target_preparer>
Next, configure the VtsHalAdapterPreparer as:
<target_preparer class="com.android.tradefed.targetprep.VtsHalAdapterPreparer">
    <option name="adapter-binary-name" value="android.hardware.vibrator@1.0-adapter"/>
    <option name="hal-package-name" value="android.hardware.vibrator@1.1"/>
</target_preparer>
Add device health test with the HAL adapter test module
Device health test is a test to verify the device system is running normally without any service/app crashing. It is a basic test to verify the device functions with a HAL adapter. To add a device health test to your HAL adapter test module. Add the following lines to your AndroidTest.xml :
<target_preparer class="com.android.tradefed.targetprep.TestAppInstallSetup">
    <option name="test-file-name" value="DeviceHealthTests.apk" />
    <option name="cleanup-apks" value="true" />
</target_preparer>
<test class="com.android.tradefed.testtype.AndroidJUnitTest">
    <option name="package" value="com.android.devicehealth.tests"/>
    <option name="runner" value="android.support.test.runner.AndroidJUnitRunner"/>
</test>
Add CTS test case with the HAL adapter test module
Various CTS test cases have been introduced to verify the framework functionality based on the vendor image. We can pick one or more CTS test cases that abundantly access the testing HAL (i.e. android.hardware.vibrator@1.0 in this case) and add them to your HAL adapter test. Let's say we have picked CtsDevicePolicyManagerTestCases and CtsMonkeyTestCases for this adapter test, just add the following lines to your AndroidTest.xml :
<include name="CtsDevicePolicyManagerTestCases.config"/>
<include name="CtsMonkeyTestCases.config"/>
The final AndroidTest.xml looks like this:
<configuration description="Config for VTS VtsHalVibratorV1_1Adapter test cases">
    <option key="plan" name="config-descriptor:metadata" value="vts-hal-adapter"/>
    <target_preparer class="com.android.compatibility.common.tradefed.targetprep.VtsFilePusher">
        <option name="abort-on-push-failure" value="true"/>
        <option name="push" value="script/target/vts_adapter.sh->/data/local/tmp/vts_adapter.sh"/>
    </target_preparer>
    <target_preparer class="com.android.tradefed.targetprep.VtsHalAdapterPreparer">
        <option name="adapter-binary-name" value="android.hardware.vibrator@1.0-adapter"/>
        <option name="hal-package-name" value="android.hardware.vibrator@1.1"/>
    </target_preparer>
    <target_preparer class="com.android.tradefed.targetprep.TestAppInstallSetup">
        <option name="test-file-name" value="DeviceHealthTests.apk" />
        <option name="cleanup-apks" value="true" />
    </target_preparer>

    <test class="com.android.tradefed.testtype.AndroidJUnitTest">
        <option name="package" value="com.android.devicehealth.tests"/>
        <option name="runner" value="android.support.test.runner.AndroidJUnitRunner"/>
    </test>
    <include name="CtsDevicePolicyManagerTestCases.config"/>
    <include name="CtsMonkeyTestCases.config"/>
</configuration>
9. Write a VTS Performance Profiling Test
HAL API call latency profiling
By enable API call latency profiling for your VTS HIDL HAL test, you are expected to get:
- trace files that record each API call happened during the test execution with the passed argument values as well as the return values.
- performance profiling data that contains the latency of each API call which is also displayed in the VTS dashboard if the dashboard feature is used.
Add profiler library to VTS
To enable profiling for your HAL testing, we need to add the corresponding profiler library in: vts_test_lib_hidl_package_list.mk. The name of the profiling library follow the pattern as:
package_name@version-vts-profiler.so
We will use Nfc Hal as a running example throughout this section, so, the profiler library name is android.hardware.nfc@1.0-vts.profiler.so.
Run your VTS test with profiling enabled
The vts-hal-profiling test plan is configured to run the containing tests with profiling enabled. So, to run VTS tests with performance profiling:
vts-tradefed run vts-hal-profiling -m YourTestModuleName
Schedule the profiling test
Add the following lines to the AndroidTest.xml file for your test module
<option name="config-descriptor:metadata" key="plan" value="vts-hal" />
Subscribe the notification alert emails
Please check notification page for the detailed instructions.
Basically, now it is all set so let's wait for a day or so and then visit your VTS Dashboard. At that time, you should be able to add YourTestModuleName to your favorite list.
That is all you need to do in order to subscribe alert emails which will sent if any notably performance degradations are found by your profiling tests.
Also if you click YourTestModuleName in the dashboard main page, the test result page shows up where the top-left side shows the list of APIs which have some measured performance data.
Where to find the trace files?
All the trace files generated during the tests are by default stored under /tmp/vts-test-trace/ with name pattern
hal-package_version_target-device-type_target-device-serial_target-build-id_timestamp.vts.trace
e.g.
android.hardware.graphics.mapper_2.0_walleye_824X002UJ_5090744_179498078432032.vts.trace
The trace file is in binary format, to parse it to text format, do
make trace_processor
./out/host/linux-x86/bin/trace_processor --mode parse_trace /path/to/trace/file
By default the trace file only contains the timestamp and the API info (e.g package_name, version, interface_name, etc.), it does not contain the values of input parameter and return results. To turn on the full trace recording, run you tests as
vts-tradefed run vts-hal-profiling --test-arg com.android.tradefed.testtype.VtsMultiDeviceTest:profiling-arg-value:true -m YourTestModuleName
Profiling for CTS tests
We can also enable HAL API profiling for CTS tests, unlike profiling for VTS tests, the profiling focus on generating trace files instead of measuring API call latency. The profiling traces will be stored locally, but the results will not be uploaded to VTS dashboard.
The cts-hal-profiling test plan is configured to run the containing CTS tests with profiling enabled. So, to collect profiling trace for your CTS test module, do:
vts-tradefed run cts-hal-profiling -m CtsTestModuleName
The trace files are stored under
$ANDROID_BUILD_TOP/out/host/linux-x86/vts/android-vts/results/test_run_id/vts-profiling/test_module_name/
E.g. $ANDROID_BUILD_TOP/out/host/linux-x86/vts/android-vts/results/2018.10.26_17.16.02/vts-profiling/android.view.accessibility.cts/
The trace file contains full API call info (including the value of input parameters and return values).
Custom profiling points and post-processing
Prerequisites
Let's assume you have created a performance benchmark binary which could run independently on device. We use an available test modules in the vts-performance test plan BinderPerformanceTest as an example. The source code of the performance benchmark is located at test/vts-testcase/performance.
BinderPerformanceTest measures roundtrip HwBinder RPC latency (nanoseconds) for the following message sizes (bytes) [4, 8, 16, 32, 64, 128, 256, 512, 1024, 2k, 4k, 8k, 16k, 32k, 64k] and outputs the roundtrip time in real time, CPU time, number of iterations. Here shows an example of the benchmark outputs when run it directory on the device:
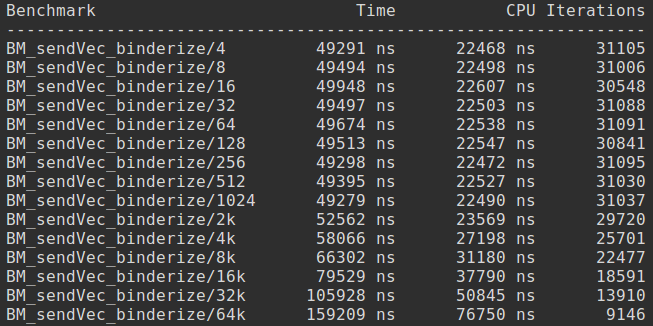
Integrate the benchmark as a VTS test
Add benchmark binary to VTS
To package benchmark binary with VTS, add it to vts_test_bin_package_list.mk after the vts_test_bin_packages variable
Add VTS host side script
The host side script control the benchmark execution and the processing of the benchmark results. It typically contains the following major steps.
i. Register device controller and invoke shell on the target device.
def setUpClass(self):
      self.dut = self.registerController(android_device)[0]
      self.dut.shell.InvokeTerminal("one")
ii. Setup the command to run the benchmark on the device.
results = self.dut.shell.one.Execute([
            "%s" % path_to_my_benchmark_test,
          ])
Where path_to_binary represents the full path of benchmark binary on the target device. The default path is /data/local/tmp/my_benchmark_test
iii. Validate benchmark test results.
asserts.assertFalse(
            any(results[const.EXIT_CODE]),
            "Benchmark test failed.")
iv. Parse the benchmark test results and upload the metrics to VTS web dashboard.
Depends on the output format of the test results, we need to parse the STDOUT content in the return results into performance data points. Currently, VTS supports processing and displaying two performance data type. One is timestamp sample which records the start and end time stamp for a particular operation. The other is vector data sample which records a list of profiling data along with data labels.
Take the vector data sample as an example, let's suppose we have parsed the benchmark results into two vectors. One stores the performance data (e.g. latency of the API call), the other stores the corresponding data labels (e.g. the input size of data package)
Call AddProfilingDataLabeledVector to upload the vector data sample to VTS web as follows:
self.web.AddProfilingDataLabeledVector(
            "Benchmark name",
            label_result,
            value_result,
            x_axis_label="x_axis_label",
            y_axis_label="y_axis_label")
Configure the VTS test
Follow the same instruction in Codelab for Host-Driven Tests ("Write a VTS Test" section) to create a host-side VTS test using the host side script created in section 2.2.
10. Coverage measurement using VTS
VTS support coverage measurement in 2 different levels
- HAL API coverage measurement which collects and displays the HAL APIs covered by the tests.
- Native code coverage measurement which collects and displays the line based implementation code covered by the tests.
HAL API coverage measurement
VTS HAL API coverage measurement will collect the list of HAL APIs accessed during the test and report the data to VTS dashboard to display the coverage rate. The measurement is piggyback on the profiling framework, so by default, just run your test with the vts-hal-profiling plan as:
vts-tradefed run vts-hal-profiling -m YourTestModuleName
It will generate the API coverage data as well and upload to the vts dashboard. The VTS Dashboard will display a test result with a link in the row labeled "API Coverage" with the number of covered APIs VS. number of total APIs. e.g 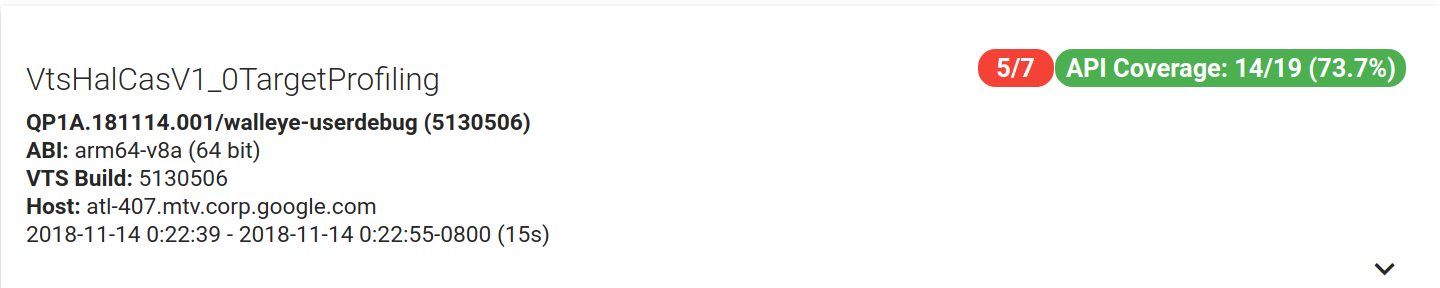
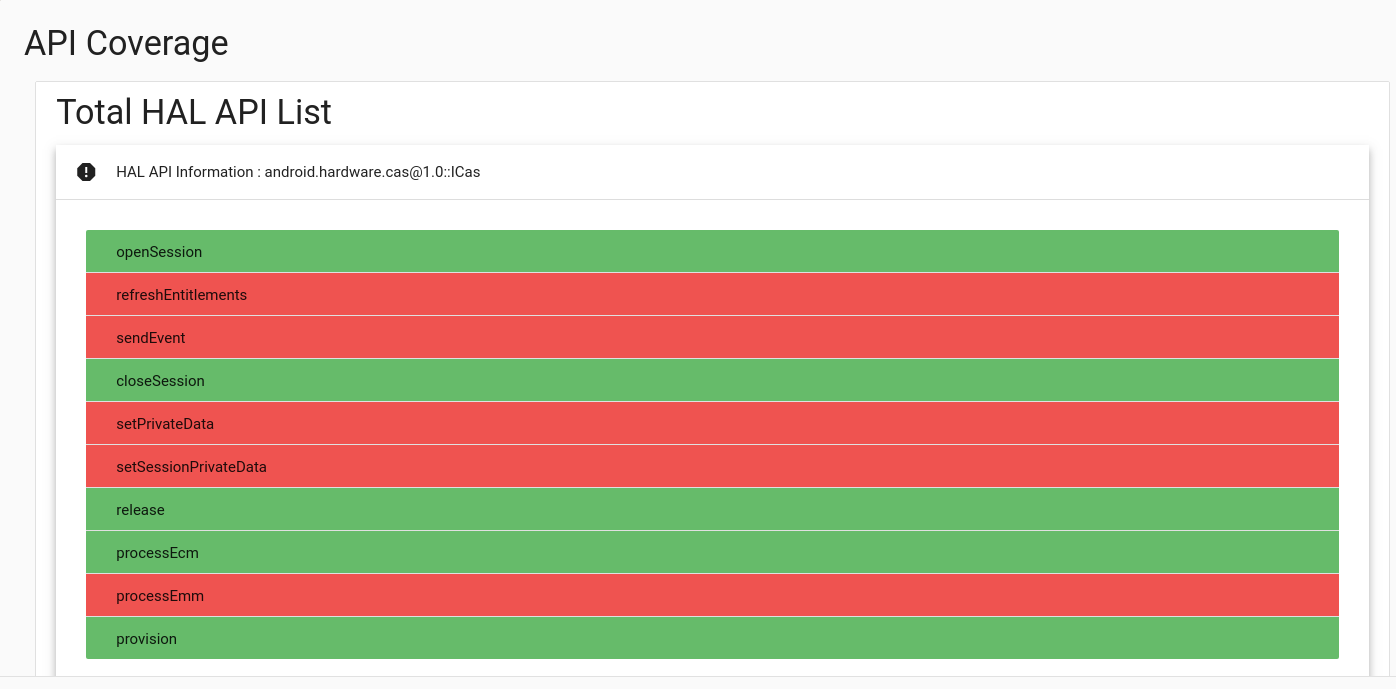
By clicking the API Coverage button, it will display a detailed list of APIs expected to be accessed by the test, the ones which are actually covered by the test are marked green while those not covered are marked read. Here shows a snapshot of the detailed API coverage graph.
Native code coverage measurement
Prerequisites
Support for native coverage through VTS depends on a functioning instance of the VTS Dashboard, including integration with a build server and a Gerrit server. See the documentation for VTS Dashboard setup and configuration before proceeding.
Building a device image
The first step in measuring coverage is creating a device image that is instrumented for gcov coverage collection. This can be accomplished with a flag in the device manifest and a few build-time flags.
Let's add the following code segment to the device.mk file:
# Set if a device image has the VTS coverage instrumentation.
ifeq ($(NATIVE_COVERAGE),true)
PRODUCT_PROPERTY_OVERRIDES += \
    ro.vts.coverage=1
endif
This will have no impact on the device when coverage is disabled at build time but will add a read-only device property in the case when coverage is enabled.
Next, we can build a device image. The continuous build server must be configured to execute the build command with a few additional flags: NATIVE_COVERAGE, and COVERAGE_PATHS. The former is a global flag to enable or disable coverage instrumentation. The latter specifies the comma-separated paths to the source which should be instrumented for coverage.
As an example, let's propose an example for measuring coverage on the NFC implementation. We can configure the build command as follows:
> make NATIVE_COVERAGE=true COVERAGE_PATHS="hardware/interfaces/nfc,system/nfc"
Modifying your test for Host-Driven HIDL HAL tests
In most cases, no additional test configuration is needed to enable coverage. By default, coverage processing is enabled on the target if it is coverage instrumented (as per the previous section) and the test is a HAL test (either a target-side HAL test or a host-side HAL test).
Running VTS
If you run a VTS test with vts-hal plan on a coverage instrumented device, coverage data will automatically be collected and processed by the VTS framework with no additional effort required. The processed coverage data will be uploaded to the VTS Dashboard along with the test results so that the source code can be visualized with a line-level coverage overlay. If you want to run a VTS test with a custom plan and want to measure the coverage rate of that test, add the following lines in your-plan.xml :
<target_preparer class="com.android.tradefed.targetprep.VtsCoveragePreparer" />
Note that two external dependencies are necessary to support coverage:
- A Gerrit server with REST API must be available and configured to integrate with the VTS Dashboard. See the Dashboard setup for integration directions.
- A build artifact server with REST API must be configured to integrate with the VTS runner. This will allow the runner to fetch both a build-time coverage artifact from the building step above as well as the source version information for each git project within the repository at build time. The VTS framework expects an a JSON file named "BUILD_INFO" which contains a dictionary of source project names to git revisions under the key "repo-dict".
Visualizing coverage
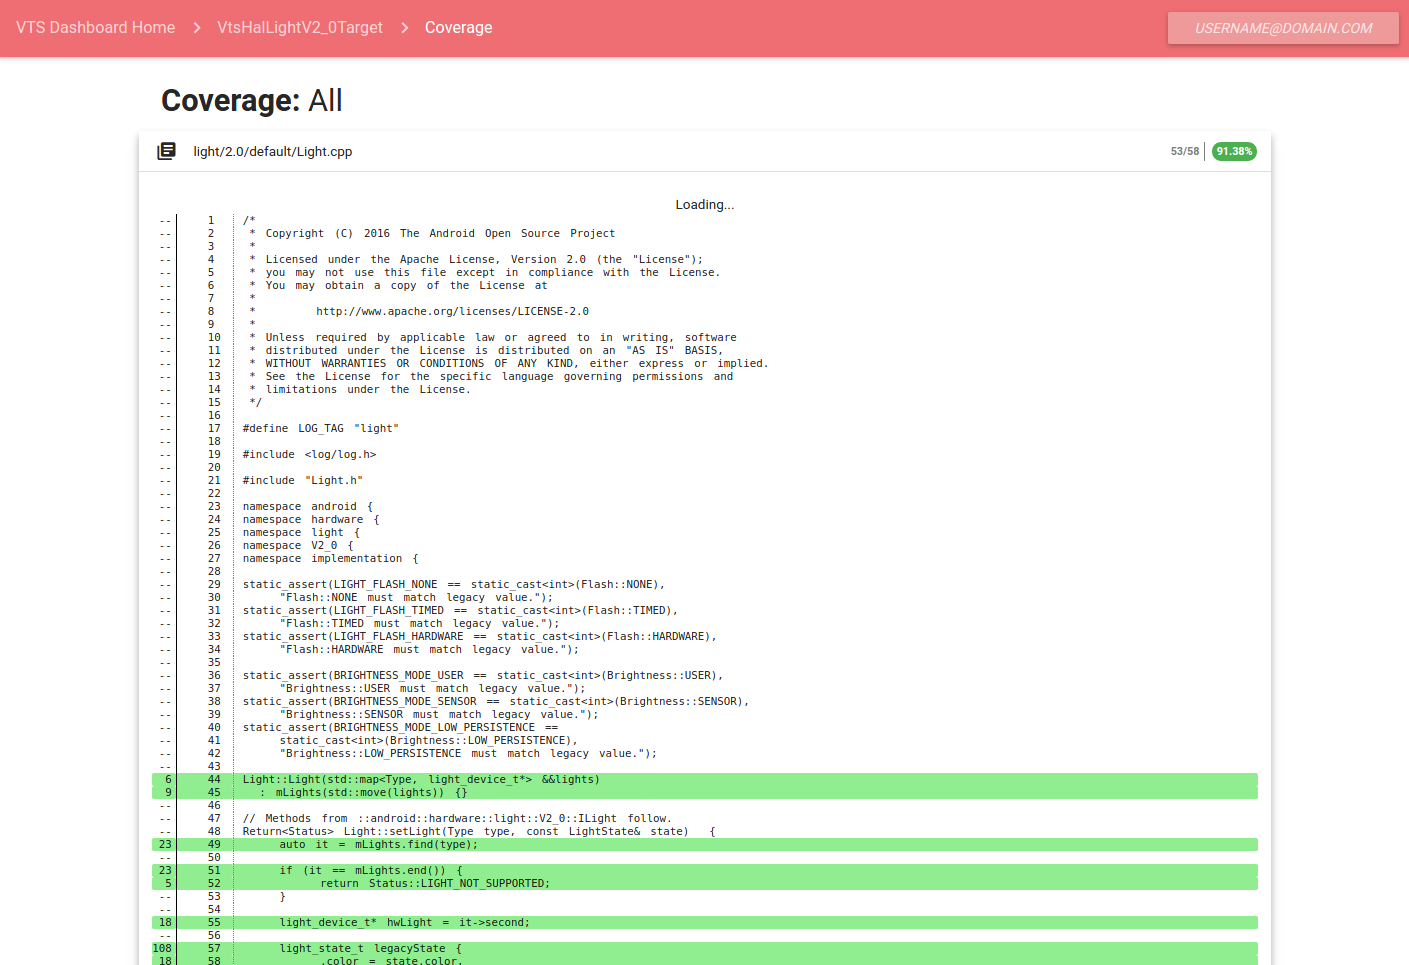
After completing the build step and the test execution step, the VTS Dashboard should display a test result with a link in the row labeled "Coverage". This will display a user interface similar to the one below.
Lines executed are highlighted in green, while lines not exercised by the test are highlighted in red. White lines are not executable lines of code, such as comments and structural components of the coding language.
Generate raw coverage report
Besides the visualized coverage displayed on the dashboard, we could also configure to make the test to output the raw coverage report for later processing. The raw coverage report is a proto file with the form similar to:
coverage {
  file_path: "light/2.0/default/service.cpp"
  project_name: "platform/hardware/interfaces"
  revision: "e35089b8bbae459fbd601fc1dcf2ff80024e32e0"
  line_coverage_vector: -1
  line_coverage_vector: -1
  line_coverage_vector: -1
  line_coverage_vector: -1
  line_coverage_vector: -1
  line_coverage_vector: -1
  line_coverage_vector: -1
  line_coverage_vector: -1
  line_coverage_vector: -1
  line_coverage_vector: -1
  line_coverage_vector: -1
  line_coverage_vector: -1
  line_coverage_vector: -1
  line_coverage_vector: -1
  line_coverage_vector: -1
  line_coverage_vector: -1
  line_coverage_vector: -1
  line_coverage_vector: -1
  line_coverage_vector: -1
  line_coverage_vector: -1
  line_coverage_vector: -1
  line_coverage_vector: -1
  line_coverage_vector: -1
  line_coverage_vector: -1
  line_coverage_vector: -1
  line_coverage_vector: 0
  total_line_count: 1
  covered_line_count: 0
}
As we can see, the report contains coverage info for each file with basic info such as file_path and project_name. The pair (line_coverage_vector: number) indicate the number of execution times for that line during the test, where -1 means the line is not executable. The aggregated coverage data is shown at the end including the total executable lines in the file and the number of lines covered by the test.
To generate such raw coverage report, add the following lines to your There are cases we may want to collect such coverage report for future process, to do this,
replace
<target_preparer class="com.android.tradefed.targetprep.VtsCoveragePreparer" >
with
<target_preparer class="com.android.tradefed.targetprep.VtsCoveragePreparer" >
    <option name="coverage-report-dir" value="some/path" />
</target_preparer>
in vts-hal.xml, and rebuild vts and run your test again.
The coverage report will be stored under $ANDROID_BUILD_TOP/out/host/linux-x86/vts/android-vts/results/test_run_id/some/path/coverage_report_test_module_name.txt
e.g.
$ANDROID_BUILD_TOP/out/host/linux-x86/vts/android-vts/results/2018.10.26_17.16.02/vts-coverage/coverage_report_VtsHalLightV2_0Target64.txt
Measure CTS native code coverage
Similar approach could also be applied to the CTS tests to measure the native code accessed during the test. The coverage data will be collected at the end of each CTS test modules and processed to generate a raw coverage report. Unfortunately, we currently do not support displaying CTS test results on VTS dashboard, so there's no visualized coverage report for CTS tests.
To measure native code coverage for CTS tests. Similarly, we need to build a device image with coverage instrumented and flash the device with that instrumented image.
The cts-hal-coverage test plan is configured to run the containing CTS tests with code coverage measurement enabled. So, run you tests with cts-hal-coverage plan as:
vts-tradefed run cts-hal-coverage -m CtsTestModuleName
You will find the raw coverage report after the test run under the vts-coverage subdirectory under the test result directory for your test invocation with pattern:
$ANDROID_BUILD_TOP/out/host/linux-x86/vts/android-vts/results/test_run_id/vts-coverage/test_module_name/coverage_report_test_module_name.txt
e.g.
$ANDROID_BUILD_TOP/out/host/linux-x86/vts/android-vts/results/2018.10.31_17.02.27/vts-coverage/android.view.accessibility.cts/coverage_report_android.view.accessibility.cts.txt
Offline coverage
If the user would like to measure coverage without integrating with the VTS Dashboard or a build server, offline coverage measurement is also possible. First, we build a local device image:
> . build/envsetup.sh
> lunch <product name>-userdebug
> make NATIVE_COVERAGE=true COVERAGE_PATHS="<list of paths to instrument with coverage>"
Next, we flash the device with the coverage-instrumented device image and run a VTS test with vts-hal plan. Finally, we can process the files by pulling the outputted GCDA files from the device using adb and matching them with the source code and GCNO files produced at build time. The file structure is symmetric in the Android source code, out directory, and data partition of the device.
- Source files located in the Android source tree: .../.../file.cpp
- GCNO files located in the appropriate out intermediates directory: out/target/product/..../..._intermediates/.../.../file.gcno
- GCDA files located on the device after test execution: /data/misc/gcov/proc/self/cwd/.../.../file.gcda
These three can be combined into a tool such as gcov or lcov to produce a local coverage report.
Background and FAQs
Background
To measure coverage, the source file is divided into units called basic blocks, which may contain one or more lines of code. All code in the same basic block are accounted for together. Some lines of code (i.e. variable declarations) are not executable and thus belong to no basic block. Some lines of code actually compile to several executable instructions (i.e. shorthand conditional operators) and belong to more than one basic block.
The generated coverage report displays a color-coded source file with numerical annotations on the left margin. The row fill indicates whether or not a line of code was executed when the tests were run: green means it was covered, red means it was not. The corresponding numbers on the left margin indicate the number of times the line was executed. Lines of code that are not colored and have no execution count in the margin are not executable instructions.
FAQs
Why do some lines have no coverage information?
The line of code is not an executable instruction. For example, comments and structural coding language elements do not reflect instructions to the processor.
Why are some lines called more than expected?
Since some lines of code may belong to more than one basic block, they may appear to have been executed more than expected. For example, a line of code with an inline conditional statement may cause the line to belong to two basic blocks. Even if a line of code belongs to only one basic block, it may be display as having been executed more than it actually was. This may occur if one or more lines of code in the same basic block were executed, causing the execution count of the whole basic block to increase.
11. Write a VTS HIDL HAL Interface Fuzz Test
What does HIDL HAL Interface Fuzzer do?
HIDL HAL Interface Fuzzer (interface fuzzer) is a fuzzer binary built using LLVM asan, sancov, and libFuzzer. It runs against a user-specified target HIDL HALs. It calls HAL functions in random order with random inputs until a terminating condition, e.g. HAL crash, sanitizer violation, timeout.
More information about asan, sancov, and libFuzzer.
Configuration
All the code for HIDL HAL interface fuzzer is already carried by android-vts.zip. In other words, no additional test code needs to be written or compiled. Only configuration is needed to run the interface fuzzer against a targeted HAL.
As usual, you need an Android.mk and an AndroidTest.xml to deploy the fuzz test as part of VTS.
Assume your test is named: VtsHalBluetoothV1_0IfaceFuzzer. Then AndroidTest.xml should look something like this:
<target_preparer class="com.android.compatibility.common.tradefed.targetprep.VtsFilePusher">
    <option name="push-group" value="IfaceFuzzerTest.push"/>
</target_preparer>
<multi_target_preparer class="com.android.tradefed.targetprep.VtsPythonVirtualenvPreparer"/>
<test class="com.android.tradefed.testtype.VtsMultiDeviceTest">
    <option name="test-module-name" value="VtsHalBluetoothV1_0IfaceFuzzer"/>
    <option name="hal-hidl-package-name" value="android.hardware.bluetooth@1.0"/>
    <option name="test-case-path" value="vts/testcases/fuzz/template/iface_fuzzer_test/iface_fuzzer_test"/>
    <option name="test-timeout" value="3h"/>
This should looks fairly standard. The only things to pay attention to are these three lines:
- This option specifies what files need to be pushed onto the device. Contents of
IfaceFuzzerTest.push.
<option name="push-group" value="IfaceFuzzerTest.push"/>
- This option specifies bluetooth HAL as our fuzz target.
<option name="hal-hidl-package-name" value="android.hardware.bluetooth@1.0"/>
- This option specifies the host code used to deploy the fuzzer binary.
<option name="test-case-path" value="vts/testcases/fuzz/template/iface_fuzzer_test/iface_fuzzer_test"/>
Running
To run the fuzzer you need to compile VTS with appropriate asan and sancov build options. From android source root directory do:
$ SANITIZE_TARGET="address coverage"  make vts -j64
$ vts-tradefed run commandAndExit vts-fuzz -l VERBOSE --module VtsHalBluetoothV1_0IfaceFuzzer
This will run VtsHalBluetoothV1_0IfaceFuzzer test, print logs to screen, and return back to shell.
Debugging
You will have to rely on logs to identify fuzzer failure. If the fuzzer encounters an error (e.g. segfault, buffer overflow, etc), you will see something like this in your log:
==15644==ERROR: AddressSanitizer: SEGV on unknown address 0x000000000110 (pc 0x0077f8776e80 bp 0x007fe11bed90 sp 0x007fe11bed20 T0)
==15644==The signal is caused by a READ memory access.
==15644==Hint: address points to the zero page.
    #0 0x77f8776e7f  (/vendor/lib64/hw/android.hardware.bluetooth@1.0-impl.so+0x8e7f)
    #1 0x77f87747e3  (/vendor/lib64/hw/android.hardware.bluetooth@1.0-impl.so+0x67e3)
    #2 0x77f87e384b  (/system/lib64/android.hardware.bluetooth@1.0.so+0x2084b)
    #3 0x79410ae4df  (/data/local/tmp/64/android.hardware.bluetooth@1.0-vts.driver.so+0x74df)
    #4 0x794498c90f  (/data/local/tmp/64/libvts_proto_fuzzer.so+0xc90f)
    #5 0x5f42e82ca3  (/data/local/tmp/libfuzzer_test/vts_proto_fuzzer+0xaca3)
    #6 0x5f42e8f08f  (/data/local/tmp/libfuzzer_test/vts_proto_fuzzer+0x1708f)
    #7 0x5f42e8f27b  (/data/local/tmp/libfuzzer_test/vts_proto_fuzzer+0x1727b)
    #8 0x5f42e900a7  (/data/local/tmp/libfuzzer_test/vts_proto_fuzzer+0x180a7)
    #9 0x5f42e90243  (/data/local/tmp/libfuzzer_test/vts_proto_fuzzer+0x18243)
    #10 0x5f42e88cff  (/data/local/tmp/libfuzzer_test/vts_proto_fuzzer+0x10cff)
    #11 0x5f42e8655f  (/data/local/tmp/libfuzzer_test/vts_proto_fuzzer+0xe55f)
    #12 0x7944aef5f3  (/system/lib64/libc.so+0x1b5f3)
    #13 0x5f42e8029b  (/data/local/tmp/libfuzzer_test/vts_proto_fuzzer+0x829b)

AddressSanitizer can not provide additional info.
This means that the fuzzer was able to trigger a segfault somewhere in bluetooth HAL implementation. Unfortunately, we don't have a way to symbolize this stack trace yet.
However, the log will contain the last call sequence batch that triggered the failure.
12. Write a Record-and-Replay Test
Prerequisites
Let's assume you have got trace files for your test (e.g. by running the tests with profiling enabled, see instructions about HAL API call latency profiling). The trace files should be stored under test/vts-tescase/hal-trace/<HAL_NAME>/<HAL_VERSION>/
where <HAL_NAME> is the name of your HAL and <HAL_VERSION> is the version of your HAL with format V<MAJOR_VERSION>_<MINOR_VERSION>.
We will use Vibrator Hal as a running example throughout this section, so the traces are stored under test/vts-tescase/hal-trace/vibrator/V1_0/
Create a HIDL HAL replay test
Follow the same instruction in Codelab for Host-Driven Tests to create a host-side VTS test with name VtsHalVibratorV1_0TargetReplay.
Add the following line to the corresponding AndroidTest.xml under the test configuration to use the VTS replay test template.
<option name="binary-test-type" value="hal_hidl_replay_test" />
Add the following line to the corresponding AndroidTest.xml under the test configuration to add the trace file for replay.
<option name="hal-hidl-replay-test-trace-path" value="test/vts-testcase/hal-trace/vibrator/V1_0/vibrator.vts.trace" />
Note, if you want or replay multiple traces within the test, add each trace file using the above configuration.
Add the following line to the corresponding AndroidTest.xml under the test configuration to indicate the HIDL HAL package name for the test.
<option name="hal-hidl-package-name" value="android.hardware.vibrator@1.0" />
An example AndroidTest.xml for a replay test looks like follows:
<configuration description="Config for VTS VtsHalVibratorV1_0TargetReplay test cases">
    <option name="config-descriptor:metadata" key="plan" value="vts-hal-replay" />
    <target_preparer class="com.android.compatibility.common.tradefed.targetprep.VtsFilePusher">
        <option name="abort-on-push-failure" value="false"/>
        <option name="push-group" value="HalHidlHostTest.push"/>
        <option name="cleanup" value="true" />
        <option name="push" value="spec/hardware/interfaces/vibrator/1.0/vts/Vibrator.vts->/data/local/tmp/spec/target.vts" />
        <option name="push" value="DATA/lib/android.hardware.vibrator@1.0-vts.driver.so->/data/local/tmp/32/android.hardware.vibrator@1.0-vts.driver.so"/>
        <option name="push" value="DATA/lib64/android.hardware.vibrator@1.0-vts.driver.so->/data/local/tmp/64/android.hardware.vibrator@1.0-vts.driver.so"/>
    </target_preparer>
    <multi_target_preparer class="com.android.tradefed.targetprep.VtsPythonVirtualenvPreparer"/>
    <test class="com.android.tradefed.testtype.VtsMultiDeviceTest">
        <option name="test-module-name" value="VtsHalVibratorV1_0TargetReplay"/>
        <option name="binary-test-type" value="hal_hidl_replay_test" />
        <option name="hal-hidl-replay-test-trace-path" value="test/vts-testcase/hal-trace/vibrator/V1_0/vibrator.vts.trace" />
        <option name="hal-hidl-package-name" value="android.hardware.vibrator@1.0" />
        <option name="test-timeout" value="2m"/>
    </test>
</configuration>
Schedule the replay test
Add the following line to vts-serving-staging-hal-hidl-replay.xml
<option name="compatibility:include-filter" value="VtsHalVibratorV1_0TargetReplay"/>
Basically, now it is all set so let's wait for a day or so and then visit your VTS Dashboard. At that time, you should be able to add VtsHalVibratorV1_0TargetReplay to your favorite list.
13. Write a Multi-Device Test
Multi-device tests are possible since VTS 9.0. Here is an example of a sample multi-device test:
Configure test plan
<configuration description="VTS Codelab Plan">
  ...
<device name="device1">
<build_provider class="com.android.compatibility.common.tradefed.build.CompatibilityBuildProvider" />
<target_preparer class="com.android.tradefed.targetprep.VtsDeviceInfoCollector" />
<target_preparer class="com.android.tradefed.targetprep.VtsDeviceInfoCollector" />
</device>
<device name="device2" >
<build_provider class="com.android.compatibility.common.tradefed.build.CompatibilityBuildProvider" />
<target_preparer class="com.android.tradefed.targetprep.VtsDeviceInfoCollector" />
<target_preparer class="com.android.compatibility.common.tradefed.targetprep.VtsFilePusher">
<option name="push-group" value="HostDrivenTest.push" />
</target_preparer>
</device>
<option name="compatibility:include-filter" value="VtsCodelabHelloWorldMultiDeviceTest" />
</configuration>
Here two device items are set in test plan config to request two devices, and VtsFilePusher options are used for each device to push default host driven related driver files.
Call both device' shells in a test script
def setUpClass(self):
logging.info('number of device: %s', self.android_devices)
asserts.assertEqual(len(self.android_devices), 2, 'number of device is wrong.')
self.dut1 = self.android_devices[0]
self.dut2 = self.android_devices[1]
self.shell1 = self.dut1.shell
self.shell2 = self.dut2.shell

def testSerialNotEqual(self):
'''Checks serial number from two device not being equal.'''
command = 'getprop | grep ro.serial'
res1 = self.shell1.Execute(command)
res2 = self.shell2.Execute(command)

def getSerialFromShellOutput(output):
'''Get serial from getprop query'''
return output[const.STDOUT][0].strip().split(' ')[-1][1:-1]
serial1 = getSerialFromShellOutput(res1)
serial2 = getSerialFromShellOutput(res2)

logging.info('Serial number of device 1 shell output: %s', serial1)
logging.info('Serial number of device 2 shell output: %s', serial2)
asserts.assertNotEqual(serial1, serial2, 'serials from two devices should not be the same')
asserts.assertEqual(serial1, self.dut1.serial, 'serial got from device system property is different from allocated serial')
asserts.assertEqual(serial2, self.dut2.serial, 'serial got from device system property is different from allocated serial')
self.android_devices is a list of AndroidDevice controllers. In the above code, we called each device's getprop command through shell to get device serial and verify them.
14. VNDK ABI Test
VtsVndkAbi ensures the ABI of VNDK libraries is consistent with that in generic system image. ABI compatibility is one of the requirements of system-only OTA.
The ABI test compares VNDK, VNDK-SP, and extension libraries with dump files generated from the libraries on GSI. When the test is running, it finds the VNDK libraries in device's partitions in the order of odm, vendor, and system. If a library is not present on the device, that means the library is unused and not installed. The test skips the comparison. If a library is present, it is required to define all symbols and vtables that the corresponding reference library has, while there are exceptions:
- NO_TYPE, undefined (SHN_UNDEF), and weak symbols (STB_WEAK) are not compared. Weak symbols are normally generated from inline functions and template instantiations. Even though they are defined in the library, they are not always part of the library's public header.
- Symbols that are not exported by the library's public headers are not compared. These include symbols declared in private headers and symbols defined in static libraries like: libgcc.a, libatomic.a, libcompiler_rt-extras.a. e.g. __aeabi_idiv is a symbol defined in libgcc.a which depends on the CPU variant.
Generate ABI dump
Reference ABI dump files are generated automatically at build-time. The build system scans ${ANDROID_BUILD_TOP}/prebuilts/abi-dumps/vndk/ for source-based ABI dumps (.lsdump files) and convert them into reference dumps used by VtsVndkAbi. The reference dumps (.dump files) are created under ${ANDROID_HOST_OUT}/vts/android-vts/testcases/vts/testcases/vndk/golden/PLATFORM_VNDK_VERSION/binder{32,64}/TARGET_ARCH/lib[64]/. (e.g., out/host/linux-x86/vts/android-vts/testcases/vts/testcases/vndk/golden/Q/binder64/arm64/lib64/libz.so.dump)
For release branches (make variable PLATFORM_VERSION_CODENAME equals REL), .lsdump files are pre-generated under ${ANDROID_BUILD_TOP}/prebuilts/abi-dumps/vndk.
For pre-release branches (PLATFORM_VERSION_CODENAME not equal REL), .lsdump files are not generated under prebuilts/abi-dump/ as the VNDK ABI isn't frozen yet.
If one wants to generate ABI dumps for pre-release branches, one needs to generate reference source-based ABI dumps (.lsdump) first:
$ . build/envsetup.sh
$ lunch aosp_arm64-userdebug
$ development/vndk/tools/header-checker/utils/create_reference_dumps.py
This generates source-based dumps under ${ANDROID_BUILD_TOP}/prebuilts/abi-dumps/vndk .
Then build VTS, the source-based dumps are automatically packaged by the build system:
$ lunch aosp_arm64-userdebug
# Delete output directory if you remove any library from VNDK.
$ rm -rf ${ANDROID_HOST_OUT}/vts/android-vts/testcases/vts/testcases/vndk/golden/
$ m vts -j
The ABI dump file (.dump) can also be created manually by dump_abi.py or extract_lsdump.py.
dump_abi.py script accepts a list of library names or a text file containing the library list. It also accepts options to specify the target type of the ABI dump to generate for. If no target is specified, the target type is read from build variables.
$ cd ${ANDROID_BUILD_TOP}/test/vts-testcase/vndk/golden/
$ ./dump_abi.py ${ANDROID_BUILD_TOP}/build/make/target/product/vndk/current.txt \
        --platform-vndk-version=28 \
        --binder-bitness=64 \
        --target-main-arch=arm64 \
        --target-arch=arm64 \
        --target-arch-variant=armv8-a
extract_lsdump.py script is used by the build system to generate the dump files for VTS. It accepts a .lsdump file directly and converts it to .dump.
$ m extract_lsdump -j
$ extract_lsdump libziparchive.so.lsdump libziparchive.so.dump
15. Report Issues
If you run into any problems with VTS, you can report an issue to the android-vts google group. In order for the VTS team to address your issue effectively, please run the diagnose.py python script (located under test/vts/script) and include the logged output to your report. The diagnose.py script prints important system platform information such as Python and Pip versions.
$ python test/vts/script/diagnose.py
Example output:
===== Current date and time =====
2017-05-23 10:37:35.117056
===== OS version =====
Linux-4.4.0-75-generic-x86_64-with-Ubuntu-14.04-trusty
===== Python version =====
2.7.6 (default, Oct 26 2016, 20:30:19)
[GCC 4.8.4]
===== Pip version =====
pip 9.0.1 from /usr/local/lib/python2.7/dist-packages (python 2.7)
===== Virtualenv version =====
1.11.4
===== Target device info [ro.build.fingerprint] =====
google/marlin/marlin:8.0.0/MASTER/username05221207:userdebug/dev-keys