
1. 事前準備
想像您身在一間擁擠的購物中心,然後發現好友珍娜。您可能會想要揮手並大聲呼喊,嘗試引起珍娜的注意。如果使用 Google 的 Nearby Messages API,應用程式就能為使用者做出類似行為,讓鄰近彼此的好友輕鬆找到對方。本程式碼研究室會指導您如何使用 Nearby Messages API,以根據實體距離讓使用者進行互動。為簡化程式碼研究室,每位使用者都會發布手機的建構模型:android.os.Build.MODEL。但實際上,您可以讓每位使用者向附近的好友發布自己的 userId,或是其他符合使用案例的資訊。Nearby Messages API 結合網際網路連線、藍牙和其他技術來提供這項功能。
必要條件
- 具備 Kotlin 和 Android 開發作業的基本知識
- 如何在 Android Studio 上建立及執行應用程式
- 兩部以上的 Android 裝置,用於執行及測試程式碼
課程內容
- 如何將 Nearby 程式庫新增至應用程式
- 如何向相關者廣播訊息
- 如何偵測來自搜尋點的訊息
- 如何取得訊息的 API 金鑰
- 電池續航力的最佳做法
軟硬體需求
- Google 帳戶 (即 Gmail 位址),以取得 Google API 金鑰
- 最新版本的 Android Studio
- 兩部已安裝 Google Play 服務 (即 Play 商店) 的 Android 裝置
- 網際網路連線 (而非不需要網路連線的 Nearby Connections API)
建構項目
這個單一 Activity 應用程式可讓使用者發布裝置資訊,並接收鄰近裝置的相關資訊。此應用程式有兩個切換鈕供使用者操作:第一個是用來探索或停止探索鄰近訊息;第二個則用於發布或取消發布訊息。我們希望此應用程式的發布與探索操作在 120 秒後任意停止。因此,我們將深入瞭解這個 API,建立 PublishOptions 和 SubscribeOptions 物件,並透過其 onExpired() 回呼關閉用於發布及訂閱的 UI 切換鈕。

2. 建立 Android Studio 專案
- 建立新的 Android Studio 專案。
- 選擇「Empty Activity」。
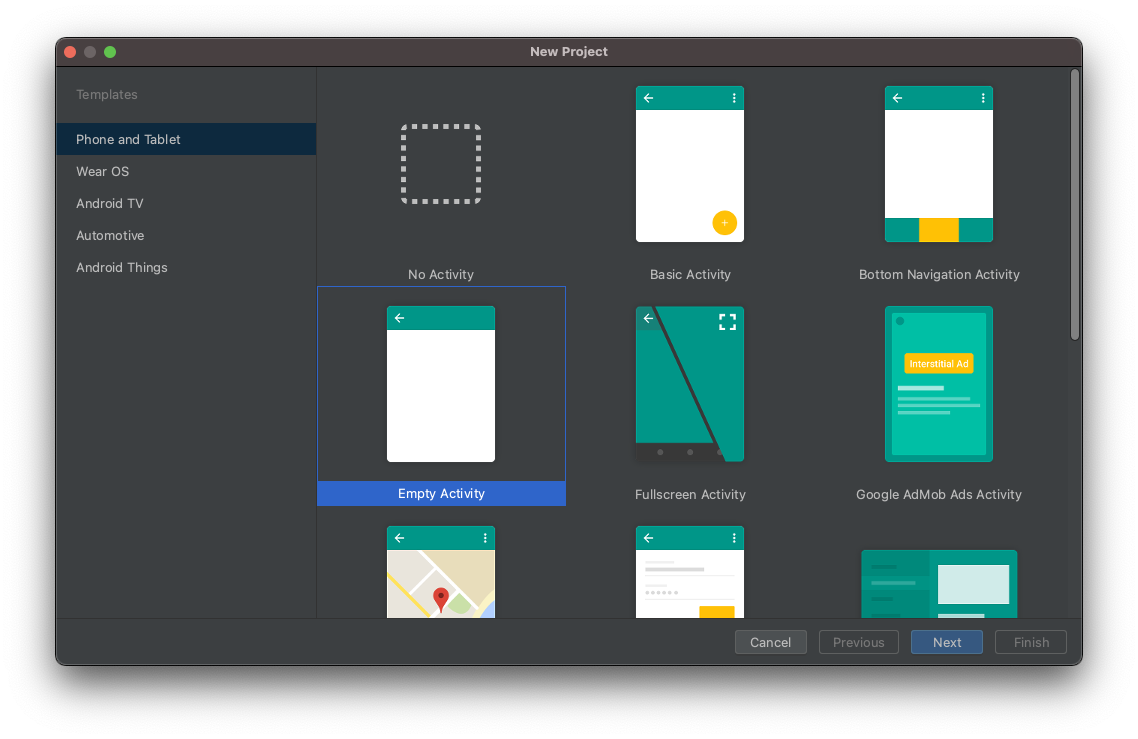
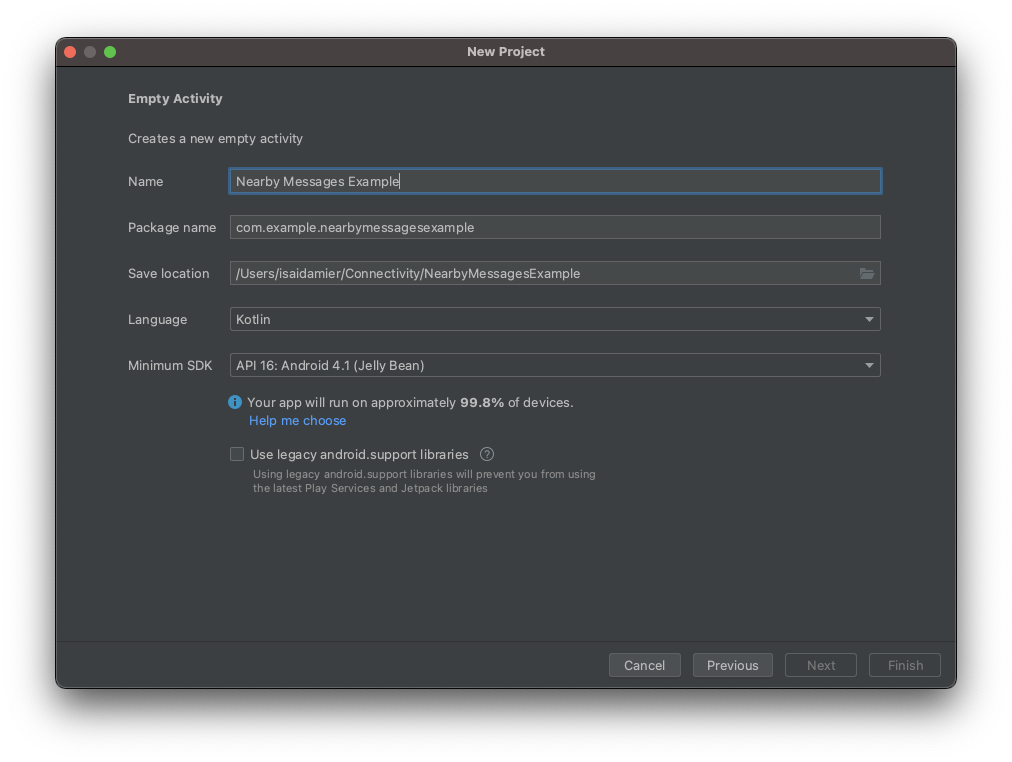
- 將專案命名為 Nearby Messages 範例,並將語言設為 Kotlin。
3. 設定程式碼
- 將「鄰近分享」依附元件的最新版本,新增至應用程式層級的
build.gradle檔案中。這可讓您使用 Nearby Messages API 傳送及偵測鄰近裝置的訊息。
implementation 'com.google.android.gms:play-services-nearby:18.0.0'
- 在 Android 區塊中,將 viewBinding 建構選項設為
true,以啟用 ViewBinding。
android {
   ...
   buildFeatures {
       viewBinding true
   }
}
- 點選「Sync Now」或綠色鐵鎚按鈕,讓 Android Studio 註冊這些 Gradle 變更內容。

- 新增「探索鄰近裝置」和「分享裝置資訊」切換鈕,以及包含裝置清單的 RecycleView。將
activity_main.xml檔案中的程式碼替換成以下程式碼。
<?xml version="1.0" encoding="utf-8"?>
<LinearLayout xmlns:android="http://schemas.android.com/apk/res/android"
   xmlns:app="http://schemas.android.com/apk/res-auto"
   xmlns:tools="http://schemas.android.com/tools"
   android:id="@+id/activity_main_container"
   android:layout_width="match_parent"
   android:layout_height="match_parent"
   android:orientation="vertical"
   android:padding="16dp"
   tools:context=".MainActivity">

   <androidx.appcompat.widget.SwitchCompat
       android:id="@+id/subscribe_switch"
       android:layout_width="match_parent"
       android:layout_height="wrap_content"
       android:text="Discover nearby devices" />

   <androidx.appcompat.widget.SwitchCompat
       android:id="@+id/publish_switch"
       android:layout_width="match_parent"
       android:layout_height="wrap_content"
       android:text="Share device information" />

   <androidx.recyclerview.widget.RecyclerView
       android:id="@+id/nearby_msg_recycler_view"
       android:layout_width="match_parent"
       android:layout_height="wrap_content"
       android:transcriptMode="alwaysScroll" />
</LinearLayout>
注意:在您的專案中,請將 16dp 等值變更為 @dimen/activity_vertical_margin 這類資源。
4. 在應用程式中新增 Nearby Messages
定義變數
- 在主要活動 (
MainActivity.kt) 的onCreate()函式上方,貼上此程式碼片段以定義下列變數。
/**
* For accessing layout variables
*/
private lateinit var binding: ActivityMainBinding

/**
* Sets the time to live in seconds for the publish or subscribe.
*/
private val TTL_IN_SECONDS = 120 // Two minutes.

/**
* Choose of strategies for publishing or subscribing for nearby messages.
*/
private val PUB_SUB_STRATEGY = Strategy.Builder().setTtlSeconds(TTL_IN_SECONDS).build()

/**
* The [Message] object used to broadcast information about the device to nearby devices.
*/
private lateinit var message: Message

/**
* A [MessageListener] for processing messages from nearby devices.
*/
private lateinit var messageListener: MessageListener

/**
* MessageAdapter is a custom class that we will define later. It's for adding
* [messages][Message] to the [RecyclerView]
*/
private lateinit var msgAdapter: MessageAdapter
由於我們想要自訂廣播的持續時間,因此定義 Strategy。在本程式碼研究室中,我們選擇 120 秒。如果您未指定策略,API 會使用預設值。此外,即使本程式碼研究室的發布和訂閱使用相同的 Strategy,但您並不一定要使用。
- 變更
onCreate()函式,以將 ViewBinding 物件傳遞至setContentView()。這會顯示activity_main.xml版面配置檔案的內容。
override fun onCreate(savedInstanceState: Bundle?) {
   super.onCreate(savedInstanceState)
   binding = ActivityMainBinding.inflate(layoutInflater)
   setContentView(binding.root)
}
連接 UI 按鈕
此應用程式會執行以下三項工作:在切換鈕撥動時發布訊息、在切換鈕時撥動探索訊息,以及在 RecyclerView 中顯示訊息。
- 我們希望使用者能夠發布及取消發布訊息,以及探索 (即訂閱) 訊息。請先建立名為
publish()、unpublish()、subscribe()和unsubscribe()的虛設常式方法。我們會在後續步驟中建立實作方式。
private fun publish() {
   TODO("Not yet implemented")
}

private fun unpublish() {
   TODO("Not yet implemented")
}

private fun subscribe() {
   TODO("Not yet implemented")
}

private fun unsubscribe() {
   TODO("Not yet implemented")
}
- 使用者可使用活動版面配置中新增的切換按鈕,發布或探索 (即訂閱) 訊息。連接兩個
Switches,以呼叫在onCreate()函式結尾定義的方法。
   binding.subscribeSwitch.setOnCheckedChangeListener { buttonView, isChecked ->
       if (isChecked) {
           subscribe()
       } else {
           unsubscribe()
       }
   }

   binding.publishSwitch.setOnCheckedChangeListener { buttonView, isChecked ->
       if (isChecked) {
           publish()
       } else {
           unpublish()
       }
   }
- 您已新增用來發布和探索訊息的 UI 程式碼,現在請設定
RecyclerView,用來顯示及移除訊息。RecyclerView會顯示經常發布的訊息。訂閱者將聽取訊息。找到訊息後,訂閱者會將其新增至RecyclerView;如果訊息遺失,意即發布者停止發布,訂閱者會將訊息從RecyclerView中移除。
private fun setupMessagesDisplay() {
   msgAdapter = MessageAdapter()
   with(binding.nearbyMsgRecyclerView) {
       layoutManager = LinearLayoutManager(context)
       this.adapter = msgAdapter
   }
}

class MessageAdapter : RecyclerView.Adapter<MessageAdapter.MessageVH>() {
   private var itemsList: MutableList<String> = arrayListOf()

   override fun onCreateViewHolder(parent: ViewGroup, viewType: Int): MessageVH {
       return MessageVH(TextView(parent.context))
   }

   override fun onBindViewHolder(holder: MessageVH, position: Int) {
       holder.bind(getItem(position))
   }

   override fun getItemCount(): Int = itemsList.size

   private fun getItem(pos: Int): String? = if (itemsList.isEmpty()) null else itemsList[pos]

   fun addItem(item: String) {
       itemsList.add(item)
       notifyItemInserted(itemsList.size)
   }

   fun removeItem(item: String) {
       val pos = itemsList.indexOf(item)
       itemsList.remove(item)
       notifyItemRemoved(pos)
   }

   inner class MessageVH(private val tv: TextView) : RecyclerView.ViewHolder(tv) {
       fun bind(item: String?) {
           item?.let { tv.text = it }
       }
   }
}
- 在
onCreate()函式的結尾,加入setupMessagesDisplay()函式的呼叫。
override fun onCreate(savedInstanceState: Bundle?) {
   ...
   setupMessagesDisplay()
}
現在 UI 已全數設定完畢,可以開始發布訊息,供其他的鄰近裝置探索。此時,應用程式應如下所示:
新增發布與探索程式碼
- 如要傳送訊息,首先需要
Message物件。由於此為試用版,我們只會傳送裝置型號。將此程式碼加入onCreate()函式,即可建立要傳送的訊息。
override fun onCreate(savedInstanceState: Bundle?) {
   ...

   // The message being published is simply the Build.MODEL of the device. But since the
   // Messages API is expecting a byte array, you must convert the data to a byte array.
   message = Message(Build.MODEL.toByteArray(Charset.forName("UTF-8")))

}
- 如要發布鄰近裝置可探索的
Message,只需呼叫Nearby.getMessagesClient(activity).publish(message)即可。不過,建議您先進一步建構PublishOptions物件;如此即可指定自訂Strategy,並利用PublishCallback在已發布訊息過期時發布通知。我們在以下程式碼中建立一個選項,這樣就能在已發布的TTL過期時,關閉使用者的切換鈕。當我們呼叫publish()時,就會傳入這個選項。請將publish()函式更新為以下內容。
private fun publish() {
   val options = PublishOptions.Builder()
       .setStrategy(PUB_SUB_STRATEGY)
       .setCallback(object : PublishCallback() {
           override fun onExpired() {
               super.onExpired()
               // flick the switch off since the publishing has expired.
               // recall that we had set expiration time to 120 seconds
               // Use runOnUiThread to force the callback
               // to run on the UI thread
               runOnUiThread{
                   binding.publishSwitch.isChecked = false
               }
           }
       }).build()

   Nearby.getMessagesClient(this).publish(message, options)
}
每當使用者開啟「發布」切換鈕時,此程式碼就會執行。
- 發布時需要
Message,訂閱時則需要MessageListener。但我們仍建議您在此建構SubscribeOptions物件,即使 API 不需此物件也可正常運作。舉例來說,建構專用的SubscriptionOption即可指定探索模式的持續時間。
將下列 MessageListener 程式碼新增至 onCreate() 函式。當系統偵測到訊息時,事件監聽器會將其新增至 RecyclerView。如訊息遺失,事件監聽器會將訊息從 RecyclerView 中移除。
messageListener = object : MessageListener() {
   override fun onFound(message: Message) {
       // Called when a new message is found.
       val msgBody = String(message.content)
       msgAdapter.addItem(msgBody)
   }

   override fun onLost(message: Message) {
       // Called when a message is no longer detectable nearby.
       val msgBody = String(message.content)
       msgAdapter.removeItem(msgBody)
   }
}
- 技術層面上,訂閱者不需要
TTL(或可將其TTL設為 Infinity)。但在本程式碼研究室中,我們希望在 120 秒後停止探索。因此,我們會建構專用的SubscribeOptions,並使用其onExpired()回呼關閉訂閱 UISwitch。使用此程式碼更新訂閱函式。
private fun subscribe() {
   val options = SubscribeOptions.Builder()
       .setStrategy(PUB_SUB_STRATEGY)
       .setCallback(object : SubscribeCallback() {
           override fun onExpired() {
               super.onExpired()
               // flick the switch off since the subscribing has expired.
               // recall that we had set expiration time to 120 seconds
               // Use runOnUiThread to force the callback
               // to run on the UI thread
               runOnUiThread {
                   binding.subscribeSwitch.isChecked = false
               }
           }
       }).build()

   Nearby.getMessagesClient(this).subscribe(messageListener, options)
}
- 請務必讓使用者關閉資訊分享功能。這代表可讓發布者停止發布,並讓訂閱者停止訂閱。如要停止發布,發布者必須指定要停止發布的訊息。因此,如果正在廣播十則訊息,您可以停止發布一則訊息,繼續發布九則訊息。
private fun unpublish() {
   Nearby.getMessagesClient(this).unpublish(message)
}
- 雖然應用程式可以同時發布多則訊息,但一次只能有一個
MessageListener;因此,取消訂閱更為普遍。如要停止訂閱,訂閱者必須指定事件監聽器。
private fun unsubscribe() {
   Nearby.getMessagesClient(this).unsubscribe(messageListener)
}
- 提醒您,雖然此 API 應該會在用戶端程序終止時關閉其程序,但您可能會想在
onDestroy()生命週期方法中停止訂閱 (並在方便時停止發布)。
override fun onDestroy() {
   super.onDestroy()
   // although the API should shutdown its processes when the client process dies,
   // you may want to stop subscribing (and publishing if convenient)
   Nearby.getMessagesClient(this).unpublish(message)
   Nearby.getMessagesClient(this).unsubscribe(messageListener)
}
此時,應編譯程式碼。但應用程式缺少 API 金鑰,因此可能無法正常運作。您的 MainActivity 應如下所示:
package com.example.nearbymessagesexample

import android.os.Build
import android.os.Bundle
import android.view.ViewGroup
import android.widget.TextView
import androidx.appcompat.app.AppCompatActivity
import androidx.recyclerview.widget.LinearLayoutManager
import androidx.recyclerview.widget.RecyclerView
import com.example.nearbymessagesexample.databinding.ActivityMainBinding
import com.google.android.gms.nearby.Nearby
import com.google.android.gms.nearby.messages.Message
import com.google.android.gms.nearby.messages.MessageListener
import com.google.android.gms.nearby.messages.PublishCallback
import com.google.android.gms.nearby.messages.PublishOptions
import com.google.android.gms.nearby.messages.Strategy
import com.google.android.gms.nearby.messages.SubscribeCallback
import com.google.android.gms.nearby.messages.SubscribeOptions
import java.nio.charset.Charset

class MainActivity : AppCompatActivity() {

   /**
    * For accessing layout variables
    */
   private lateinit var binding: ActivityMainBinding

   /**
    * Sets the time to live in seconds for the publish or subscribe.
    */
   private val TTL_IN_SECONDS = 120 // Two minutes.

   /**
    * Choose of strategies for publishing or subscribing for nearby messages.
    */
   private val PUB_SUB_STRATEGY = Strategy.Builder().setTtlSeconds(TTL_IN_SECONDS).build()

   /**
    * The [Message] object used to broadcast information about the device to nearby devices.
    */
   private lateinit var message: Message

   /**
    * A [MessageListener] for processing messages from nearby devices.
    */
   private lateinit var messageListener: MessageListener

   /**
    * For adding [messages][Message] to the [RecyclerView]
    */
   private lateinit var msgAdapter: MessageAdapter

   override fun onCreate(savedInstanceState: Bundle?) {
       super.onCreate(savedInstanceState)
       binding = ActivityMainBinding.inflate(layoutInflater)
       setContentView(binding.root)

       binding.subscribeSwitch.setOnCheckedChangeListener { buttonView, isChecked ->
           if (isChecked) {
               subscribe()
           } else {
               unsubscribe()
           }
       }

       binding.publishSwitch.setOnCheckedChangeListener { buttonView, isChecked ->
           if (isChecked) {
               publish()
           } else {
               unpublish()
           }
       }
       setupMessagesDisplay()

       // The message being published is simply the Build.MODEL of the device. But since the
       // Messages API is expecting a byte array, you must convert the data to a byte array.
       message = Message(Build.MODEL.toByteArray(Charset.forName("UTF-8")))

       messageListener = object : MessageListener() {
           override fun onFound(message: Message) {
               // Called when a new message is found.
               val msgBody = String(message.content)
               msgAdapter.addItem(msgBody)
           }

           override fun onLost(message: Message) {
               // Called when a message is no longer detectable nearby.
               val msgBody = String(message.content)
               msgAdapter.removeItem(msgBody)
           }
       }

   }

   override fun onDestroy() {
       super.onDestroy()
       // although the API should shutdown its processes when the client process dies,
       // you may want to stop subscribing (and publishing if convenient)
       Nearby.getMessagesClient(this).unpublish(message)
       Nearby.getMessagesClient(this).unsubscribe(messageListener)
   }

   private fun publish() {
       val options = PublishOptions.Builder()
           .setStrategy(PUB_SUB_STRATEGY)
           .setCallback(object : PublishCallback() {
               override fun onExpired() {
                   super.onExpired()
                   // flick the switch off since the publishing has expired.
                   // recall that we had set expiration time to 120 seconds
                   runOnUiThread {
                       binding.publishSwitch.isChecked = false
                   }
                   runOnUiThread() {
                       binding.publishSwitch.isChecked = false
                   }
               }
           }).build()

       Nearby.getMessagesClient(this).publish(message, options)
   }

   private fun unpublish() {
       Nearby.getMessagesClient(this).unpublish(message)
   }

   private fun subscribe() {
       val options = SubscribeOptions.Builder()
           .setStrategy(PUB_SUB_STRATEGY)
           .setCallback(object : SubscribeCallback() {
               override fun onExpired() {
                   super.onExpired()
                   runOnUiThread {
                       binding.subscribeSwitch.isChecked = false
                   }
               }
           }).build()

       Nearby.getMessagesClient(this).subscribe(messageListener, options)
   }

   private fun unsubscribe() {
       Nearby.getMessagesClient(this).unsubscribe(messageListener)
   }

   private fun setupMessagesDisplay() {
       msgAdapter = MessageAdapter()
       with(binding.nearbyMsgRecyclerView) {
           layoutManager = LinearLayoutManager(context)
           this.adapter = msgAdapter
       }
   }

   class MessageAdapter : RecyclerView.Adapter<MessageAdapter.MessageVH>() {
       private var itemsList: MutableList<String> = arrayListOf()

       override fun onCreateViewHolder(parent: ViewGroup, viewType: Int): MessageVH {
           return MessageVH(TextView(parent.context))
       }

       override fun onBindViewHolder(holder: MessageVH, position: Int) {
           holder.bind(getItem(position))
       }

       override fun getItemCount(): Int = itemsList.size

       private fun getItem(pos: Int): String? = if (itemsList.isEmpty()) null else itemsList[pos]

       fun addItem(item: String) {
           itemsList.add(item)
           notifyItemInserted(itemsList.size)
       }

       fun removeItem(item: String) {
           val pos = itemsList.indexOf(item)
           itemsList.remove(item)
           notifyItemRemoved(pos)
       }

       inner class MessageVH(private val tv: TextView) : RecyclerView.ViewHolder(tv) {
           fun bind(item: String?) {
               item?.let { tv.text = it }
           }
       }
   }
}
將 Google 的 API 金鑰新增至資訊清單檔案
Nearby Messages API 具備 Google 為您提供的伺服器元件。當您發布訊息時,Nearby Messages API 會實際將訊息傳送至 Google 伺服器,讓訂閱者查詢訊息。您必須將 Google 的 API_KEY 新增至 Manifest.xml 檔案,Google 才能識別您的應用程式。隨後,我們只需按下執行即可使用應用程式。
取得 API 金鑰有三個步驟:
- 前往 Google 開發人員控制台。
- 按一下「+ 建立憑證」,然後選擇「API 金鑰」*。*
- 複製建立的 API 金鑰,然後貼到 Android 專案的資訊清單檔案中。
將 com.google.android.nearby.messages.API_KEY 中繼資料項目加入資訊清單檔案的應用程式中。檔案應如下所示。
<?xml version="1.0" encoding="utf-8"?>
<manifest xmlns:android="http://schemas.android.com/apk/res/android"
   package="com.example.nearbymessagesexample">

   <application
       android:allowBackup="true"
       android:icon="@mipmap/ic_launcher"
       android:label="@string/app_name"
       android:roundIcon="@mipmap/ic_launcher_round"
       android:supportsRtl="true"
       android:theme="@style/Theme.NearbyMessagesExample">

       <meta-data
           android:name="com.google.android.nearby.messages.API_KEY"
           android:value="ADD_KEY_HERE" />

       <activity android:name=".MainActivity">
           <intent-filter>
               <action android:name="android.intent.action.MAIN" />

               <category android:name="android.intent.category.LAUNCHER" />
           </intent-filter>
       </activity>
   </application>

</manifest>
新增 API 金鑰後,請在兩部以上的裝置上執行應用程式,查看是否會相互通訊。
5. 電池續航力的最佳做法
- 為保護使用者隱私及維持電池壽命,一旦使用者離開該功能所需的功能,您應立即停止發布及訂閱。
- 您應使用 Nearby Messages 功能在裝置之間建立距離,但不適合連續通訊。連續通訊可能會以正常電池耗電速率的 2.5 到 3.5 倍消耗裝置電池的電力。
6. 恭喜
恭喜!現在您已瞭解如何使用 Nearby Messages API 在鄰近裝置間傳送及探索訊息。
簡單來說,如要使用 Nearby Messages API,您必須為 play-services-nearby 新增依附元件,且需要透過 Google 開發人員控制台取得 API 金鑰,並將其新增至 Manifest.xml 檔案。此 API 需要網際網路連線,發布者才能將訊息傳送至 Google 伺服器,以供訂閱者擷取。
- 您已瞭解如何傳送訊息
- 您已瞭解如何訂閱及探索訊息
- 您已瞭解如何使用訊息 (在此範例中,只需在
RecyclerView中顯示)
後續步驟
參閱我們的網誌系列文章和範例