
1. Before you begin
The Data Binding Library is an Android Jetpack library that allows you to bind UI components in your XML layouts to data sources in your app using a declarative format rather than programmatically, reducing boilerplate code.
Prerequisites
This codelab has been designed for those with some Android development experience.
What you'll do
In this codelab, you'll convert this app to Data Binding:
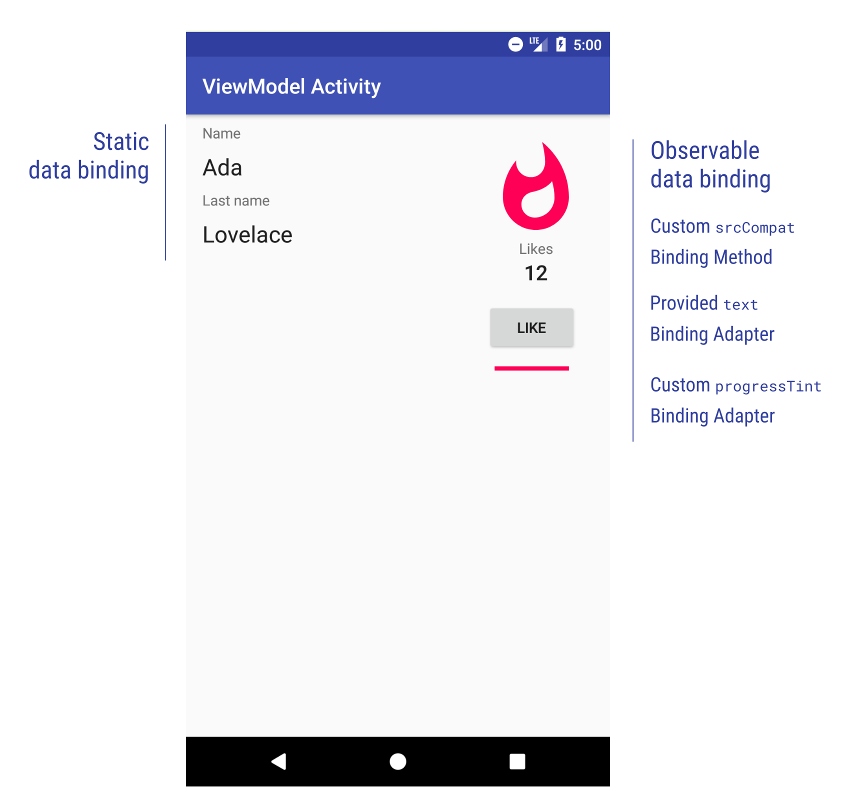
The app has a single screen that shows some static data and some observable data, meaning that when the data changes, the UI will be automatically updated.
The data is provided by a ViewModel. Model-View-ViewModel is a presentation layer pattern that works very well with Data Binding. Here's a diagram:
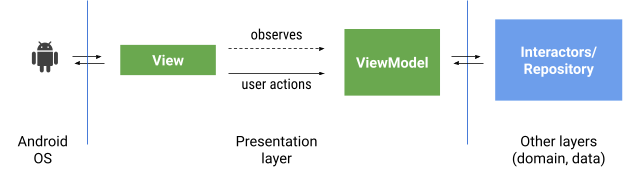
If you're not yet familiar with the ViewModel class from the Architecture Components libraries, you can check out the official documentation. In summary, it's a class that provides UI state to the view (Activity, Fragment, etc.). It survives orientation changes and acts as an interface to the rest of the layers in your app.
What you'll need
- Android Studio Bumblebee
2. Try out the app without Data Binding
In this step, you download the code for the entire codelab and then run a simple example app.
$ git clone https://github.com/android/codelab-android-databinding
Alternatively you can download the repository as a zip file:
Once the project is open, click  in the toolbar to run the app.
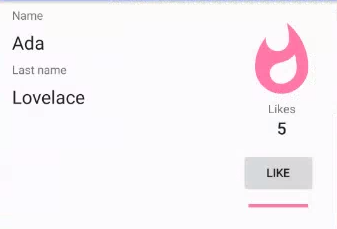
Once the build is complete and the app is deployed to your device or emulator, the default activity opens and looks like this:
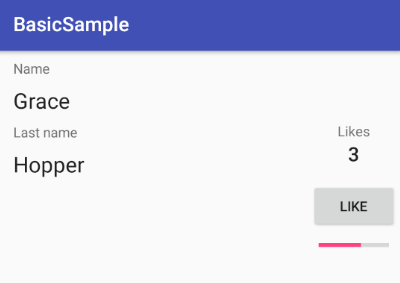
This screen shows some data and lets the user click on a button to increment a counter and update a progress bar. It uses SimpleViewModel. Open it and take a look.
The SimpleViewModel class exposes:
- First and last name
- Number of likes
- A value describing level of popularity
SimpleViewModel also lets the user increment the number of likes with the onLike() method.
While it doesn't have the most interesting functionality, SimpleViewModel is sufficient for this exercise. On the other hand, the UI implementation found in the PlainOldActivity class has a number of problems:
- It calls
findViewById()multiple times. Not only is this slow, it's not safe because it's not checked at compile time. If the ID you pass tofindViewById()is wrong, the app will crash at run time. - It sets initial values in
onCreate(). It'd be much better to have good defaults that are set automatically - It uses the
android:onClickattribute in theButtonelement of the XML layout declaration, which is not safe either: If theonLike()method is not implemented in your activity (or is renamed), the app will crash at run time. - It has a lot of code. Activities and fragments tend to grow very quickly, so it's a good idea to move as much code as possible out of them. Also, code in activities and fragments is hard to test and maintain.
With the Data Binding Library you can fix all of these problems by moving logic out of the activity into places where it's reusable and easier to test.
3. Enable Data Binding and convert the layout
This project already has Data Binding enabled, but when you want to use it in your own projects the first step is to enable the library in the modules that will use it:
build.gradle
android {
...
    buildFeatures {
       dataBinding true
    }
}
Now convert the layout to a Data Binding layout.
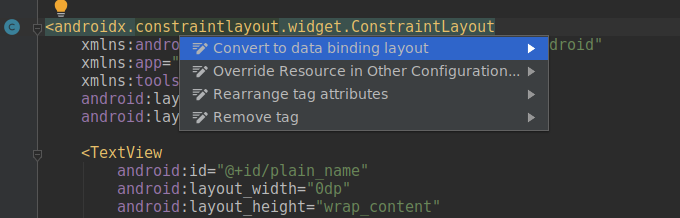
Open plain_activity.xml. It is a regular layout with a ConstraintLayout as the root element.
In order to convert the layout to Data Binding, you need to wrap the root element in a <layout> tag. You'll also have to move the namespace definitions (the attributes that start with xmlns:) to the new root element.
Android Studio offers a handy way to do this automatically: Right-click the root element, select Show Context Actions, then Convert to data binding layout:
Your layout should now look like this:
<layout xmlns:android="http://schemas.android.com/apk/res/android"
       xmlns:app="http://schemas.android.com/apk/res-auto"
       xmlns:tools="http://schemas.android.com/tools">
   <data>

   </data>
   <androidx.constraintlayout.widget.ConstraintLayout
           android:layout_width="match_parent"
           android:layout_height="match_parent">

       <TextView
...
The <data> tag will contain layout variables.
Layout variables are used to write layout expressions. Layout expressions are placed in the value of element attributes and they use the @{expression} format. Here are some examples:
// Some examples of complex layout expressions
android:text="@{String.valueOf(index + 1)}"
android:visibility="@{age < 13 ? View.GONE : View.VISIBLE}"
android:transitionName='@{"image_" + id}'
By using layout expressions to bind components in the layout file, you can:
- Improve your app's performance
- Help prevent memory leaks and null pointer exceptions
- Streamline your activity's code by removing UI framework calls
Here are some examples:
// Bind the name property of the viewmodel to the text attribute
android:text="@{viewmodel.name}"
// Bind the nameVisible property of the viewmodel to the visibility attribute
android:visibility="@{viewmodel.nameVisible}"
// Call the onLike() method on the viewmodel when the View is clicked.
android:onClick="@{() -> viewmodel.onLike()}"
Check out a complete description of the language here.
Now, let's bind some data!
4. Create your first layout expression
Let's start with some static data binding for now.
- Create two
Stringlayout variables inside the<data>tag.
    <data>
        <variable name="name" type="String"/>
        <variable name="lastName" type="String"/>
    </data>
- Look for the TextView with the ID
plain_nameand add theandroid:textattribute with a layout expression:
        <TextView
                android:id="@+id/plain_name"
                android:text="@{name}"
        ... />
Layout expressions start with an @ symbol and are wrapped inside curly braces { }.
Because name is a String, Data Binding is going to know how to set that value in the TextView. You'll learn how to deal with different layout expression types and attributes later on.
- Do the same thing with the
plain_lastNametext view:
        <TextView
                android:id="@+id/plain_lastname"
                android:text="@{lastName}"
        ... />
You can find the result of these operations in plain_activity_solution_2.xml.
Now we need to modify the Activity so that it inflates a Data Binding layout correctly:
5. Change inflation and remove UI calls from activity
The layout is ready, but now it's necessary to make some changes in the activity. Open PlainOldActivity.
Because you're using a Data Binding layout, the inflation is done in a different way.
In onCreate, replace:
setContentView(R.layout.plain_activity)
with:
val binding : PlainActivityBinding =
    DataBindingUtil.setContentView(this, R.layout.plain_activity)
What is the purpose of this variable? You'll need it to set those layout variables you declared in the <data> block. Binding classes are generated automatically by the library.
To see what a generated class looks like, open PlainActivitySolutionBinding, and take a look around.
- Now you can set the variable values:
    binding.name = "Your name"
    binding.lastName = "Your last name"
And that's it. You just bound data using the library.
You can start removing old code:
- Remove the
updateName()method, since the new Data Binding code is now finding the IDs and setting the text values. - Remove the
updateName()call inonCreate().
You can find the result of these operations in PlainOldActivitySolution2.
You can now run the app. You'll see that your name has replaced Ada's.
6. Dealing with user events
So far you've learned how to show data to the user, but with the Data Binding Library you can also handle user events and invoke actions on layout variables.
Before modifying the event handling code, you can clean up the layout a bit.
- First, replace the two variables for a single ViewModel. This is the way to go in the majority of cases since it keeps your presentation code and state in one place.
    <data>
        <variable
                name="viewmodel"
                type="com.example.android.databinding.basicsample.data.SimpleViewModel"/>
    </data>
Instead of accessing the variables directly, call the viewmodel properties:
- Change the layout expressions in both TextViews:
        <TextView
                android:id="@+id/plain_name"
                android:text="@{viewmodel.name}"
... />
        <TextView
                android:id="@+id/plain_lastname"
                android:text="@{viewmodel.lastName}"
... />
Also, update how clicks on the "Like" button are handled.
- Look for the
like_buttonButton and replace
android:onClick="onLike"
with
android:onClick="@{() -> viewmodel.onLike()}"
The former onClick attribute used an unsafe mechanism in which the onLike() method in the activity or fragment is called when the view is clicked. If a method with that exact signature doesn't exist, the app crashes.
The new way is much safer because it's checked at compile time and uses a lambda expression to call the onLike() method of the view model.
You can find the result of these operations in plain_activity_solution_3.xml.
Now, remove things you don't need from the activity:
- Replace
    binding.name = "Your name"
    binding.lastName = "Your last name"
with
binding.viewmodel = viewModel
- Remove the
onLike()method in the activity, as it's bypassed now.
You can find the result of these operations in PlainOldActivitySolution3.
If you run the app you'll see that the button doesn't do anything. That's because you're not calling updateLikes() anymore. In the next section, you'll learn to implement that properly.
7. Observing data
In the previous step, you created a static binding. If you open the ViewModel you'll find that name and lastName are just Strings, which is fine because they are not going to change. However, likes is modified by the user.
var likes = 0
Instead of explicitly updating the UI when this value changes, make it observable.
There are multiple ways to implement observability. You can use observable classes, observable fields, or, the preferred way, LiveData. The full documentation on that is here.
We're going to use ObservableFields as they are simpler.
Replace
    val name = "Grace"
    val lastName = "Hopper"
    var likes = 0
        private set // This is to prevent external modification of the variable.
with the new LiveDatas:
    private val _name = MutableLiveData("Ada")
    private val _lastName = MutableLiveData("Lovelace")
    private val _likes =  MutableLiveData(0)

    val name: LiveData<String> = _name
    val lastName: LiveData<String> = _lastName
    val likes: LiveData<Int> = _likes
Also, replace
    fun onLike() {
        likes++
    }

    /**
     * Returns popularity in buckets: [Popularity.NORMAL],
     * [Popularity.POPULAR] or [Popularity.STAR]
     */
    val popularity: Popularity
        get() {
            return when {
                likes > 9 -> Popularity.STAR
                likes > 4 -> Popularity.POPULAR
                else -> Popularity.NORMAL
            }
        }
with
    // popularity is exposed as LiveData using a Transformation instead of a @Bindable property.
    val popularity: LiveData<Popularity> = Transformations.map(_likes) {
        when {
            it > 9 -> Popularity.STAR
            it > 4 -> Popularity.POPULAR
            else -> Popularity.NORMAL
        }
    }

    fun onLike() {
        _likes.value = (_likes.value ?: 0) + 1
    }
As you can see, a LiveData's value is set with the value property, and you can make one LiveData depend on another using Transformations. This mechanism allows the library to update the UI when the value changes.
LiveData is a lifecycle-aware observable so you need to specify what lifecycle owner to use. You do this in the binding object.
Open PlainOldActivity (it should look like PlainOldActivitySolution3) and set the lifecycle owner in the binding object:
binding.lifecycleOwner = this
If you rebuild the project you'll find that the activity is not compiling. We're accessing likes directly from the activity, which we don't need anymore:
    private fun updateLikes() {
        findViewById<TextView>(R.id.likes).text = viewModel.likes.toString()
        findViewById<ProgressBar>(R.id.progressBar).progress =
            (viewModel.likes * 100 / 5).coerceAtMost(100)
...
Open PlainOldActivity and remove all the private methods in the activity and their calls. The activity is now as simple as it gets.
class PlainOldActivity : AppCompatActivity() {

    // Obtain ViewModel from ViewModelProviders
    private val viewModel by lazy { ViewModelProviders.of(this).get(SimpleViewModel::class.java) }

    override fun onCreate(savedInstanceState: Bundle?) {
        super.onCreate(savedInstanceState)

        val binding : PlainActivityBinding =
            DataBindingUtil.setContentView(this, R.layout.plain_activity)

        binding.lifecycleOwner = this

        binding.viewmodel = viewModel
    }
}
You can find the result of these operations in SolutionActivity.
In general, moving code out of the activity is great for maintainability and testability.
Let's bind the TextView showing the number of likes to the observable integer. In plain_activity.xml:
        <TextView
                android:id="@+id/likes"
                android:text="@{Integer.toString(viewmodel.likes)}"
...
If you run the app now, the number of likes is incremented as expected.

Let's recap what's been done so far:
- Name and last name are exposed as strings from the view model.
- The button's
onClickattribute is bound to the view model via a lambda expression. - The number of likes is exposed from the view model via an observable integer and bound to a text view so it's refreshed automatically when it changes.
Thus far, you've used attributes like android:onClick and android:text. In the next section, you'll learn about other properties and create your own.
8. Using Binding Adapters to create custom attributes
When you bind a string (or an observable string) to an android:text attribute it's pretty obvious what's going to happen but how is it happening?
With the Data Binding Library, almost all UI calls are done in static methods called Binding Adapters.
The library provides a huge amount of Binding Adapters. Check them out here. Here's an example for the android:text attribute:
    @BindingAdapter("android:text")
    public static void setText(TextView view, CharSequence text) {
        // Some checks removed for clarity

        view.setText(text);
    }
Or the android:background one:
    @BindingAdapter("android:background")
    public static void setBackground(View view, Drawable drawable) {
        if (VERSION.SDK_INT >= VERSION_CODES.JELLY_BEAN) {
            view.setBackground(drawable);
        } else {
            view.setBackgroundDrawable(drawable);
        }
    }
There's no magic in Data Binding. Everything is resolved at compilation time and it's accessible for you to read in the generated code.
Let's work on the progress bar. We want it to:
- Be invisible if there are no likes
- Fill up with 5 likes
- Change color if full
We're going to create custom Binding Adapters for this.
Open the BindingAdapters.kt file in the utils package. It doesn't matter where you create them, the library will find them. In Kotlin, static methods can be created by adding functions to the top level of a Kotlin file or as extension functions on the class.
Look for the Binding Adapter for the first requirement, hideIfZero:
    @BindingAdapter("app:hideIfZero")
    fun hideIfZero(view: View, number: Int) {
        view.visibility = if (number == 0) View.GONE else View.VISIBLE
    }
This binding adapter:
- applies to the
app:hideIfZeroattribute. - can be applied to every View (since the first parameter is a View; you can restrict to certain classes by changing this type)
- takes an Integer that should be what the layout expression returns.
- makes the View GONE if the number is zero. VISIBLE otherwise.
In the plain_activity layout, look for the progress bar and add the hideIfZero attribute:
    <ProgressBar
            android:id="@+id/progressBar"
            app:hideIfZero="@{viewmodel.likes}"
...
Run the app and you'll see that the progress bar shows up when you click for the first time on the button. However, we still need to change its value and color:

You can find the result of these steps in plain_activity_solution_4.xml.
9. Create a Binding Adapter with multiple parameters
For the progress value, we're going to use a Binding Adapter that takes the maximum value and the number of likes. Open the BindingAdapters file and look for this one:
/**
 *  Sets the value of the progress bar so that 5 likes will fill it up.
 *
 *  Showcases Binding Adapters with multiple attributes. Note that this adapter is called
 *  whenever any of the attribute changes.
 */
@BindingAdapter(value = ["app:progressScaled", "android:max"], requireAll = true)
fun setProgress(progressBar: ProgressBar, likes: Int, max: Int) {
    progressBar.progress = (likes * max / 5).coerceAtMost(max)
}
This Binding Adapter is not used if any of the attributes are missing. This happens at compile time. The method takes 3 parameters now (the view it applies to plus the number of attributes defined in the annotation).
The requireAll parameter defines when the binding adapter is used:
- When
true, all elements must be present in the XML definition. - When
false, the missing attributes will benull,falseif booleans, or 0 if primitives.
Next, add the attributes to the XML:
        <ProgressBar
                android:id="@+id/progressBar"
                app:hideIfZero="@{viewmodel.likes}"
                app:progressScaled="@{viewmodel.likes}"
                android:max="@{100}"
...
We're binding the progressScaled attribute to the number of likes and we're just passing a literal integer to the max attribute. If you don't add the @{} format, Data Binding won't be able to find the correct Binding Adapter.
You can find the result of these steps in plain_activity_solution_5.xml.
If you run the app, you'll see how the progress bar fills up as expected.
10. Practice creating Binding Adapters
Practice makes perfect. Create:
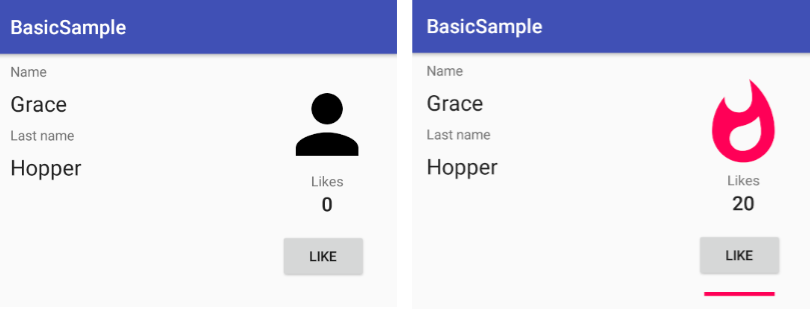
- a Binding Adapter that tints the color of the progress bar depending on the value of likes and adds the corresponding attribute
- a Binding Adapter that shows a different icon depending on the popularity:
ic_person_black_96dpin blackic_whatshot_black_96dpin light pinkic_whatshot_black_96dpin bold pink
You'll find solutions in the BindingAdapters.kt file, the SolutionActivity file, and the solution.xml layout.
11. Congratulations!
Now you know how to create Data Binding layouts, add variables and expressions to it, use observable data, and make your XML layouts more meaningful with custom attributes via custom Binding Adapters. You're bound to succeed!
Now check out the samples for more advanced usages and the documentation for the complete picture.