
1. 介紹與設定
在本程式碼研究室中,您將學習如何測試以 Jetpack Compose 建立的 UI。您將編寫第一批測試,同時瞭解獨立測試、偵錯測試、語意樹和同步處理。
軟硬體需求
- 最新版 Android Studio
- Kotlin 知識
- 瞭解 Compose 的基本知識 (例如
@Composable註解) - 熟悉修飾符的基本概念
- 選擇性:建議您先學習 Jetpack Compose 的基本程式碼研究室,再學習本程式碼研究室。
查看本程式碼研究室的程式碼 (Rally)
您將以 Rally Material Design 研究做為此程式碼研究室的基礎。您可以在 android-compose-codelabs GitHub 存放區找到上述程式碼。如要複製,請執行:
git clone https://github.com/android/codelab-android-compose.git
下載完成後,開啟 TestingCodelab 專案。
或者,您也可以下載兩個 ZIP 檔案:
開啟 TestingCodelab 資料夾,其中包含名為 Rally 的應用程式。
檢查專案結構
Compose 測試是檢測設備測試。這代表必須搭配裝置 (實體裝置或模擬器) 執行。
Rally 內含若干檢測設備 UI 測試。您可以在 androidTest 來源集中找到這些測試:
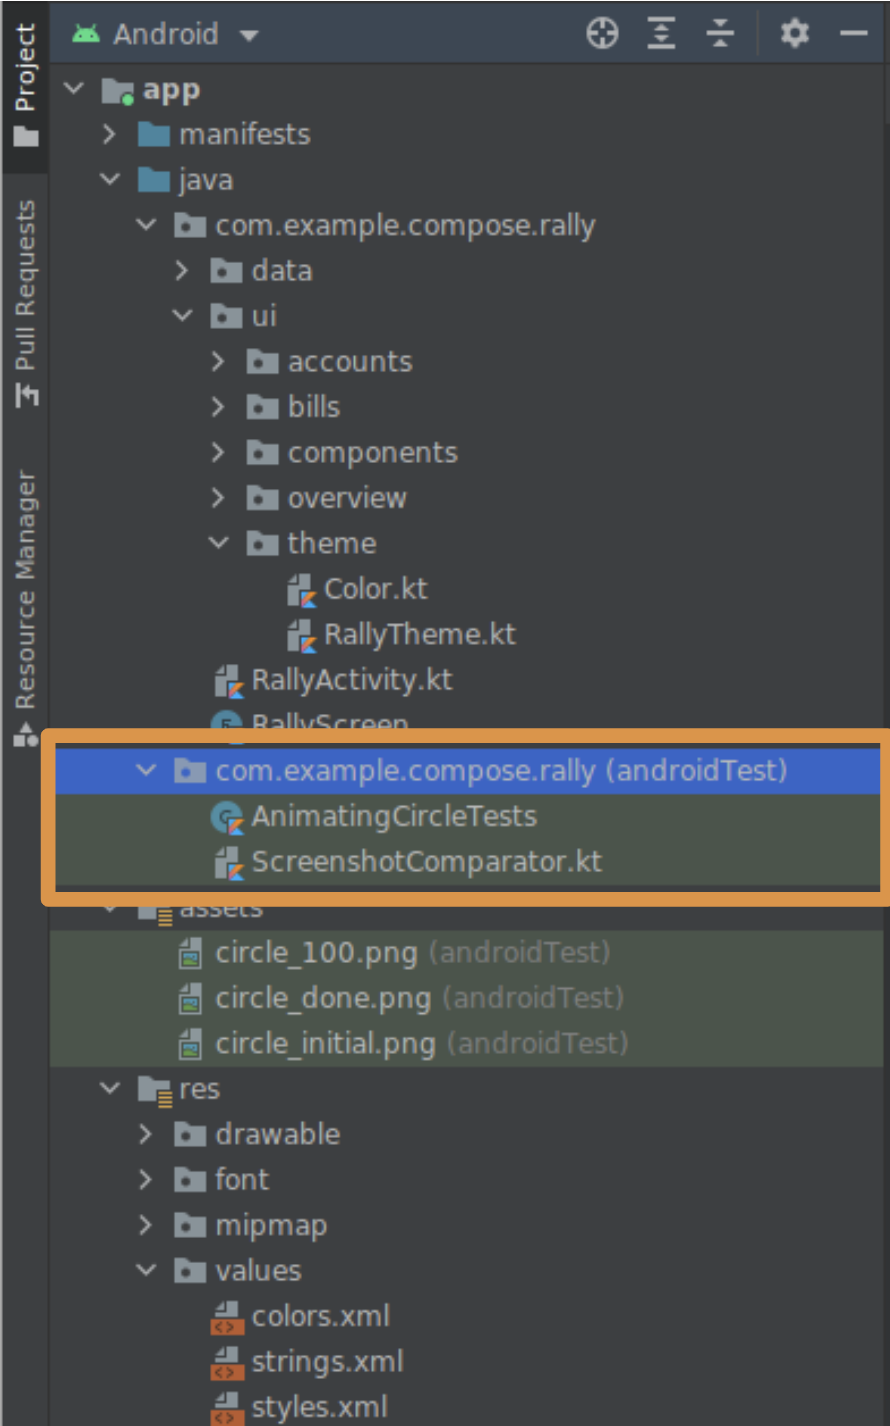
這是您用來放置新測試的目錄。歡迎查看 AnimatingCircleTests.kt 檔案,瞭解 Compose 測試的內容。
Rally 現已設定完成,不過,如要在新專案中啟用 Compose 測試,需要的只是相關模組 build.gradle 檔案中的測試依附元件而已:
androidTestImplementation "androidx.compose.ui:ui-test-junit4:$version"

debugImplementation "androidx.compose.ui:ui-test-manifest:$rootProject.composeVersion"
您可以執行並熟悉一下應用程式。
2. 要測試哪些項目?
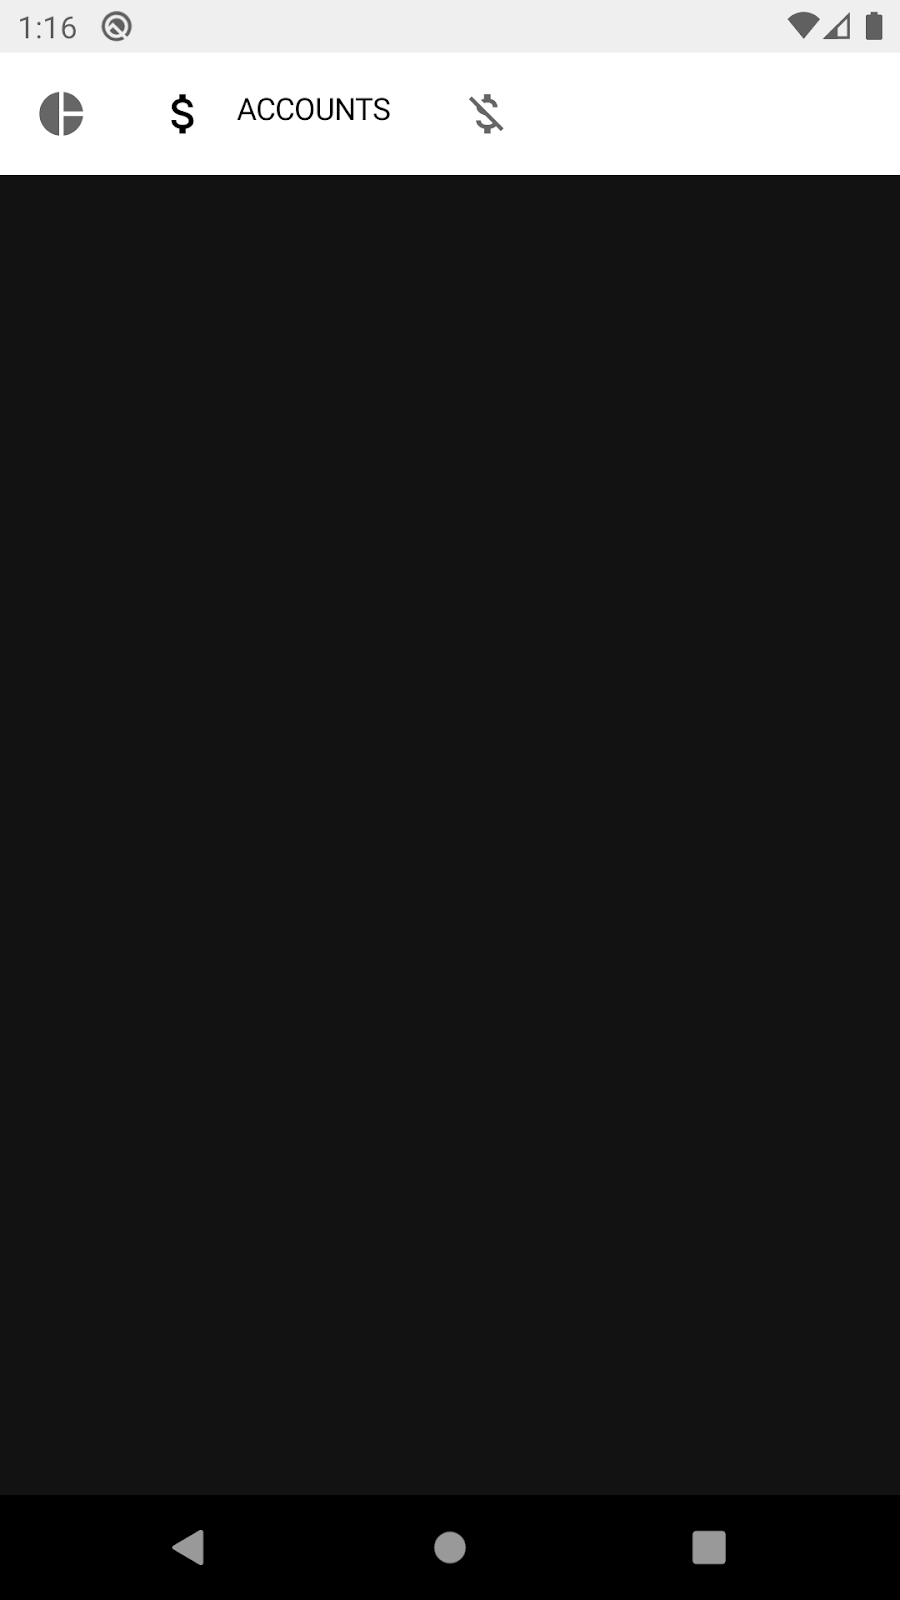
我們要聚焦在 Rally 的分頁標籤列,當中包含一列分頁標籤 (「Overview」、「Accounts」和「Bills」),內容如下所示:

在本程式碼研究室中,您需要測試分頁標籤列的 UI。
這可能有很多涵義:
- 測試分頁標籤是否顯示預期的圖示和文字
- 測試動畫是否符合規格
- 測試觸發的導覽事件是否正確
- 測試不同狀態中 UI 元素的位置和距離
- 擷取分頁標籤列的螢幕截圖,並與先前的螢幕截圖比較
確切的測試元件數量或測試規則不盡相同。您可以執行所有上述動作!在本程式碼研究室中,您將驗證以下項目,測試狀態邏輯是否正確:
- 只有在選取分頁狀態下,才會顯示分頁標籤
- 使用中的畫面會定義已選取的分頁
3. 建立簡單的 UI 測試
建立 TopAppBarTest 檔案
在與 AnimatingCircleTests.kt (app/src/androidTest/com/example/compose/rally) 相同的資料夾中建立新檔案,並命名為 TopAppBarTest.kt。
Compose 隨附 ComposeTestRule,只要呼叫 createComposeRule() 即可取得。您可以利用這項規則設定受測試的 Compose 內容,並與之互動。
新增 ComposeTestRule
package com.example.compose.rally

import androidx.compose.ui.test.junit4.createComposeRule
import org.junit.Rule

class TopAppBarTest {

    @get:Rule
    val composeTestRule = createComposeRule()

    // TODO: Add tests
}
單獨測試
在 Compose 測試中,我們可以透過類似在 Android View 中使用 Espresso 的方式,啟動應用程式的主要活動,方法是使用 createAndroidComposeRule。
// Don't copy this over

@get:Rule
val composeTestRule = createAndroidComposeRule(RallyActivity::class.java)
不過,使用 Compose 就可以單獨測試元件,大幅簡化相關流程。您可以選擇要在測試中使用的 Compose UI 內容,方法是使用 ComposeTestRule 的 setContent 方法,而且可在任何位置呼叫 (但僅限一次)。
// Don't copy this over

class TopAppBarTest {

    @get:Rule
    val composeTestRule = createComposeRule()

    @Test
    fun myTest() {
        composeTestRule.setContent {
            Text("You can set any Compose content!")
        }
    }
}
我們想要測試 TopAppBar,所以重點會放在此目的上。請呼叫 setContent 中的 RallyTopAppBar,然後讓 Android Studio 填寫參數名稱。
import androidx.compose.ui.test.junit4.createComposeRule
import com.example.compose.rally.ui.components.RallyTopAppBar
import org.junit.Rule
import org.junit.Test

class TopAppBarTest {

    @get:Rule
    val composeTestRule = createComposeRule()

    @Test
    fun rallyTopAppBarTest() {
        composeTestRule.setContent {
            RallyTopAppBar(
                allScreens = ,
                onTabSelected = { /*TODO*/ },
                currentScreen =
            )
        }
    }
}
能夠測試可組合項的重要性
RallyTopAppBar 採用三個很容易提供的參數,因此能傳遞我們控管的假資料。例如:
    @Test
    fun rallyTopAppBarTest() {
        val allScreens = RallyScreen.values().toList()
        composeTestRule.setContent {
            RallyTopAppBar(
                allScreens = allScreens,
                onTabSelected = { },
                currentScreen = RallyScreen.Accounts
            )
        }
        Thread.sleep(5000)
    }
為讓您瞭解情況,我們也加入了 sleep()。請在 rallyTopAppBarTest 按一下滑鼠右鍵,然後點選「Run rallyTopAppBarTest()...」。
這個測試連續 5 秒顯示頂端應用程式列,但套用了淺色主題,所以不是我們預期的結果!
原因在於,該應用程式列是透過 Material 元件建構而成,應位於 MaterialTheme 內,否則就會改回套用「基準」樣式顏色。
MaterialTheme 有完善的預設值,因此不會造成當機。由於我們不會測試主題或擷取螢幕截圖,因此可以省略這些,並使用預設的淺色主題。您可以將 RallyTopAppBar 與 RallyTheme 包裝在一起來進行修正。
確認已選取該分頁標籤
請遵循以下模式,找出 UI 元素、檢查其屬性、並透過測試規則執行操作:
composeTestRule{.finder}{.assertion}{.action}
在本測試中,您會看到「Accounts」字詞,確認是否顯示所選分頁的標籤。
建議您善用 Compose 測試一覽表或測試套件參考說明文件,瞭解有哪些可用的工具。請使用適合這裡情況的尋找工具和斷言。例如:onNodeWithText、onNodeWithContentDescription、isSelected、hasContentDescription、assertIsSelected...
每個分頁標籤會有各自的內容說明:
- 總覽
- 帳戶
- 帳單
知道這一點後,請將 Thread.sleep(5000) 替換成能夠尋找內容說明並斷言其存在的陳述式:
import androidx.compose.ui.test.assertIsSelected
import androidx.compose.ui.test.onNodeWithContentDescription
...

@Test
fun rallyTopAppBarTest_currentTabSelected() {
    val allScreens = RallyScreen.values().toList()
    composeTestRule.setContent {
        RallyTopAppBar(
            allScreens = allScreens,
            onTabSelected = { },
            currentScreen = RallyScreen.Accounts
        )
    }

    composeTestRule
        .onNodeWithContentDescription(RallyScreen.Accounts.name)
        .assertIsSelected()
}
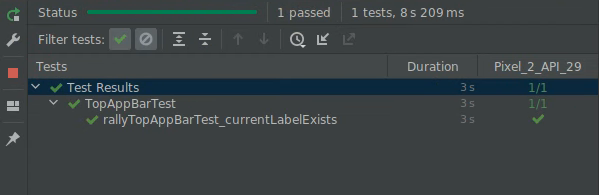
現在再次執行測試,您應該會看到一個綠色測試:
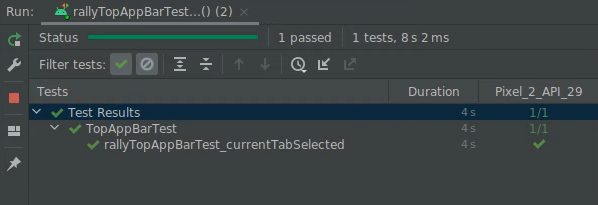
恭喜!您已編寫首個 Compose 測試,也學到了如何獨立執行測試並使用尋找工具和斷言。
這些內容很簡單,但需要事先瞭解元件 (內容說明和 selected 屬性) 的一些概念。在下個步驟中,您將學習如何檢查有哪些屬性可用。
4. 偵錯測試
在這個步驟中,您將確認是否以大寫字母顯示目前分頁的標籤。
嘗試尋找文字並斷言其存在,是一種可能的解決方案:
import androidx.compose.ui.test.onNodeWithText
...

@Test
fun rallyTopAppBarTest_currentLabelExists() {
    val allScreens = RallyScreen.values().toList()
    composeTestRule.setContent {
        RallyTopAppBar(
            allScreens = allScreens,
            onTabSelected = { },
            currentScreen = RallyScreen.Accounts
        )
    }

    composeTestRule
        .onNodeWithText(RallyScreen.Accounts.name.uppercase())
        .assertExists()
}
但如果您執行測試,測試會失敗😱
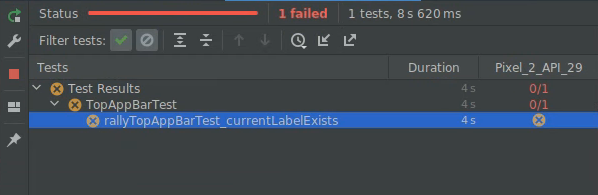
在這個步驟中,您將瞭解如何使用語意樹偵錯。
語意樹
Compose 測試會使用稱為語意樹的結構,檢查畫面上的元素並讀取其屬性。這也是無障礙服務採用的結構,因為 TalkBack 等服務理應讀取這類服務。
您可以在節點上使用 printToLog 函式顯示語意樹。請在測試中加入新行:
import androidx.compose.ui.test.onRoot
import androidx.compose.ui.test.printToLog
...

fun rallyTopAppBarTest_currentLabelExists() {
    val allScreens = RallyScreen.values().toList()
    composeTestRule.setContent {
        RallyTopAppBar(
            allScreens = allScreens,
            onTabSelected = { },
            currentScreen = RallyScreen.Accounts
        )
    }

    composeTestRule.onRoot().printToLog("currentLabelExists")

    composeTestRule
        .onNodeWithText(RallyScreen.Accounts.name.uppercase())
        .assertExists() // Still fails
}
現在執行測試,查看 Android Studio 中的 Logcat (您可尋找 currentLabelExists)。
...com.example.compose.rally D/currentLabelExists: printToLog:
    Printing with useUnmergedTree = 'false'
    Node #1 at (l=0.0, t=63.0, r=1080.0, b=210.0)px
     |-Node #2 at (l=0.0, t=63.0, r=1080.0, b=210.0)px
       [SelectableGroup]
       MergeDescendants = 'true'
        |-Node #3 at (l=42.0, t=105.0, r=105.0, b=168.0)px
        | Role = 'Tab'
        | Selected = 'false'
        | StateDescription = 'Not selected'
        | ContentDescription = 'Overview'
        | Actions = [OnClick]
        | MergeDescendants = 'true'
        | ClearAndSetSemantics = 'true'
        |-Node #6 at (l=189.0, t=105.0, r=468.0, b=168.0)px
        | Role = 'Tab'
        | Selected = 'true'
        | StateDescription = 'Selected'
        | ContentDescription = 'Accounts'
        | Actions = [OnClick]
        | MergeDescendants = 'true'
        | ClearAndSetSemantics = 'true'
        |-Node #11 at (l=552.0, t=105.0, r=615.0, b=168.0)px
          Role = 'Tab'
          Selected = 'false'
          StateDescription = 'Not selected'
          ContentDescription = 'Bills'
          Actions = [OnClick]
          MergeDescendants = 'true'
          ClearAndSetSemantics = 'true'
在語意樹中,您會看到 SelectableGroup 有 3 個子元素,這些子元素代表頂端應用程式列的分頁標籤。但實際上,沒有任何 text 屬性具有值「ACCOUNTS」,這正是測試失敗的原因。不過,每個分頁標籤都有內容說明。您可以在 RallyTopAppBar.kt 內的 RallyTab 可組合函式中,查看這項屬性的設定方式:
private fun RallyTab(text: String...)
...
    Modifier
        .clearAndSetSemantics { contentDescription = text }
這個修飾符會清除子系中的屬性,並自行設定內容說明,因此您會看到「Accounts」,而不是「ACCOUNTS」。
請將尋找工具 onNodeWithText 替換成 onNodeWithContentDescription,然後重新執行測試:
fun rallyTopAppBarTest_currentLabelExists() {
    val allScreens = RallyScreen.values().toList()
    composeTestRule.setContent {
        RallyTopAppBar(
            allScreens = allScreens,
            onTabSelected = { },
            currentScreen = RallyScreen.Accounts
        )
    }

    composeTestRule
        .onNodeWithContentDescription(RallyScreen.Accounts.name)
        .assertExists()
}
恭喜!您已修正測試,並已瞭解 ComposeTestRule、單獨測試、尋找工具、斷言和使用語意樹偵錯。
不過,也有個壞消息,那就是這項測試並不實用!仔細查看語意樹,您會發現無論是否選取分頁標籤,系統都會顯示這三個分頁標籤的內容說明。我們必須更深入思考!
5. 合併及未合併的語意樹
語意樹的特性是會盡可能精簡,僅顯示相關資訊。
例如 TopAppBar 中,圖示和標籤不必做為不同節點。請查看「Overview」節點:

        |-Node #3 at (l=42.0, t=105.0, r=105.0, b=168.0)px
        | Role = 'Tab'
        | Selected = 'false'
        | StateDescription = 'Not selected'
        | ContentDescription = 'Overview'
        | Actions = [OnClick]
        | MergeDescendants = 'true'
        | ClearAndSetSemantics = 'true'
這個節點包含專為 selectable 元件定義的屬性 (例如 Selected 和 Role),以及整個分頁標籤的內容說明。這些是高階屬性,對簡易測試來說非常實用。圖示或文字的詳細資料可能重複,因此則不顯示。
Compose 會在部分可組合項 (例如 Text) 中自動顯示這些語意屬性。您也可以自訂及合併這些屬性,用來表示由一或多個子系組成的單一元件,例如包含 Text 可組合項的 Button。我們可透過屬性 MergeDescendants = 'true' 得知這個節點有子系,但已合併至該節點中。在測試中,通常需要存取所有節點。
為驗證是否顯示分頁標籤內的 Text,我們可以查詢將 useUnmergedTree = true 傳遞至 onRoot 尋找工具的未合併語意樹。
@Test
fun rallyTopAppBarTest_currentLabelExists() {
    val allScreens = RallyScreen.values().toList()
    composeTestRule.setContent {
        RallyTopAppBar(
            allScreens = allScreens,
            onTabSelected = { },
            currentScreen = RallyScreen.Accounts
        )
    }

    composeTestRule.onRoot(useUnmergedTree = true).printToLog("currentLabelExists")


}
現在,Logcat 的輸出內容會稍長一些:
    Printing with useUnmergedTree = 'true'
    Node #1 at (l=0.0, t=63.0, r=1080.0, b=210.0)px
     |-Node #2 at (l=0.0, t=63.0, r=1080.0, b=210.0)px
       [SelectableGroup]
       MergeDescendants = 'true'
        |-Node #3 at (l=42.0, t=105.0, r=105.0, b=168.0)px
        | Role = 'Tab'
        | Selected = 'false'
        | StateDescription = 'Not selected'
        | ContentDescription = 'Overview'
        | Actions = [OnClick]
        | MergeDescendants = 'true'
        | ClearAndSetSemantics = 'true'
        |-Node #6 at (l=189.0, t=105.0, r=468.0, b=168.0)px
        | Role = 'Tab'
        | Selected = 'true'
        | StateDescription = 'Selected'
        | ContentDescription = 'Accounts'
        | Actions = [OnClick]
        | MergeDescendants = 'true'
        | ClearAndSetSemantics = 'true'
        |  |-Node #9 at (l=284.0, t=105.0, r=468.0, b=154.0)px
        |    Text = 'ACCOUNTS'
        |    Actions = [GetTextLayoutResult]
        |-Node #11 at (l=552.0, t=105.0, r=615.0, b=168.0)px
          Role = 'Tab'
          Selected = 'false'
          StateDescription = 'Not selected'
          ContentDescription = 'Bills'
          Actions = [OnClick]
          MergeDescendants = 'true'
          ClearAndSetSemantics = 'true'
節點 #3 仍沒有子系:
        |-Node #3 at (l=42.0, t=105.0, r=105.0, b=168.0)px
        | Role = 'Tab'
        | Selected = 'false'
        | StateDescription = 'Not selected'
        | ContentDescription = 'Overview'
        | Actions = [OnClick]
        | MergeDescendants = 'true'
        | ClearAndSetSemantics = 'true'
但節點 6 (所選分頁標籤) 含有一個子系,而且現在我們可以看見「Text」屬性:
        |-Node #6 at (l=189.0, t=105.0, r=468.0, b=168.0)px
        | Role = 'Tab'
        | Selected = 'true'
        | StateDescription = 'Selected'
        | ContentDescription = 'Accounts'
        | Actions = [OnClick]
        | MergeDescendants = 'true'
        |  |-Node #9 at (l=284.0, t=105.0, r=468.0, b=154.0)px
        |    Text = 'ACCOUNTS'
        |    Actions = [GetTextLayoutResult]
為驗證符合預期的正確行為,您要編寫比對工具,找出一個包含「ACCOUNTS」文字的節點,且其父項節點包含內容說明「Accounts」。
請再次查看 Compose 測試一覽表,試著找出編寫比對工具的方式。請注意,您可以使用布林運算子 (例如 and 和 or) 搭配比對器。
所有尋找工具都有一個名為 useUnmergedTree 的參數。您只需將其設為 true,即可使用未合併的語意樹。
請試著不要參考解決方案,自行編寫測試!
解決方案
import androidx.compose.ui.test.hasParent
import androidx.compose.ui.test.hasText
...

@Test
fun rallyTopAppBarTest_currentLabelExists() {
    val allScreens = RallyScreen.values().toList()
    composeTestRule.setContent {
        RallyTopAppBar(
            allScreens = allScreens,
            onTabSelected = { },
            currentScreen = RallyScreen.Accounts
        )
    }

    composeTestRule
        .onNode(
            hasText(RallyScreen.Accounts.name.uppercase()) and
            hasParent(
                hasContentDescription(RallyScreen.Accounts.name)
            ),
            useUnmergedTree = true
        )
        .assertExists()
}
繼續並執行測試:
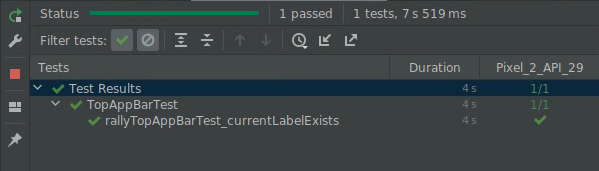
恭喜!在這個步驟中,您已瞭解如何合併屬性,並認識已合併和未合併的語意樹。
6. 同步處理
您撰寫的所有測試都必須與受測試的主體正確同步。舉例來說,當您使用 onNodeWithText 等尋找工具時,測試作業會等到應用程式處於「閒置」狀態後,才查詢語意樹。如果不同步,測試作業可能會在元素顯示之前尋找元素,或無謂地等待。
我們會使用這個步驟的「Overview」畫面,執行應用程式時的畫面會如下所示:
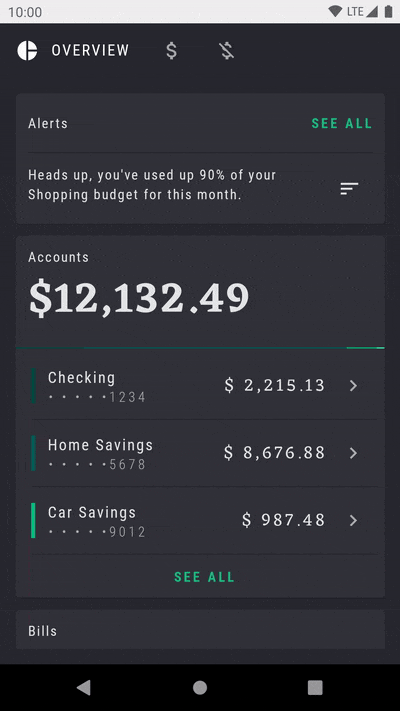
請留意「Alerts」資訊卡的重複閃爍動畫,這個元素能引人目光。
建立另一個名為 OverviewScreenTest 的測試類別,並新增下列內容:
package com.example.compose.rally

import androidx.compose.ui.test.assertIsDisplayed
import androidx.compose.ui.test.junit4.createComposeRule
import androidx.compose.ui.test.onNodeWithText
import com.example.compose.rally.ui.overview.OverviewBody
import org.junit.Rule
import org.junit.Test

class OverviewScreenTest {

    @get:Rule
    val composeTestRule = createComposeRule()

    @Test
    fun overviewScreen_alertsDisplayed() {
        composeTestRule.setContent {
            OverviewBody()
        }

        composeTestRule
            .onNodeWithText("Alerts")
            .assertIsDisplayed()
    }
}
如果您執行這項測試,會發現測試從未完成 (會在 30 秒後逾時)。
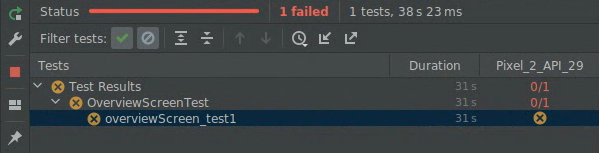
錯誤訊息顯示:
androidx.compose.ui.test.junit4.android.ComposeNotIdleException: Idling resource timed out: possibly due to compose being busy.
IdlingResourceRegistry has the following idling resources registered:
- [busy] androidx.compose.ui.test.junit4.android.ComposeIdlingResource@d075f91
這基本上表示 Compose 處於永久忙碌狀態,所以無法同步處理應用程式與測試。
您可能已經猜到,問題是會發生無限閃動動畫。應用程式一律不會處於閒置狀態,因此測試無法繼續進行。
以下說明無限動畫的實作方式:
app/src/main/java/com/example/compose/rally/ui/overview/OverviewBody.kt
var currentTargetElevation by remember {  mutableStateOf(1.dp) }
LaunchedEffect(Unit) {
    // Start the animation
    currentTargetElevation = 8.dp
}
val animatedElevation = animateDpAsState(
    targetValue = currentTargetElevation,
    animationSpec = tween(durationMillis = 500),
    finishedListener = {
        currentTargetElevation = if (currentTargetElevation > 4.dp) {
            1.dp
        } else {
            8.dp
        }
    }
)
Card(elevation = animatedElevation.value) { ... }
此程式碼基本上是等待動畫完成 (finishedListener),然後再次執行動畫。
修正這項測試的方法之一,就是停用開發人員選項中的動畫。在 View 環境中,這是廣為接受的其中一種方式。
在 Compose 中,動畫 API 的設計已考量可測試性,因此只要使用正確的 API,即可修正問題。我們可使用無限動畫,而不必重新啟動 animateDpAsState 動畫。
將 OverviewScreen 中的程式碼替換為適當的 API:
import androidx.compose.animation.core.RepeatMode
import androidx.compose.animation.core.VectorConverter
import androidx.compose.animation.core.animateValue
import androidx.compose.animation.core.infiniteRepeatable
import androidx.compose.animation.core.rememberInfiniteTransition
import androidx.compose.animation.core.tween
import androidx.compose.ui.unit.Dp
...

    val infiniteElevationAnimation = rememberInfiniteTransition()
    val animatedElevation: Dp by infiniteElevationAnimation.animateValue(
        initialValue = 1.dp,
        targetValue = 8.dp,
        typeConverter = Dp.VectorConverter,
        animationSpec = infiniteRepeatable(
            animation = tween(500),
            repeatMode = RepeatMode.Reverse
        )
    )
    Card(elevation = animatedElevation) {
如果您執行測試,現在測試能成功通過:
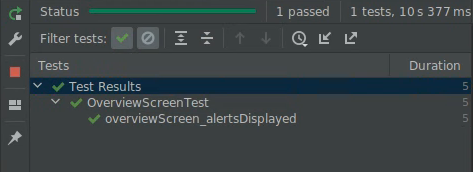
恭喜!在這個步驟中,您已瞭解同步處理作業,以及動畫對測試的影響。
7. 自選練習
在這個步驟中,您將採用一項操作 (請參閱測試一覽表),證明點選 RallyTopAppBar 中的不同分頁標籤,確實會改變選取項目。
提示:
- 測試範圍需包含
RallyApp所擁有的狀態。 - 請驗證狀態,而非行為。使用 UI 狀態上的斷言,而不是依賴已呼叫的物件和方式。
這項練習未提供解決方案。
8. 後續步驟
恭喜!您已完成 Jetpack Compose 測試。現在您已具備基本知識,可以為 Compose UI 建立良好的測試策略。
如想進一步瞭解測試與 Compose,請參閱下列資源:
- 測試說明文件進一步說明了尋找工具、斷言、動作和比對工具的資訊,並介紹同步處理機制和時間控管功能等。
- 將測試一覽表加入書籤!
- Rally 範例提供簡易的螢幕截圖測試類別。請查看
AnimatingCircleTests.kt檔案瞭解詳情。 - 若需關於測試 Android 應用程式的一般指南,請參考下列三個程式碼研究室:
- GitHub 上的 Compose 範例存放區有多個具備 UI 測試的應用程式,歡迎參考。
- Jetpack Compose Pathway 列有可協助您開始使用 Compose 的資源清單。
預祝測試愉快!