1. 始める前に
この Codelab では、ビューにドラッグ&ドロップ機能を実装するための基本的な手順について説明します。アプリ内とアプリ間の両方で、ビューのドラッグ&ドロップを有効にするとともに、ドラッグ&ドロップ操作を実装する方法を学びます。この Codelab では、DropHelper を使用してドラッグ&ドロップを有効にする方法、ShadowBuilder でドラッグ中の視覚的なフィードバックをカスタマイズする方法、アプリ間でドラッグする権限を追加する方法、普遍的に機能するコンテンツ レシーバを実装する方法について説明します。
前提条件
この Codelab を完了するには、以下が必要です。
- Android アプリを作成した経験
- アクティビティ、フラグメント、ビュー バインディング、xml-layout を使用した経験
演習内容
次の機能がある簡単なアプリを作成します。
DragStartHelperとDropHelperを使用してドラッグ&ドロップ機能を実装する- ShadowBuilder を変更する
- アプリ間でドラッグする権限を追加する
- 普遍的な実装用に Rich Content Receiver を実装する。
必要なもの
- Android Studio Jellyfish 以降
- Android デバイスまたはエミュレータ
2. ドラッグ&ドロップ イベント
ドラッグ&ドロップ プロセスは、次の 4 つのステージで構成されるイベントと見なすことができます。
- 開始: ユーザーのドラッグ操作に応じて、システムがドラッグ&ドロップ オペレーションを開始します。
- 継続: ユーザーがドラッグを継続します。ターゲット ビューに入ると、ドラッグ シャドウ ビルダーが開始されます。
- 終了: ユーザーが、ドロップ ターゲット領域の境界ボックス内でドラッグを解放します。
- 完了: システムがドラッグ&ドロップ オペレーションを完了するシグナルを送信します。
システムは、DragEvent オブジェクトでドラッグ イベントを送信します。DragEvent オブジェクトには、次のデータを含めることができます。
ActionType: ドラッグ&ドロップ イベントのライフサイクル イベントに基づくイベントのアクション値(例:ACTION_DRAG_STARTED,ACTION_DROPなど)。ClipData: ドラッグ対象のデータ。ClipDataオブジェクトにカプセル化されます。ClipDescription:ClipDataオブジェクトに関するメタ情報。Result: ドラッグ&ドロップ オペレーションの結果。X: ドラッグされたオブジェクトの現在位置の x 座標。Y: ドラッグされたオブジェクトの現在位置の y 座標。
3. 設定
新しいプロジェクトを作成し、「Empty Views Activity」テンプレートを選択します。
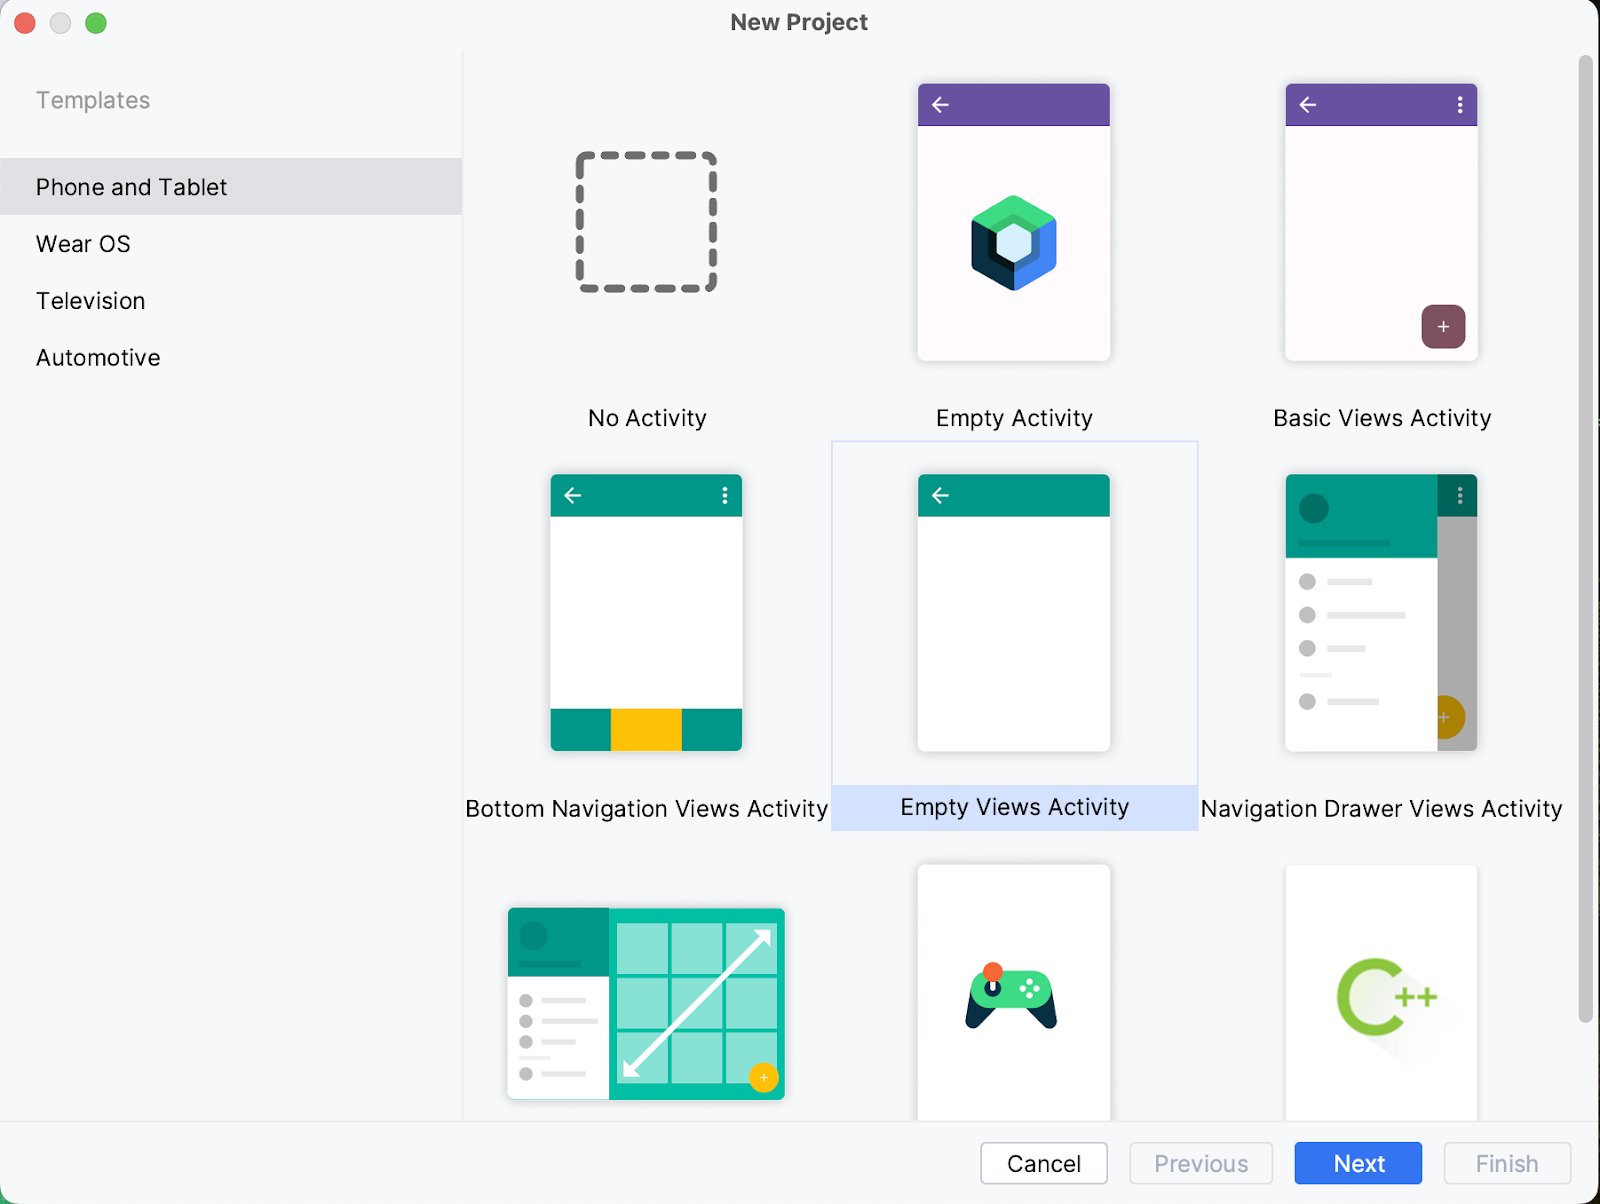
すべてのパラメータをデフォルトのままにします。プロジェクトを同期してインデックスに登録します。MainActivity.kt がビュー activity_main.xml とともに作成されていることがわかります。
4. ビューを使用したドラッグ&ドロップ
string.xml に文字列値を追加しましょう。
<resources>
    <string name="app_name">DragAndDropCodelab</string>
    <string name="drag_image">Drag Image</string>
    <string name="drop_image">drop image</string>
 </resources>
activity_main.xml ソースファイルを開き、2 つの ImageViews が含まれるようにレイアウトを変更します。1 つはドラッグソースとして機能し、もう 1 つはドロップ ターゲットとして機能します。
<?xml version="1.0" encoding="utf-8"?>
<androidx.constraintlayout.widget.ConstraintLayout xmlns:android="http://schemas.android.com/apk/res/android"
    xmlns:app="http://schemas.android.com/apk/res-auto"
    xmlns:tools="http://schemas.android.com/tools"
    android:layout_width="match_parent"
    android:layout_height="match_parent"
    tools:context=".MainActivity">

    <TextView
        android:id="@+id/tv_greeting"
        android:layout_width="wrap_content"
        android:layout_height="wrap_content"
        app:layout_constraintBottom_toTopOf="@id/iv_source"
        app:layout_constraintLeft_toLeftOf="parent"
        app:layout_constraintRight_toRightOf="parent"
        app:layout_constraintTop_toTopOf="parent" />

    <ImageView
        android:id="@+id/iv_source"
        android:layout_width="match_parent"
        android:layout_height="wrap_content"
        android:contentDescription="@string/drag_image"
        app:layout_constraintBottom_toTopOf="@id/iv_target"
        app:layout_constraintLeft_toLeftOf="parent"
        app:layout_constraintRight_toRightOf="parent"
        app:layout_constraintTop_toBottomOf="@id/tv_greeting" />

    <ImageView
        android:id="@+id/iv_target"
        android:layout_width="match_parent"
        android:layout_height="wrap_content"
        android:contentDescription="@string/drop_image"
        app:layout_constraintBottom_toBottomOf="parent"
        app:layout_constraintLeft_toLeftOf="parent"
        app:layout_constraintRight_toRightOf="parent"
        app:layout_constraintTop_toBottomOf="@id/iv_source" />
</androidx.constraintlayout.widget.ConstraintLayout>
build.gradle.kts で、ビュー バインディングを有効にします。
buildFeatures{
   viewBinding = true
}
build.gradle.kts で、Glide の依存関係を追加します。
dependencies {
    implementation("com.github.bumptech.glide:glide:4.16.0")
    annotationProcessor("com.github.bumptech.glide:compiler:4.16.0")

    //other dependencies
}
string.xml に画像の URL と挨拶のテキストを追加します。
<string name="greeting">Drag and Drop</string>
<string name="target_url">https://services.google.com/fh/files/misc/qq2.jpeg</string>
<string name="source_url">https://services.google.com/fh/files/misc/qq10.jpeg</string>
MainActivity.kt で、ビューを初期化しましょう。
class MainActivity : AppCompatActivity() {
   val binding by lazy(LazyThreadSafetyMode.NONE) {
       ActivityMainBinding.inflate(layoutInflater)
   }

   override fun onCreate(savedInstanceState: Bundle?) {
       super.onCreate(savedInstanceState)
       setContentView(binding.root)
       binding.tvGreeting.text = getString(R.string.greeting)
       Glide.with(this).asBitmap()
           .load(getString(R.string.source_url))
           .into(binding.ivSource)
       Glide.with(this).asBitmap()
           .load(getString(R.string.target_url))
           .into(binding.ivTarget)
   }
}
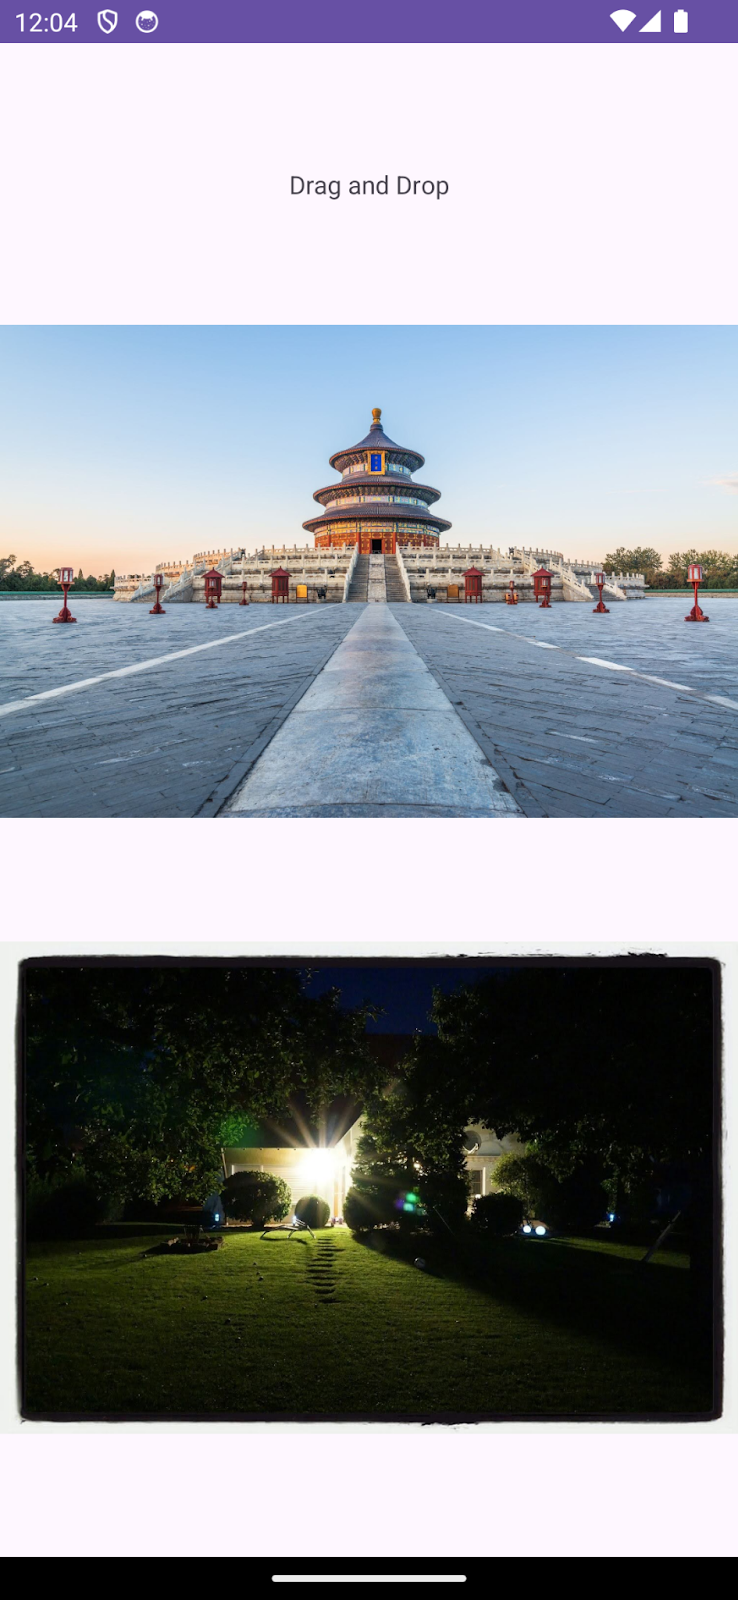
この段階のアプリには、挨拶のテキストと 2 つの画像が縦向きに表示されるはずです。
5. ビューをドラッグ可能にする
特定のビューをドラッグ可能にするには、ビューのドラッグ操作に startDragAndDrop() メソッドを実装する必要があります。
ユーザーがビューでドラッグを開始したときに実行される onLongClickListener のコールバックを実装しましょう。
draggableView.setOnLongClickListener{ v ->
   //drag logic here
   true
}
このコールバックにより、ビューが長押し可能でない場合でも長押し可能になります。戻り値はブール値で、true はコールバックによってドラッグが使用されることを示します。
ClipData を準備する: ドラッグ対象のデータ
ドロップするデータを定義しましょう。単純なテキストから動画まで、あらゆる種類のデータを定義できます。このデータは ClipData オブジェクトにカプセル化されます。ClipData オブジェクトは 1 つ以上の複雑な ClipItem を保持します。
ClipDescription にはさまざまな MIME タイプが定義されています。
ここでは、ソースビューの画像 URL をドラッグします。ClipData には主に 3 つのコンポーネントがあります。
- ラベル: ドラッグされているデータをユーザーに表示するシンプルなテキスト。
- MIME タイプ: ドラッグ対象アイテムの MIME タイプ。
- ClipItem:
ClipData.Itemオブジェクトにカプセル化されたドラッグ対象アイテム。
ClipData を作成しましょう。
val label = "Dragged Image Url"
val clipItem = ClipData.Item(v.tag as? CharSequence)
val mimeTypes = arrayOf(ClipDescription.MIMETYPE_TEXT_PLAIN)
val draggedData = ClipData(
   label, mimeTypes, clipItem
)
ドラッグ&ドロップを開始する
ドラッグするデータの準備が整ったので、ドラッグを開始しましょう。これには startDragAndDrop を使用します。
startDragAndDrop メソッドは、次の 4 つの引数を取ります。
- data: ドラッグされるデータ(
ClipData.形式)。 - shadowBuilder: ビューのシャドウを作成する DragShadowBuilder。
- myLocalState: ドラッグ&ドロップ オペレーションに関するローカルデータを格納するオブジェクト。同じアクティビティ内のビューにドラッグ イベントをディスパッチする際に、このオブジェクトを DragEvent.getLocalState() で使用できます。
- Flags: ドラッグ&ドロップ オペレーションを制御するフラグ。
この関数が呼び出されると、View.DragShadowBuilder クラスに基づいてドラッグ シャドウが描画されます。ドラッグ シャドウが描画されたら、システムは OnDragListener インターフェースを実装している表示中のビューにイベントを送信して、ドラッグ&ドロップ オペレーションを開始します。
v.startDragAndDrop(
   draggedData,
   View.DragShadowBuilder(v),
   null,
   0
)
これで、ドラッグ用のビューとドラッグ対象データを設定しました。最終的な実装は次のようになります。
fun setupDrag(draggableView: View) {
   draggableView.setOnLongClickListener { v ->
       val label = "Dragged Image Url"
       val clipItem = ClipData.Item(v.tag as? CharSequence)
       val mimeTypes = arrayOf(ClipDescription.MIMETYPE_TEXT_PLAIN)
       val draggedData = ClipData(
           label, mimeTypes, clipItem
       )
       v.startDragAndDrop(
           draggedData,
           View.DragShadowBuilder(v),
           null,
           0
       )
   }
}
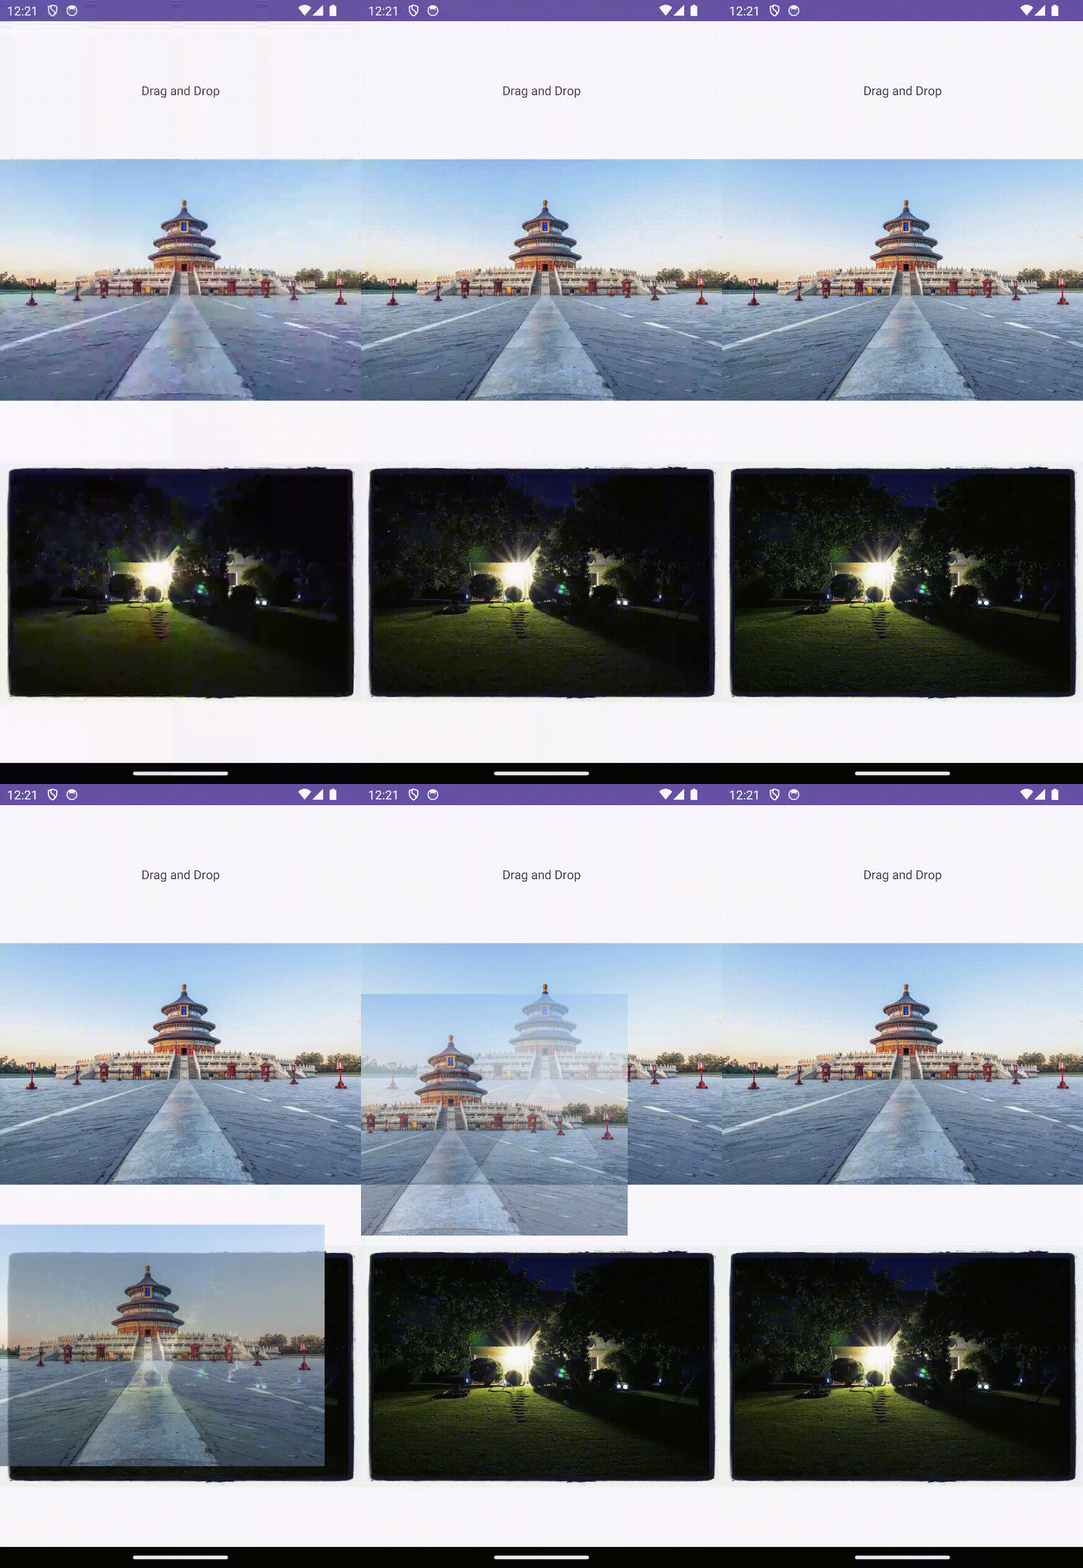
この段階では、長押しでビューをドラッグできるはずです。
次に、ドロップ ターゲットのビューを設定します。
6. ドロップ ターゲットのビューを設定する
ビューは、OnDragListener インターフェースを実装している場合に、ドロップ ターゲットとして機能できます。
2 つ目の画像ビューをドロップ ターゲットとして設定しましょう。
private fun setupDrop(dropTarget: View) {
   dropTarget.setOnDragListener { v, event ->
       // handle drag events here
       true
   }
}
ここでは、OnDragListener インターフェースの onDrag メソッドをオーバーライドしています。onDrag メソッドには 2 つの引数があります。
- ドラッグ イベントを受け取ったビュー
- ドラッグ イベントのイベント オブジェクト
このメソッドは、ドラッグ イベントが正常に処理された場合は true を返し、そうでない場合は false を返します。
DragEvent
DragEvent は、ドラッグ&ドロップ オペレーションの各ステージでシステムによって送信されるデータ パッケージを表します。このデータ パッケージは、オペレーション自体と関連するデータに関する重要な情報をカプセル化します。
DragEvent のドラッグ アクションは、ドラッグ&ドロップ オペレーションのステージによって異なります。
ACTION_DRAG_STARTED: ドラッグ&ドロップ オペレーションの開始を示します。ACTION _DRAG_LOCATION: ユーザーがターゲット ドロップ領域の境界外でドラッグを解放したことを示します。ACTION_DRAG_ENTERED: ドラッグされたビューがターゲット ドロップビューの境界内にあることを示します。ACTION_DROP: ユーザーがターゲット ドロップ領域でドラッグを解放したことを示します。ACTION_DRAG_ENDED: ドラッグ&ドロップ オペレーションが終了したことを示します。ACTION_DRAG_EXITED: ドラッグ&ドロップ オペレーションの完了を示します。
DragEvent を検証する
ACTION_DRAG_STARTED イベントですべての制約が満たされている場合は、ドラッグ&ドロップ オペレーションを続行できます。たとえば、次の例では受信データが正しいタイプであるかどうかを確認できます。
DragEvent.ACTION_DRAG_STARTED -> {
   Log.d(TAG, "ON DRAG STARTED")
   if (event.clipDescription.hasMimeType(ClipDescription.MIMETYPE_TEXT_PLAIN)) {
       (v as? ImageView)?.alpha = 0.5F
       v.invalidate()
       true
   } else {
       false
   }
}
この例では、イベントの ClipDescription の MIME タイプが許容可能かどうかを確認しています。許容可能な場合、そのことを示す視覚的なシグナルを提供し、true を返して、ドラッグされたデータが処理中であることを示します。それ以外の場合は、false を返して、ドラッグがドロップ ターゲット ビューによって破棄されていることを示します。
ドロップデータを処理する
ACTION_DROP イベントでは、ドロップされたデータの処理方法を選択できます。この例では、ClipData に追加した URL をテキストとして抽出しています。この画像を URL からターゲット画像ビューに配置します。
DragEvent.ACTION_DROP -> {
   Log.d(TAG, "On DROP")
   val item: ClipData.Item = event.clipData.getItemAt(0)
   val dragData = item.text
   Glide.with(this).load(item.text).into(v as ImageView)
   (v as? ImageView)?.alpha = 1.0F
   true
}
ドロップの処理に加えて、ユーザーがターゲット ドロップビューの境界ボックス内でビューをドラッグしたとき、およびユーザーがビューをターゲット領域の外部にドラッグしたときに何が起こるかを設定できます。
ドラッグされたアイテムがターゲット領域に入ったときに表示される視覚的な手掛かりを追加しましょう。
DragEvent.ACTION_DRAG_ENTERED -> {
   Log.d(TAG, "ON DRAG ENTERED")
   (v as? ImageView)?.alpha = 0.3F
   v.invalidate()
   true
}
また、ユーザーがビューをターゲット ドロップビューの境界ボックスの外部にドラッグしたときに表示される視覚的な手掛かりも追加します。
DragEvent.ACTION_DRAG_EXITED -> {
   Log.d(TAG, "ON DRAG EXISTED")
   (v as? ImageView)?.alpha = 0.5F
   v.invalidate()
   true
}
ドラッグ&ドロップ オペレーションの終了を示す視覚的な手掛かりを追加します。
DragEvent.ACTION_DRAG_ENDED -> {
   Log.d(TAG, "ON DRAG ENDED")
   (v as? ImageView)?.alpha = 1.0F
   true
}
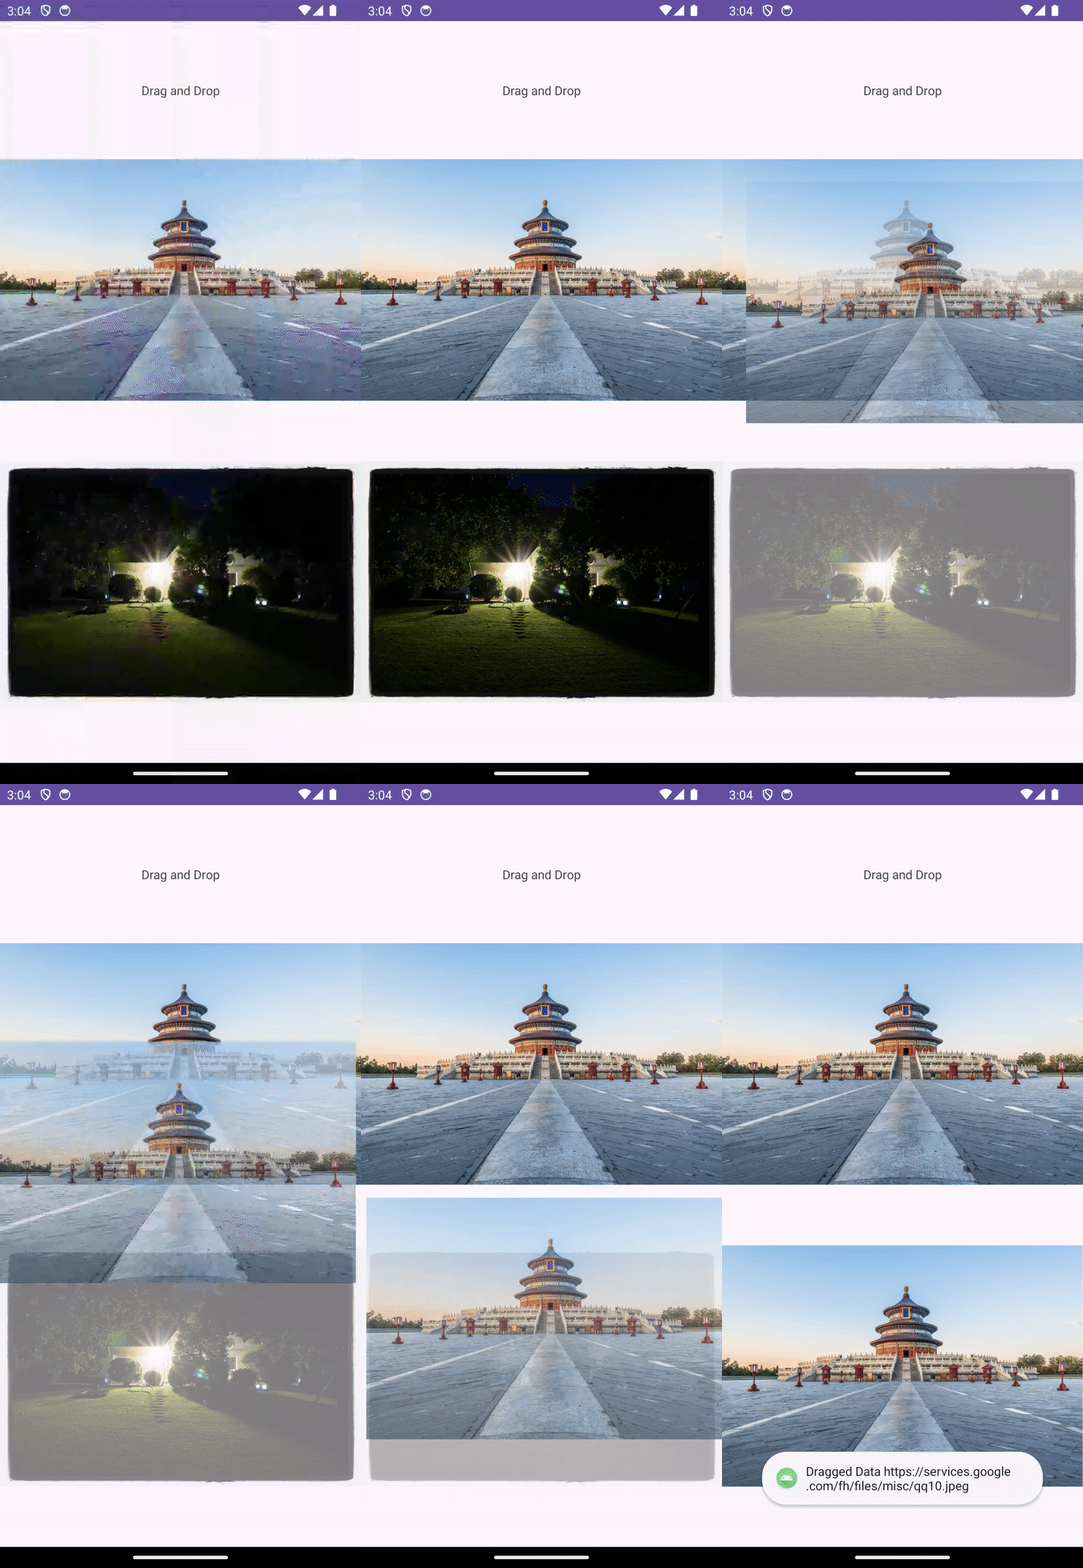
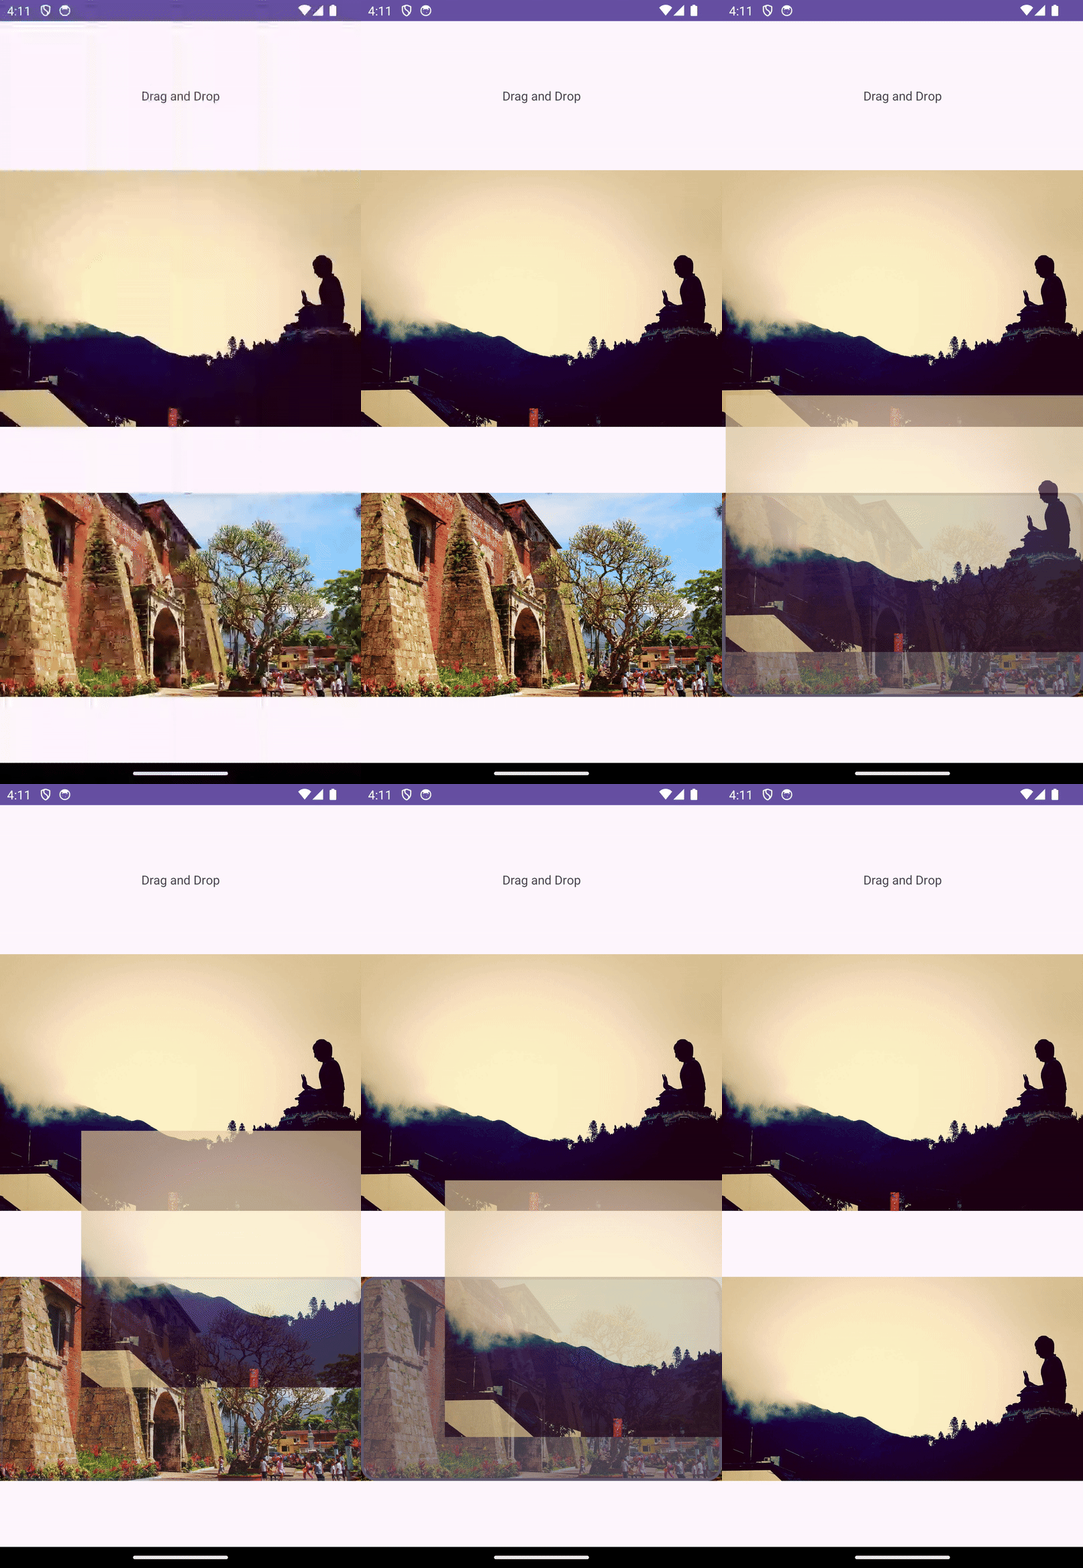
この段階では、画像をターゲット ImageView にドラッグ&ドロップすると、ターゲット ImageView の画像に変更が反映されるはずです。
7. マルチウィンドウ モードでのドラッグ&ドロップ
マルチ ウィンドウ モードで画面を共有しているアプリであれば、アプリ間でアイテムをドラッグできます。アプリ間でドラッグ&ドロップを有効にする実装は同じですが、ドラッグ中にフラグを追加し、ドロップ中に権限を追加する必要がある点が異なります。
ドラッグ中にフラグを設定する
前述のとおり、startDragAndDrop にはフラグを指定する引数が 1 つあります。このフラグはドラッグ&ドロップ オペレーションを制御します。
v.startDragAndDrop(
   draggedData,
   View.DragShadowBuilder(v),
   null,
   View.DRAG_FLAG_GLOBAL or View.DRAG_FLAG_GLOBAL_URI_READ
)
View.DRAG_FLAG_GLOBAL は、ドラッグがウィンドウの境界を越えられることを示します。View.DRAG_FLAG_GLOBAL_URI_READ は、ドラッグの受信者がコンテンツ URI を読み取れることを示します。
他のアプリからドラッグされたデータをドロップ ターゲットが読み取るには、ドロップ ターゲット ビューで読み取り権限を宣言する必要があります。
val dropPermission = requestDragAndDropPermissions(event)
また、ドラッグされたデータが処理されたら権限を解放します。
dropPermission.release()
ドラッグされたアイテムの最終的な処理は次のようになります。
DragEvent.ACTION_DROP -> {
   Log.d(TAG, "On DROP")
   val dropPermission = requestDragAndDropPermissions(event)
   val item: ClipData.Item = event.clipData.getItemAt(0)
   val dragData = item.text
   Glide.with(this).load(item.text).into(v as ImageView)
   (v as? ImageView)?.alpha = 1.0F
   dropPermission.release()
   true
}
この段階では、この画像を別のアプリにドラッグできるだけでなく、別のアプリからドラッグされたデータも正しく処理できるはずです。
8. ドラッグ&ドロップ ライブラリ
Jetpack には、ドラッグ&ドロップ オペレーションの実装を簡素化する DragAndDrop ライブラリが用意されています。
build.gradle.kts に依存関係を追加して、DragAndDrop ライブラリを使用しましょう。
implementation("androidx.draganddrop:draganddrop:1.0.0")
この演習では、DndHelperActivity.kt という別のアクティビティを作成します。このアクティビティには、2 つの ImageView が縦に配置されます。1 つはドラッグソースとして機能し、もう 1 つはドロップ ターゲットとして機能します。
strings.xml を変更して文字列リソースを追加します。
<string name="greeting_1">DragStartHelper and DropHelper</string>
<string name="target_url_1">https://services.google.com/fh/files/misc/qq9.jpeg</string>
<string name="source_url_1">https://services.google.com/fh/files/misc/qq8.jpeg</string>
activity_dnd_helper.xml を更新して ImageView を追加します。
<?xml version="1.0" encoding="utf-8"?>
<androidx.constraintlayout.widget.ConstraintLayout xmlns:android="http://schemas.android.com/apk/res/android"
   xmlns:app="http://schemas.android.com/apk/res-auto"
   xmlns:tools="http://schemas.android.com/tools"
   android:layout_width="match_parent"
   android:layout_height="match_parent"
   android:padding="24dp"
   tools:context=".DnDHelperActivity">

   <TextView
       android:id="@+id/tv_greeting"
       android:layout_width="wrap_content"
       android:layout_height="wrap_content"
       app:layout_constraintBottom_toTopOf="@id/iv_source"
       app:layout_constraintLeft_toLeftOf="parent"
       app:layout_constraintRight_toRightOf="parent"
       app:layout_constraintTop_toTopOf="parent" />

   <ImageView
       android:id="@+id/iv_source"
       android:layout_width="match_parent"
       android:layout_height="wrap_content"
       android:contentDescription="@string/drag_image"
       app:layout_constraintBottom_toTopOf="@id/iv_target"
       app:layout_constraintLeft_toLeftOf="parent"
       app:layout_constraintRight_toRightOf="parent"
       app:layout_constraintTop_toBottomOf="@id/tv_greeting" />

   <ImageView
       android:id="@+id/iv_target"
       android:layout_width="match_parent"
       android:layout_height="wrap_content"
       android:contentDescription="@string/drop_image"
       app:layout_constraintBottom_toBottomOf="parent"
       app:layout_constraintLeft_toLeftOf="parent"
       app:layout_constraintRight_toRightOf="parent"
       app:layout_constraintTop_toBottomOf="@id/iv_source" />
</androidx.constraintlayout.widget.ConstraintLayout>
最後に、DnDHelperActivity.kt でビューを初期化します。
class DnDHelperActivity : AppCompatActivity() {
   private val binding by lazy(LazyThreadSafetyMode.NONE) {
       ActivityMainBinding.inflate(layoutInflater)
   }

   override fun onCreate(savedInstanceState: Bundle?) {
       super.onCreate(savedInstanceState)
       setContentView(binding.root)
       binding.tvGreeting.text = getString(R.string.greeting)
       Glide.with(this).asBitmap()
           .load(getString(R.string.source_url_1))
           .into(binding.ivSource)
       Glide.with(this).asBitmap()
           .load(getString(R.string.target_url_1))
           .into(binding.ivTarget)
       binding.ivSource.tag = getString(R.string.source_url_1)
   }
}
AndroidManifest.xml を更新して、DndHelperActivity をランチャー アクティビティにします。
<activity
   android:name=".DnDHelperActivity"
   android:exported="true">
   <intent-filter>
       <action android:name="android.intent.action.MAIN" />
       <category android:name="android.intent.category.LAUNCHER" />
   </intent-filter>
</activity>
DragStartHelper
前に、onLongClickListener を実装して startDragAndDrop を呼び出すことで、ビューをドラッグ可能にするように設定しました。DragStartHelper は、ユーティリティ メソッドを提供することでその実装を簡素化します。
DragStartHelper(draggableView)
{ view: View, _: DragStartHelper ->
   // prepare clipData

   // startDrag and Drop
}.attach()
DragStartHelper は、ドラッグされるビューを引数に取ります。ここでは、OnDragStartListener メソッドを実装しています。このメソッドでは、ClipData を準備して、ドラッグ&ドロップ オペレーションを開始します。
最終的な実装は次のようになります。
DragStartHelper(draggableView)
{ view: View, _: DragStartHelper ->
   val item = ClipData.Item(view.tag as? CharSequence)
   val dragData = ClipData(
       view.tag as? CharSequence,
       arrayOf(ClipDescription.MIMETYPE_TEXT_PLAIN),
       item
   )
   view.startDragAndDrop(
       dragData,
       View.DragShadowBuilder(view),
       null,
       0
   )
}.attach()
DropHelper
DropHelper は、configureView というユーティリティ メソッドを提供することで、ターゲット ドロップビューの設定を簡素化します。
configureView は次の 4 つの引数を取ります。
- Activity: 現在のアクティビティ
- dropTarget: 設定中のビュー
- mimeTypes: ドロップされるデータアイテムの MIME タイプ
OnReceiveContentListener: ドロップされたデータを処理するインターフェース
ドロップ ターゲットのハイライトをカスタマイズします。
DropHelper.configureView(
   This, // Current Activity
   dropTarget,
   arrayOf("text/*"),
   DropHelper.Options.Builder().build()
) {
   // handle the dropped data
}
OnRecieveContentListener は、ドロップされたコンテンツを受け取ります。これには次の 2 つのパラメータがあります。
- View: コンテンツがドロップされる場所
- Payload: ドロップされる実際のコンテンツ
private fun setupDrop(dropTarget: View) {
   DropHelper.configureView(
       this,
       dropTarget,
       arrayOf("text/*"),
   ) { _, payload: ContentInfoCompat ->
       // TODO: step through clips if one cannot be loaded
       val item = payload.clip.getItemAt(0)
       val dragData = item.text
       Glide.with(this)
           .load(dragData)
           .centerCrop().into(dropTarget as ImageView)
       // Consume payload by only returning remaining items
       val (_, remaining) = payload.partition { it == item }
       remaining
   }
}
この段階では、DragStartHelper と DropHelper を使用してデータをドラッグ&ドロップできるはずです。
ドロップ領域のハイライトを設定する
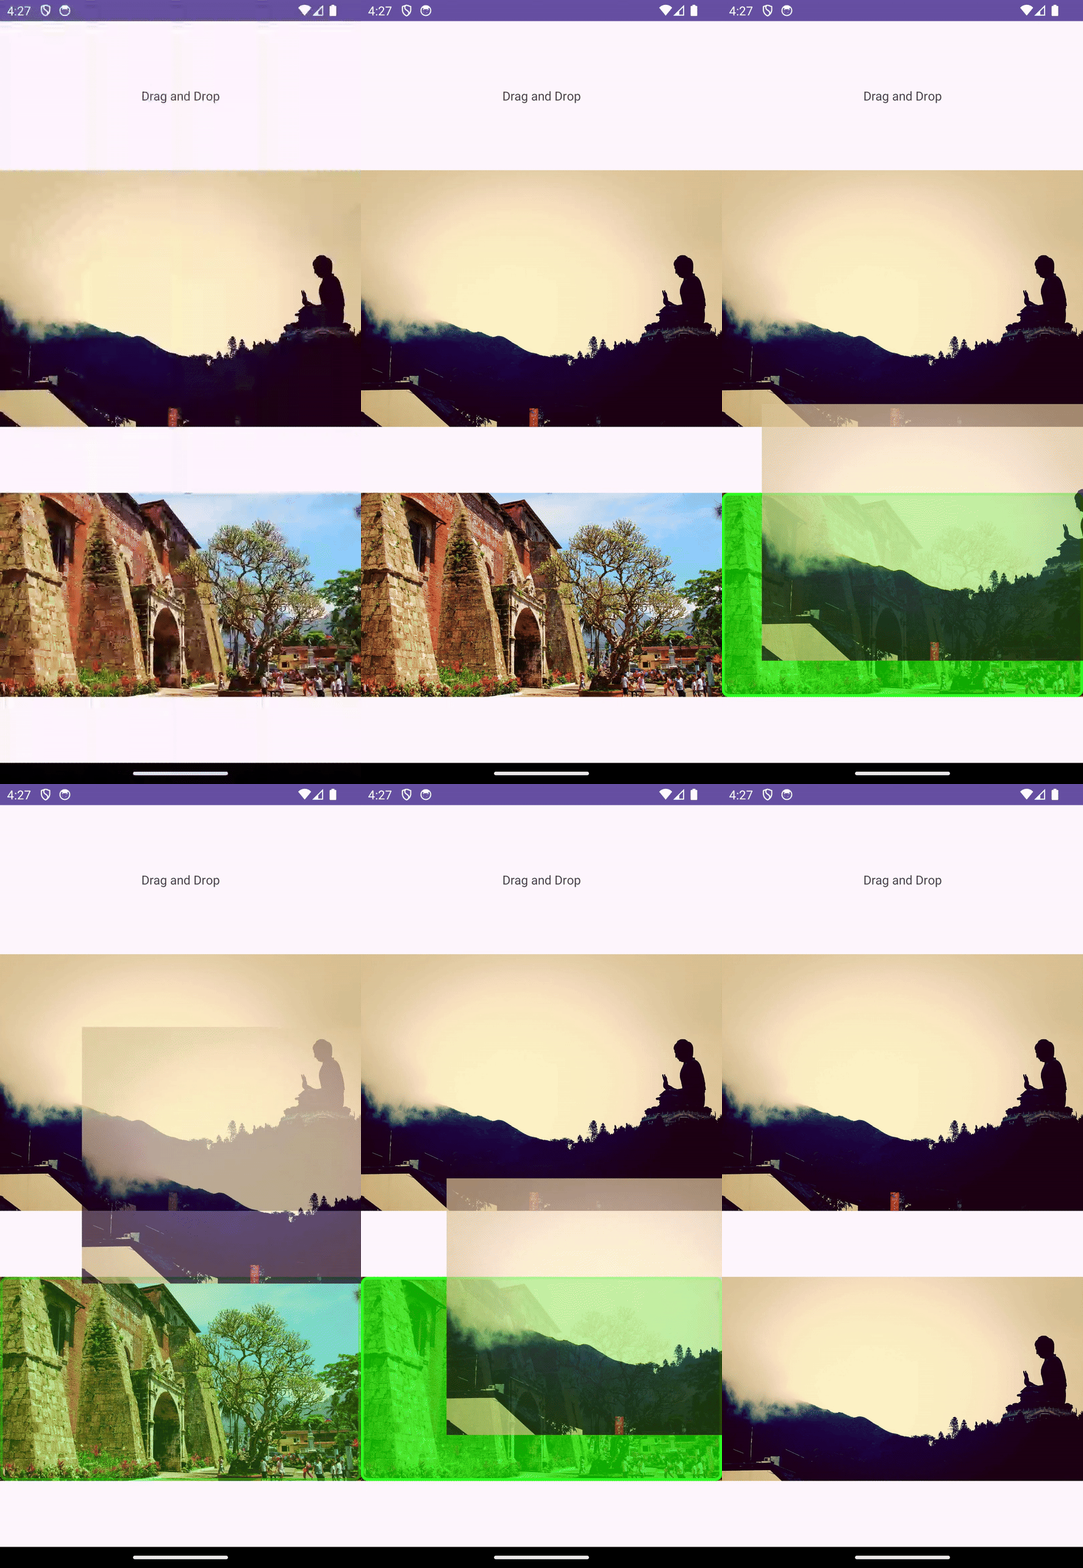
前に見たように、ドラッグされたアイテムがドロップ領域に入ると、ドロップ領域がハイライト表示されます。DropHelper.Options を使用すると、ドラッグされたアイテムがビューの境界内に入ったときのドロップ領域のハイライト表示をカスタマイズできます。
DropHelper.Options を使用して、ドロップ ターゲット領域のハイライト表示の色と角の丸みを設定できます。
DropHelper.Options.Builder()
   .setHighlightColor(getColor(R.color.green))
   .setHighlightCornerRadiusPx(16)
   .build()
これらのオプションは、DropHelper の configureView メソッドに引数として渡す必要があります。
private fun setupDrop(dropTarget: View) {
   DropHelper.configureView(
       this,
       dropTarget,
       arrayOf("text/*"),
       DropHelper.Options.Builder()
           .setHighlightColor(getColor(R.color.green))
           .setHighlightCornerRadiusPx(16)
           .build(),
   ) { _, payload: ContentInfoCompat ->
       // TODO: step through clips if one cannot be loaded
       val item = payload.clip.getItemAt(0)
       val dragData = item.text
       Glide.with(this)
           .load(dragData)
           .centerCrop().into(dropTarget as ImageView)
       // Consume payload by only returning remaining items
       val (_, remaining) = payload.partition { it == item }
       remaining
   }
}
これで、ドラッグ&ドロップ中のハイライト表示の色と角の丸みをカスタマイズできました。
9. リッチ コンテンツを受信する
OnReceiveContentListener は、テキスト、HTML、画像、動画などのリッチ コンテンツを受信するための統合 API です。コンテンツはキーボード、ドラッグ、クリップボードのいずれかからビューに挿入できますが、入力メカニズムごとにコールバックを維持するのは面倒です。OnReceiveContentListener では単一の API を使用して、テキスト、マークアップ、音声、動画、画像などのコンテンツを受信できます。OnReceiveContentListener API は実装する API を 1 つにし、このさまざまなコードパスを統合します。これにより、デベロッパーはアプリ固有のロジックに集中し、それ以外の処理はプラットフォームに委ねることができます。
この演習では、ReceiveRichContentActivity.kt という別のアクティビティを作成します。このアクティビティには、2 つの ImageView が縦に配置されます。1 つはドラッグソースとして機能し、もう 1 つはドロップ ターゲットとして機能します。
strings.xml を変更して文字列リソースを追加します。
<string name="greeting_2">Rich Content Receiver</string>
<string name="target_url_2">https://services.google.com/fh/files/misc/qq1.jpeg</string>
<string name="source_url_2">https://services.google.com/fh/files/misc/qq3.jpeg</string>
activity_receive_rich_content.xml を更新して ImageView を追加します。
<?xml version="1.0" encoding="utf-8"?>
<androidx.constraintlayout.widget.ConstraintLayout xmlns:android="http://schemas.android.com/apk/res/android"
   xmlns:app="http://schemas.android.com/apk/res-auto"
   xmlns:tools="http://schemas.android.com/tools"
   android:layout_width="match_parent"
   android:layout_height="match_parent"
   tools:context=".ReceiveRichContentActivity">

   <TextView
       android:id="@+id/tv_greeting"
       android:layout_width="wrap_content"
       android:layout_height="wrap_content"
       app:layout_constraintBottom_toTopOf="@id/iv_source"
       app:layout_constraintLeft_toLeftOf="parent"
       app:layout_constraintRight_toRightOf="parent"
       app:layout_constraintTop_toTopOf="parent" />

   <ImageView
       android:id="@+id/iv_source"
       android:layout_width="320dp"
       android:layout_height="wrap_content"
       android:contentDescription="@string/drag_image"
       app:layout_constraintBottom_toTopOf="@id/iv_target"
       app:layout_constraintLeft_toLeftOf="parent"
       app:layout_constraintRight_toRightOf="parent"
       app:layout_constraintTop_toBottomOf="@id/tv_greeting" />

   <ImageView
       android:id="@+id/iv_target"
       android:layout_width="320dp"
       android:layout_height="wrap_content"
       android:contentDescription="@string/drop_image"
       app:layout_constraintBottom_toBottomOf="parent"
       app:layout_constraintLeft_toLeftOf="parent"
       app:layout_constraintRight_toRightOf="parent"
       app:layout_constraintTop_toBottomOf="@id/iv_source" />
</androidx.constraintlayout.widget.ConstraintLayout>
最後に、ReceiveRichContentActivity.kt でビューを初期化します。
class ReceiveRichContentActivity : AppCompatActivity() {
   private val binding by lazy(LazyThreadSafetyMode.NONE) {
       ActivityReceiveRichContentBinding.inflate(layoutInflater)
   }
   override fun onCreate(savedInstanceState: Bundle?) {
       super.onCreate(savedInstanceState)
       setContentView(binding.root)
       binding.tvGreeting.text = getString(R.string.greeting_2)
       Glide.with(this).asBitmap()
           .load(getString(R.string.source_url_2))
           .into(binding.ivSource)
       Glide.with(this).asBitmap()
           .load(getString(R.string.target_url_2))
           .into(binding.ivTarget)
       binding.ivSource.tag = getString(R.string.source_url_2)
   }
}
AndroidManifest.xml を更新して、DndHelperActivity をランチャー アクティビティにします。
<activity
   android:name=".ReceiveRichContentActivity"
   android:exported="true">
   <intent-filter>
       <action android:name="android.intent.action.MAIN" />
       <category android:name="android.intent.category.LAUNCHER" />
   </intent-filter>
</activity>
まず、OnReceiveContentListener. を実装するコールバックを作成しましょう。
val listener = OnReceiveContentListener { view, payload ->
   val (textContent, remaining) =
       payload.partition { item: ClipData.Item -> item.text != null }
   if (textContent != null) {
       val clip = textContent.clip
       for (i in 0 until clip.itemCount) {
           val currentText = clip.getItemAt(i).text
           Glide.with(this)
               .load(currentText)
               .centerCrop().into(view as ImageView)
       }
   }
   remaining
}
ここでは、インターフェース OnRecieveContentListener を実装しています。メソッド onRecieveContent には 2 つの引数があります
- データを受信している現在のビュー
- キーボード、ドラッグ、またはクリップボードからのデータのペイロード(
ContentInfoCompat形式)
このメソッドは、処理されないペイロードを返します。
ここでは、Partition メソッドを使用してペイロードをテキスト コンテンツとその他のコンテンツに分離しています。必要に応じてテキストデータを処理し、残りのペイロードを返します。
ドラッグされたデータに対して行う処理を指定しましょう。
val listener = OnReceiveContentListener { view, payload ->
   val (textContent, remaining) =
       payload.partition { item: ClipData.Item -> item.text != null }
   if (textContent != null) {
       val clip = textContent.clip
       for (i in 0 until clip.itemCount) {
           val currentText = clip.getItemAt(i).text
           Glide.with(this)
               .load(currentText)
               .centerCrop().into(view as ImageView)
       }
   }
   remaining
}
リスナーの準備が整ったところで、このリスナーをターゲット ビューに追加しましょう。
ViewCompat.setOnReceiveContentListener(
   binding.ivTarget,
   arrayOf("text/*"),
   listener
)
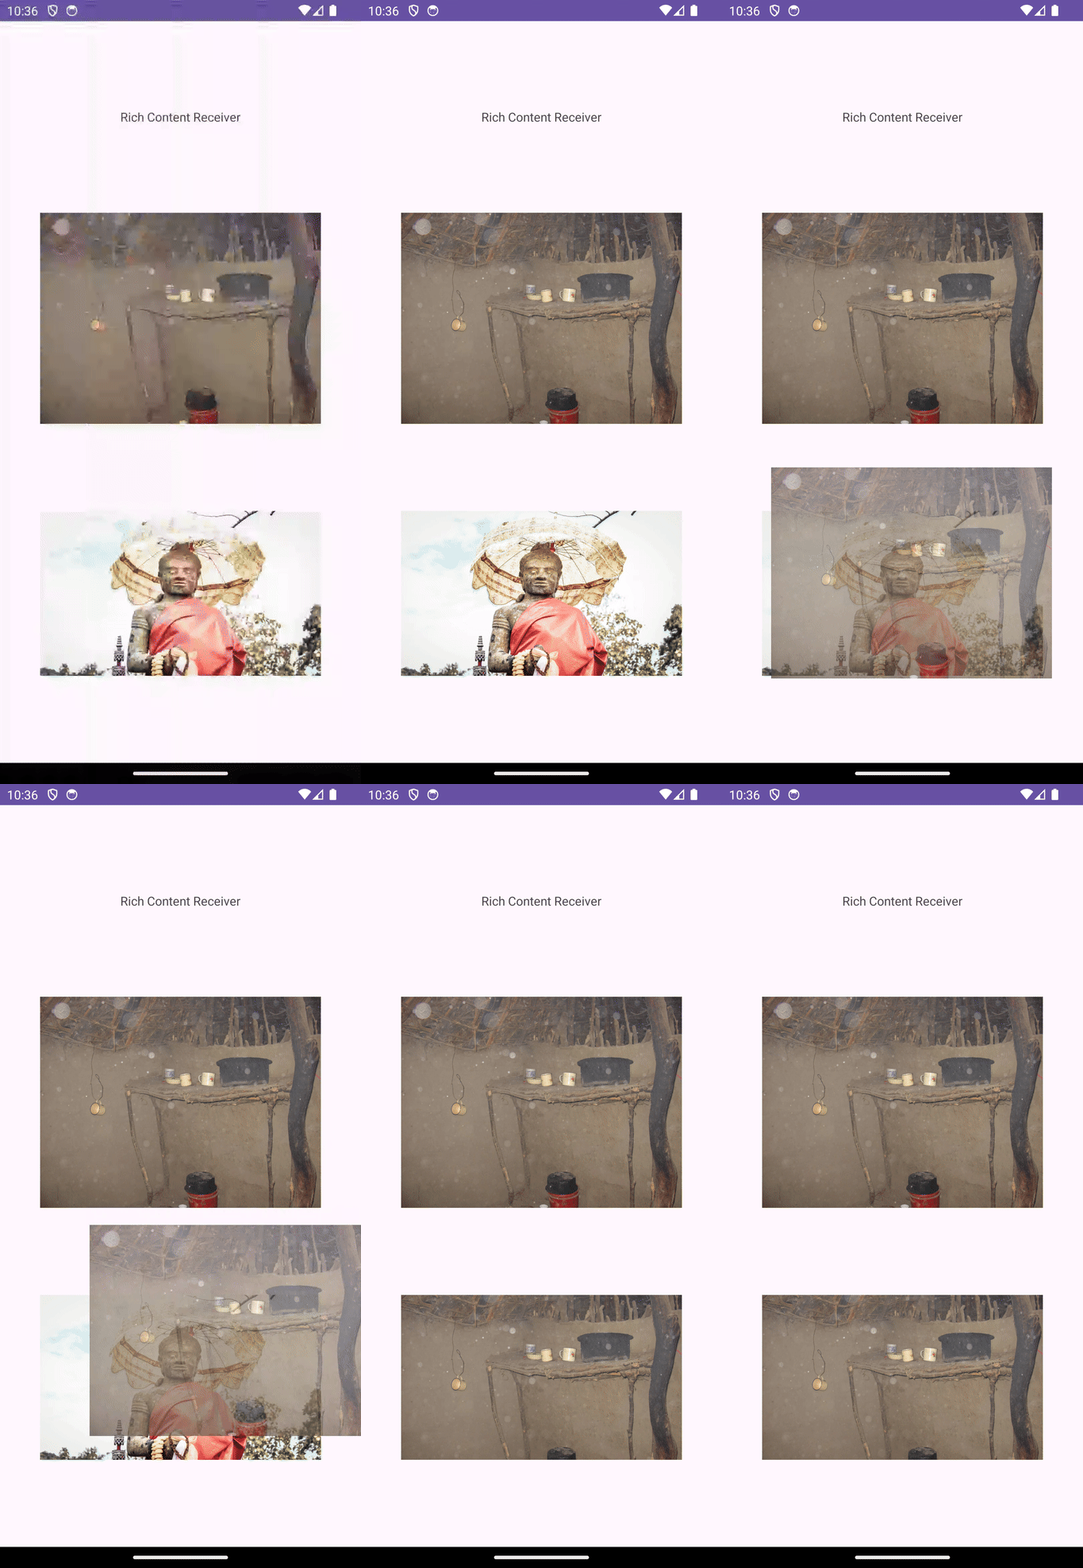
この段階では、画像をドラッグしてターゲット領域にドロップすると、ドロップ ターゲット ビューで元の画像がドラッグした画像に置き換えられるはずです。
10. 完了
これで、Android アプリにドラッグ&ドロップを実装する方法が身につきました。この Codelab では、Android アプリ内や異なるアプリ間でインタラクティブなドラッグ&ドロップ操作を作成して、ユーザー エクスペリエンスと機能を強化する方法を学びました。具体的な学習項目は以下のとおりです。
- ドラッグ&ドロップの基礎: ドラッグ&ドロップ イベントの 4 つのステージ(開始、継続、終了、完了)と、DragEvent オブジェクト内の主要なデータについて理解しました。
- ドラッグ&ドロップの有効化: ビューをドラッグ可能にし、DragEvent を使用してターゲット ビューでドロップを処理しました。
- マルチ ウィンドウ モードでのドラッグ&ドロップ: 適切なフラグと権限を設定して、アプリ間のドラッグ&ドロップを有効にしました。
- DragAndDrop ライブラリの使用: Jetpack ライブラリを使用してドラッグ&ドロップの実装を簡素化しました。
- リッチ コンテンツの受信: 統合 API を使用して、さまざまな入力方法から各種コンテンツ タイプ(テキスト、画像、動画など)を処理するよう実装しました。
