
1. Before you begin
Introduction
At this point in the course you are well versed in building apps with Compose and have some knowledge of building apps with XML, Views, View Bindings, and Fragments. After building apps with Views, you might have come to appreciate the conveniences of building apps with a declarative UI like Compose. However, there might be some cases where it makes sense to use Views instead of Compose. In this codelab, you learn how to use View Interops to add View components into a modern Compose app.
At the time of writing this codelab, the UI components you are set to create are not yet available in Compose. This is the perfect opportunity to utilize View Interop!
Prerequisites:
- Complete the Android Basics with Compose coursework through the Build an Android App with Views codelab.
What you'll need
- A computer with internet access and Android Studio
- A device or emulator
- The starter code for the Juice Tracker app
What you'll build
In this codelab, you will need to integrate three Views into the Compose UI to complete the Juice Tracker app UI; a Spinner, a RatingBar, and an AdView. To build these components, you will use View Interoperability, or View Interop for short. With View Interop, you can actually add Views to your app by wrapping them in a Composable.

Code walkthrough
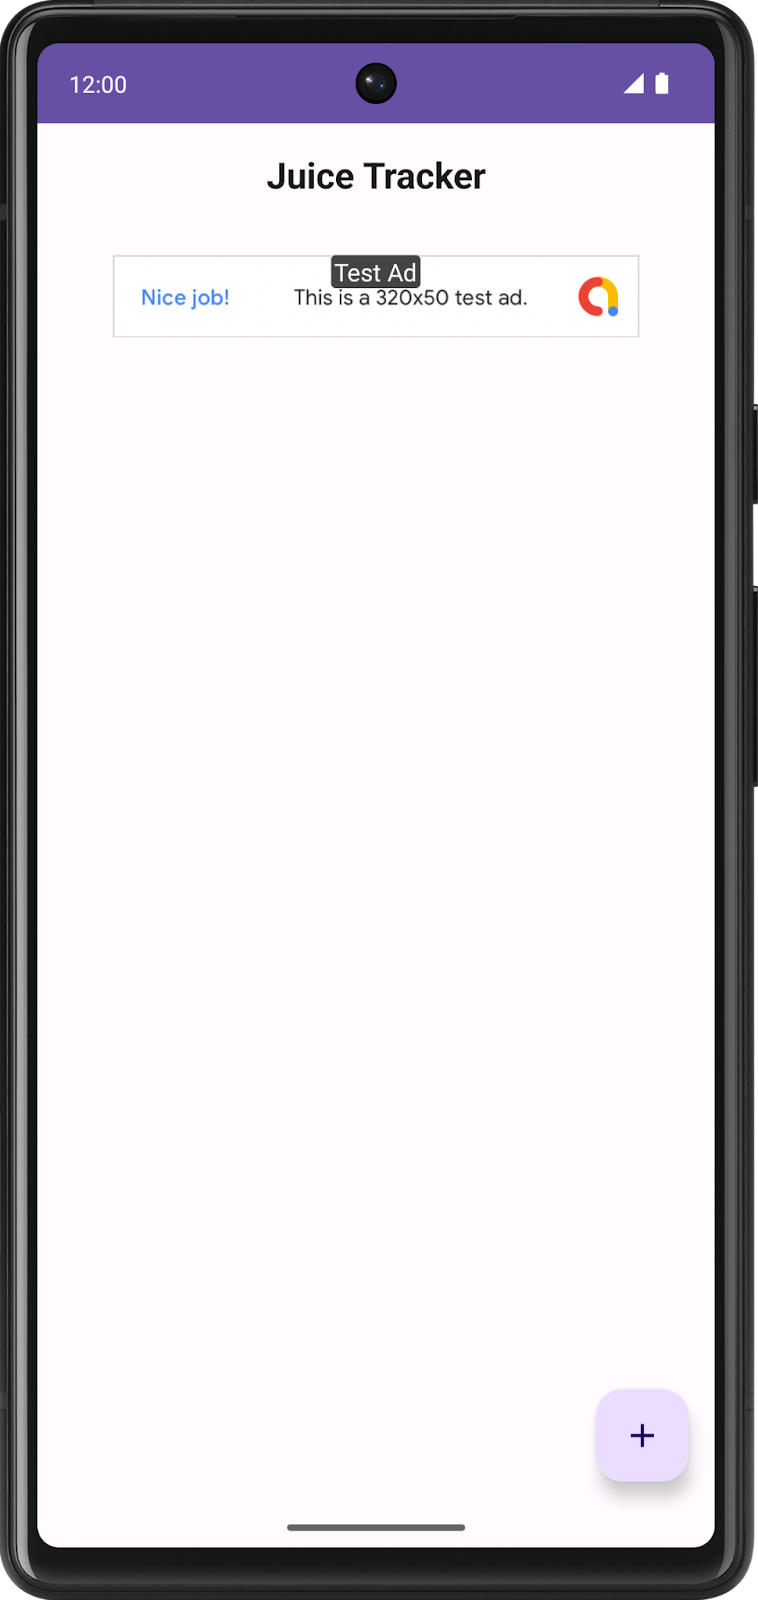
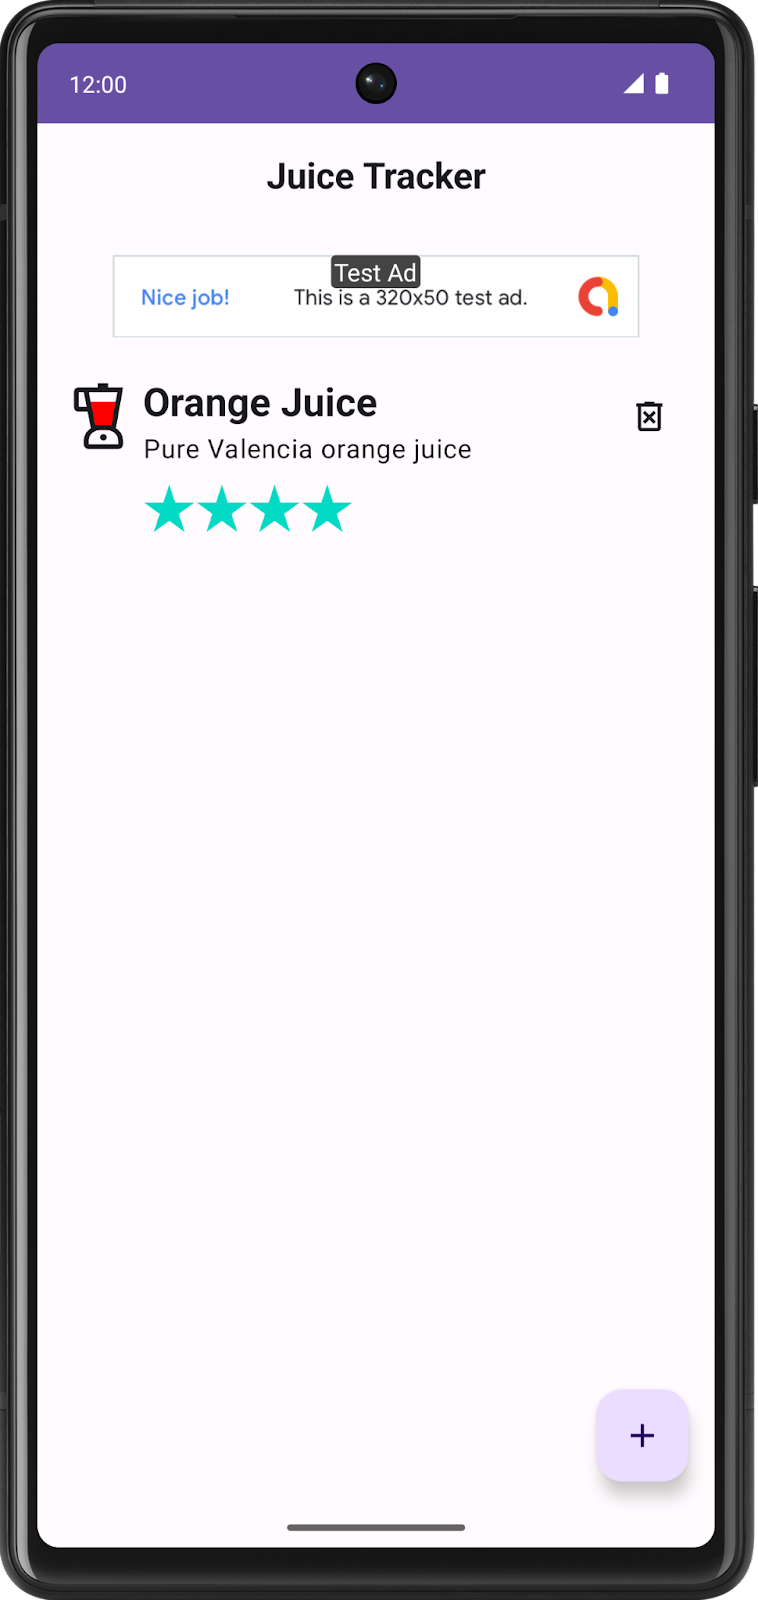
In this codelab, you work with the same JuiceTracker app from the Build an Android App with Views and Add Compose to a View-based app codelabs. The difference with this version is that the provided starter code is entirely in Compose. The app is currently missing the color and rating inputs in the entry dialog sheet and the ad banner at the top of the list screen.
The bottomsheet directory contains all of the UI components related to the entry dialog. This package should contain the UI components for the color and rating inputs, when they're created.
The homescreen contains the UI components hosted by the home screen, this includes the JuiceTracker list. This package should eventually contain the ad banner, when it's created.
The main UI components, such as the bottom sheet and the juice list, are hosted in the JuiceTrackerApp.kt file.
2. Get the starter code
To get started, download the starter code:
Alternatively, you can clone the GitHub repository for the code:
$ git clone https://github.com/google-developer-training/basic-android-kotlin-compose-training-juice-tracker.git
$ cd basic-android-kotlin-compose-training-juice-tracker
$ git checkout compose-starter
- In Android Studio, open the
basic-android-kotlin-compose-training-juice-trackerfolder. - Open the Juice Tracker app code in Android Studio.
3. Gradle configuration
Add the play services ads dependency to the app build.gradle.kts file.
app/build.gradle.kts
android {
   ...
   dependencies {
      ...
      implementation("com.google.android.gms:play-services-ads:22.2.0")
   }
}
4. Setup
Add the following value to the Android manifest, above the activity tag, to enable the ad banner for testing:
AndroidManifest.xml
...
<meta-data
   android:name="com.google.android.gms.ads.APPLICATION_ID"
   android:value="ca-app-pub-3940256099942544~3347511713" />

...
5. Complete the entry dialog
In this section, you complete the entry dialog by creating the color spinner and the rating bar. The color spinner is the component that lets you choose a color, and the rating bar lets you select a rating for the juice. See the design below:
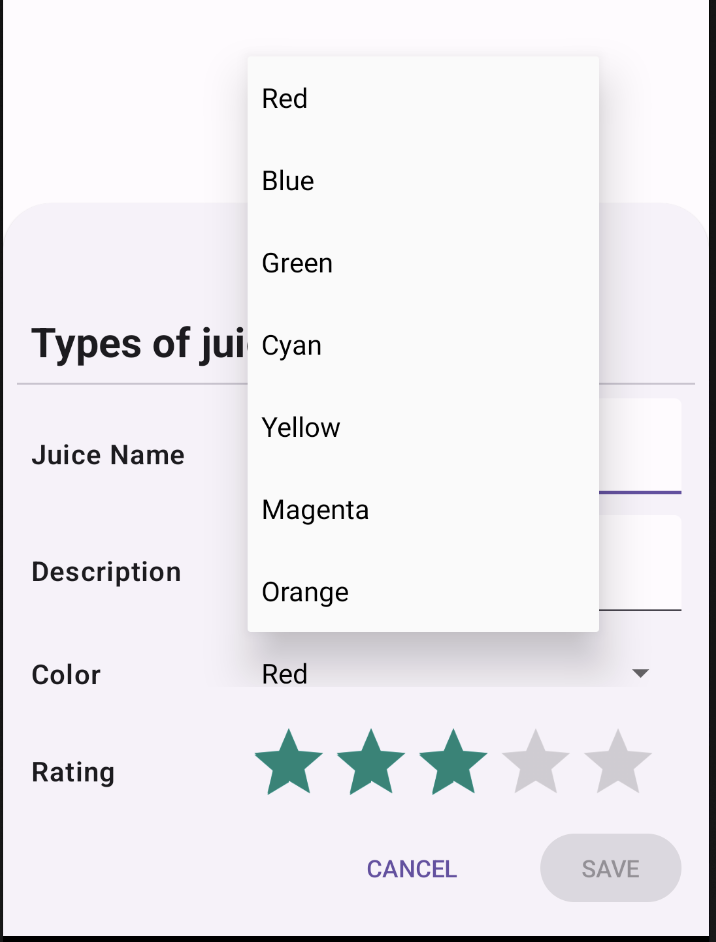

Create the color spinner
To implement a spinner in Compose, the Spinner class must be used. Spinner is a View component, as opposed to a Composable, so it must be implemented using an interop.
- In the
bottomsheetdirectory, create a new file calledColorSpinnerRow.kt. - Create a new class inside the file called
SpinnerAdapter. - In the constructor for the
SpinnerAdapter, define a callback parameter calledonColorChangethat takes anIntparameter. TheSpinnerAdapterhandles the callback functions for theSpinner.
bottomsheet/ColorSpinnerRow.kt
class SpinnerAdapter(val onColorChange: (Int) -> Unit){
}
- Implement the
AdapterView.OnItemSelectedListenerinterface.
Implementing this interface lets you define the clicking behavior for the spinner. You set up this adapter in a Composable later on.
bottomsheet/ColorSpinnerRow.kt
class SpinnerAdapter(val onColorChange: (Int) -> Unit): AdapterView.OnItemSelectedListener {
}
- Implement the
AdapterView.OnItemSelectedListenermember functions:onItemSelected()andonNothingSelected().
bottomsheet/ColorSpinnerRow.kt
class SpinnerAdapter(val onColorChange: (Int) -> Unit): AdapterView.OnItemSelectedListener {
   override fun onItemSelected(parent: AdapterView<*>?, view: View?, position: Int, id: Long) {
        TODO("Not yet implemented")
    }

    override fun onNothingSelected(parent: AdapterView<*>?) {
        TODO("Not yet implemented")
    }
}
- Modify the
onItemSelected()function to call theonColorChange()callback function so that when you select a color, the app updates the selected value in the UI.
bottomsheet/ColorSpinnerRow.kt
class SpinnerAdapter(val onColorChange: (Int) -> Unit): AdapterView.OnItemSelectedListener {
   override fun onItemSelected(parent: AdapterView<*>?, view: View?, position: Int, id: Long) {
        onColorChange(position)
    }

    override fun onNothingSelected(parent: AdapterView<*>?) {
        TODO("Not yet implemented")
    }
}
- Modify the
onNothingSelected()function to set the color to0so that when you select nothing, the default color is the first color, red.
bottomsheet/ColorSpinnerRow.kt
class SpinnerAdapter(val onColorChange: (Int) -> Unit): AdapterView.OnItemSelectedListener {
   override fun onItemSelected(parent: AdapterView<*>?, view: View?, position: Int, id: Long) {
        onColorChange(position)
    }

    override fun onNothingSelected(parent: AdapterView<*>?) {
        onColorChange(0)
    }
}
The SpinnerAdapter, which defines the spinner's behavior through callback functions, is already built. Now you need to build the content of the spinner and populate it with data.
- Inside of the
ColorSpinnerRow.ktfile, but outside of theSpinnerAdapterclass, create a new Composable calledColorSpinnerRow. - In the method signature of
ColorSpinnerRow(), add anIntparameter for the spinner position, a callback function that takes anIntparameter and a modifier.
bottomsheet/ColorSpinnerRow.kt
...
@Composable
fun ColorSpinnerRow(
    colorSpinnerPosition: Int,
    onColorChange: (Int) -> Unit,
    modifier: Modifier = Modifier
) {
}
- Inside the function, create an array of juice color string resources using the
JuiceColorenum. This array serves as the content that will populate the spinner.
bottomsheet/ColorSpinnerRow.kt
...
@Composable
fun ColorSpinnerRow(
    colorSpinnerPosition: Int,
    onColorChange: (Int) -> Unit,
    modifier: Modifier = Modifier
) {
   val juiceColorArray =
        JuiceColor.values().map { juiceColor -> stringResource(juiceColor.label) }

}
- Add an
InputRow()Composable and pass the color string resource for the input label and a modifier, which defines the input row where theSpinnerappears.
bottomsheet/ColorSpinnerRow.kt
...
@Composable
fun ColorSpinnerRow(
    colorSpinnerPosition: Int,
    onColorChange: (Int) -> Unit,
    modifier: Modifier = Modifier
) {
   val juiceColorArray =
        JuiceColor.values().map { juiceColor -> stringResource(juiceColor.label) }
   InputRow(inputLabel = stringResource(R.string.color), modifier = modifier) {
   }
}
Next you will create the Spinner! Since Spinner is a View class, Compose's View interoperability API must be utilized to wrap it into a Composable. This is achieved with the AndroidView Composable.
- To use a
Spinnerin Compose, create anAndroidView()Composable in theInputRowlambda body. TheAndroidView()Composable creates a View element or hierarchy in a Composable.
bottomsheet/ColorSpinnerRow.kt
...
@Composable
fun ColorSpinnerRow(
    colorSpinnerPosition: Int,
    onColorChange: (Int) -> Unit,
    modifier: Modifier = Modifier
) {
   val juiceColorArray =
        JuiceColor.values().map { juiceColor -> stringResource(juiceColor.label) }
   InputRow(inputLabel = stringResource(R.string.color), modifier = modifier) {
      AndroidView()
   }
}
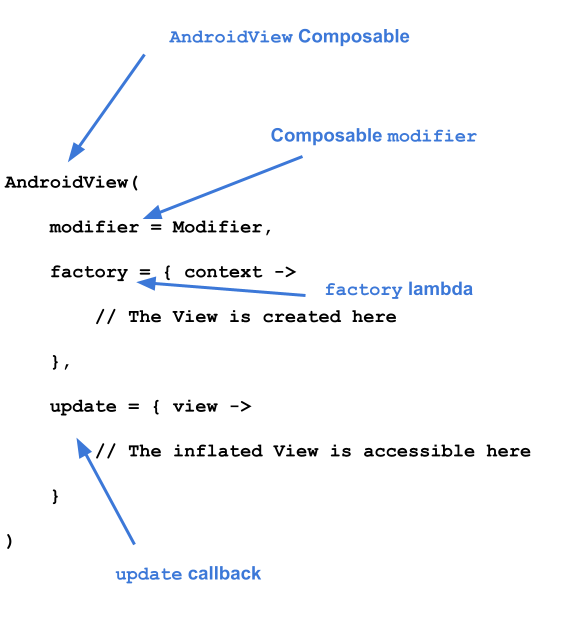
The AndroidView Composable takes three parameters:
- The
factorylambda, which is a function that creates the View. - The
updatecallback, which is called when the View created in thefactoryis inflated. - A Composable
modifier.
- To implement the
AndroidView, start by passing a modifier and filling the max width of the screen. - Pass a lambda for the
factoryparameter. - The
factorylambda takes aContextas a parameter. Create aSpinnerclass and pass the context.
bottomsheet/ColorSpinnerRow.kt
...
@Composable
fun ColorSpinnerRow(
    colorSpinnerPosition: Int,
    onColorChange: (Int) -> Unit,
    modifier: Modifier = Modifier
) {
   ...
   InputRow(...) {
      AndroidView(
         modifier = Modifier.fillMaxWidth(),
         factory = { context ->
            Spinner(context)
         }
      )
   }
}
Just like a RecyclerView.Adapter provides data to a RecyclerView, an ArrayAdapter provides data to a Spinner. The Spinner requires an adapter to hold the array of colors.
- Set the adapter using an
ArrayAdapter. TheArrayAdapterrequires a context, an XML layout, and an array. Passsimple_spinner_dropdown_itemfor the layout; this layout is provided as a default with Android.
bottomsheet/ColorSpinnerRow.kt
...
@Composable
fun ColorSpinnerRow(
colorSpinnerPosition: Int,
onColorChange: (Int) -> Unit,
modifier: Modifier = Modifier
) {
...
InputRow(...) {
AndroidView(
modifier = Modifier.fillMaxWidth(),
factory = { context ->
Spinner(context).apply {
adapter =
ArrayAdapter(
context,
android.R.layout.simple_spinner_dropdown_item,
juiceColorArray
)
}
}
)
}
}
The factory callback returns an instance of the View created within it. update is a callback that takes a parameter of the same type returned by the factory callback. This parameter is an instance of the View that is inflated by the factory. In this case, since a Spinner was created in the factory, the instance of that Spinner is accessible in the update lambda body.
- Add an
updatecallback that passes aspinner. Use the callback provided inupdateto call thesetSelection()method.
bottomsheet/ColorSpinnerRow.kt
...
@Composable
fun ColorSpinnerRow(
    colorSpinnerPosition: Int,
    onColorChange: (Int) -> Unit,
    modifier: Modifier = Modifier
) {
   ...
   InputRow(...) {
      //...
         },
         update = { spinner ->
             spinner.setSelection(colorSpinnerPosition)
             spinner.onItemSelectedListener = SpinnerAdapter(onColorChange)
         }
      )
   }
}
- Use the
SpinnerAdapteryou created earlier to set anonItemSelectedListener()callback in theupdate.
bottomsheet/ColorSpinnerRow.kt
...
@Composable
fun ColorSpinnerRow(
    colorSpinnerPosition: Int,
    onColorChange: (Int) -> Unit,
    modifier: Modifier = Modifier
) {
   ...
   InputRow(...) {
      AndroidView(
         // ...
         },
         update = { spinner ->
             spinner.setSelection(colorSpinnerPosition)
             spinner.onItemSelectedListener = SpinnerAdapter(onColorChange)
         }
      )
   }
}
The code for the color spinner component is now complete.
- Add the following utility function to get the enum index of
JuiceColor. You will use this in the next step.
private fun findColorIndex(color: String): Int {
   val juiceColor = JuiceColor.valueOf(color)
   return JuiceColor.values().indexOf(juiceColor)
}
- Implement the
ColorSpinnerRowin theSheetFormComposable in theEntryBottomSheet.ktfile. Place the color spinner after the "Description" text, and above the buttons.
bottomsheet/EntryBottomSheet.kt
...
@Composable
fun SheetForm(
   juice: Juice,
   onUpdateJuice: (Juice) -> Unit,
   onCancel: () -> Unit,
   onSubmit: () -> Unit,
   modifier: Modifier = Modifier,
) {
   ...
   TextInputRow(
            inputLabel = stringResource(R.string.juice_description),
            fieldValue = juice.description,
            onValueChange = { description -> onUpdateJuice(juice.copy(description = description)) },
            modifier = Modifier.fillMaxWidth()
        )
        ColorSpinnerRow(
            colorSpinnerPosition = findColorIndex(juice.color),
            onColorChange = { color ->
                onUpdateJuice(juice.copy(color = JuiceColor.values()[color].name))
            }
        )
   ButtonRow(
            modifier = Modifier
                .align(Alignment.End)
                .padding(bottom = dimensionResource(R.dimen.padding_medium)),
            onCancel = onCancel,
            onSubmit = onSubmit,
            submitButtonEnabled = juice.name.isNotEmpty()
        )
    }
}
Create the rating input
- Create a new file in the
bottomsheetdirectory calledRatingInputRow.kt. - In the
RatingInputRow.ktfile, create a new Composable calledRatingInputRow(). - In the method signature, pass an
Intfor the rating, a callback with anIntparameter to handle a selection change, and a modifier.
bottomsheet/RatingInputRow.kt
@Composable
fun RatingInputRow(rating:Int, onRatingChange: (Int) -> Unit, modifier: Modifier = Modifier){
}
- Like the
ColorSpinnerRow, add anInputRowto the Composable that contains anAndroidView, as shown in the following example code.
bottomsheet/RatingInputRow.kt
@Composable
fun RatingInputRow(rating:Int, onRatingChange: (Int) -> Unit, modifier: Modifier = Modifier){
    InputRow(inputLabel = stringResource(R.string.rating), modifier = modifier) {
        AndroidView(
            factory = {},
            update = {}
        )
    }
}
- In the
factorylambda body, create an instance of theRatingBarclass, which provides the type of rating bar needed for this design. Set thestepSizeto1fto enforce the rating to only be a whole number.
bottomsheet/RatingInputRow.kt
@Composable
fun RatingInputRow(rating:Int, onRatingChange: (Int) -> Unit, modifier: Modifier = Modifier){
    InputRow(inputLabel = stringResource(R.string.rating), modifier = modifier) {
        AndroidView(
            factory = { context ->
                RatingBar(context).apply {
                    stepSize = 1f
                }
            },
            update = {}
        )
    }
}
When the View is inflated, the rating is set. Recall that the factory returns the instance of the RatingBar to the update callback.
- Use the rating passed to the Composable to set the rating for the
RatingBarinstance in theupdatelambda body. - When a new rating is set, use the
RatingBarcallback to call theonRatingChange()callback function to update the rating in the UI.
bottomsheet/RatingInputRow.kt
@Composable
fun RatingInputRow(rating:Int, onRatingChange: (Int) -> Unit, modifier: Modifier = Modifier){
    InputRow(inputLabel = stringResource(R.string.rating), modifier = modifier) {
        AndroidView(
            factory = { context ->
                RatingBar(context).apply {
                    stepSize = 1f
                }
            },
            update = { ratingBar ->
                ratingBar.rating = rating.toFloat()
                ratingBar.setOnRatingBarChangeListener { _, _, _ ->
                    onRatingChange(ratingBar.rating.toInt())
                }
            }
        )
    }
}
The rating input composable is now complete.
- Use the
RatingInputRow()composable in theEntryBottomSheet. Place it after the color spinner and above the buttons.
bottomsheet/EntryBottomSheet.kt
@Composable
fun SheetForm(
    juice: Juice,
    onUpdateJuice: (Juice) -> Unit,
    onCancel: () -> Unit,
    onSubmit: () -> Unit,
    modifier: Modifier = Modifier,
) {
    Column(
        modifier = modifier,
        verticalArrangement = Arrangement.spacedBy(4.dp)
    ) {
        ...
        ColorSpinnerRow(
            colorSpinnerPosition = findColorIndex(juice.color),
            onColorChange = { color ->
                onUpdateJuice(juice.copy(color = JuiceColor.values()[color].name))
            }
        )
        RatingInputRow(
            rating = juice.rating,
            onRatingChange = { rating -> onUpdateJuice(juice.copy(rating = rating)) }
        )
        ButtonRow(
            modifier = Modifier.align(Alignment.CenterHorizontally),
            onCancel = onCancel,
            onSubmit = onSubmit,
            submitButtonEnabled = juice.name.isNotEmpty()
        )
    }
}
Create the ad banner
- In the
homescreenpackage, create a new file calledAdBanner.kt. - In the
AdBanner.ktfile, create a new Composable calledAdBanner().
Unlike the previous Composables you made, the AdBanner does not require an input. Therefore, you do not need to wrap it in an InputRow Composable. However, it does require an AndroidView.
- Attempt to build the banner on your own using the
AdViewclass. Make sure to set the ad size toAdSize.BANNERand the ad unit id to"ca-app-pub-3940256099942544/6300978111". - When the
AdViewis inflated, load an ad using theAdRequest Builder.
homescreen/AdBanner.kt
@Composable
fun AdBanner(modifier: Modifier = Modifier) {
    AndroidView(
        modifier = modifier,
        factory = { context ->
            AdView(context).apply {
                setAdSize(AdSize.BANNER)
                // Use test ad unit ID
                adUnitId = "ca-app-pub-3940256099942544/6300978111"
            }
        },
        update = { adView ->
            adView.loadAd(AdRequest.Builder().build())
        }
    )
}
- Place the
AdBannerbefore theJuiceTrackerListin theJuiceTrackerApp. TheJuiceTrackerListis declared on line 83.
ui/JuiceTrackerApp.kt
...
AdBanner(
   Modifier
       .fillMaxWidth()
       .padding(
           top = dimensionResource(R.dimen.padding_medium),
           bottom = dimensionResource(R.dimen.padding_small)
       )
)

JuiceTrackerList(
    juices = trackerState,
    onDelete = { juice -> juiceTrackerViewModel.deleteJuice(juice) },
    onUpdate = { juice ->
        juiceTrackerViewModel.updateCurrentJuice(juice)
        scope.launch {
            bottomSheetScaffoldState.bottomSheetState.expand()
        }
     },
)
6. Get the solution code
To download the code for the finished codelab, you can use these git commands:
$ git clone https://github.com/google-developer-training/basic-android-kotlin-compose-training-juice-tracker.git
$ cd basic-android-kotlin-compose-training-juice-tracker
$ git checkout compose-with-views
Alternatively, you can download the repository as a zip file, unzip it, and open it in Android Studio.
If you want to see the solution code, view it on GitHub.
7. Learn more
8. It's a wrap!
This course may end here, but this is just the beginning of your journey into Android app development!
In this course, you have learned to build apps using Jetpack Compose, the modern UI toolkit for building native Android apps. Throughout this course, you built apps with lists, single or multiple screens, and navigated between them. You learned to create interactive apps, made your app respond to user input and updated the UI. You applied Material Design and used colors, shapes, and typography to theme your app. You also used Jetpack and other third-party libraries to schedule tasks, retrieve data from remote servers, persist data locally and more.
By completing this course, you not only have a good understanding of how to create beautiful and responsive apps using Jetpack Compose, but are also equipped with the knowledge and skills you need to create efficient, maintainable, and visually appealing Android apps. This foundation will help you to continue learning and building your skills in Modern Android development and Compose.
We would like to thank you all for participating and completing this course! We encourage you all to continue learning and expanding your skills through additional resources such as the Android Developer docs, Jetpack Compose for Android Developers course, Modern Android App Architecture, Android Developers blog, other codelabs, and sample projects.
Finally, don't forget to share what you built on social media and use the hashtag #AndroidBasics so that we and the rest of the Android developer community can follow your learning journey too!
Happy composing!!