
1. Antes de começar
A maioria dos apps com qualidade de produção tem dados que precisam ser armazenados. Por exemplo, o app pode salvar uma playlist de músicas, itens em uma lista de tarefas, registros de despesas e renda, um catálogo de constelações ou um histórico de dados pessoais. Para esses casos de uso, um banco de dados é utilizado para armazenar os dados persistentes.
O Room é uma biblioteca de persistência que faz parte do Android Jetpack. O Room é uma camada de abstração sobre um banco de dados SQLite. O SQLite usa uma linguagem especializada (SQL) para executar operações do banco de dados. Em vez de usar o SQLite diretamente, o Room simplifica as tarefas de configuração do banco de dados e a interação com o app. Ele também oferece verificações durante a compilação de instruções SQLite.
Uma camada de abstração é um conjunto de funções que oculta a implementação/complexidade. Ela fornece uma interface para um conjunto de funções existentes, como o SQLite nesse caso.
A imagem abaixo mostra como o Room, como fonte de dados, se encaixa na arquitetura geral recomendada neste curso. O Room é uma fonte de dados.

Pré-requisitos
- Saber criar uma interface do usuário básica para um app Android usando o Jetpack Compose.
- Saber usar elementos combináveis, como
Text,Icon,IconButtoneLazyColumn. - Saber usar o elemento combinável
NavHostpara definir rotas e telas no seu app. - Saber navegar entre telas usando um
NavHostController. - Familiaridade com o componente da arquitetura do Android
ViewModel. Saber usarViewModelProvider.Factorypara instanciar os ViewModels. - Familiaridade com os princípios básicos de simultaneidade.
- Capacidade de usar corrotinas para tarefas de longa duração.
- Conhecimento básico em bancos de dados SQLite e na linguagem SQL.
O que você vai aprender
- Como criar e interagir com o banco de dados SQLite usando a biblioteca Room.
- Como criar uma entidade, um objeto de acesso a dados (DAO, na sigla em inglês) e classes de banco de dados.
- Como usar um DAO para mapear funções Kotlin em consultas SQL.
O que você vai criar
- Você vai criar um app chamado Inventory, que salva os itens de um inventário em um banco de dados SQLite.
O que é necessário
- Código inicial do app Inventory.
- Um computador com o Android Studio.
- Dispositivo ou emulador com o nível 26 da API ou mais recente.
2. Visão geral do app
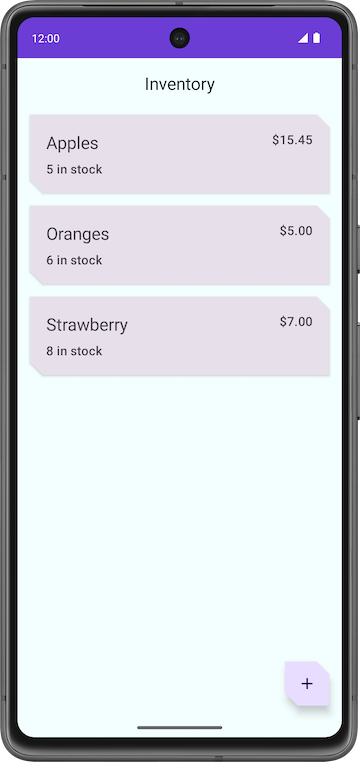
Neste codelab, você vai trabalhar com um código inicial do app Inventory e adicionar a camada do banco de dados a ele usando a biblioteca Room. A versão final do app mostra uma lista de itens do banco de dados do inventário. O usuário tem a opção de adicionar um novo item, atualizar um item existente e excluir um item do banco de dados do inventário. Neste codelab, você vai salvar os dados do item no banco de dados do Room. Você vai concluir o restante das funções do app no próximo codelab.
|
|
|
3. Visão geral do app inicial
Fazer o download do código inicial para este codelab
Para começar, faça o download do código inicial:
Outra opção é clonar o repositório do GitHub:
$ git clone https://github.com/google-developer-training/basic-android-kotlin-compose-training-inventory-app.git
$ cd basic-android-kotlin-compose-training-inventory-app
$ git checkout starter
Procure o código no repositório do GitHub do Inventory app (link em inglês).
Visão geral do código inicial
- Abra o projeto com o código inicial no Android Studio.
- Execute o app em um dispositivo Android ou em um emulador. Confira se o emulador ou dispositivo conectado é executado com o nível 26 da API ou mais recente. O Database Inspector funciona melhor em emuladores/dispositivos com o nível 26 da API ou mais recentes.
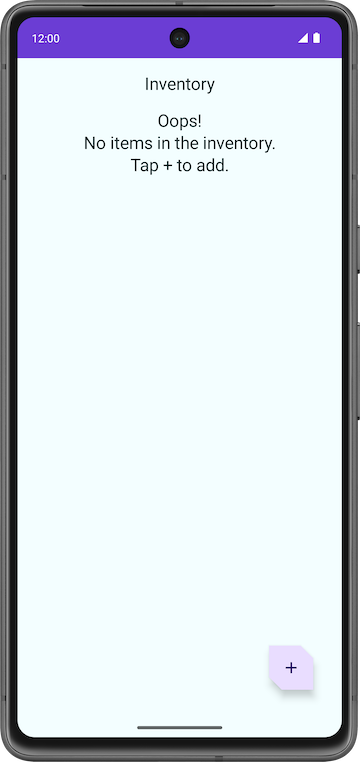
- O app não mostra dados de inventário.
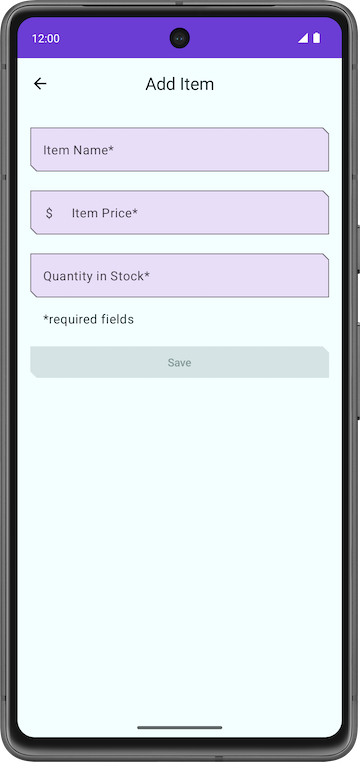
- Toque no botão de ação flutuante (FAB), que permite adicionar novos itens ao banco de dados.
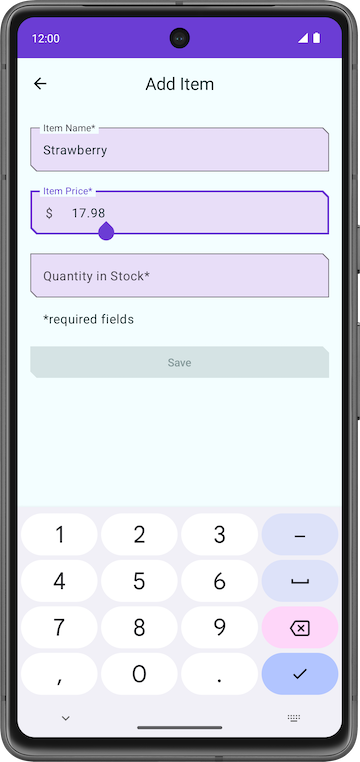
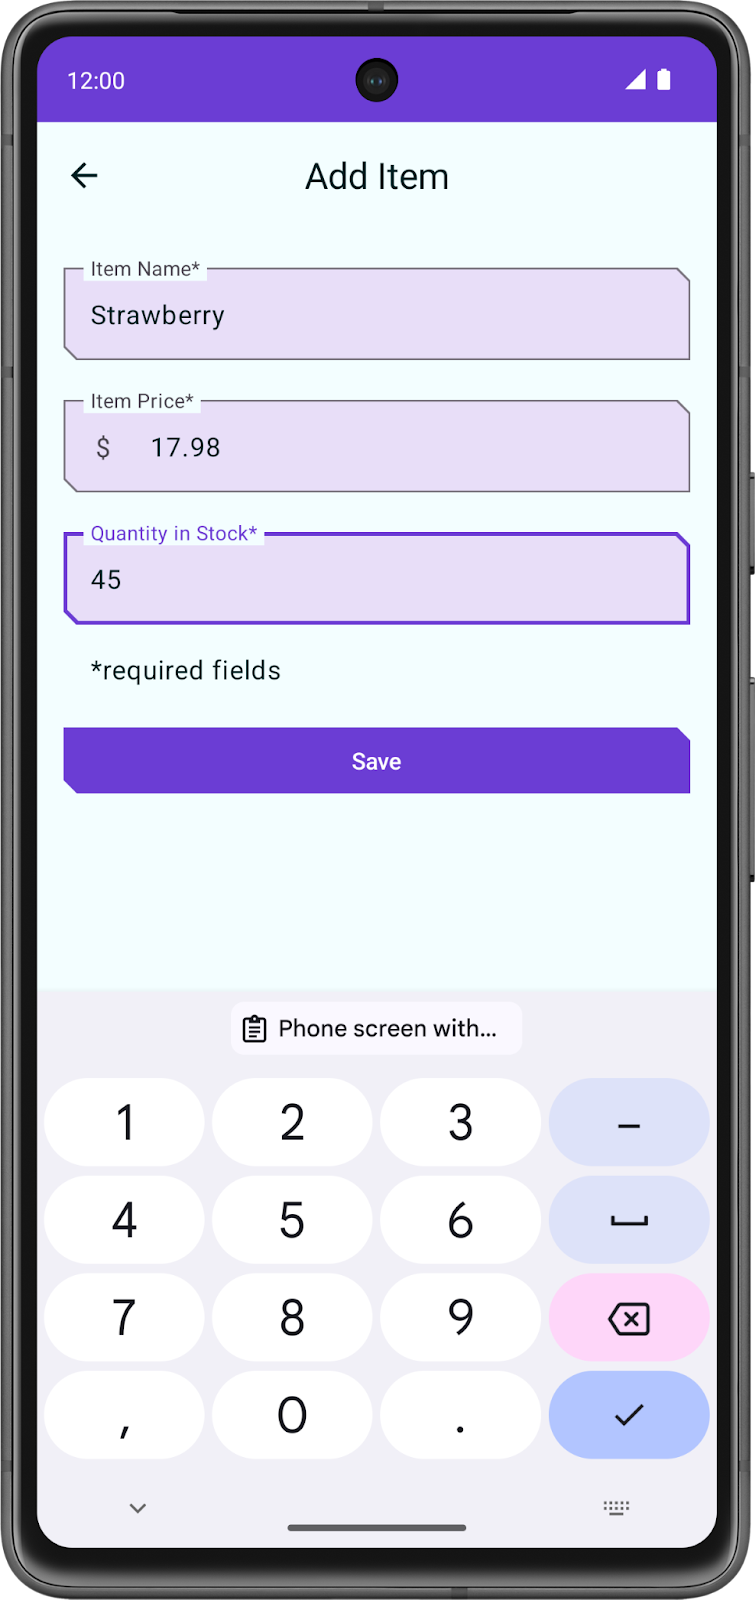
O app abrirá uma nova tela em que é possível inserir as informações do novo item.
|
|
Problemas com o código inicial
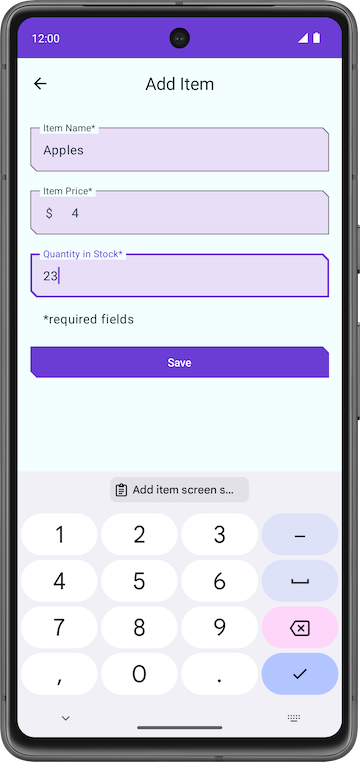
- Na tela Add Item (adicionar itens), insira os detalhes do item, como nome, preço e quantidade.
- Toque em Salvar. A tela Add Item não é fechada, mas você pode usar a tecla "Voltar" para navegar para as telas anteriores. A funcionalidade de salvar não foi implementada. Por isso, os detalhes do item não foram salvos.
O app ainda não está completo, e a função do botão Save não está implementada.
Neste codelab, você vai adicionar o código que usa o Room para salvar os detalhes do inventário no banco de dados SQLite. A biblioteca de persistência Room é usada para interagir com o banco de dados SQLite.
Tutorial do código
O código inicial que foi transferido por download tem layouts de tela pré-criados para você. Nesse módulo, o foco vai ser implementar a lógica do banco de dados. A próxima seção tem um breve tutorial de alguns arquivos para você começar.
ui/home/HomeScreen.kt
Esse arquivo é a tela inicial, ou a primeira tela no app, que contém os elementos combináveis para mostrar a lista de inventário. Ele tem um FAB  para adicionar novos itens à lista. Você vai mostrar os itens na lista mais adiante no Programa de treinamentos.

ui/item/ItemEntryScreen.kt
Essa tela é semelhante à ItemEditScreen.kt. Ambas têm campos de texto para os detalhes do item. Essa tela é mostrada quando o FAB é tocado na tela inicial. O ItemEntryViewModel.kt é o modelo de visualização correspondente ao ViewModel dessa tela.
ui/navigation/InventoryNavGraph.kt
Esse arquivo é o gráfico de navegação de todo o aplicativo.
4. Principais componentes do Room
O Kotlin oferece uma maneira fácil de trabalhar com dados usando classes de dados. Embora seja fácil trabalhar com dados na memória usando classes de dados, quando se trata de persistência, você precisa converter esses dados em um formato compatível com o armazenamento do banco de dados. Para isso, você precisa de tabelas para armazenar os dados e consultas para os acessar e modificar.
Os três componentes do Room apresentados abaixo simplificam esses fluxos de trabalho.
- As entidades do Room representam tabelas no banco de dados do app. Elas são usadas para atualizar os dados armazenados nas linhas das tabelas e criar novas linhas para inserção.
- Os DAOs do Room oferecem métodos que o app usa para extrair, atualizar, inserir e excluir dados no banco de dados.
- A classe de banco de dados do Room é a classe de banco de dados que oferece ao app instâncias dos DAOs associados ao banco de dados.
Você vai implementar esses componentes e aprender mais sobre eles mais adiante no codelab. O diagrama abaixo demonstra como os componentes do Room trabalham em conjunto para interagir com o banco de dados.

Adicionar dependências do Room
Nesta tarefa, você vai adicionar as bibliotecas de componentes do Room necessárias para os arquivos do Gradle.
- Abra o arquivo do Gradle
build.gradle.kts (Module: InventoryApp.app)no módulo. - No bloco
dependencies, adicione as dependências da biblioteca Room mostradas no código abaixo.
//Room
implementation("androidx.room:room-runtime:${rootProject.extra["room_version"]}")
ksp("androidx.room:room-compiler:${rootProject.extra["room_version"]}")
implementation("androidx.room:room-ktx:${rootProject.extra["room_version"]}")
A KSP é uma API eficiente e simples para analisar anotações Kotlin.
5. Criar a Entity de um item
A classe Entity define uma tabela. Cada instância dessa classe representa uma linha na tabela do banco de dados. A classe Entity tem mapeamentos para informar ao Room como ela pretende apresentar e interagir com as informações no banco de dados. No app, a entidade tem informações sobre itens de inventário, como nome, preço e quantidade dos itens disponíveis.

A anotação @Entity marca uma classe como Entity (entidade) do banco de dados. Para cada classe Entity, o app cria uma tabela de banco de dados para armazenar os itens. Cada campo da classe é representado como uma coluna no banco de dados, a menos que indicado de outra forma. Consulte os documentos da Entity para mais informações. Todas as instâncias de entidade armazenadas no banco de dados precisam ter uma chave primária. A chave primária é usada para identificar de forma exclusiva cada registro/entrada das tabelas do banco de dados. Depois que o app atribui uma chave primária, ela não pode ser modificada. Ela representa o objeto de entidade enquanto ele existir no banco de dados.
Nesta tarefa, você vai criar uma classe Entity e definir campos para armazenar as seguintes informações de inventário de cada item: Int para armazenar a chave primária, String para armazenar o nome do item, double para armazenar o preço do item e Int para armazenar a quantidade em estoque.
- Abra o código inicial no Android Studio.
- Abra o pacote
datano pacote basecom.example.inventory. - No pacote
data, abra a classeItemdo Kotlin, que representa uma entidade de banco de dados no app.
// No need to copy over, this is part of the starter code
class Item(
    val id: Int,
    val name: String,
    val price: Double,
    val quantity: Int
)
Classes de dados
As classes de dados são usadas principalmente para armazenar dados no Kotlin. Elas são definidas com a palavra-chave data. Os objetos de classe de dados do Kotlin têm alguns benefícios extras. Por exemplo, o compilador gera utilitários automaticamente para comparar, mostrar e copiar, como toString(), copy() (link em inglês) e equals().
Exemplo:
// Example data class with 2 properties.
data class User(val firstName: String, val lastName: String){
}
Para garantir a consistência e o comportamento significativo do código gerado, as classes de dados precisam satisfazer a estes requisitos:
- O construtor principal precisa ter pelo menos um parâmetro.
- Todos os parâmetros do construtor principal precisam ser
valouvar. - As classes de dados não podem ser
abstract,openousealed.
Para saber mais sobre as classes de dados, consulte a documentação Classes de dados (em inglês).
- Adicione a palavra-chave
datacomo prefixo da definição da classeItempara a converter em uma classe de dados.
data class Item(
    val id: Int,
    val name: String,
    val price: Double,
    val quantity: Int
)
- Acima da declaração de classe
Item, faça a anotação@Entityna classe de dados. Use o argumentotableNamepara definir oitemscomo o nome da tabela SQLite.
import androidx.room.Entity

@Entity(tableName = "items")
data class Item(
   ...
)
- Faça uma anotação
@PrimaryKeyna propriedadeidpara tornar oida chave primária. Uma chave primária é um ID para identificar de forma exclusiva cada registro/entrada na tabelaItem.
import androidx.room.PrimaryKey

@Entity(tableName = "items")
data class Item(
    @PrimaryKey
    val id: Int,
    ...
)
- Atribua ao
idum valor padrão de0, que é necessário para que oidgere automaticamente valores deid. - Adicione o parâmetro
autoGenerateà anotação@PrimaryKeypara especificar se a coluna da chave primária precisa ser gerada automaticamente. Se a opçãoautoGeneratefor definida comotrue, o Room vai gerar automaticamente um valor exclusivo para a coluna da chave primária quando uma nova instância de entidade for inserida no banco de dados. Isso garante que cada instância de entidade tenha um identificador exclusivo, sem ter que atribuir manualmente valores à coluna da chave primária
data class Item(
    @PrimaryKey(autoGenerate = true)
    val id: Int = 0,
    // ...
)
Ótimo! Agora que você criou uma classe Entity, pode criar um objeto de acesso a dados (DAO) para acessar o banco de dados.
6. Criar o DAO do item
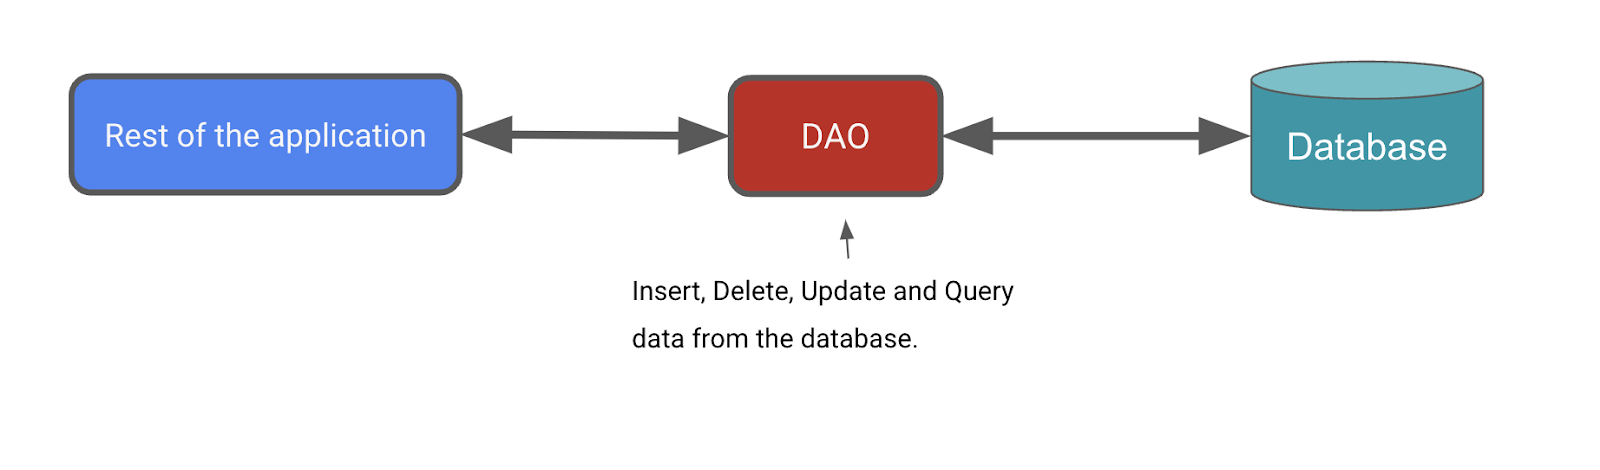
O objeto de acesso a dados (DAO) é um padrão que pode ser usado para separar a camada de persistência do restante do aplicativo, fornecendo uma interface abstrata. Esse isolamento segue o princípio de responsabilidade única (link em inglês), abordado nos codelabs anteriores.
A função do DAO é ocultar e separar do restante do aplicativo todas as complexidades envolvidas na execução das operações do banco de dados na camada de persistência. Isso permite mudar a camada de dados de maneira independente do código que usa os dados.
Nesta tarefa, você vai definir um DAO para o Room. Os DAOs são os principais componentes do Room responsáveis por definir a interface que acessa o banco de dados.
O DAO que você cria é uma interface personalizada que fornece métodos práticos para consultar/extrair, inserir, excluir e atualizar o banco de dados. O Room gera uma implementação dessa classe durante o tempo de compilação.
A biblioteca Room fornece anotações de conveniência, como @Insert, @Delete e @Update, para definir métodos que executam inserções, exclusões e atualizações simples sem que você precise criar uma instrução SQL.
Se você precisar definir operações mais complexas para inserir, excluir, atualizar ou consultar os dados no banco de dados, use uma anotação @Query.
Outro benefício é que, à medida que você cria suas consultas no Android Studio, o compilador verifica se há erros de sintaxe nas consultas SQL.
Para o app de inventário, é necessário fazer o seguinte:
- Inserir ou adicionar um novo item.
- Atualizar um item existente para mudar o nome, o preço e a quantidade.
- Buscar um item específico com base na chave primária
id. - Buscar todos os itens para poder mostrá-los.
- Excluir uma entrada do banco de dados.

Conclua as etapas abaixo para implementar o DAO do item no app:
- No pacote
data, crie a interface KotlinItemDao.kt.

- Adicione a anotação
@Daoà interfaceItemDao.
import androidx.room.Dao

@Dao
interface ItemDao {
}
- Dentro do corpo da interface, adicione uma anotação
@Insert. - Abaixo de
@Insert, adicione uma funçãoinsert()que aceita uma instância doitemda classeEntitycomo argumento. - Marque a função com a palavra-chave
suspendpara permitir que ela seja executada em uma linha de execução separada.
Como as operações do banco de dados podem levar muito tempo para ser executadas, isso precisa ser feito em uma linha de execução separada. O Room não permite acessar o banco de dados na linha de execução principal.
import androidx.room.Insert

@Insert
suspend fun insert(item: Item)
Ao inserir itens no banco de dados, podem ocorrer conflitos. Por exemplo, vários locais no código tentam atualizar a entidade com valores diferentes e conflitantes, como a mesma chave primária. Uma entidade é uma linha no banco de dados. No app Inventory, só inserimos a entidade de um lugar, que é a tela Add Item, para que não haja conflitos e que possamos definir a estratégia como Ignore.
- Adicione um argumento
onConflicte atribua a ele um valor deOnConflictStrategy.IGNORE.
O argumento onConflict instrui o Room sobre o que fazer em caso de conflito. A estratégia OnConflictStrategy.IGNORE ignora um novo item.
Para saber mais sobre as estratégias de conflito disponíveis, confira a documentação de OnConflictStrategy.
import androidx.room.OnConflictStrategy

@Insert(onConflict = OnConflictStrategy.IGNORE)
suspend fun insert(item: Item)
Agora, o Room gera todo o código necessário para inserir o item no banco de dados. Quando você chama qualquer uma das funções de DAO marcadas com anotações do Room, o Room executa a consulta SQL correspondente no banco de dados. Por exemplo, quando você chama o método acima, insert() no código Kotlin, o Room executa uma consulta SQL para inserir a entidade no banco de dados.
- Adicione uma nova função com a anotação
@Update, que usa umItemcomo parâmetro.
A entidade atualizada tem a mesma chave primária que a entidade transmitida. É possível atualizar algumas ou todas as outras propriedades da entidade.
- Assim como no método
insert(), marque essa função com a palavra-chavesuspend.
import androidx.room.Update

@Update
suspend fun update(item: Item)
Adicione outra função com a anotação @Delete para excluir itens e torná-los uma função de suspensão.
import androidx.room.Delete

@Delete
suspend fun delete(item: Item)
Não existe uma anotação de conveniência para as funções restantes. Portanto, é necessário usar a anotação @Query e oferecer consultas SQLite.
- Programe uma consulta SQLite para extrair um item específico da tabela de itens com base no
idfornecido. O código abaixo fornece um exemplo de consulta que seleciona todas as colunas doitems, em que oidcorresponde a um valor específico e oidé um identificador exclusivo.
Exemplo:
// Example, no need to copy over
SELECT * from items WHERE id = 1
- Adicione uma anotação
@Query. - Use a consulta SQLite da etapa anterior como um parâmetro de string para a anotação
@Query. - Adicione um parâmetro
Stringà@Query, que é uma consulta SQLite, para extrair um item da tabela de itens.
Agora, a consulta diz para selecionar todas as colunas do items, em que o id corresponde ao argumento :id. Observe que o :id usa a notação de dois-pontos na consulta para referenciar argumentos na função.
@Query("SELECT * from items WHERE id = :id")
- Depois da anotação
@Query, adicione uma funçãogetItem()que usa um argumentoInte retorna umFlow<Item>.
import androidx.room.Query
import kotlinx.coroutines.flow.Flow

@Query("SELECT * from items WHERE id = :id")
fun getItem(id: Int): Flow<Item>
É recomendável usar o Flow (fluxo) na camada de persistência. Com Flow como o tipo de retorno, você recebe uma notificação sempre que os dados do banco de dados mudam. O Room mantém esse Flow atualizado para você, o que significa que você só precisa receber os dados explicitamente uma vez. Essa configuração é útil para atualizar a lista de inventário, que você vai implementar no próximo codelab. Devido ao tipo de retorno Flow, o Room também executa a consulta na linha de execução em segundo plano. Não é necessário transformar o fluxo em uma função suspend explicitamente e chamá-lo dentro de um escopo de corrotina.
- Adicione uma
@Querycom uma funçãogetAllItems(). - Faça com que a consulta SQLite retorne todas as colunas da tabela
item, em ordem crescente. - Faça com que
getAllItems()retorne uma lista de entidadesItemcomo umFlow. ORoommantém esseFlowatualizado para você, o que significa que você só precisa receber os dados explicitamente uma vez.
@Query("SELECT * from items ORDER BY name ASC")
fun getAllItems(): Flow<List<Item>>
Concluídos ItemDao:
import androidx.room.Dao
import androidx.room.Delete
import androidx.room.Insert
import androidx.room.OnConflictStrategy
import androidx.room.Query
import androidx.room.Update
import kotlinx.coroutines.flow.Flow

@Dao
interface ItemDao {
    @Insert(onConflict = OnConflictStrategy.IGNORE)
    suspend fun insert(item: Item)

    @Update
    suspend fun update(item: Item)

    @Delete
    suspend fun delete(item: Item)

    @Query("SELECT * from items WHERE id = :id")
    fun getItem(id: Int): Flow<Item>

    @Query("SELECT * from items ORDER BY name ASC")
    fun getAllItems(): Flow<List<Item>>
}
- Não será possível notar nenhuma mudança, mas crie o app mesmo assim para garantir que não haja erros.
7. Criar uma instância de banco de dados
Nesta tarefa, você vai criar um RoomDatabase que usa a Entity e o DAO das tarefas anteriores. A classe do banco de dados define a lista de entidades e DAOs.
A classe Database fornece ao app instâncias dos DAOs definidos. O app pode usar os DAOs para extrair dados do banco de dados, como instâncias dos objetos da entidade de dados associados. Ele também pode usar as entidades de dados definidas para atualizar linhas das tabelas correspondentes ou criar novas linhas para inserção.
Você precisa criar uma classe RoomDatabase abstrata e adicionar a anotação @Database a ela. Essa classe tem um método que retorna a instância atual do RoomDatabase caso o banco de dados não exista.
Confira abaixo o processo geral para retornar a instância do RoomDatabase:
- Crie uma classe
public abstractque estenda oRoomDatabase. A nova classe abstrata definida hospeda o banco de dados. A classe definida é abstrata porque oRoomcria a implementação para você. - Adicione a anotação
@Databaseà classe. Nos argumentos, liste as entidades do banco de dados e configure o número da versão. - Defina um método ou uma propriedade abstrata que retorne uma instância do
ItemDao. ORoomvai gerar a implementação para você. - Só é necessária uma instância do
RoomDatabasepara todo o app. Portanto, transforme oRoomDatabaseem um Singleton. - Use o
Room.databaseBuilderdoRoompara criar seu banco de dados (item_database) somente se ele não existir. Caso contrário, retorne o banco de dados existente.
Criar o banco de dados
- No pacote
data, crie uma classe do Kotlin com o nomeInventoryDatabase.kt. - No arquivo
InventoryDatabase.kt, transformeInventoryDatabaseem uma classeabstractque estenda oRoomDatabase. - Adicione a anotação
@Databaseà classe. Desconsidere o erro de parâmetros ausentes que vai ser corrigido na próxima etapa.
import androidx.room.Database
import androidx.room.RoomDatabase

@Database
abstract class InventoryDatabase : RoomDatabase() {}
A anotação @Database requer vários argumentos para que o Room possa criar o banco de dados.
- Especifique o
Itemcomo a única classe com a lista deentities. - Defina a
versioncomo1. Sempre que o esquema da tabela do banco de dados mudar, vai ser necessário aumentar o número da versão. - Defina o
exportSchemacomofalsepara não manter os backups do histórico de versões do esquema.
@Database(entities = [Item::class], version = 1, exportSchema = false)
- No corpo da classe, declare uma função abstrata que retorne o
ItemDaopara que o banco de dados saiba sobre o DAO.
abstract fun itemDao(): ItemDao
- Abaixo da função abstrata, defina um
companion object, que permite acesso aos métodos criar ou acessar o banco de dados e usa o nome da classe como qualificador.
companion object {}
- Dentro do objeto
companion, declare uma variável particular anulávelInstancepara o banco de dados e a inicialize comonull.
A variável Instance mantém uma referência ao banco de dados, quando uma tiver sido criada. Isso ajuda a manter uma única instância do banco de dados aberta em determinado momento, porque ela é um recurso com criação e manutenção caras.
- Inclua a anotação
@VolatilenaInstance.
O valor de uma variável volátil nunca é armazenado em cache, e todas as leituras e gravações são de e para a memória principal. Esses recursos ajudam a garantir que o valor de Instance esteja sempre atualizado e seja o mesmo para todas as linhas de execução. Isso significa que as mudanças feitas por uma linha de execução na Instance ficam imediatamente visíveis para todas as outras.
@Volatile
private var Instance: InventoryDatabase? = null
- Abaixo da
Instance, ainda dentro do objetocompanion, defina um métodogetDatabase()com um parâmetroContext, necessário para o builder do banco de dados. - Retorne um tipo
InventoryDatabase. Uma mensagem de erro aparece porque o métodogetDatabase()ainda não retorna nada.
import android.content.Context

fun getDatabase(context: Context): InventoryDatabase {}
Várias linhas de execução podem solicitar uma instância de banco de dados ao mesmo tempo, o que resulta em dois bancos de dados em vez de um. Esse problema é conhecido como disputa (link em inglês). Envolver o código para receber o banco de dados em um bloco synchronized significa que somente uma linha de execução poderá entrar nesse bloco de código por vez, garantindo que o banco de dados será inicializado apenas uma vez. Usar o bloco synchronized{} para evitar a disputa.
- Dentro de
getDatabase(), retorne a variávelInstanceou, caso aInstanceseja nula, inicialize-a dentro de um blocosynchronized{}. Use o operador Elvis (?:) para fazer isso. - Transmita
this, o objeto complementar. O erro vai ser corrigido em etapas futuras.
return Instance ?: synchronized(this) { }
- Dentro do bloco sincronizado, use o builder de banco de dados para acessar o banco de dados. Continue ignorando os erros, que serão corrigidos nas próximas etapas.
import androidx.room.Room

Room.databaseBuilder()
- No bloco
synchronized, use o builder do banco de dados para acessar um banco de dados. Transmita o contexto do aplicativo, a classe do banco de dados e um nome para o banco de dados,item_databaseparaRoom.databaseBuilder().
Room.databaseBuilder(context, InventoryDatabase::class.java, "item_database")
O Android Studio gera um erro de correspondência de tipo. Para remover esse erro, adicione um build() nas próximas etapas.
- Adicione a estratégia de migração necessária ao builder. Use
.fallbackToDestructiveMigration().
.fallbackToDestructiveMigration()
- Para criar a instância do banco de dados, chame
.build(). Essa chamada remove os erros do Android Studio.
.build()
- Depois de
build(), adicione um blocoalsoe atribuaInstance = itpara manter uma referência à instância db recém-criada.
.also { Instance = it }
- No final do bloco
synchronized, retorne umainstance. O código final vai ficar assim:
import android.content.Context
import androidx.room.Database
import androidx.room.Room
import androidx.room.RoomDatabase

/**
* Database class with a singleton Instance object.
*/
@Database(entities = [Item::class], version = 1, exportSchema = false)
abstract class InventoryDatabase : RoomDatabase() {

    abstract fun itemDao(): ItemDao

    companion object {
        @Volatile
        private var Instance: InventoryDatabase? = null

        fun getDatabase(context: Context): InventoryDatabase {
            // if the Instance is not null, return it, otherwise create a new database instance.
            return Instance ?: synchronized(this) {
                Room.databaseBuilder(context, InventoryDatabase::class.java, "item_database")
                    .build()
                    .also { Instance = it }
            }
        }
    }
}
- Crie o código para garantir que não haja erros.
8. Implementar o repositório
Nesta tarefa, você vai implementar a interface ItemsRepository e a classe OfflineItemsRepository para fornecer entidades get, insert, delete e update do banco de dados.
- Abra o arquivo
ItemsRepository.ktno pacotedata. - Adicione as funções abaixo à interface, que são mapeadas para a implementação do DAO.
import kotlinx.coroutines.flow.Flow

/**
* Repository that provides insert, update, delete, and retrieve of [Item] from a given data source.
*/
interface ItemsRepository {
    /**
     * Retrieve all the items from the the given data source.
     */
    fun getAllItemsStream(): Flow<List<Item>>

    /**
     * Retrieve an item from the given data source that matches with the [id].
     */
    fun getItemStream(id: Int): Flow<Item?>

    /**
     * Insert item in the data source
     */
    suspend fun insertItem(item: Item)

    /**
     * Delete item from the data source
     */
    suspend fun deleteItem(item: Item)

    /**
     * Update item in the data source
     */
    suspend fun updateItem(item: Item)
}
- Abra o arquivo
OfflineItemsRepository.ktno pacotedata. - Transmita um parâmetro do construtor do tipo
ItemDao.
class OfflineItemsRepository(private val itemDao: ItemDao) : ItemsRepository
- Na classe
OfflineItemsRepository, substitua as funções definidas na interfaceItemsRepositorye chame as funções correspondentes noItemDao.
import kotlinx.coroutines.flow.Flow

class OfflineItemsRepository(private val itemDao: ItemDao) : ItemsRepository {
    override fun getAllItemsStream(): Flow<List<Item>> = itemDao.getAllItems()

    override fun getItemStream(id: Int): Flow<Item?> = itemDao.getItem(id)

    override suspend fun insertItem(item: Item) = itemDao.insert(item)

    override suspend fun deleteItem(item: Item) = itemDao.delete(item)

    override suspend fun updateItem(item: Item) = itemDao.update(item)
}
Implementar a classe AppContainer
Nesta tarefa, você instancia o banco de dados e transmite a instância do DAO para a classe OfflineItemsRepository.
- Abra o arquivo
AppContainer.ktno pacotedata. - Transmita a instância
ItemDao()para o construtorOfflineItemsRepository. - Defina a instância do banco de dados chamando
getDatabase()na classeInventoryDatabasetransmitindo o contexto e chame.itemDao()para criar a instância doDao.
override val itemsRepository: ItemsRepository by lazy {
    OfflineItemsRepository(InventoryDatabase.getDatabase(context).itemDao())
}
Agora você tem todos os elementos básicos para trabalhar com o Room. Esse código é compilado e executado, mas não é possível saber se ele realmente funciona. Este é um bom momento para testar seu banco de dados. Para concluir o teste, você precisa que o ViewModel se comunique com o banco de dados.
9. Adicionar a função de salvar
Até agora, você criou um banco de dados com as classes de interface como parte do código inicial. Para salvar os dados transitórios do app e também acessar o banco de dados, você precisa atualizar os ViewModels. Os ViewModels interagem com o banco de dados pelo DAO e fornecem dados à interface. Todas as operações do banco de dados precisam ser executadas na linha de execução de interface principal. Faça isso com corrotinas e o viewModelScope.
Tutorial da classe de estado da interface
Abra o arquivo ui/item/ItemEntryViewModel.kt. A classe de dados ItemUiState representa o estado da interface de um item. A classe de dados ItemDetails representa um único item.
O código inicial oferece três funções de extensão:
- A função de extensão
ItemDetails.toItem()converte o objeto de estado da interfaceItemUiStatepara o tipo de entidadeItem. - A função de extensão
Item.toItemUiState()converte o objeto de entidadeItemdo Room no tipo de estadoItemUiStateda interface. - A função de extensão
Item.toItemDetails()converte o objeto de entidadeItemdo Room para oItemDetails.
// No need to copy, this is part of starter code
/**
* Represents Ui State for an Item.
*/
data class ItemUiState(
    val itemDetails: ItemDetails = ItemDetails(),
    val isEntryValid: Boolean = false
)

data class ItemDetails(
    val id: Int = 0,
    val name: String = "",
    val price: String = "",
    val quantity: String = "",
)

/**
* Extension function to convert [ItemDetails] to [Item]. If the value of [ItemDetails.price] is
* not a valid [Double], then the price will be set to 0.0. Similarly if the value of
* [ItemDetails.quantity] is not a valid [Int], then the quantity will be set to 0
*/
fun ItemDetails.toItem(): Item = Item(
    id = id,
    name = name,
    price = price.toDoubleOrNull() ?: 0.0,
    quantity = quantity.toIntOrNull() ?: 0
)

fun Item.formatedPrice(): String {
    return NumberFormat.getCurrencyInstance().format(price)
}

/**
* Extension function to convert [Item] to [ItemUiState]
*/
fun Item.toItemUiState(isEntryValid: Boolean = false): ItemUiState = ItemUiState(
    itemDetails = this.toItemDetails(),
    isEntryValid = isEntryValid
)

/**
* Extension function to convert [Item] to [ItemDetails]
*/
fun Item.toItemDetails(): ItemDetails = ItemDetails(
    id = id,
    name = name,
    price = price.toString(),
    quantity = quantity.toString()
)
Use a classe acima nos modelos de visualização para ler e atualizar a interface.
Atualizar o ViewModel da itemEntry
Nesta tarefa, você vai transmitir o repositório para o arquivo ItemEntryViewModel.kt. Você também salva no banco de dados os detalhes do item inseridos na tela Add Item.
- Observe a função particular
validateInput()na classeItemEntryViewModel.
// No need to copy over, this is part of starter code
private fun validateInput(uiState: ItemDetails = itemUiState.itemDetails): Boolean {
    return with(uiState) {
        name.isNotBlank() && price.isNotBlank() && quantity.isNotBlank()
    }
}
A função acima confere se name, price e quantity estão vazios. Essa função é usada para verificar a entrada do usuário antes de adicionar ou atualizar a entidade no banco de dados.
- Abra a classe
ItemEntryViewModele adicione um parâmetro de construtor padrãoprivatedo tipoItemsRepository.
import com.example.inventory.data.ItemsRepository

class ItemEntryViewModel(private val itemsRepository: ItemsRepository) : ViewModel() {
}
- Atualize o
initializerdo modelo de visualização de entrada do item noui/AppViewModelProvider.kte transmita a instância do repositório como um parâmetro.
object AppViewModelProvider {
    val Factory = viewModelFactory {
        // Other Initializers
        // Initializer for ItemEntryViewModel
        initializer {
            ItemEntryViewModel(inventoryApplication().container.itemsRepository)
        }
        //...
    }
}
- Acesse o arquivo
ItemEntryViewModel.kte, no final da classeItemEntryViewModel, adicione uma função de suspensão com o nomesaveItem()para inserir um item no banco de dados do Room. Essa função adiciona os dados ao banco de dados sem bloqueio.
suspend fun saveItem() {
}
- Na função, verifique se o
itemUiStateé válido e o converta em um tipoItempara que o Room entenda os dados. - Chame
insertItem()emitemsRepositorye transmita os dados. A interface chama essa função para adicionar detalhes do item ao banco de dados.
suspend fun saveItem() {
    if (validateInput()) {
        itemsRepository.insertItem(itemUiState.itemDetails.toItem())
    }
}
Você adicionou todas as funções necessárias para acrescentar entidades ao banco de dados. Na próxima tarefa, você vai atualizar a interface para usar as funções acima.
Tutorial do elemento combinável ItemEntryBody()
- No arquivo
ui/item/ItemEntryScreen.kt, o elemento combinávelItemEntryBody()é implementado parcialmente como parte do código inicial. Observe esse elementoItemEntryBody()na chamada de funçãoItemEntryScreen().
// No need to copy over, part of the starter code
ItemEntryBody(
    itemUiState = viewModel.itemUiState,
    onItemValueChange = viewModel::updateUiState,
    onSaveClick = { },
    modifier = Modifier
        .padding(innerPadding)
        .verticalScroll(rememberScrollState())
        .fillMaxWidth()
)
- O estado da interface e a lambda
updateUiStateestão sendo transmitidos como parâmetros de função. Consulte a definição da função para saber como o estado da interface está sendo atualizado.
// No need to copy over, part of the starter code
@Composable
fun ItemEntryBody(
    itemUiState: ItemUiState,
    onItemValueChange: (ItemUiState) -> Unit,
    onSaveClick: () -> Unit,
    modifier: Modifier = Modifier
) {
    Column(
        // ...
    ) {
        ItemInputForm(
             itemDetails = itemUiState.itemDetails,
             onValueChange = onItemValueChange,
             modifier = Modifier.fillMaxWidth()
         )
        Button(
             onClick = onSaveClick,
             enabled = itemUiState.isEntryValid,
             shape = MaterialTheme.shapes.small,
             modifier = Modifier.fillMaxWidth()
         ) {
             Text(text = stringResource(R.string.save_action))
         }
    }
}
Você está mostrando ItemInputForm e um botão Save (salvar) nesse elemento combinável. No elemento combinável ItemInputForm(), você está mostrando três campos de texto. A opção Save só vai ser ativada se o texto for digitado nos campos. O valor isEntryValid vai ser verdadeiro se o texto em todos os campos for válido (não vazio).
|
|
- Observe a implementação da função combinável
ItemInputForm()e o parâmetro de funçãoonValueChange. Você está atualizando o valoritemDetailscom o valor inserido pelo usuário nos campos de texto. Quando o botão Save estiver ativado, oitemUiState.itemDetailsvai ter os valores necessários para ser salvo.
// No need to copy over, part of the starter code
@Composable
fun ItemEntryBody(
    //...
) {
    Column(
        // ...
    ) {
        ItemInputForm(
             itemDetails = itemUiState.itemDetails,
             //...
         )
        //...
    }
}
// No need to copy over, part of the starter code
@Composable
fun ItemInputForm(
    itemDetails: ItemDetails,
    modifier: Modifier = Modifier,
    onValueChange: (ItemUiState) -> Unit = {},
    enabled: Boolean = true
) {
    Column(modifier = modifier.fillMaxWidth(), verticalArrangement = Arrangement.spacedBy(16.dp)) {
        OutlinedTextField(
            value = itemUiState.name,
            onValueChange = { onValueChange(itemDetails.copy(name = it)) },
            //...
        )
        OutlinedTextField(
            value = itemUiState.price,
            onValueChange = { onValueChange(itemDetails.copy(price = it)) },
            //...
        )
        OutlinedTextField(
            value = itemUiState.quantity,
            onValueChange = { onValueChange(itemDetails.copy(quantity = it)) },
            //...
        )
    }
}
Adicionar listeners de clique ao botão "Save"
Para juntar tudo, adicione um gerenciador de cliques ao botão Save. No gerenciador de cliques, você inicia uma corrotina e chama saveItem() para salvar os dados no banco de dados do Room.
- No
ItemEntryScreen.kt, dentro da função combinávelItemEntryScreen, crie umvalcom o nomecoroutineScopecom a função combinávelrememberCoroutineScope().
import androidx.compose.runtime.rememberCoroutineScope

val coroutineScope = rememberCoroutineScope()
- Atualize a chamada de função
ItemEntryBody()e inicie uma corrotina dentro da lambdaonSaveClick.
ItemEntryBody(
   // ...
    onSaveClick = {
        coroutineScope.launch {
        }
    },
    modifier = modifier.padding(innerPadding)
)
- Observe a implementação da função
saveItem()no arquivoItemEntryViewModel.ktpara verificar se oitemUiStateé válido, convertendo oitemUiStateno tipoIteme inserindo-o no banco de dados usandoitemsRepository.insertItem().
// No need to copy over, you have already implemented this as part of the Room implementation

suspend fun saveItem() {
    if (validateInput()) {
        itemsRepository.insertItem(itemUiState.itemDetails.toItem())
    }
}
- No
ItemEntryScreen.kt, dentro da função combinávelItemEntryScreen, dentro da corrotina, chameviewModel.saveItem()para salvar o item no banco de dados.
ItemEntryBody(
    // ...
    onSaveClick = {
        coroutineScope.launch {
            viewModel.saveItem()
        }
    },
    //...
)
Você não usou a função viewModelScope.launch() para a saveItem() no arquivo ItemEntryViewModel.kt, mas ela é necessária para a função ItemEntryBody() ao chamar um método de repositório. Só é possível chamar funções de suspensão em uma corrotina ou outra função de suspensão. A função viewModel.saveItem() é de suspensão.
- Crie e execute o app.
- Toque no FAB +.
- Na tela Add Item, insira os detalhes do item e toque em Save. Tocar no botão Save não fecha a tela Add Item.
- Na lambda
onSaveClick, adicione uma chamada paranavigateBack()depois da chamadaviewModel.saveItem()para voltar à tela anterior. A funçãoItemEntryBody()vai ser parecida com este código:
ItemEntryBody(
    itemUiState = viewModel.itemUiState,
    onItemValueChange = viewModel::updateUiState,
    onSaveClick = {
        coroutineScope.launch {
            viewModel.saveItem()
            navigateBack()
        }
    },
    modifier = modifier.padding(innerPadding)
)
- Execute o app novamente e siga as mesmas etapas para inserir e salvar os dados. Dessa vez, o app vai voltar para a tela Inventory.
Essa ação salva os dados, mas não é possível conferir os dados de inventário no app. Na próxima tarefa, você vai usar o Database Inspector para visualizar os dados salvos.

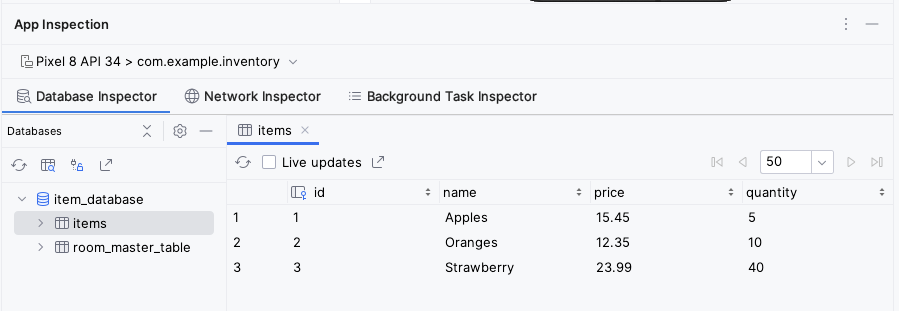
10. Visualizar o conteúdo do banco de dados usando o Database Inspector
O Database Inspector permite inspecionar, consultar e modificar os bancos de dados do app enquanto ele é executado. Esse recurso é especialmente útil para a depuração do banco de dados. O Database Inspector funciona com o SQLite simples e com bibliotecas criadas com base no SQLite, como o Room. Ele funciona melhor em emuladores/dispositivos com o nível 26 da API.
- Execute o app em um emulador ou dispositivo conectado com o nível 26 da API ou mais recente, caso ainda não tenha feito isso.
- No Android Studio, selecione View > Tool Windows > App Inspection na barra de menus.
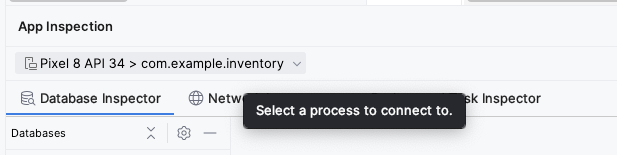
- Selecione a guia Database Inspector.
- No painel Database Inspector, selecione
com.example.inventoryno menu suspenso, caso ainda não esteja selecionado. O item_database do app Inventory é mostrado no painel Databases.
- Expanda o nó de item_database no painel Databases e selecione Item para inspecionar. Se o painel Databases estiver vazio, use o emulador para adicionar alguns itens ao banco de dados usando a tela Add Item.
- Marque a caixa de seleção Live updates no Database Inspector para atualizar automaticamente os dados apresentados à medida que você interage com o app em execução no emulador ou dispositivo.
Parabéns! Você criou um app que pode armazenar dados usando o Room. No próximo codelab, você vai adicionar uma lazyColumn ao app para mostrar os itens no banco de dados e adicionar novos recursos ao app, como a capacidade de excluir e atualizar as entidades. Até lá!
11. Acessar o código da solução
O código da solução deste codelab está no repositório do GitHub. Para fazer o download do código do codelab concluído, use os comandos git abaixo:
$ git clone https://github.com/google-developer-training/basic-android-kotlin-compose-training-inventory-app.git
$ cd basic-android-kotlin-compose-training-inventory-app
$ git checkout room
Se preferir, você pode fazer o download do repositório como um arquivo ZIP, descompactar e abrir no Android Studio.
Confira o código da solução deste codelab no GitHub (link em inglês).
12. Resumo
- Defina suas tabelas como classes de dados com a anotação
@Entity. Defina as propriedades com a anotação@ColumnInfocomo colunas em tabelas. - Defina um objeto de acesso a dados (DAO, na sigla em inglês) como uma interface com a anotação
@Dao. O DAO mapeia funções do Kotlin para realizar consultas no banco de dados. - Use anotações para definir as funções
@Insert,@Deletee@Update. - Use a anotação
@Querycom uma string de consulta do SQLite como parâmetro para outras consultas. - Use o Database Inspector para visualizar os dados salvos no banco de dados SQLite do Android.
13. Saiba mais
Documentação do desenvolvedor Android
- Salvar dados em um banco de dados local usando Room
- androidx.room
- Depurar seu banco de dados com o Database Inspector
Postagens do blog
- Sete dicas para o Room (link em inglês)
- O único objeto. Vocabulário do Kotlin (link em inglês)
Vídeos
Outros documentos e artigos
- Padrão Singleton (link em inglês)
- Objetos complementares (link em inglês)
- Tutorial do SQLite: uma forma fácil de dominar o SQLite rapidamente (link em inglês)