
1. Antes de começar
Nesta unidade, você aprendeu o seguinte:
- Como criar um app com várias telas.
- Como criar um layout adaptável para que o app funcione bem em vários tamanhos de tela.
- A importância da arquitetura do app.
- Como garantir que o app siga o ciclo de vida da atividade sem desperdiçar recursos desnecessários.
- Como preservar o estado do usuário em todas as mudanças de configuração do dispositivo.
Você aprendeu muita coisa.
Seguir as etapas do codelab ajudou você a conhecer esses novos conceitos até certo ponto, mas você vai compreendê-los de maneira mais profunda ao aplicar seus conhecimentos e habilidades a um novo app.
Você vai usar seus conhecimentos ao se deparar com novas situações, bugs ou momentos em que precisar criar uma solução por conta própria. Você pode consultar apps e codelabs anteriores para se lembrar rapidamente e colocar em prática o que aprendeu.
Você vai aprender melhor se tentar resolver esses problemas por conta própria, o que se assemelha mais à situação real de um desenvolvedor. Saber como detalhar e resolver problemas ou pesquisar recursos para encontrar uma solução é uma habilidade por si só. Por isso, recomendamos trabalhar nos projetos ao final de cada unidade. Com essa motivação e esse contexto em mente, confira as instruções abaixo para o projeto da Unidade 4.
Pré-requisitos
- Saber criar e executar um projeto no Android Studio.
- Conhecer as noções básicas da linguagem de programação Kotlin.
- Familiaridade com a criação de layouts de interface no Compose e a adaptação deles a diferentes tamanhos de tela.
- Saber adicionar e implementar o componente de navegação do Jetpack com o Compose.
- Saber implementar um app com a arquitetura de app recomendada usando ViewModels, UiState e Jetpack Navigation.
O que você vai criar
- Um app Android que mostra recomendações de coisas legais para fazer e lugares para visitar na cidade em que você mora
O que é necessário
- Um computador com o Android Studio instalado.
2. Visão geral
Parabéns por concluir a Unidade 4.
Para reforçar o que aprendeu nesta unidade, você vai criar um app com listas de recomendações de diferentes atividades e lugares para visitar em uma cidade escolhida.
Esse app precisa:
- conter várias telas; por exemplo, cada tela pode mostrar uma categoria diferente de recomendações;
- usar o componente de navegação do Jetpack para permitir que os usuários naveguem pelo app;
- manter uma distinção clara entre a camada de interface e a camada de dados;
- usar um ViewModel e fazer atualizações na interface do modelo de visualização usando o fluxo de dados unidirecional (UDF);
- usar layouts adaptáveis que atendam a todos os diferentes tamanhos de tela.
- seguir as diretrizes de design adaptável e navegação do Material Design.
3. Coletar o conteúdo do app
Escreva o conteúdo do app em um pedaço de papel ou digite em um documento. É mais fácil organizar o conteúdo antes de começar a programação.
Decida a cidade ou região que você quer usar no app. Sugerimos usar sua cidade favorita ou a cidade em que mora. Se preferir, você também pode escolher uma região mais ampla que inclua várias cidades.
Escolha um nome para o app com base na cidade escolhida. Embora este projeto se chame app My City, recomendamos personalizar o nome do app para ser específico à sua cidade.
Crie listas com diferentes categorias de recomendações para sua cidade. Por exemplo, é possível criar uma lista de recomendações para os seguinte locais:
- Cafés
- Restaurantes
- Lugares adequados para crianças
- Parques
- Shopping centers
Seu app precisa ter várias listas de recomendações de categorias diferentes. Tente criar pelo menos três a cinco recomendações para cada categoria, para que a tela não pareça vazia.
Se quiser adicionar fotos ao app, colete-as nesta etapa.
4. Fazer um esboço das telas do app
Em um pedaço de papel, faça um esboço das diferentes telas do app. Você pode desenhar setas entre as telas e adicionar botões ao layout para mostrar ao usuário como navegar de uma tela para outra.
Esse esboço não precisa ser muito detalhado ou refinado. O objetivo principal é desenvolver uma ideia para os destinos no gráfico de navegação e o layout geral do app. Esses desenhos podem ajudar você na próxima etapa.
Se você precisar de ajuda para esboçar o app e o fluxo de navegação, veja este exemplo:
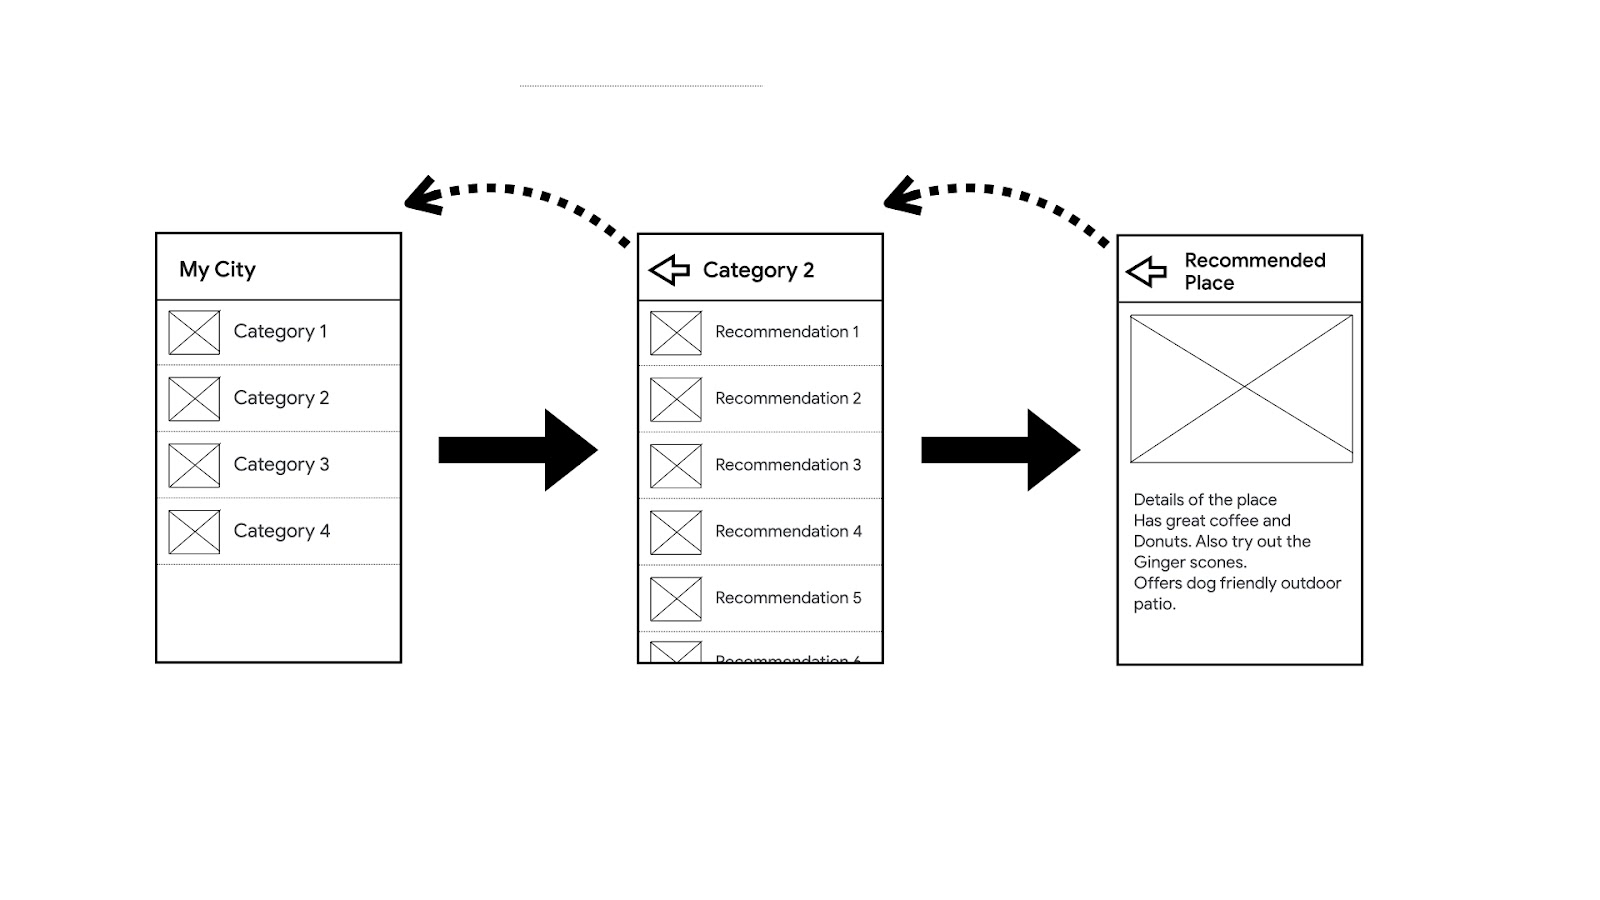
Você pode usar esse exemplo para esboçar o app e o fluxo de navegação em telas maiores? Se precisar de mais ajuda, confira o codelab em que você criou o app Reply.
5. Planejar as etapas
Escreva as etapas gerais de como criar o app que você esboçou.
Exemplos:
- Criar a classe de dados para um local recomendado.
- Criar o layout da tela para as cafeterias recomendadas.
- Criar o gráfico de navegação para todas as telas.
Essas anotações ajudam a determinar qual parte do app você quer abordar primeiro.
Para maior organização, você também pode enumerar as etapas na ordem em que planeja completá-las. Se uma etapa exigir a conclusão de outra primeiro, organize todas elas adequadamente.
6. Implementar o app
Agora que você tem um plano de alto nível para o app, pode começar a desenvolver o código dele.
Crie o projeto e conclua cada tarefa individualmente. Seja paciente se uma tarefa demorar muito. É normal ter uma curva de aprendizado bem elevada para criar um app dessa complexidade.
Dicas:
- Consulte os codelabs anteriores e os repositórios de código do GitHub para referência.
- Veja outros apps de exemplo do Compose ou o app Now in Android. Observe que esses apps são maiores e mais complexos do que os apps criados até agora.
- Se você encontrar um bug no app e não conseguir descobrir como corrigir, use as ferramentas de depuração do Android Studio.
7. Receber feedback de um usuário (opcional)
Esta seção é recomendada para proporcionar uma boa experiência de aprendizado. Quando tiver uma versão em funcionamento do app, mostre para um usuário em potencial e anote o feedback dele.
Se você tiver um dispositivo Android, instale o app nele. Você também pode usar um emulador, mas lembre-se de que o usuário pode não estar familiarizado com o que é um emulador e como ele se relaciona com um dispositivo real.
Não dê orientações ou instruções ao usuário. Em vez disso, concentre-se em observá-lo e fazer perguntas a ele para entender como os usuários podem usar o app pela primeira vez. Preste atenção em como ele interage com o app e se a navegação parece intuitiva ou confusa. Ele consegue usar o app como esperado ou está com dificuldade para descobrir como usar?
Confira se ele navega por todas as telas e interage com cada parte do app. Você pode fazer outras perguntas, incluindo:
- Qual é sua primeira impressão deste app?
- O que você gostou?
- Você tem alguma sugestão de melhoria?
Veja se você quer incorporar essas sugestões para criar uma experiência melhor para os usuários.
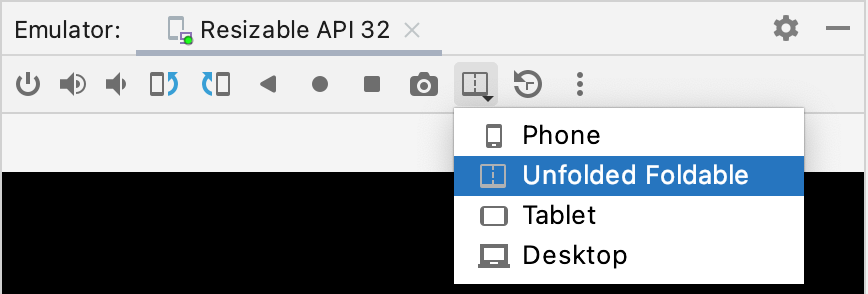
8. Testar o app com um emulador redimensionável
É recomendável testar o que você criou em um emulador redimensionável para conferir se o app funciona conforme o esperado em diferentes tamanhos de tela. Mude o tamanho do emulador e teste as diferentes opções de dispositivo, conforme mostrado na imagem a seguir.
9. Boa sorte!
Boa sorte na criação do seu app! Quando terminar, compartilhe o app nas mídias sociais usando a hashtag #AndroidBasics. Estamos ansiosos para ver como ele vai ficar e para ouvir suas recomendações!