
1. Antes de começar
A maioria dos apps Android no mercado se conecta à Internet para executar operações de rede, por exemplo, acessar e-mails, mensagens ou outras informações em um servidor de back-end. O Gmail, o YouTube e o Google Fotos são exemplos de apps que se conectam à Internet para exibir os dados do usuário.
Neste codelab, você vai usar bibliotecas de código aberto criadas pela comunidade para criar uma camada de dados e receber dados de um servidor de back-end. Com essas bibliotecas, a busca de dados fica mais simples, e o app consegue seguir as práticas recomendadas do Android, por exemplo, executar operações em uma linha de execução em segundo plano. Você também vai incluir uma mensagem de erro caso a conexão de Internet esteja lenta ou indisponível, para informar o usuário sobre qualquer problema de conectividade.
Pré-requisitos
- Conhecimento básico sobre como criar funções de composição.
- Conhecimento básico sobre como usar os Componentes da arquitetura do Android
ViewModel. - Conhecimento básico sobre como usar corrotinas para tarefas de longa duração.
- Conhecimento básico sobre como adicionar dependências no
build.gradle.kts.
O que você vai aprender
- O que é um serviço da Web REST (link em inglês).
- Como usar a biblioteca Retrofit (link em inglês) para se conectar a um serviço REST da Web e receber uma resposta.
- Como usar a biblioteca Serialization (kotlinx.serialization) (link em inglês) para analisar a resposta JSON em um objeto de dados.
O que você vai fazer
- Modificar um app inicial para fazer uma solicitação de API de serviço da Web e lidar com a resposta.
- Implementar uma camada de dados no app usando a biblioteca Retrofit.
- Usar a lista de objetos de dados do app e a biblioteca kotlinx.serialization para analisar a resposta JSON do serviço da Web. Em seguida, anexar essa resposta ao estado da IU.
- Usar corrotinas na biblioteca Retrofit para simplificar o código.
O que você precisa
- Um computador com o Android Studio
- O código inicial do app Mars Photos
2. Visão geral do app
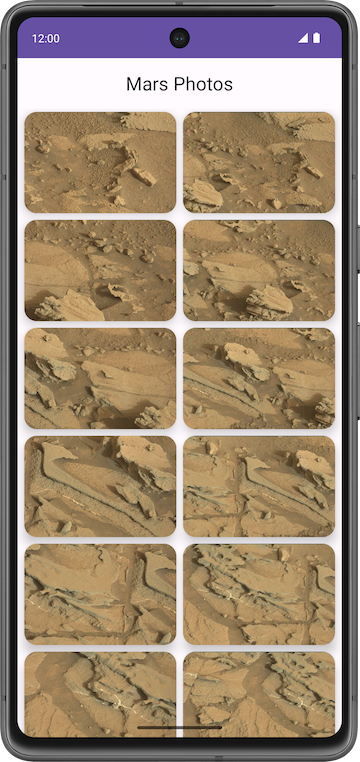
Você vai trabalhar com o app Mars Photos, que mostra imagens da superfície de Marte. Esse app se conecta a um serviço da Web para buscar e mostrar imagens do planeta vermelho. Elas são fotos reais capturadas por rovers da NASA em Marte. Confira abaixo uma captura de tela do app final, contendo uma grade de imagens.
A versão do app que você vai criar neste codelab não terá muitos recursos visuais. Este codelab trata da parte da camada de dados usada para se conectar à Internet e fazer o download dos dados brutos das propriedades usando um serviço da Web. Para garantir que o app acesse e analise esses dados corretamente, você pode mostrar o número de fotos recebidas do servidor de back-end em um elemento combinável Text.
3. Conheça o app inicial Mars Photos
Fazer o download do código inicial
Para começar, faça o download do código inicial:
Outra opção é clonar o repositório do GitHub:
$ git clone https://github.com/google-developer-training/basic-android-kotlin-compose-training-mars-photos.git
$ cd basic-android-kotlin-compose-training-mars-photos
$ git checkout starter
Procure o código no repositório do GitHub do Mars Photos (link em inglês).
Executar o código inicial
- No Android Studio, abra o projeto que transferiu por download. O nome da pasta do projeto é
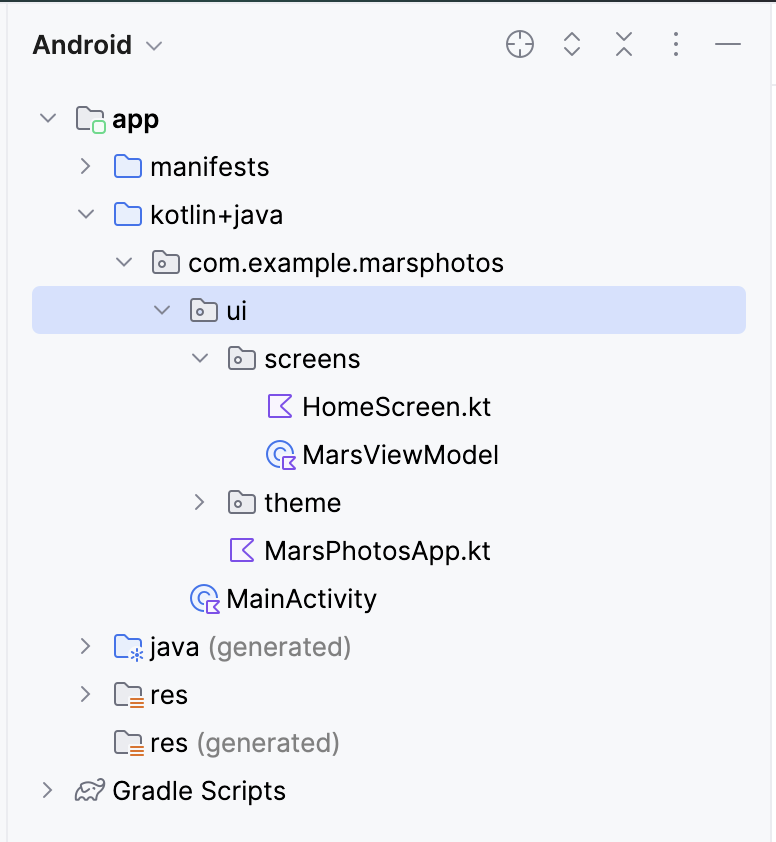
basic-android-kotlin-compose-training-mars-photos. - No painel Android, clique para expandir app > Kotlin + java. O app tem uma pasta de pacote com o nome
ui. Essa é a camada da interface do app.
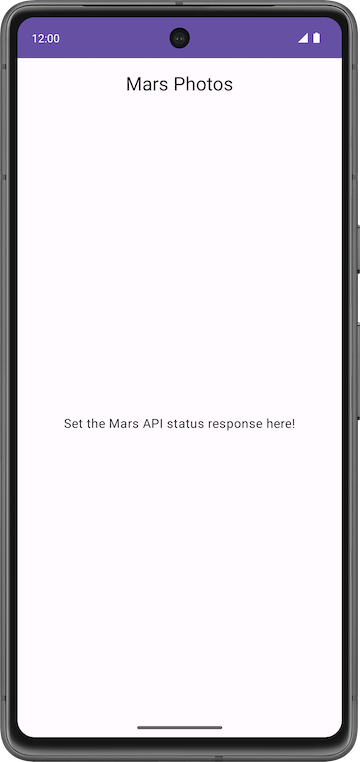
- Execute o app. Depois de ser compilado e executado, a tela abaixo vai aparecer, com um texto temporário no centro. Ao final deste codelab, você vai atualizar esse texto para indicar o número de fotos encontradas.
Tutorial do código inicial
Nesta tarefa, você vai conhecer a estrutura do projeto. Veja a seguir explicações sobre os arquivos e as pastas mais importantes desse projeto.
ui\MarsPhotosApp.kt:
- Esse arquivo contém o combinável
MarsPhotosApp, que mostra o conteúdo na tela, por exemplo, a barra de apps e o combinávelHomeScreen. O texto temporário da etapa anterior é exibido nesse elemento combinável. - No próximo codelab, esse elemento combinável vai passar a exibir os dados recebidos do servidor de back-end de fotos de Marte.
screens\MarsViewModel.kt:
- Esse é o modelo de visualização correspondente para o
MarsPhotosApp. - Essa classe contém uma propriedade
MutableState, com o nomemarsUiState. A atualização do valor dessa propriedade atualiza o texto temporário exibido na tela. - O método
getMarsPhotos()atualiza a resposta do marcador. Mais adiante no codelab, você vai usar esse método para exibir os dados encontrados no servidor. O objetivo é atualizar oMutableStatedoViewModelusando dados da Internet.
screens\HomeScreen.kt:
- Esse arquivo contém os elementos combináveis
HomeScreeneResultScreen. OResultScreentem um layoutBoxsimples, que mostra o valor demarsUiStateem um elemento combinávelText.
MainActivity.kt:
- A única tarefa dessa atividade é carregar o
ViewModele exibir o elemento combinávelMarsPhotosApp.
4. Introdução aos serviços da Web
Neste codelab, você vai criar uma camada para o serviço de rede que se comunica com o servidor de back-end e busca os dados necessários. Para implementar essa tarefa, vamos usar uma biblioteca de terceiros, a Retrofit (em inglês). Você vai aprender sobre essa biblioteca mais adiante. Com ela, o ViewModel se comunica com a camada de dados, e essa implementação é refletida no restante do app.

O MarsViewModel é responsável por fazer a chamada de rede para acessar os dados de fotos de Marte. No ViewModel, use MutableState para atualizar a IU do app quando os dados mudarem.
5. Serviços da Web e Retrofit
Os dados de fotos de Marte são armazenados em um servidor da Web. Para acessar esses dados no app, é necessário estabelecer uma conexão e se comunicar com o servidor na Internet.


Atualmente, a maioria dos servidores on-line executa serviços desse tipo usando uma arquitetura da Web sem estado comum conhecida como REST (link em inglês), que significa REpresentional State Transfer (Transferência de Estado Representacional, em inglês). Os serviços da Web que oferecem essa arquitetura são conhecidos como serviços RESTful.
As solicitações são enviadas a serviços RESTful da Web de maneira padronizada, usando identificadores uniformes de recursos (URIs) (link em inglês). Um URI identifica um recurso no servidor por nome, sem revelar o local em que ele se encontra ou o processo para que ele possa ser acessado. Por exemplo, no app desta lição, o URI de servidor a seguir é usado para recuperar os URLs da imagem. O servidor hospeda tanto fotos quanto propriedades imobiliárias de Marte:
android-kotlin-fun-mars-server.appspot.com
Um URL (localizador uniforme de recursos) é um subconjunto de um URI que especifica o local em que um recurso se encontra e o mecanismo necessário para acessá-lo.
Exemplo:
O URL a seguir acessa uma lista de todas as propriedades imobiliárias disponíveis em Marte:
https://android-kotlin-fun-mars-server.appspot.com/realestate
O URL a seguir acessa uma lista de fotos de Marte:
https://android-kotlin-fun-mars-server.appspot.com/photos
Esses URLs representam um recurso identificado, como /realestate ou /photos, que pode ser encontrado pelo protocolo de transferência de hipertexto (http:) da rede. Neste codelab, estamos usando o endpoint /photos. Um endpoint é um URL que permite acessar um serviço da Web executado em um servidor.
Solicitação de serviço da Web
Cada solicitação de serviço da Web contém um URI e é transferida para o servidor usando o mesmo protocolo HTTP usado por navegadores da Web, como o Chrome. As solicitações HTTP contêm uma operação para informar ao servidor o que fazer.
Operações HTTP comuns incluem:
- GET, para fazer download de dados do servidor.
- POST, para criar novos dados no servidor.
- PUT, para atualizar os dados existentes no servidor.
- DELETE, para excluir dados do servidor.
Nesse caso, o app faz uma solicitação HTTP GET ao servidor para receber informações de fotos de Marte e, como resposta, o servidor envia os URLs das imagens ao app.


As respostas de serviços da Web usam os formatos de dados mais comuns, como XML (eXtensible Markup Language) ou JSON (JavaScript Object Notation). O formato JSON representa dados estruturados em pares de chave-valor. Os apps usam JSON para se comunicar com a API REST, como veremos em uma tarefa mais adiante.
Nesta tarefa, você vai estabelecer uma conexão de rede, se comunicar com o servidor e receber uma resposta JSON. Você vai usar um servidor de back-end pré-criado. Neste codelab, vamos usar a biblioteca Retrofit, uma biblioteca de terceiros implementada para se comunicar com o servidor de back-end.
Bibliotecas externas
Bibliotecas externas ou bibliotecas de terceiros são extensões das principais APIs do Android. As bibliotecas usadas neste curso são de código aberto, desenvolvidas e mantidas por contribuições coletivas da grande comunidade Android em todo o mundo. Com esses recursos, desenvolvedores Android como você podem criar apps melhores.
Biblioteca Retrofit
A biblioteca Retrofit usada neste codelab para se comunicar com o serviço RESTful da web é um bom exemplo de uma biblioteca com bastante apoio e mantida pela comunidade. Para descobrir se esse é o caso de uma biblioteca, consulte a página dela no GitHub e analise os problemas em aberto e os resolvidos. Alguns desses são solicitações de recursos. Se os desenvolvedores resolvem os problemas e respondem às solicitações de recursos regularmente, isso significa que a biblioteca tem manutenção adequada e é uma boa candidata para uso no app. Você também pode consultar a documentação da Retrofit (links em inglês) para saber mais sobre ela.
A biblioteca Retrofit se comunica com o back-end REST. Ela gera o código, mas é necessário fornecer os URIs do serviço da Web de acordo com os parâmetros transmitidos. Vamos falar mais sobre esse assunto em outras seções.

Adicionar dependências da Retrofit
O Android Gradle permite adicionar bibliotecas externas ao projeto. Além da dependência da biblioteca, você também precisa incluir o repositório em que a biblioteca está hospedada.
- Abra o arquivo do Gradle
build.gradle.kts (Module :app)no módulo. - Na seção
dependencies, adicione as linhas abaixo para as bibliotecas da Retrofit:
// Retrofit
implementation("com.squareup.retrofit2:retrofit:2.9.0")
// Retrofit with Scalar Converter
implementation("com.squareup.retrofit2:converter-scalars:2.9.0")
As duas bibliotecas trabalham juntas. A primeira dependência é para a biblioteca Retrofit2, e a segunda é para o conversor escalar da Retrofit. A Retrofit2 é a versão atualizada da biblioteca Retrofit. Esse conversor escalar permite que a Retrofit retorne o resultado JSON como uma String. JSON é o formato usado para o armazenamento e transporte de dados entre o cliente e o servidor. Você vai aprender sobre esse formato em outra seção.
- Clique em Sync Now para recriar o projeto com as novas dependências.
6. Como se conectar à Internet
Você vai usar a biblioteca Retrofit para se comunicar com o serviço da Web de imagens de Marte e exibir a resposta JSON bruta em uma String. Como resposta, o marcador de posição Text exibe a string JSON retornada ou uma mensagem indicando um erro de conexão.
A Retrofit cria uma API de rede para o app com base no conteúdo do serviço da Web. Ela busca dados do serviço da Web e os transmite usando uma biblioteca de conversor separada, que sabe como decodificar e retornar esses dados na forma de objetos, como uma String. Essa biblioteca oferece suporte integrado a formatos de dados conhecidos, por exemplo, XML e JSON. Além disso, ela cria o código para chamar e consumir esse serviço, incluindo detalhes importantes, por exemplo, executar solicitações em linhas de execução de segundo plano.

Nesta tarefa, você vai adicionar uma camada de dados ao projeto Mars Photos. Ela é usada pelo ViewModel para se comunicar com o serviço da Web. Para implementar a API de serviço Retrofit , siga estas etapas:
- Crie uma fonte de dados; nesse caso, a classe
MarsApiService. - Crie um objeto da Retrofit com o URL base e uma fábrica de conversores para converter strings.
- Crie uma interface que explique como a Retrofit se comunica com o servidor da Web.
- Crie um serviço Retrofit e exponha a instância ao serviço da API no restante do app.
Implemente as etapas acima:
- Clique com o botão direito do mouse no pacote com.example.marsphotos no painel do projeto Android e selecione New > Package.
- No janela pop-up, adicione network ao final do nome do pacote sugerido.
- Crie um novo arquivo Kotlin no novo pacote "network", com o nome
MarsApiService. - Abra
network/MarsApiService.kt. - Adicione a seguinte constante para o URL base do serviço da Web.
private const val BASE_URL =
   "https://android-kotlin-fun-mars-server.appspot.com"
- Adicione um builder da Retrofit abaixo dessa constante para compilar e criar um objeto Retrofit.
import retrofit2.Retrofit

private val retrofit = Retrofit.Builder()
A Retrofit precisa do URI base do serviço da Web e de uma fábrica de conversores para criar uma API de serviços da Web. O conversor informa à Retrofit o que fazer com os dados recebidos do serviço da Web. Nesse caso, a Retrofit precisa buscar uma resposta JSON do serviço da Web e retorná-la como uma String. A Retrofit tem um ScalarsConverter com suporte para strings e outros tipos primitivos.
- Chame
addConverterFactory()no builder com uma instância deScalarsConverterFactory.
import retrofit2.converter.scalars.ScalarsConverterFactory

private val retrofit = Retrofit.Builder()
   .addConverterFactory(ScalarsConverterFactory.create())
- Adicione o URL de base do serviço da Web usando o método
baseUrl(). - Por fim, chame
build()para criar o objeto da Retrofit.
private val retrofit = Retrofit.Builder()
   .addConverterFactory(ScalarsConverterFactory.create())
   .baseUrl(BASE_URL)
   .build()
- Abaixo da chamada para o builder da Retrofit, defina uma interface com o nome
MarsApiService, que estabelece como a Retrofit se comunica com o servidor da Web usando solicitações HTTP.
interface MarsApiService {
}
- Adicione uma função com o nome
getPhotos()à interfaceMarsApiServicepara receber a string de resposta do serviço da Web.
interface MarsApiService {
    fun getPhotos()
}
- Use a anotação
@GETpara informar à Retrofit que esta é uma solicitação GET e especifique o endpoint para esse método de serviço da Web. Nesse caso, o endpoint éphotos. Como mencionado na tarefa anterior, vamos usar o endpoint /photos neste codelab.
import retrofit2.http.GET


interface MarsApiService {
    @GET("photos")
    fun getPhotos()
}
Quando o método getPhotos() é invocado, a Retrofit anexa o endpoint photos ao URL de base usado para iniciar a solicitação e definido no builder da Retrofit.
- Adicione um tipo de retorno da função à
String.
interface MarsApiService {
    @GET("photos")
    fun getPhotos(): String
}
Declarações de objetos
Em Kotlin, as declarações de objetos (link em inglês) são usadas para declarar objetos Singleton. O padrão Singleton (links em inglês) garante que apenas uma instância de um objeto seja criada e tenha um ponto global de acesso a esse objeto. A inicialização de objetos é thread-safe e é feita no primeiro acesso.
Veja abaixo um exemplo de declaração de objeto e como acessá-lo. A declaração de objeto sempre tem um nome depois da palavra-chave object.
Exemplo:
// Example for Object declaration, do not copy over
object SampleDataProvider {
fun register(provider: SampleProvider) {
// ...
}
// ...
}
// To refer to the object, use its name directly.
SampleDataProvider.register(...)
A chamada para a função create() em um objeto da Retrofit exige muita memória, velocidade e performance. Como o app precisa de apenas uma instância do serviço da API Retrofit, você pode usar a declaração de objetos para expor esse serviço ao restante do app.
- Fora da declaração da interface
MarsApiService, defina um objeto público com o nomeMarsApipara inicializar o serviço da Retrofit. Esse objeto é o Singleton público, que pode ser acessado pelo restante do app.
object MarsApi {}
- Na declaração do objeto
MarsApi, adicione uma propriedade de inicialização lenta de objeto da Retrofit com o nomeretrofitServicee o tipoMarsApiService. Essa inicialização lenta serve para garantir que o objeto seja inicializado no primeiro uso. Ignore o erro exibido por enquanto; vamos corrigi-lo nas próximas etapas.
object MarsApi {
    val retrofitService : MarsApiService by lazy {}
}
- Inicialize a variável
retrofitServiceusando o métodoretrofit.create()com a interfaceMarsApiService.
object MarsApi {
    val retrofitService : MarsApiService by lazy {
       retrofit.create(MarsApiService::class.java)
    }
}
A configuração da Retrofit foi concluída. Cada vez que o app chama MarsApi.retrofitService, o autor da chamada acessa o mesmo objeto Singleton da Retrofit que implementa o MarsApiService, criado no primeiro acesso. Na próxima tarefa, você vai usar o objeto da Retrofit implementado.
Chamar o serviço da Web no MarsViewModel
Nesta etapa, você vai implementar o método getMarsPhotos(), que chama o serviço REST e processa a string JSON retornada.
ViewModelScope
Um viewModelScope é o escopo integrado de corrotinas definido para cada ViewModel no app. Qualquer corrotina iniciada nesse escopo vai ser cancelada automaticamente se o ViewModel for limpo.
Você pode usar o viewModelScope para iniciar a corrotina e fazer a solicitação de serviço da Web em segundo plano. Como o viewModelScope pertence ao ViewModel, a solicitação continua mesmo que ocorra uma mudança de configuração no app.
- No arquivo
MarsApiService.kt, transformegetPhotos()em uma função de suspensão para torná-la assíncrona e evitar o bloqueio da linha de execução de chamada. Chame essa função em umviewModelScope.
@GET("photos")
suspend fun getPhotos(): String
- Abra o arquivo
ui/screens/MarsViewModel.kt. Role para baixo até encontrar o métodogetMarsPhotos(). Exclua a linha que define a resposta de status como"Set the Mars API Response here!"para que o métodogetMarsPhotos()fique vazio.
private fun getMarsPhotos() {}
- No método
getMarsPhotos(), inicie a corrotina usandoviewModelScope.launch.
import androidx.lifecycle.viewModelScope
import kotlinx.coroutines.launch


private fun getMarsPhotos() {
    viewModelScope.launch {}
}
- No
viewModelScope, use o objeto SingletonMarsApipara chamar o métodogetPhotos()da interfaceretrofitService. Salve a resposta retornada em umavalcom o nomelistResult.
import com.example.marsphotos.network.MarsApi

viewModelScope.launch {
    val listResult = MarsApi.retrofitService.getPhotos()
}
- Atribua o resultado recebido do servidor de back-end ao
marsUiState. OmarsUiStateé um objeto de estado mutável que representa o status da solicitação da Web mais recente.
val listResult = MarsApi.retrofitService.getPhotos()
marsUiState = listResult
- Execute o app. Ele vai fechar imediatamente e talvez até exiba um pop-up de erro. Isso é uma falha no app.
- Clique na guia Logcat no Android Studio. No registro, há um erro que começa com uma linha assim:
------- beginning of crash.
    --------- beginning of crash
22803-22865/com.example.android.marsphotos E/AndroidRuntime: FATAL EXCEPTION: OkHttp Dispatcher
    Process: com.example.android.marsphotos, PID: 22803
    java.lang.SecurityException: Permission denied (missing INTERNET permission?)
...
Essa mensagem de erro indica que o app pode não ter as permissões de INTERNET. A próxima tarefa descreve como adicionar permissões de Internet ao app para resolver esse problema.
7. Adicionar permissão de Internet e processamento de exceção
Permissões do Android
O objetivo das permissões no Android é proteger a privacidade de um usuário do Android. Os apps Android precisam declarar ou solicitar permissões para acessar dados confidenciais do usuário, como contatos, registros de chamadas e alguns recursos do sistema, por exemplo, a câmera ou a Internet.
Para que o app acesse a Internet, ele precisa da permissão INTERNET. Conectar-se à Internet gera preocupações de segurança. Por isso, os apps não têm conectividade com a Internet por padrão. É necessário declarar explicitamente que o app precisa de acesso à Internet. Essa declaração é considerada uma permissão normal. Para saber mais sobre as permissões no Android e os tipos delas, consulte a página Permissões no Android.
Nesta etapa, seu app declara as permissões necessárias incluindo tags <uses-permission> no arquivo AndroidManifest.xml.
- Abra
manifests/AndroidManifest.xml. Adicione esta linha imediatamente antes da tag<application>:
<uses-permission android:name="android.permission.INTERNET" />
- Compile e execute o app novamente.
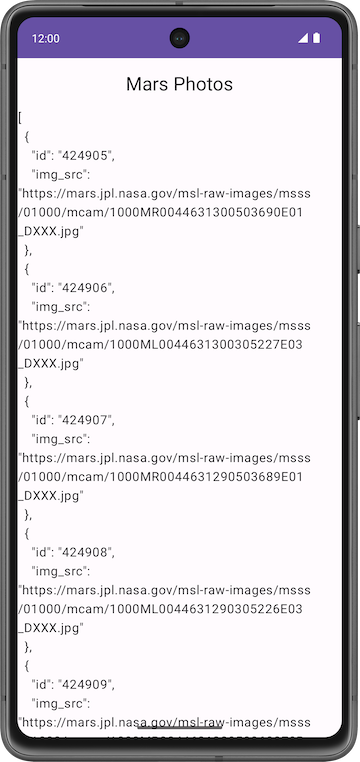
Se a conexão com a Internet estiver funcionando, o app vai exibir o texto JSON contendo dados relacionados às fotos de Marte. Observe que o id e o img_src se repetem para cada imagem. Vamos falar mais sobre o formato JSON mais adiante neste codelab.
- Toque no botão Voltar do dispositivo ou emulador para fechar o app.
Como processar exceções
Há um bug no código. Siga estas etapas para identificá-lo:
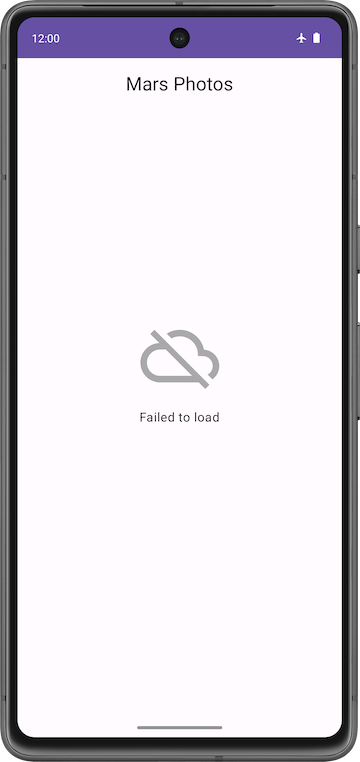
- Coloque o dispositivo ou emulador no modo avião para simular um erro de conexão de rede.
- Abra o app novamente no menu Recentes ou reinicie-o no Android Studio.
- Clique na guia Logcat no Android Studio e observe a exceção fatal no registro, que fica assim:
3302-3302/com.example.android.marsphotos E/AndroidRuntime: FATAL EXCEPTION: main
    Process: com.example.android.marsphotos, PID: 3302
Essa mensagem de erro indica que o app tentou se conectar, mas o tempo expirou. Exceções como essa são muito comuns em situações de uso reais. Diferentemente do problema de permissão, esse erro não pode ser corrigido, mas é possível fazer com que o app consiga processá-lo. Na próxima etapa, você vai aprender a processar essas exceções.
Exceções
Exceções são erros que podem ocorrer durante a execução (não no momento da compilação) e encerram o app de forma abrupta, sem notificar o usuário. Isso pode resultar em uma experiência insatisfatória para o usuário. O processamento de exceções é um mecanismo que impede que o app seja encerrado de forma abrupta e permite resolver a situação de um jeito fácil.
As exceções podem ser causadas por algo simples, por exemplo, uma divisão por zero ou um erro na conexão de rede. Essas exceções são semelhantes à IllegalArgumentException, que apresentamos em um codelab anterior.
Veja alguns exemplos de possíveis problemas ao se conectar a um servidor:
- O URL ou URI usado pela API está incorreto.
- O servidor não está disponível e, por isso, o app não conseguiu se conectar a ele.
- Problema de latência da rede.
- Conexão de Internet ruim ou inexistente no dispositivo.
Não é possível identificar essas exceções no momento da compilação, mas você pode usar um bloco try-catch para fazer o processamento delas durante a execução. Para saber mais, consulte Exceções (link em inglês).
Exemplo de sintaxe para o bloco try-catch
try {
    // some code that can cause an exception.
}
catch (e: SomeException) {
    // handle the exception to avoid abrupt termination.
}
No bloco try, adicione o código em que você prevê uma exceção. No caso desse app, na chamada de rede. No bloco catch, implemente o código que impede o encerramento abrupto do app. Assim, se houver uma exceção, o bloco catch vai ser executado para recuperar o app do erro, impedindo que ele seja encerrado abruptamente.
- Em
getMarsPhotos(), no blocolaunch, adicione um blocotryao redor da chamadaMarsApipara processar exceções. - Adicione um bloco
catchdepois dotry.
import java.io.IOException


viewModelScope.launch {
   try {
       val listResult = MarsApi.retrofitService.getPhotos()
       marsUiState = listResult
   } catch (e: IOException) {

   }
}
- Execute o app de novo. Dessa vez, ele não vai falhar.
Adicionar uma IU de estado
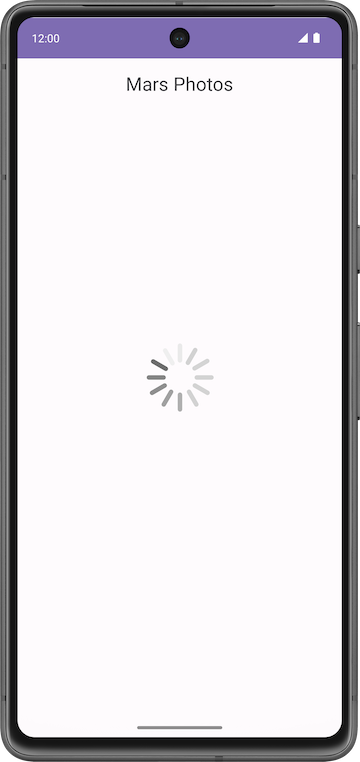
Na classe MarsViewModel, o status da solicitação da Web mais recente, marsUiState, é salvo como um objeto de estado mutável. No entanto, essa classe não consegue salvar os diferentes status: "loading", "success" e "failure".
- O status loading indica que o app está aguardando dados.
- O status success indica que os dados foram transferidos do serviço da Web.
- O status failure indica erros de rede ou de conexão.
Para representar esses três estados no aplicativo, use uma interface selada. Uma sealed interface facilita o gerenciamento do estado, limitando os valores possíveis. No app Mars Photos, restrinja a resposta da Web de marsUiState a três estados, ou objetos de classe de dados: "loading", "success" e "failure". O código vai ficar assim:
// No need to copy over
sealed interface MarsUiState {
   data class Success : MarsUiState
   data class Loading : MarsUiState
   data class Error : MarsUiState
}
No snippet de código acima, no caso de uma resposta positiva, o app vai receber informações sobre fotos de Marte do servidor. Para armazenar os dados, adicione um parâmetro construtor à classe de dados Success.
No caso dos estados Loading e Error, não é necessário definir novos dados nem criar objetos, já que você apenas transmite a resposta da Web. Para criar objetos para as respostas da Web, mude a classe data para Object.
- Abra o arquivo
ui/MarsViewModel.kt. Adicione a interface seladaMarsUiStateapós as instruções de importação. Assim, os valores que podem ser atribuídos ao objetoMarsUiStatevão ficar completos.
sealed interface MarsUiState {
    data class Success(val photos: String) : MarsUiState
    object Error : MarsUiState
    object Loading : MarsUiState
}
- Na classe
MarsViewModel, atualize a definição demarsUiState. Mude o tipo paraMarsUiStateeMarsUiState.Loadingcomo padrão. Defina o setter como particular, para proteger as gravações nomarsUiState.
var marsUiState: MarsUiState by mutableStateOf(MarsUiState.Loading)
  private set
- Role para baixo até encontrar o método
getMarsPhotos(). Atualize o valor demarsUiStateparaMarsUiState.Successe transmitalistResult.
val listResult = MarsApi.retrofitService.getPhotos()
marsUiState = MarsUiState.Success(listResult)
- No bloco
catch, gerencie a resposta da falha. DefinaMarsUiStatecomoError.
catch (e: IOException) {
   marsUiState = MarsUiState.Error
}
- Você pode remover a atribuição
marsUiStatedo blocotry-catch. A função concluída vai ficar assim:
private fun getMarsPhotos() {
   viewModelScope.launch {
       marsUiState = try {
           val listResult = MarsApi.retrofitService.getPhotos()
           MarsUiState.Success(listResult)
       } catch (e: IOException) {
           MarsUiState.Error
       }
   }
}
- No arquivo
screens/HomeScreen.kt, adicione uma expressãowhenaomarsUiState. Se omarsUiStateforMarsUiState.Success, chameResultScreene transmitamarsUiState.photos. Ignore os erros por enquanto.
import androidx.compose.foundation.layout.fillMaxWidth

fun HomeScreen(
   marsUiState: MarsUiState,
   modifier: Modifier = Modifier
) {
    when (marsUiState) {
        is MarsUiState.Success -> ResultScreen(
            marsUiState.photos, modifier = modifier.fillMaxWidth()
        )
    }
}
- No bloco
when, adicione verificações paraMarsUiState.LoadingeMarsUiState.Error. O app mostra os elementos combináveisLoadingScreen,ResultScreeneErrorScreen, que vão ser implementados depois.
import androidx.compose.foundation.layout.fillMaxSize

fun HomeScreen(
   marsUiState: MarsUiState,
   modifier: Modifier = Modifier
) {
    when (marsUiState) {
        is MarsUiState.Loading -> LoadingScreen(modifier = modifier.fillMaxSize())
        is MarsUiState.Success -> ResultScreen(
            marsUiState.photos, modifier = modifier.fillMaxWidth()
        )

        is MarsUiState.Error -> ErrorScreen( modifier = modifier.fillMaxSize())
    }
}
- Abra
res/drawable/loading_animation.xml. Esse drawable é uma animação que gira um drawable de imagem,loading_img.xml, ao redor do ponto central. Essa animação não vai ser mostrada na visualização.

- No arquivo
screens/HomeScreen.kt, abaixo do elementoHomeScreen, adicione a função combinávelLoadingScreenpara mostrar a animação de carregamento. O recurso drawableloading_imgestá incluído no código inicial.
import androidx.compose.ui.res.painterResource
import androidx.compose.ui.unit.dp
import androidx.compose.foundation.layout.size
import androidx.compose.foundation.Image


@Composable
fun LoadingScreen(modifier: Modifier = Modifier) {
    Image(
        modifier = modifier.size(200.dp),
        painter = painterResource(R.drawable.loading_img),
        contentDescription = stringResource(R.string.loading)
    )
}
- Abaixo do elemento
LoadingScreen, adicione a função combinávelErrorScreenabaixo para que o app possa mostrar a mensagem de erro.
import androidx.compose.foundation.layout.Arrangement
import androidx.compose.foundation.layout.Column
import androidx.compose.foundation.layout.padding

@Composable
fun ErrorScreen(modifier: Modifier = Modifier) {
    Column(
        modifier = modifier,
        verticalArrangement = Arrangement.Center,
        horizontalAlignment = Alignment.CenterHorizontally
    ) {
        Image(
            painter = painterResource(id = R.drawable.ic_connection_error), contentDescription = ""
        )
        Text(text = stringResource(R.string.loading_failed), modifier = Modifier.padding(16.dp))
    }
}
- Execute o app mais uma vez com o modo avião ativado. Observe que ele não fecha de forma abrupta, e sim mostra esta mensagem de erro:
- Desative o modo avião no smartphone ou emulador. Execute e teste o app. Confira se tudo está funcionando corretamente e se você consegue ver a string JSON.
|
|
8. Analisar a resposta JSON com kotlinx.serialization
JSON
Os dados solicitados normalmente são formatados em um dos formatos de dados comuns, como XML ou JSON. Cada chamada retorna dados estruturados, e o app precisa identificar cada estrutura para conseguir ler os dados da resposta recebida.
O app deste codelab, por exemplo, acessa os dados do servidor https://android-kotlin-fun-mars-server.appspot.com/photos. Ao digitar esse URL no navegador, você vai encontrar uma lista de IDs e URLs de imagens da superfície de Marte em formato JSON.
Estrutura de um exemplo de resposta JSON:

A estrutura de uma resposta JSON apresenta os seguintes recursos:
- A resposta JSON é uma matriz, indicada por colchetes. A matriz contém objetos JSON.
- Os objetos JSON ficam entre chaves.
- Cada objeto JSON contém um conjunto de pares de chave-valor separados por vírgula.
- A chave e o valor em um par são separados por dois-pontos.
- Os nomes ficam entre aspas.
- Os valores podem ser números, strings, booleanos, uma matriz, um objeto (objeto JSON) ou nulo.
Por exemplo, img_src é um URL, que é uma string. Ao colar o URL em um navegador da Web, você abre uma imagem da superfície de Marte.

O app agora recebe uma resposta JSON do serviço da Web com imagens de Marte, o que é um ótimo começo. Contudo, para mostrar essas imagens, você precisa de objetos Kotlin, e não de uma grande string JSON. Esse processo é chamado de desserialização.
A serialização é o processo de converter os dados usados por um aplicativo em um formato que possa ser transferido pela rede. Ao contrário da serialização, a desserialização é o processo de ler os dados de uma fonte externa, por exemplo, um servidor, e convertê-los em um objeto usado no ambiente de execução. Ambos são componentes essenciais para a maioria dos aplicativos que transmitem dados usando uma rede.
O kotlinx.serialization oferece conjuntos de bibliotecas que convertem uma string JSON em objetos Kotlin. Existe também uma biblioteca desenvolvida pela comunidade que funciona com a Retrofit: a biblioteca Kotlin Serialization Converter (link em inglês).
Nesta tarefa, você vai usar a biblioteca kotlinx.serialization para transformar a resposta JSON do serviço da Web em objetos Kotlin que representem as fotos de Marte e que possam ser usados pelo app. Para isso, é necessário fazer uma modificação no app para que ele mostre o número de fotos de Marte retornadas, em vez da resposta JSON bruta.
Adicionar dependências da biblioteca kotlinx.serialization
- Abra
build.gradle.kts (Module :app). - No bloco
plugins, adicione o plug-inkotlinx serialization.
id("org.jetbrains.kotlin.plugin.serialization") version "1.8.10"
- Na seção
dependencies, adicione o código a seguir para incluir a dependênciakotlinx.serialization. Essa dependência fornece serialização JSON para projetos Kotlin.
// Kotlin serialization
implementation("org.jetbrains.kotlinx:kotlinx-serialization-json:1.5.1")
- Localize as linhas do conversor escalar da Retrofit no bloco
dependenciese modifique essa dependência para que ela usekotlinx-serialization-converter:
Substitua este código
// Retrofit with scalar Converter
implementation("com.squareup.retrofit2:converter-scalars:2.9.0")
pelo código a seguir
// Retrofit with Kotlin serialization Converter

implementation("com.jakewharton.retrofit:retrofit2-kotlinx-serialization-converter:1.0.0")
implementation("com.squareup.okhttp3:okhttp:4.11.0")
- Clique em Sync Now para recriar o projeto com as novas dependências.
Implementar a classe de dados de Fotos de Marte
Confira um exemplo de entrada da resposta JSON recebida do serviço da Web, parecido com o que mostramos anteriormente:
[
    {
        "id":"424906",
        "img_src":"http://mars.jpl.nasa.gov/msl-raw-images/msss/01000/mcam/1000ML0044631300305227E03_DXXX.jpg"
    },
...]
No exemplo acima, cada entrada de foto de Marte tem os seguintes pares de chave e valor JSON:
id: o ID da propriedade, como uma string. Por estar entre aspas (" "), ele é do tipoString, e nãoInteger.img_src: o URL da imagem, como uma string.
O kotlinx.serialization analisa esses dados JSON e os converte em objetos Kotlin. Para fazer isso, o kotlinx.serialization precisa ter uma classe de dados Kotlin em que ele possa armazenar os resultados analisados. Por esse motivo, você vai criar a classe de dados MarsPhoto nesta etapa.
- Clique com o botão direito do mouse no pacote network e selecione New > Kotlin File/Class.
- Na caixa de diálogo exibida, selecione Class e digite
MarsPhotocomo o nome da classe. Isso criará um novo arquivo com o nomeMarsPhoto.ktno pacotenetwork. - Transforme a classe
MarsPhotoem uma classe de dados adicionando a palavra-chavedataantes da definição dela. - Troque as chaves
{}por parênteses(). Isso vai gerar um erro, já que as classes de dados precisam ter pelo menos uma propriedade definida.
data class MarsPhoto()
- Adicione as seguintes propriedades à definição da classe
MarsPhoto.
data class MarsPhoto(
    val id: String,  val img_src: String
)
- Adicione a anotação
@Serializablepara tornar a classeMarsPhotoserializável.
import kotlinx.serialization.Serializable

@Serializable
data class MarsPhoto(
    val id: String,  val img_src: String
)
Cada uma das variáveis na classe MarsPhoto corresponde a um nome de chave no objeto JSON. Para corresponder aos tipos da nossa resposta JSON específica, use objetos String para todos os valores.
Ao analisar a resposta JSON, a kotlinx serialization faz a correspondência das chaves por nome e preenche os objetos de dados com os valores corretos.
Anotação @SerialName
Às vezes, os nomes das chaves em uma resposta JSON podem gerar propriedades Kotlin confusas ou que não correspondam ao estilo recomendado de programação. Por exemplo, no arquivo JSON, a chave img_src usa um sublinhado, quando a convenção Kotlin para propriedades determina o uso de letras maiúsculas e minúsculas (letras concatenadas).
Para usar nomes de variáveis na sua classe de dados que sejam diferentes dos nomes de chave da resposta JSON, use a anotação @SerialName. No exemplo a seguir, o nome da variável na classe de dados é imgSrc. A variável pode ser mapeada para o atributo JSON img_src usando @SerialName(value = "img_src").
- Substitua a linha da chave
img_srcpela linha mostrada abaixo.
import kotlinx.serialization.SerialName

@SerialName(value = "img_src")
val imgSrc: String
Atualizar MarsApiService e MarsViewModel
Nesta tarefa, você vai usar o conversor kotlinx.serialization para converter o objeto JSON em objetos Kotlin.
- Abra
network/MarsApiService.kt. - Observe que há erros de referência não resolvidos na
ScalarsConverterFactory. Eles ocorrem devido à mudança da dependência da Retrofit feita em uma seção anterior. - Exclua a importação de
ScalarConverterFactory. Vamos corrigir o outro erro mais adiante.
Remova:
import retrofit2.converter.scalars.ScalarsConverterFactory
- Na declaração do objeto
retrofit, mude o builder da Retrofit para usarkotlinx.serialization, em vez deScalarConverterFactory.
import com.jakewharton.retrofit2.converter.kotlinx.serialization.asConverterFactory
import kotlinx.serialization.json.Json
import okhttp3.MediaType

private val retrofit = Retrofit.Builder()
        .addConverterFactory(Json.asConverterFactory("application/json".toMediaType()))
        .baseUrl(BASE_URL)
        .build()
Agora que você implementou a kotlinx.serialization, peça à Retrofit para retornar uma lista de objetos MarsPhoto da matriz JSON, em vez de retornar uma string JSON.
- Atualize a interface
MarsApiServicepara que a Retrofit retorne uma lista de objetosMarsPhoto, e não umaString.
interface MarsApiService {
    @GET("photos")
    suspend fun getPhotos(): List<MarsPhoto>
}
- Faça mudanças desse mesmo tipo no
viewModel. AbraMarsViewModel.kte role para baixo até o métodogetMarsPhotos().
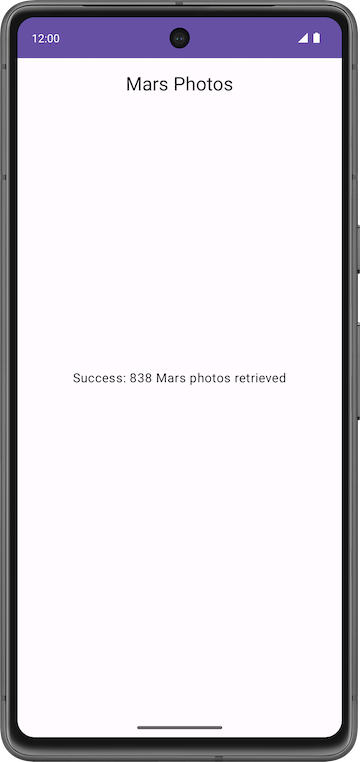
No método getMarsPhotos(), listResult é um List<MarsPhoto>, e não uma String. O tamanho dessa lista é o número de fotos que foram recebidas e analisadas.
- Para mostrar o número de fotos encontradas, atualize
marsUiStatedesta forma:
val listResult = MarsApi.retrofitService.getPhotos()
marsUiState = MarsUiState.Success(
   "Success: ${listResult.size} Mars photos retrieved"
)
- Confira se o modo avião está desativado no dispositivo ou emulador. Compile e execute o app.
Desta vez, a mensagem vai mostrar o número de propriedades retornadas do serviço da Web, e não uma grande string JSON:
9. Código da solução
Para fazer o download do código do codelab concluído, use estes comandos git:
$ git clone https://github.com/google-developer-training/basic-android-kotlin-compose-training-mars-photos.git
$ cd basic-android-kotlin-compose-training-mars-photos
$ git checkout repo-starter
Se preferir, você pode baixar o repositório como um arquivo ZIP, descompactar e abrir no Android Studio.
Confira o código da solução deste codelab no GitHub (link em inglês).
10. Resumo
Serviços REST da Web
- Um serviço da Web é uma funcionalidade baseada em software oferecida pela Internet que permite que o app faça solicitações e receba dados como resposta.
- Os serviços comuns da Web usam uma arquitetura REST (link em inglês). Os serviços da Web que oferecem arquitetura REST são conhecidos como serviços RESTful. Serviços RESTful da Web são criados usando componentes e protocolos padrão da Web.
- A solicitação é enviada a um serviço REST da web de maneira padronizada, usando URIs.
- Para usar um serviço da Web, um app precisa estabelecer uma conexão de rede e se comunicar com o serviço. Em seguida, o app precisa receber e analisar os dados de resposta em um formato que ele possa usar.
- A Retrofit (link em inglês) é uma biblioteca de cliente que permite que o app faça solicitações a um serviço REST da web.
- Use os conversores para informar à Retrofit o que fazer com os dados que ela envia ao serviço da Web e os dados que recebe desse serviço. Por exemplo, o conversor
ScalarsConvertertrata os dados do serviço da Web como umaStringou outro primitivo. - Para permitir que seu app faça conexões com a Internet, adicione a permissão
"android.permission.INTERNET"ao manifesto do Android. - A inicialização lenta determina que um objeto seja criado na primeira vez for usado. Ou seja, ela cria a referência, mas não o objeto. Quando um objeto é acessado pela primeira vez, uma referência é criada e usada sempre que isso ocorrer.
Análise JSON
- As respostas de serviços da Web geralmente usam o formato JSON, um formato comum para representar dados estruturados.
- Um objeto JSON é uma coleção de pares de chave-valor.
- Uma coleção de objetos JSON é uma matriz JSON. Você recebe uma matriz JSON como resposta de um serviço da Web.
- As chaves em um par de chave-valor ficam entre aspas. Os valores podem ser números ou strings.
- Em Kotlin, as ferramentas de serialização de dados estão disponíveis em um componente separado, a kotlinx.serialization (link em inglÊs). A kotlinx.serialization oferece conjuntos de bibliotecas que convertem uma string JSON em objetos Kotlin.
- A biblioteca Kotlin Serialization Converter, desenvolvida pela comunidade, funciona com a Retrofit: retrofit2-kotlinx-serialization-converter (link em inglês).
- A kotlinx.serialization combina as chaves em uma resposta JSON com as propriedades de um objeto de dados com o mesmo nome.
- Para usar um nome de propriedade diferente para uma chave, adicione a anotação
@SerialNamee a chave JSONvaluea essa propriedade.
11. Saiba mais
Documentação para desenvolvedores Android:
Documentação do Kotlin:
- Exceções: try, catch, finally, throw, nothing (link em inglês)
- Documentação oficial de corrotinas (link em inglês)
- Contexto e agentes de corrotinas (link em inglês)
- Serialização | Kotlin (link em inglês)
Outro:
- Retrofit (link em inglês)
- Converter.Factory da Retrofit 2 para serialização em Kotlin (link em inglês)