
1. Introdução
Por décadas, os programadores desenvolveram vários recursos de linguagem de programação para ajudar a criar códigos melhores. Alguns exemplos são a possibilidade de expressar a mesma ideia com menos código, usar abstração para expressar ideias complexas e programar código que evita que outros desenvolvedores cometam erros acidentalmente. O mesmo ocorre com a linguagem Kotlin, que oferece vários recursos para ajudar desenvolvedores a programar códigos mais expressivos.
Infelizmente, esses recursos podem complicar o processo para programadores de primeira viagem. Embora possam parecer úteis, algumas vezes pode ser difícil perceber quais são os problemas que eles resolvem e o quanto é vantajoso utilizá-los. É provável que você já tenha visto alguns recursos usados no Compose e em outras bibliotecas.
Nada substitui a experiência, mas este codelab apresenta vários conceitos do Kotlin que ajudam a estruturar apps maiores:
- Genéricos
- Diferentes tipos de classes (classes de enumeração e classes de dados)
- Objetos singleton e complementares
- Propriedades e funções de extensão
- Funções de escopo
Ao final deste codelab, você vai aumentar seu conhecimento sobre os códigos que já estudou neste curso e conferir alguns exemplos de onde encontrar ou usar esses conceitos nos seus apps.
Pré-requisitos
- Conhecer os conceitos de programação orientada a objetos, incluindo o conceito de herança.
- Saber como definir e implementar interfaces.
O que você vai aprender
- Como definir um parâmetro de tipo genérico para uma classe.
- Como instanciar uma classe genérica.
- Quando usar classes de enumeração e de dados.
- Como definir um parâmetro de tipo genérico que precisa implementar uma interface.
- Como usar funções de escopo para acessar propriedades e métodos de classe.
- Como definir objetos singleton e complementares para uma classe.
- Como ampliar classes existentes incluindo novas propriedades e métodos.
O que é necessário
- Um navegador da Web com acesso ao Playground Kotlin.
2. Criar uma classe reutilizável com genéricos
Imagine que você está criando um app para fazer um teste on-line, parecido com os testes que já viu neste curso. Existem muitos tipos de perguntas nesses testes, como pedir para a pessoa preencher as lacunas, escolher entre verdadeiro ou falso, entre outros. Uma pergunta do teste pode ser representada por uma classe, com várias propriedades.
O texto da pergunta pode ser representado por uma string, e cada pergunta do teste também precisa representar a respectiva resposta. No entanto, perguntas de tipos diferentes, como verdadeiro ou falso, podem precisar representar a resposta usando outro tipo de dado. Vamos definir três tipos diferentes de pergunta.
- Preenchimento de lacunas: a resposta é uma palavra representada por uma
String. - Verdadeiro ou falso: a resposta é representada por um
Boolean. - Problemas matemáticos: a resposta é um valor numérico. A resposta para um problema aritmético simples é representada por uma
Int.
Além disso, as perguntas do nosso teste de exemplo também vão ser classificadas por nível de dificuldade, independente do tipo delas. A classificação de dificuldade é representada por uma string com três valores possíveis: "easy" (fácil), "medium" (médio) ou "hard" (difícil).
Defina as classes para representar cada tipo de pergunta do teste:
- Acesse o Playground Kotlin.
- Acima da função
main(), defina uma classe com o nomeFillInTheBlankQuestionpara as perguntas de preencher a lacuna. Ela consiste em uma propriedadeStringpara oquestionText(texto da pergunta), uma propriedadeStringpara aanswer(resposta) e uma propriedadeStringpara adifficulty(dificuldade).
class FillInTheBlankQuestion(
    val questionText: String,
    val answer: String,
    val difficulty: String
)
- Abaixo da classe
FillInTheBlankQuestion, defina outra classe com o nomeTrueOrFalseQuestionpara perguntas de verdadeiro ou falso, que consiste em uma propriedadeStringpara oquestionText, uma propriedadeBooleanpara aanswere uma propriedadeStringpara adifficulty.
class TrueOrFalseQuestion(
    val questionText: String,
    val answer: Boolean,
    val difficulty: String
)
- Por fim, abaixo das outras duas classes, defina uma classe
NumericQuestion, que consiste em uma propriedadeStringpara oquestionText, uma propriedadeIntpara aanswere umaStringpara adifficulty.
class NumericQuestion(
    val questionText: String,
    val answer: Int,
    val difficulty: String
)
- Observe o código que você criou. Percebe como há bastante repetição?
class FillInTheBlankQuestion(
    val questionText: String,
    val answer: String,
    val difficulty: String
)

class TrueOrFalseQuestion(
    val questionText: String,
    val answer: Boolean,
    val difficulty: String
)
class NumericQuestion(
    val questionText: String,
    val answer: Int,
    val difficulty: String
)
As três classes têm exatamente as mesmas propriedades: questionText, answer e difficulty. A única diferença é o tipo de dado da propriedade answer. Você pode pensar que a solução óbvia seria criar uma classe mãe com o questionText e a difficulty, fazendo com que cada subclasse defina a propriedade answer.
No entanto, usar o conceito de herança geraria o mesmo problema acima. Sempre que você adicionar um novo tipo de pergunta, vai precisar adicionar uma propriedade answer. A única diferença é o tipo de dado. Também seria estranho ter uma classe Question mãe que não tivesse uma propriedade de resposta.
Quando você precisa que uma propriedade tenha diferentes tipos de dados, criar subclasses não é a solução. Em vez disso, o Kotlin oferece um recurso conhecido como tipos genéricos que permite que uma única propriedade tenha diferentes tipos de dados, dependendo do caso de uso específico.
O que é um dado de tipo genérico?
Os tipos genéricos, ou genéricos, permitem que um tipo de dado, por exemplo, uma classe, especifique um marcador de posição para um tipo de dado desconhecido. Esse marcador pode ser usado com propriedades ou métodos. O que isso significa?
No exemplo acima, em vez de definir uma propriedade de resposta para cada tipo de dado possível, você pode criar uma única classe para representar qualquer pergunta e usar um marcador para o tipo de dado da propriedade answer. O tipo de dado real, seja String, Int ou Boolean, vai ser especificado quando a classe for instanciada. Sempre que o marcador for usado, o tipo de dado usado será aquele transmitido para a classe. Confira abaixo a sintaxe para definir um tipo genérico para uma classe:
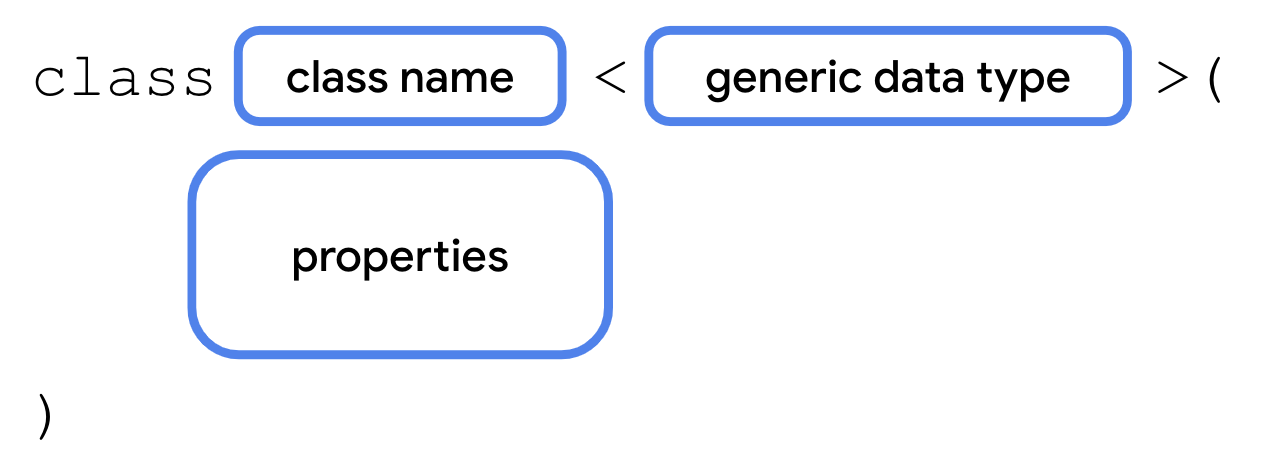
Como um dado de tipo genérico é fornecido ao instanciar a classe, ele precisa ser definido como parte da assinatura da classe. Depois do nome da classe, inserimos um sinal "menor que" (<), seguido por um marcador para o tipo de dado e, finalmente, por um sinal "maior que" (>).
O marcador pode ser usado sempre que você usa um tipo de dado real na classe, como uma propriedade.
Esse processo é idêntico a qualquer outra declaração de propriedade, exceto pelo uso do marcador no lugar do tipo de dados.
E como uma classe sabe qual tipo de dado usar? O tipo de dado usado pelo genérico é transmitido como parâmetro entre os sinais "menor que" e "maior que" ao instanciar a classe.

Depois do nome, inserimos um sinal "menor que" (<), seguido pelo tipo de dado real (String, Boolean, Int ou outro), seguido por um sinal "maior que" (>). O tipo de dado do valor transmitido para a propriedade genérica precisa corresponder ao tipo de dado entre os sinais de "menor que" e "maior que". A propriedade de resposta precisa ser genérica para que seja possível usar uma única classe para representar qualquer tipo de pergunta do teste, independente da resposta ser uma String, um Boolean, um Int ou qualquer outro tipo de dado.
Refatorar o código para usar genéricos
Refatore o código para usar uma única classe com o nome Question (pergunta) com uma propriedade de resposta genérica.
- Remova as definições das classes
FillInTheBlankQuestion,TrueOrFalseQuestioneNumericQuestion. - Crie uma nova classe com o nome
Question.
class Question()
- Depois do nome da classe, mas antes dos parênteses, adicione um parâmetro de tipo genérico usando sinais de "menor que" e "maior que". Dê o nome
Tao tipo genérico.
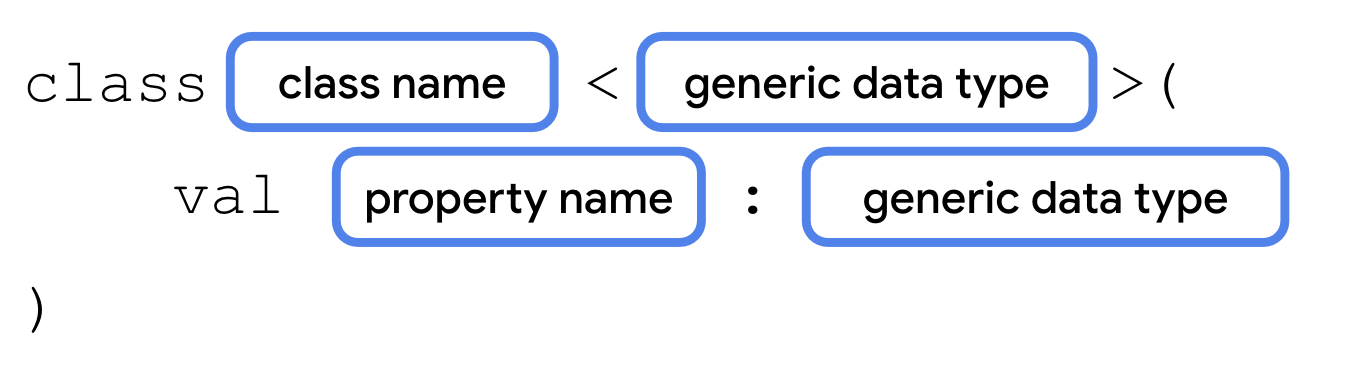
class Question<T>()
- Adicione as propriedades
questionText,answeredifficulty. OquestionTextprecisa ser do tipoString. Aanswerprecisa ser do tipoT, porque o tipo de dado é especificado ao instanciar a classeQuestion. A propriedadedifficultyprecisa ser do tipoString.
class Question<T>(
    val questionText: String,
    val answer: T,
    val difficulty: String
)
- Para conferir como isso funciona com vários tipos de pergunta, seja de preencher lacunas, verdadeiro ou falso ou outra, crie três instâncias da classe
Questionemmain(), conforme mostrado abaixo.
fun main() {
    val question1 = Question<String>("Quoth the raven ___", "nevermore", "medium")
    val question2 = Question<Boolean>("The sky is green. True or false", false, "easy")
    val question3 = Question<Int>("How many days are there between full moons?", 28, "hard")
}
- Execute o app para conferir se tudo está funcionando. Agora você tem três instâncias da classe
Question, cada uma com tipos de dados diferentes para a resposta, ao invés de usar três classes diferentes ou o conceito de herança. Caso queira processar perguntas com um tipo de resposta diferente, você pode reutilizar a mesma classeQuestion.
3. Usar uma classe de enumeração
Na seção anterior, você definiu uma propriedade de dificuldade com três valores possíveis: "fácil", "médio" e "difícil". Embora essas classificações funcionem, há alguns problemas.
- Se você digitar uma das três strings incorretamente, isso pode gerar bugs.
- Se os valores mudarem, por exemplo, se
"medium"(médio) for renomeado como"average"(intermediário), você vai precisar atualizar todos os usos dessa string. - Você ou outro desenvolvedor pode acidentalmente usar uma string diferente, que não seja um dos três valores válidos.
- Vai ser mais difícil fazer a manutenção do código caso você queira adicionar mais níveis de dificuldade.
O Kotlin ajuda a resolver esses problemas com um tipo de classe especial conhecido como classe de enumeração. Essa classe é usada para criar tipos com um conjunto limitado de valores possíveis. Por exemplo, os quatro pontos cardeais (norte, sul, leste e oeste) poderiam ser representadas por uma classe de enumeração. Não é necessário acrescentar nenhuma outra informação, e o código não permite que isso seja feito. A sintaxe de uma classe de tipo enumerado é apresentada abaixo.
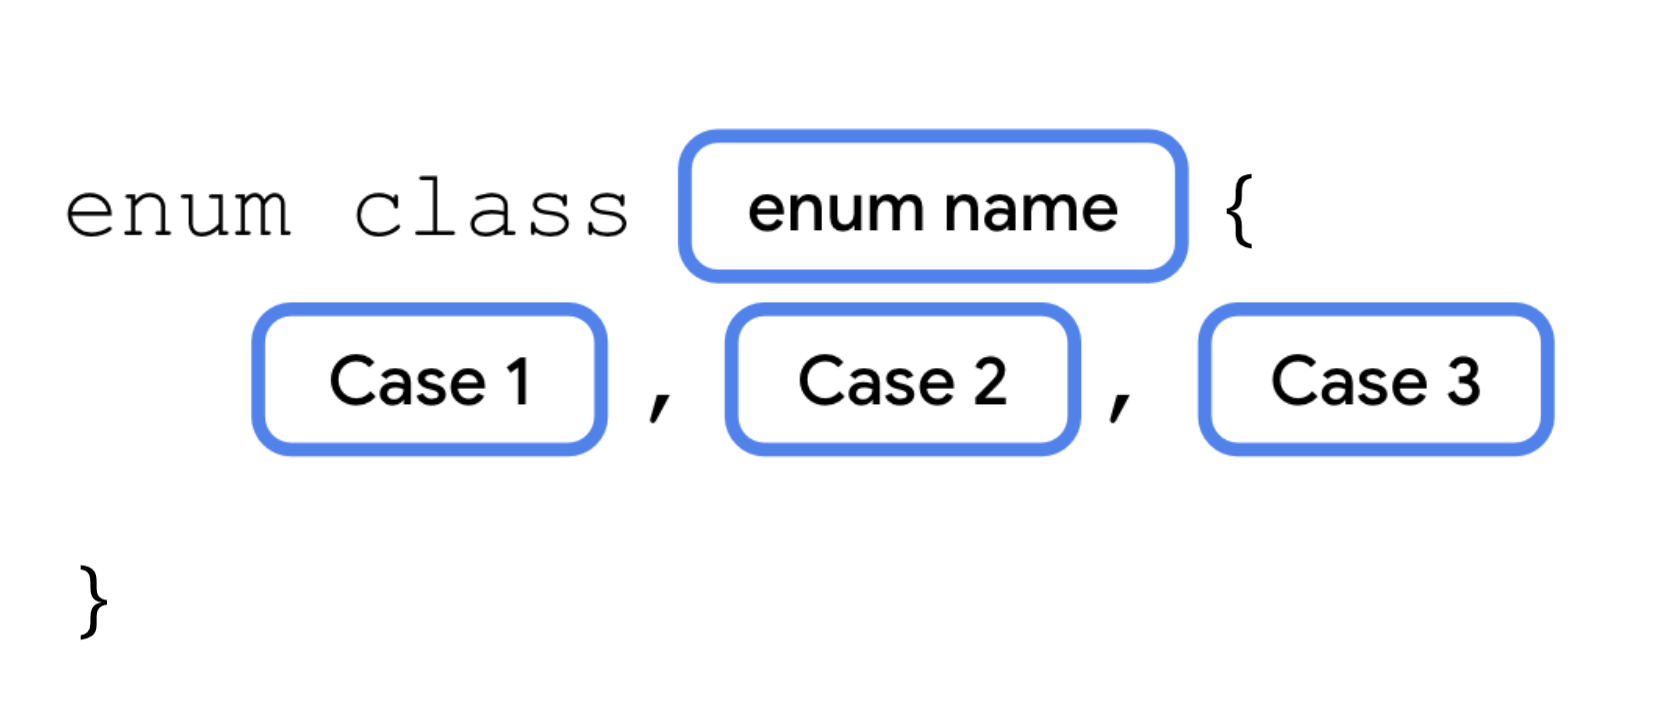
Cada valor possível de um tipo enumerado é chamado de constante. Elas são colocadas dentro das chaves separadas por vírgulas. Por convenção, os nomes de constantes são escritos com todas as letras maiúsculas.
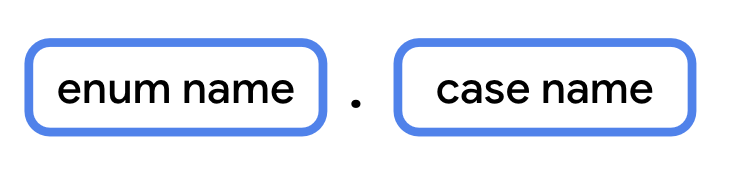
Para se referir a constantes de tipo enumerado, use o operador de ponto.
Usar uma constante de tipo enumerado
Modifique o código para usar uma constante de enumeração para representar o nível de dificuldade, em vez de uma String.
- Abaixo da classe
Question(pergunta), defina uma classe deenumcom o nomeDifficulty(dificuldade).
enum class Difficulty {
    EASY, MEDIUM, HARD
}
- Na classe
Question, mude o tipo de dado da propriedadedifficultydeStringparaDifficulty.
class Question<T>(
    val questionText: String,
    val answer: T,
    val difficulty: Difficulty
)
- Ao inicializar as três perguntas, transmita a constante de enumeração para a dificuldade.
val question1 = Question<String>("Quoth the raven ___", "nevermore", Difficulty.MEDIUM)
val question2 = Question<Boolean>("The sky is green. True or false", false, Difficulty.EASY)
val question3 = Question<Int>("How many days are there between full moons?", 28, Difficulty.HARD)
4. Usar uma classe de dados
Muitas das classes com que trabalhamos até agora, como as subclasses de Activity, oferecem vários métodos para realizar diferentes ações. Essas classes não só representam dados, mas também contêm muitas funcionalidades.
Por outro lado, classes como a Question contêm apenas dados, sem nenhum método que realize uma ação. Elas podem ser definidas como classes de dados. Quando uma classe é definida como sendo de dados, o compilador Kotlin pode fazer algumas suposições sobre ela e implementar alguns métodos de modo automático. Por exemplo, chamar toString() em segundo plano com a função println(). Quando você usa uma classe de dados, toString() e outros métodos são implementados automaticamente de acordo com as propriedades da classe.
Para definir uma classe de dados, basta adicionar a palavra-chave data antes de class.

Converter Question em uma classe de dados
Primeiro, observe o que acontece ao tentar chamar um método como toString() em uma classe que não seja de dados. Depois disso, converta Question em uma classe de dados, para que esse e outros métodos sejam implementados por padrão.
- Na função
main(), mostre o resultado da chamada detoString()naquestion1.
fun main() {
    val question1 = Question<String>("Quoth the raven ___", "nevermore", Difficulty.MEDIUM)
    val question2 = Question<Boolean>("The sky is green. True or false", false, Difficulty.EASY)
    val question3 = Question<Int>("How many days are there between full moons?", 28, Difficulty.HARD)
    println(question1.toString())
}
- Execute o código. A saída mostra apenas o nome da classe e um identificador exclusivo para o objeto.
Question@37f8bb67
- Transforme
Questionem uma classe de dados usando a palavra-chavedata.
data class Question<T>(
    val questionText: String,
    val answer: T,
    val difficulty: Difficulty
)
- Execute o código novamente. Quando a classe é marcada como sendo de dados, o Kotlin pode determinar como mostrar as propriedades da classe ao chamar
toString().
Question(questionText=Quoth the raven ___, answer=nevermore, difficulty=MEDIUM)
Quando uma classe é definida como sendo de dados, os métodos abaixo são implementados.
equals()hashCode(): esse método é encontrado ao trabalhar com alguns tipos de coleção.toString()componentN()(link em inglês):component1(),component2(), entre outros.copy()
5. Usar um objeto singleton
Existem muitos casos em que você pode precisar que uma classe tenha apenas uma instância. Exemplos:
- Estatísticas do jogador atual em um jogo para dispositivos móveis.
- Interações com um único dispositivo de hardware, como enviar áudio para um alto-falante.
- Acesso a uma fonte de dados remota por um objeto (como um banco de dados do Firebase).
- Autenticação, em casos em que apenas um usuário pode estar conectado por vez.
Nos casos acima, você provavelmente vai precisar usar uma classe. No entanto, só é necessário criar uma única instância dela. Isso ocorre porque, se há apenas um dispositivo de hardware ou apenas um usuário conectado por vez, não existe motivo para criar mais de uma instância. Permitir que dois objetos acessem o mesmo dispositivo de hardware simultaneamente pode gerar um comportamento estranho e cheio de bugs.
Para comunicar claramente no código que um objeto precisa apenas de uma instância, defina-o como um singleton. Um singleton é uma classe que pode ter apenas uma instância. O Kotlin oferece uma estrutura especial, conhecida como objeto, que pode ser usada para criar uma classe singleton.
Definir um objeto Singleton
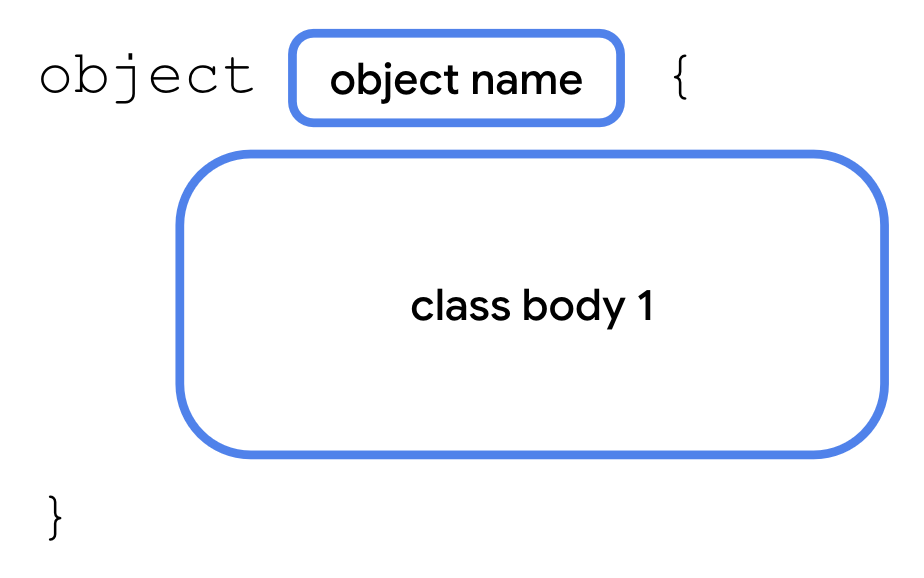
A sintaxe de um objeto é semelhante à de uma classe. Basta usar a palavra-chave object, em vez da palavra-chave class. Um objeto singleton não pode ter um construtor, porque ele não pode criar instâncias diretamente. Em vez disso, todas as propriedades são definidas dentro das chaves e recebem um valor inicial.
Alguns dos exemplos apresentados antes podem não parecer óbvios, principalmente se você ainda não trabalhou com alguns dispositivos de hardware específicos ou ainda não usou a autenticação em apps. Contudo, você vai encontrar os objetos singleton sendo usados cada vez mais à medida que continuar aprendendo sobre o desenvolvimento para Android. Vamos conferir como eles funcionam na prática com um exemplo simples, usando um objeto para o estado do usuário em um caso em que apenas uma instância é necessária.
No caso de um teste, seria ótimo ter uma forma de armazenar o número total de perguntas e quantas perguntas o aluno respondeu até o momento. Como você só precisa que uma instância dessa classe exista, declare-a como um objeto singleton, em vez de declarar como uma classe.
- Crie um objeto com o nome
StudentProgress(progresso do estudante).
object StudentProgress {
}
- Para esse exemplo, vamos supor que existem dez perguntas e que três delas foram respondidas até o momento. Adicione duas propriedades
Int:totalcom um valor10eanswered(respondidas) com um valor3.
object StudentProgress {
    var total: Int = 10
    var answered: Int = 3
}
Acessar um objeto singleton
Não é possível criar uma instância de um objeto singleton diretamente. Então, como você pode acessar as propriedades desse objeto?
Como há apenas uma instância de StudentProgress por vez, você pode acessar as propriedades se referindo ao nome do objeto em si, seguido pelo operador de ponto (.) e, finalmente, pelo nome da propriedade.

Atualize a função main() para acessar as propriedades do objeto Singleton.
- Em
main(), adicione uma chamada paraprintln()que retorna as perguntasansweredetotaldo objetoStudentProgress.
fun main() {
    ...
    println("${StudentProgress.answered} of ${StudentProgress.total} answered.")
}
- Execute o código para conferir se está tudo funcionando.
...
3 of 10 answered.
Declarar objetos como objetos complementares
As classes e os objetos em Kotlin podem ser definidos dentro de outros tipos e podem ser uma ótima maneira de organizar seu código. Você pode definir um objeto singleton dentro de outra classe usando um objeto complementar. Com um objeto complementar, é possível acessar as propriedades e os métodos desse objeto dentro da classe, desde que eles pertençam à classe. Essa sintaxe pode ser mais concisa.
Para declarar um objeto complementar, basta adicionar a palavra-chave companion antes da palavra-chave object.

Você vai criar uma nova classe com o nome Quiz (teste) para armazenar as perguntas do teste e fazer com que StudentProgress seja um objeto complementar da classe Quiz.
- Abaixo da enumeração
Difficulty, defina uma nova classe com o nomeQuiz.
class Quiz {
}
- Mova
question1,question2equestion3demain()para a classeQuiz. Também é necessário removerprintln(question1.toString()), caso ainda não tenha feito isso.
class Quiz {
    val question1 = Question<String>("Quoth the raven ___", "nevermore", Difficulty.MEDIUM)
    val question2 = Question<Boolean>("The sky is green. True or false", false, Difficulty.EASY)
    val question3 = Question<Int>("How many days are there between full moons?", 28, Difficulty.HARD)

}
- Mova o objeto
StudentProgresspara a classeQuiz.
class Quiz {
    val question1 = Question<String>("Quoth the raven ___", "nevermore", Difficulty.MEDIUM)
    val question2 = Question<Boolean>("The sky is green. True or false", false, Difficulty.EASY)
    val question3 = Question<Int>("How many days are there between full moons?", 28, Difficulty.HARD)

    object StudentProgress {
        var total: Int = 10
        var answered: Int = 3
    }
}
- Marque o objeto
StudentProgresscom a palavra-chavecompanion.
companion object StudentProgress {
    var total: Int = 10
    var answered: Int = 3
}
- Atualize a chamada de
println()para passar a se referir às propriedades comQuiz.answeredeQuiz.total. Ainda que essas propriedades sejam declaradas no objetoStudentProgress, elas ainda podem ser acessadas com a notação de ponto usando apenas o nome da classeQuiz.
fun main() {
    println("${Quiz.answered} of ${Quiz.total} answered.")
}
- Execute o código para conferir o resultado.
3 of 10 answered.
6. Ampliar classes com novas propriedades e métodos
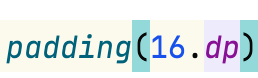
Ao trabalhar com o Compose, talvez você tenha encontrado algumas sintaxes interessantes ao especificar o tamanho dos elementos da IU. Os tipos numéricos, como Double, parecem ter propriedades como dp e sp que especificam dimensões.
Por que será que os desenvolvedores que criaram a linguagem Kotlin incluíram propriedades e funções em tipos de dados integrados, usados especificamente para criar interfaces do Android? Eles conseguiam prever o futuro? O Kotlin foi projetado para ser usado no Compose antes mesmo que ele existisse?
Claro que não. Muitas vezes, ao programar uma classe, não se sabe exatamente como outros desenvolvedores pretendem ou vão usá-la nos apps deles. Não é possível prever todos os casos de uso futuros e não é recomendável adicionar sobrecarga desnecessária ao código para casos inesperados.
O que a linguagem Kotlin oferece aos desenvolvedores é a possibilidade de ampliar os tipos de dados já existentes, adicionando propriedades e métodos que podem ser acessados com a sintaxe de ponto, como se fizessem parte desse tipo de dado. Por exemplo, um desenvolvedor que não trabalhou nos tipos de ponto flutuantes no Kotlin, por exemplo, alguém criando a biblioteca do Compose, pode preferir adicionar propriedades e métodos específicos para processar as dimensões da IU.
Como você já aprendeu sobre essa sintaxe ao estudar o Compose nas duas primeiras unidades, vamos conferir como isso funciona nos bastidores. Você vai adicionar algumas propriedades e métodos para ampliar os tipos existentes.
Adicionar uma propriedade de extensão
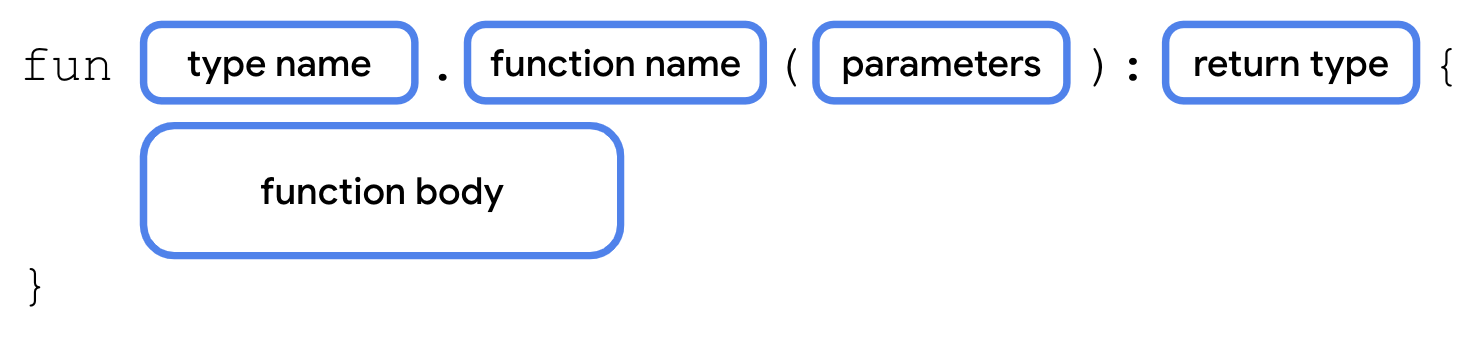
Para definir uma propriedade de extensão, adicione o nome do tipo e um operador de ponto (.) antes do nome da variável.

É necessário refatorar o código na função main() para mostrar o progresso do teste com uma propriedade de extensão.
- Abaixo da classe
Quiz, defina uma propriedade de extensãoQuiz.StudentProgress, com o nomeprogressText(progresso do teste) e o tipoString.
val Quiz.StudentProgress.progressText: String
- Defina um getter para a propriedade de extensão que retorne a mesma string usada anteriormente em
main().
val Quiz.StudentProgress.progressText: String
    get() = "${answered} of ${total} answered"
- Substitua o código na função
main()pelo código que mostraprogressText. Como essa é uma propriedade de extensão do objeto complementar, você pode acessá-la com a notação de ponto usando o nome da classe,Quiz.
fun main() {
    println(Quiz.progressText)
}
- Execute o código para conferir se ele funciona.
3 of 10 answered.
Adicionar uma função de extensão
Para definir uma função de extensão, adicione o nome do tipo e um operador de ponto (.) antes do nome da função.
A função de extensão vai ser adicionada para mostrar uma barra do progresso do teste. Como não é possível criar uma barra de progresso no Playground Kotlin, vamos mostrar uma barra retrô usando texto.
- Adicione uma função de extensão com o nome
printProgressBar()ao objetoStudentProgress. A função não pode ter nenhum parâmetro nem valor de retorno.
fun Quiz.StudentProgress.printProgressBar() {
}
- Mostre o caractere
▓, que corresponde ao número de perguntasanswered, usandorepeat(). A parte escura da barra de progresso representa o número de perguntas respondidas. Como não queremos adicionar uma nova linha depois de cada caractere, useprint().
fun Quiz.StudentProgress.printProgressBar() {
    repeat(Quiz.answered) { print("▓") }
}
- Mostre o caractere
▒, que corresponde à diferença entre os valorestotaleanswered, usandorepeat(). Essa parte clara na barra de progresso representa as perguntas restantes.
fun Quiz.StudentProgress.printProgressBar() {
    repeat(Quiz.answered) { print("▓") }
    repeat(Quiz.total - Quiz.answered) { print("▒") }
}
- Crie uma nova linha usando
println()sem argumentos e, em seguida, mostre oprogressText.
fun Quiz.StudentProgress.printProgressBar() {
    repeat(Quiz.answered) { print("▓") }
    repeat(Quiz.total - Quiz.answered) { print("▒") }
    println()
    println(Quiz.progressText)
}
- Atualize o código na função
main()para chamarprintProgressBar().
fun main() {
    Quiz.printProgressBar()
}
- Execute o código para conferir o resultado.
▓▓▓▒▒▒▒▒▒▒
3 of 10 answered.
Isso é obrigatório? Claro que não. No entanto, com as propriedades e os métodos de extensão, você pode mostrar seu código a outros desenvolvedores de várias formas. O uso da sintaxe de ponto em outros tipos pode facilitar a leitura do código, tanto para você quanto para outros desenvolvedores.
7. Reescrever funções de extensão usando interfaces
Na página anterior, você aprendeu como adicionar propriedades e métodos ao objeto StudentProgress sem adicionar código diretamente a ele, usando propriedades e funções de extensão. Embora essa seja uma ótima maneira de aumentar a funcionalidade de uma classe já definida, nem sempre é necessário ampliar essa classe se você tem acesso ao código-fonte. Além disso, há casos em que você não sabe exatamente o que precisa ser implementado, mas sabe que um determinado método ou propriedade precisa existir. Se várias classes precisam ter os mesmos métodos e propriedades extra, mas com comportamentos diferentes, use uma interface para definir esses métodos e propriedades.
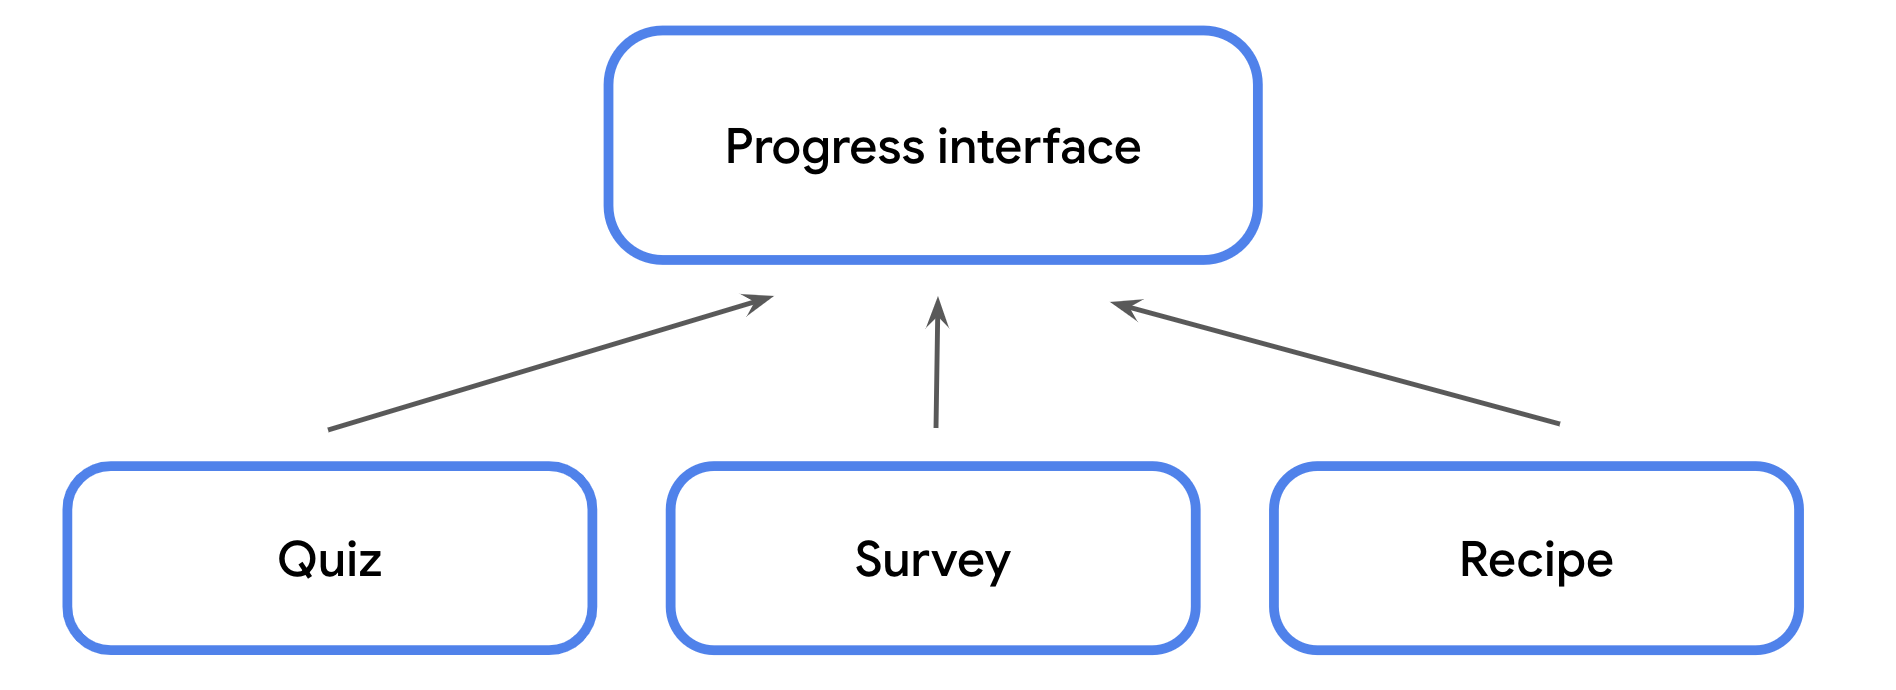
Por exemplo, além dos testes, digamos que você também use classes para pesquisas, etapas de uma receita ou quaisquer outros dados ordenados que possam usar uma barra de progresso. Nesses casos, é possível definir algo conhecido como uma interface, que especifica os métodos e as propriedades que precisam ser incluídos em cada uma dessas classes.
Uma interface é definida usando a palavra-chave interface, seguida de um nome com letras maiúsculas concatenadas e de chaves de abertura e fechamento. Dentro das chaves, você pode definir qualquer assinatura de método ou propriedade somente acesso que precisa ser implementada pelas classes que se enquadram nessa interface.
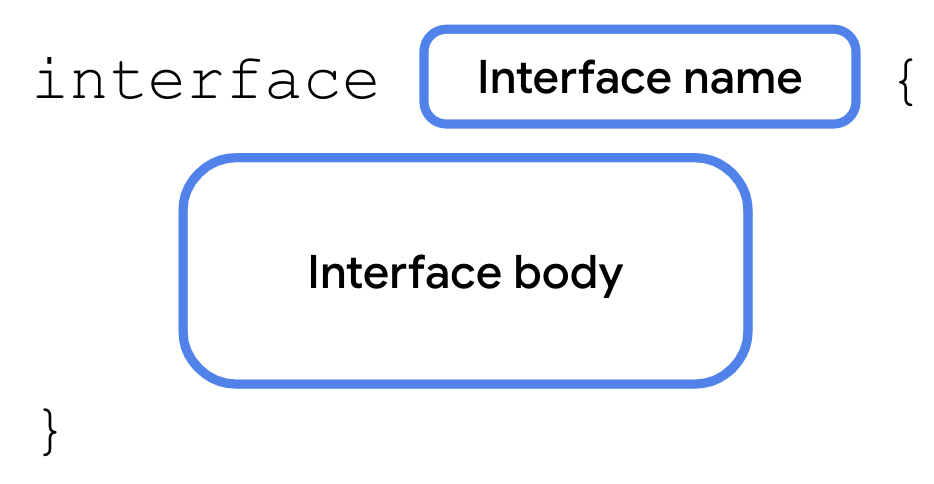
A interface é um contrato. Por isso, consideramos que uma classe que se enquadra em uma interface abrange essa mesma interface. Para declarar que uma classe precisa abranger uma determinada interface, use dois pontos (:), seguidos de espaço e, por fim, do nome da interface.
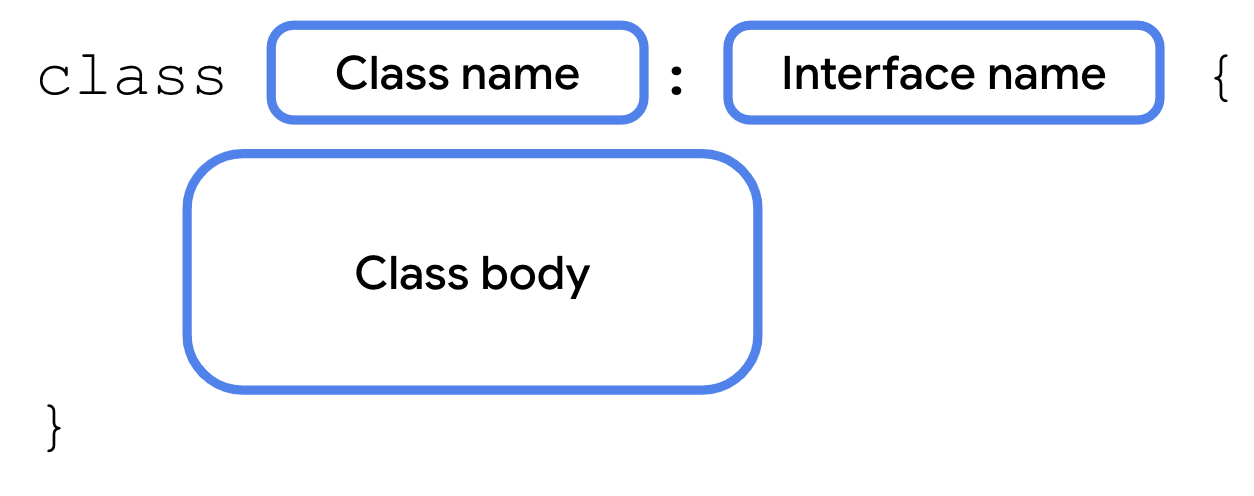
A classe precisa implementar todas as propriedades e todos os métodos especificados na interface. Assim, é possível garantir facilmente que qualquer classe que precise abranger a interface implemente exatamente os mesmos métodos, usando a mesma assinatura do método. Se a interface for modificada de qualquer forma, como ao adicionar ou remover propriedades ou métodos ou mudar uma assinatura de método, o compilador vai exigir que as classes contendo essa interface sejam atualizadas. Isso permite que o código continue sendo consistente e de fácil manutenção.
É possível haver variação de comportamento nas classes que abrangem uma mesma interface. Cabe a cada classe definir sua implementação.
Vamos conferir como reescrever a barra de progresso para usar uma interface e fazer a classe "Quiz" abranger essa mesma interface.
- Acima da classe
Quiz, defina uma interface com o nomeProgressPrintable. Escolhemos o nomeProgressPrintableporque ele permite que qualquer classe contendo esse nome possa mostrar uma barra de progresso.
interface ProgressPrintable {
}
- Na interface
ProgressPrintable, defina uma propriedade com o nomeprogressText.
interface ProgressPrintable {
    val progressText: String
}
- Modifique a declaração da classe
Quizpara abranger a interfaceProgressPrintable.
class Quiz : ProgressPrintable {
    ...
}
- Na classe
Quiz, adicione uma propriedade com o nomeprogressTextdo tipoString, conforme especificado na interfaceProgressPrintable. Como a propriedade é originada daProgressPrintable, inclua a palavra-chave de substituição antes deval.
override val progressText: String
- Copie o getter da antiga propriedade de extensão
progressText.
override val progressText: String
        get() = "${answered} of ${total} answered"
- Remova a antiga propriedade de extensão
progressText.
Código a ser excluído:
val Quiz.StudentProgress.progressText: String
    get() = "${answered} of ${total} answered"
- Na interface
ProgressPrintable, adicione um método com o nomeprintProgressBar, que não usa parâmetros e não tem nenhum valor de retorno.
interface ProgressPrintable {
    val progressText: String
    fun printProgressBar()
}
- Na classe
Quiz, adicione o métodoprintProgressBar()usando a palavra-chaveoverride.
override fun printProgressBar() {
}
- Mova o código da antiga função de extensão
printProgressBar()para a novaprintProgressBar()da interface. Para fazer referência à nova variávelprogressText, modifique a última linha e remova a referência àQuiz.
override fun printProgressBar() {
    repeat(Quiz.answered) { print("▓") }
    repeat(Quiz.total - Quiz.answered) { print("▒") }
    println()
    println(progressText)
}
- Remova a função de extensão
printProgressBar(). Essa funcionalidade agora pertence à classeQuiz, que abrangeProgressPrintable.
Código a ser excluído:
fun Quiz.StudentProgress.printProgressBar() {
    repeat(Quiz.answered) { print("▓") }
    repeat(Quiz.total - Quiz.answered) { print("▒") }
    println()
    println(Quiz.progressText)
}
- Atualize o código em
main(). Como a funçãoprintProgressBar()agora é um método da classeQuiz, é necessário primeiro instanciar um objetoQuize, em seguida, chamarprintProgressBar().
fun main() {
    Quiz().printProgressBar()
}
- Execute o código. O resultado não mudou, mas o código agora está mais modular. À medida que as bases de código aumentarem, vai ser fácil adicionar classes que se enquadrem em uma mesma interface para reutilizar o código, sem que elas sejam herdadas de uma superclasse.
▓▓▓▒▒▒▒▒▒▒
3 of 10 answered.
Existem diversos casos de uso em que as interfaces ajudam a estruturar o código. Você vai começar a notar que elas são usadas com frequência nas unidades comuns. Confira abaixo alguns exemplos de interfaces que podem ser encontradas ao continuar trabalhando com Kotlin.
- Injeção manual de dependência. Com ela, você pode criar uma interface que define todas as propriedades e os métodos da dependência. Assim, é possível estabelecer a interface como o tipo de dados de uma dependência (atividade, caso de teste, entre outros) e utilizar uma instância de qualquer classe que implemente essa interface. Isso permite trocar as respectivas implementações.
- Simulação de testes automatizados. Nesse caso, tanto a classe simulada quanto a classe real se enquadram na mesma interface.
- Ao acessar as mesmas dependências em um app multiplataforma do Compose (link em inglês). Por exemplo, ao criar uma interface que forneça um conjunto comum de propriedades e métodos para Android e computador, mesmo que a implementação seja diferente para cada plataforma.
- Vários tipos de dados no Compose, como
Modifier, são interfaces. Isso permite adicionar novos modificadores sem precisar acessar ou modificar o código-fonte.
8. Usar funções de escopo para acessar propriedades e métodos de classes
Como você já aprendeu, o Kotlin inclui muitos recursos para deixar o código mais conciso.
Um desses recursos, que você vai encontrar ao continuar aprendendo sobre o desenvolvimento para Android, são as funções de escopo. Essas funções permitem acessar de forma concisa as propriedades e os métodos de uma classe, sem precisar acessar o nome da variável repetidamente. O que isso significa? Vamos conferir um exemplo.
Eliminar referências repetitivas a objetos usando funções de escopo
As funções de escopo são funções de ordem superior que permitem acessar as propriedades e os métodos de um objeto sem se referir ao nome dele. Elas são chamadas de "funções de escopo" porque o corpo da função transmitida assume o escopo do objeto com que ela é chamada. Por exemplo, algumas funções de escopo permitem acessar as propriedades e os métodos de uma classe, como se elas fossem definidas como um método dessa classe. Isso pode deixar seu código mais legível, porque permite omitir o nome do objeto quando ele for considerado redundante.
Para ilustrar melhor esse comportamento, vamos analisar algumas funções de escopo que você vai encontrar mais adiante no curso.
Substituir nomes de objetos longos usando a função let().
A função let() permite se referir a um objeto em uma expressão lambda usando o identificador it, em vez do nome real do objeto. Isso ajuda a evitar o uso repetitivo de um nome de objeto longo e descritivo quando você precisa acessar mais de uma propriedade. A função let() é uma função de extensão que pode ser chamada em qualquer objeto Kotlin, usando uma notação de ponto.
Acesse as propriedades question1, question2 e question3 usando let():
- Adicione uma função à classe
Quiz, com o nomeprintQuiz().
fun printQuiz() {

}
- Adicione o código abaixo, que mostra as propriedades
questionText,answeredifficultyda pergunta. Como várias propriedades são acessadas paraquestion1,question2equestion3, o nome inteiro da variável é usado todas as vezes. Assim, se o nome da variável mudasse, você precisaria atualizar todos os usos.
fun printQuiz() {
    println(question1.questionText)
    println(question1.answer)
    println(question1.difficulty)
    println()
    println(question2.questionText)
    println(question2.answer)
    println(question2.difficulty)
    println()
    println(question3.questionText)
    println(question3.answer)
    println(question3.difficulty)
    println()
}
- Coloque uma chamada à função
let()em volta do código que acessa as propriedadesquestionText,answeredifficultyemquestion1,question2equestion3. Substitua o nome da variável em cada expressão lambda por essa chamada.
fun printQuiz() {
    question1.let {
        println(it.questionText)
        println(it.answer)
        println(it.difficulty)
    }
    println()
    question2.let {
        println(it.questionText)
        println(it.answer)
        println(it.difficulty)
    }
    println()
    question3.let {
        println(it.questionText)
        println(it.answer)
        println(it.difficulty)
    }
    println()
}
- Atualize o código em
main()para criar uma instância da classeQuizchamadaquiz.
fun main() {
    val quiz = Quiz()
}
- Chame o método
printQuiz().
fun main() {
    val quiz = Quiz()
    quiz.printQuiz()
}
- Execute o código para conferir se está tudo funcionando.
Quoth the raven ___
nevermore
MEDIUM

The sky is green. True or false
false
EASY

How many days are there between full moons?
28
HARD
Chamar os métodos de um objeto sem uma variável usando a função apply()
Um dos recursos interessantes das funções de escopo é que elas podem ser chamadas em um objeto antes mesmo de ele ser atribuído a uma variável. Por exemplo, a função apply() é uma função de extensão que pode ser chamada em um objeto usando a notação de ponto. A função apply() também retorna uma referência a esse objeto para que ele possa ser armazenado em uma variável.
Atualize o código em main() para chamar a função apply().
- Chame
apply()depois do parêntese de fechamento ao criar uma instância da classeQuiz. Você pode omitir os parênteses ao chamarapply()e usar a sintaxe de lambda final.
val quiz = Quiz().apply {
}
- Mova a chamada da função
printQuiz()para dentro da expressão lambda. Não é mais necessário fazer referência à variávelquiznem usar a notação de ponto.
val quiz = Quiz().apply {
    printQuiz()
}
- A função
apply()retorna a instância da classeQuiz, mas, como ela não está mais sendo usada, remova a variávelquiz. Com a funçãoapply(), você não precisa de uma variável para chamar métodos na instância deQuiz.
Quiz().apply {
    printQuiz()
}
- Execute o código. Observe que foi possível chamar esse método sem fazer referência à instância de
Quiz. A funçãoapply()retornou os objetos armazenados emquiz.
Quoth the raven ___
nevermore
MEDIUM

The sky is green. True or false
false
EASY

How many days are there between full moons?
28
HARD
Embora não seja obrigatório usar as funções de escopo para alcançar os resultados esperados, os exemplos acima ilustram como elas podem deixar o código mais conciso e evitar a repetição de um mesmo nome de variável.
O código acima demonstra apenas dois exemplos, mas recomendamos que você salve a documentação das funções de escopo (em inglês) nos seus favoritos para consultá-la quando encontrar essas funções no restante do curso.
9. Resumo
Você aprendeu na prática sobre vários novos recursos do Kotlin. Os genéricos permitem que tipos de dados sejam transmitidos como parâmetros para classes, as classes de enumeração definem um conjunto limitado de valores possíveis, e as classes de dados ajudam a gerar alguns métodos úteis para classes automaticamente.
Você também aprendeu como criar um objeto singleton, que é restrito a uma instância, como transformá-lo em um objeto complementar de outra classe e como ampliar as classes já existentes usando novas propriedades de acesso e novos métodos. Por fim, apresentamos alguns exemplos de como as funções de escopo oferecem uma sintaxe mais simples para acessar as propriedades e os métodos.
Voltaremos a tratar desses conceitos nas próximas unidades ao falar mais sobre o Kotlin, o desenvolvimento para Android e o Compose. Agora você já entende melhor como eles funcionam e como podem melhorar a reutilização e a legibilidade do código.