
1. Antes de começar
No codelab anterior, você aprendeu sobre corrotinas. Você usou o Playground Kotlin para programar um código simultâneo usando corrotinas. Neste codelab, você vai aplicar seus conhecimentos sobre corrotinas a um app Android e o ciclo de vida dele. Você vai adicionar um código para iniciar novas corrotinas de forma simultânea, além de aprender a testá-las.
Pré-requisitos
- Conhecimento básico de Kotlin, incluindo funções e lambdas.
- Saber criar layouts no Jetpack Compose.
- Sabe programar testes de unidade em Kotlin (consulte o codelab Programar testes de unidade para ViewModel).
- Conhecimento sobre linhas de execução e simultaneidade
- Conhecimento básico sobre as corrotinas e o CoroutineScope
O que você vai criar
- O app Race Tracker, que simula o progresso de uma corrida entre dois jogadores. Aproveite esse app como uma oportunidade para praticar e saber mais sobre os diferentes aspectos das corrotinas.
O que você vai aprender
- Como usar corrotinas no ciclo de vida de apps Android.
- Os princípios da simultaneidade estruturada.
- Como programar testes de unidade para testar as corrotinas.
O que é necessário
- A versão estável mais recente do Android Studio
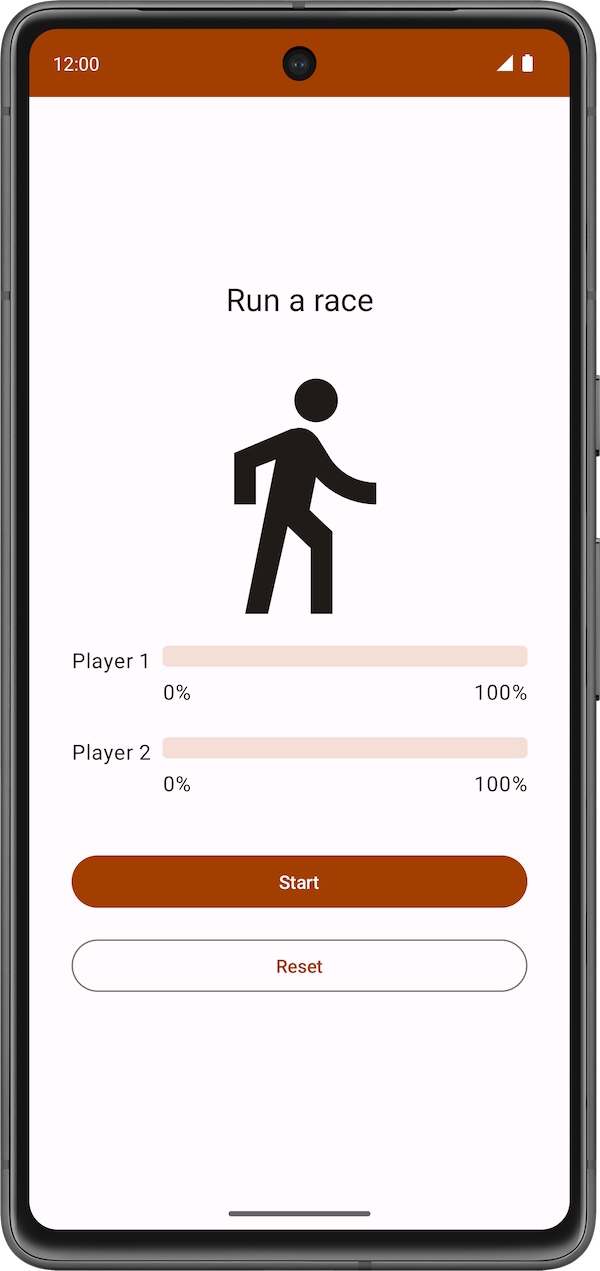
2. Visão geral do app
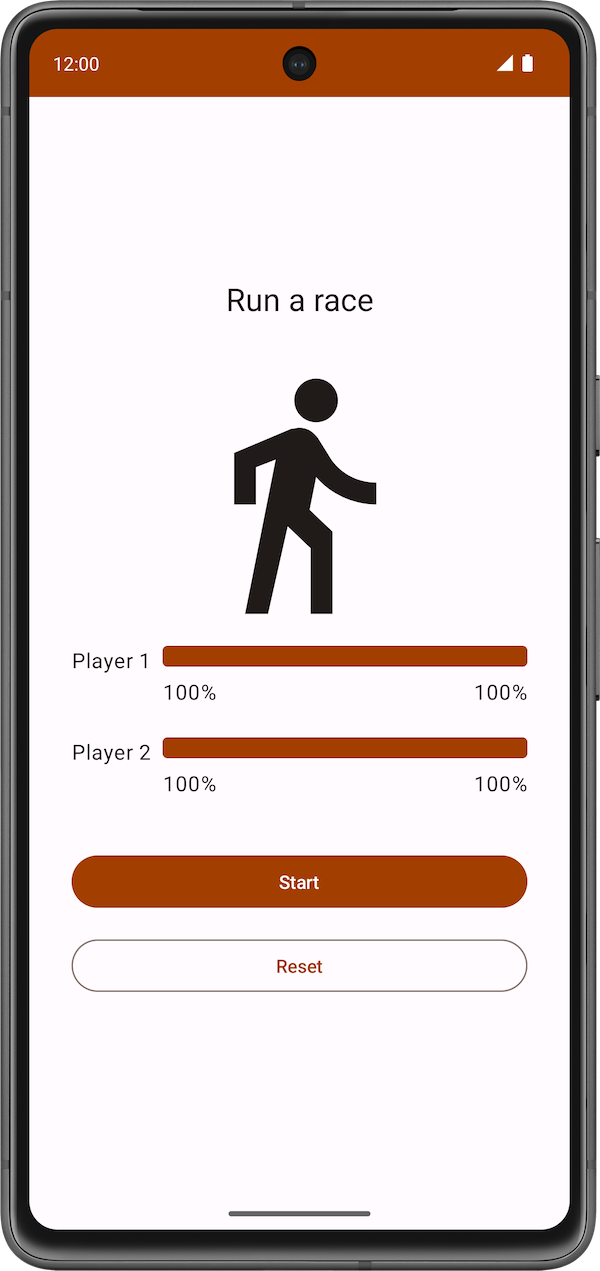
O app Race Tracker simula uma corrida entre dois jogadores. A interface do app consiste em dois botões: Start/Pause e Reset, além de duas barras que mostram o progresso dos corredores. Uma velocidade diferente é definida para os jogadores 1 e 2. Quando a corrida começa, o jogador 2 avança duas vezes mais rápido que o jogador 1.
|
|
|

Você vai usar as corrotinas no app para garantir que:
- Os dois participantes avancem na corrida ao mesmo tempo.
- A interface do app seja responsiva e as barras de progresso aumentem ao longo da corrida.
O código da interface do app Racer Tracker já está pronto no código inicial. O principal foco desta parte do codelab é apresentar as corrotinas do Kotlin em um app Android.
Acessar o código inicial
Para começar, faça o download do código inicial:
Outra opção é clonar o repositório do GitHub:
$ git clone https://github.com/google-developer-training/basic-android-kotlin-compose-training-race-tracker.git
$ cd basic-android-kotlin-compose-training-race-tracker
$ git checkout starter
Procure o código inicial do Race Tracker no repositório do GitHub.
Tutorial do código inicial
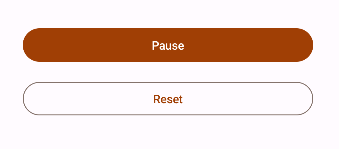
Para iniciar a corrida, clique no botão Start. O texto do botão Start vai mudar para Pause enquanto a corrida estiver em andamento.
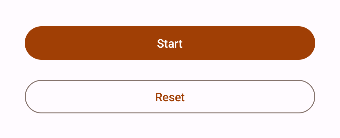
Você pode usar esse botão para pausar ou continuar a corrida a qualquer momento.
Quando a corrida começar, você poderá acompanhar o progresso de cada jogador em um indicador de status. A função combinável StatusIndicator mostra o progresso de cada jogador. Ela usa o elemento combinável LinearProgressIndicator para mostrar a barra de progresso. Você vai usar corrotinas para atualizar o valor que corresponde a esse progresso.

O RaceParticipant fornece os dados para aumentar o progresso. Essa classe detém o estado de cada um dos jogadores e armazena o name do participante, o maxProgress para chegar ao fim da corrida, o tempo de demora entre incrementos de progresso, o currentProgress na corrida e o initialProgress.
Na próxima seção, você vai usar corrotinas para implementar a funcionalidade que simula o progresso da corrida sem bloquear a UI do app.
3. Implementar o progresso da corrida
Você precisa usar a função run(), que compara o currentProgress com o maxProgress do jogador, reflete o progresso total da corrida e usa a função de suspensão delay() para adicionar um atraso entre os incrementos de progresso. Ela precisa ser uma função suspend, porque chama outra função de suspensão, delay(). Além disso, você vai chamar essa função mais adiante neste codelab usando uma corrotina. Siga estas etapas para implementar a função:
- Abra a classe
RaceParticipant, que faz parte do código inicial. - Na classe
RaceParticipant, defina uma nova funçãosuspend, chamadarun().
class RaceParticipant(
    ...
) {
    var currentProgress by mutableStateOf(initialProgress)
        private set

    suspend fun run() {

    }
    ...
}
- Para simular o progresso da corrida, adicione uma repetição
whileque vai ser executada até que ocurrentProgressatinja o valormaxProgress, definido como100.
class RaceParticipant(
    ...
    val maxProgress: Int = 100,
    ...
) {
    var currentProgress by mutableStateOf(initialProgress)
        private set

    suspend fun run() {
        while (currentProgress < maxProgress) {

        }
    }
    ...
}
- O valor do
currentProgressestá definido comoinitialProgress, que é0. Para simular o progresso do participante, aumente o valor docurrentProgresscom o valor da propriedadeprogressIncrementdentro da repetição "while". O valor padrão doprogressIncrementé1.
class RaceParticipant(
    ...
    val maxProgress: Int = 100,
    ...
    private val progressIncrement: Int = 1,
    private val initialProgress: Int = 0
) {
    ...
    var currentProgress by mutableStateOf(initialProgress)
        private set

    suspend fun run() {
        while (currentProgress < maxProgress) {
            currentProgress += progressIncrement
        }
    }
}
- Para simular diferentes intervalos de progresso na corrida, use a função de suspensão
delay(). Transmita o valor da propriedadeprogressDelayMilliscomo um argumento.
suspend fun run() {
    while (currentProgress < maxProgress) {
        delay(progressDelayMillis)
        currentProgress += progressIncrement
    }
}
Ao analisar o código que acabamos de adicionar, você vai encontrar um ícone à esquerda da chamada à função delay() no Android Studio, como mostrado na captura de tela a seguir: 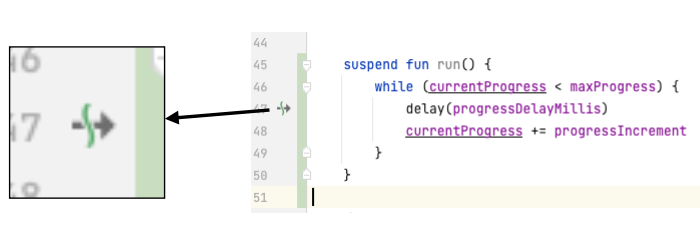
Esse ícone indica o ponto em que a função pode ser suspensa e retomada novamente mais tarde.
A linha de execução principal não fica bloqueada enquanto a corrotina aguarda o tempo de atraso, conforme mostrado no diagrama a seguir:
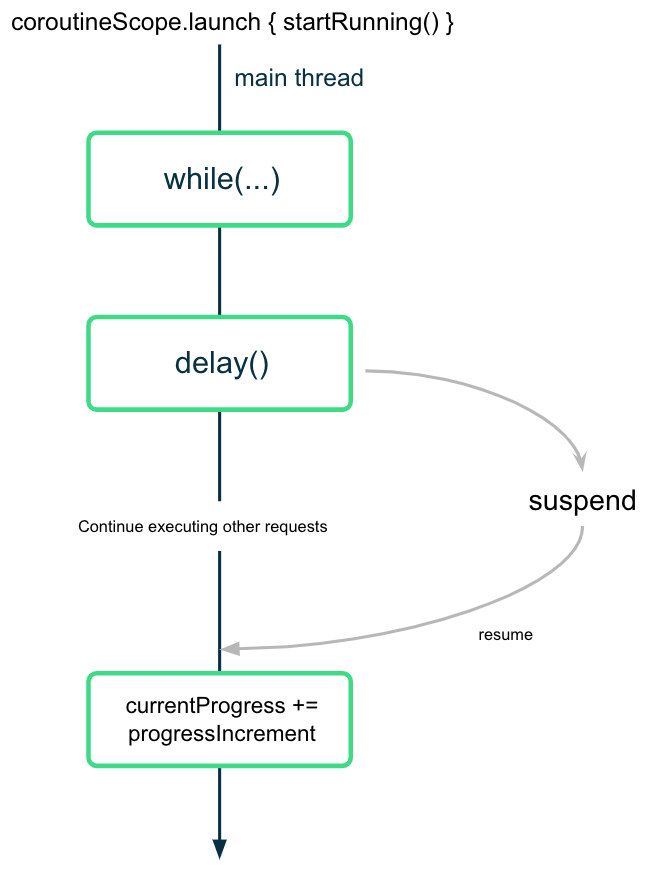
A corrotina suspende, mas não bloqueia, a execução depois de chamar a função delay() com o valor do intervalo esperado. Após a conclusão do tempo de atraso, a corrotina retoma a execução e atualiza o valor da propriedade currentProgress.
4. Começar a corrida
Quando o usuário pressionar o botão Start, o app precisará começar a corrida, chamando a função de suspensão run() em cada uma das instâncias dos dois jogadores. Para isso, inicie uma corrotina que chame a função run().
Ao iniciar uma corrotina para começar a corrida, é necessário garantir os seguintes aspectos para os dois participantes:
- Os dois começam a correr assim que o usuário clica no botão Start, ou seja, assim que as corrotinas são iniciadas.
- Os dois pausam ou encerram a corrida quando o usuário clica no botão Pause ou Reset, respectivamente, ou seja, quando as corrotinas são canceladas.
- Caso o usuário feche o app, o cancelamento vai ser processado da forma adequada, ou seja, todas as corrotinas serão canceladas e vinculadas a um ciclo de vida.
No primeiro codelab, você aprendeu que só é possível chamar uma função de suspensão de outra função de suspensão. Para chamar funções de suspensão de forma segura em um elemento combinável, use o elemento LaunchedEffect(). O elemento combinável LaunchedEffect() executa a função de suspensão fornecida enquanto ela permanece na composição. Você pode usar a função combinável LaunchedEffect() para executar todas as ações apresentadas acima:
- O
LaunchedEffect()permite chamar funções de suspensão em elementos combináveis de forma segura. - Quando a função
LaunchedEffect()entra na composição, ela inicia uma corrotina com o bloco de código transmitido como um parâmetro. Ela executa a função de suspensão fornecida durante o tempo em que permanece na composição. Quando o usuário clica no botão Start no app Race Tracker, oLaunchedEffect()entra na composição e inicia uma corrotina para atualizar o progresso. - A corrotina é cancelada quando o
LaunchedEffect()sai da composição. No app, se o usuário clicar no botão Reset/Pause, oLaunchedEffect()vai ser removido da composição e as corrotinas serão canceladas.
No app Race Tracker, não é necessário informar um agente de forma explícita, porque o LaunchedEffect() executa esse processo.
Para começar a corrida, chame a função run() para cada participante e, em seguida, faça o seguinte:
- Abra o arquivo
RaceTrackerApp.kt, localizado no pacotecom.example.racetracker.ui. - Navegue até o combinável
RaceTrackerApp()e adicione uma chamada aoLaunchedEffect()na linha seguinte à definição deraceInProgress.
@Composable
fun RaceTrackerApp() {
    ...
    var raceInProgress by remember { mutableStateOf(false) }

    LaunchedEffect {

    }
    RaceTrackerScreen(...)
}
- Para garantir que o
LaunchedEffect()cancele e reinicie as corrotinas se as instâncias doplayerOneouplayerTwoforem substituídas por outras diferentes, adicione os objetosplayerOneeplayerTwocomo umakeyaoLaunchedEffect. Da mesma forma que um elemento combinávelText()é recomposto quando o valor do texto muda, se qualquer um dos principais argumentos doLaunchedEffect()mudar, a corrotina vai ser cancelada e reiniciada.
LaunchedEffect(playerOne, playerTwo) {
}
- Adicione uma chamada às funções
playerOne.run()eplayerTwo.run().
@Composable
fun RaceTrackerApp() {
    ...
    var raceInProgress by remember { mutableStateOf(false) }

    LaunchedEffect(playerOne, playerTwo) {
        playerOne.run()
        playerTwo.run()
    }
    RaceTrackerScreen(...)
}
- Envolva o bloco
LaunchedEffect()com uma condiçãoif. O valor inicial desse estado éfalse. Quando o usuário clicar no botão Start e oLaunchedEffect()for executado, o valor do estado deraceInProgressvai ser atualizado paratrue.
if (raceInProgress) {
    LaunchedEffect(playerOne, playerTwo) {
        playerOne.run()
        playerTwo.run()
    }
}
- Para encerrar a corrida, atualize a flag em
raceInProgressparafalse. Esse valor também é definido comofalsequando o usuário clica em Pause. Depois que ele é definido comofalse, oLaunchedEffect()garante que todas as corrotinas iniciadas sejam canceladas.
LaunchedEffect(playerOne, playerTwo) {
    playerOne.run()
    playerTwo.run()
    raceInProgress = false
}
- Execute o app e clique em Start. Observe que o primeiro jogador termina a corrida antes que o segundo comece, como mostrado no vídeo a seguir:
Essa não parece uma disputa justa. Na próxima seção, você vai aprender a iniciar tarefas simultâneas para que os dois jogadores possam correr ao mesmo tempo, além de entender os conceitos correspondentes e implementar esse comportamento.
5. Simultaneidade estruturada
A programação de códigos que usam corrotinas é chamada de simultaneidade estruturada. Esse estilo de programação melhora a legibilidade e diminui o tempo de desenvolvimento do código. A ideia da simultaneidade estruturada é que as corrotinas têm uma hierarquia: as tarefas podem iniciar subtarefas que, por sua vez, podem iniciar outras subtarefas. Essa hierarquia é chamada de escopo de corrotinas. Os escopos de corrotinas sempre precisam estar associados a um ciclo de vida.
As APIs de corrotinas usam essa simultaneidade estruturada por padrão. Não é possível chamar uma função de suspensão em uma função que não está marcada de suspensão. Essa limitação garante que as funções de suspensão sejam chamadas em builders de corrotinas, como launch. Esses builders, por sua vez, estão vinculados a um CoroutineScope.
6. Iniciar tarefas simultâneas
- Para permitir que os dois participantes corram ao mesmo tempo, é necessário iniciar duas corrotinas separadas e mover cada chamada à função
run()dentro delas. Envolva a chamada aoplayerOne.run()com o builderlaunch.
LaunchedEffect(playerOne, playerTwo) {
    launch { playerOne.run() }
    playerTwo.run()
    raceInProgress = false
}
- Da mesma forma, envolva a chamada à função
playerTwo.run()com o builderlaunch. Com essa mudança, o app vai iniciar duas corrotinas que serão executadas de forma simultânea. Agora, os dois jogadores poderão correr ao mesmo tempo.
LaunchedEffect(playerOne, playerTwo) {
    launch { playerOne.run() }
    launch { playerTwo.run() }
    raceInProgress = false
}
- Execute o app e clique em Start. Enquanto você espera a corrida começar, o texto do botão muda imediatamente para Start.
Quando os dois jogadores terminam a corrida, o app Race Tracker redefine o texto do botão Pause como Start. Entretanto, no momento o app atualiza a raceInProgress logo após iniciar as corrotinas, sem esperar que os jogadores terminem a corrida:
LaunchedEffect(playerOne, playerTwo) {
    launch {playerOne.run() }
    launch {playerTwo.run() }
    raceInProgress = false // This will update the state immediately, without waiting for players to finish run() execution.
}
A flag raceInProgress é atualizada imediatamente porque:
- A função do builder
launchinicia uma corrotina para executarplayerOne.run()e retorna imediatamente para executar a próxima linha no bloco de código. - O mesmo fluxo de execução acontece com a segunda função do builder
launch, que executa a funçãoplayerTwo.run(). - Assim que o segundo builder
launchretorna, a flagraceInProgressé atualizada. Isso muda imediatamente o texto do botão para Start, sem que a corrida comece.
CoroutineScope
A função de suspensão coroutineScope cria um CoroutineScope e chama o bloco de suspensão especificado com o escopo atual. Esse escopo herda o coroutineContext do LaunchedEffect().
O escopo retorna assim que o bloco especificado e todas as corrotinas filhas são concluídas. No app RaceTracker, ele retorna quando os dois objetos dos participante terminam de executar a função run().
- Para garantir que a função
run()doplayerOnee doplayerTwoconclua a execução antes de atualizar a flagraceInProgress, envolva os dois builders de inicialização com um blococoroutineScope.
LaunchedEffect(playerOne, playerTwo) {
    coroutineScope {
        launch { playerOne.run() }
        launch { playerTwo.run() }
    }
    raceInProgress = false
}
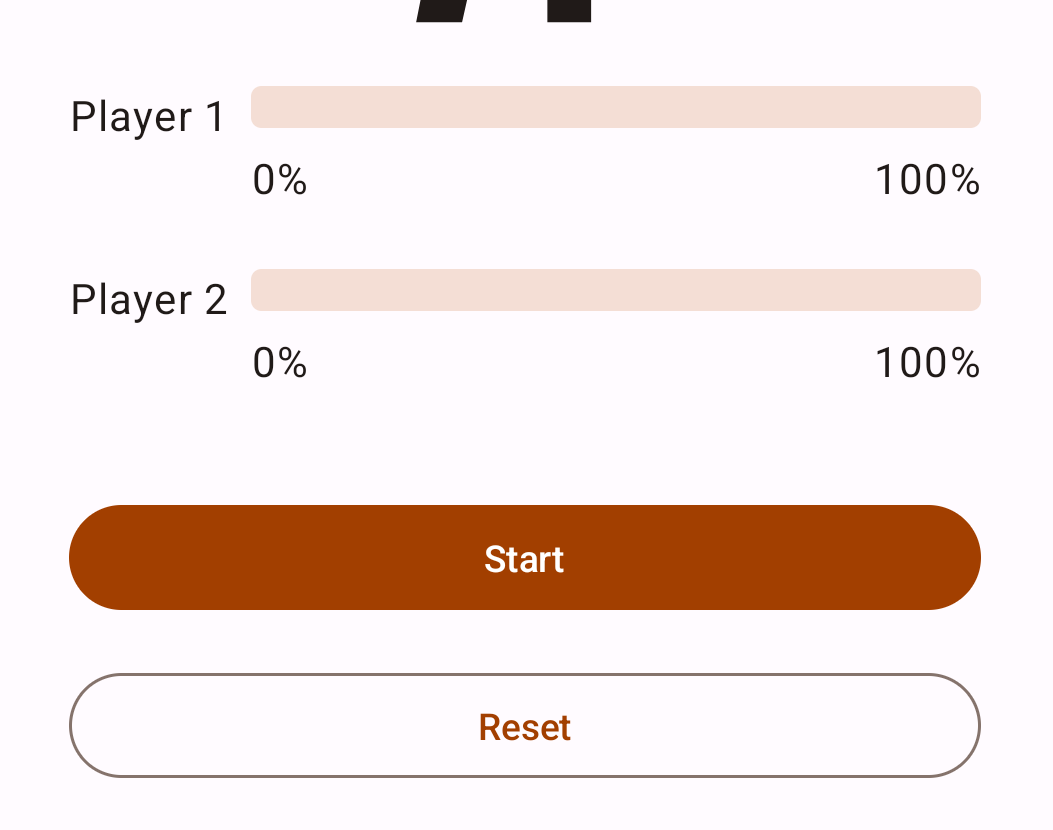
- Execute o app em um emulador ou dispositivo Android. A tela mostrada vai ficar assim:
- Clique no botão Start. O jogador 2 corre mais rápido do que o jogador 1. Quando a corrida termina, ou seja, quando os dois jogadores atingem um progresso de 100%, o texto do botão Pause muda para Start. Clique no botão Reset para reiniciar a corrida e executar a simulação mais uma vez. Mostramos a corrida no vídeo a seguir.

Observe o fluxo de execução no diagrama a seguir:
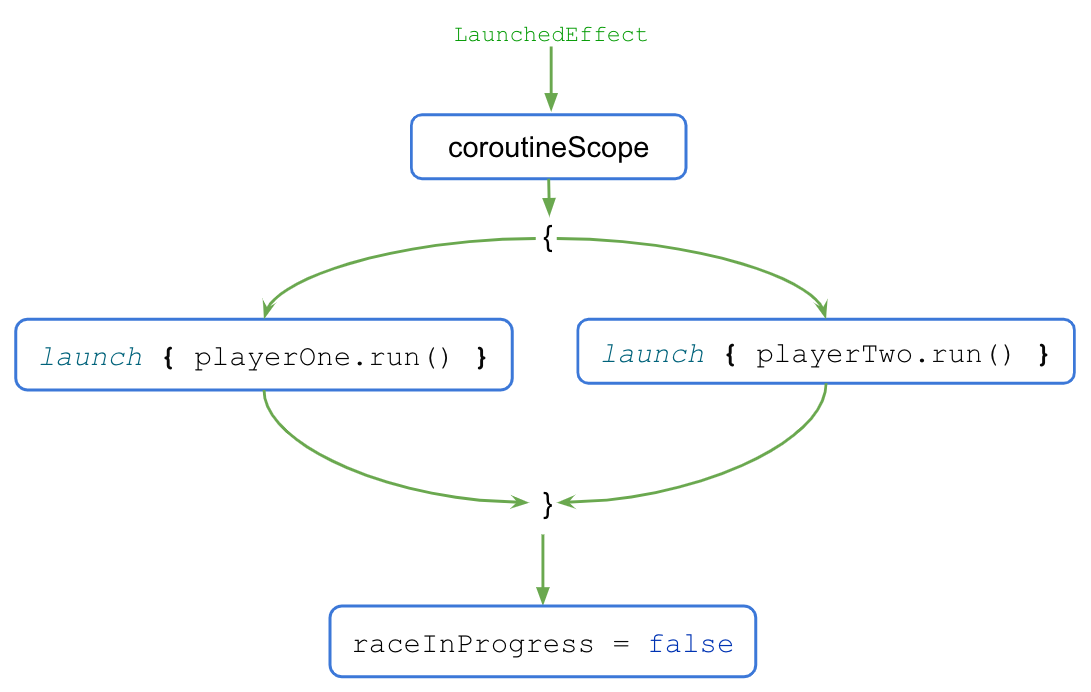
- Quando o bloco
LaunchedEffect()é executado, o controle é transferido para o blococoroutineScope{..}. - O bloco
coroutineScopeinicia as duas corrotinas simultaneamente e aguarda até que elas terminem de ser executadas. - Quando a execução é concluída, a flag
raceInProgressé atualizada.
O bloco coroutineScope só retorna e prossegue depois que todo o código dentro do bloco termina a execução. Para o código fora do bloco, a simultaneidade, ou a falta dela, é um mero detalhe de implementação. Esse estilo de programação apresenta uma abordagem estruturada à programação simultânea e, portanto, é chamado de simultaneidade estruturada.
Ao clicar no botão Reset quando a corrida termina, a corrotina é cancelada e o progresso de ambos os jogadores é redefinido como 0.
Para observar o cancelamento das corrotinas quando o usuário clica no botão Reset, siga estas etapas:
- Insira o corpo do método
run()em um bloco try-catch, como mostrado no código abaixo.
suspend fun run() {
    try {
        while (currentProgress < maxProgress) {
            delay(progressDelayMillis)
            currentProgress += progressIncrement
        }
    } catch (e: CancellationException) {
        Log.e("RaceParticipant", "$name: ${e.message}")
        throw e // Always re-throw CancellationException.
    }
}
- Execute o app e clique no botão Start.
- Espere o progresso aumentar e, em seguida, clique no botão Reset.
- Confira se a mensagem abaixo é mostrada no Logcat.
Player 1: StandaloneCoroutine was cancelled
Player 2: StandaloneCoroutine was cancelled
7. Programar testes de unidade para testar corrotinas
O código de teste de unidade que usa corrotinas exige atenção especial, já que a execução delas pode ser assíncrona e ocorrer em várias linhas.
Para chamar funções de suspensão em testes, você precisa estar em uma corrotina. Como as funções de teste JUnit não são de suspensão, é necessário usar o builder de corrotinas runTest. Esse builder faz parte da biblioteca kotlinx-coroutines-test e foi projetado para executar testes. Ele executa o corpo do teste em uma nova corrotina.
Como runTest faz parte da biblioteca kotlinx-coroutines-test, é necessário adicionar a dependência correspondente.
Para adicionar a dependência, siga estas etapas:
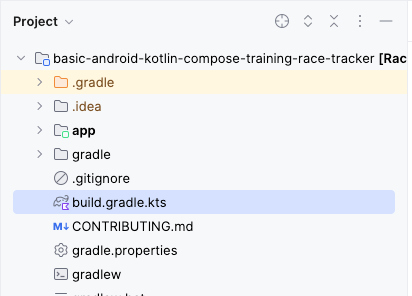
- Abra o arquivo
build.gradle.ktsdo módulo, localizado no diretórioappno painel Project.
- Dentro do arquivo, role a tela para baixo até encontrar o bloco
dependencies{}. - Adicione uma dependência usando a configuração
testImplementationà bibliotecakotlinx-coroutines-test.
plugins {
    ...
}

android {
    ...
}

dependencies {
    ...
    testImplementation("org.jetbrains.kotlinx:kotlinx-coroutines-test:1.6.4")
}
- Na barra de notificações localizada na parte de cima do arquivo build.gradle.kts, clique em Sync Now para que a importação e o build sejam concluídos, conforme mostrado nesta captura de tela:

Você poderá começar a programar testes quando o build for concluído.
Implementar testes de unidade para iniciar e encerrar a corrida
Para garantir que o progresso da corrida seja atualizado corretamente em diferentes fases, os testes de unidade precisam abranger diferentes casos. Neste codelab, vamos abordar dois casos:
- Progresso após o início da corrida.
- Progresso após o fim da corrida.
Para conferir se o progresso da corrida está sendo atualizado corretamente após o início, você precisa declarar que o progresso atual é 1 depois que o tempo de raceParticipant.progressDelayMillis for percorrido.
Para implementar o caso que vamos testar, siga estas etapas:
- Navegue até o arquivo
RaceParticipantTest.kt, localizado no conjunto de origem de teste. - Para definir o teste, depois da definição do
raceParticipant, crie uma funçãoraceParticipant_RaceStarted_ProgressUpdated()e adicione a anotação@Testa ela. Como o bloco de teste precisa ser colocado no builderrunTest, use a sintaxe de expressão para retornar o blocorunTest()como um resultado do teste.
class RaceParticipantTest {
    private val raceParticipant = RaceParticipant(
        ...
    )

    @Test
    fun raceParticipant_RaceStarted_ProgressUpdated() = runTest {
    }
}
- Adicione um
expectedProgresssomente de leitura e defina essa variável como1.
@Test
fun raceParticipant_RaceStarted_ProgressUpdated() = runTest {
    val expectedProgress = 1
}
- Para simular o início da corrida, use o builder
launchpara iniciar uma nova corrotina e chamar a funçãoraceParticipant.run().
@Test
fun raceParticipant_RaceStarted_ProgressUpdated() = runTest {
    val expectedProgress = 1
    launch { raceParticipant.run() }
}
O valor da propriedade raceParticipant.progressDelayMillis determina o tempo que vai ser percorrido antes que o progresso da corrida seja atualizado. Para testar o progresso apenas depois que o tempo de progressDelayMillis for percorrido, é necessário adicionar uma forma de atraso ao teste.
- Use a função auxiliar
advanceTimeBy()para avançar o tempo pelo valor deraceParticipant.progressDelayMillis. A funçãoadvanceTimeBy()ajuda a reduzir o tempo de execução do teste.
@Test
fun raceParticipant_RaceStarted_ProgressUpdated() = runTest {
    val expectedProgress = 1
    launch { raceParticipant.run() }
    advanceTimeBy(raceParticipant.progressDelayMillis)
}
- Como
advanceTimeBy()não executa a tarefa programada no tempo especificado, você precisa chamar a funçãorunCurrent(). Essa função executa todas as tarefas pendentes no momento atual.
@Test
fun raceParticipant_RaceStarted_ProgressUpdated() = runTest {
    val expectedProgress = 1
    launch { raceParticipant.run() }
    advanceTimeBy(raceParticipant.progressDelayMillis)
    runCurrent()
}
- Para garantir que o progresso seja atualizado, adicione uma chamada à função
assertEquals()para verificar se o valor da propriedaderaceParticipant.currentProgresscorresponde ao valor da variávelexpectedProgress.
@Test
fun raceParticipant_RaceStarted_ProgressUpdated() = runTest {
    val expectedProgress = 1
    launch { raceParticipant.run() }
    advanceTimeBy(raceParticipant.progressDelayMillis)
    runCurrent()
    assertEquals(expectedProgress, raceParticipant.currentProgress)
}
- Execute o teste para confirmar se ele está aprovado.
Para conferir se o progresso está sendo atualizado corretamente após o fim da corrida, você precisa declarar que, quando a corrida termina, o progresso atual é 100.
Siga estas etapas para implementar o teste:
- Depois da função de teste
raceParticipant_RaceStarted_ProgressUpdated(), crie uma funçãoraceParticipant_RaceFinished_ProgressUpdated()e inclua a anotação@Testnela. Ela precisa retornar um resultado de teste do blocorunTest{}.
class RaceParticipantTest {
    ...

    @Test
    fun raceParticipant_RaceStarted_ProgressUpdated() = runTest {
        ...
    }

    @Test
    fun raceParticipant_RaceFinished_ProgressUpdated() = runTest {
    }
}
- Use o builder
launchpara iniciar uma nova corrotina e adicione uma chamada à funçãoraceParticipant.run().
@Test
fun raceParticipant_RaceFinished_ProgressUpdated() = runTest {
    launch { raceParticipant.run() }
}
- Para simular o término da corrida, use a função
advanceTimeBy()para avançar o tempo do agente comraceParticipant.maxProgress * raceParticipant.progressDelayMillis:
@Test
fun raceParticipant_RaceFinished_ProgressUpdated() = runTest {
    launch { raceParticipant.run() }
    advanceTimeBy(raceParticipant.maxProgress * raceParticipant.progressDelayMillis)
}
- Adicione uma chamada à função
runCurrent()para executar qualquer tarefa pendente.
@Test
fun raceParticipant_RaceFinished_ProgressUpdated() = runTest {
    launch { raceParticipant.run() }
    advanceTimeBy(raceParticipant.maxProgress * raceParticipant.progressDelayMillis)
    runCurrent()
}
- Para garantir que o progresso seja atualizado, adicione uma chamada à função
assertEquals()para verificar se o valor da propriedaderaceParticipant.currentProgressé igual a100.
@Test
fun raceParticipant_RaceFinished_ProgressUpdated() = runTest {
    launch { raceParticipant.run() }
    advanceTimeBy(raceParticipant.maxProgress * raceParticipant.progressDelayMillis)
    runCurrent()
    assertEquals(100, raceParticipant.currentProgress)
}
- Execute o teste para confirmar se ele está aprovado.
Desafio
Aplique as estratégias de teste apresentadas no codelab Programar testes de unidade para ViewModel. Adicione testes que abranjam o cenário ideal, casos de erro e casos de limite.
Compare o teste que você programou com os disponíveis no código da solução.
8. Acessar o código da solução
Para baixar o código do codelab concluído, use estes comandos git:
git clone https://github.com/google-developer-training/basic-android-kotlin-compose-training-race-tracker.git
cd basic-android-kotlin-compose-training-race-tracker
Se preferir, você pode baixar o repositório como um arquivo ZIP, descompactar e abrir no Android Studio.
Para conferir o código da solução, acesse o GitHub (link em inglês).
9. Conclusão
Parabéns! Você acabou de aprender a usar corrotinas para processar a simultaneidade. As corrotinas ajudam a gerenciar tarefas de longa duração que podem bloquear a linha de execução principal e fazer com que seu app pare de responder. Você também aprendeu a programar testes de unidade para testar as corrotinas.
Alguns dos benefícios das corrotinas são:
- Legibilidade: o código programado com corrotinas possibilita um entendimento claro da sequência que executa as linhas de código.
- Integração com o Jetpack: muitas bibliotecas do Jetpack, como o Compose e o ViewModel, incluem extensões com suporte total para corrotinas. Algumas bibliotecas também fornecem um escopo de corrotina próprio que pode ser usado para simultaneidade estruturada.
- Simultaneidade estruturada: as corrotinas tornam o código simultâneo, seguro e fácil de implementar, eliminam código boilerplate desnecessário e garantem que as corrotinas iniciadas pelo app não sejam perdidas ou desperdiçadas.
Resumo
- As corrotinas permitem criar um código de longa duração executado simultaneamente, sem que seja necessário aprender um novo estilo de programação. A execução de uma corrotina é sequencial por padrão.
- A palavra-chave
suspendé usada para marcar uma função ou um tipo de função, além de indicar a disponibilidade para execução e pausar e retomar um conjunto de instruções de código. - Uma função
suspendsó pode ser chamada em outra função de suspensão. - Você pode iniciar uma nova corrotina usando a função do builder
launchouasync. - O contexto de corrotina, os builders de corrotinas, o job, o escopo de corrotina e o agente são os principais componentes para a implementação de corrotinas.
- As corrotinas usam agentes para determinar a linha de execução a ser usada na execução dela.
- Os jobs desempenham um papel importante para garantir a simultaneidade estruturada, gerenciando o ciclo de vida das corrotinas e mantendo a relação pai-filho.
- Um
CoroutineContextdefine o comportamento de uma corrotina usando um job e um agente de corrotina. - Um
CoroutineScopecontrola o ciclo de vida das corrotinas com o job e aplica o cancelamento e outras regras aos filhos e aos filhos deles recursivamente. - Lançamento, conclusão, cancelamento e falha são quatro operações comuns na execução da corrotina.
- As corrotinas seguem um princípio da simultaneidade estruturada.
Saiba mais
- Corrotinas do Kotlin no Android
- Outros recursos para corrotinas e fluxos do Kotlin
- Exceções em corrotinas (em inglês)
- Corrotinas no Android (parte 1) (em inglês)
- Corrotinas Kotlin 101 (em inglês)